Herunterladen Inhalt Inhalt Diese Seite drucken
Becker Centronic TimeControl TC445-II Montage- Und Betriebsanleitung

Becker Centronic TimeControl TC445-II Montage- Und Betriebsanleitung

Vorschau ausblenden Andere Handbücher für Centronic TimeControl TC445-II:
Inhaltsverzeichnis

Werbung

Verfügbare Sprachen

Verfügbare Sprachen

Centronic
TimeControl TC445-II
Montage- und Betriebsanleitung
de
Zeitschaltuhr im Handsender mit Display
Wichtige Informationen für:
• den Monteur / • die Elektrofachkraft / • den Benutzer
Bitte entsprechend weiterleiten!
Diese Anleitung ist vom Benutzer aufzubewahren.
Assembly and Operating Instructions
en
Timer in handheld transmitter featuring display
Important information for:
• Fitters / • Electricians / • Users
Please forward accordingly!
These instructions must be kept for future reference.
Notice de montage et d'utilisation
fr
Télécommande avec horloge intégrée avec écran
Informations importantes pour:
• l'installateur / • l'électricien / • l'utilisateur
À transmettre à la personne concernée !
Cette notice doit être conservée par l'utilisateur.
Montage- en gebruiksaanwijzing
nl
Tijdschakelklok in handzender met display
Belangrijke informatie voor:
• de monteur / • de elektricien / • de gebruiker
Aan de betreffende personen doorgeven!
De gebruiker dient deze gebruiksaanwijzing te bewaren.
Becker-Antriebe GmbH
35764 Sinn/Germany
www.becker-antriebe.com

Werbung

Inhaltsverzeichnis
loading

Inhaltszusammenfassung für Becker Centronic TimeControl TC445-II

  • Seite 1 Cette notice doit être conservée par l’utilisateur. Montage- en gebruiksaanwijzing Tijdschakelklok in handzender met display Belangrijke informatie voor: • de monteur / • de elektricien / • de gebruiker Aan de betreffende personen doorgeven! De gebruiker dient deze gebruiksaanwijzing te bewaren. Becker-Antriebe GmbH 35764 Sinn/Germany www.becker-antriebe.com...
  • Seite 2: Inhaltsverzeichnis

    Inhaltsverzeichnis Allgemeines ....................4 Gewährleistung ..................4 Sicherheitshinweise .................. 4 Bestimmungsgemäße Verwendung ............5 Anzeigen- und Tastenerklärung ..............6 Erklärungen ....................8 Einlernen des Funks .................13 Inbetriebnahme ..................14 Werkseinstellung ..................14 Programmierung ..................15 Montage Wandhalterung ................. 24 Batteriewechsel ..................24 Reinigung ....................25 Technische Daten ...................
  • Seite 3 Sommaire Généralités ..................... 52 Prestation de Garantie ................52 Consignes de sécurité ................52 Utilisation conforme aux prescriptions ............53 Explication des textes d’affichage et des touches ........54 Explications .................... 56 Programmation de la radio ................61 Mise en service ..................62 Paramétrage usine ..................
  • Seite 4: Allgemeines

    Endproduktes, Installation und Kundenberatung, erforderlichen gesetzlichen und behördlichen Vorschriften, insbesondere die einschlägigen aktuellen EMV-Vorschriften, beachtet und eingehalten werden. Sicherheitshinweise Vorsicht Bitte bewahren Sie die Anleitung auf! • Nur in trockenen Räumen verwenden. • Verwenden Sie nur unveränderte Becker Originalteile. • Halten Sie Personen aus dem Fahrbereich der Anlagen fern. • Halten Sie Kinder von Steuerungen fern. • Beachten Sie Ihre landesspezifischen Bestimmungen. • Verbrauchte Batterien fachgerecht entsorgen. Batterien nur durch identischen Typ (LR 03; AAA) ersetzen. • Wird die Anlage durch einen oder mehrere Sender gesteuert, muss der Fahrbereich der Anlage während des Betriebes einsehbar sein.
  • Seite 5: Bestimmungsgemäße Verwendung

    Bestimmungsgemäße Verwendung Die TC445-II darf nur für die Ansteuerung von Rollladen- und Jalousieanlagen verwendet werden. • Bitte beachten Sie, dass Funkanlagen nicht in Bereichen mit erhöhtem Stö- rungsrisiko betrieben werden dürfen (z.B. Krankenhäuser, Flughäfen). • Die Fernsteuerung ist nur für Geräte und Anlagen zulässig, bei denen eine Funktionsstörung im Handsender oder Empfänger keine Gefahr für Perso- nen, Tiere oder Sachen ergibt oder dieses Risiko durch andere Sicherheits- einrichtungen abgedeckt ist.
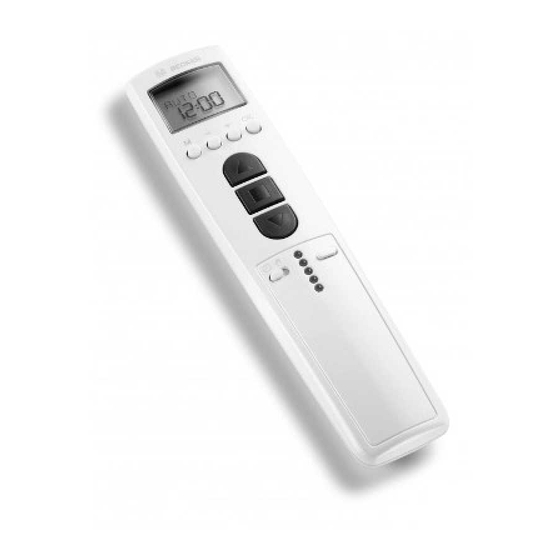
  • Seite 6: Anzeigen- Und Tastenerklärung

    Montage- und Betriebsanleitung Anzeigen- und Tastenerklärung Display Hand- / Automatik- Schiebeschalter Menü-Tastenblock Einlerntaste AUF-Taste Batteriefach STOPP-Taste Beschriftungsfeld AB-Taste RESET-Taste (hinter dem Beschriftungsfeld) Kanalwahltaste Typenschild Kanalkontrollleuchten...
  • Seite 7 Displaysymbolik Auffahrt Uhr/Datum Abfahrt Programm Wochentage (Mo.-So.) Einstellung Ziffernanzeige Funktion Textzeile Astro-Abend...
  • Seite 8: Erklärungen

    Montage- und Betriebsanleitung Erklärungen Rollladen-Auswahl Bei der Rollladen¬Funktion fährt der Rollladen nach Betätigung einer Fahrtaste in Selbsthaltung. Jalousie-Auswahl Bei der Jalousie¬Funktion fährt die Jalousie im Tippbetrieb, um eine genaue Positionierung der Lamellen zu ermöglichen. Drücken Sie eine Fahrtaste länger als 1 Sekunde, fährt die Jalousie in Selbsthaltung. Nach Anfahren der programmierten Zwischen- und Endlagenposition wird auto- matisch eine Wendung der Lamellen durchgeführt (wenn die Wendeposition programmiert wurde).
  • Seite 9: Reset-Taste

    OK-Taste Durch Drücken der OK-Taste, werden die aktuell angezeigten Werte gespei- chert. +/- Tasten Folgende Bedienungen sind über + und - möglich: • Menü -> Wert verändern • Auto-Betrieb -> Informationen abfragen • + Taste- > Nächste automatische Schaltzeit s • - Taste -> Nächste automatische Schaltzeit t •...
  • Seite 10 Montage- und Betriebsanleitung ASTRO ABEND Steuert die Auffahrt nach der eingestellten Schaltzeit. Abfahrt nach Astrofunktion. Winterzeit Winterzeit Sommerzeit Sonnenaufgang 05:00 Uhr 07:00 Uhr 09:00 Uhr Jan. Feb. Mär. Apr. Jun. Jul. Aug. Sep. Okt. Nov. Dez. 15:00 Uhr 18:30 Uhr Sonnenuntergang 22:00 Uhr Winterzeit Winterzeit...
  • Seite 11: Menü Einstellungen

    SCHALTZEIT Automatische Auf- und Abfahrzeiten für Rollladen und Jalousie in allen einge- lernten Empfängern. Bei der Displayanzeige --:-- (zwischen der Uhrzeit 23:59 und 00:00) wird die Schaltzeit nicht ausgeführt. Menü Einstellungen EINSTELLUNG Im Menü EINSTELLUNG haben Sie folgende Möglichkeiten: • URLAUB •...
  • Seite 12 Montage- und Betriebsanleitung LUEFTUNG/WENDUNG Die Lüftungs-/Wendeposition ist eine frei wählbare Position des Rollladens/ Jalousie, zwischen der unteren und oberen Endlage. Mit dieser Funktion kön- nen Sie den Rollladen aus der unteren Endlage soweit wieder auffahren, bis die Lüftungsschlitze geöffnet sind. Bei der Jalousie erfolgt die Lamellenwendung. Dazu drücken Sie die AUF-Taste zweimal kurz nacheinander.
  • Seite 13: Einlernen Des Funks

    Einlernen des Funks 1) Mastersender einlernen a) Empfänger in Lernbereitschaft bringen Hinweis Beachten Sie die Betriebsanleitung des Empfängers. • Schalten Sie die Spannungsversorgung des Empfängers aus und nach 5 Se- kunden wieder ein. oder • Betätigen Sie die Lerntaste bzw. den Funkschalter des Empfängers. Der Empfänger befindet sich nun für 3 Minuten in Lernbereitschaft. b) Mastersender einlernen Drücken Sie die Einlerntaste innerhalb der Lernbereitschaft, bis der Empfänger das erfolgreiche Einlernen quittiert.
  • Seite 14: Inbetriebnahme

    Montage- und Betriebsanleitung Inbetriebnahme Mit dem ersten Tastendruck „wecken“ Sie die Uhr auf. Sie können nun mit den +/- Tasten die Sprache wählen und diese mir der OK Taste übernehmen. Die Uhr befindet sich im Automatikmodus. Werkseinstellung UHR/DAT: aktuelle MEZ und aktuelles Datum PROGRAMM: ASTRO ABEND s Schaltzeiten Montag-Freitag (1-5) s 7.00 Uhr,...
  • Seite 15: Programmierung

    Programmierung Hinweis Alle nun folgenden Programmiermöglichkeiten sind für alle 5-Kanäle gleich wirksam. Menüübersicht 1. Drücken Sie die MENUE-Taste UHR/DAT erscheint. Betriebsmodus UHR/DAT EINSTEllUNg FUNkTION PROgRAMM 2. Um weitere Menüs auszuwählen, drücken Sie die +/- Tasten. 3. Drücken Sie die MENUE-Taste, um in den Betriebsmodus zu gelangen. UHR/DAT (Uhrzeit und Datum einstellen) 1.
  • Seite 16 Montage- und Betriebsanleitung PROGRAMM ASTRO ABEND (Auffahrt -> Schaltzeit, Abfahrt -> Sonnenuntergang) PROgRAMM ASTRO SPERRzEIT SCHAlTzEIT ABEND SCHAlTzEIT SPERRzEIT PROgRAMM Drücken Sie die MENUE-Taste. Um das Menü PROGAMM auszuwählen, drücken Sie die + Taste bis PRO- GAMM erscheint. Bestätigen Sie mit OK. + Taste erneut drücken, bis ASTRO ABEND erscheint.
  • Seite 17 PROGRAMM INDIVIDUELL (Auf-/Abfahrt -> Schaltzeiten) PROgRAMM INDIVIDUEll SCHAlTzEIT SCHAlTzEIT SCHAlTzEIT SCHAlTzEIT PROgRAMM 1. Drücken Sie die MENUE-Taste. 2. Um das Menü PROGRAMM auszuwählen, drücken Sie die + Taste bis PROGRAMM erscheint. 3. Bestätigen Sie mit OK. 4. + Taste erneut drücken, bis INDIVIDUELL erscheint. 5.
  • Seite 18 Montage- und Betriebsanleitung EINSTELLUNG URLAUB (Urlaub OFF/ON) EINSTEllUNg URlAUB OFF URlAUB ON 1. Drücken Sie die MENUE-Taste. 2. Um das Menü EINSTELLUNG auszuwählen, drücken Sie die + Taste bis EIN- STELLUNG erscheint. 3. Bestätigen Sie mit OK. URLAUB ON/OFF erscheint. 4. Mit der +/- Taste können sie die Urlaubsfunktion auf ON oder OFF stellen. 5.
  • Seite 19 EINSTELLUNG ZWISCHENPOSITION, LUEFTUNG/WENDUNG, Prog ENDLAGE (Zeit/Lageprogrammierung) lUEFTUNg PROg zWISCHEN­ (WENDUNg) ENDlAgE POSITION PROg zWISCHEN­ POSITION PROg lUEFTUNg 1. Sie haben die Funktion URLAUB bestätigt. ZWISCHENPOSITION erscheint. 2. Mit der +/- Taste können Sie die Fahrzeit zur ZWISCHENPOSITION einstel- len. Die Angabe der Fahrzeit erfolgt in Sekunden oder Sie fahren die ZWI- SCHENPOSITION mit der AB-/AUF-Taste aus der oberen Endlage an.
  • Seite 20 Montage- und Betriebsanleitung EINSTELLUNG DEUTSCH/ASTROVERSCHIEBUNG t (Sprachauswahl, Astroverschiebung) ASTROVER­ DEUTSCH SCHIEBUNg � 1. Sie haben die Funktion PROG ENDLAGE bestätigt. DEUTSCH erscheint. 2. Mit der +/- Taste können Sie die gewünschte Sprache einstellen. 3. Bestätigen Sie Ihre Sprachauswahl mit OK. 4. ASTROVERSCHIEBUNG t erscheint. 5.
  • Seite 21 EINSTELLUNG (Städteauswahl, EXPERTEN MODUS (LAENGE, BREITE, ZEITZONE) ExPERTEN kASSEl MODUS ON/OFF lAENgE BREITE zEITzONE Sie haben die Funktion ASTROVERSCHIEBUNG t bestätigt. Stadtauswahl (KASSEL) erscheint. Mit der +/- Taste können Sie die nächstgelegene Stadt einstellen. Betätigen Sie mit OK. Hinweis Diese Dialogfenster werden nur angezeigt, wenn im Funktionsmenü der EXPERTEN MODUS auf ON steht.
  • Seite 22 Montage- und Betriebsanleitung EINSTELLUNG SO/WI (Automatische Sommer-/Winterzeitumstellung) SO/WI EINSTEllUNg SO/WI 1. Sie haben die Funktion ZEITZONE bestätigt. SO/WI erscheint. 2. Mit der +/- Taste können Sie SO/WI ein- oder ausschalten. 3. Bestätigen Sie Ihre Auswahl mit OK. 4. Drücken Sie die MENUE-Taste, um in den Betriebsmodus zu gelangen.
  • Seite 23: Funktion

    FUNKTION ROLLLADEN/JALOUSIE, ERSTINBETRIEBNAHME (Auswahl des Behanges, Datum der Erstinbetriebnahme) FUNkTION ROlllADEN/ ERSTINBETRIEB­ ExPERTEN MODUS OFF/ON NAHME JAlOUSIE FUNkTION Drücken Sie die MENUE-Taste. Um das Menü FUNKTION auszuwählen, drücken Sie die + Taste bis FUNK- TION erscheint. Bestätigen Sie mit OK. ROLLLADEN/JALOUSIE erscheint. Mit der +/- Taste können Sie zwischen Rollladen/Jalousie auswählen.
  • Seite 24: Montage Wandhalterung

    Montage- und Betriebsanleitung Montage Wandhalterung • Prüfen Sie vor der Montage an der gewünschten Montageposition die Wandhalter einwandfreie Funktion von Sender und Empfänger. • Befestigen Sie die Halterung mit den zwei beigelegten Schrauben an W a n d h a l t e r - Entriegelung der Wand.
  • Seite 25: Reinigung

    Funkfrequenz 868,3 MHz Allgemeine Konformitätserklärung Hiermit erklärt die Firma Becker-Antriebe GmbH, dass sich das Gerät Centronic TimeControl TC445-II in Übereinstimmung mit den grundlegenden Anforderun- gen und den anderen relevanten Vorschriften der Richtlinie 1999/5/EG befindet. Bestimmt für den Gebrauch in folgenden Ländern: EU, CH, NO, IS, LI...
  • Seite 26: Was Tun, Wenn

    Montage- und Betriebsanleitung Was tun, wenn...? Störung Ursache Abhilfe Antrieb läuft nicht. 1. Batterien sind leer. 1. Neue Batterien ein- legen. 2. Batterien sind falsch 2. Batterien richtig ein- eingelegt. legen. 3. Empfänger außerhalb 3. Entfernung zum Emp- der Funkreichweite. fänger verringern. 4.
  • Seite 28: General Information

    EMC regulations are adhered to dur- ing utilisation of our products, especially with regard to end product assembly, installation and customer advice. Safety instructions Warning Please keep the instructions in a safe place! • Use in dry rooms only. • Use unmodified Becker original parts only. • Keep persons away from the system guide track. • Keep children away from controls. • Please comply with national stipulations. • Dispose of used batteries properly. Replace batteries by an identical type (LR 03; AAA) only. • If the system is controlled using one or several transmitters, the sys- tem guide track must be visible during operation.
  • Seite 29: Use In Accordance With Regulations

    Use in accordance with regulations The TC445-II may only be used to control roller shutter and sunshade systems. • Please note that radio sets cannot be operated in areas with increased risk of interference (e.g. hospitals, airports). • The remote control is only permitted for equipment and systems with which a malfunction in the hand-held transmitter or receiver does not present a risk to persons, animals or objects, or this risk is covered by other safety devices.
  • Seite 30: Explanation Of Displays And Buttons

    Assembly and Operating Instructions Explanation of displays and buttons Display window Manual / automatic sliding switch Selection buttons Programming pushbutton UP pushbutton Battery compartment STOP pushbutton Labelling space DOWN pushbutton RESET-pushbutton (behind the labelling space) Channel selector button Type plate Channel control lights...
  • Seite 31: Display Symbols

    Display symbols Time/date DOWN Programme Days (Mon.-Sun.) Setting Digital display Function Text line Astro evening...
  • Seite 32: Explanations

    Assembly and Operating Instructions Explanations Selecting roller shutter When the roller shutter function is used, the roller shutter remains locked after a control button has been activated. Selecting venetian blind When the venetian blind function is being used, the venetian blind moves in non¬maintained command mode in order to allow the slats to be positioned more precisely.
  • Seite 33: Menu Button

    OK button When the OK button is pressed, the currently displayed values are saved. +/- Buttons The following features can be operated using the + and - buttons: • Menu -> Change setting • AUTO mode -> Request information • + Button -> Next automatic switching time s •...
  • Seite 34 Assembly and Operating Instructions ASTRO EVENING Shutters are raised according to the set switching time. Shutters are lowered according to the astro function. winter time summer time winter time sun rise 05:00 h 07:00 hrs 09:00 hrs Jan. Feb. Mar. Apr. Jun.
  • Seite 35: Menu Settings

    Automatic switching times for roller shutters and venetian blinds to be raised and lower ed in all receivers that have been programmed. Programming will not take effect if the sign: --:-- is showing on your display. (--:-- is located between 23.59 and 00:00). Menu Settings SETTINGS The following settings can be made via the SETTING menu:...
  • Seite 36 Assembly and Operating Instructions function, you can raise the shutter from the lower end limit until the ventilation slits are open. The slats of the venetian blind will be turned. Press the UP button twice in rapid succession to move to the ventilation/revers- ing pos ition.
  • Seite 37: Programming The Remote Control

    Programming the remote control 1) Learning the master transmitter a) Put receiver into learn mode Note Please refer to the operating instructions for the receiver. • Switch off the receiver’s power supply and reconnect after 5 seconds. • Activate the “Learn” key or the radio-controlled receiver switch. The receiver will then be in “Learn” mode for 3 minutes. b) Learn master transmitter When the receiver is in “Learn” mode, the learn button is to be pressed until the receiver indicates that the learn process has been successfully completed.
  • Seite 38: Initial Operation

    Assembly and Operating Instructions Initial operation Press the button once to “wake up” the timer. Now you can select the language with the +/- buttons and accept it with the OK button. The clock is in automatic mode. Factory settings TIME/DATE: Current CET and current date PROGRAMME: ASTRO EVENING -> Switching times Mon-Fri (1-5) s 7.00 a.m.
  • Seite 39: Programming

    Programming Note Following program modifications are now likewise valid for all 5 chan- nels. Overview of menu Operating mode TIME/DATE PROGRAMME SETTING FUNCTION 1. Press the MENU button until TIME/DATE appears. 2. To select further menus, press the +/- buttons. 3. Press the MENU button to switch to operating mode. TIME/DATE (to set the time and date) TIME/DATE TIME YEAR MONTH TIME/DATE 1.
  • Seite 40 Assembly and Operating Instructions PROGRAMME ASTRO EVENING (UP -> switching time, DOWN -> sunset) PROGRAMME BLOCKING ASTRO SWITCHING TIME � EVENING TIME � BLOCKING SWITCHING TIME � TIME � PROGRAMME Press the MENU button. To select the PROGAMME menu, press the + button until PROGAMME ap- pears.
  • Seite 41 PROGRAMME SEPARATE (UP/DOWN command -> switching times) 1. Press the MENU button. 2. To select the PROGAMME menu, press the + button until PROGAMME ap- pears. 3. Press OK to confirm. 4. Press the + button again until SEPARATE appears. 5. Press OK to confirm. 6.
  • Seite 42 Assembly and Operating Instructions SETTING HOLIDAY (Holiday OFF/ON) SETTING HOLIDAY OFF HOLIDAY ON 1. Press the MENU button. 2. To select the SETTING menu, press the + button until SETTING appears. 3. Press OK to confirm. HOLDAY ON/OFF appears. 4. The holiday function can be set to ON or OFF using the +/- buttons. 5.
  • Seite 43 SETTING INTERMEDIATE POSITION, VENTILATION/REVERSE, PROG END LIMIT (Time/position programming) INTERMEDIATE VENTILATION PROG POSITION (REVERSE) END LIMIT PROG INTERMEDIATE POSITION PROG VENTILATION 1. You have confirmed the HOLIDAY function. INTERMEDIATE POSITION ap- pears. 2. The switching time for the INTERMEDIATE POSITION can be set using the +/- buttons.
  • Seite 44 Assembly and Operating Instructions SETTING ENGLISH GB/ASTRO SHIFT t (Language selection, astro shift) ENGLISH GB ASTRO SHIFT ▼ 1. You have confirmed the PROG END LIMIT function. ENGLISH GB appears. 2. You can select the desired language using the +/- buttons. 3. Confirm your language selection by pressing OK. 4.
  • Seite 45 SETTING (City, EXPERT MODE (LONGITUDE, LATITUDE, TIME ZONE)) EXPERT LONDON MODE ON/OFF LONGITUDE LATITUDE TIME ZONE You have confirmed the function ASTRO SHIFT t. The city selected (LON- DON) will appear. You can set the nearest town using the +/- button. Confirm by pressing OK.
  • Seite 46 Assembly and Operating Instructions SETTING SUMMER/WINTER (Automatic clock adjustment for daylight saving changes) SUMMER/WINTER Operating mode SUMMER/WINTER 1. You have confirmed the TIME ZONE function. SUMMER/WINTER will appear. 2. The SUMMER/WINTER setting can be switched on or off using the +/- but- ton.
  • Seite 47 FUNCTION ROLLER SHUTTER/BLIND, INITIAL OPERATION (Shutter/blind selection, date of initial operation) FUNCTION ROLLER SHUTTER/ EXPERT MODE INITIAL BLIND OFF/ON OPERATION FUNCTION Press the MENU button. To select the FUNCTION menu, press the + button until FUNCTION ap- pears. Press OK to confirm. ROLLER SHUTTER/BLIND appears. You can choose between roller shutter/blind using the +/- button.
  • Seite 48: Installing The Wall Mount

    Assembly and Operating Instructions Installing the wall mount • Before installing in the position re- quired, check that the transmitter Wall holder and receiver are functioning prop- erly. • Fix the mount to the wall with the two screws provided. Wall holder Unlocking m o u n t i n g plate Changing the battery...
  • Seite 49: Cleaning

    -10 to +55 °C Radio frequency 868.3 MHz General declaration of conformity Becker hereby declares that the Centronic TimeControl TC445-II complies with the basic requirements and other relevant regulations of the EC Directive 1999/5/EC. For use in the following countries: EU, CH, NO, IS, LI...
  • Seite 50: What To Do If

    Assembly and Operating Instructions What to do if...? Problem Cause Remedy Drive is not function- 1. Batteries are dead. 1. Insert new batteries. ing. 2. Batteries are incor- 2. Insert batteries cor- rectly inserted. rectly. 3. Receiver outside the 3. Reduce distance to the radio range.
  • Seite 52: Généralités

    électromagnétique actuellement en vigueur, notamment en ce qui concerne la production du produit fini, l’installation et le service-clientèle. Consignes de sécurité Avertissement Prière de conserver cette notice d’utilisation! • A utiliser uniquement dans des locaux secs. • Utilisez uniquement des pièces originales de Becker qui n’ont subi aucune modification. • Veillez à ce que personne ne se tienne dans la zone de déploiement des installations. • Tenez les enfants à l’écart des commandes. • Observez les directives spécifiques des pays. • Eliminez les piles usagées conformément aux prescriptions en la matière. Remplacez toujours les piles usagées par des piles de type...
  • Seite 53: Utilisation Conforme Aux Prescriptions

    • Lorsque l’installation est pilotée par un ou plusieurs émetteurs, la zone de fonctionnement de l’installation doit être visible pendant l’utilisation. • L’appareil contient des petites pièces qui peuvent être avalées. Utilisation conforme aux prescriptions La TC445-II doit être utilisée exclusivement pour la commande de volets rou- lants et de protections solaires. •...
  • Seite 54: Explication Des Textes D'affichage Et Des Touches

    Notice de montage et d’utilisation Explication des textes d’affichage et des touches Visuel Curseur Manuel / Automatique Barre de sélection Touche de programmation Touche MONTEE Compartiment à piles Touche STOP Champ d’inscription Touche DESCENTE Touche RESET (derrière le champ d’inscription) Touche de sélection des canaux Plaque signalétique Voyants des canaux...
  • Seite 55 Pictogramme de l’affichage Montée Heure/Date Descente Programme Jours de la semaine (lu.-di.) Réglage Affichage numérique Fonction Texte Soir Astro...
  • Seite 56: Explications

    Notice de montage et d’utilisation Explications Sélection volet roulant Pour la fonction volet roulant, le volet roulant se déplace en position de maintien après activation d’une touche de marche. Sélection store Lorsque la fonction store est active, le store se déplace par impulsion pour permettre un positionnement exact des lamelles.
  • Seite 57: Touche Menu

    Touche OK La touche OK permet de mémoriser les valeurs actuellement affichées. Touches +/- Les touches + et - permettent les actions suivantes : • Menu -> Modification de la valeur • Service Auto -> Demande d’informations • Touche + -> Horaire s automatique suivant •...
  • Seite 58 Notice de montage et d’utilisation ASTRO SOIR Pilote la montée selon l’horaire réglé. Descente selon fonction astro. Heure d’hiver Heure d’été Heure d’hiver Coucher du soleil 05 00 07h00 09h00 Jan. Feb. Mar. Apr. Jun. Jul. Aug. Sep. Oct. Nov. Dec. 15h00 18h30 Coucher du soleil...
  • Seite 59: Menu Réglages

    Menu Réglages REGLAGE Le menu REGLAGE vous offre les possibilités suivantes : • VACANCES • POS. INTERM. • AERATION/INVERSION • PROG1 (POSITION FINALE, POS. INTERM, AERATION/INVERSION) • Sélection de la langue (FRANÇAIS) • DECALAGE ASTRO t • Sélection de la ville (PARIS) •...
  • Seite 60 Notice de montage et d’utilisation DECALAGE ASTRO Le réglage du décalage astro permet de décaler le temps astro t (maximum +/- 120 minutes). Décalage astro Jan. Feb. Mar. Apr. Jun. Jul. Aug. Sep. Oct. Nov. Dec. 15h00 Fermeture p. ex. 1h avant le coucher du soleil avec un décalage astro de -1h 18h30...
  • Seite 61: Programmation De La Radio

    Programmation de la radio 1) Programmation de l’émetteur maître a) Préparer le récepteur en mode de programmation. Remarque Suivez la notice de service du récepteur. • Coupez la tension d’alimentation du récepteur et connectez-la de nouveau au bout de 5 secondes. • Actionnez la touche de programmation ou le commutateur radio du récep- teur. Le récepteur est alors en mode de programmation pendant 3 minutes. b) Programmation de l’émetteur maître Appuyez sur la touche de programmation pendant que le récepteur est en mode de programmation jusqu’à...
  • Seite 62: Mise En Service

    Notice de montage et d’utilisation Mise en service En appuyant une première fois sur la touche, vous « réveillez » l’horloge. Vous pouvez maintenant sélectionner la langue avec les touches +/- et la confirmer avec la touche OK. L’horloge est en mode Automatique. Paramétrage usine HEURE/DATE : heure de l’Europe centrale actuelle et date actuelle PROGRAMME : ASTRO SOIR -> Horaires lundi-vendredi (1-5)
  • Seite 63: Programmation

    Programmation Remarque Toutes les programmations suivants sont également valable pour l’en- semble des 5 canaux. Vue d’ensemble du menu Mode de service HEURE/DATE PROGRAMME REGLAGE FONCTION 1. Appuyez sur la touche MENU, HEURE/DATE apparaît. 2. Pour sélectionner d’autres menus, appuyez sur les touches +/-. 3. Appuyez sur la touche MENU pour accéder au mode de service. HEURE/DATE (régler l’heure et la date) HEURE/DATE HEURE...
  • Seite 64 Notice de montage et d’utilisation PROGRAMME ASTRO SOIR (montée -> horaire, descente -> coucher du soleil) PROGRAMME ASTRO TEMPS HORAIRE � SOIR DE BLOCAGE � TEMPS HORAIRE � DE BLOCAGE � PROGRAMME Appuyez sur la touche MENU. Pour sélectionner le menu PROGAMME, appuyez sur la touche + jusqu’à ce que PROGRAMME apparaisse.
  • Seite 65 PROGRAMME INDIVIDUEL (montée/descente -> horaires) PROGRAMME INDIVIDUEL HORAIRE � HORAIRE � HORAIRE � HORAIRE � PROGRAMME 1. Appuyez sur la touche MENU. 2. Pour sélectionner le menu PROGAMME, appuyez sur la touche + jusqu’à ce que PROGRAMME apparaisse. 3. Confirmez avec OK. 4.
  • Seite 66 Notice de montage et d’utilisation REGLAGE VACANCES (Vacances OFF/ON) REGLAGE VACANCES OFF VACANCES ON 1. Appuyez sur la touche MENU. 2. Pour sélectionner le menu REGLAGE, appuyez sur la touche + jusqu’à ce que REGLAGE apparaisse. 3. Confirmez avec OK. VACANCES ON / OFF apparaît. 4.
  • Seite 67 REGLAGE POS. INTERM., AERATION/INVERSION, POSITION FINALE (programmation temps/position) POS. AERATION PROG INTERM (INVERSION) POS. FINALE PROG POS. INTERM PROG AERATION 1. Vous avez confirmé la fonction VACANCES. POS. INTERM. apparaît. 2. Vous pouvez régler les horaires de marche pour la POS. INTERM. avec les touches +/-.
  • Seite 68 Notice de montage et d’utilisation REGLAGE FRANÇAIS/ DECALAGE ASTRO t (sélection de la langue, décalage astro) DECALAGE FRANÇAIS ASTRO ▼ 1. Vous avez confirmé la fonction PROG POSITION FINALE. FRANÇAIS apparaît. 2. Vous pouvez régler la langue désirée avec les touches +/-. 3. Confirmez le choix de la langue en appuyant sur OK. 4.
  • Seite 69 REGLAGE (Sélection de la ville, MODE EXPERT (LONGITUDE, LATITUDE, ZONE HORAIRE) MODE PARIS EXPERT ON/OFF LONGITUDE LATITUDE ZONE HORAIRE Vous avez confirmé la fonction DECALAGE ASTRO t. Sélection de la ville (PARIS) apparaît. Vous pouvez régler la ville la plus proche avec la touche +/-. Confirmez avec OK.
  • Seite 70 Notice de montage et d’utilisation REGLAGE ETE/HIVER (commutation automatique été/hiver) ETE/HIV REGLAGE ETE/HIV 1. Vous avez confirmé la fonction ZONE HORAIRE. ETE/HIVER apparaît. 2. Vous pouvez activer ou désactiver ETE/HIVER avec les touches +/-. 3. Confirmez votre sélection avec OK. 4.
  • Seite 71 FONCTION VOLET ROULANT/STORE, 1 MISE EN SERVICE ère (sélection du tablier, date de la 1 mise en service) ère FONCTION VOLET ROULANT/ MODE EXPERT PREMIERE STORES ON/OFF MISE EN SERVICE FONCTION Appuyez sur la touche MENU. Pour sélectionner le menu FONCTION, appuyez sur la touche + jusqu’à ce que FONCTION apparaisse.
  • Seite 72: Montage Du Support Mural

    Notice de montage et d’utilisation Montage du support mural • Assurez-vous avant monter l’appareil à l’endroit désiré du bon Support fonctionnement de l’émetteur et du récepteur. mural • Fixez le support au mur au moyen Plaque des deux vis jointes à la fourniture. Déverrouillage fixation pour support mural...
  • Seite 73: Nettoyage

    Fréquence radio 868,3 MHz Déclaration de conformité générale La société Becker-Antriebe GmbH, déclare par la présente que l’appareil Cen- tronic TimeControl TC445-II est en conformité avec les exigences fondamen- tales et les autres prescriptions pertinentes de la directive 1999/5/CE. Est destiné à une utilisation dans les pays suivants: EU, CH, NO, IS, LI...
  • Seite 74: Que Faire Quand

    Notice de montage et d’utilisation Que faire quand...? Anomalie Cause Mesure à prendre Le moteur ne marche 1. Les piles dont déchar- 1. Mettre de nouvelles pas. gées. piles. 2. Les piles ne sont pas 2. Placer les piles correc- placées correctement tement.
  • Seite 75 Anomalie Cause Mesure à prendre Le volet roulant n’atteint La position finale n’est Régler la position finale pas la position finale. pas réglée. dans le menu REGLAGE PROG POSITION FINALE. Aucune réaction de Le courant a été inter- Appuyer sur la touche l‘émetteur après rem- rompu trop longtemps.
  • Seite 76: Algemeen

    EMV-voorschriften. Aanwijzingen voor de veiligheid Waarschuwing Bewaar deze gebruiksaanwijzing goed! • Uitsluitend in droge ruimtes gebruiken. • Maakt u uitsluitend gebruik van ongewijzigde Becker originele de- len. • Houd personen buiten het bereik van de installaties. • Laat kinderen niet met de installatie spelen. • Houdt u rekening met de landspecifieke bepalingen. • Verbruikte batterijen deskundig afvoeren.
  • Seite 77: Reglementaire Toepassing

    • Wordt de installatie door één of meerdere zenders bestuurt, moet het bereik van de installatie gedurende het bedrijf kunnen worden overzien. • Apparaat bevat onderdelen die ingeslikt kunnen worden. Reglementaire toepassing De TC445-II mag uitsluitend worden gebruikt voor het aansturen van rolluik- en zonweringinstallaties. • Houdt u er alstublieft rekening mee, dat radio-installaties niet in bereiken met een verhoogd storingsrisico mogen worden geëxploiteerd (bv ziekenhuizen, vliegvelden).
  • Seite 78: Verklaring Van Displays En Toetsen

    Montage- en gebruiksaanwijzing Verklaring van displays en toetsen Displayvenster Hand / Automatisch schuifschakelaar Selectietoetsen Programmeringstoets OP-toets Batterijvak STOP-toets Tekstveld NEER-toets RESET-toets (achter het tekstveld) Kanaalkeuzetoets Typeplaatje Kanaalcontrolelampje...
  • Seite 79: Displaysymbolen

    Displaysymbolen Tijd/Datum Neer Programma Weekdagen (ma.-zo.) Instelling Cijferweergave Functie Tekstregel Astro avond...
  • Seite 80: Verklaringen

    Montage- en gebruiksaanwijzing Verklaringen Selectie rolluik Bij de rolluikfunctie loopt het rolluik na het activeren van een richtingstoets zelf- standig. Selectie jaloezie Bij de jaloeziefunctie gaat de jaloezie in de tipstand om een nauwkeurige positi- onering van de lamellen mogelijk te maken. Wanneer een richtingstoets langer dat 1 seconde wordt ingedrukt dan loopt de jaloezie zelfstandig.
  • Seite 81: Menu Programma

    OK-toets Gebruik de OK-toets, om de op dat moment aangegeven waarden op te slaan. +/—toetsen De volgende bediening is met + en - mogelijk: • Menu -> Waarde veranderen • Auto-stand -> Informatie opvragen • +-toets -> Volgende automatische schakeltijd s • - toets -> Volgende automatische schakeltijd t •...
  • Seite 82 Montage- en gebruiksaanwijzing ASTRO AVOND Stuurt het omhoog lopen na de ingestelde schakeltijd. Omlaag lopen volgens astrofunctie. Wintertijd Zomertijd Wintertijd Zonsopgang 05:00 uur 07:00 uur 09:00 uur Mrt. Jan. Feb. Apr. Jun. Jul. Aug. Sep. Okt. Nov. Dec. 15:00 uur 18:30 uur 22:00 uur Zonsondergang Wintertijd...
  • Seite 83: Menu Instellingen

    Menu Instellingen INSTELLING In het menu INSTELLING zijn de volgende mogelijkheden: • VAKANTIE • TUSSENPOSITIE • VENTILATIE/KANTELEN • PROG (EINDSTAND, TUSSENPOSITIE, VENTILATIE/KANTELEN) • Taalkeuze (NEDERLANDS) • ASTROVERSCHUIVING t • Stadkeuze (AMSTERDAM) • LENGTE (Verschijnt alleen bij EXPERT-MOD ON) • BREEDTE (Verschijnt alleen bij EXPERT-MOD ON) •...
  • Seite 84 Montage- en gebruiksaanwijzing ASTROVERSCHUIVING Door de instelling van de astroverschuiving kan de astrotijd t onafhankelijk van elkaar worden verschoven (max. +/- 120 Min.). Astroverschuiving Jan. Feb. Mrt. Apr. Jun. Jul. Aug. Sep. Okt. Nov. Dec. 15:00 uur Sluiten bijv. 1 uur voor zonsondergang bij astroverschuiving van -1 uur 18:30 uur...
  • Seite 85: Programmeren Van De Zender

    Programmeren van de zender 1) Masterzender programmeren a) Ontvanger in programmeergereedheid brengen Opmerking Houdt u alstublieft rekening met de gebruiksaanwijzing van de ontvan- ger. • Schakelt u de voedingsspanning van de ontvanger uit en na 5 seconden weer • Druk op de programmeertoets resp. de schakelaar van de ontvanger. De ontvanger bevindt zich nu 3 minuten lang in programmeergereedheid. b) Masterzender programmeren Drukt u de programmeertoets gedurende de programmeergereedheid in tot de ontvanger het succesvol programmeren bevestigd.
  • Seite 86: Ingebruikname

    Montage- en gebruiksaanwijzing Ingebruikname Met de eerste druk op de toets wordt de klok „gewekt“. Kies met de +/—toetsen de taal en neem deze over met de OK toets. De klok bevindt zich in de automa- tische modus. Fabrieksinstelling TIJD/DAT: actuele MET en actuele datum PROGRAMMA: ASTRO AVOND ->...
  • Seite 87: Programmering

    Programmering Aanwijzing De hier volgende programmeringen gelden steeds gelijktijdig voor alle vijf kanalen. Menuoverzicht Bedrijfsmodus TIJD/DAT PROGRAMMA INSTELLING FUNCTIE 1. Druk op de MENU-toets TIJD/DAT verschijnt. 2. Druk op de +/- toetsen om meer menu’s te selecteren. 3. Druk op de MENU-toets, om in de bedrijfsmodus terecht te komen. TIJD/DAT (tijd en datum instellen) TIJD/DAT TIJD...
  • Seite 88 Montage- en gebruiksaanwijzing PROGRAMMA ASTRO AVOND (Op -> Schakeltijd, Neer -> Zonsondergang) PROGRAMMA ASTRO SCHAKELTIJD � SPERTIJD � AVOND SCHAKELTIJD � SPERTIJD � PROGRAMMA Druk op de MENU-toets. Om het nieuwe PROGAMMA te selecteren, op de + toets drukken tot PROGRAMMA verschijnt. Bevestig met OK.
  • Seite 89 PROGRAMMA INDIVIDUEEL (Op-/Neer -> schakeltijden) PROGRAMMA INDIVIDUEEL SCHAKELTIJD � SCHAKELTIJD � SCHAKELTIJD � SCHAKELTIJD � PROGRAMMA 1. Druk op de MENU-toets. 2. Om het nieuwe PROGAMMA te selecteren, op de + toets drukken tot PRO- GRAMMA verschijnt. 3. Bevestig met OK. 4.
  • Seite 90 Montage- en gebruiksaanwijzing INSTELLING VAKANTIE (Vakantie OFF/ON) INSTELLING VAKANTIE OFF VAKANTIE ON 1. Druk op de MENU-toets. 2. Om het menu INSTELLING te selecteren, op de + toets drukken tot INSTEL- LING verschijnt. 3. Bevestig met OK. VAKANTIE ON / OFF verschijnt. 4.
  • Seite 91: Tussenpositie, Ventilatie/Kantelen, Prog Eindstand

    INSTELLING TUSSENPOSITIE, VENTILATIE/KANTELEN, PROG EINDSTAND (Tijd/ Standprogrammering) TUSSEN- VENTILATIE/ PROG POSITIE KANTELEN EINDSTAND PROG TUSSEN- POSITIE PROG VENTILATIE 1. De functie VAKANTIE is bevestigd. TUSSENPOSITIE verschijnt. 2. Gebruik de +/- toets om de looptijd naar de TUSSENPOSITIE in te stellen. De opgave van de looptijd vindt plaats in seconden of u loopt naar de TUS- SENPOSITIE met de NEER-/OP-toets vanuit de bovenste eindstand.
  • Seite 92 Montage- en gebruiksaanwijzing INSTELLING NEDERLANDS/ ASTROVERSCHUIVING t (Taalkeuze, Astroverschuiving) ASTROVER- NEDERLANDS SCHUIVING 1. De functie PROG EINDSTAND is bevestigd. NEDERLANDS verschijnt. 2. Gebruik de +/- toets om de gewenste taal in te stellen. 3. Bevestig de taalkeuze met OK. 4. ASTROVERSCHUIVING t Verschijnt. 5.
  • Seite 93 INSTELLING (Stadkeuze, EXPERT MODUS (LENGTE, BREEDTE, TIJDZONE)) EXPERT AMSTERDAM MODUS ON/OFF LENGTE BREEDTE TIJDZONE De functie ASTROVERSCHUIVING t is bevestigd. Stadkeuze (AMSTER- DAM) verschijnt. Gebruik de +/- toets om de dichtst bij gelegen stad in te stellen. Bevestig met OK. Aanwijzing Deze dialoogvensters worden alleen getoond, wanneer in het functie- menu de EXPERT MODUS op ON staat.
  • Seite 94 Montage- en gebruiksaanwijzing INSTELLING ZO/WI (Automatische zomer-/wintertijd omschakeling) ZO/WI INSTELLING ZO/WI 1. De functie TIJDZONE is bevestigd. ZO/WI verschijnt. 2. Gebruik de +/- toets om ZO/WI in- of uit te schakelen. 3. Bevestig de keuze met OK. 4. Druk op de MENU-toets, om in de bedrijfsmodus terecht te komen.
  • Seite 95 FUNCTIE ROLLUIKEN/JALOEZIE, EERSTE INGEBRUIKNAME (Selectie type raambekleding, de datum van de eerste ingebruikname) FUNCTIE ROLLUIKEN/ EXPERT MODUS EERSTE JALOEZIE OFF/ON INGEBRUIKNAME FUNCTIE Druk op de MENU-toets. Om het menu FUNCTIE te selecteren, op de + toets drukken tot FUNCTIE verschijnt. Bevestig met OK. ROLLUIKEN/JALOEZIE verschijnt. Gebruik de +/- toets om tussen rolluiken/jaloezie te kiezen.
  • Seite 96: Montage Van De Wandhouder

    Montage- en gebruiksaanwijzing Montage van de wandhouder • Controleert u vóór de montage ter plekke van de gewenste montage- Wandhouder positie de foutloze werking van zen- der en ontvanger. • Bevestigt u de houder met de twee ingesloten schroeven aan de wand. Ontgrendeling Wandhouder- montageplaat Vervangen van de batterijen...
  • Seite 97: Reiniging

    Radiofrequentie 868,3 MHz Algemene conformiteitsverklaring Hiermee verklaart de firma Becker dat het apparaat Centronic TimeControl TC445-II in overeenstemming is met de basisvereisten en andere relevante voorschriften volgens richtlijn 1999/5/EG. Bepaalt voor het gebruik in de volgende landen: EU, CH, NO, IS, LI...
  • Seite 98: Wat Te Doen, Als

    Montage- en gebruiksaanwijzing Wat te doen, als ...? Storing Oorzaak Remedie Motor draait niet. 1. Batterijen leeg. 1. Nieuwe batterijen plaatsen. 2. Batterijen werden niet 2. Batterijen correct correct geplaatst. plaatsen. 3. Ontvanger buiten de 3. Afstand t.o.v. de ont- reikwijdte. vanger reduceren. 4. Zender is niet in de 4.

Inhaltsverzeichnis