Becker Centronic TC4410 Montage- Und Betriebsanleitung
Inhaltsverzeichnis
Verfügbare Sprachen
Verfügbare Sprachen
Centronic
TimeControl TC4410
Montage- und Betriebsanleitung
de
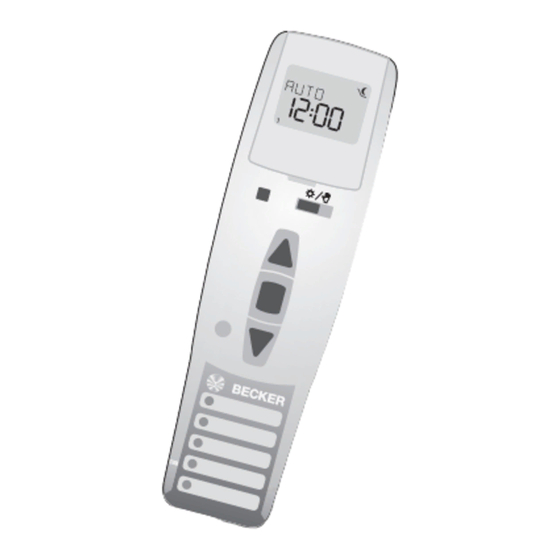
Zeitschaltuhr im Handsender mit Display
Wichtige Informationen für:
• den Monteur / • die Elektrofachkraft / • den Benutzer
Bitte entsprechend weiterleiten!
Diese Anleitung ist vom Benutzer aufzubewahren.
Assembly and Operating Instructions
en
Timer in handheld transmitter featuring display
Important information for:
• Fitters / • Electricians / • Users
Please forward accordingly!
These instructions must be kept for future reference.
Notice de montage et d'utilisation
fr
Télécommande avec horloge intégrée avec écran
Informations importantes pour:
• l'installateur / • l'électricien / • l'utilisateur
À transmettre à la personne concernée !
Cette notice doit être conservée par l'utilisateur.
Montage- en gebruiksaanwijzing
nl
Tijdschakelklok in handzender met display
Belangrijke informatie voor:
• de monteur / • de elektricien / • de gebruiker
Aan de betreffende personen doorgeven!
De gebruiker dient deze gebruiksaanwijzing te bewaren.
Inhaltsverzeichnis

Verwandte Anleitungen für Becker Centronic TC4410


Inhaltszusammenfassung für Becker Centronic TC4410
- Seite 1 Centronic TimeControl TC4410 Montage- und Betriebsanleitung Zeitschaltuhr im Handsender mit Display Wichtige Informationen für: • den Monteur / • die Elektrofachkraft / • den Benutzer Bitte entsprechend weiterleiten! Diese Anleitung ist vom Benutzer aufzubewahren. Assembly and Operating Instructions Timer in handheld transmitter featuring display Important information for: •...
-
Seite 2: Inhaltsverzeichnis
Inhaltsverzeichnis Allgemeines ....................4 Gewährleistung ..................4 Sicherheitshinweise .................. 5 Bestimmungsgemäße Verwendung ............5 Anzeigen- und Tastenerklärung ..............6 Erklärungen ....................7 Einlernen des Funks .................13 Inbetriebnahme ..................14 Werkseinstellung ..................14 Programmierung ..................15 Montage Wandhalterung ................. 24 Batteriewechsel ..................24 Reinigung ....................25 Technische Daten ................... -
Seite 4: Allgemeines
Montage- und Betriebsanleitung Allgemeines Die TC4410 ist kompatibel zu allen Empfängern der Becker Centronic Steuer- ungspalette. Mit den 10 Sendekanälen können Produkte wie Rollladen- Sonnenschutzan- lagen, Lichtsteuerungen und Funksteckdosen gesteuert werden. Neben den 10 Einzel- Sendekanälen besitzt die TC4410 noch 3 Zentral- Sende- kanäle welche die Sendekanäle 1-5, 6-10 und 1-10 ansprechen. -
Seite 5: Sicherheitshinweise
Vorsicht Bitte bewahren Sie die Anleitung auf! • Nur in trockenen Räumen verwenden. • Verwenden Sie nur unveränderte Becker Originalteile. • Halten Sie Personen aus dem Fahrbereich der Anlagen fern. • Halten Sie Kinder von Steuerungen fern. • Beachten Sie Ihre landesspezifischen Bestimmungen. -
Seite 6: Anzeigen- Und Tastenerklärung
Montage- und Betriebsanleitung Anzeigen- und Tastenerklärung... -
Seite 7: Erklärungen
Erklärungen Rollladen-Auswahl Bei der Rollladen-Funktion fährt der Rollladen nach Betätigung einer Fahrtaste in Selbsthaltung. Jalousie-Auswahl Bei der Jalousie-Funktion fährt die Jalousie im Tippbetrieb, um eine genaue Positionierung der Lamellen zu ermöglichen. Drücken Sie eine Fahrtaste länger als 1 Sekunde, fährt die Jalousie in Selbsthaltung. Nach Anfahren der programmierten Zwischen- und Endlagenposition wird au- tomatisch eine Wendung der Lamellen durchgeführt (wenn die Wendeposition programmiert wurde). - Seite 8 Montage- und Betriebsanleitung Gruppentaste Hinweis Die Gruppenauswahl kann nur im Betriebsmodus erfolgen. Mit der Gruppentaste können bis zu 10 Kanäle ausgewählt werden. Angezeigt werden die einzelnen Kanäle durch das Aufleuchten der zugehörigen LED. Kanal Farbe LED 1-5 und Zentralbefehl 1-5 grün 6-10 und Zentralbefehl 6-10 1-10 Zentralbefehl...
-
Seite 9: Reset-Taste
RESET-Taste Durch Drücken der RESET-Taste (mit einem Kugelschreiber oder Ähnlichem) wird die TC4410 in die Werkseinstellung zurückgesetzt. Ausnahme: Menüpunkt Funktion, Sprachauswahl und Stadtauswahl. Sender bleibt im Empfänger eingelernt. Hinweis Wenn sich die TC4410 im Programmiermodus befindet und Sie die Ta- sten für mehr als 1 Minute nicht betätigen, so springt die Zeitschaltuhr automatisch wieder in den Betriebsmodus. - Seite 10 Montage- und Betriebsanleitung ASTRO ABEND Steuert die Auffahrt nach der eingestellten Schaltzeit. Abfahrt nach Astrofunktion. Winterzeit Sommerzeit Winterzeit Sonnenaufgang 05:00 Uhr 07:00 Uhr 9:00 Uhr Jan. Feb. Mär. Apr. Jun. Jul. Aug. Sep. Okt. Nov. Dez. 15:00 Uhr 18:30 Uhr 22:00 Uhr Sonnenuntergang Winterzeit...
-
Seite 11: Menü Einstellungen
SCHALTZEIT Automatische Auf- und Abfahrzeiten für Rollladen und Jalousie in allen einge- lernten Empfängern. Bei der Displayanzeige --:-- (zwischen der Uhrzeit 23:59 und 00:00) wird die Schaltzeit nicht ausgeführt. Menü Einstellungen EINSTELLUNG Im Menü EINSTELLUNG haben Sie folgende Möglichkeiten: • URLAUB • ZWISCHENPOSITION • LUEFTUNG/WENDUNG • PROG (ENDLAGE, ZWISCHENPOSITION, LUEFTUNG/WENDUNG) - Seite 12 Montage- und Betriebsanleitung LUEFTUNG/WENDUNG Die Lüftungs-/Wendeposition ist eine frei wählbare Position des Rollladens/ Jalousie, zwischen der unteren und oberen Endlage. Mit dieser Funktion kön- nen Sie den Rollladen aus der unteren Endlage soweit wieder auffahren, bis die Lüftungsschlitze geöffnet sind. Bei der Jalousie erfolgt die Lamellenwendung. Dazu drücken Sie die AUF-Taste zweimal kurz nacheinander.
-
Seite 13: Einlernen Des Funks
Einlernen des Funks Hinweis Die Zentralbefehle 1-5, 6-10 und 1-10 können nicht separat eingelernt werden. 1) Mastersender einlernen a) Empfänger in Lernbereitschaft bringen Hinweis Beachten Sie die Betriebsanleitung des Empfängers. • Schalten Sie die Spannungsversorgung des Empfängers aus und nach 5 Se- kunden wieder ein. oder • Betätigen Sie die Lerntaste bzw. den Funkschalter des Empfängers. Der Empfänger befindet sich nun für 3 Minuten in Lernbereitschaft. b) Mastersender einlernen Drücken Sie die Einlerntaste innerhalb der Lernbereitschaft, bis der Empfänger das erfolgreiche Einlernen quittiert. -
Seite 14: Inbetriebnahme
Montage- und Betriebsanleitung Inbetriebnahme Mit dem ersten Tastendruck „wecken“ Sie die Uhr auf. Sie können nun mit den +/- Tasten die Sprache wählen und diese mir der OK Taste übernehmen. Die Uhr befindet sich im Automatikmodus. Werkseinstellung UHR/DAT: aktuelle MEZ und aktuelles Datum PROGRAMM: ASTRO ABEND s Schaltzeiten Montag-Freitag (1-5) s 7.00 Uhr,... -
Seite 15: Programmierung
Programmierung Hinweis Wählen Sie zuerst im Betriebsmodus den gewünschten Kanal mit der Gruppentaste aus. Menüübersicht Betriebsmodus UHR/DAT PROGRAMM EINSTELLUNG FUNKTION 1. Drücken Sie die MENUE-Taste UHR/DAT erscheint. 2. Um weitere Menüs auszuwählen, drücken Sie die +/- Tasten. 3. Drücken Sie die MENUE-Taste, um in den Betriebsmodus zu gelangen. UHR/DAT (Uhrzeit und Datum einstellen) UHR/DAT UHRZEIT... - Seite 16 Montage- und Betriebsanleitung PROGRAMM ASTRO ABEND (Auffahrt -> Schaltzeit, Abfahrt -> Sonnenuntergang) PROGRAMM ASTRO SCHALTZEIT L SPERRZEIT M ABEND SCHALTZEIT L SPERRZEIT M PROGRAMM Hinweis Wählen Sie zuerst im Betriebsmodus den gewünschten Kanal mit der Gruppentaste aus. Drücken Sie die MENUE-Taste. Um das Menü...
- Seite 17 PROGRAMM INDIVIDUELL (Auf-/Abfahrt -> Schaltzeiten) PROGRAMM INDIVIDUELL SCHALTZEIT L SCHALTZEIT M SCHALTZEIT L SCHALTZEIT M PROGRAMM Hinweis Wählen Sie zuerst im Betriebsmodus den gewünschten Kanal mit der Gruppentaste aus. 1. Drücken Sie die MENUE-Taste. 2. Um das Menü PROGRAMM auszuwählen, drücken Sie die + Taste bis PROGRAMM erscheint.
-
Seite 18: Einstellung
Montage- und Betriebsanleitung EINSTELLUNG URLAUB (Urlaub OFF/ON) EINSTELLUNG URLAUB OFF URLAUB ON Hinweis Die Einstellung URLAUB ON/OFF gilt für alle Kanäle. 1. Drücken Sie die MENUE-Taste. 2. Um das Menü EINSTELLUNG auszuwählen, drücken Sie die + Taste bis EIN- STELLUNG erscheint. 3. Bestätigen Sie mit OK. URLAUB ON/OFF erscheint. 4. - Seite 19 EINSTELLUNG ZWISCHENPOSITION, LUEFTUNG/WENDUNG, Prog ENDLAGE (Zeit/Lageprogrammierung) ZWISCHEN- LUEFTUNG PROG POSITION (WENDUNG) ENDLAGE PROG ZWISCHEN- POSITION PROG LUEFTUNG 1. Sie haben die Funktion URLAUB bestätigt. ZWISCHENPOSITION erscheint. 2. Mit der +/- Taste können Sie die Fahrzeit zur ZWISCHENPOSITION einstel- len. Die Angabe der Fahrzeit erfolgt in Sekunden oder Sie fahren die ZWI- SCHENPOSITION mit der AB-/AUF-Taste aus der oberen Endlage an.
- Seite 20 Montage- und Betriebsanleitung EINSTELLUNG DEUTSCH/ASTROVERSCHIEBUNG t (Sprachauswahl, Astroverschiebung) ASTROVER- DEUTSCH SCHIEBUNG M Hinweis Die Einstellung ASTROVERSCHIEBUNG gilt für alle Kanäle. 1. Sie haben die Funktion PROG ENDLAGE bestätigt. DEUTSCH erscheint. 2. Mit der +/- Taste können Sie die gewünschte Sprache einstellen. 3.
- Seite 21 EINSTELLUNG (Städteauswahl, EXPERTEN MODUS (LAENGE, BREITE, ZEITZONE) EXPERTEN KASSEL MODUS ON/OFF LAENGE BREITE ZEITZONE Sie haben die Funktion ASTROVERSCHIEBUNG t bestätigt. Stadtauswahl (KASSEL) erscheint. Mit der +/- Taste können Sie die nächstgelegene Stadt einstellen. Betätigen Sie mit OK. Hinweis Diese Dialogfenster werden nur angezeigt, wenn im Funktionsmenü der EXPERTEN MODUS auf ON steht.
- Seite 22 Montage- und Betriebsanleitung EINSTELLUNG SO/WI (Automatische Sommer-/Winterzeitumstellung) SO/WI EINSTELLUNG SO/WI 1. Sie haben die Funktion ZEITZONE bestätigt. SO/WI erscheint. 2. Mit der +/- Taste können Sie SO/WI ein- oder ausschalten. 3. Bestätigen Sie Ihre Auswahl mit OK. 4. Drücken Sie die MENUE-Taste, um in den Betriebsmodus zu gelangen.
-
Seite 23: Funktion
FUNKTION ROLLLADEN/JALOUSIE, ERSTINBETRIEBNAHME (Auswahl des Behanges, Datum der Erstinbetriebnahme) FUNKTION ROLLLADEN/ EXPERTEN MODUS ERSTINBETRIEB JALOUSIE OFF/ON NAHME FUNKTION Drücken Sie die MENUE-Taste. Um das Menü FUNKTION auszuwählen, drücken Sie die + Taste bis FUNK- TION erscheint. Bestätigen Sie mit OK. ROLLLADEN/JALOUSIE erscheint. Mit der +/- Taste können Sie zwischen Rollladen/Jalousie auswählen. -
Seite 24: Montage Wandhalterung
Montage- und Betriebsanleitung Montage Wandhalterung • Prüfen Sie vor der Montage an der gewünschten Montageposition die einwandfreie Funktion von Sender und Empfänger. • Befestigen Sie die Halterung mit 38,5 den zwei beigelegten Schrauben an der Wand. 43,6 Batteriewechsel Hinweis Wechseln Sie die Batterien inner- halb einer Minute und drücken Sie dabei keine Tasten. -
Seite 25: Reinigung
-10 bis +55 °C Funkfrequenz 868,3 MHz Allgemeine Konformitätserklärung Hiermit erklärt die Firma Becker-Antriebe GmbH, dass sich das Gerät Centronic TimeControl TC4410 in Übereinstimmung mit den grundlegenden Anforde- rungen und den anderen relevanten Vorschriften der Richtlinie R&TTE 1999/5/ EG befindet. Bestimmt für den Gebrauch in folgenden Ländern: EU, CH... -
Seite 26: Was Tun, Wenn
Montage- und Betriebsanleitung Was tun, wenn...? Störung Ursache Abhilfe Antrieb läuft nicht. 1. Batterien sind leer. 1. Neue Batterien einle- gen. 2. Batterien sind falsch 2. Batterien richtig einle- eingelegt. gen. Antrieb läuft nicht, 1. Empfänger außerhalb 1. Entfernung zum Emp- Sendekontrollleuchte der Funkreichweite. - Seite 100 Becker-Antriebe GmbH 35764 Sinn/Germany www.becker-antriebe.com...