Herunterladen Inhalt Inhalt Diese Seite drucken

Becker Centronic TimeControl TC511 Montage & Betriebsanleitung

Zeitschaltuhr funk für lichtsensor
Vorschau ausblenden Andere Handbücher für Centronic TimeControl TC511:
Inhaltsverzeichnis

Werbung

Verfügbare Sprachen

Verfügbare Sprachen

Centronic TimeControl
TC511
Montage- und Betriebsanleitung
de
Zeitschaltuhr Funk für Lichtsensor
Wichtige Informationen für:
• den Monteur / • die Elektrofachkraft / • den Benutzer
Bitte entsprechend weiterleiten!
Diese Originalanleitung ist vom Benutzer aufzubewahren.
Assembly and Operating Instructions
en
Radio timer for light sensor
Important information for:
• Fitters / • Electricians / • Users
Please forward accordingly!
These instructions must be kept safe for future reference.
Notice de montage et d'utilisation
fr
Horloge radio pour capteur de lumière
Informations importantes pour:
• l'installateur / • l'électricien / • l'utilisateur
À transmettre à la personne concernée!
L'original de cette notice doit être conservée par l'utilisateur.
Montage- en gebruiksaanwijzing
nl
Schakelklok draadloos voor lichtsensor
Belangrijke informatie voor:
• de monteur / • de elektricien / • de gebruiker
Aan de betreffende personen doorgeven!
De gebruiker dient deze originele gebruiksaanwijzing te bewaren.
4034 630 013 0f     19.04.2017     3009055
Becker-Antriebe GmbH
Friedrich-Ebert-Straße 2-4
35764 Sinn/Germany
www.becker-antriebe.com

Werbung

Inhaltsverzeichnis
loading

Inhaltszusammenfassung für Becker Centronic TimeControl TC511

  • Seite 1 Schakelklok draadloos voor lichtsensor Belangrijke informatie voor: • de monteur / • de elektricien / • de gebruiker Aan de betreffende personen doorgeven! De gebruiker dient deze originele gebruiksaanwijzing te bewaren. 4034 630 013 0f     19.04.2017     3009055 Becker-Antriebe GmbH Friedrich-Ebert-Straße 2-4 35764 Sinn/Germany www.becker-antriebe.com...
  • Seite 2: Inhaltsverzeichnis

    Inhaltsverzeichnis Allgemeines.....................  3 Gewährleistung.................. 3 Sicherheitshinweise .................  4 Anzeigen- und Tastenerklärung.............. 5 Bestimmungsgemäße Verwendung ............ 6 Einlernen des Funks .................  7 Montage Wandhalterung ................ 8 Lichtsensor .....................  8 Funktionserklärung ..................  9 Einstellungen.................. 14 Inbetriebnahme .................. 17 Werkseinstellung.................. 18 Programmierung.................. 19 Batteriewechsel .................. 32 Reinigung.................... 32 Technische Daten ................... 33 Was tun wenn...?.................. 34 Vereinfachte EU-Konformitätserklärung............ 35 2 - de...
  • Seite 3: Allgemeines

    Allgemeines Die vom Werk mit aktuellem Datum und Uhrzeit (MEZ) ausgelieferte Zeitschalt- uhr Funk für Lichtsensor (nachfolgend als Sender bezeichnet), steuert den Antrieb automatisch zu den Astrozeiten (Sonnenauf- und Untergangszeiten). Eine manuelle Bedienung des Senders ist jederzeit möglich. Durch den einfach anzubringenden Lichtsensor kann der Sender zu einer komfortablen Sonnenschutz-Steuerung (Beschattung der Pflanzen und Mö- bel) erweitert werden.
  • Seite 4: Sicherheitshinweise

    Endproduktehersteller und Installateur haben darauf zu achten, dass bei Ver- wendung unserer Produkte alle, insbesondere hinsichtlich Herstellung des Endproduktes, Installation und Kundenberatung, erforderlichen gesetzlichen und behördlichen Vorschriften, insbesondere die einschlägigen aktuellen EMV-Vorschriften, beachtet und eingehalten werden. Sicherheitshinweise Allgemeine Hinweise • Bitte bewahren Sie die Anleitung auf! •...
  • Seite 5: Anzeigen- Und Tastenerklärung

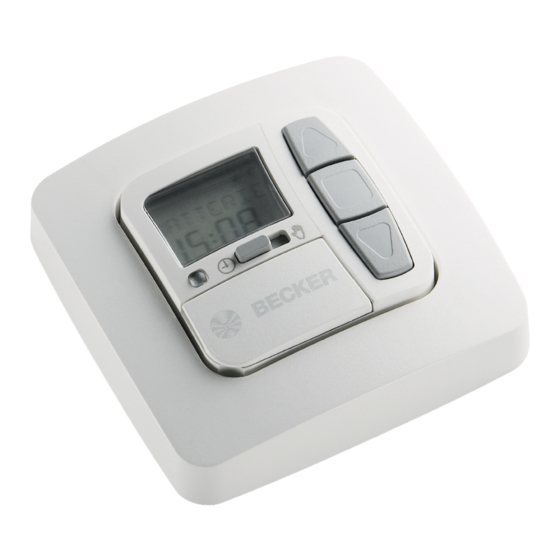
    Anzeigen- und Tastenerklärung Hand- / Automatik- Schiebeschalter AUF-Taste STOPP-Taste Sende- kontrollleuchte AB-Taste Abdeckklappe Tasten unter der Abdeckklappe RESET-Taste MENUE-Taste OK-Taste - Taste + Taste Displaysymbolik Einstellung Programm Funktion Uhr/Datum Astro Textzeile Auffahrt Ziffernanzeige Abfahrt Wochentage (Mo.-So.) Geräterückseite Einlerntaste 5 - de...
  • Seite 6: Bestimmungsgemäße Verwendung

    Bestimmungsgemäße Verwendung Der Sender in der vorliegenden Anleitung darf nur für die Ansteuerung von Rollladen- und Jalousieanlagen verwendet werden. Der Anschluss von Fremd- geräten muss in Rücksprache mit dem Fachhandel durchgeführt werden. • Bitte beachten Sie, dass Funkanlagen nicht in Bereichen mit erhöhtem Störungsrisiko betrieben werden dürfen (z.
  • Seite 7: Einlernen Des Funks

    Einlernen des Funks 1) Mastersender einlernen a) Empfänger in Lernbereitschaft bringen Unter Mastersender versteht man den ersten in einen Emp- fänger eingelernten Sender. Im Gegensatz zu weiteren hin- zugelernten Sendern ermöglicht der Mastersender u.a. das Einstellen der Endlagen (bei Antrieben mit integr. Funkemp- fänger) und das Hinzulernen oder Löschen weiterer Sender.
  • Seite 8: Montage Wandhalterung

    Montage Wandhalterung   Achten Sie darauf das die Steuerung nicht im Bereich me- tallischer Flächen oder magneti- scher Felder installiert und be- trieben wird. Funkanlagen, die auf der gleichen Frequenz sen- den, können zur Störung des Empfangs führen. Es ist zu be- achten, dass die Reichweite des Funksignals durch den Gesetzge- ber und die baulichen Maßnah-...
  • Seite 9: Funktionserklärung

    Funktionserklärung Rollladen-Auswahl Bei der Rollladen-Funktion fährt der Rollladen nach Betätigung einer Fahrtaste in Selbsthaltung. Jalousie-Auswahl Bei der Jalousie-Funktion fährt die Jalousie im Tippbetrieb, um eine genaue Positionierung der Lamellen zu ermöglichen. Drücken Sie eine Fahrtaste län- ger als 1 Sekunde, fährt die Jalousie in Selbsthaltung. Nach Anfahren der programmierten Zwischen- und Endlagenposition wird au- tomatisch eine Wendung der Lamellen durchgeführt (wenn die Wendeposition programmiert wurde).
  • Seite 10 +/- Tasten Folgende Bedienungen sind über + und - möglich: • Menü ->Wert verändern • Auto-Betrieb ->Informationen abfragen: ∙ + Taste ->Nächste automatische Schaltzeit ∙ - Taste ->Nächste automatische Schaltzeit ∙ + Taste und OK Taste halten -> Astrozeit ∙ - Taste und OK Taste halten ->...
  • Seite 11 2. PROG 2 (z.B. Mittagsruhe) • Individuell ∙ Woche (1-7) ∙ Block1/2 (1-5 und 6,7) ∙ Einzel (1, 2, 3, 4, 5, 6, 7) OFFSET ASTRO Steuert automatisch den Rollladen oder die Jalousie zu den Sonnenauf- und Sonnenuntergangszeiten. Diese Zeiten gelten als Richtwerte. Winterzeit Sommerzeit Winterzeit...
  • Seite 12 ASTRO ABEND Steuert die Auffahrt nach der eingestellten Schaltzeit. Abfahrt nach Astrofunktion. Winterzeit Sommerzeit Winterzeit 05:00 Uhr Sonnenaufgang 07:00 Uhr 09:00 Uhr Jan. Feb. Mar. Apr. Mai. Jun. Jul. Aug. Sep. Okt. Nov. Dez. 15:00 Uhr 18:30 Uhr 22:00 Uhr Sonnenuntergang Winterzeit Sommerzeit...
  • Seite 13 SPERRZEIT Verhindert ein zu frühes Auf- und Abfahren des Rollladens durch die Astro Funktion. Beispiel: Astrozeit : 5:30 Sperrzeit : 6:00 Der Rollladen fährt nicht vor 6:00 auf. Astrozeit : 17:00 Sperrzeit : 18:00 Der Rollladen fährt nicht vor 18:00 ab. Winterzeit Sommerzeit Winterzeit...
  • Seite 14: Einstellungen

    OFFSET Mit dem Menü OFFSET kann eine zusätzliche Schaltzeit programmiert wer- den. Diese ist abhängig von der PROG1 Schaltzeit (max. +/- 240 Min.). Beispiel: Astrozeit : 20:00 Offset : +60 Min. Der Rollladen fährt um 20.00 Uhr in Lüftungsposition und um 21.00 Uhr in die untere Endlage.
  • Seite 15 • Städteauswahl (KASSEL) • LAENGE (Erscheint nur bei EXPERT-MOD ON) • BREITE (Erscheint nur bei EXPERT-MOD ON) • ZEITZONE (Erscheint nur bei EXPERT-MOD ON) • SO/WI (Automatische Sommer-/Winterzeitumstellung) Um Einstellungen vornehmen zu können, drücken Sie die OK-Taste so oft, bis Sie zu Ihrem gewünschten Menüpunkt kommen.
  • Seite 16 ASTROVERSCHIEBUNG Durch die Einstellung der Astroverschiebung kann die Astrozeit und Astro- zeit unabhängig voneinander verschoben werden (max. +/- 120 Min.). Winterzeit Sommerzeit Winterzeit 05:00 Uhr Sonnenaufgang 07:00 Uhr Öffnen z. B. 1 Stunde nach Sonnenaufgang bei Astroverschiebung von +1 h 09:00 Uhr Astro-Funktion Jan.
  • Seite 17: Inbetriebnahme

    FUNKTION Dieser Modus ist nur für ausgebildetes Fachpersonal bestimmt! Im Menü FUNKTION haben Sie die Möglichkeit, folgende Funktionen einzu- stellen: • ROLLLADEN/JALOUSIE (Auswahl des Behanges) • LAUFZEIT • EXPERTEN MODUS • ERSTINBETRIEBNAHME (für Servicezwecke) EXPERTEN MODUS Ist Ihnen die Städteauswahl (EXPERTEN MODUS OFF) zu ungenau, können Sie eine Feineinstellung über den Längen- und Breiten-Grad einstellen (EX- PERTEN MODUS ON).
  • Seite 18: Werkseinstellung

    Werkseinstellung Durch Drücken der RESET-Taste (mit einem Kugelschreiber oder Ähnlichem) wird das Gerät in die Werkseinstellung zu- rückgesetzt. Ausnahme: Menü Funktion, Sprachauswahl und Städteaus- wahl. Der Sender bleibt im Empfänger eingelernt. UHR/DAT: aktuelle MEZ und aktuelles Datum PROGRAMM: SPERRZEIT Montag – Freitag (1-5) ASTRO ->...
  • Seite 19: Programmierung

    Programmierung Menüübersicht AUTO UHR/DAT PROGRAMM EINSTELLUNG FUNKTION UHR/DAT AUTO Drücken Sie die MENUE-Taste UHR/DAT erscheint. Um weitere Menüs auszuwählen, drücken Sie die +/- Tasten. Drücken Sie die MENUE-Taste, um in den Betriebsmodus zu gelangen. UHR/DAT (Uhrzeit und Datum einstellen) AUTO UHR/DAT UHRZEIT JAHR...
  • Seite 20 PROGRAMM PROG1/ ASTRO WOCHE (Astrofunktion für Woche + Sperrzeiten PROG1/ ASTRO BLOCK (Astrofunktion für Block1/2 + Sperrzeiten PROG1/ ASTRO EINZEL (Astrofunktion für Einzel + Sperrzeiten AUTO PROGRAMM PROG 1 ASTRO BLOCK SPERRZEIT SPERRZEIT SPERRZEIT SPERRZEIT PROGRAMM AUTO 1. Drücken Sie die MENUE-Taste. 2.
  • Seite 21 PROGRAMM PROG1/ ASTRO ABEND WOCHE (Astrofunktion Abend für Woche + Schalt- zeit + Sperrzeit PROG1/ ASTRO ABEND BLOCK (Astrofunktion Abend für Block1/2 + Schalt- zeit + Sperrzeit PROG1/ ASTRO ABEND EINZEL (Astrofunktion Abend für Einzel + Schaltzeit + Sperrzeit AUTO PROGRAMM PROG 1 ASTRO ABEND...
  • Seite 22 ASTRO ABEND Einzel Mit OK kommen Sie in den Menüpunkt EINZEL (1,2,3,4,5,6,7). Alle weiteren Eingaben beziehen sich jetzt auf jeden einzelnen Tag der Woche. 8. Mit den +/- Tasten, stellen Sie jetzt die SCHALTZEIT ein. Bestätigen Sie die Eingabe mit OK. 9.
  • Seite 23 INDIVIDUELL Block Mit OK kommen Sie in den Menüpunkt BLOCK (BLOCK 1 1-5, BLOCK 2 6,7). Alle weiteren Eingaben beziehen sich jetzt auf BLOCK 1 (1-5) und BLOCK 2 (6,7). INDIVIDUELL Einzel Mit OK kommen Sie in den Menüpunkt EINZEL (1,2,3,4,5,6,7). Alle weiteren Eingaben beziehen sich jetzt auf jeden einzelnen Tag der Woche.
  • Seite 24 PROGRAMM PROG2/ INDIVIDUELL WOCHE (Individuelle Schaltzeit für Woche) PROG2/ INDIVIDUELL BLOCK (Individuelle Schaltzeit für Block1/2) PROG2/ INDIVIDUELL EINZEL (Individuelle Schaltzeit für Einzel) AUTO PROGRAMM PROG 2 INDIVIDUELL WOCHE SCHALTZEIT SCHALTZEIT PROGRAMM AUTO 1. Drücken Sie die MENUE-Taste. 2. Um das Menü PROGAMM auszuwählen, drücken Sie die + Taste bis PRO- GAMM erscheint.
  • Seite 25 10. Drücken Sie die MENUE-Taste, um in den Betriebsmodus zu gelangen. PROGRAMM PROG2/OFFSET (z. B. Abfahrzeit Abend auf Lüftungsposition) AUTO PROGRAMM PROG 2 OFFSET OFFSET PROGRAMM AUTO 1. Drücken Sie die MENUE-Taste. 2. Um das Menü PROGAMM auszuwählen, drücken Sie die + Taste bis PRO- GAMM erscheint.
  • Seite 26 EINSTELLUNG URLAUB, LICHTSENSOR (Urlaub OFF/ON, Sonne/Dämmerung) AUTO EINSTELLUNG URLAUB SONNE DAEMMER 1. Drücken Sie die MENUE-Taste. 2. Um das Menü EINSTELLUNG auszuwählen, drücken Sie die + Taste bis EIN- STELLUNG erscheint. 3. Bestätigen Sie mit OK. 4. URLAUB ON / OFF erscheint. 5.
  • Seite 27 EINSTELLUNG ZWISCHENPOSITION, LUEFTUNG/WENDUNG, Prog1 ENDLAGE (Zeit/ Lageprogrammierung) LUEFTUNG ZWISCHENPOSITION PROG 1 ENDLAGE 1. Sie haben die Menüpunkte URLAUB/LICHTSENSOR bestätigt. ZWISCHEN- POSITION erscheint. 2. Mit der +/- Taste können Sie die Fahrzeit zur ZWISCHENPOSITION einstel- len. Die Angabe der Fahrzeit erfolgt in Sekunden oder Sie fahren die ZWI- SCHENPOSITION mit der AB-/AUF-Taste aus der oberen Endlage an.
  • Seite 28 EINSTELLUNG Prog2 ENDLAGE (Zeit/Lageprogrammierung) PROG 2 ENDLAGE Nur wenn in PROG2 eine Zeit eingestellt ist, wird Ihnen die- ses Dialogfenster angezeigt. 1. Sie haben den Menüpunkt PROG1 ENDLAGE bestätigt. PROG2 ENDLAGE erscheint. 2. Mit der +/- Taste können Sie zwischen PROG 2 ENDLAGE, PROG 2 ZWI- SCHENPOSITION und PROG 2 LUEFTUNG/WENDUNG auswählen.
  • Seite 29 EINSTELLUNG DEUTSCH/ ASTROVERSCHIEBUNG (Sprachauswahl, Astroverschie- bung) TEST MODUS DEUTSCH ASTROVERSCHIEBUNG ASTROVERSCHIEBUNG Nur wenn ein Lichtsensor im Gerät eingesteckt ist, wird Ih- nen der Menüpunkt TEST MODUS angezeigt. 1. Sie haben den Menüpunkt PROG2 ENDLAGE bestätigt. TEST MODUS ON/ OFF erscheint. 2.
  • Seite 30 EINSTELLUNG (Städteauswahl, EXPERTEN MODUS (LAENGE, BREITE, ZEITZONE) KASSEL LAENGE BREITE ZEITZONE 1. Sie haben die Funktion ASTROVERSCHIEBUNG bestätigt. Stadtauswahl (KASSEL) erscheint. 2. Mit der +/- Taste können Sie die nächstgelegene Stadt einstellen. 3. Betätigen Sie mit OK. Diese Dialogfenster werden nur angezeigt, wenn im Funkti- onsmenü...
  • Seite 31 FUNKTION ROLLLADEN/JALOUSIE, LAUFZEIT, ERSTINBETRIEBNAHME (Auswahl des Behanges, Laufzeit des Rollladens/Jalousie, Datum der Erstinbetrieb- nahme) AUTO FUNKTION ROLLLADEN LAUFZEIT FUNKTION AUTO EXPERTEN MODUS ERSTINBETRIEBNAHME 1. Drücken Sie die MENUE-Taste. 2. Um das Menü FUNKTION auszuwählen, drücken Sie die + Taste bis FUNK- TION erscheint.
  • Seite 32: Batteriewechsel

    Batteriewechsel Den entsprechenden Batterietyp entnehmen Sie bitte aus dem Kapitel „Technische Daten“.   Wechseln Sie die Batterien in- nerhalb einer Minute und drücken Sie dabei keine Tasten. Die einge- stellten Werte bleiben erhalten. 2. Entnehmen Sie die Batterien. 3. Legen Sie die neuen Batterien lagerichtig ein.
  • Seite 33: Technische Daten

    Technische Daten Nennspannung 3 V DC Batterietyp LR03 (AAA) Schutzart IP 20 Zulässige Umgebungstemperatur -10 bis +55 °C Montageart Wandaufbau Abgestrahlte maximale Sendeleistung ≤ 25 mW Funkfrequenz 868,3 MHz Die maximale Funkreichweite beträgt am und im Gebäude bis zu 25 m und im freien Feld bis zu 350 m.
  • Seite 34: Was Tun Wenn

    Was tun wenn...? Problem Abhilfe Antrieb läuft nicht. Neue Batterien einlegen. Batterien richtig einlegen. Antrieb läuft nicht, Sendekontroll- Entfernung zum Empfänger verrin- leuchte leuchtet. gern. Sender einlernen. Sendekontrollleuchte blinkt und im Neue Batterien einlegen. Display erscheint BATTERIE. Nach Batteriewechsel keine Reakti- RESET-Taste drücken.
  • Seite 35: Vereinfachte Eu-Konformitätserklärung

    Vereinfachte EU-Konformitätserklärung Hiermit erklärt Becker-Antriebe GmbH, dass diese Funkanlage der Richtlinie 2014/53/EU entspricht. Der vollständige Text der EU-Konformitätserklärung ist unter der folgenden In- ternetadresse verfügbar: www.becker-antriebe.de/ce Technische Änderungen vorbehalten. 35 - de...
  • Seite 36 Table of contents General .................... 37 Warranty .................... 37 Safety instructions .................. 38 Explanation of displays and buttons ............ 39 Intended use .................. 40 Programming the transmitter .............. 41 Installing the wall bracket................. 42 Light sensor.................... 42 Explanation of functions ................ 42 Settings .................... 48 Commissioning.................. 50 Factory setting.................. 51 Programming .................. 52 Changing batteries.................. 65 Cleaning.................... 65 Technical data .................. 66...
  • Seite 37: General

    General The radio timer for light sensor (hereinafter referred to as a transmitter) is already set with the current date and time (CET) on delivery and controls your drive automatically at the Astro times (sunrise and sunset times). Manual op- eration of the transmitter is possible at any time.
  • Seite 38: Safety Instructions

    Safety instructions General information • Please keep the instructions safe! • Only use in dry rooms. • Only use unmodified original parts from the control unit manufacturer. • Keep children away from control units. • Observe all pertinent country-specific regulations. •...
  • Seite 39: Explanation Of Displays And Buttons

    Explanation of displays and buttons Manual/Automatic slide switch UP button STOP button Transmission pilot light DOWN button Cover flap Buttons under the cover flap RESET button MENU button OK button - button + button Display symbols Setting Program Function Time/date Astro Text field Upward travel...
  • Seite 40: Intended Use

    Intended use The transmitter described by the present instructions must only be used for the operation of roller shutter and venetian blind installations. The connection of external devices must be carried out in consultation with specialist retailers. • Please note that radio-controlled systems may not be used in areas with a high risk of interference (e.g.
  • Seite 41: Programming The Transmitter

    Programming the transmitter 1) Programming the master transmitter a) Readying the receiver for programming The master transmitter refers to the very first transmitter programmed in a receiver. In contrast to subsequently pro- grammed transmitters, the master transmitter enables, among other things, the setting of limit positions and the programming or deleting of further transmitters.
  • Seite 42: Installing The Wall Bracket

    Installing the wall bracket   Ensure that the control unit is not installed or operated close to metal surfaces or magnetic fields. Radio-controlled systems transmitting on the same fre- quency may cause reception in- terference. Note that the range of the radio signal is limited by legis- lation as well as by design.
  • Seite 43 Venetian blind selection With the venetian blind function, the venetian blind runs in touch mode to facil- itate precise positioning of the laths. If you press a travel button for longer than 1 second, the venetian blind runs in maintained operation mode. After moving to the programmed intermediate and end positions, the laths automatically tilt (if the tilt position was programmed).
  • Seite 44: Menu Button

    MENU button By pressing the MENU button, you access the menu overview or Operating mode. The displayed value is not saved. RESET button By pressing the RESET button (with a ballpoint pen or similar), the unit is reset to its factory settings. Exception: Function, Language selection and City selection menu items.
  • Seite 45 ASTRO Automatically controls the roller shutter or the venetian blind at the sunrise and sunset times. These times are guidelines. Winter time Summer time Winter time 05:00 Sunrise 07:00 09:00 Jan. Feb. Mar. Apr. Jun. Jul. Aug. Sep. Oct. Nov. Dec.
  • Seite 46 INDIVIDUAL Controls opening and closing according to the switching times set by you. WEEK You set the same running times for Monday–Sunday (1–7) in the WEEK menu. BLOCK You set two blocks in the BLOCK menu. Block 1: sets the running times for Monday–Friday (1–5). Block 2: sets the running times for Saturday and Sunday (6,7).
  • Seite 47 Winter time Summer time Winter time 05:00 Sunrise Blocking time 07:00 09:00 Jan. Feb. Mar. Apr. Jun. Jul. Aug. Sep. Oct. Nov. Dec. 15:00 Blocking time 18:30 22:00 Sunset Winter time Summer time Winter time SWITCHING TIME Automatic opening and closing times for roller shutter and venetian blind. When --:-- is shown on the display (between 23:59 and 00:00), the switching time is not executed.
  • Seite 48: Settings

    Settings Setting menu SETTING In the SETTING menu, you have the following options: • HOLIDAY • SUN (if the sensor is connected) • TWILIGHT (if the sensor is connected) • INTERMEDIATE POSITION • VENTILATION/TILT • PROG1 (END POS, INTERM POS, VENT/TILT) •...
  • Seite 49 INTERMEDIATE POSITION The intermediate position is any roller shutter/venetian blind position of your choosing, situated between the upper and lower end position. Once pro- grammed, this position can be travelled to from the upper position. To do so, press the DOWN button briefly twice in succession. VENTILATION/TILT The ventilation/tilt position is any roller shutter/venetian blind position of your choosing, situated between the upper and lower end position.
  • Seite 50: Commissioning

    LONGITUDE/LATITUDE/TIME ZONE (only with EXPERT MODE ON) Find out your coordinates; e.g. using an atlas. SUMMER/WINTER SUMMER/WINTER denotes the automatic summer/winter time adjustment. Factory setting is ON; the unit adapts automatically. FUNCTION This mode is only intended for trained, specialist personnel! In the FUNCTION menu you can set the following functions: •...
  • Seite 51: Factory Setting

    Factory setting By pressing the RESET button (with a ballpoint pen or sim- ilar), the unit is reset to its factory settings. Exception: Function, Language selection and City selection menus. The transmitter remains programmed in the receiver. TIME/DATE: Current CET and current date PROGRAM: BLOCKING TIME Monday–Friday (1–5) ASTRO ->...
  • Seite 52: Programming

    Programming Menu overview AUTO TIME/DATE PROGRAM SETTING AUTO FUNCTION TIME/DATE Press the MENU button, TIME/DATE appears. To select additional menus, press the +/- buttons. Press the MENU button to switch to Operating mode. TIME/DATE (setting the time and date) AUTO TIME/DATE TIME YEAR...
  • Seite 53 PROGRAM PROG1/ ASTRO WEEK (Astro function for week + blocking times PROG1/ ASTRO BLOCK (Astro function for block1/2 + blocking times PROG1/ ASTRO INDIVIDUAL (Astro function for individual + blocking times AUTO PROGRAM PROG 1 ASTRO BLOCK BLOCKING TIME BLOCKING TIME BLOCKING TIME BLOCKING TIME PROGRAM...
  • Seite 54 PROGRAM PROG1/ ASTRO EVENING WEEK (Astro evening function for week + switch- ing time + blocking time PROG1/ ASTRO EVENING BLOCK (Astro evening function for block1/2 + switching time + blocking time PROG1/ ASTRO EVENING INDIVIDUAL (Astro evening function for individual + switching time + blocking time AUTO...
  • Seite 55 ASTRO EVENING individual Press OK to go to the INDIVIDUAL menu item (1,2,3,4,5,6,7). All further inputs will be applied to each day of the week individually. 8. You can now set the SWITCHING TIME using the +/- buttons. Confirm the setting with OK.
  • Seite 56 PROGRAM PROG1/ INDIVIDUAL WEEK (individual switching time for week) PROG1/ INDIVIDUAL BLOCK (individual switching time for block1/2) PROG1/ INDIVIDUAL INDIVIDUAL (individual switching time for indi- vidual) AUTO PROGRAM PROG 1 INDIVIDUAL WEEK SWITCHING TIME SWITCHING TIME PROGRAM AUTO 1. Press the MENU button. 2.
  • Seite 57 PROGRAM PROG2/ INDIVIDUAL WEEK (individual switching time for week) PROG2/ INDIVIDUAL BLOCK (individual switching time for block1/2) PROG2/ INDIVIDUAL INDIVIDUAL (individual switching time for indi- vidual) AUTO PROGRAM PROG 2 INDIVIDUAL WEEK SWITCHING TIME SWITCHING TIME PROGRAM AUTO 1. Press the MENU button. 2.
  • Seite 58 PROGRAM PROG2/OFFSET (e.g. evening closing time to ventilation position) AUTO PROGRAM PROG 2 OFFSET OFFSET PROGRAM AUTO 1. Press the MENU button. 2. To select the PROGRAM menu, press the + button until PROGRAM appears. 3. Confirm with OK. 4. Press the + button until PROG2 appears. 5.
  • Seite 59 SETTING HOLIDAY, LIGHT SENSOR (holiday OFF/ON, sun/twilight) AUTO SETTING HOLIDAY TWILIGHT 1. Press the MENU button. 2. To select the SETTING menu, press the + button until SETTING appears. 3. Confirm with OK. 4. HOLIDAY ON/OFF appears. 5. You can switch the holiday function to ON or OFF using the +/- buttons. 6.
  • Seite 60 SETTING INTERMEDIATE POSITION, VENTILATION/TILT, Prog1 END POS (time/ position programming) VENTILATION PROG 1 END POS INTERMEDIATE POSITION 1. You have confirmed the HOLIDAY/LIGHT SENSOR menu items. INTERMEDI- ATE POSITION appears. 2. You can set the INTERMEDIATE POSITION running time using the +/- but- ton.
  • Seite 61 SETTING Prog2 END POS (time/position programming) PROG 2 END POS You will only see this interactive window if a time is set in PROG2. 1. You have confirmed the menu item PROG1 END POS. PROG2 END POS ap- pears. 2. You can choose between PROG 2 END POS, PROG 2 INTERM POS and PROG 2 VENT/TILT using the +/- button.
  • Seite 62 SETTING ENGLISH/ASTRO SHIFT (Language selection, Astro shift) TEST MODE ENGLISH ASTRO SHIFT ASTRO SHIFT You will only see the menu item TEST MODE if a light sensor is connected to the device. 1. You have confirmed the PROG2 END POS menu item. TEST MODE ON/OFF appears.
  • Seite 63 SETTING (City selection, EXPERT MODE (LONGITUDE, LATITUDE, TIME ZONE) LONDON LONGITUDE LATITUDE TIME ZONE 1. You have confirmed the function ASTRO SHIFT . City selection (LONDON) appears. 2. You can set the nearest city using the +/- button. 3. Confirm with OK. This interactive window only appears if EXPERT MODE is set to ON in the Function menu.
  • Seite 64 FUNCTION ROLLER SHUTTER/VENETIAN BLIND, RUNNING TIME, INITIAL OPERA- TION (Selection of the shading solution, running time of roller shutter/venetian blind, date of initial operation) AUTO FUNCTION ROLLER SHUTTER RUNNING TIME FUNCTION AUTO EXPERT MODE INITIAL OPERATION 1. Press the MENU button. 2.
  • Seite 65: Changing Batteries

    Changing batteries You will find the appropriate battery type in the "Technical data" chapter.   Change the batteries within a minute and do not press any but- tons in the process. The saved values are retained. 2. Take out the batteries. 3.
  • Seite 66: Technical Data

    Technical data Rated voltage 3 V DC Battery type LR03 (AAA) Degree of protection IP 20 Permissible ambient temperature -10 to +55°C Type of mounting Wall mounting Maximum emitted transmission output ≤ 25 mW Radio frequency 868.3 MHz The maximum transmitter range on and in the building is up to 25 m, and up to 350 m in the open.
  • Seite 67: Simplified Eu Declaration Of Conformity

    Set limit position in the PROG1/2 set- ting menu. Simplified EU declaration of conformity Becker-Antriebe GmbH hereby declares that this radio control system com- plies with Directive 2014/53/EU. The full text of the EU declaration of conformity is available at the following web address: www.becker-antriebe.com/ce...
  • Seite 68 Sommaire Généralités..................... 69 Garantie .................... 69 Consignes de sécurité................ 70 Description des affichages et des touches .......... 71 Utilisation conforme ................ 72 Programmation radio ................ 73 Montage du support mural............... 74 Capteur de lumière ................. 74 Description du fonctionnement .............. 74 Réglages.................... 80 Mise en service.................. 83 Réglages usine .................. 84 Programmation.................. 85 Remplacement des piles ............... 101 Nettoyage .................... 101 Caractéristiques techniques .............. 102...
  • Seite 69: Généralités

    Généralités L’horloge radio pour le capteur de lumière (désigné ci-après par émetteur), dont la date et l’heure actuelles (HEC) sont réglées à l’usine, commande auto- matiquement les heures astro (heures de lever et de coucher du soleil). Il est possible de commander l’émetteur manuellement à tout moment. Le capteur de lumière facile à...
  • Seite 70: Consignes De Sécurité

    Lorsqu’ils utilisent nos produits, les fabricants des produits finis et les installa- teurs doivent impérativement tenir compte et respecter toutes les dispositions légales et administratives nécessaires, en particulier les dispositions relatives à la compatibilité électromagnétique actuellement en vigueur, notamment en ce qui concerne la production du produit fini, l’installation et le service clien- tèle.
  • Seite 71: Description Des Affichages Et Des Touches

    Description des affichages et des touches Curseur manuel/ automatique Touche MONTÉE Touche ARRÊT Voyant de contrôle d’émission Touche DESCENTE Capot de protection Touches situées sous le capot de protection Touche RESET Touche MENU Touche OK Touche - Touche + Symboles d’affichage Réglage Programme Fonction...
  • Seite 72: Utilisation Conforme

    Utilisation conforme L’émetteur décrit dans la présente notice doit être uniquement utilisé pour le pilotage d’installations de volet roulant et de store vénitien. Le branchement d’appareils d’autres marques doit se faire en concertation avec un revendeur spécialisé. • Sachez qu’il est interdit d’utiliser les installations radio dans des zones où...
  • Seite 73: Programmation Radio

    Programmation radio 1) Programmation de l’émetteur maître a) Mise en mode de programmation du récepteur L’émetteur maître est le premier émetteur programmé dans un récepteur. Contrairement aux autres émetteurs program- més, l’émetteur maître permet entre autres le réglage des positions de fin de course (pour les moteurs avec récepteur radio intégré) et la programmation ou l’effacement d’autres émetteurs.
  • Seite 74: Montage Du Support Mural

    Montage du support mural   Veillez à ce que la commande ne soit pas installée ni utilisée à proximité de surfaces métalliques ou de champs magnétiques. Les installations radio qui émettent sur la même fréquence peuvent causer une perturbation de la ré- ception.
  • Seite 75 Sélection du store vénitien Lors du fonctionnement comme store vénitien, le store vénitien se déplace en mode pas à pas pour permettre le positionnement exact des lames. Maintenez enfoncée une touche de déplacement pendant plus de 1 seconde pour dépla- cer le store vénitien en autoentretien. Après le déplacement vers les positions intermédiaire et de fin de course pro- grammées, les lames s’inversent automatiquement (lorsque la position d’in- version a été...
  • Seite 76: Touche Menu

    Touches +/- Les touches + et - permettent d’exécuter les commandes suivantes : • Menu -> Modifier la valeur • Fonctionnement automatique -> Consulter les informations : ∙ Touche + -> Prochain horaire de commutation automatique ∙ Touche - -> Prochain horaire de commutation automatique ∙...
  • Seite 77 2. PROG 2 (par ex. sieste de midi) • Individuel ∙ Semaine (1-7) ∙ Bloc 1/2 (1-5 et 6,7) ∙ Seul (1, 2, 3, 4, 5, 6, 7) OFFSET ASTRO Actionne automatiquement le volet roulant ou le store vénitien aux heures de lever et de coucher du soleil.
  • Seite 78 ASTRO SOIR Commande la montée selon l’horaire de commutation réglé. Descente selon la fonction astro. Heure d’hiver Heure d’été Heure d’hiver 05h00 Lever du soleil 07h00 09h00 Jan. Fév. Mars Avr. Juin Juil. Août Sep. Oct. Nov. Déc. 15h00 18h30 22h00 Coucher du soleil Heure d’hiver...
  • Seite 79 HEURE DE BLOCAGE Permet d’éviter que le volet roulant ne monte et ne descende trop tôt en rai- son de la fonction astro. Exemple : Heure astro  : 5:30 Heure de blocage  : 6:00 Le volet roulant ne monte pas avant 6h00. Heure astro  : 17:00 Heure de blocage...
  • Seite 80: Réglages

    OFFSET Le menu OFFSET vous permet de programmer un horaire de commutation supplémentaire. Celui-ci dépend de l’horaire de commutation PROG 1 (+/- 240 minutes maxi.). Exemple : Heure astro  : 20:00 Offset  : +60 minutes Le volet roulant se déplace à 20h00 en position d’aération et à 21h00 en posi- tion de fin de course inférieure.
  • Seite 81 • DÉCALAGE ASTRO • Sélection de la ville (PARIS) • LONGITUDE (ne s’affiche que lorsque le mode EXPERT est en position • LATITUDE (ne s’affiche que lorsque le mode EXPERT est en position ON) • FUSEAU HORAIRE (ne s’affiche que lorsque le mode EXPERT est en po- sition ON) •...
  • Seite 82 DÉCALAGE ASTRO Le réglage du décalage astro permet de décaler l’heure astro et l’heure as- indépendamment l’une de l’autre (+/- 120 minutes maxi.). Heure d’hiver Heure d’été Heure d’hiver 05h00 Lever du soleil 07h00 Ouvrez par ex. 1 heure après le lever du soleil avec un décalage astro de +1 h 09h00 Fonction astro...
  • Seite 83: Mise En Service

    FONCTION Ce mode n’est conçu que pour des personnes qualifiées et formées ! Le menu FONCTION vous offre la possibilité de régler les fonctions suivantes : • VOLET ROULANT/STORE VÉNITIEN (sélection du tablier/de la toile) • TEMPS DE FONCTIONNEMENT • MODE EXPERT •...
  • Seite 84: Réglages Usine

    Réglages usine En actionnant la touche RESET (avec un stylo ou un objet si- milaire), les réglages usine de l’appareil sont réinitialisés. Exception : menu Fonction, sélection de la langue et sélec- tion de la ville. L’émetteur reste programmé dans le récepteur. HEURE/DATE : HEC actuelle et date actuelle PROGRAMME :...
  • Seite 85: Programmation

    Programmation Aperçu du menu AUTO HEURE/DATE PROGRAMME REGLAGE AUTO FONCTION HEURE/DATE Appuyez sur la touche MENU ; HEURE/DATE apparaît. Pour sélectionner des menus supplémentaires, appuyez sur les touches +/-. Appuyez sur la touche MENU pour accéder au mode de fonctionnement. HEURE/DATE (régler l’heure et la date) AUTO HEURE/DATE HEURE...
  • Seite 86 PROGRAMME PROG 1/ ASTRO SEMAINE (fonction astro pour la semaine + heures de blo- cage PROG 1/ ASTRO BLOC (fonction astro pour bloc 1/2 + heures de blocage PROG 1/ ASTRO SEUL (fonction astro pour seul + heures de blocage AUTO PROGRAMME PROG 1...
  • Seite 87 ASTRO seul En appuyant sur la touche OK, vous accédez à l’option de menu SEUL (1,2,3,4,5,6,7). Toutes les autres entrées s’appliquent maintenant aux diffé- rents jours de la semaine. 8. Les touches +/- vous permettent maintenant de régler L’HEURE DE BLO- CAGE et L’HEURE DE BLOCAGE ...
  • Seite 88 PROGRAMME PROG 1/ ASTRO SOIR SEMAINE (fonction astro soir pour la semaine + ho- raire de commutation + heure de blocage  ) PROG 1/ ASTRO SOIR BLOC (fonction astro soir pour bloc 1/2 + horaire de commutation + heure de blocage  ) PROG 1/ ASTRO SOIR SEUL (fonction astro soir pour seul + horaire de com- mutation + heure de blocage ...
  • Seite 89 ASTRO SOIR seul En appuyant sur la touche OK, vous accédez à l’option de menu SEUL (1,2,3,4,5,6,7). Toutes les autres entrées s’appliquent maintenant aux diffé- rents jours de la semaine. 8. Les touches +/- vous permettent maintenant de régler L’HORAIRE DE COMMUTATION .
  • Seite 90 PROGRAMME PROG 1/ INDIVIDUEL SEMAINE (horaire de commutation individuel pour la semaine) PROG 1/ INDIVIDUEL BLOC (horaire de commutation individuel pour bloc 1/2) PROG 1/ INDIVIDUEL SEUL (horaire de commutation individuel pour seul) AUTO PROGRAMME PROG 1 INDIVIDUEL SEMAINE PROGRAMME HORAIRE DE COMMUTATION HORAIRE DE COMMUTATION AUTO...
  • Seite 91 INDIVIDUEL seul En appuyant sur la touche OK, vous accédez à l’option de menu SEUL (1,2,3,4,5,6,7). Toutes les autres entrées s’appliquent maintenant aux diffé- rents jours de la semaine. 8. Les touches +/- vous permettent maintenant de régler L’HORAIRE DE COMMUTATION et L’HORAIRE DE COMMUTATION ...
  • Seite 92 PROGRAMME PROG 2/ INDIVIDUEL SEMAINE (horaire de commutation individuel pour la semaine) PROG 2/ INDIVIDUEL BLOC (horaire de commutation individuel pour bloc 1/2) PROG 2/ INDIVIDUEL SEUL (horaire de commutation individuel pour seul) AUTO PROGRAMME PROG 2 INDIVIDUEL SEMAINE PROGRAMME HORAIRE DE COMMUTATION HORAIRE DE COMMUTATION AUTO...
  • Seite 93 INDIVIDUEL seul En appuyant sur la touche OK, vous accédez à l’option de menu SEUL (1,2,3,4,5,6,7). Toutes les autres entrées s’appliquent maintenant aux diffé- rents jours de la semaine. 9. Les touches +/- vous permettent maintenant de régler L’HORAIRE DE COMMUTATION et L’HORAIRE DE COMMUTATION ...
  • Seite 94 RÉGLAGE VACANCES, CAPTEUR LUMIÈRE (vacances OFF/ON, soleil/crépuscule) AUTO RÉGLAGE VACANCES SOLEIL CRÉPUSCULE 1. Appuyez sur la touche MENU. 2. Pour sélectionner le menu RÉGLAGE, appuyez sur la touche + jusqu’à ce que RÉGLAGE apparaisse. 3. Confirmez en appuyant sur OK. 4. VACANCES ON / OFF apparaît. 5.
  • Seite 95 RÉGLAGE POS. INTERM, AÉRATION/INVERSION, PROG 1 POS. FINALE (program- mation de l’heure/de la position) AÉRATION POS. INTERM PROG 1 POS. FINALE 1. Vous avez confirmé les options de menu VACANCES/CAPTEUR LUMIÈRE. POS. INTERM apparaît. 2. Les touches +/- vous permettent de régler l’horaire de déplacement vers la POS.
  • Seite 96 RÉGLAGE PROG 2 POS. FINALE (programmation de l’heure/de la position) PROG 2 POS. FINALE Cette boîte de dialogue n’apparaît que lorsqu’une heure est réglée dans PROG 2. 1. Vous avez confirmé l’option de menu PROG 1 POS. FINALE. PROG 2 POS. FINALE apparaît.
  • Seite 97 RÉGLAGE FRANCE/ DÉCALAGE ASTRO (sélection de la langue, décalage astro) MODE TEST FRANCE DÉCALAGE ASTRO DÉCALAGE ASTRO L’option de menu MODE TEST n’apparaît qu’en cas de bran- chement d’un capteur de lumière dans l’appareil. 1. Vous avez confirmé l’option de menu PROG 2 POS. FINALE. MODE TEST ON/OFF apparaît.
  • Seite 98 RÉGLAGE (Sélection de la ville, MODE EXPERT (LONGITUDE, LATITUDE, FUSEAU HO- RAIRE)) FUSEAU HORAIRE PARIS LONGITUDE LATITUDE 1. Vous avez confirmé la fonction DÉCALAGE ASTRO . Sélection de la ville (PARIS) apparaît. 2. Les touches +/- vous permettent de régler la ville la plus proche. 3.
  • Seite 99 RÉGLAGE ÉTÉ/HIVER (passage automatique à l’heure d’été et d’hiver) ÉTÉ/HIVER AUTO RÉGLAGE 1. Vous avez confirmé la fonction FUSEAU HORAIRE. ÉTÉ/HIVER apparaît. 2. Les touches +/- vous permettent d’activer ou de désactiver ÉTÉ/HIVER. 3. Confirmez votre sélection avec OK. 4. Appuyez sur la touche MENU pour accéder au mode de fonctionnement. 99 - fr...
  • Seite 100 FONCTION VOLET ROULANT/STORE VÉNITIEN, TEMPS DE FONCTIONNEMENT, 1- IÈRE MISE EN SERVICE (sélection du tablier/de la toile, temps de fonction- nement du volet roulant/store vénitien, date de la première mise en service) AUTO FONCTION VOLET ROULANT TEMPS DE FONCTIONNEMENT FONCTION AUTO MODE EXPERT 1IÈRE MISE EN SERVICE...
  • Seite 101: Remplacement Des Piles

    Remplacement des piles Le type de pile correspondant est indiqué dans le chapitre « Caractéristiques techniques ».   Remplacez les batteries dans un laps de temps d’une minute en veillant à n’appuyer sur aucune touche. Les valeurs réglées sont conservées. 2. Retirez les piles. 3.
  • Seite 102: Caractéristiques Techniques

    Caractéristiques techniques Tension nominale 3 V CC Type de piles LR03 (AAA) Type de protection IP 20 Température ambiante admissible -10 à +55 °C Type de montage Montage mural Puissance d’émission maximale émise ≤ 25 mW Fréquence radio 868,3 MHz La portée radio maximale peut aller jusqu’à 25 m en intérieur et jusqu’à 350 m en extérieur.
  • Seite 103: Déclaration De Conformité Ue Simplifiée

    PROG 1/2. Déclaration de conformité UE simplifiée La société Becker-Antriebe GmbH atteste par la présente que cette installa- tion radio satisfait aux exigences de la directive 2014/53/UE. Le texte intégral de la déclaration de conformité UE est disponible sur Internet à...
  • Seite 104 Inhoudsopgave Algemeen..................... 105 Garantieverlening ................. 105 Veiligheidsaanwijzingen................. 106 Verklaring van aanduidingen en toetsen.......... 107 Doelmatig gebruik................. 108 Draadloze besturing programmeren ............ 109 Montage wandhouder ................ 110 Lichtsensor .................. 110 Functiebeschrijving ................ 111 Instellingen................... 116 Ingebruikname .................. 119 Fabrieksinstelling .................. 120 Programmering .................. 121 Batterijen vervangen ................ 136 Schoonmaken .................. 136 Technische gegevens ................ 137 Wat doen, wanneer...?................ 138 Vereenvoudigde EU-verklaring van overeenstemming...... 139 104 - nl...
  • Seite 105: Algemeen

    Algemeen De af de fabriek met actuele datum en tijd (MET) geleverde draadloze scha- kelklok voor de lichtsensor (hierna "zender" genoemd) bestuurt de buismotor automatisch op de Astro-tijden (zonsopkomst- en zonsondergangstijden). Een handmatige bediening van de zender is op elk moment mogelijk. Door de eenvoudig aan te brengen lichtsensor kan de zender worden uitge- breid naar een comfortabele zonweringsbesturing (schaduw leveren voor planten en meubels).
  • Seite 106: Veiligheidsaanwijzingen

    De fabrikant van het eindproduct en de installateur dienen erop te letten dat bij gebruik van onze producten aan alle noodzakelijke wettelijke en officiële voor- schriften aandacht wordt besteed en dat deze worden opgevolgd. Dit betreft de fabricage van het eindproduct, de installatie en het advies aan de klant en geldt vooral voor de daarop betrekking hebbende actuele EMC-voorschriften.
  • Seite 107: Verklaring Van Aanduidingen En Toetsen

    Verklaring van aanduidingen en toetsen Schuifschakelaar hand/automatisch OP-toets STOP-toets Zend- controlelampje NEER-toets Afdekklep Toetsen onder de afdekklep RESET-toets MENU-toets OK-toets - toets + toets Displaysymbolen Instelling Programma Functie Tijd/datum Astro Tekstregel Omhoog lopen Cijferindicatie Omlaag lopen Weekdagen (ma-zo) Achterkant apparaat Programmeertoets 107 - nl...
  • Seite 108: Doelmatig Gebruik

    Doelmatig gebruik De zender in deze gebruiksaanwijzing mag uitsluitend worden gebruikt voor de aansturing van rolluiken en jaloezieën. De aansluiting van apparaten van der- den moet in overleg met de dealer worden uitgevoerd. • Let erop dat draadloze installaties niet in gebieden met een verhoogd ri- sico op storingen gebruikt mogen worden (bijv.
  • Seite 109: Draadloze Besturing Programmeren

    Draadloze besturing programmeren 1) Masterzender programmeren a) Ontvanger in de programmeermodus zetten Met de masterzender wordt de eerste in een ontvanger ge- programmeerde zender bedoeld. In tegenstelling tot andere erbij geprogrammeerde zenders is het met de masterzender o.a. mogelijk de eindposities in te stellen (bij buismotoren met geïntegreerde draadloze ontvanger) en andere zenders bij te programmeren of te wissen.
  • Seite 110: Montage Wandhouder

    Montage wandhouder   Let erop dat de besturing niet in het bereik van metalen opper- vlakken of magnetische velden wordt geïnstalleerd en gebruikt. Draadloze installaties die op de- zelfde frequentie zenden, kunnen aanleiding geven tot storing van de ontvangst. Houd er rekening mee dat de reikwijdte van het ra- diosignaal door de wetgever en door bouwkundige maatregelen is...
  • Seite 111: Functiebeschrijving

    Functiebeschrijving Rolluikkeuze Bij de rolluik-functie loopt het rolluik na bediening van een bewegingstoets in zelfvergrendeling. Jaloeziekeuze Bij de jaloezie-functie loopt de jaloezie in tipbedrijf om een nauwkeurige plaat- sing van de lamellen mogelijk te maken. Als u langer dan 1 seconde op een bewegingstoets drukt, dan loopt de jaloezie in zelfvergrendeling.
  • Seite 112 +/- toetsen De volgende bedieningen zijn via + en - mogelijk: • Menu -> waarde veranderen • Auto-modus -> informatie opvragen: ∙ + toets -> volgende automatische schakeltijd ∙ - toets -> volgende automatische schakeltijd ∙ + toets en OK-toets vasthouden -> Astro-tijd ∙...
  • Seite 113 2. PROG2 (bijv. middagdutje) • Individueel ∙ Week (1-7) ∙ Blok 1/2 (1-5 en 6,7) ∙ Afzonderlijk (1, 2, 3, 4, 5, 6, 7) OFFSET ASTRO Bestuurt automatisch het rolluik of de jaloezie op de zonsopkomst- en zonson- dergangstijden. Deze tijden gelden als richtwaarden. Wintertijd Zomertijd Wintertijd...
  • Seite 114 ASTRO AVOND Bestuurt het omhooglopen volgens de ingestelde schakeltijd. Omlaaglopen volgens Astro-functie. Wintertijd Zomertijd Wintertijd 5:00 uur Zonsopkomst 7:00 uur 9:00 uur jan. feb. mrt. apr. juni juli aug. sept. okt. nov. dec. 15:00 uur 18:30 uur 22:00 uur Zonsondergang Wintertijd Zomertijd Wintertijd...
  • Seite 115 SPERTIJD Verhindert een te vroeg omhoog- en omlaaglopen van het rolluik door de As- tro-functie. Voorbeeld: Astro-tijd : 5:30 Spertijd : 6:00 Het rolluik loopt niet vóór 6:00 omhoog. Astro-tijd : 17:00 Spertijd : 18:00 Het rolluik loopt niet vóór 18:00 omlaag. Wintertijd Zomertijd Wintertijd...
  • Seite 116: Instellingen

    OFFSET Met het menu OFFSET kan een extra schakeltijd geprogrammeerd worden. Deze is afhankelijk van de PROG1 schakeltijd (max. +/- 240 min.). Voorbeeld: Astro-tijd : 20:00 Offset : +60 min. Het rolluik loopt om 20.00 uur naar ventilatiepositie en om 21.00 uur naar de onderste eindpositie.
  • Seite 117 • Locatiekeuze (Amsterdam) • LENGTEGRAAD (verschijnt alleen bij EXPERT-MOD ON) • BREEDTEGRAAD (verschijnt alleen bij EXPERT-MOD ON) • TIJDZONE (verschijnt alleen bij EXPERT-MOD ON) • ZO/WI (automatisch omschakelen zomer-/wintertijd) Om instellingen uit te kunnen voeren, drukt u zo vaak op de OK-toets tot u bij het gewenste menupunt komt.
  • Seite 118 ASTROVERSCHUIVING Door de instelling van de astroverschuiving kunnen de Astro-tijd en Astro- tijd onafhankelijk van elkaar verschoven worden (max. +/- 120 min.). Wintertijd Zomertijd Wintertijd 5:00 uur Zonsopkomst 7:00 uur Sluiten bijv. 1 uur na zonsopkomst bij astroverschuiving van +1 u 9:00 uur Astro-functie jan.
  • Seite 119: Ingebruikname

    FUNCTIE Deze modus is uitsluitend bestemd voor geschoold personeel! In het menu FUNCTIE kunt u de volgende functies instellen: • ROLLUIK/JALOEZIE (keuze van rolluikpantser/zonwering) • LOOPTIJD • EXPERT MODUS • EERSTE INGEBRUIKNAME (voor servicedoeleinden) EXPERT MODUS Als de locatiekeuze (EXPERT MODUS OFF) voor u te onnauwkeurig is, kunt u uw keuze verfijnen door de lengte- en breedtegraad in te stellen (EXPERT MO- DUS ON).
  • Seite 120: Fabrieksinstelling

    Fabrieksinstelling Door op de RESET-toets te drukken (met een balpen o.i.d.) wordt het apparaat teruggezet naar de fabrieksinstelling. Uitzondering: menu Functie, Taalkeuze en Locatiekeuze. De zender blijft in ontvanger geprogrammeerd. TIJD/DAT: actuele tijd (MET) en datum PROGRAMMA: SPERTIJD maandag – vrijdag (1-5) ASTRO ->...
  • Seite 121: Programmering

    Programmering Menu-overzicht AUTO TIJD/DAT PROGRAMMA INSTELLING AUTO FUNCTIE TIJD/DAT Druk op de MENU-toets, TIJD/DAT verschijnt. Om verdere menu's te selecteren, drukt u op de +/- toetsen. Druk op de MENU-toets, om in de gebruiksmodus te komen. TIJD/DAT (tijd en datum instellen) AUTO TIJD/DAT TIJD...
  • Seite 122 PROGRAMMA PROG1 / ASTRO WEEK (Astro-functie voor week + spertijden PROG1/ ASTRO BLOK (Astro-functie voor blok 1/2 + spertijden PROG1/ ASTRO AFZONDERLIJK (Astro-functie voor afzonderlijk + spertij- AUTO PROGRAMMA PROG1 ASTRO BLOK SPERTIJD SPERTIJD SPERTIJD SPERTIJD PROGRAMMA AUTO 1. Druk op de MENU-toets. 2.
  • Seite 123 ASTRO afzonderlijk Met OK komt u in het menupunt AFZONDERLIJK (1,2,3,4,5,6,7). Alle verdere ingevoerde gegevens hebben nu betrekking op elke afzonderlijke dag van de week. 8. Met de +/- toetsen stelt u nu de SPERTIJD en de SPERTIJD in. Beves- tig elke invoer met OK.
  • Seite 124 PROGRAMMA PROG1/ ASTRO AVOND WEEK (Astro-functie avond voor week + schakeltijd + spertijd PROG1/ ASTRO AVOND BLOK (Astro-functie avond voor blok 1/2 + schakel- tijd + spertijd PROG1/ ASTRO AVOND AFZONDERLIJK (Astro-functie avond voor afzon- derlijk + schakeltijd + spertijd AUTO PROGRAMMA PROG1...
  • Seite 125 ASTRO AVOND afzonderlijk Met OK komt u in het menupunt AFZONDERLIJK (1,2,3,4,5,6,7). Alle verdere ingevoerde gegevens hebben nu betrekking op elke afzonderlijke dag van de week. 8. Met de +/- toetsen stelt u nu de SCHAKELTIJD in. Bevestig de invoer met 9.
  • Seite 126 PROGRAMMA PROG1/ INDIVIDUEEL WEEK (individuele schakeltijd voor week) PROG1/ INDIVIDUEEL BLOK (individuele schakeltijd voor blok 1/2) PROG1/ INDIVIDUEEL AFZONDERLIJK (individuele schakeltijd voor Af- zonderlijk) AUTO PROGRAMMA PROG1 INDIVIDUEEL WEEK SCHAKELTIJD SCHAKELTIJD PROGRAMMA AUTO 1. Druk op de MENU-toets. 2. Om het menu PROGRAMMA te selecteren, drukt u op de + toets tot PRO- GRAMMA verschijnt.
  • Seite 127 INDIVIDUEEL afzonderlijk Met OK komt u in het menupunt AFZONDERLIJK (1,2,3,4,5,6,7). Alle verdere ingevoerde gegevens hebben nu betrekking op elke afzonderlijke dag van de week. 8. Met de +/- toetsen stelt u nu de SCHAKELTIJD en de SCHAKELTIJD Bevestig elke invoer met OK. 9.
  • Seite 128 PROGRAMMA PROG2/ INDIVIDUEEL WEEK (individuele schakeltijd voor week) PROG2/ INDIVIDUEEL BLOK (individuele schakeltijd voor blok 1/2) PROG2/ INDIVIDUEEL AFZONDERLIJK (individuele schakeltijd voor Af- zonderlijk) AUTO PROGRAMMA PROG2 INDIVIDUEEL WEEK SCHAKELTIJD SCHAKELTIJD PROGRAMMA AUTO 1. Druk op de MENU-toets. 2. Om het menu PROGRAMMA te selecteren, drukt u op de + toets tot PRO- GRAMMA verschijnt.
  • Seite 129 INDIVIDUEEL afzonderlijk Met OK komt u in het menupunt AFZONDERLIJK (1,2,3,4,5,6,7). Alle verdere ingevoerde gegevens hebben nu betrekking op elke afzonderlijke dag van de week. 9. Met de +/- toetsen stelt u nu de SCHAKELTIJD en de SCHAKELTIJD Bevestig elke invoer met OK. 10.
  • Seite 130 INSTELLING VAKANTIE, LICHTSENSOR (vakantie OFF/ON, zon/schemering) AUTO INSTELLING VAKANTIE SCHEMER 1. Druk op de MENU-toets. 2. Om het menu INSTELLING te selecteren, drukt u op de + toets tot INSTEL- LING verschijnt. 3. Bevestig met OK. 4. VAKANTIE ON/OFF verschijnt. 5.
  • Seite 131 INSTELLING TUSSENPOSITIE, VENTILATIE/KANTELING, Prog1 EINDSTAND (tijd/posi- tieprogrammering) VENTILATIE TUSSENPOSITIE PROG1 EINDSTAND 1. U heeft de menupunten VAKANTIE/LICHTSENSOR bevestigd. TUSSENPO- SITIE verschijnt. 2. Met de +/- toets kunt u de looptijd naar de TUSSENPOSITIE instellen. De looptijd wordt in seconden aangegeven of u loopt met de NEER-/OP-toets vanuit de bovenste eindpositie de TUSSENPOSITIE aan.
  • Seite 132 INSTELLING Prog2 EINDSTAND (tijd/positieprogrammering) PROG2 EINDSTAND Alleen wanneer in PROG2 een tijd is ingesteld, verschijnt dit dialoogvenster. 1. U heeft het menupunt PROG1 EINDSTAND bevestigd. PROG2 EINDSTAND verschijnt. 2. Met de +/- toets kunt u kiezen uit PROG2 EINDSTAND, PROG2 TUSSENPO- SITIE en PROG2 VENTILATIE/KANTELEN.
  • Seite 133 INSTELLING NEDERLANDS/ASTROVERSCHUIVING (taalkeuze, astroverschuiving) TEST MODUS NEDERLANDS ASTROVERSCHUIVING ASTROVERSCHUIVING Alleen wanneer een lichtsensor in het apparaat is ingesto- ken, verschijnt het menupunt TEST MODUS. 1. U heeft het menupunt PROG2 EINDSTAND bevestigd. TEST MODUS ON/ OFF verschijnt. 2. Met de +/- toets kunt u de TEST MODUS activeren of deactiveren (ON/ OFF).
  • Seite 134 INSTELLING (locatiekeuze, EXPERT MODUS (LENGTEGRAAD, BREEDTEGRAAD, TIJDZO- AMSTERDAM LENGTEGRAAD BREEDTEGRAAD TIJDZONE 1. U heeft de functie ASTROVERSCHUIVING bevestigd. Locatiekeuze (Am- sterdam) verschijnt. 2. Met de +/- toets kunt u de dichtstbijgelegen stad instellen. 3. Bevestig met OK. Deze dialoogvensters verschijnen alleen, wanneer in het functiemenu de EXPERT MODUS op ON staat.
  • Seite 135 FUNCTIE ROLLUIK/JALOEZIE, LOOPTIJD, EERSTE INGEBRUIKNAME (keuze van rolluikpantser/zonwering, looptijd van het rolluik/jaloezie, datum van eerste in- gebruikname) AUTO FUNCTIE ROLLUIK LOOPTIJD FUNCTIE AUTO EXPERT MODUS EERSTE INGEBRUIKNAME 1. Druk op de MENU-toets. 2. Om het menu FUNCTIE te selecteren, drukt u op de + toets tot FUNCTIE verschijnt.
  • Seite 136: Batterijen Vervangen

    Batterijen vervangen Het desbetreffende batterijtype vindt u in het hoofdstuk 'Technische gegevens'.   Vervang de batterijen binnen één minuut en druk daarbij op geen enkele toets. De ingestelde waarden blijven behouden. 2. Verwijder de batterijen. 3. Plaats de nieuwe batterijen op cor- recte wijze.
  • Seite 137: Technische Gegevens

    Technische gegevens Nominale spanning 3 V DC Batterijtype LR03 (AAA) Beschermklasse IP 20 Toegestane omgevingstemperatuur -10 tot +55 °C Montagesoort Wandopbouw Uitgezonden maximaal zendvermogen ≤ 25 mW Radiofrequentie 868,3 MHz De maximale reikwijdte van het radiosignaal bedraagt bij en in het gebouw tot 25 m en in het vrije veld tot 350 m.
  • Seite 138: Wat Doen, Wanneer

    Wat doen, wanneer...? Probleem Verhelpen Aandrijving loopt niet. Nieuwe batterijen plaatsen. De batterijen op correcte wijze plaat- sen. Buismotor loopt niet, zendcontrole- Afstand tot ontvanger verminderen. lampje brandt. Zender programmeren. Zendcontrolelampje knipper en op Nieuwe batterijen plaatsen. het display verschijnt BATTERIJ. Na vervangen van batterijen geen re- Op RESET-toets drukken.
  • Seite 139: Vereenvoudigde Eu-Verklaring Van Overeenstemming

    Vereenvoudigde EU-verklaring van overeenstemming Hierbij verklaart Becker-Antriebe GmbH dat deze draadloze installatie voldoet aan de richtlijn 2014/53/EU. De volledige tekst van de EU-verklaring van overeenstemming is beschikbaar op het volgende internetadres: www.becker-antriebe.com/ce Technische wijzigingen voorbehouden. 139 - nl...

Inhaltsverzeichnis