Herunterladen Inhalt Inhalt Diese Seite drucken
Becker Centronic TimeControl TC52 Bedienungsanleitung

Becker Centronic TimeControl TC52 Bedienungsanleitung

Zeitschaltuhr für lichtsensor
Vorschau ausblenden Andere Handbücher für Centronic TimeControl TC52:
Inhaltsverzeichnis

Werbung

Verfügbare Sprachen

Verfügbare Sprachen

Centronic
TimeControl TC52
Bedienungsanleitung
DE
Zeitschaltuhr für Lichtsensor
Wichtige Informationen für den Elektroanschluss.
Operating Instructions
GB
Light Sensor Timer
Important information about the electric supply connection.
Notice d'utilisation
FR
Horloge pour capteur de luminosité
Informations importantes pour le branchement électrique.
Gebruiksaanwijzing
NL
Tijdschakelklok voor lichtsensor
Belangrijke informaties voor de elektrische aansluitingen.

Werbung

Inhaltsverzeichnis
loading

Inhaltszusammenfassung für Becker Centronic TimeControl TC52

  • Seite 1 Centronic TimeControl TC52 Bedienungsanleitung Zeitschaltuhr für Lichtsensor Wichtige Informationen für den Elektroanschluss. Operating Instructions Light Sensor Timer Important information about the electric supply connection. Notice d‘utilisation Horloge pour capteur de luminosité Informations importantes pour le branchement électrique. Gebruiksaanwijzing Tijdschakelklok voor lichtsensor Belangrijke informaties voor de elektrische aansluitingen.
  • Seite 2: Inhaltsverzeichnis

    Inhaltsverzeichnis Allgemeines ....................4 Gewährleistung ..................4 Sicherheitshinweise .................. 5 Bestimmungsgemäße Verwendung ............5 Anzeigen- und Tastenerklärung ..............6 Montage/Anschluss .................. 7 Lichtsensor .....................10 Erklärungen .....................10 Einstellungen ...................15 Inbetriebnahme ..................18 Werkseinstellung ..................18 Programmierung ..................19 Technische Daten ................... 34 Batteriewechsel ..................
  • Seite 3 Sommaire Généralités ..................... 68 Prestation de Garantie ................68 Instructions de sécurité ................69 Utilisation prévue ..................69 Explication des textes d’affi chage et des touches ........70 Montage/Branchement ................71 Capteur de luminosité ................74 Explications .....................74 Réglages ....................79 Mise en service ..................82 Paramétrage usine ..................
  • Seite 4: Allgemeines

    Sonnenschutz-Steuerung (Beschattung der Pfl anzen und Möbel) erweitert werden. Gewährleistung Becker-Antriebe GmbH ist von der gesetzlichen und vertraglichen Gewährleis- tung für Sachmängel und Produkthaftung befreit, wenn ohne unsere vorherige Zustimmung eigene bauliche Veränderungen und/oder unsachgemäße Instal- lationen entgegen dieser Anleitung vorgenommen, ausgeführt oder veranlasst werden.
  • Seite 5: Sicherheitshinweise

    Bestimmungen für nasse und feuchte Räume nach VDE 100, sind beim Anschluss einzuhalten. • Nur in trockenen Räumen verwenden. • Verwenden Sie nur unveränderte Becker Originalteile. • Halten Sie Personen aus dem Fahrbereich der Anlagen fern. • Halten Sie Kinder von Steuerungen fern.
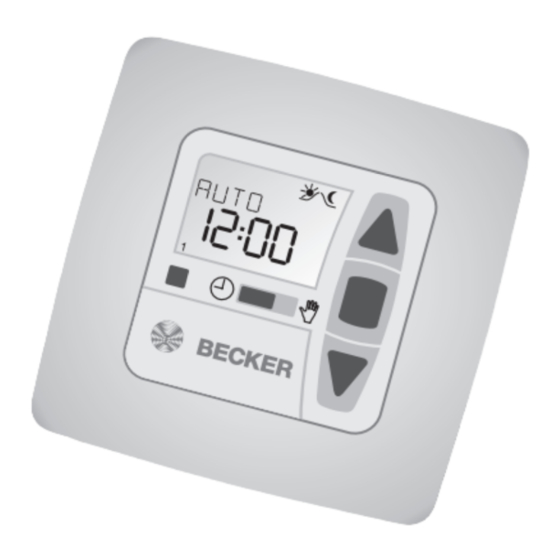
  • Seite 6: Anzeigen- Und Tastenerklärung

    Bedienungsanleitung Anzeigen- und Tastenerklärung...
  • Seite 7: Montage/Anschluss

    Montage/Anschluss...
  • Seite 8: Anschluss Als Antriebssteuergerät

    • Anschluss nur durch eine Elektrofachkraft! • Wird mehr als ein Antrieb über die TC52 angesteuert, müssen die Antriebe durch Relaissteuerungen entkoppelt werden. Diese Ent- kopplung entfällt bei Becker-Antrieben mit elektronischer Endab- schaltung. Beachten Sie den Schaltstrom des Gerätes. 1. Schließen Sie das Netzteil der TC52 wie folgt an: 2.
  • Seite 9: Anschluss Als Gruppensteuergerät

    Anschluss als Gruppensteuergerät Achtung Wird die Steuerung z.B. als Gruppensteuergerät verwendet, darf keine Brücke zwischen den Klemmen L und C eingelegt sein! 1. Schließen Sie das Netzteil der TC52 wie folgt an: 2. Setzen Sie die Schutzkappen wieder auf das Netzteil. 3.
  • Seite 10: Gruppensteuerung

    Bedienungsanleitung Lichtsensor Hinweis Es kann am Gerät ein Lichtsensor angeschlossen werden, siehe Bedie- nungsanleitung Centronic SensorControl SC43. Erklärungen Hand/Auto Schiebeschalter In der Schiebeschalterstellung „ “ werden nur manuelle Fahrbefehle ausge- führt (z.B.: AUF, STOP, AB per Tastendruck). In der Schiebeschalterstellung „ “ werden automatische Fahrbefehle aus- geführt (z.B.
  • Seite 11: Reset-Taste

    +/- Tasten Folgende Bedienungen sind über + und - möglich: • Menü ➔ Wert verändern • Auto-Betrieb ➔ Informationen abfragen • + Taste ➔ Nächste automatische Schaltzeit ▲ • - Taste ➔ Nächste automatische Schaltzeit ▼ • + Taste und OK Taste ➔ Astrozeit ▲ •...
  • Seite 12 Bedienungsanleitung ASTRO Die TC52 steuert automatisch den Rollladen oder die Jalousie zu den Sonnen- auf- und Sonnenuntergangszeiten. Diese Zeiten gelten als Richtwerte. ASTRO ABEND Steuert die Auffahrt nach der eingestellten Schaltzeit. Abfahrt nach Astrofunktion. INDIVIDUELL Steuert die Auf- und Abfahrt nach den von Ihnen eingestellten Schaltzeiten.
  • Seite 13 WOCHE Mit dem Menü WOCHE legen Sie gleiche Fahrzeiten von Montag - Sonntag (1-7) fest. BLOCK Mit dem Menü BLOCK stellen Sie zwei Blöcke ein. Block 1: legt die Fahrzeiten für Montag - Freitag (1-5) fest. Block 2: legt die Fahrzeiten für Samstag und Sonntag (6,7) fest. EINZEL Mit dem Menü...
  • Seite 14 Bedienungsanleitung OFFSET Mit dem Menü OFFSET kann eine zusätzliche Schaltzeit ▼ programmiert wer- den. Diese ist abhängig von der PROG1 Schaltzeit ▼ (max. +/- 240 Min.). Beispiel: Astrozeit ▼: 20:00 Offset ▼: +60 Min. Der Rollladen fährt um 20.00 Uhr in Lüftungsposition und um 21.00 Uhr in die untere Endlage.
  • Seite 15: Einstellungen

    Einstellungen EINSTELLUNG Im Menü EINSTELLUNG haben Sie folgende Möglichkeiten: • URLAUB • SONNE (bei angeschlossenem Sensor) • DAEMMER (bei angeschlossenem Sensor) • ZWISCHENPOSITION • LUEFTUNG/WENDUNG • PROG1 (ENDLAGE, ZWISCHENPOSITION, LUEFTUNG/WENDUNG) • PROG2 (ENDLAGE, ZWISCHENPOSITION, LUEFTUNG/WENDUNG) • TEST MODUS (bei angeschlossenem Sensor) •...
  • Seite 16 Bedienungsanleitung LUEFTUNG/WENDUNG Die Lüftungs-/Wendeposition ist eine frei wählbare Position des Rollladens/Ja- lousie, zwischen der unteren und oberen Endlage. Mit dieser Funktion können Sie den Rollladen aus der unteren Endlage soweit wieder auffahren, bis die Lüf- tungsschlitze geöffnet sind. Bei der Jalousie erfolgt die Lamellenwendung. Dazu drücken Sie die AUF-Taste zweimal kurz nacheinander.
  • Seite 17 LAENGE/BREITE/ZEITZONE (nur bei EXPERTEN MODUS ON) Ihre Koordinaten ermitteln Sie z.B. mit Hilfe eines Atlas. SO/WI SO/WI bezeichnet die automatische Sommer-/Winterzeitumschaltung. Werks- einstellung ist ON; die Zeitschaltuhr passt sich automatisch an. FUNKTION Dieser Modus ist nur für ausgebildetes Fachpersonal bestimmt! (Erscheint nur bei abgezogenem Bedienteil) Im Menü...
  • Seite 18: Inbetriebnahme

    Bedienungsanleitung Inbetriebnahme Mit dem ersten Tastendruck „wecken“ Sie die Uhr auf. Sie können nun mit den +/- Tasten die Sprache wählen und diese mir der OK Taste übernehmen. Die Uhr befi ndet sich im Automatikmodus. Werkseinstellung UHR/DAT: aktuelle MEZ und aktuelles Datum PROGRAMM: ASTRO ➔...
  • Seite 19: Programmierung

    Programmierung Menüübersicht 1. Drücken Sie die MENUE-Taste UHR/DAT erscheint. 2. Um weitere Menüs auszuwählen, drücken Sie die +/- Tasten. 3. Drücken Sie die MENUE-Taste, um in den Betriebsmodus zu gelangen. UHR/DAT (Uhrzeit und Datum einstellen) 1. Drücken Sie die MENUE-Taste, UHR/DAT erscheint. 2.
  • Seite 20 Bedienungsanleitung PROGRAMM PROG1/ ASTRO WOCHE (Astrofunktion für Woche + Sperrzeiten ▲▼) PROG1/ ASTRO BLOCK (Astrofunktion für Block1/2 + Sperrzeiten ▲▼) PROG1/ ASTRO EINZEL (Astrofunktion für Einzel + Sperrzeiten ▲▼) 1. Drücken Sie die MENUE-Taste. 2. Um das Menü PROGAMM auszuwählen, drücken Sie die + Taste bis PRO- GAMM erscheint.
  • Seite 21 PROGRAMM PROG1/ ASTRO ABEND WOCHE (Astrofunktion Abend für Woche + Schaltzeit ▲ + Sperrzeit ▼) PROG1/ ASTRO ABEND BLOCK (Astrofunktion Abend für Block1/2 + Schaltzeit ▲ + Sperrzeit ▼) PROG1/ ASTRO ABEND EINZEL (Astrofunktion Abend für Einzel + Schaltzeit ▲ + Sperrzeit ▼) Drücken Sie die MENUE-Taste.
  • Seite 22 Bedienungsanleitung PROGRAMM PROG1/ INDIVIDUELL WOCHE (Individuelle Schaltzeit ▲▼ für Woche) PROG1/ INDIVIDUELL BLOCK (Individuelle Schaltzeit ▲▼ für Block1/2) PROG1/ INDIVIDUELL EINZEL (Individuelle Schaltzeit ▲▼ für Einzel) 1. Drücken Sie die MENUE-Taste. 2. Um das Menü PROGAMM auszuwählen, drücken Sie die + Taste bis PRO- GAMM erscheint.
  • Seite 23 PROGRAMM PROG2/ INDIVIDUELL WOCHE (Individuelle Schaltzeit ▲▼ für Woche) PROG2/ INDIVIDUELL BLOCK (Individuelle Schaltzeit ▲▼ für Block1/2) PROG2/ INDIVIDUELL EINZEL (Individuelle Schaltzeit ▲▼ für Einzel) Drücken Sie die MENUE-Taste. Um das Menü PROGAMM auszuwählen, drücken Sie die + Taste bis PRO- GAMM erscheint.
  • Seite 24 Bedienungsanleitung PROGRAMM PROG2/OFFSET (z.B. Abfahrzeit Abend auf Lüftungsposition) 1. Drücken Sie die MENUE-Taste. 2. Um das Menü PROGAMM auszuwählen, drücken Sie die + Taste bis PRO- GAMM erscheint. 3. Bestätigen Sie mit OK. 4. Drücken Sie die + Taste PROG2 erscheint. 5.
  • Seite 25: Einstellung

    EINSTELLUNG URLAUB, LICHTSENSOR (Urlaub OFF/ON, Sonne/Dämmerung) Drücken Sie die MENUE-Taste. Um das Menü EINSTELLUNG auszuwählen, drücken Sie die + Taste bis EINSTELLUNG erscheint. Bestätigen Sie mit OK. URLAUB ON / OFF erscheint. Mit der +/- Taste können sie die Urlaubsfunktion auf ON oder OFF stellen. Bestätigen Sie Ihre Auswahl mit OK.
  • Seite 26: Zwischenposition, Lueftung/Wendung, Prog1 Endlage

    Bedienungsanleitung EINSTELLUNG ZWISCHENPOSITION, LUEFTUNG/WENDUNG, Prog1 ENDLAGE (Zeit/Lageprogrammierung) 1. Sie haben die Menüpunkte URLAUB/LICHTSENSOR bestätigt. ZWISCHEN- POSITION erscheint. 2. Mit der +/- Taste können Sie die Fahrzeit zur ZWISCHENPOSITION einstel- len. Die Angabe der Fahrzeit erfolgt in Sekunden oder Sie fahren die ZWI- SCHENPOSITION mit der AB-/AUF-Taste aus der oberen Endlage an.
  • Seite 27 EINSTELLUNG Prog2 ENDLAGE (Zeit/Lageprogrammierung) Hinweis Nur wenn in PROG2 eine Zeit eingestellt ist, wird Ihnen dieses Dialog- fenster angezeigt. 1. Sie haben den Menüpunkt PROG1 ENDLAGE bestätigt. PROG2 ENDLAGE erscheint. 2. Mit der +/- Taste können Sie zwischen PROG 2 ENDLAGE, PROG 2 ZWI- SCHENPOSITION und PROG 2 LUEFTUNG/WENDUNG auswählen.
  • Seite 28 Bedienungsanleitung EINSTELLUNG DEUTSCH/ ASTROVERSCHIEBUNG ▲▼ (Sprachauswahl, Astroverschiebung) Hinweis Nur wenn ein Lichtsensor im Gerät eingesteckt ist, wird Ihnen der Menüpunkt TEST MODUS angezeigt. Sie haben den Menüpunkt PROG2 ENDLAGE bestätigt. TEST MODUS ON/ OFF erscheint. Mit der +/- Taste können Sie den TEST MODUS aktivieren oder deaktivie- ren (ON/OFF).
  • Seite 29 EINSTELLUNG (Städteauswahl, EXPERTEN MODUS (LAENGE, BREITE, ZEITZONE) Sie haben die Funktion ASTROVERSCHIEBUNG ▼ bestätigt. Stadtauswahl (KASSEL) erscheint. Mit der +/- Taste können Sie die nächstgelegene Stadt einstellen. Betätigen Sie mit OK. Hinweis Diese Dialogfenster werden nur angezeigt, wenn im Funktionsmenü der EXPERTEN MODUS auf ON steht.
  • Seite 30 Bedienungsanleitung EINSTELLUNG SO/WI (Automatische Sommer-/Winterzeitumstellung) 1. Sie haben die Funktion ZEITZONE bestätigt. SO/WI erscheint. 2. Mit der +/- Taste können Sie SO/WI ein- oder ausschalten. 3. Bestätigen Sie Ihre Auswahl mit OK. 4. Drücken Sie die MENUE-Taste, um in den Betriebsmodus zu gelangen.
  • Seite 31: Rollladen/Jalousie, Antriebssteuergeraet/Gruppensteuer- Geraet, Laufzeit

    FUNKTION (nur bei abgezogenem Bedienteil, nur für Fachpersonal) ROLLLADEN/JALOUSIE, ANTRIEBSSTEUERGERAET/GRUPPENSTEUER- GERAET, LAUFZEIT (Auswahl des Behanges, Auswahl als Antriebssteuergerät/Gruppensteuerge- rät, Laufzeit des Rollladens/Jalousie) Drücken Sie die MENUE-Taste. Um das Menü FUNKTION auszuwählen, drücken Sie die + Taste bis FUNK- TION erscheint. Bestätigen Sie mit OK.
  • Seite 32 Bedienungsanleitung FUNKTION (nur bei abgezogenem Bedienteil, nur für Fachpersonal) EXTERN ON/OFF/SCHALTER, NOTSIGNAL ON/OFF (Verarbeitung externer Signale, Verarbeitung von Notsignalen) 1. Sie haben die Funktion LAUFZEIT bestätigt. EXTERN ON erscheint. (EXTERN ON/ OFF/SCHALTER bezeichnet die externen Steuersignale. Werkseinstel- lung ist EXTERN SCHALTER) 2.
  • Seite 33 FUNKTION (nur bei abgezogenem Bedienteil, nur für Fachpersonal) ERSTINBETRIEBNAHME, RELAIS, GES-ZEIT (Datum der Erstinbetriebnahme, Relaisschalthäufi gkeit, Gesamtlaufzeit) 1. Sie haben die Funktion NOTSIGNAL ON/OFF bestätigt EXPERTEN MODUS OFF/ON erscheint. 2. Mit der +/- Taste können Sie die gewünschte Einstellung auswählen. 3.
  • Seite 34: Technische Daten

    Bedienungsanleitung Batteriewechsel 1. Ziehen Sie das Bedienteil ab. 2. Entnehmen Sie die Batterie. 3. Setzen Sie die neue Batterie lage- richtig ein. 4. Stellen Sie die Uhrzeit neu ein. Hinweis Die eingestellten Werte bleiben erhalten. Reinigung Reinigen Sie das Gerät nur mit einem feuchten Tuch. Verwenden Sie kein Reini- gungsmittel, da dieses den Kunststoff angreifen kann.
  • Seite 35: Was Tun, Wenn

    Was tun, wenn...? Störung Ursache Abhilfe Antrieb läuft nicht. Falscher Anschluss. Anschluss prüfen. Antrieb läuft in die Falscher Anschluss. Drähte ▲ und  am falsche Richtung. Netzteil tauschen. Astroprogramm schaltet 1. Datum stimmt nicht. 1. Richtiges Datum nicht genau. 2. Falsche Stadt oder einstellen.
  • Seite 36: General

    (shading plants and furniture). Warranty Becker Antriebe GmbH will be released from all warranty and product liability obligations if the customer modifi es the equipment without prior approval from Becker Antriebe GmbH or if the equipment is installed incorrectly and/or con- trary to these installation instructions, by the customer or a third party.
  • Seite 37: Safety Information

    VDE 100 are to be observed when the system is connected. • Use in dry rooms only. • Use only unmodifi ed Becker original parts. • Keep persons away from the systems guide track. • Keep away from controls.
  • Seite 38: Explanation Of Displays And Buttons

    Operating Instructions Explanation of displays and buttons...
  • Seite 39: Assembly/Connection

    Assembly/connection...
  • Seite 40 • If more than one drive is controlled using the TC52, the drives must be decoupled by relay controls. This decoupling is not applicable to Becker drives with electronic limit stop. Always observe the switched current of the device. 1. Connect the power supply unit to the TC52 as follows: 2.
  • Seite 41 Connection as a group controller Attention If the control is used as a group control device, for example, no bridge can be inserted between the L and C terminals! 1. Connect the power supply unit to the TC52 as follows: 2.
  • Seite 42: Light Sensor

    Operating Instructions Light sensor Note A light sensor can be connected to the device. See operating instruc- tions for the Centronic SensorControl SC43 . Explanations MAN/AUTO sliding switch In the “ ” sliding switch setting, only manual command controls are carried out (e.g.: UP, STOP, DOWN by pressing the relevant buttons).
  • Seite 43: Menu Button

    +/- buttons The following operations are possible using the + and - buttons: • Menu ➔ change value • Auto mode ➔ request information • + button ➔ next automatic switching time ▲ • - button ➔ next automatic switching time ▼ •...
  • Seite 44 Operating Instructions ASTRO The TC52 automatically controls the roller shutters or venetian blinds at sunrise and sunset. These times are used as guidelines. ASTRO EVENING Shutters are raised according to the set switching time. Shutters are lowered according to the astro function. INDIVIDUAL Triggers the UP and DOWN control commands according to the switching times you have set.
  • Seite 45 WEEK Using the WEEK menu, you can set the same switching times from Monday - Sunday (1-7). BLOCK Using the BLOCK menu, you can set two blocks. Block 1: sets the switching times for Monday - Friday (1-5). Block 2: sets the switching times for Saturday and Sunday (6,7). INDIVIDUAL Using the INDIVIDUAL menu, you can set separate switching times for every day of the week.
  • Seite 46 Operating Instructions OFFSET An additional switching time ▼ (OK) can be programmed using the OFFSET menu. This depends on the PROG 1 switching time ▼ (max. +/- 240 mins.). For example: astro time ▼: 20:00 Offset ▼: +60 mins. The roller shutter moves to the intermediate position at 20.00 and to the lower end limit at 21.00.
  • Seite 47: Settings

    Settings SETTING The SETTING menu gives you the following options: • HOLIDAY SETTING • SUN (when sensor is connected) • TWILIGHT SETTING (when sensor is connected) • INTERMEDIATE POSITION • VENTILATION/REVERSE • PROG 1 (END LIMIT, INTERMEDIATE POSITION, VENTILATION/REVERSE) • PROG 2 (END LIMIT, INTERMEDIATE POSITION, VENTILATION/REVERSE) •...
  • Seite 48 Operating Instructions VENTILATION/REVERSE The ventilation/reversing position is a position of the roller shutter/blind be- tween the upper and lower limits that can be freely selected. Using this func- tion, you can raise the shutter from the lower end limit until the ventilation slits are open.
  • Seite 49 LONGITUDE/LATITUDE/TIME ZONE (only when EXPERT MODE is ON) You can fi nd out your coordinates, for example, with the aid of an atlas. SUMMER/WINTER SUMMER/WINTER describes the automatic clock adjustment for daylight sav- ing changes. If the default setting is ON, the time switch adjusts automatically. FUNCTION This mode is only intended for qualifi...
  • Seite 50: Initial Operation

    Operating Instructions Initial operation Press the button once to „wake up“ the timer. Now you can select the language with the +/- buttons and accept it with the OK button. The clock is in automatic mode. Default setting TIME/DATE: current GMT and current date PROGRAMME: ASTRO ➔...
  • Seite 51: Programming

    Programming Operating mode Overview of the menu 1. Press the MENU button until TIME/DATE appears. 2. To select further menus, press the +/- buttons. 3. Press the MENU button to switch to operating mode. TIME/DATE (to set the time and date) 1.
  • Seite 52 Operating Instructions PROGRAMME PROG1/ ASTRO WEEK (Astro function for week + idle period ▲▼) PROG1/ ASTRO BLOCK (Astro function for block1/2 + idle period ▲▼) PROG1/ ASTRO INDIVIDUAL (Astro function for individual + idle period ▲▼) 1. Press the MENU button. 2.
  • Seite 53 PROGRAMME PROG1/ ASTRO EVENING WEEK (Astro function evening for week + switching time ▲ + idle period ▼) PROG1/ ASTRO EVENING BLOCK (Astro function evening for block 1/2 + switching time ▲ + idle period ▼) PROG1/ ASTRO EVENING INDIVIDUAL (Astro function evening for individual + switching time ▲+ idle period ▼) Press the MENU button.
  • Seite 54 Operating Instructions PROGRAMME PROG1/INDIVIDUAL WEEK (Individual switching time ▲▼ for week) PROG1/INDIVIDUAL BLOCK (Individual switching time ▲▼ for block1/2) PROG1/INDIVIDUAL INDIVIDUAL (Individual switching time ▲▼ for individual day) 1. Press the MENU button. 2. To select the PROGAMME menu, press the + button until PROGAMME appears.
  • Seite 55 PROGRAMME PROG1/ INDIVIDUAL WEEK (Individual switching time ▲▼ for week) PROG1/ INDIVIDUAL BLOCK (Individual switching time ▲▼ for block1/2) PROG1/ INDIVIDUAL INDIVIDUAL (Individual switching time ▲▼ for individual day) Press the MENU button. To select the PROGAMME menu, press the + button until PROGAMME ap- pears.
  • Seite 56 Operating Instructions PROGRAMME PROG2/OFFSET (e.g. Time shutters are lowered to ventilation position in the evening) 1. Press the MENU button. 2. To select the PROGAMME menu, press the + button until PROGAMME ap- pears. 3. Confi rm by pressing OK. 4.
  • Seite 57 SETTING HOLIDAY, LIGHT SENSOR (Holiday OFF/ON, sun/twilight setting) Press the MENU button. To select the SETTING menu, press the + button until SETTING appears. Confi rm by pressing OK. HOLIDAY ON / OFF will appear. You can set the holiday function to ON or OFF by pressing the +/- button. Confi...
  • Seite 58 Operating Instructions SETTING INTERMEDIATE POSITION, VENTILATION/REVERSE, Prog1 END LIMIT (Time/ position programming) 1. You have confi rmed the HOLIDAY/LIGHT SENSOR menu levels. INTERMEDI- ATE POSITION will appear. 2. You can set the switching time to move to the INTERMEDIATE POSITION using the +/- button.
  • Seite 59 SETTING Prog2 END LIMIT (Time/position programming) Note This dialog window will only be displayed if a time is set in PROG2. 1. You have confi rmed the PROG1 END LIMIT menu level. PROG2 END LIMIT will appear. 2. You can select PROG 2 END LIMIT, PROG 2 INTERMEDIATE POSITION and PROG 2 VENTILATION/REVERSE using the +/- button.
  • Seite 60 Operating Instructions SETTING GB ENGL/ ASTRO SHIFT ▲▼ (Language, astro shift) Note The TEST MODE menu level will only be displayed if a light sensor is connected to the device. You have confi rmed the PROG2 END LIMIT menu level. TEST MODE ON/ OFF will appear.
  • Seite 61 SETTING (City, EXPERT MODE (LONGITUDE, LATITUDE, TIME ZONE) You have confi rmed the function ASTRO SHIFT ▼. The city selected (LON- DON) will appear. You can set the nearest town using the +/- button. Confi rm by pressing OK. Note These dialog windows are only displayed when the EXPERT MODE in the function menu is ON.
  • Seite 62 Operating Instructions SETTING SUMMER/WINTER (Automatic clock adjustment for daylight saving changes) 1. You have confi rmed the TIME ZONE function. SUMMER/WINTER will appear. 2. You can switch SUMMER/WINTER on or off using the +/- button. 3. Confi rm your selection by pressing OK. 4.
  • Seite 63 FUNCTION (only when the operating device is discon- nected, only for qualifi ed electricians) ROLLER SHUTTER/BLIND, DRIVE CONTROLLER/ GROUP CONTROLLER, RUNNING TIME (Selection of shutter/blind, selection of the drive controller/ group controller, running time of the roller shutter/blind) Press the MENU button. To select the FUNCTION menu, press the + button until FUNCTION ap- pears.
  • Seite 64 Operating Instructions FUNCTION (only when the operating device is discon- nected, only for qualifi ed electricians) EXTERNAL ON/OFF/SWITCH, ALARM SIGNAL ON/OFF (Processing external signals, processing alarm signals) 1. You have confi rmed the RUNNING TIME function. EXTERNAL ON will appear. (EXTERNAL ON/ OFF/ SWITCH describes the external control signals.
  • Seite 65 FUNCTION (only when the operating device is discon- nected, only for qualifi ed electricians) INITIAL OPERATION, RELAY, TOTAL RUNNING TIME (Date of initial operation, relay switching rate, total running time) 1. You have confi rmed the ALARM SIGNAL ON/OFF. EXPERT MODE OFF/ON will appear.
  • Seite 66: Technical Data

    Operating Instructions Changing the battery 1. Disconnect the operating device. 2. Remove the battery. 3. Insert the new battery properly. 4. Reset the time. Note The values set are still saved Cleaning Clean the device with a damp cloth only. Do not use a cleansing agent since this could damage the plastic.
  • Seite 67: What To Do If

    What to do if...? Problem Cause Remedy Drive is not functioning. Faulty connection. Check the connection. Blind or shutter moves in Faulty connection. Exchange ▲ and  the wrong direction. wires in the power sup- ply unit. Astro programme does 1.
  • Seite 68: Généralités

    Prestation de Garantie Becker Antriebe GmbH est dégagé de la garantie et de la responsabilité du fait du produit si, sans notre autorisation préalable, des modifi cations de construc- tion sont effectuées et/ou des installations inadéquates sont exécutées ou en- gagées, à...
  • Seite 69: Instructions De Sécurité

    VDE 100. • A utiliser uniquement dans des locaux secs. • Utilisez uniquement des pièces originales de Becker qui n’ont subi aucune modifi cation. • Veillez à ce que personne ne se tienne dans la zone de déploiement des installations.
  • Seite 70: Explication Des Textes D'affi Chage Et Des Touches

    Notice d‘utilisation Explication des textes d’affi chage et des touches...
  • Seite 71: Montage/Branchement

    Montage/Branchement...
  • Seite 72 • Si la TC42 commande plus d’un moteur, les moteurs doivent être dé- couplés par des commutations à relais. Ce découplage n’est pas né- cessaire pour les moteurs Becker avec fi n de course électronique. Observez le courant de commutation de l’appareil.
  • Seite 73 Branchement comme appareil de commande de groupe Attention Si la commande est par exemple utilisée comme appareil de comman- de de groupe, il convient de ne pas mettre de pont en place entre les bornes L et C ! 1. Pour brancher le bloc d’alimentation de la TC52, procédez comme suit : 2.
  • Seite 74: Capteur De Luminosité

    Notice d‘utilisation Capteur de luminosité Remarque Un capteur de luminosité peut être connecté à l’appareil, voir à ce sujet les instructions d’utilisation Centronic SensorControl SC43. Explications Curseur Manuel / Auto Lorsque le curseur est en position « », seules les commandes de marche ma- nuelles sont exécutées (p.
  • Seite 75: Touche Menu

    Touches +/- Les touches + et - permettent les actions suivantes : • Menu ➔ Modifi cation de la valeur • Service Auto ➔ Demande d’informations • Touche + ➔ horaire ▲ automatique suivant • Touche - ➔ horaire ▼ automatique suivant •...
  • Seite 76 Notice d‘utilisation ASTRO La TC52 pilote automatiquement le volet roulant ou le store aux heures de lever et de coucher du soleil. Il s’agit de valeurs indicatives. ASTRO SOIR Pilote la montée selon l’horaire réglé. Descente selon fonction astro. INDIVIDUEL Pilote la montée et la descente selon les horaires que vous avez réglés.
  • Seite 77 SEMAINE Le menu SEMAINE vous permet de régler les mêmes horaires de marche du lundi au dimanche (1-7). BLOC Le menu BLOC vous permet de régler deux blocs. Bloc 1 : défi nit les horaires de marche du lundi au vendredi (1-5). Bloc 2 : défi...
  • Seite 78 Notice d‘utilisation OFFSET Le menu OFFSET vous permet de régler un horaire ▼ (OK) supplémentaire. Ce- lui-ci dépend de l’horaire PROG1 ▼ (maxi +/- 240 minutes). Exemple : Horaire astro ▼: 20h00 Offset ▼: +60 minutes Le volet descend à 20h00 en position d’aération et à 21h00 en fi n de course inférieure.
  • Seite 79: Réglages

    Réglages REGLAGE Le menu REGLAGE vous offre les possibilités suivantes : • VACANCES • SOLEIL (avec capteur connecté) • CREPUSCULE (avec capteur connecté) • POS. INTERM • AERATION/INVERSION • PROG1 (POSITION FINALE, POS. INTERM, AERATION/INVERSION) • PROG2 (POSITION FINALE, POS. INTERM, AERATION/INVERSION) •...
  • Seite 80 Notice d‘utilisation AERATION/INVERSION La position aération/inversion est une position du volet roulant/store qui peut être librement sélectionnée entre la position fi nale supérieure et la position fi na- le inférieure. Cette fonction vous permet de remonter le volet roulant à partir de la position fi...
  • Seite 81 LONGITUDE/LATITUDE/ZONE HORAIRE (seulement avec MODE EXPERT Vous pouvez déterminer vos coordonnées, p. ex., à l’aide d’un atlas. ETE/HIVER ETE/HIVER désigne la commutation automatique entre les heures d’été et d’hi- ver. Le réglage usine est ON ; l’horloge s’adapte automatiquement. FONCTION Ce mode est réservé...
  • Seite 82: Mise En Service

    Notice d‘utilisation Mise en service En appuyant une première fois sur la touche, vous « réveillez » l’horloge. Vous pouvez maintenant sélectionner la langue avec les touches +/- et la confi rmer avec la touche OK. L’horloge est en mode Automatique. Paramétrage usine HEURE/DATE : heure de l’Europe centrale actuelle et date actuelle PROGRAMME : ASTRO ➔...
  • Seite 83: Programmation

    Programmation Vue d’ensemble du menu 1. Appuyez sur la touche MENU, HEURE/DATE apparaît. 2. Pour sélectionner d’autres menus, appuyez sur les touches +/-. 3. Appuyez sur la touche MENU pour accéder au mode de service. HEURE/DATE (régler l’heure et la date) 1.
  • Seite 84 Notice d‘utilisation PROGRAMME PROG1/ ASTRO SEMAINE (fonction astro pour semaine + horaire de blocage ▲▼) PROG1/ ASTRO BLOC (fonction astro pour BLOC1/2 + horaire de blocage ▲▼) PROG1/ ASTRO SEUL (fonction astro pour seul + horaire de blocage ▲▼) 1. Appuyez sur la touche MENU. 2.
  • Seite 85 PROGRAMME PROG1/ ASTRO SOIR SEMAINE (fonction astro soir pour semaine + horaire ▲ + horaire de blocage ▼) PROG1/ ASTRO SOIR BLOC (fonction astro soir pour bloc1/2 + horaire ▲ + horaire de blocage ▼) PROG1/ ASTRO SOIR SEUL (fonction astro soir pour seul + horaire ▲ + horaire de blocage ▼) Appuyez sur la touche MENU.
  • Seite 86 Notice d‘utilisation PROGRAMME PROG1/ INDIVIDUEL SEMAINE (horaire individuel ▲▼ pour semaine) PROG1/ INDIVIDUEL BLOC (horaire individuel ▲▼ pour bloc 1/2) PROG1/ INDIVIDUEL SEUL (horaire individuel ▲▼ pour seul) 1. Appuyez sur la touche MENU. 2. Pour sélectionner le menu PROGRAMME, appuyez sur la touche + jusqu’à ce que PROGRAMME apparaisse.
  • Seite 87 PROGRAMME PROG2/ INDIVIDUEL SEMAINE (horaire individuel ▲▼ pour semaine) PROG2/ INDIVIDUEL BLOC (horaire individuel ▲▼ pour bloc 1/2) PROG2/ INDIVIDUEL SEUL (horaire individuel ▲▼ pour seul) Appuyez sur la touche MENU. Pour sélectionner le menu PROGRAMME, appuyez sur la touche + jusqu’à ce que PROGRAMME apparaisse.
  • Seite 88 Notice d‘utilisation PROGRAMME PROG2/OFFSET (p. ex. temps de descente soir sur position d’aération) 1. Appuyez sur la touche MENU. 2. Pour sélectionner le menu PROGRAMME, appuyez sur la touche + jusqu’à ce que PROGRAMME apparaisse. 3. Confi rmez avec OK. 4.
  • Seite 89 REGLAGE VACANCES, CAPTEUR DE LUMINOSITE (Vacances OFF/ON, Soleil/Crépus- cule) Appuyez sur la touche MENU. Pour sélectionner le menu REGLAGE, appuyez sur la touche + jusqu’à ce que REGLAGE apparaisse. Confi rmez avec OK. VACANCES ON / OFF apparaît. Vous pouvez régler la fonction Vacances sur ON ou sur OFF au moyen des touches +/-.
  • Seite 90 Notice d‘utilisation REGLAGE POS. INTERM, AERATION/INVERSION, Prog1 POSITION FINALE (programmation de l’horaire /de la position) 1. Vous avez confi rmé les points de menu VACANCES/CAPTEUR DE LUMINO- SITE. POS. INTERM apparaît. 2. Vous pouvez régler le temps de marche pour POS. INTERM avec les touches +/-.
  • Seite 91 REGLAGE Prog2 POSITION FINALE (programmation du temps/de la position) Remarque Cette fenêtre de dialogue s’affi che seulement lorsqu’un temps est ré- glé dans PROG2. 1. Vous avez confi rmé le point de menu PROG1 POSITION FINALE. PROG2 PO- SITION FINALE apparaît. 2.
  • Seite 92 Notice d‘utilisation REGLAGE FRANÇAIS/ DECALAGE ASTRO ▲▼ (sélection de la langue, décalage astro) Remarque Le point de menu MODE TEST s’affi che seulement lorsqu’un capteur de luminosité est connecté à l’appareil. Vous avez confi rmé le point de menu PROG2 POSITION FINALE. MODE TEST ON/OFF apparaît.
  • Seite 93 REGLAGE (Sélection de la ville, MODE EXPERT (LONGITUDE, LATITUDE, ZONE HORAI- Vous avez confi rmé la fonction DECALAGE ASTRO ▼. Sélection de la ville (PARIS) apparaît. Vous pouvez régler la ville la plus proche avec la touche +/-. Confi rmez avec OK. Remarque Cette fenêtre de dialogue ne s’ouvre que lorsque le MODE EXPERT est sur ON dans le menu fonction.
  • Seite 94 Notice d‘utilisation REGLAGE ETE/HIVER (commutation automatique été/hiver) 1. Vous avez confi rmé la fonction ZONE HORAIRE. ETE/HIVER apparaît. 2. Vous pouvez activer ou désactiver ETE/HIVER avec les touches +/-. 3. Confi rmez votre sélection avec OK. 4. Appuyez sur la touche MENU pour accéder au mode de service.
  • Seite 95 FONCTION (seulement lorsque l’élément de commande est enlevé, seulement pour le personnel spécialisé) VOLET ROULANT/STORE, APP. COMM MOT / APP. COMM GROUPE, TEMPS DE MARCHE (sélection du tablier, sélection comme appareil de commande d’entraînement / d’appareil de commande de groupe, temps de marche du volet roulant/store) Appuyez sur la touche MENU.
  • Seite 96 Notice d‘utilisation FONCTION (seulement lorsque l’élément de commande est enlevé, seulement pour le personnel spécialisé) EXTERNE ON/OFF/COMMUTATEUR, SIGNAL SECOURS ON/OFF (traitement des signaux externes, traitement des signaux de secours) 1. Vous avez confi rmé la fonction TEMPS DE MARCHE. EXTERNE ON apparaît. (EXTERNE ON/ OFF/ COMMUTATEUR désigne les signaux de commande extérieurs.
  • Seite 97 FONCTION (seulement lorsque l’élément de commande est enlevé, seulement pour le personnel spécialisé) 1e MISE EN SERVICE, RELAIS, TEMPS TOTAL (date de la 1e mise en service, fréquence de commutation des relais, temps de marche total) 1. Vous avez confi rmé la fonction SIGNAL DE SECOURS ON/OFF. MODE EX- PERT OFF/ON apparaît.
  • Seite 98: Caractéristiques Techniques

    Notice d‘utilisation Remplacement de la pile 1. Enlevez l’élément de commande. 2. Enlevez la pile. 3. Mettez la pile neuve en place dans la bonne position. 4. Réglez l’heure. Remarque Les valeurs réglées sont conservées. Nettoyage Nettoyez l’appareil seulement avec un chiffon humide. N’utilisez pas de produit de nettoyage, celui-ci pouvant avoir un effet agressif sur la matière plastique.
  • Seite 99: Que Faire Quand

    Que faire quand...? Anomalie Cause Mesures à prendre Le moteur ne marche Branchement incorrect. Contrôler le branche- pas. ment. Le moteur marche dans Branchement incorrect. Remplacer les fi ls  le mauvais sens. et  du bloc d’alimen- tation. Le programme Astro 1.
  • Seite 100: Algemeen

    (schaduw geven aan plan- ten en meubels). Garantieverlening Becker Antriebe GmbH is van de garantieverlening en de productaansprakelijk- heid bevrijd, wanneer zonder onze voorafgaande toestemming eigen bouwkun- dige constructie wijzigingen zijn aangebracht en/of onvakkundige installaties worden doorgevoerd of in opdracht worden gegeven, die in strijd zijn met deze handleiding.
  • Seite 101: Veiligheidsrichtlijnen

    Veiligheidsrichtlijnen Voorzichtig • Gevaar voor verwonding door elektrische schok. • Aansluitingen op het 230 V elektriciteitsnet moeten door een geau- toriseerd vakman worden uitgevoerd. • Haal voor de montage de spanning van de aansluitkabel. • Bij het aansluiten dienen de voorschriften van het plaatselijke ener- giebedrijf alsmede de bepalingen voor natte en droge ruimten vol- gens VDE 100 te worden aangehouden.
  • Seite 102: Verklaring Van Displays En Toetsen

    Gebruiksaanwijzing Verklaring van displays en toetsen...
  • Seite 103: Montage /Aansluiting

    Montage /Aansluiting...
  • Seite 104: Aansluiting Als Individuele Bediening

    • Wanneer meer dan één aandrijving via de TC52 wordt geregeld, ont- koppel dan aandrijvingen dan d.m.v. relais. Deze ontkoppeling ver- valt bij Becker aandrijvingen met elektronische eindschakelaar. Let op de schakelstroom van het apparaat. 1. Sluit het voedingsgedeelte van de TC52 als volgt aan: 2.
  • Seite 105: Aansluiten Als Groepsbediening

    Aansluiten als groepsbediening Opgelet Wanneer de besturing bijv. als groepsbesturing wordt gebruikt, mag er geen brug tussen de klemmen L en C zijn geplaatst! 1. Sluit het voedingsgedeelte van de TC52 als volgt aan: 2. Plaats de beschermkap weer over de voeding. 3.
  • Seite 106: Lichtsensor

    Gebruiksaanwijzing Lichtsensor Aanwijzing Er kan een lichtsensor op het apparaat worden aangesloten, zie ge- bruiksaanwijzing van de Centronic SensorControl SC43. Verklaringen Hand/ Auto schuifschakelaar In de stand “ ” van de schuifschakelaar worden uitsluitend handmatige com- mando’s uitgevoerd (bijv.: OP, STOP, NEER met een druk op de toets). In de stand “...
  • Seite 107 +/- toetsen De volgende bediening is met + en - mogelijk: • Menu ➔ Waarde veranderen • Auto-stand ➔ Informatie opvragen • +-toets ➔ Volgende automatische schakeltijd▲ • - toets ➔ Volgende automatische schakeltijd ▼ • + toets en OK toets ➔ Astrotijd ▲ •...
  • Seite 108 Gebruiksaanwijzing ASTRO De TC52 bestuurt automatisch de rolluiken of de jaloezie op de tijden van zons- opgang of zonsondergang. Deze tijden gelden als richtwaarden. ASTRO AVOND Stuurt het omhoog lopen na de ingestelde schakeltijd. Omlaag lopen volgens astrofunctie. INDIVIDUEEL Schakelt het Op en Neer sturen in met de door u ingestelde schakeltijden.
  • Seite 109 WEEK Gebruik het menu WEEK om dezelfde schakeltijden voor maandag - zondag (1-7) vast te leggen. BLOK Gebruik het menu BLOK om de twee blokken in te stellen. BLOK 1: legt de schakeltijden voor maandag - vrijdag (1-5) vast. BLOK 2: legt de schakeltijden voor zaterdag en zondag (6,7) vast. AFZONDERLIJK Gebruik het menu AFZONDERLIJK om voor iedere dag van de week de schakel- tijden apart in te stellen.
  • Seite 110 Gebruiksaanwijzing OFFSET Gebruik het menu OFFSET om een extra schakeltijd ▼ te programmeren. Deze is afhankelijk van de PROG 1 schakeltijd▲ (max. +/- 240 Min.). Voorbeeld: Astrotijd ▲: 20:00 Offset ▼: +60 min. Het rolluik loopt om 20.00 uur in ventilatiepositie en om 21.00 uur in de onderste eindstand.
  • Seite 111: Instellingen

    Instellingen INSTELLING In het menu INSTELLING zijn de volgende mogelijkheden: • VAKANTIE • ZON (bij aangesloten sensor) • SCHEMER (bij aangesloten sensor) • TUSSENPOSITIE • VENTILATIE/KANTELEN • PROG 1 (EINDSTAND, TUSSENPOSITIE, VENTILATIE/KANTELEN) • PROG 2 (EINDSTAND, TUSSENPOSITIE, VENTILATIE/KANTELEN) • TESTMODUS (bij aangesloten sensor) •...
  • Seite 112 Gebruiksaanwijzing VENTILATIE/KANTELEN De ventilatie-/kantelstand is een vrij te kiezen stand van het rolluik/de jaloezie tussen de bovenste en onderste eindstand. Gebruik deze functie om het rolluik uit de onderste stand zo ver omhoog te laten lopen dat de ventilatiespleet wordt geopend.
  • Seite 113 LENGTE/BREEDTE/TIJDZONE (alleen in EXPERT MODUS ON) De coördinaten zijn bijvoorbeeld in een atlas te vinden. ZO/WI ZO/WI geeft de automatische zomer-/wintertijdomschakeling aan. Fabrieksin- stelling is ON; de tijdschakelklok past zich automatisch aan. FUNCTIE Deze modus is uitsluitend bedoeld voor geschoold personeel! (Verschijnt alleen bij afgetrokken bedieningsgedeelte) In het menu FUNCTIE bestaat de mogelijkheid de volgende functies in te stel- len:...
  • Seite 114: Ingebruikname

    Gebruiksaanwijzing Ingebruikname Met de eerste druk op de toets wordt de klok „gewekt“. Kies met de+/- toetsen de taal en neem deze over met de OK toets. De klok bevindt zich in de automa- tische modus. Fabrieksinstelling TIJD/DAT: actuele MET en actuele datum PROGRAMMA: ASTRO ➔...
  • Seite 115: Menuoverzicht

    Programmering Menuoverzicht 1. Druk op de MENU-toets TIJD/DAT verschijnt. 2. Druk op de +/- toetsen om meer menu’s te selecteren. 3. Druk op de MENU-toets, om in de bedrijfsmodus terecht te komen. TIJD/DAT (tijd en datum instellen) 1. Druk op de MENU-toets en TIJD/DAT verschijnt. 2.
  • Seite 116 Gebruiksaanwijzing PROGRAMMA PROG 1/ ASTRO WEEK (astrofunctie voor Week + Spertijden▲▼) PROG 1/ ASTRO BLOK (astrofunctie voor BLOK1/2 + Spertijden ▲▼) PROG 1/ ASTRO AFZONDERLIJK (astrofunctie voor Afzonderlijk + Spertijden ▲▼) 1. Druk op de MENU-toets. 2. Om het nieuwe PROGAMMA te selecteren, op de + toets drukken tot PRO- GRAMMA verschijnt.
  • Seite 117 PROGRAMMA PROG 1/ ASTRO AVOND WEEK (astrofunctie Avond voor Week + Schakeltijd ▲ + Spertijd ▼) PROG 1/ ASTRO AVOND BLOK (astrofunctie Avond voor BLOK1/2 + Schakeltijd ▲ + Spertijd ▼) PROG 1/ ASTRO AVOND AFZONDERLIJK (astrofunctie Avond voor Afzonderlijk + Schakeltijd ▲ + SPERTIJD ▼) Druk op de MENU-toets.
  • Seite 118 Gebruiksaanwijzing PROGRAMMA PROG 1/ INDIVIDUEEL WEEK (individuele schakeltijd ▲▼ voor week) PROG 1/ INDIVIDUEEL BLOK (individuele schakeltijd ▲▼ voor BLOK1/2) PROG 1/ INDIVIDUEEL AFZONDERLIJK (individuele schakeltijd ▲▼ voor Af- zonderlijk) 1. Druk op de MENU-toets. 2. Om het nieuwe PROGAMMA te selecteren, op de +-toets drukken tot PRO- GRAMMA verschijnt.
  • Seite 119 PROGRAMMA PROG 2/ INDIVIDUEEL WEEK (individuele schakeltijd ▲▼ voor week) PROG 2/ INDIVIDUEEL BLOK (individuele schakeltijd ▲▼ voor BLOK 1/2) PROG 2/ INDIVIDUEEL AFZONDERLIJK (individuele schakeltijd ▲▼ voor Af- zonderlijk) Druk op de MENU-toets. Om het nieuwe PROGAMMA te selecteren, op de +-toets drukken tot PRO- GRAMMA verschijnt.
  • Seite 120 Gebruiksaanwijzing PROGRAMMA PROG 2/OFFSET (bijv. vertrektijd avond naar ventilatiestand) 1. Druk op de MENU-toets. 2. Om het nieuwe PROGAMMA te selecteren, op de +-toets drukken tot PRO- GRAMMA verschijnt. 3. Bevestig met OK. 4. Druk op de + toets PROG 2 verschijnt. 5.
  • Seite 121 INSTELLING VAKANTIE, LICHTSENSOR (Vakantie OFF/ON, Zon/Schemering) Druk op de MENU-toets. Om het menu INSTELLING te selecteren, op de + toets drukken tot INSTEL- LING verschijnt. Bevestig met OK VAKANTIE ON / OFF verschijnt. Met de +/- toets kan de vakantiefunctie op ON of OFF worden gezet. Bevestig de keuze met OK.
  • Seite 122: Tussenpositie, Ventilatie/Kantelen, Prog1 Eindstand

    Gebruiksaanwijzing INSTELLING TUSSENPOSITIE, VENTILATIE/KANTELEN, Prog1 EINDSTAND (Tijd/ Standprogrammering) 1. De menu-items VAKANTIE/LICHTSENSOR zijn bevestigd. TUSSENPOSITIE verschijnt. 2. Met de +/- toets kan de looptijd naar de TUSSENPOSITIE worden ingesteld. De opgave van de looptijd vindt plaats in seconden of u loopt naar de TUS- SENPOSITIE met de NEER-/OP-toets vanuit de bovenste eindstand.
  • Seite 123 INSTELLING PROG 2 EINDSTAND (Tijd/ Standprogrammering) Aanwijzing Alleen wanneer in PROG 2 een tijd is ingesteld, wordt het dialoogven- ster weergegeven. 1. Het menu-item VENTILATIE/KANTELEN is bevestigd. PROG 2 EINDSTAND verschijnt. 2. Gebruik de +/- -toets om te kiezen tussen PROG 2 EINDSTAND, PROG 2 TUSSENPOSITIE en PROG 2 VENTILATIE/KANTELEN .
  • Seite 124 Gebruiksaanwijzing INSTELLING NEDERL/ ASTROVERSCHUIVING ▲▼ (Taalkeuze, Astroverschuiving) Aanwijzing Het MENU-item TEST MODUS verschijnt alleen wanneer er een licht- sensor in het apparaat gestoken is. Het menu-item VENTILATIE/KANTELEN is bevestigd. TEST MODUS ON/ OFF verschijnt. Gebruik de +/- toets om de TEST MODUS te activeren of te deactiveren (ON/OFF).
  • Seite 125 INSTELLING (Stadkeuze, EXPERT MODUS (LENGTE, BREEDTE, TIJDZONE)) De functie ASTROVERSCHUIVING ▼ is bevestigd. Stadkeuze (AMSTER- DAM) verschijnt. Gebruik de +/- toets om de dichtst bij gelegen stad in te stellen. Bevestig met OK. Aanwijzing Deze dialoogvensters worden alleen getoond, wanneer in het functie- menu de EXPERT MODUS op ON staat.
  • Seite 126 Gebruiksaanwijzing INSTELLING ZO/WI (Automatische zomer-/wintertijd omschakeling) De functie TIJDZONE is bevestigd. ZO/WI verschijnt. Gebruik de +/- toets om ZO/WI in- of uit te schakelen. Bevestig de keuze met OK. Druk op de MENU-toets, om in de bedrijfsmodus terecht te komen.
  • Seite 127 FUNCTIE (uitsluitend bij afgetrokken bedieningsgedeel- te, uitsluitend voor vakkundig personeel) ROLLUIKEN/JALOEZIE, INDIVIDUELE BESTURING/ GROEPSBESTU- RING, LOOPTIJD (Keuze van het type, keuze als individuele besturing/ groepsbesturing, looptijd van het rolluik/de jaloezie) Druk op de MENU-toets. Om het menu FUNCTIE te selecteren, op de + toets drukken tot FUNCTIE verschijnt.
  • Seite 128 Gebruiksaanwijzing FUNCTIE (uitsluitend bij afgetrokken bedieningsgedeel- te, uitsluitend voor vakkundig personeel) EXTERN ON/OFF/SCHAKELAAR, NOODSIGNAAL ON/OFF (Verwerking van externe signalen, verwerking van noodsignalen) 1. De functie LOOPTIJD is bevestigd. EXTERN ON verschijnt. (EXTERN ON/ OFF/ SCHAKELAAR geeft de externe besturingssignalen aan. Fabrieksinstel- ling is EXTERN SCHAKELAAR) 2.
  • Seite 129 FUNCTIE (uitsluitend bij afgetrokken bedieningsgedeel- te, uitsluitend voor vakkundig personeel) EERSTE INGEBRUIKNAME, RELAIS, TOT-TIJD (Datum van de eerste ingebruikname, relaisschakelfrequentie, totale looptijd) 1. De functie NOODSIGNAAL ON/OFF is bevestigd EXPERT MODUS OFF/ON verschijnt. 2. Gebruik de +/- toets om de gewenste instelling te kiezen. 3.
  • Seite 130: Technische Gegevens

    Gebruiksaanwijzing Batterij vervangen 1. Trek het bedieningsgedeelte er af. 2. Haal de batterij er uit. 3. Plaats de nieuwe batterij in de juis- te positie. 4. Stel de tijd opnieuw in. Aanwijzing De ingestelde waarden blijven behouden. Reiniging Reinig het apparaat uitsluitend met een vochtige doek. Gebruik geen reinigings- middelen aangezien deze kunststof kunnen aantasten.
  • Seite 131: Wat Te Doen, Als

    Wat te doen, als ...? Storing Oorzaak Verhelpen Aandrijving loopt niet. Verkeerde aansluiting. Aansluiting controleren. Aandrijving loopt in de Verkeerde aansluiting. Bedrading ▲ en  aan verkeerde richting. voeding omwisselen. Astroprogramma scha- 1. Datum klopt niet. 1. Correcte datum kelt niet nauwkeurig. instellen.
  • Seite 132 Becker-Antriebe GmbH 35764 Sinn/Germany...

Inhaltsverzeichnis