Herunterladen Inhalt Inhalt Diese Seite drucken
Sharp PG-B10S Anleitung
Vorschau ausblenden Andere Handbücher für PG-B10S:
Inhaltsverzeichnis

Werbung

Verfügbare Sprachen

Verfügbare Sprachen

In the interests of user-safety (Required by safety regulations in some countries) the set should be re-
stored to its original condition and only parts identical to those specified should be used.
Im lnteresse der Benutzersicherheit (erforderliche Sicherheitsregeln in einigen Ländern) muß das Gerät in seinen
Originalzustand gebracht werden. Außerdem dürfen für die spezifizierten Bauteile nur identische Teile verwendet
werden.
SHARP CORPORATION
SERVICE MANUAL
SERVICE-ANLEITUNG
LCD PROJECTOR
LCD PROJEKTOR
MODEL
PG-B10S
MODELL
This document has been published to be used for
after sales service only.
The contents are subject to change without notice.
PG-B10S
S93J4PG-B10S/

Werbung

Inhaltsverzeichnis
loading

Inhaltszusammenfassung für Sharp PG-B10S

  • Seite 1 PG-B10S SERVICE MANUAL SERVICE-ANLEITUNG S93J4PG-B10S/ LCD PROJECTOR LCD PROJEKTOR MODEL PG-B10S MODELL In the interests of user-safety (Required by safety regulations in some countries) the set should be re- stored to its original condition and only parts identical to those specified should be used.
  • Seite 2: Inhaltsverzeichnis

    PG-B10S CONTENTS Page Page • SPECIFICATIONS ..........3 • CHASSIS LAYOUT .......... 80 • IMPORTANT SERVICE SAFETY • BLOCK DIAGRAM .......... 82 NOTES (for USA) ..........4 • OVERALL WIRING DIAGRAM ......84 • NOTE TO SERVICE PERSONNEL ....5 •...
  • Seite 3: Specifications

    (UDSKAA039WJZZ), “QUICK GUIDE” label (TLABZA439WJZZ), Operation manual (TINS- A917WJZZ) As a part of policy of continuous improvement, SHARP reserves the right to make design and specification changes for product improvement without prior notice. The performance specification figures indicated are nominal values of production units. There may be...
  • Seite 4: Important Service Safety Notes (For Usa)

    PG-B10S IMPORTANT SERVICE SAFETY NOTES (for USA) Ë Service work should be performed only by qualified service technicians who are thoroughly familiar with all safety checks and servicing guidelines as follows: » Use an AC voltmeter with sensitivity of 5000 ohm per WARNING volt., or higher, sensitivity to measure the AC voltage...
  • Seite 5: Note To Service Personnel

    PG-B10S NOTE TO SERVICE NOTE POUR LE PERSONNEL PERSONNEL D’ENTRETIEN 1 2 3 4 5 6 7 8 9 0 1 2 3 4 5 6 7 8 9 0 1 2 3 4 5 6 7 8 9 0 1 2 1 2 3 4 5 6 7 8 9 0 1 2 3 4 5 6...
  • Seite 6 PG-B10S 1 2 3 4 5 6 7 8 9 0 1 2 3 4 5 6 7 8 9 0 1 2 3 4 5 6 7 8 9 0 1 2 1 2 3 4 5 6 7 8 9 0 1 2 3 4 5 6...
  • Seite 7 PG-B10S WARNING: High brightness light source, do not stare into the beam of light, or view directly. Be especially careful that children do not stare directly in to the beam of light. WARNING: TO REDUCE THE RISK OF FIRE OR ELECTRIC SHOCK, DO NOT EXPOSE THIS UNIT TO MOISTURE OR WET LOCATIONS.
  • Seite 8 PG-B10S Precautions for using lead-free solder 1 Employing lead-free solder "PWBs" of this model employs lead-free solder. The LF symbol indicates lead-free solder, and is attached on the PWBs and service manuals. The alphabetical character following LF shows the type of lead-free solder.
  • Seite 9: Operation Manual

    PG-B10S Operation Manual Projector (Front and Top View) INPUT button ON button For switching input mode For turning the power on. 1, 2 or 3. Power indicator KEYSTONE button For entering the Keystone Correction mode. STANDBY button Adjustment buttons For putting the projector into the ('"\ |)
  • Seite 10 PG-B10S About the Indicators on the Projector Power indicator Green on/Red on ... Normal Red blinks ... Abnormal Lamp indicator Green on ... Normal Green blinks ... The lamp is warming up. Red on ... Change the lamp. Temperature warning indicator Off ...
  • Seite 11 PG-B10S Projector (Rear View) INPUT 1 terminal INPUT 2 terminal Terminal for Terminal for computer RGB and connecting video component signals. equipment with an S-video terminal. RGB OUTPUT INPUT 3 terminal terminal Terminal for Terminal for connecting video connecting a monitor.
  • Seite 12 PG-B10S INPUT/OUTPUT Terminals and Connectable Main Equipment INPUT 1 terminal RS-232C terminal INPUT 3 terminal Connecting the Connecting the computer. Connecting video equipment without computer to control the (See page 51.) S-video output terminal. projector. Connecting video equipment with component output terminal (DVD player, DTV decoder, etc.).
  • Seite 13 PG-B10S Remote Control (Front View) ON button STANDBY button For turning the power on. For putting the projector into the standby mode. MENU button KEYSTONE button For displaying adjustment and For entering the Keystone setting screens. Correction mode. Adjustment buttons (' "...
  • Seite 14: Using The Remote Control

    PG-B10S Connection Pin Assignments Using the Remote Control Usable Range Remote control sensor The remote control can be used to control the projector within the ranges shown in the 30° illustration. Note 30° • The signal from the remote control can be re-...
  • Seite 15 PG-B10S Connection Pin Assignments INPUT 1 and OUTPUT RGB Signal Terminal: 15-pin Mini D-sub female connector RGB Input Component Input 1. Video input (red) 1. P 2. Video input (green/sync on green) 2. Y 3. Video input (blue) 3. P 4.
  • Seite 16: Communication Conditions

    PG-B10S RS-232C Specifications and Command Settings PC control A computer can be used to control the projector by connecting an RS-232C serial control cable (cross type, sold separately) to the projector. (See page for connection.) Communication conditions Set the serial port settings of the computer to match that of the table.
  • Seite 17: Dimensions

    PG-B10S DIMENSIONS Rear View Units: inches (mm) Top View (294) Side View Side View (64) ø 65 Front View (60.4) (195.6) (64.2) (207.4) (86.6) (28.5) (65) Bottom View (45)
  • Seite 18: Removing Of Major Parts

    PG-B10S REMOVING OF MAJOR PARTS 1. Detaching the lamp unit cover and filter cover 1-1. Remove the lock screw from the lamp cover, and detach the lamp cover. 1-2. Remove the two lock screws from the lamp unit, and detach the lamp unit.
  • Seite 19 PG-B10S 3. Detaching the main PWB 3-1. Remove the two lock screws from the main PWB unit, and detach the main PWB. Main PWB [FD] [EA] [RP] [GP] [RP] [FA] [TH] [FB] [LF] [TI] [SP] 4. Removing the optical unit 4-1.
  • Seite 20 PG-B10S 5. Detaching the power PWB/ballast PWB unit 5-1. Remove the four lock screws from the power PWB/ballast PWB unit, and detach the power PWB/ballast PWB unit. 5-2. Detach the insulating board. 5-3. Detach the ballast PWB. Power PWB Top shield...
  • Seite 21 PG-B10S 6. Detaching the AC inlet, exhaust fan, speaker, suction duct and suction fan 6-1. Detach the AC inlet PWB. 6-2. Remove the lock screw from the exhaust fan, and detach the exhaust fan. 6-3. Detach the speaker. 6-4. Remove the two lock screws from the suction duct, and detach the suction duct.
  • Seite 22: Resetting The Total Lamp Timer

    Clean the air filter. Air filter (removable) • Ask your nearest Sharp Authorized Pro- • Clean the dust off the air filter and cover jector Dealer or Service Center to ex- with a vacuum cleaner extension hose.
  • Seite 23: The Optical Unit Outline

    PG-B10S THE OPTICAL UNIT OUTLINE Layout for proper setup of the optical components and parts (top view) Place the M1 and M2 reflectors so that their markings should be positioned as shown above.
  • Seite 24 PG-B10S <Replacing the prism holder> 1. Remove the two lock screws from the prism holder, and detach the prism holder out of the optical unit. 2. Fit a new prism holder in the optical unit. Note: Even if only the LCD is defective, replace the entire prism holder with new one. Do not change the LCD alone for new one.
  • Seite 25: Electrical Adjustment

    PG-B10S ELECTRICAL ADJUSTMENT Adjusting point Adjusting conditions Adjusting procedure » Make the following settings. EEPROM 1. Turn on the power (with the initialization Press S2002 to call the process mode and execute lamp on) and warm up the "SS2" on SS menu.
  • Seite 26 PG-B10S Adjusting point Adjusting conditions Adjusting procedure Video Bright- 1. Feed an NTSC composite 1. Check the setting value. ness/Contrast video 10-step signal (no Contrast (White Level): 43 adjustment setup) with 100% ampli- Bright (Black Level): tude. 2. Select the following group and subjects.
  • Seite 27 PG-B10S Adjusting point Adjusting conditions Adjusting procedure Panel ghost 1. Get the SVGA60Hz ghost 1. E N B X R p h a s e a d j u s t m e n t ( R - L C D g h o s t...
  • Seite 28 PG-B10S Adjusting point Adjusting conditions Adjusting procedure Automatic color 1. Apply the automatic color 1. Make sure that no remarkable uneven color remains irregularity correction using the auto- on the screen. correction matic color irregularity cor- rection system. Video Tint 1.
  • Seite 29 PG-B10S Adjusting point Adjusting point Adjusting conditions Adjusting conditions Adjusting procedure Adjusting procedure Sample hold 1. Feed the SVGA 75-Hz 1. Check the fixed value. pulse phase black signal. GCK-PHASE :282 checking 2. Select the following group RCK-PHASE :282 and subjects.
  • Seite 30 PG-B10S 1. Calling and quitting the process mode with the control keys on this model. 1-1. Calling and quitting With no menu onscreen, press the "UP", "UP", "DOWN", "DOWN", "RIGHT", "LEFT" and "ENTER" keys, in this order, on the remote controller (Type A10, or C50/45 and P25/20 series remote controllers).
  • Seite 31 PG-B10S Process menu1 Readjust only the shaded items from the process menu below. Adjustment Process Menu OUTPUT2 PSIG-H First layer Pedestal PSIG-L VERSION LC-SW VIDEO LC-HPOS-R TEMP RLV1 OUTPUT1 PATTERN RLV2 OUTPUT2 LAMP RLV3 OUTPUT3 LINE LC-HPOS-G VIDEO1 EXIT GLV1...
  • Seite 32 PG-B10S Process menu2 second layer Initial Value VERSION Rom Code EXIT SS3 EU SS4 US SS5 JPN SS6 CHIN EXIT TEMP Temp1 Parameter of sensor 1 Temp2 Parameter of sensor 2 Temp3 No Use Temp4 No Use EXIT PATTERN Cross Hatch...
  • Seite 33: Upgrading The Version

    2. Do not connect the AC power cord yet at this time. 2) Upgrading procedure 1. For upgrading the PG-B10S, use the "Flash Upgrader" program. 2. Decompress the attached file, and a folder is created. 3. Double-click on "FlashUpgrader.exe", and the following window appears...
  • Seite 34 PG-B10S 5. Click on the arrow mark shown above, and select the decompressed folder. 6. Select "pwSDK.inf" in the folder. 7. Double-click on "pwSDK.inf".
  • Seite 35 PG-B10S Note: Do not put checkmark the "Continuous Flash Mode" and "Notify On Completion" boxes, but put checkmark the "Reset Target After Download" box, all in Options. Put checkmark the "Flash" box in Modes. 8. Click on "Flash". The above screen shows up to get ready to write the program.
  • Seite 36 After up grade, OSD is in Japanese, Background is set None and Eco mode is ON. So, change OSD is Englis, Background is set to SHARP and Eco mode is off, (Or, set to "SS3". However, lamp time is also in this case.)
  • Seite 37: Trouble Shooting Table

    PG-B10S TROUBLESHOOTING Checking the basic operation Does the power LED light up or flash in red or green? Go to "Checking the power unit". Does the set function with its keys or the remote controller? Go to "Checking the microprocessor circuits".
  • Seite 38 PG-B10S Checking the power unit Are the P701, P711 and P741 connectors tightly connected? Reconnect the P701, P711 and P741 connectors tightly. Is the bimetal switch in good condition? Replace the bimetal switch. Is there AC voltage (100- 240V) applied across C701? Replace F701.
  • Seite 39 PG-B10S Checking the microprocessor circuits Is there about DC3.3V applied between pins (3) and (5) of IC1703? Check IC1703 and its peripheral circuits, or IC1702 and its peripheral circuits. Is there about DC2.5V applied between pins (5) and (8) of IC1704? Check IC1704 and its peripheral circuits.
  • Seite 40 PG-B10S Checking the lamp light-up Is the lamp tight in the socket? Insert the lamp tightly in the socket. Is there DC350-400V voltage applied between the P712 pins? Go to "Checking the power unit". Are the P741 and P742 harnesses tightly...
  • Seite 41 PG-B10S Checking the RGB signals Are there RGB gradation signals at pins (43), (48) and (54) of IC6004? Check Q3008, Q3012, Q3016 and their peripheral circuits. Are there RIN2-RIN9, GIN2-GIN9 and BIN2- BIN9 input signals at Check IC8003 and its IC1401? peripheral circuits.
  • Seite 42 PG-B10S Checking the S-Video signals Is there specified voltage at the EA connector? Go to "Checking the power unit". Is there S-Video input signal at pins (71) and (75) of IC3001? Check the S-Video terminal and its peripheral circuits. Check IC3001 and its peripheral circuits.
  • Seite 43: Technische Daten

    (SPAKXA333WJZZ), Projektorhandbuch- und- technische Referenz-CD-ROM (UDSKAA039WJZZ), “QUICK GUIDE (Schnellanleitung)”-Aufkleber (TLABZA439WJZZ), Bedienungsanleitung (TINS-A917WJZZ) Bedingt durch fortlaufende technische Verbesserungen behält sich SHARP das Recht vor, das De- sign und die Spezifikationen ohne vorherige Ankündigung ändern zu können. Die angegebenen Leistungswerte stellen die Nennwerte einer in Serienherstellung produzierten Einheit dar. Geringe...
  • Seite 44: Hinweise Für Das Wartungspersonal

    PG-B10S HINWEISE FÜR DAS WARTUNGSPERSONAL 1 2 3 4 5 6 7 8 9 0 1 2 3 4 5 6 7 8 9 0 1 2 3 4 5 6 7 8 9 0 1 2 1 2 3 4 5 6 7 8 9 0 1 2 3 4 5 6...
  • Seite 45: Vorsichtsmaßregeln Für Bleifreien Lötzinn

    PG-B10S Vorsichtsmaßregeln für bleifreien Lötzinn 1 Verwendung von bleifreiem Lötzinn Bei den Platinen für dieses Modells wird bleifreies Lot verwendet. Das Symbol LF kennzeichnet bleifreies Lot und findet sich an den Platinen und in den Wartungshandbüchern. Der Buchstabe hinter LF bezieht sich auf die Art des bleifreien Lots.
  • Seite 46: Bedienungsanleitung

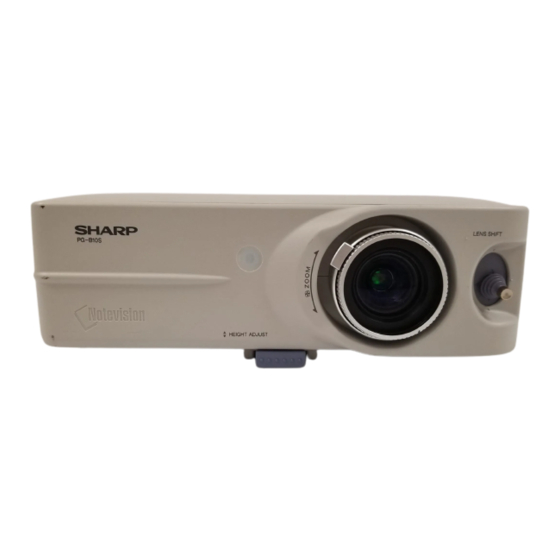
    PG-B10S Bedienungsanleitung Projektor (Vorderansicht- und Draufsicht) INPUT-Taste ON-Taste Für das Umschalten zwischen Schaltet die Stromversorgung ein. Eingang 1, 2 oder 3-Betriebsart. Netz-Anzeige KEYSTONE-Taste Für das Aktivieren des Trapezverzerrungs-Korrekturmodus. STANDBY-Taste Einstelltasten (', ", \, |) Schaltet den Projektor in den •...
  • Seite 47: Informationen Über Die Anzeigen Des Projektors

    PG-B10S Informationen über die Anzeigen des Projektors Netz-Anzeige Grün ein/Rot ein ... Normal Rot blinkt ... Unnormal Lampen-Anzeige Grün ein ... Normal Grün blinkt ... Die Lampe wird aufgewärmt. Rot ein ... Wechseln Sie die Lampe. Temperaturwarn-Anzeige Aus ... Normal Rot ein ...
  • Seite 48: Projektor (Hintersicht)

    PG-B10S Projektor (Hintersicht) INPUT 1-Anschluss INPUT 2-Anschluss Anschluss für Computer- Anschluss für ein RGB- und Videogerät mit einem Komponentensignale. S-VIDEO-Anschluss. RGB AUSGABE- INPUT 3-Anschluss Anschluss Anschluss für ein Terminal zum Anschluss Videogerät. eines Monitors. RS-232C-Anschluss AUDIO INPUT- Anschluss für die Bedienung...
  • Seite 49: Eingabe/Ausgabe Terminals Und Hauptausrüstung Zum Anschließen

    PG-B10S EINGABE/AUSGABE Terminals und Hauptausrüstung zum Anschließen RS-232C-Anschluss INPUT 1-Anschluss INPUT 3-Anschluss Anschluss des Computers Anschließen des Computers. Anschließen der Videogeräte ohne zur Steuerung des S-Video Ausgabeterminal. Projektors. Anschließen der Videogeräte mit der Komponente Ausgabeterminal (DVD- Player, DTV-Decoder, usw.). AUDIO INPUT-Anschluss Anschließen an ein...
  • Seite 50: Fernbedienung (Vordersicht)

    PG-B10S Fernbedienung (Vordersicht) ON-Taste STANDBY-Taste Schaltet die Stromversorgung ein. Schaltet den Projektor in den Standby-Modus. MENU-Taste KEYSTONE-Taste Für die Anzeige des Justierungs- und Für das Aktivieren des Trapezverzerrungs- Einstellungsbildschirms. Korrekturmodus. Einstelltasten ('" \ |) • Für die Auswahl der Menüpunkte.
  • Seite 51: Pin-Belegung

    PG-B10S Pin-Belegung Reichweite Fernbedienungssensor Der Projektor kann mittels der Fernbedienung ° innerhalb der in der Abbildung dargestellten Bereiche gesteuert werden. Hinweis ° • Das Signal von der Fernbedienung kann für eine einfache Bedienung von der Bildwand reflektiert Signalsender für werden. Die tatsächliche Reichweite des Signals Fernbedienung kann je nach Bildwandmaterial unterschiedlich sein.
  • Seite 52 PG-B10S INPUT 1 und RGB AUSGABE-Signalanschluss: 15-Pin Mini-D-Sub weiblich RGB-Eingang Komponenteneingang 1. Videoeingang (rot) 1. P 2. Videoausgang (grün/Sync. auf grün) 2. Y 3. Videoausgabe (blau) 3. P 4. Nicht angeschlossen 4. Nicht angeschlossen 5. Nicht angeschlossen 5. Nicht angeschlossen 6.
  • Seite 53: Pc-Steuerung

    PG-B10S PC-Steuerung Der Projektor kann durch einen Anschluss an einen Computer über ein serielles RS-232C-Steuerkabel (Kreuztyp, separat erhältlich) über den Computer gesteuert werden. (Siehe Seite Anschlussanleitungen.) Kommunikationsbedingungen Legen Sie die seriellen Porteinstellungen des Computers so fest, dass sie denen der Tabelle entsprechen.
  • Seite 54: Abmessungen

    PG-B10S ABMESSUNGEN Ansicht von hinten Einheiten: Zoll (mm) Ansicht von oben Ansicht von Ansicht von (294) der Seite der Seite (64) ø 65 Ansicht von vorne (60.4) (195.6) (64.2) (207.4) (86.6) (28.5) (65) Ansicht von unten (45) Einheit:mm...
  • Seite 55: Entfernen Der Hauptteile

    PG-B10S ENTFERNEN DER HAUPTTEILE 1. Entfernen der Lampeneinheits- und der Filtereinheitsabdeckung 1-1. Die Sicherungsschraube von der Lampeneinheitsabdeckung losdrehen, dann die Lampeneinheitsabdeckung entfernen. 1-2. Die beiden Sicher ungsschrauben von der Lampeneinheitsabdeckung losdrehen, dann die Lampeneinheitsabdeckung entfernen. 1-3. Die beiden Sicherungsschrauben von der Filterabdeckung losdrehen, dann die Filterabdeckung entfernen.
  • Seite 56: Entfernen Der Hauptplatine

    PG-B10S 3. Entfernen der Hauptplatine 3-1. Die beiden Sicherungsschrauben von der Hauptplatineneinheit losdrehen, dann die Hauptplatineneinheit entfernen. Hauptplatine [FD] [EA] [RP] [GP] [RP] [FA] [TH] [FB] [LF] [TI] [SP] 4. Entfernen des Objektivs 4-1. Die beiden Arretierschrauben von der Lampenfassung losdrehen, dann die Lampenfassung abnehmen.
  • Seite 57: Entfernen Der Stromversorgungsplatinen-Vorschaltgeräteeinheit

    PG-B10S 5. Entfernen der Stromversorgungsplatinen-Vorschaltgeräteeinheit 5-1. Die vier Sicherungsschrauben von der Stromversorgungsplatinen-Vorschaltgeräteeinheit losdrehen, dann die Platinen-Vorschaltgeräteeinheit entfernen. 5-2. Die Isolationsplatte entfernen. 5-3. Das Platinen-Vorschaltgerät entfernen. Stromversorgungsplatine Obere Abschirmung Platinen-Vorschaltgerät Untere Abschirmung...
  • Seite 58 PG-B10S 6. Entfernen des Netzeingangs, des Luftauslaßgebläses, des Lautsprechers sowie des Ansaugschachts und des Ansauggebläses 6-1. Die Netzeingangsplatine entfernen. 6-2. Die Sicherungsschraube vom Abluftgebläse losdrehen, dann das Abluftgebläse entfernen. 6-3. Den Lautsprecher entfernen. 6-4. Die beiden Sicherungsschrauben vom Ansaugschacht losdrehen, dann den Ansaugschacht entfernen.
  • Seite 59: Rückstellen Des Lampenbetriebseit-Timers

    Kundendienst zur Reparatur geben. Lüftungsöffnungen verstopft Lüftungsöffnungen. Die Lampe muss Restliche Lebensdauer Grün ein Den Projektor einem von Sharp autorisierten Rot ein ausgetauscht der Lampe sinkt auf 5% Grün blinkt, Händler für Projektoren oder dem werden. oder weniger ab.
  • Seite 60: Beschreibung Der Optik-Inheit

    PG-B10S BESCHREIBUNG DER OPTIK-EINHEIT Erläuterungen für das korrekte Setup der optischen Komponenten und Baugruppen (An- sicht von oben) Projektionsobjektiv LCD (R) LCD (B) Eingangspolarisator (R) Eingangspolarisator (B) Relaislinse 3 Kondensor B Polarisationsstrahlenteiler (PBS) Facettenlinse (Ausgang) Facettenlinse (Eingang) Konkavlinse Ausgangspolarisator C...
  • Seite 61 PG-B10S <Auswechseln des Prismenhalters> 1. Die beiden Arretierschrauben vom Prismenhalter entfernen, dann den Prismenhalter aus der Optikeinheit abnehmen. 2. Einen neuen Prismenhalter in die Optikeinheit einsetzen. Hinweis: Selbst wenn ausschließlich die LCD defekt ist, den ganzen Prismenhalter durch einen neuen ersetzen.
  • Seite 62: Elektrische Einstellung

    PG-B10S ELEKTRISCHE EINSTELLUNG Nr. Einstellgegenstand Einstellbedingungen Einstellverfahren » Die folgenden Einstellungen vornehmen: EEPROM wird 1. D e n N e t z s c h a l t e r initialisiert S2002 drücken, um den Bearbeitungsmodus einschalten und das Gerät aufzurufen und "SS2"...
  • Seite 63 PG-B10S Nr. Einstellgegenstand Einstellbedingungen Einstellverfahren Einstellung der 1. Ein NTSC-Komposit-10- 1. Den Einstellwert überprüfen. Video-Helligkeit Stufensignal (ohne Setup) Contrast (Weißpegel): 43 und des mit einem Amplitudenpegel Bright (Schwarzpegel): 142 Kontrastes von 100% zuführen. 2. Die folgenden Gruppen und Positionen wählen:...
  • Seite 64 PG-B10S Nr. Einstellgegenstand Einstellbedingungen Einstellverfahren 1. D a s S V G A 6 0 H z - 1. E N B X R - P h a s e n e i n s t e l l u n g...
  • Seite 65 PG-B10S Nr. Einstellgegenstand Einstellbedingungen Einstellverfahren Automatische 1. Die automatische Korrektur 1. S i c h ve r g ew i s s e r n , d a ß k e i n e a u f f ä l l i g e...
  • Seite 66 PG-B10S Nr. Einstellgegenstand Einstellbedingungen Einstellverfahren Muster- und 1. E i n S V G A - 7 5 - H z - 1. Den Festwert überprüfen. Halteimpulsphase Schwarzsignal zuführen. PCK-PHASE : 282 2. Die folgenden Gruppen GCK-PHASE: 282 und Positionen wählen:...
  • Seite 67: Rückstellung Des Lampen-Timers An Diesem Modell

    PG-B10S 1. Aktivieren und Deaktivieren des Prozeßmodus unter Verwendung der Steuertasten dieses Modells. 1-1. Aktivieren und Deaktivieren Wenn am Bildschirm kein Menü angezeigt wird, in der angegebenen Reihenfolge an der Fernbedienungseinheit die Tasten "UP", "UP", "DOWN", "DOWN", "RIGHT", "LEFT" und "ENTER" drücken (Fernbedienungseinheiten des Typs A10 oder der Serie C50/45 und P25/20).
  • Seite 68: Prozeßmenü

    PG-B10S Prozeßmenü 1 Ausschließlich die schattierten Posten vom unteren Prozeßmenü einstellen. Prozeßmenü einstellen OUTPUT2 PSIG-H First layer Pedestal PSIG-L VERSION LC-SW VIDEO LC-HPOS-R TEMP RLV1 OUTPUT1 PATTERN RLV2 OUTPUT2 LAMP RLV3 OUTPUT3 LINE LC-HPOS-G VIDEO1 EXIT GLV1 GLV2 Second layer...
  • Seite 69 PG-B10S Prozeßmenü 2 second layer Initial Value VERSION Rom Code EXIT SS3 EU SS4 US SS5 JPN SS6 CHIN EXIT TEMP Temp1 Parameter of sensor 1 Temp2 Parameter of sensor 2 Temp3 No Use Temp4 No Use EXIT PATTERN Cross Hatch...
  • Seite 70: Aktualisierung Der Version

    2. Das Netzkabel zu diesem Zeitpunkt noch nicht anschließen. 2) Aktualisierungsverfahren 1. Um PG-B10S zu aktualisieren, ist das "Flash Up grader"-Programm zu verwenden. 2. Die angehängte Datei entkomprimieren und einen Ordner erstellen. 3. "FlashUpgrader.exe" doppelklicken, worauf das folgende Fenster erscheint.
  • Seite 71 PG-B10S 5. Die obere Pfeilmarke anklicken und den entkomprimierten Ordner anw_hlen. 6. "pwSDK.inf" im Ordner anw_hlen. 7. "pwSDK.inf" doppelklicken.
  • Seite 72 PG-B10S Hinweis: Die Markierung "Continuous Flash Mode" sowie "Notify On Completion" nicht anhaken, jedoch "Reset Target After Download" in allen Optionen markieren. Das Optionsfeld "Flash" anwählen, oder sicherstellen, daß dieses Optionsfeld gewählt wird. 8. "Flasch" anklicken. Das obige Display erscheint und ist bereit, das Programm zu schreiben.
  • Seite 73 PG-B10S 9. Nun das Netzkabel anschließen, worauf das Programm geschrieben wird. Ca. 4 Minuten warten, bis das Schreiben des Programms beendet ist. Wenn dieser Vorgang beendet ist, erscheint die folgende Anzeige. "Close" anklicken, worauf die Aktualisierung endet. Das Gerät startet eventuell nicht automatisch. Das Netzkabel abziehen und wieder einstecken, damit das Gerät...
  • Seite 74: Fehlersuchtabelle

    PG-B10S FEHLERSUCHTABELLE Überprüfung der grundlegenden Funktionen Ist die POWER LED NEIN eingeschaltet, oder blinkt sie rot oder grün? Mit dem Abschnitt "Überprüfung des Netzteils" fortfahren. Kann das Gerät mit der Einschalttaste oder über NEIN die Fernbedienungseinheit eingeschaltet werden? Mit dem Abschnitt "Überprüfung der Mikrocomputer- Peripherieschaltkreise"...
  • Seite 75 PG-B10S Überprüfen des Netzteils Sind die Stecker P701, NEIN P711 und P741 fest angeschlossen? Sind die Stecker P701, P711 und P741 fest eingesteckt? Ist der Bimetall-Schalter NEIN ausgeschaltet? Den Bimetall-Schalter ersetzen. Liegt eine NEIN Wechselspannung (100 - 240 V) an C701 an? F701 ersetzen.
  • Seite 76 PG-B10S Überprüfung der Mikrocomputer- Peripherieschaltkreise Liegt eine Gleichspannung NEIN von ca. 3,3 V an den Stiften (3) und (5) von IC1703 und seine Peripherie- IC1703 an? Schaltkreise bzw. IC1702 und seine Peripherie-Schaltkreise überprüfen. Liegt eine Gleichspannung NEIN von ca. 2,5 V zwischen...
  • Seite 77 PG-B10S Überprüfung der Lampenfunktion Ist die Lampenfassung locker? NEIN Die Lampenfassung fest anschließen. Liegt eine Gleichspannung NEIN von 350 - 400 V zwischen den Stiften von P712 an? Mit dem Abschnitt "Überprüfen des Netzteils" fortfahren. Sind die Zuleitungskabel für P741 und P742 fest am NEIN Netzteil bzw.
  • Seite 78 PG-B10S Überprüfung des RGB- Signals Werden die RGB-Signale über die Stifte (43), (48) NEIN und (54) von IC6004 ausgegeben? Q3008, Q3012, Q3016 und seine Peripherie- Schaltkreise überprüfen. Werden die Signale RIN2 - NEIN RIN9, GIN2 - GIN9 und BIN2 - BIN9 zu IC1401 IC8003 und seine übermittelt?
  • Seite 79 PG-B10S Überprüfen des S-Video- Signals Liegt die spezifizierte NEIN Spannung an den EA- Steckern an? Mit dem Abschnitt überprüfen des Netzteils. Liegt an den Stiften (71) NEIN und (75) von IC3001 ein S- Videosignal an? Die S-Video-Anschlüsse und ihre Peripherie- Schaltkreise überprüfen.
  • Seite 80: Chassis-Anordnung

    PG-B10S CHASSIS LAYOUT / CHASSIS-ANORDNUNG...
  • Seite 81 PG-B10S...
  • Seite 82: Block Diagram

    PG-B10S BLOCK DIAGRAM / BLOCKSCHALTBILD...
  • Seite 83 PG-B10S...
  • Seite 84: Overall Wiring Diagram

    PG-B10S OVERALL WIRING DIAGRAM / GESAMTSCHALTPLAN...
  • Seite 85 PG-B10S...
  • Seite 86: Description Of Schematic Diagram

    PG-B10S DESCRIPTION OF BESCHREIBUNG DES SCHEMATIC DIAGRAM SCHEMATISCHEN SCHALTPLANS VOLTAGE MEASUREMENT CONDITION: SPANNUNGSMESSUNGEN: 1. Voltages at test points are measured at the 1. Spannungen an den Prüfpunkten werden bei einer supply voltage of AC 220V. Signals are fed by a color...
  • Seite 87: Waveforms

    PG-B10S WAVEFORMS / WELLENFORMEN 1 RTP(P1302-1) 2 GTP(P1302-2) 3 BTP(P1302-3) H:20µsec/div H:20µsec/div H:20µsec/div V:2V/div V:2V/div V:2V/div 4 NRS(TP1201) 5 VSYNC-TG(R8074-2) 6 HSYNC-TG(R8074-4) H:20µsec/div H:10msec/div H:10µsec/div V:2V/div V:1V/div V:1V/div 7 VIDEO-IN(IC3001-73) 8 Video(J402-2) H:20µsec/div H:10µsec/div V:0.5V/div V:0.2V/div...
  • Seite 88: Schematischer Schaltplan

    PG-B10S Ë MAIN UNIT / HAUPTEINHEIT-1/12...
  • Seite 89 PG-B10S...
  • Seite 90 PG-B10S Ë MAIN UNIT / HAUPTEINHEIT-2/12...
  • Seite 91 PG-B10S...
  • Seite 92 PG-B10S Ë MAIN UNIT / HAUPTEINHEIT-3/12...
  • Seite 93 PG-B10S...
  • Seite 94 PG-B10S Ë MAIN UNIT / HAUPTEINHEIT-4/12...
  • Seite 95 PG-B10S...
  • Seite 96 PG-B10S Ë MAIN UNIT / HAUPTEINHEIT-5/12...
  • Seite 97 PG-B10S...
  • Seite 98 PG-B10S Ë MAIN UNIT / HAUPTEINHEIT-6/12...
  • Seite 99 PG-B10S...
  • Seite 100 PG-B10S Ë MAIN UNIT / HAUPTEINHEIT-7/12...
  • Seite 101 PG-B10S...
  • Seite 102 PG-B10S Ë MAIN UNIT / HAUPTEINHEIT-8/12...
  • Seite 103 PG-B10S...
  • Seite 104 PG-B10S Ë MAIN UNIT / HAUPTEINHEIT-9/12...
  • Seite 105 PG-B10S...
  • Seite 106 PG-B10S Ë MAIN UNIT / HAUPTEINHEIT-10/12...
  • Seite 107 PG-B10S...
  • Seite 108 PG-B10S Ë MAIN UNIT / HAUPTEINHEIT-11/12...
  • Seite 109 PG-B10S...
  • Seite 110 PG-B10S Ë MAIN UNIT / HAUPTEINHEIT-12/12...
  • Seite 111 PG-B10S...
  • Seite 112 PG-B10S Ë POWER UNIT / NETZTEILEINHEIT...
  • Seite 113 PG-B10S...
  • Seite 114 PG-B10S Ë AC INLET UNIT...
  • Seite 115: Printed Wiring Board Assemblies

    PG-B10S PRINTED WIRING BOARD ASSEMBLIES LEITERPLATTENEINHEITEN AC INLET Unit (Component Side)
  • Seite 116: Main Unit (Side-A) Haupt-Einheit (Seite-A)

    PG-B10S Main Unit (Side-A) Haupt-einheit (Seite-A)
  • Seite 117 PG-B10S...
  • Seite 118: Main Unit (Side-B) Haupt-Einheit (Seite-B)

    PG-B10S Main Unit (Side-B) Haupt-einheit (Seite-B)
  • Seite 119 PG-B10S...
  • Seite 120: Power Unit (Component Side) Netzteinheit (Bestückungsseite)

    PG-B10S Power Unit (Component Side) Netzteinheit (Bestückungsseite)
  • Seite 121: Power Unit (Wiring Side) Netzteinheit (Leiterbahnseite)

    PG-B10S Power Unit (Wiring Side) Netzteinheit (Leiterbahnseite)
  • Seite 122: Parts Listë Electrical Parts

    Contact your nearest SHARP Parts Distributor. For location of SHARP Parts Distributor, 5. KODE 6. QUANTITÄT Please call Toll-Free; 1-800-BE-SHARP in CANADA: Contact SHARP Electronics of Canada Limited Phone (416) 890-2100. # MARK: SPARE PARTS-DELIVERY SECTION # MARKIERUNG : ERSATZTEILE-LIEFERUNG Ref. No.
  • Seite 123 PG-B10S Ref. No. Part No. Description Code Ref. No. Part No. Description Code DUNTKC053FE01 Q4002 VSHN1B04FU/-1Y J HN1B04FU Q4003 VSHN1B04FU/-1Y J HN1B04FU MAIN UNIT (Continued) Q4004 VSHN1B04FU/-1Y J HN1B04FU Q4005 VS2SC2735//-1Y J 2SC2735 Q4006 VS2SC3928AR-1Y J 2SC3928AR IC5009 VHiLV123AT+-1Y J SN74LV123APWR...
  • Seite 124 PG-B10S Ref. No. Part No. Description Code Ref. No. Part No. Description Code DUNTKC053FE01 C1325 VCCCCY1HH102JY J 1000p 50V Ceramic C1329 VCEAPF1CW106MY J 10 16V Electrolytic MAIN UNIT (Continued) C1330 VCEAPF1CW106MY J 10 16V Electrolytic C1332 VCKYCY1EF104ZY J 0.1 25V Ceramic...
  • Seite 125 PG-B10S Ref. No. Part No. Description Code Ref. No. Part No. Description Code DUNTKC053FE01 C3050 VCKYCY1EF104ZY J 0.1 25V Ceramic C3051 VCKYCY1HB103KY J 0.01 50V Ceramic MAIN UNIT (Continued) C3052 VCKYCY1HB103KY J 0.01 50V Ceramic C3053 VCKYCY1HB103KY J 0.01 50V Ceramic C3054 VCKYCY1EF104ZY J 0.1...
  • Seite 126 PG-B10S Ref. No. Part No. Description Code Ref. No. Part No. Description Code DUNTKC053FE01 RESISTORS R401 VRS-TW2ED750JY J 75 1/4W Metal Oxide MAIN UNIT (Continued) R402 VRS-TW2ED750JY J 75 1/4W Metal Oxide R403 VRS-TW2ED750JY J 75 1/4W Metal Oxide C6005 VCKYCY1EF104ZY J 0.1...
  • Seite 127 PG-B10S Ref. No. Part No. Description Code Ref. No. Part No. Description Code R1537 VRS-CY1JF000JY 1/16W Metal Oxide DUNTKC053FE01 R1547 VRS-CY1JF182JY J 1.8k 1/16W Metal Oxide MAIN UNIT (Continued) R1548 VRS-CY1JF392JY J 3.9k 1/16W Metal Oxide R1549 VRS-CY1JF332JY J 3.3k 1/16W Metal Oxide...
  • Seite 128 PG-B10S Ref. No. Part No. Description Code Ref. No. Part No. Description Code DUNTKC053FE01 R3058 VRS-CY1JF102JY J 1k 1/16W Metal Oxide R3060 VRS-CY1JF102JY J 1k 1/16W Metal Oxide MAIN UNIT (Continued) R3062 VRS-CY1JF101JY J 100 1/16W Metal Oxide R3063 VRS-CY1JF102JY...
  • Seite 129 PG-B10S Ref. No. Part No. Description Code Ref. No. Part No. Description Code DUNTKC053FE01 R8037 VRS-CY1JF222JY J 2.2k 1/16W Metal Oxide R8038 VRS-CH1JF220JY J 22 1/16W Metal Oxide MAIN UNIT (Continued) R8042 VRS-CY1JF220JY J 22 1/16W Metal Oxide R8043 VRS-CY1JF220JY...
  • Seite 130 PG-B10S Ref. No. Part No. Description Code Ref. No. Part No. Description Code DUNTKC053FE01 LX-BZ3100CEFN J Screw, x2 XBBSN30P08000 J Screw, x1 MAIN UNIT (Continued) FB1714 RBLN-0209TAZZY J Ferrite Bead FB1715 RBLN-0058TAZZY J Ferrite Bead FB2001 RBLN-0067CEZZY J Ferrite Bead...
  • Seite 131 PG-B10S Ref. No. Part No. Description Code Ref. No. Part No. Description Code DUNTKC054DE01 RESISTORS R711 VRS-TW2ED221JY J 220 1/4W Metal Oxide POWER UNIT R712 VRS-TW2ED223JY J 22k 1/4W Metal Oxide R714 VRN-VV3DBR27J J 0.27 2W Metal Film INTEGRATED CIRCUITS...
  • Seite 132: Ë Cabinet And Mechanical Parts

    PG-B10S Ref. No. Part No. Description Code Ref. No. Part No. Description Code DUNTKC055DE01 CABINET AND MECHANICAL PARTS AC INLET UNIT VARISTOR CBDYFA001WJ01 J Front Body Ass’y Not Available – Front Body — VA701 RH-VXA018WJZZ J Varistor å GCOVAA419WJSA J RC Cover...
  • Seite 133 PG-B10S Ref. No. Part No. Description Code Ref. No. Part No. Description Code CABINET AND MECHANICAL PARTS 2 2-1 2-1-1 2-1-4 2-1-3 2-1-2 3-18 3-3-1 3-3-2 13-1 13-2 3-3-3 3-18 3-1-6 3-3-4 3-13 3-10 3-20 3-1-4 3-1-2 3-1-3 3-20 3-1-5...
  • Seite 134 PG-B10S Ref. No. Part No. Description Code Ref. No. Part No. Description Code CABINET AND MECHANICAL PARTS OPTICAL MECHANISM PARTS (Continued) RDENCA050WJZZ J BALLAST Unit CCHSKA009WJ01 J Optical Mechanism Unit RH-HXA008WJZZ J Thermister CLCDPA035WJ01 J Cross Dichroic Prism Not Available –...
  • Seite 135 PG-B10S Ref. No. Part No. Description Code Ref. No. Part No. Description Code OPTICS MECHANISM PARTS 5-43 5-41 5-43 5-1-1 5-1-2 5-42 5-4-5 5-1-3 5-14 5-4-2 5-4-1 5-4-3 5-42 5-42 5-12 5-49 5-4-4 5-35 5-40 5-50 5-29 5-37 5-36 5-32...
  • Seite 136: Supplied Accessories

    PG-B10S Ref. No. Part No. Description Code Ref. No. Part No. Description Code PACKING PARTS SUPPLIED ACCESSORIES (NOT REPLACEMENT ITEM) GCASNA009WJZZ J Carrying Case SPAKCA914WJZZ – Packing Case — PFiLDA010WJZZ J Extra Air Filter SPAKPA237WJZZ – Polystyrene Cover — QACCBA015WJPZ J Power Cord(for U.K.,...
  • Seite 137: Packing Of The Set

    PG-B10S Ref. No. Part No. Description Code Ref. No. Part No. Description Code PACKING OF THE SET / VERPACKEN DES GERÄTS Extra Air Fiter # Polyethylene Bag (PFiLDA010WJZZ) (SSAKA0160CEZZ) Operation Manual (TiNS-A917WJZZ) "QUICK GUIDE" Label (TLABZA439WJZZ) Carrying Case CD-ROM (GCASNA006WJZZ)
  • Seite 138 PG-B10S COPYRIGHT © 2003 BY SHARP CORPORATION ALL RIGHTS RESERVED. No part of this publication may be reproduced, stored in a retrieval system, or transmitted in any form or by any means, electronic, mechanical, photocopying, recording, or otherwise, without prior written permission of the publisher.

Inhaltsverzeichnis