Herunterladen Inhalt Inhalt Diese Seite drucken
Beyerdynamic Stegos Schnellstartanleitung

Beyerdynamic Stegos Schnellstartanleitung

Drahtloses digitales grenzflächenmikrofonsystem
Vorschau ausblenden Andere Handbücher für Stegos:

Werbung

Verfügbare Sprachen

Verfügbare Sprachen

QUICK START GUIDE
Stegos
Drahtloses digitales Grenzflächenmikrofonsystem
Wireless digital boundary microphone system
Système numérique sans fil
de microphone à gradient de pression

Werbung

Inhaltsverzeichnis
loading

Inhaltszusammenfassung für Beyerdynamic Stegos

  • Seite 1 QUICK START GUIDE Stegos Drahtloses digitales Grenzflächenmikrofonsystem Wireless digital boundary microphone system Système numérique sans fil de microphone à gradient de pression...
  • Seite 3: Inhaltsverzeichnis

    Inbetriebnahme mit Mediensteuerung ..... . 6 Grenzflächenmikrofon Stegos TB ....... . . 7 Was tun, wenn .
  • Seite 4: Einführung

    Wir danken für Ihr Vertrauen. Nehmen Sie sich bitte einige Minuten Zeit und lesen Sie diese Information vor Inbetriebnahme aufmerksam durch. Eine ausführliche Beschreibung des Stegos-Systems und der Stegos Software finden Sie in der Bedienungs- anleitung „Stegos“ auf der mitgelieferten CD.
  • Seite 5: Inbetriebnahme

    Stegos – Quick Start Guide Inbetriebnahme Empfänger Stegos RS Am Empfänger sind drei verschiedene Anschlüsse für Videokonferenzsysteme verfügbar: 3-pol. Phönix- Klemme, 3,5 mm Klinke und 3-pol. XLR. Die einzelnen Mikrofonsignale können über eine mehrpolige Phönix-Klemmleiste abgegriffen werden. Für den Datenaustausch mit Mediensteuersystemen oder PC ist eine RS 232-Schnittstelle sowie ein USB-Anschluss vorhanden.
  • Seite 6: Inbetriebnahme Mit Pc

    Stegos – Quick Start Guide Aufstellen des Emfängers • Stellen Sie den Empfänger Stegos RS in dem Raum auf, in dem die Übertragung statt findet freistehend mindestens auf gleicher Höhe zu den Grenzflächenmikrofonen Stegos TB. • Vermeiden Sie Abschattungen der Stegos RS Antennen, insbesondere durch metallische Flächen.
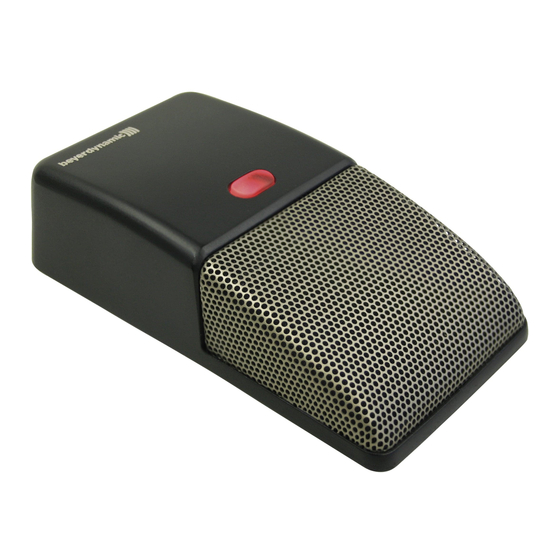
  • Seite 7: Grenzflächenmikrofon Stegos Tb

    Mikrofons erfolgt über integrierte NiMH-Akkus. Vor der ersten Inbetriebnahme müssen Sie daher die Akkus im Grenzflächenmikrofon Stegos TB aufladen. Der Akku- und Ladezustand wird zu- verlässig über eine LED auf der Rückseite des Mikrofons angezeigt. Über die mitgelieferte Stegos Soft- ware sind individuelle Anpassungen der Mikrofonparameter möglich.
  • Seite 8 Konfiguration des ersten Stegos-Systems 1. Schalten Sie den ersten Empfänger Stegos RS ein und verbinden Sie die RS 232-Schnittstelle oder den USB-Anschluss des Empfängers Stegos RS mit einem PC. 2. Schalten Sie die zugehörigen Grenzflächenmikrofone Stegos TB ein.
  • Seite 9 Wichtig: Alle Grenzflächenmikrofone Stegos TB sind nun bestimmten HF-Bändern zugeordnet und verbinden sich nur mit dem jeweiligen Empfänger Stegos RS, der auf diesem HF-Band empfängt. Somit können bis zu drei Stegos-Systeme parallel betrieben werden. Die Grenzflächenmikrofone können nicht unter den verschiedenen Empfängern ausgetauscht werden („Auto-Lock“...
  • Seite 10: Was Tun, Wenn

    Verringern Sie den Abstand zwischen beiden Geräten. • Die Kanäle sind in der Stegos Software nicht aktiviert. Aktivieren Sie die Kanäle in der Stegos Software. • Die Anzahl der zulässigen Mikrofone ist überschritten. Beachten Sie, dass Sie maximal 4 Grenz- flächenmikrofone Stegos TB gleichzeitig betreiben können.
  • Seite 11: Entsorgung

    Stegos – Quick Start Guide Entsorgung Dieses Produkt darf am Ende seiner Lebensdauer nicht über den normalen Haushaltsabfall entsorgt werden, sondern muss an einem Sammelpunkt für das Recycling von elektrischen und elektronischen Geräten abgegeben werden. Das Symbol auf dem Produkt, der Gebrauchs-...
  • Seite 13 How to operate Stegos with a media control system... 14 Stegos TB boundary microphone ....... . 15 What can I do, if .
  • Seite 14: Introduction

    Thank you for selecting the Stegos wireless digital boundary microphone system. Please take some time to read carefully through this manual before setting up the equipment. Please refer to the supplied CD for a more detailed description of the Stego system and the Stegos software in the Stegos manual.
  • Seite 15: How To Operate The System

    Stegos – Quick Start Guide How to operate the system Stegos RS receiver The receiver provides three different connections for video conference systems: 3-pin Phoenix terminal strip, mini jack (3.5 mm) and 3-pin XLR. The individual microphone signals are available via a multipin Phoenix terminal strip.
  • Seite 16: How To Operate Stegos With A Pc

    Stegos – Quick Start Guide Where to place the receiver • Place the Stegos RS receiver in the same room where the transmission takes place. Make sure that the receiver is placed on the same table height as the Stegos TB boundary microphone.
  • Seite 17: Stegos Tb Boundary Microphone

    Button for On / Off of the device How to recharge • Before the Stegos TB boundary microphone is used for the first time, you have to recharge the integrated rechargeable batteries. The charging time is approx. 2 hours. • In order to recharge the batteries connect the supplied mains charger adapter to the microphone and a power socket.
  • Seite 18 Please note during the configuration only one Stegos RS receiver may be turned on. Configuration of the first Stegos system 1. Turn on the first Stegos RS receiver and connect the RS 232 interface or the USB connection of the Stegos RS receiver to a PC.
  • Seite 19 Stegos – Quick Start Guide 3. First of all you must find all Stegos TB boundary microphones where “Auto Lock” is ticked in the Stegos software. Tick the “Auto Lock” tick box. Select any RF band (e.g. Low) and wait a few seconds until all Stegos TB boundary microphones that are set to “Low”...
  • Seite 20: What Can I Do, If

    If the change of frequency band does not help, turn off the other devices that operate on 2.4 GHz. • The Stegos TB boundary microphone is not within the range of the Stegos RS receiver. Reduce the distance between the two devices.
  • Seite 21: Disposal

    Stegos – Quick Start Guide Disposal This symbol on the product, in the instructions or on the packaging means that your electrical and electronic equipment should be disposed at the end of its life separately from your household waste. There are separate collection systems for recycling in the EU. For more information, please contact the local authority or your retailer where you purchased the product.
  • Seite 23 Récepteur Stegos RS ........
  • Seite 24: Introduction

    Veuillez impérativement observer le feuillet joint « Instructions de sécurité ». Le système Stegos sans fil se compose d’un récepteur et d’un microphone à gradient de pression et a été spécialement mis au point pour l’utilisation avec des systèmes de vidéoconférence. Il est possible d’utiliser jusqu’à...
  • Seite 25: Mise En Service

    Stegos – Quick Start Guide Mise en service Récepteur Stegos RS Le récepteur comprend trois prises différentes pour systèmes de vidéoconférence : une sortie Phoenix 3 broches, une jack 3,5 mm et une XLR 3 broches. Les différents signaux de microphone peuvent être captés via une plaque à...
  • Seite 26: Mise En Service Avec Pc

    Stegos – Quick Start Guide Installation du récepteur • Placez isolément le récepteur Stegos RS dans la pièce où a lieu la transmission au moins à même hauteur que les microphones. • Evitez la projection d’ombre sur les antennes Stegos RS, notamment par des surfaces métalliques.
  • Seite 27: Microphone À Gradient De Pression Stegos Tb

    Larsen. L’alimentation électrique du microphone s’effectue par le biais d’accumulateurs NiMH. Avant la première mise en service, vous devez charger les accus du microphone à gradient de pression Stegos TB. Un témoin DEL à l’arrière du microphone indique de manière fiable l’état de charge et des accus. Des réglages individuels des paramètres de microphones peuvent être effectués via le logiciel Stegos fourni.
  • Seite 28: Durée De Fonctionnement

    Stegos RS (extinction du microphone au bout d’une minute). Fonctionnement sur secteur • Le microphone à gradient de pression Stegos TB peut également être alimenté via le bloc de charge- ment fourni. • Branchez le bloc de chargement sur la prise DC .
  • Seite 29 Stegos – Quick Start Guide Configuration du premier système Stegos 1. Allumez le premier récepteur Stegos RS et raccordez-le via l'interface RS 232 ou le port USB à un PC. 2. Allumez les microphones de surface Stegos TB afférents. 3. Dans un premier temps, tous les microphones de surface Stegos TB afférents doivent être localisés avec fonction «...
  • Seite 30: Que Faire Si

    • Il est possible qu’un autre appareil (p.ex. routeur WiFi) travaille sur la même gamme de fréquences. Changez de bande de fréquences à l’aide du logiciel Stegos ou pressez la pointe d’un crayon ou d'un trombone sur l’interrupteur encastré pour commutation HF .
  • Seite 31: Evacuation

    Stegos – Quick Start Guide Evacuation Ce symbole sur le produit, l’emballage ou dans le manuel signifie que votre équipement électrique et électronique doit être, en fin de vie, jeté séparement de vos déchets ménages. Il existe en France des systèmes de collecte différents pour les déchets recyclables. Pour plus d’information, veuillez contacter les autorités locales ou le revendeur chez qui vous avez...
  • Seite 32 Theresienstr. 8 | 74072 Heilbronn – Germany Tel. +49 (0) 7131 / 617 - 0 | Fax +49 (0) 7131 / 617 - 204 info@beyerdynamic.de | www.beyerdynamic.com Weitere Vertriebspartner weltweit finden Sie unter www.beyerdynamic.com For further distributors worldwide, please go to www.beyerdynamic.com...

Inhaltsverzeichnis