Next Level Racing ERS3 HYPERCOOL Bedienungsanleitung
Inhaltsverzeichnis
Inhaltsverzeichnis

Verwandte Anleitungen für Next Level Racing ERS3 HYPERCOOL


Inhaltszusammenfassung für Next Level Racing ERS3 HYPERCOOL
- Seite 1 INSTRUCTION MANUAL *IMAGE IS INDICATIVE ONLY*...
- Seite 2 We know you’re eager to start racing! Take your time with the instructions and follow this guide to assemble your product. You’ll be setting yourself up for success by following the instruction booklet to fully optimize your product. ASSEMBLY VIDEO bit.ly/nlrbuild @next_level_racing @nextlevelracingOfficial @nextlvlracing Next Level Racing FOLLOW support@nextlevelracing.com...
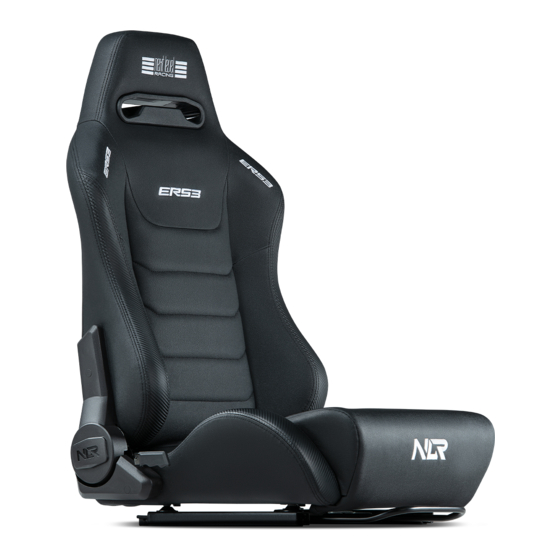
- Seite 3 T A K E R A C I N G T O T H E N E X T L E V E L...
- Seite 4 3 years or any NLR-E063 INSTRUCTIONS individuals who have a tendency to Date of Document: May, 2025 place inedible objects in their mouths. Manufactured by: Next Level Racing Simulations PTY LTD 23 Olympic CCT, Southport, QLD, 4215 Australia ASSEMBLY VIDEO...
- Seite 5 IN THE BOX NOTE: Some Items Come with Rust Resistant Coating *NOT TO SCALE 1 x LEFT, 1 x RIGHT 1 x RIGHT SEAT RECLINER COVER 1 x SEAT BACKREST 1 x SEAT BOTTOM SEAT BASE RECLINER 1 x LEFT SEAT RECLINER COVER 2 x M5 8mm 4 x M8 WASHERS 4 x M8 25mm BOLTS...
-
Seite 6: Inhaltsverzeichnis
3.1 How to Use the Next Level Racing ERS3 Hypercool Safely ......9... -
Seite 7: Introduction
1 INTRODUCTION Thank you for purchasing the Next Level Racing ERS3 Hypercool Seat. This manual is designed to guide you through the setup and usage of your new seat. If you have any questions or require assistance, please reach out to our support team at support@nextlevelracing.com. -
Seite 8: Obtaining Documentation And Information
1.4 Intended Use and Reasonably Foreseeable Misuse The Next Level Racing ERS3 Hypercool Seat is designed solely for indoor gaming applications and should be used only within gaming simulators or esports environments. It must not be used in vehicles, on public roads, or for any non-gaming-related activity. -
Seite 9: Important Safety Information
• Individual Use Only: The ERS3 Hypercool Seat is intended for individual use only. • Power Supply Compatibility: Ensure that the power supply matches the seat’s voltage and current specifications. -
Seite 10: Child Safety Information
3.1.2 Child Safety Information • Child Safety: Keep children away from the seat to prevent injury. Always supervise children to prevent them from tampering with the product. • Packaging Materials: Never leave children unattended with packaging material, as it may pose a suffocation hazard. -
Seite 11: Instructions
4 INSTRUCTIONS PARTS: NLR ERS3 HYPERCOOL ASSEMBLY • • 1 x Seat Backrest Repeat • • 1 x Seat Bottom on Other Side • • 4 x M8 25mm Bolts • • 4 x M8 Washers NOTE: Uninstall the M8... - Seite 12 A) Switching down operates fan at Speed 1 Low. B) Switching up operates fan at Speed 2 High. WARNING: Steps following ERS3 Hypercool seat assembly, show typical ERS3 seat assembly to cockpit frames. These steps do not show cable management.
-
Seite 13: Nlr Elite Cockpit Series Assembly
PARTS: NLR ELITE SERIES ASSEMBLY • • NIL Uninstall the M8 Bolts and Washers securing the Seat Brackets to the 4040 Extrusions. PARTS: • • NIL Remove the Seat Brackets. PARTS: • • NIL Lift the Seat Slider Lever and slide the Seat Rails all the way back to access the rear mounting slots on the Seat Slider Rail. - Seite 14 PARTS: NOTE: Partially tighten bolts with fingers, then secure using M6 • • 2 x M8 16mm Low Profile Bolts Allen Key. • • 2 x M8 Spring Washers Note: Use Spring Washers with M8 Low Profile Bolts when installing Seat to the F-GT Elite Cockpit.
-
Seite 15: Nlr Elite Cockpit Series Assembly For Angle & Height Adjustment
PARTS: NLR ELITE SERIES ASSEMBLY FOR • • NIL ANGLE & HEIGHT ADJUSTMENT (NOT COMPATIBLE WITH GT ELITE LITE) Uninstall the Bolts securing the Seat Brackets to the 4040 Extrusions. PARTS: • • NIL Remove the Seat Brackets. PARTS: • • NIL Uninstall the Ratchet Handles securing the 4040 Extrusion Assemblies to the Base Members. - Seite 16 PARTS: • • NIL Remove the 4040 Extrusion Assemblies. PARTS: TOP VIEW of 4040 Extrusions from Elite Cockpits. • • NIL (FRONT) 285mm 104mm 104mm 355mm (REAR) NOTE: Leave the 4040 Extrusions aside for future steps. A) Uninstall the Countersunk Bolts securing the End Plates to the 4040 Extrusions and remove the End Plates. B) For ease of installation in later Steps, move T-Nuts in the 4040 Extrusion to locations shown by red dots.
- Seite 17 PARTS: • • NIL Uninstall the T-Nuts from the upper outside channel in the Left and Right Base Members where the Ratchet Handles were installed. PARTS: • • 4 x T-Nuts Repeat on Other Side Install the T-Nuts previously uninstalled in Step 19 into the top channel of the Base Members. PARTS: •...
- Seite 18 PARTS: NOTE: Leave Bolts hand tight to allow adjustment in future steps. • • 4 x M8 16mm Bolts • • 4 x M8 Washers • • 2 x Side Mount Seat Brackets Align the mounting slots on the Seat Brackets with the T-Nuts previously installed in Step 20. Bolt through and secure with 4 x M8 Bolts and Washers.
- Seite 19 PARTS: • • NIL Align the threaded holes on the end of the 4040 Extrusions with the mounting holes and slots on the Seat Brackets. PARTS: • • 4 x Rachet Handles Bolt through and secure with Ratchet Handles previously uninstalled in Step 15. LATERAL ADJUSTMENT PARTS: Repeat...
-
Seite 20: Nlr Gttrack Assembly
PARTS: ANGLE & HEIGHT ADJUSTMENT • • NIL For angle and height adjustment use the variety of mounting holes and slots provided on the Seat Brackets. PARTS: • • NIL Your installation is complete on the Elite Series cockpit. PARTS: NLR GTTRACK ASSEMBLY •... - Seite 21 PARTS: • • NIL Uninstall the M8 Low Profile Bolts securing the front Seat Slider Rails to the frame. PARTS: • • NIL Lift the Seat Slider Lever and slide the GTTrack Seat all the way forward to access the rear Bolts. PARTS: •...
- Seite 22 PARTS: • • NIL Remove the GTTrack Seat Assembly. PARTS: • • NIL A) Lift the Seat Slider Lever and slide the Seat Rails all the way back to access the rear mounting slots on the Seat Slider Rails. B) Identify the Seat Slider Rail mounting holes and slots marked by the arrows. PARTS: •...
- Seite 23 PARTS: • • NIL Lift the Seat Slider Lever and slide the ELITE SERIES Seat all the way back to access the front mounting holes on the Seat Slider. PARTS: • • 2 x M8 16mm Low Profile Bolts Repeat on Other Side A) Align the identified Seat Slider front mounting holes from Step 34B with the inserts in the frame.
-
Seite 24: Nlr F-Gt Assembly (Only Compatible With Existing F-Gt Seat Sliders)
PARTS: NLR F-GT ASSEMBLY • • NIL NOTE: The ELITE SERIES Seat installation is not compatible with the F-GT Shifter Assembly installed on the F-GT Cockpit. Uninstall the Bolts, Washers and Nuts securing the Shifter to the frame and remove the Shifter Assembly. - Seite 25 PARTS: • • NIL NOTE: Make sure Seat Sliders do not splay open after removing front Bolts. A) Lift the Seat Slider Lever and slide the Seat Rails all the way back to access the front mounting Bolts on the Seat. B) Uninstall the Bolts securing the Seat Sliders to the Seat.
- Seite 26 PARTS: • • 2 x M8 Bolts Repeat on Other Side A) Lift the Seat Slider Lever and slide the Seat all the way back to access the rear mounting slots. B) Align the Seat Slider rear mounting slots with the threaded inserts on the seat and secure with M8 Bolts uninstalled in Step 41.
-
Seite 27: Disposals
5 DISPOSALS 5.1 How to Dispose the Product 5.1.1 Disposal of electronic components The symbol on the product, the accessories or packaging indicates that this device must not be treated as unsorted municipal waste but must be collected separately. Dispose of the device via a collection point for the recycling of waste electrical and electronic equipment if you live within the EU and in other European countries that operate separate collection systems for waste electrical and electronic equipment. - Seite 28 1. Présentation Merci d'avoir acheté le siège Hypercool Next Level Racing ERS3. Ce manuel est conçu pour vous guider tout au long de la configuration et de l'utilisation de votre nouveau siège. Si vous avez des questions ou si vous avez besoin d'aide, veuillez contacter notre équipe d'assistance au support@nextlevelracing.com.
-
Seite 29: Données Techniques
1.4 Utilisation prévue et mauvaise utilisation raisonnablement prévisible Le siège Next Level Racing ERS3 Hypercool est conçu uniquement pour les applications de jeu en salle et ne doit être utilisé que dans des simulateurs de jeu ou des environnements esports. Il ne doit pas être utilisé dans des véhicules, sur la voie publique ou pour toute activité... - Seite 30 à moins qu'il ne soit sous la supervision d'une personne responsable ou qu'il ne reçoive des instructions appropriées. Utilisation individuelle uniquement : Le siège ERS3 Hypercool est destiné à un usage individuel uniquement. • Compatibilité de l'alimentation électrique : Assurez-vous que l'alimentation correspond aux spécifications de tension et •...
- Seite 31 06 – OPÉRATIONS NLR ESR3 HYPERCOOL. Appuyez sur le bouton situé sur le côté du siège pour faire fonctionner le ventilateur Next Level Racing Hypercool. A) L'abaissement fait fonctionner le ventilateur à la vitesse 1 faible. B) La mise en marche fait fonctionner le ventilateur à...
- Seite 32 12 – L'installation de votre siège ERS3 est terminée sur le cockpit de la série Elite. 13 – NLR ERS3 SUR L' A SSEMBLAGE DE LA SÉRIE ELITE POUR LE RÉGLAGE DE L' A NGLE ET DE LA HAUTEUR. Désinstallez les boulons fixant les supports de siège à...
-
Seite 33: Élimination Des Composants Électroniques
trous de montage avant du curseur de siège. 38 – A) Alignez les trous de montage avant du curseur de siège identifiés à l'étape 32B avec les inserts du cadre. B) Boulonnez et fixez avec des boulons à profil bas M8. Fixez ensuite les boulons à partir de l'étape 36. 39 –... - Seite 34 1. Introducción Gracias por comprar el asiento Next Level Racing ERS3 Hypercool. Este manual está diseñado para guiarlo a través de la configuración y el uso de su nuevo asiento. Si tienes alguna pregunta o necesitas ayuda, comunícate con nuestro equipo de soporte en support@nextlevelracing.com.
- Seite 35 1.4 Uso previsto y uso indebido razonablemente previsible El asiento Next Level Racing ERS3 Hypercool está diseñado únicamente para aplicaciones de juego en interiores y debe usarse solo dentro de simuladores de juegos o entornos de deportes electrónicos. No debe usarse en vehículos, en la vía pública ni para ninguna actividad no relacionada con el juego.
- Seite 36 (incluidos niños) con discapacidades físicas, sensoriales o intelectuales, o que carezcan de experiencia o conocimiento a menos que esté bajo la supervisión de una persona responsable o se le proporcionen las instrucciones adecuadas. Solo para uso individual: El asiento ERS3 Hypercool está diseñado solo para uso individual. •...
- Seite 37 06 – OPERACIONES DE NGR ESR3 HYPERCOOL. Presione el interruptor de botón ubicado en el costado del asiento para operar el ventilador Next Level Racing Hypercool. A) La desconexión hace funcionar el ventilador a la velocidad 1 baja. B) La conmutación hace funcionar el ventilador a velocidad 2 alta.
- Seite 38 asegúrelos con una llave Allen M6. Nota: Use arandelas de resorte con pernos de perfil bajo M8 cuando instale el asiento en la cabina F-GT Elite. 24 – A) Levante la palanca del deslizador del asiento y deslice los rieles del asiento completamente hacia adelante para acceder a los orificios de montaje delanteros del deslizador del asiento.
-
Seite 39: Cómo Desechar El Producto
ranuras de montaje traseras. B) Alinee las ranuras de montaje traseras del deslizador del asiento con los insertos roscados del asiento y asegúrelo con los pernos M8 desinstalados en el paso 41. Luego, asegure los pernos apretados a mano del paso 45. - Seite 40 1. مقدمة . تم تصميم هذا الدليل أل إ رشادك خالل إعداد واستخدام مقعدك الجديد. إذا كانت لديك أيHypercool Next Level Racing ERS3 شك ر ا لك عىل رش ش اء مقعد .support@nextlevelracing.com أسئلة أو تحتاج إىل مساعدة ، ف� � جى التواصل مع فريق الدعم لدينا عىل...
- Seite 41 :أنذر ال� ت � لم تتم الموافقة عليها � احة من قبل ال� ش كة المصنعة أو الطرفHypercool Next Level Racing ERS3 أي تغي� � ات أو تعديالت غ� � مرصح بها عىل مقعد .المسؤول عن األمتثال قد تبطل حقك � ن � تشغيل المنتج وقد تؤدي إىل عدم استيفاء المقعد لمعاي� � السالمة ، مما يشكل خط ر ا أو عطال محتمال...
- Seite 42 .الطاقة بمصدر الطاقة . أ) يعمل التبديلNext Level Racing Hypercool . اضغط عىل مفتاح الزر الموجود عىل جانب المقعد لتشغيل مروحةNLR ESR3 60 - عمليات الت� ب يد الفائق .أل أ سفل عىل تشغيل المروحة ب�عة 1 منخفضة. ب) تشغيل المروحة ب�عة 2 عالية...
- Seite 43 .فتحات وفتحات تثبيت سكة م� ن ن لق المقعد المم� � ن ة باأل أ سهم 63 - أ) قم بمحاذاة فتحات التثبيت الخلفية ل� ش يط تمرير المقعد المحددة مع األ إ دخاألت الملولبة عىل األ إ طار. ب) قم بتثبيته يدويا للمساعدة � ن � محاذاة فتحات .
- Seite 44 • 座椅专为模拟器和电子竞技而设计, 不适用于道路或车辆。 • 如果您的产品需要任何支持, 请联系我们友好的团队: support@nextlevelracing.com 警告 窒息危险 小部件不适合 3 岁以下的儿童或任何倾向于将不可食用物品放入口中的人。 1. 引言 感谢您购买 Next Level Racing ERS3 Hypercool 座椅。 本手册旨在指导您完成新座椅的设置和使用。 如果您有任何问题或需 要帮助, 请通过 support@nextlevelracing.com 联系我们的支持团队。 1.1 本手册中安全警告的说明 用户的安全是我们的首要任务。 请密切注意本手册中的以下危险分类: 危险: 表示高风险危险, 如果不避免, 将导致死亡或重伤。 • 警告: 表示中等风险危险, 如果不避免, 可能会导致死亡或重伤。...
- Seite 45 FCC 合规声明: 本设备符合 FCC 规则的第 15 部分。 作需满足以下两个条件: 本设备可能不会造成有害干扰。 本设备必须接受接收到的任何干扰, 包括可能导致意外作的干扰。 谨慎: 未经制造商或合规责任方明确批准而对 Next Level Racing ERS3 Hypercool 座椅进行任何未经授权的更改或修改, 可能会使 您作该产品的权利失效, 并可能导致座椅不再符合安全标准, 构成潜在危险或故障。 注意: 本设备已经过测试, 符合 FCC 规则第 15 部分对 B 类数字设备的限制。 这些限制旨在提供合理的保护, 防止住宅安装中的有 害干扰。 本设备会产生、 使用和辐射射频能量, 如果不按照说明安装或使用, 可能会对无线电通信造成有害干扰。 但是, 不能保...
- Seite 46 04 - 座椅躺椅调节。 抬起两个座椅调角杆以改变座椅靠背的角度。 松开调节靠背以锁定到位的控制杆。 05 – NLR ESR3 HYPERCOOL 连接。 A) 如图所示, 将位于座椅靠背上的连接电源线连接在一起。 b) 将电源适配器连接到电源。 06 – NLR ESR3 HYPERCOOL作。 按下位于座椅侧面的按钮开关可作 Next Level Racing Hypercool 风扇。 A) 向下切换后, 风扇 以 1 Low 的速度运行。 B) 切换以 2 High 速度运行风扇。 警告: 按照 ERS3 Hypercool 座椅组件的步骤, 显示了驾驶舱框架的典型 ERS3 座椅组件。 这些步骤不显示电缆管理。 请注意...
- Seite 47 11 – A) 向上提起座椅滑块杆并将座椅一直向后滑动以进入前安装孔。 将座椅滑块前安装孔与前 4040 挤压件中的 T 形螺母 对齐。 B) 用螺栓穿过并用 M8 低矮型螺栓固定。 请注意: 用手指部分拧紧螺栓, 然后使用 M6 内六角扳手固定。 注意 : 将座椅安 装到 F-GT Elite Cockpit 时, 请使用带有 M8 Low Profile 螺栓的弹簧垫圈。 12 – 您的 ERS3 座椅在 Elite Series Cockpit 上安装完成。 13 –...
- Seite 48 41 – A) 抬起座椅滑块杆并将座椅一直向后滑动以接触后螺栓。 B) 卸下将座椅导轨固定到座椅上的后 M8 螺栓。 42 – A) 抬起座椅滑块杆并将座椅一直向前滑动以接触前螺栓。 B) 卸下将座椅导轨固定到座椅的前 M8 螺栓, 然后从框架上 拆下座椅。 43 – A) 抬起座椅滑块杆并将座椅导轨一直向后滑动, 以接触座椅上的前部安装螺栓。 B) 卸下将座椅滑块固定到座椅上的螺 栓。 注意 :确保座椅滑块在卸下前螺栓后不会张开。 44 – A) 抬起座椅滑块杆并将座椅导轨一直向前滑动, 以接触座椅上的后部安装螺栓。 B) 卸下将座椅滑块固定到座椅的后部 M8 低矮型螺栓, 然后拆下包括座椅垫片在内的组件。 注意:如果 Seat Slider Lever 弹出, 则可以手动激活单个 Seat Slider。 为 此,...
- Seite 49 Malé části, ne pro děti do 3 let nebo pro jakékoli jedince, kteří mají tendenci vkládat do úst nepoživatelné předměty. 1. Úvod Děkujeme, že jste si zakoupili sedačku Next Level Racing ERS3 Hypercool. Tato příručka je navržena tak, aby vás provedla nastavením a používáním vašeho nového sedadla. Máte-li jakékoli dotazy nebo potřebujete pomoc, obraťte se na náš...
-
Seite 50: Technické Údaje
1.4 Zamýšlené použití a rozumně předvídatelné zneužití Sedadlo Next Level Racing ERS3 Hypercool Seat je určeno výhradně pro vnitřní herní aplikace a mělo by být používáno pouze v herních simulátorech nebo v prostředí esportů. Nesmí se používat ve vozidlech, na veřejných komunikacích ani pro žádné... - Seite 51 Kompatibilita napájecího zdroje: Ujistěte se, že napájecí zdroj odpovídá voltage a aktuální specifikace sedadla. • Používejte pouze napájecí adaptér dodaný s produktem. Nebezpečí úrazu elektrickým proudem: Abyste předešli úrazu elektrickým proudem, nikdy neponořujte sedadlo do • vody a zajistěte, aby se do jeho vnitřku nedostala voda. Viditelné...
- Seite 52 Next Level Racing Hypercool ovládat. A) Ztlumením provozu ventilátoru při nízké rychlosti 1. B) Zapnutí pracuje ventilátor při rychlosti 2 vysoké. UPOZORNĚNÍ: Kroky následující po sestavě sedadla ERS3 Hypercool ukazují typickou sestavu sedadla ERS3 k rámům kokpitu. Tyto kroky nezobrazují správu kabelů. Dbejte prosím na vedení kabelů a zajistěte, aby se kabely nepřiskříply při sestavě...
- Seite 53 30 – NLR ERS3 V SESTAVĚ GTTRACK. Zvedněte páčku posuvníku sedadla a posuňte sedadlo GTTrack úplně dozadu, abyste získali přístup k předním šroubům. 31 – Odmontujte nízkoprofilové šrouby M8, které připevňují posuvné kolejnice předních sedadel k rámu. 32 – Zvedněte páčku posuvníku sedadla a posuňte sedadlo GTTrack úplně dopředu, abyste získali přístup k zadním šroubům.
-
Seite 54: Anweisungen Zur Aufbewahrung
Mund zu nehmen. 1. Einleitung Vielen Dank, dass Sie sich für den Next Level Racing ERS3 Hypercool Sitz entschieden haben. Dieses Handbuch soll Sie durch die Einrichtung und Verwendung Ihres neuen Sitzes führen. Wenn Sie Fragen haben oder Hilfe benöti- gen, wenden Sie sich bitte an unser Support-Team unter support@nextlevelracing.com. -
Seite 55: Beschaffung Von Unterlagen Und Informationen Support Und Service
Betrieb verursachen können. VORSICHT: Nicht autorisierte Änderungen oder Modifikationen am Next Level Racing ERS3 Hypercool-Sitz, die nicht ausdrück- lich vom Hersteller oder der für die Einhaltung verantwortlichen Partei genehmigt wurden, können zum Erlöschen Ihres Rechts zum Betrieb des Produkts führen und dazu führen, dass der Sitz nicht mehr den Sicherheitsstandards entspricht, was eine potenzielle Gefahr oder Fehlfunktion darstellt. -
Seite 56: Allgemeine Sicherheitsinformationen In Bezug Auf Den Verwendungszweck
Erfahrung oder Wissen bestimmt, es sei denn, es wird von einer verantwortlichen Person beaufsichtigt oder mit entsprechenden Anweisungen versehen. • Nur für den individuellen Gebrauch: Der ERS3 Hypercool-Sitz ist nur für den individuellen Gebrauch bestimmt. • Kompatibilität des Netzteils: Stellen Sie sicher, dass das Netzteil den Spannungs- und Stromspezifikationen des Sitzes entspricht. - Seite 57 Racing Hypercool-Lüfter zu bedienen. A) Beim Ausschalten wird der Lüfter auf Stufe 1 niedrig betrieben. B) Beim Einschalten wird der Lüfter auf Stufe 2 High betrieben. ACHTUNG: Die Schritte nach der ERS3 Hypercool-Sitzbaugruppe zeigen die typische ERS3-Sitzmontage an den Cockpitrahmen. Bei diesen Schritten wird das Kabelmanagement nicht angezeigt. Bitte achten Sie auf das Kabelmanagement und stellen Sie sicher, dass die Kabel nicht durch die Sitz- und Rahmenmontage eingeklemmt werden.
- Seite 58 gangsschrauben und Unterlegscheiben, mit denen die linken und rechten Basisteile am hinteren Basiselement befestigt sind. 19 – Deinstallieren Sie die T-Muttern aus dem oberen Außenkanal in den linken und rechten Basisträgern, wo die Ratschengriffe installiert wurden. 20 – Montieren Sie die T-Muttern, die zuvor in Schritt 19 deinstalliert wurden, in den oberen Kanal der Basisele- mente.
-
Seite 59: So Entsorgen Sie Das Produkt
40 – NLR ERS3 AUF F-GT-BAUGRUPPE. Deinstallieren Sie die Schrauben, Unterlegscheiben und Muttern, mit denen der Schalthebel am Rahmen befestigt ist, und entfernen Sie die Schalthebelbaugruppe. Hinweis: Die Installation des ERS3-Sitzes ist nicht mit der F-GT Shifter Assembly kompatibel, die auf dem F-GT Cockpit installiert ist. 41 –... -
Seite 60: Spiegazione Delle Avvertenze Di Sicurezza In Questo Manuale
1. Introduzione Grazie per aver acquistato il sedile Hypercool Next Level Racing ERS3. Questo manuale ha lo scopo di guidare l'utente attraverso la configurazione e l'utilizzo del nuovo seggiolino. Se hai domande o hai bisogno di assistenza, contatta il nostro team di supporto all'indirizzo support@nextlevelracing.com. -
Seite 61: Dati Tecnici
150 kg (330 libbre) 2.2 Conformità del prodotto Il sedile ventilato Sim Racing Next Level Racing® ERS3 HYPERCOOL è conforme ai seguenti standard di conformità del prodotto: Certificazioni di prodotto: CE, ROHS, REACH, WEEE, UKCA / UKCA ROHS, RCM, PSE, FCC Part 15, CA 65, certificazione KC, CCC, CN ROHS Dichiarazione di conformità... -
Seite 62: Riparazioni E Modifiche
Solo per uso individuale: il seggiolino ERS3 Hypercool è destinato esclusivamente all'uso individuale. • Compatibilità dell'alimentatore: assicurarsi che l'alimentatore corrisponda alle specifiche di tensione e corrente del • seggiolino. Utilizzare solo l'adattatore di alimentazione fornito con il prodotto. Rischio di scosse elettriche: per evitare scosse elettriche, non immergere mai il sedile in acqua e assicurarsi che •... - Seite 63 06 – OPERAZIONI DI HYPERCOOL NLR ESR3. Premere l'interruttore a pulsante situato sul lato del sedile per azionare la ventola Next Level Racing Hypercool. A) La disattivazione aziona il ventilatore a Velocità 1 Bassa. B) L'accensione aziona la ventola a velocità 2 alta.
- Seite 64 25 – Allineare i fori filettati all'estremità dei profilati 4040 con i fori di montaggio e le fessure sulle staffe del sedile per montaggio laterale. 26 – Avvitare e fissare con le maniglie a cricchetto precedentemente disinstallate al passaggio 15. 27 –...
- Seite 65 dispositivo in modo corretto, si contribuisce a evitare possibili pericoli per l'ambiente e la salute pubblica che potrebbero altrimenti essere causati da un trattamento improprio delle apparecchiature di scarto. Il riciclaggio dei materiali contribuisce alla conservazione delle risorse naturali. Non smaltire le vecchie apparecchiature elettriche ed elettroniche con i rifiuti urbani indifferenziati.
- Seite 66 JA - エスパニョール ERS3ハイパークール取扱説明書 あなたがレースを始めることを熱望していることを私たちは知っています!指示に時間をかけ、 このガイドに従って製品を組み 立ててください。 取扱説明書に従って製品を完全に最適化することで、 成功への準備を整えることができます。 レース前のチェック 警告 • 締めすぎると部品が損傷する可能性があるため、 組み立てに電動工具を使用しないでください。 • さらにサポートが必要な場合は、 インストールビデオを参照するか、 support@nextlevelracing.com までお問い 合わせください • 部品を無理に押し合わせないでください。 • クロススレッドボルトは避けてください。 • 鋭いエッジに注意してください。 • 部品が壊れたり、 破れたり、 欠落している場合は、 シートを使用しないでください。 • すべての組み立て金具がしっかりと締められていることを確認し、 安全性と安定性について定期的にチェックして ください。 • シートはシミュレーターやeスポーツ用に設計されており、 道路での使用や車両での使用には適していません。 製品に関するサポートが必要な場合は、 次のフレンドリーなチームにお問い合わせください support@nextlevelracing.com 警告窒息の危険...
- Seite 67 ーターまたはeスポーツ環境でのみ使用する必要があります。 車両、 公道、 またはゲームに関連しない活動に使用することはで きません。 意図された目的を超えた使用は誤用と見なされ、 損傷や怪我につながる可能性があります。 ________________________________________ 2.製品の説明 2.1 技術データ パラメーター 単位 デバイス名 ネクスト レベル レーシング® ERS3 HYPERCOOL ベンチレーテッド シム レーシング シート 指定 シムレーシングシート 種類 ER3ハイパークール 電圧/周波数 12VDC、 24W、 100V-240VAC / 2A / 50-60Hz 最大負荷 150 kg (330 ポンド) 2.2 製品コンプライアンス...
- Seite 68 • この製品を使用する前に、 すべての安全上の注意を含むこのマニュアルをよく読んで理解してください。 • これらの安全ガイドラインに従わないと、 重傷を負ったり、 製品が損傷したりする可能性があります。 警告: 3.1.1 使用目的に関連する一般的な安全情報 • 能力に障害のある個人には適していません:この製品は、 責任者の監督下にあるか、 適切な指示が提供されていない限り、 身体的、 感覚的、 または知的障害のある個人(子供を含む)、 または経験や知識が不足している人による使用を目的としてい ません。 • 個人使用のみ: ERS3 Hypercoolシートは、 個人使用のみを目的としています。 • 電源の互換性:電源がシートの電圧と電流の仕様と一致していることを確認してください。 製品に付属の電源アダプターの みを使用してください。 • 感電の危険性:感電を防ぐため、 シートを水に浸さず、 シート内部に水が入らないようにしてください。 • 目に見える損傷または過度の熱:使用中にシート、 電源コード、 または電源アダプターに目に見える損傷、 異臭、 または過度 の熱が見られる場合は、 すぐにシートの使用を中止し、 電源から切り離してください。 3.1.2 子供の安全情報...
- Seite 69 05 – NLR ESR3 ハイパークール接続。 A) 図のように、 シートの背面にある付属の電源ケーブルを一緒に接続します。 b)電源アダ プタを電源に接続します。 06 – NLR ESR3ハイパークール操作。 シート側面にあるボタンスイッチを押して、 ネクストレベルレーシングハイパークールファ ンを操作します。 A)スイッチダウンすると、 ファンが速度1低で作動します。 B)スイッチアップすると、 速度2高でファンが作動しま す。 警告: ERS3 Hypercoolシートアセンブリに続く手順は、 コックピッ トフレームへの典型的なERS3シートアセンブリを示していま す。 これらの手順では、 ケーブル管理は示されていません。 ケーブルの管理に注意し、 ケーブルがシートとフレームアセンブリで 挟まれないように注意してください。 シートスライダーの上や上にケーブルを置かないでください。 07 – エリートシリーズアセンブリのNLR ERS3。 サイドマウントシートブラケッ トを4040押出材に固定しているM8ボルトとワッシ ャーを取り外します。...
- Seite 70 15 – 4040押出アセンブリをベースメンバーに固定しているラチェッ トハンドルを取り外します。 16 – 4040 押し出しアセンブリを取り外します。 17 – A)エンドプレートを4040押出材に固定している皿ボルトを取り外し、 エンドプレートを取り外します。 B)後のステップで取り 付けを容易にするために、 4040エクストルージョンのTナッ トを赤い点で示されている場所に移動します。 注意: 4040押し出し は、 将来の手順のために脇に置いておきます。 注:エリートコックピッ トからの4040押出成形の上面図。 18 –ベースメンバーの背面にあるエンドキャップを取り外します。 左右のベースメンバーをリアベースメンバーに固定している アッパースルーボルトとワッシャーを取り外します。 19 –ラチェッ トハンドルが取り付けられた左右のベースメンバーの上部の外側チャネルからTナッ トを取り外します。 20 –手順19でアンインストールしたTナッ トをベースメンバーの上部チャネルに取り付けます。 21 – 手順18で取り外したボルト、 ワッシャー、 エンドキャップを再度取り付けます。 22 –サイドマウントシートブラケッ トの取り付けスロッ トを、 手順20で以前に取り付けたTナッ トに合わせます。 ボルトで固定し、 4 x M8ボルトとワッシャーで固定します。...
- Seite 71 40 – F-GTアセンブリのNLR ERS3。 シフターをフレームに固定しているボルト、 ワッシャー、 ナッ トを取り外し、 シフターアセンブ リを取り外します。 注:ERS3シートの取り付けは、 F-GTコックピッ トに取り付けられているF-GTシフターアセンブリと互換性が ありません。 41 – A)シートスライダーレバーを持ち上げ、 シートを完全に後ろにスライドさせて、 リアボルトにアクセスします。 B)シートレール をシートに固定しているリアM8ボルトを取り外します。 42 – A)シートスライダーレバーを持ち上げ、 シートを前方にスライドさせてフロントボルトにアクセスします。 B)シートレールを シートに固定しているフロントM8ボルトを取り外し、 シートをフレームから取り外します。 43 – A)シートスライダーレバーを持ち上げ、 シートレールを完全に後ろにスライドさせて、 シートのフロント取り付けボルトにア クセスします。 b)シートスライダーをシートに固定しているボルトを外します。 注意: フロントボルトを取り外した後、 シートスライ ダーが開かないようにしてください。 44 – A)シートスライダーレバーを持ち上げ、 シートレールを前方にスライドさせて、 シートの背面取り付けボルトにアクセスしま す。...
- Seite 72 1. Inleiding Bedankt voor het aanschaffen van de Next Level Racing ERS3 Hypercool Seat. Deze handleiding is bedoeld om u te begeleiden bij de installatie en het gebruik van uw nieuwe stoel. Als je vragen hebt of hulp nodig hebt, neem dan contact op met ons ondersteuningsteam op support@nextlevelracing.com.
- Seite 73 1.4 Beoogd gebruik en redelijkerwijs voorzienbaar verkeerd gebruik De Next Level Racing ERS3 Hypercool Seat is uitsluitend ontworpen voor indoor gaming-toepassingen en mag alleen worden gebruikt in gamesimulators of esports-omgevingen. Het mag niet worden gebruikt in voertuigen, op de openbare weg of voor andere niet-gaminggerelateerde activiteiten.
- Seite 74 (inclusief kinderen) met een lichamelijke, zintuiglijke of verstandelijke handicap, of mensen zonder ervaring of kennis, tenzij onder toezicht van een verantwoordelijke persoon of voorzien van de juiste instructies. Alleen voor individueel gebruik: De ERS3 Hypercool-stoel is uitsluitend bedoeld voor individueel gebruik. •...
- Seite 75 Racing Hypercool-ventilator te bedienen. A) Door het uitschakelen werkt de ventilator op snelheid 1 laag. B) Door het inschakelen werkt de ventilator op snelheid 2 Hoog. WAARSCHUWING: Stappen na de montage van de ERS3 Hypercool-stoel, toon de typische ERS3-stoelmontage aan de cockpitframes. In deze stappen wordt geen kabelbeheer weergegeven. Wees voorzichtig met kabelbeheer en zorg ervoor dat kabels niet bekneld raken bij zitting &...
- Seite 76 de voorste 4040 extrusie die in stap 16 is verwijderd. Bevestig het aan de stoelschuiven met behulp van M8 Low Profile Bolts. Opmerking: Draai de bouten gedeeltelijk vast met de vingers en zet ze vervolgens vast met de M6-inbussleutel. Opmerking: Gebruik veerringen met M8 Low Profile bouten bij het installeren van de stoel op de F-GT Elite Cockpit. 25 –...
- Seite 77 5.1 Hoe het product weg te gooien 5.1.1 Verwijdering van elektronische componenten Het symbool op het product, de accessoires of de verpakking geeft aan dat dit apparaat niet mag worden behandeld als ongesorteerd gemeentelijk afval, maar gescheiden moet worden ingezameld. Gooi het apparaat weg via een inzamelpunt voor de recycling van afgedankte elektrische en elektronische apparatuur als u in de EU woont en in andere Europese landen die gescheiden inzamelingssystemen voor afgedankte elektrische en elektronische apparatuur gebruiken.
- Seite 78 1. Wprowadzenie Dziękujemy za zakup fotela Next Level Racing ERS3 Hypercool. Niniejsza instrukcja ma na celu przeprowadzenie Cię przez proces konfiguracji i użytkowania nowego fotelika. Jeśli masz jakiekolwiek pytania lub potrzebujesz pomocy, skontaktuj się z naszym zespołem pomocy technicznej pod adresem support@nextlevelracing.com.
-
Seite 79: Dane Techniczne
1.4 Użytkowanie zgodne z przeznaczeniem i możliwe do przewidzenia niewłaściwe użycie Fotel Next Level Racing ERS3 Hypercool został zaprojektowany wyłącznie do zastosowań w grach w pomieszczeniach i powinien być używany wyłącznie w symulatorach gier lub środowiskach e-sportowych. Nie wolno go używać w pojazdach, na drogach publicznych ani do żadnych czynności niezwiązanych z grami. - Seite 80 że znajdują się pod nadzorem osoby odpowiedzialnej lub otrzymują odpowiednie instrukcje. Tylko do użytku indywidualnego: Fotel ERS3 Hypercool jest przeznaczony wyłącznie do użytku indywidualnego. • Kompatybilność zasilacza: Upewnij się, że zasilacz jest zgodny z voltage i aktualna specyfikacja siedzenia. Używaj •...
- Seite 81 B) Przełączenie w górę uruchamia wentylator z prędkością 2 High. UWAGA: Kroki następujące po montażu fotela ERS3 Hypercool, pokazują typowy montaż siedzenia ERS3 do ram kokpitu. Te kroki nie pokazują zarządzania. Zachowaj ostrożność podczas zarządzania i upewnij się, że nie zostaną ściśnięte podczas montażu siedziska i ramy.
- Seite 82 24 – A) Podnieś dźwignię suwaka siedzenia i przesuń szyny siedzenia całkowicie do przodu, aby uzyskać dostęp do przednich otworów montażowych w suwaku siedzenia. B) Dopasuj przednie otwory montażowe suwaka siedzenia do nakrętek teowych w przednim profilu 4040, który został odinstalowany w kroku 16. Przymocuj go do suwaków siedzenia za pomocą...
- Seite 83 5.1 Jak pozbyć się produktu? 5.1.1 Utylizacja elementów elektronicznych Symbol na produkcie, akcesoriach lub opakowaniu oznacza, że tego urządzenia nie wolno traktować jako niesortowanych odpadów komunalnych, ale należy je zbierać oddzielnie. Urządzenie należy zutylizować w punkcie zbiórki zużytego sprzętu elektrycznego i elektronicznego, jeśli mieszkasz w UE i innych krajach europejskich, które prowadzą...
- Seite 84 1. Introdução Obrigado por adquirir o assento Next Level Racing ERS3 Hypercool. Este manual foi projetado para guiá-lo na configuração e uso de seu novo assento. Se você tiver alguma dúvida ou precisar de ajuda, entre em contato com nossa equipe de suporte em support@nextlevelracing.com.
- Seite 85 1.4 Uso pretendido e uso indevido razoavelmente previsível O assento Next Level Racing ERS3 Hypercool foi projetado exclusivamente para aplicações de jogos internos e deve ser usado apenas em simuladores de jogos ou ambientes de esports. Não deve ser usado em veículos, em vias públicas ou para qualquer atividade não relacionada a jogos.
- Seite 86 (incluindo crianças) com deficiências físicas, sensoriais ou intelectuais, ou sem experiência ou conhecimento a menos que sob a supervisão de uma pessoa responsável ou com instruções apropriadas. Apenas para uso individual: O assento ERS3 Hypercool destina-se apenas ao uso individual. •...
- Seite 87 2 alta. AVISO: As etapas após o conjunto do assento ERS3 Hypercool mostram o conjunto típico do assento ERS3 nas estruturas do cockpit. Essas etapas não mostram o gerenciamento de cabos. Por favor, tome cuidado com o gerenciamento de cabos e garanta que os cabos não fiquem presos com o conjunto do assento e do quadro.
- Seite 88 controle deslizante do assento com as porcas em T na extrusão 4040 frontal que foi desinstalada na Etapa 16. Prenda-o aos controles deslizantes do assento usando parafusos de baixo perfil M8. NOTA Aperte parcialmente os parafusos com os dedos e, em seguida, prenda usando a chave Allen M6. Observação: Use arruelas de pressão com M8 Low Profile Parafusos ao instalar o assento no F-GT Elite Cockpit.
- Seite 89 aperto manual da Etapa 45. 47 – A sua instalação no F-GT está concluída. ________________________________________ 5.1 Como descartar o produto 5.1.1 Descarte de componentes eletrônicos O símbolo no produto, nos acessórios ou na embalagem indica que este dispositivo não deve ser tratado como lixo municipal indiferenciado, mas deve ser recolhido separadamente.
- Seite 90 рот несъедобные предметы. 1. Введение Благодарим вас за покупку сиденья Next Level Racing ERS3 Hypercool. Это руководство предназначено для того, чтобы помочь вам настроить и использовать новое сиденье. Если у вас есть какие-либо вопросы или вам нужна помощь, обратитесь в нашу службу поддержки по адресу support@nextlevelracing.com.
-
Seite 91: Технические Данные
1.4 Предполагаемое использование и разумно предсказуемое злоупотребление Сиденье Next Level Racing ERS3 Hypercool предназначено исключительно для игр в помещении и должно использоваться только в игровых симуляторах или киберспортивных средах. Его нельзя использовать в транспортных средствах, на дорогах общего пользования или для любой деятельности, не связанной с... - Seite 92 лицами (включая детей) с физическими, сенсорными или интеллектуальными нарушениями, а также с недостаточным опытом или знаниями, если только они не находятся под наблюдением ответственного лица или не сопровождаются соответствующими инструкциями. Только индивидуальное использование: Сиденье ERS3 Hypercool предназначено только для индивидуального • использования.
- Seite 93 спинке сиденья, как показано на рисунке. б) Подключите адаптер питания к блоку питания. 06 – ОПЕРАЦИИ ГИПЕРОХЛАЖДЕНИЯ NDR ESR3. Нажмите кнопочный переключатель, расположенный сбоку сиденья, чтобы управлять вентилятором Next Level Racing Hypercool. А) При переключении вниз вентилятор работает на низкой скорости 1. Б) При переключении вентилятор работает на скорости 2 Высокая.
- Seite 94 будущих шагов. ПРИМЕЧАНИЕ: ВИД СВЕРХУ на 4040 Extrusions из кабин Elite. 18 – Снимите торцевые заглушки в задней части элементов основания. Отсоедините верхний через болты и шайбы, которые удерживают левый и правый элементы основания к заднему элементу основания. 19 – Снимите Т-образные гайки с верхнего наружного канала в левом и правом элементах основания, где были установлены...
- Seite 95 42 – A) Поднимите рычаг ползунка сиденья и сдвиньте сиденье до упора вперед, чтобы получить доступ к передним болтам. B) Отсоедините передние болты M8, крепящие поручни сиденья к сиденью, и снимите сиденье с рамы. 43 – A) Поднимите рычаг ползунка сиденья и сдвиньте поручни сиденья до упора назад, чтобы получить доступ к...
- Seite 96 Küçük parçalar, 3 yaşın altındaki çocuklar veya ağızlarına yenmeyen nesneler koyma eğilimi olan kişiler için değildir. 1. Giriş Next Level Racing ERS3 Hypercool Koltuğu satın aldığınız için teşekkür ederiz. Bu kılavuz, yeni koltuğunuzun kurulumu ve kullanımı sırasında size rehberlik etmek için tasarlanmıştır. Herhangi bir sorunuz varsa veya yardıma ihtiyacınız varsa, lütfen support@nextlevelracing.com numaralı...
-
Seite 97: Teknik Veri
DİKKAT: Next Level Racing ERS3 Hypercool Koltukta üretici veya uyumluluktan sorumlu tarafça açıkça onaylanmayan herhangi bir yetkisiz değişiklik veya modifikasyon, ürünü çalıştırma hakkınızı geçersiz kılabilir ve koltuğun artık güvenlik standartlarını karşılamamasına neden olarak potansiyel bir tehlike veya arıza oluşturabilir. - Seite 98 Güç adaptörünü güç kaynağına bağlayın. 06 – NLR ESR3 HYPERCOOL IŞLEMLERI. Next Level Racing Hypercool fanını çalıştırmak için koltuğun yan tarafında bulu- nan düğmeye basın. A) Kapatma, fan Hız 1 Düşük Hızda çalışır. B) Anahtarlama, fanı 2 Yüksek Hızda çalıştırır.
- Seite 99 montajı ile sıkışmadığından emin olun. Kabloları koltuk sürgülerinin üzerine veya üzerine koymayın. 07 – NLR ERS3 ELITE SERISI MONTAJDA. Yan Montaj Koltuk Braketlerini 8 Ekstrüzyonlarına sabitleyen M4040 Cıvatalarını ve Pullarını çıkarın. 08 – Yana monte koltuk braketlerini çıkarın. 09 – NLR ERS3 KOLTUK KURULUMU. Koltuk Kaydırma Rayında bulunan arka montaj yuvalarına erişmek için Koltuk Kaydır- ma Kolunu kaldırın ve Koltuk Raylarını...
- Seite 100 35 – NLR ERS3 KOLTUK KURULUMU. A) Koltuk Kaydırma Rayları üzerindeki arka montaj yuvalarına erişmek için Koltuk Kaydırma Kolunu kaldırın ve Koltuk Raylarını tamamen geriye kaydırın. B) Oklarla işaretlenmiş Koltuk Sürgü Rayı montaj deliklerini ve yuvalarını belirleyin. 36 – A) Tanımlanan Koltuk Sürgüsü arka montaj yuvalarını çerçeve üzerindeki dişli ek parçalarla hizalayın. B) Adım 38'deki kokpitteki ön Koltuk Rayı...
- Seite 101 NOTES...
- Seite 102 support@nextlevelracing.com...