Herunterladen Diese Seite drucken

Werbung

Verfügbare Sprachen
  • DE

Verfügbare Sprachen

  • DEUTSCH, seite 24
T A K E R A C I N G T O T H E N E X T L E V E L
Video Instruction: bit.ly/nlrbuild
NEXT LEVEL RACING® WHEEL STAND 2.0
INSTRUCTION MANUAL
*Electronics not included

Werbung

loading

Inhaltszusammenfassung für Next Level Racing WHEEL STAND 2.0

  • Seite 1 T A K E R A C I N G T O T H E N E X T L E V E L Video Instruction: bit.ly/nlrbuild NEXT LEVEL RACING® WHEEL STAND 2.0 INSTRUCTION MANUAL *Electronics not included...
  • Seite 2 We know you’re eager to start racing! Take your time with the instructions and follow this guide to assemble your product. You’ll be setting yourself up for success with following the instruction booklet to fully optimize your product. ASSEMBLY VIDEO bit.ly/nlrbuild @next_level_racing @nextlevelracingOfficial @nextlvlracing Next Level Racing FOLLOW support@nextlevelracing.com...
  • Seite 3 Video Instruction: bit.ly/nlrbuild T A K E R A C I N G T O T H E N E X T L E V E L® N E X T L E V E L R A C I N G . C O M...
  • Seite 4 support@nextlevelracing.com PRE-RACE CHECKS WARNING • Please do not use power tools for assembly as over tightening can damage the frame. • Layout and build the Wheel Stand on level surface. • Do not force parts together. • Avoid cross threading bolts. •...
  • Seite 5 Video Instruction: bit.ly/nlrbuild IN THE 14 x 16mm M6 Bolt 14 x 16mm M8 Bolt Pedal Plate 8 x 55mm M8 Bolt 1 x M6 Allen Key 14 x M6 Flange Nuts 1 x M8 Allen Key Wheel Stand Wheel Plate 8 x M8 Flange Nuts 14 x M6 Washers Shifter Mounting Arm...
  • Seite 6 support@nextlevelracing.com PARTS: WARNING: Pinch Point Hazard, keep hands clear of the pivot area. Loosen the two knobs circled to unfold wheel stand. PARTS: • • 1x M8 16mm Knob WARNING: Be careful with fingers not getting pinched. Cut the plastic ties, then lay down the pedal frame and reinstall the twist knob at the front of the pedal frame.
  • Seite 7 Video Instruction: bit.ly/nlrbuild PARTS: • • Pedal Plate • • Pedal Plate Brackets • • 2 x M8 16mm Bolts • • 2 x M8 Washers Line up the back holes on the pedal plate with the back holes on the pedal brackets and bolt through using 2 x M8 Bolts and Washers.
  • Seite 8 support@nextlevelracing.com PARTS: Align the pedal assembly with the threaded inserts on the wheel stand pedal frame. PARTS: • • 4x M8 16mm Knob Install the knobs through the pedal assembly into the threaded inserts. Adjust the pedal plate to your desired position.
  • Seite 9 Video Instruction: bit.ly/nlrbuild PARTS: • • Wheel Deck • • 2x M8 55mm Bolts • • 2x M8 Washers • • 2x M8 Nuts Line up the front hole on the wheel plate with the wheel post hole secure using 1x M8 55mm bolt, washer and nut.
  • Seite 10 support@nextlevelracing.com PARTS: • • 4 x M8 16mm Bolts • • 4 x M8 Washers Uninstall the preinstalled bolts on the vertical posts, adjust to your desired height and re-install the bolts to lock your height in place. PARTS: • • 4 x M8 16mm Bolts REPEAT ON OTHER SIDE •...
  • Seite 11 Video Instruction: bit.ly/nlrbuild PARTS: • • 2x M8 55mm Bolts • • 2x M8 Washers • • 2x M8 Nuts (under shifter plate) Line up the holes on the Shifter Plate with the slots on the shifter arm, bolt through and secure using 2 x M8 55mm Bolts, Washers and Nuts.
  • Seite 12 support@nextlevelracing.com PARTS: • • 2 x M8 16mm Bolts • • 2 x M8 Washers Line up the holes on the Shifter Mounting Arm with the threaded inserts on the vertical post choose your desired height securing with 2x M8 16mm Bolts and Washers. PARTS: •...
  • Seite 13 Video Instruction: bit.ly/nlrbuild PARTS: • • 2 x M8 16mm Bolts • • 2 x M8 Washers Line up the holes on the cradle brackets with the threaded inserts on the Gaming Chair Cradle, bolt through using 2 x M8 16mm Bolts and Washers. PARTS: •...
  • Seite 14 support@nextlevelracing.com PARTS: Place two feet/wheels in the Gaming Chair Cradle. PARTS: (Open Position) (Stow Away Position) Stow away the Gaming Chair Cradle as shown to allow easy folding of the stand for storage.
  • Seite 15 Video Instruction: bit.ly/nlrbuild PARTS: Uninstall the Knob, and lift the pedal frame to line up the threaded insert with the folding tab install the knob to secure the pedal assembly. PARTS: WARNING: Make sure all knobs are tightened before lifting stand. Loosen the Knobs on the pivot joint and pull the legs together to fold the stand.
  • Seite 16 OTHER SIDE • • 4 x M8 Washers Line up the holes on the “Next Level Racing® GTSeat Add-on” with the threaded inserts on the “Next Level Racing® Wheel Stand 2.0” frame, secure using 4 x M8 16mm Bolts and Washers.
  • Seite 17 It will be easier to install when putting the bolt on the end of the allen key. Bolt through the “Next Level Racing® GTSeat Add-on” and secure using 2 x M8 16mm Bolts and Washers. Reinstall the plastic cap cover.
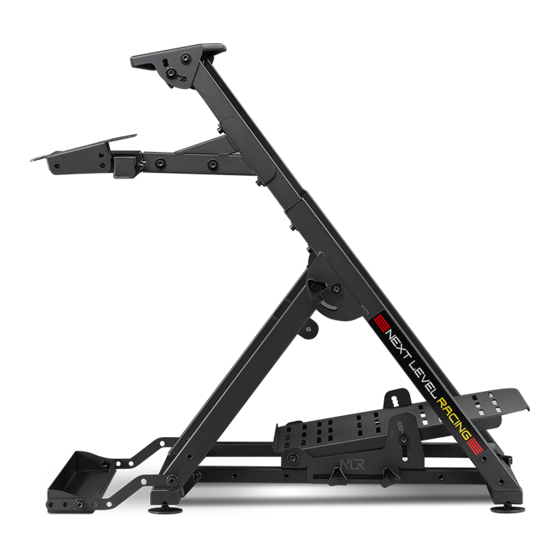
  • Seite 18 support@nextlevelracing.com ANGLE HEIGHT DISTANCE...
  • Seite 19 Video Instruction: bit.ly/nlrbuild WARNING Please do not use power tools for assembly as over tightening can damage the frame. Layout and building Wheel Stand on level surface. Do not force parts together. Avoid cross threading bolts. Ensure knobs are fastened tightly before lifting the folded Wheel Stand. ASSISTANCE ASSEMBLY VIDEO...
  • Seite 20 20. Veuillez vous référer à l’image. Alignez le Next Level Racing® GTSeat Add-On avec le support de roue et désinstallez les capuchons en plastique pour exposer les trous de montage 21. Veuillez vous référer à l’image. Alignez les trous sur le Next Level Racing® GTSeat Add-On avec les inserts filetés sur le cadre du support de roue, fixez à l’aide de 4 boulons et rondelles M8 de 16 mm 22.
  • Seite 21 20. Raadpleeg de afbeelding. Lijn de Next Level Racing® GTSeat Add-On uit met de wielstandaard en verwijder de plastic doppen om de montagegaten bloot te leggen 21. Raadpleeg de afbeelding. Breng de gaten op de Next Level Racing® GTSeat Add-On op één lijn met de schroefdraadinzetstukken op het frame van de wielstandaard, zet vast met 4 x M8 16 mm bouten en ringen 22.
  • Seite 22 20. Fare riferimento all’immagine. Allineare l’add-on Next Level Racing® GTSeat con il supporto della ruota e disinstallare i cappucci di plastica per esporre i fori di montaggio 21. Fare riferimento all’immagine. Allineare i fori sull’add-on Next Level Racing® GTSeat con gli inserti filettati sul telaio del cavalletto ruota, fissare con 4 bulloni e rondelle M8 da 16 mm 22.
  • Seite 23 20. Consulte la imagen. Alinee el complemento Next Level Racing® GTSeat con el soporte de la rueda y desinstale las tapas de plástico para exponer los orificios de montaje 21. Consulte la imagen. Alinee los orificios en el complemento Next Level Racing® GTSeat con las inserciones roscadas en el marco del soporte de la rueda, asegúrelo con 4 pernos y arandelas M8 de 16 mm 22.
  • Seite 24 20. Bitte beachten Sie das Bild. Richten Sie das Next Level Racing® GTSeat Add-On mit dem Radständer aus und entfernen Sie die Plastikkappen, um die Befestigungslöcher freizulegen 21. Bitte beachten Sie das Bild. Richten Sie die Löcher am Next Level Racing® GTSeat Add-On mit den Gewindeeinsätzen am Rahmen des Radständers aus und befestigen Sie sie mit 4 x M8 16mm Schrauben und Unterlegscheiben 22.
  • Seite 25 Video Instruction: bit.ly/nlrbuild NEXTLEVELRACING®WHEELSTAND2.0レーシングを次のレベルの取扱説明書に あなたのSIMレーシングジャーニーはここから始まります あなたがレースを始めたいと思っていることを私たちは知っています !指示に従って時間をかけて、 このガイドに従って製品を組み立ててください。 取扱説明書に従って製品を完全に最適化することで、 成功への準備を整え ることができます。 組み立てビデオについては、 QRコードをスキャンしてください QRコードをスキャンしてソーシャルメディアでフォローしてください レース前のチェック 警告 •締めすぎるとフレームが損傷する可能性があるため、 組み立てに電動工具を使用しないでください。 •水平な面にホイールスタンドをレイアウトして構築します。 •部品を無理に押し込まないでください。 •クロススレッドボルトは避けてください。 •折りたたまれたホイールスタンドを持ち上げる前に、 ノブがしっかりと固定されていることを確認してください。 製品のサポートが必要な場合は、 support @ nextlevelracing.comのフレンドリーなチームにお問い合わせください。 警告窒息の危険性-3歳未満の子供や、 食べられないものを口に入れる傾向のある人向けではない小さな部品。 すべての部品が箱に入っていることを確認してください 1.画像を参照してください。 丸で囲んだ2つのノブを緩めて、 ホイールスタンドを広げます。 警告:ピンチポイントハザード、 ピボット領域に手を近づけないでください。 2.画像を参照してください。 プラスチックのタイを切り、 ペダルフレームを置き、 ペダルフレームの前面にツイストノブを取り付け直します。 ヒント :指が挟まれないように注意してください。 3.画像を参照してください。...
  • Seite 26 20. Consulte a imagem. Alinhe o complemento Next Level Racing® GTSeat com o suporte de roda e desinstale as tampas de plástico para expor os orifícios de montagem 21. Consulte a imagem. Alinhe os orifícios no complemento Next Level Racing® GTSeat com as inserções roscadas na estrutura do suporte da roda, prenda usando 4 parafusos e arruelas M8 de 16 mm 22.
  • Seite 27 20. См. Изображение. Совместите надстройку Next Level Racing® GTSeat Add-On с колесной стойкой и снимите пластиковые крышки, чтобы открыть монтажные отверстия. 21. См. Изображение. Совместите отверстия на дополнительном устройстве Next Level Racing® GTSeat с резьбовыми вставками на раме стойки колеса, закрепите с помощью 4 болтов M8 16 мм и шайб.
  • Seite 28 20. Lütfen resme bakın. Next Level Racing® GTSeat Eklentisini tekerlek sehpasıyla hizalayın ve montaj deliklerini ortaya çıkarmak için plastik kapakları çıkarın 21. Lütfen resme bakın. Next Level Racing® GTSeat Eklentisindeki delikleri Tekerlek sehpası çerçevesindeki dişli uçlarla hizalayın, 4 x M8 16mm Cıvata ve Pul kullanarak sabitleyin 22.
  • Seite 29 21. Viz obrázek. Zarovnejte otvory na doplňku Next Level Racing® GTSeat se závitovými vložkami na rámu stojanu, zajistěte pomocí 4 x 16 mm šroubů a podložek 22. Podívejte se prosím na obrázek. Zašroubujte doplněk Next Level Racing® GTSeat a zajistěte pomocí 2 x 16 mm šroubů a podložek. Znovu nasaďte kryt plastového víčka.
  • Seite 30 20. Proszę odnieść się do obrazu. Dopasuj dodatek Next Level Racing® GTSeat do stojaka na kierownicę i zdemontuj plastikowe zaślepki, aby odsłonić otwory montażowe 21. Proszę odnieść się do obrazu. Wyrównaj otwory w Next Level Racing® GTSeat Add-On z gwintowanymi wstawkami w ramie stojaka na koła, zabezpiecz za pomocą 4 x M8 16mm śrub i podkładek 22.
  • Seite 31 20. ‫ ةيفاضإلا ةفيظولا ةاذاحمب مق .ةروصلا ىلإ عوجرلا ىجري‬Next Level Racing® GTS ‫بيكرتلا تاحتف فشكل ةيكيتسالبلا ةيطغألا تيبثت ءاغلإو ةلجعلا لماح عم دعقملل‬ 21. ‫ ةيفاضإلا ةفيظولا يف ةدوجوملا تاحتفلا ةاذاحمب مق .ةروصلا ىلإ عوجرلا ىجري‬Next Level Racing® GTS ‫ × 4 ساقم تالاسغو ريماسم مادختساب كلذ نم دكأتو ، ةلجعلا لماح راطإ ىلع ةبلولملا تالاخدإلا عم دعقملل‬M8 ‫مم 61 ساقم‬...
  • Seite 32 support@nextlevelracing.com NOTES...
  • Seite 33 Video Instruction: bit.ly/nlrbuild NOTES...
  • Seite 34 support@nextlevelracing.com support@nextlevelracing.com...