
Verwandte Anleitungen für Next Level Racing GT ELITE


Inhaltszusammenfassung für Next Level Racing GT ELITE
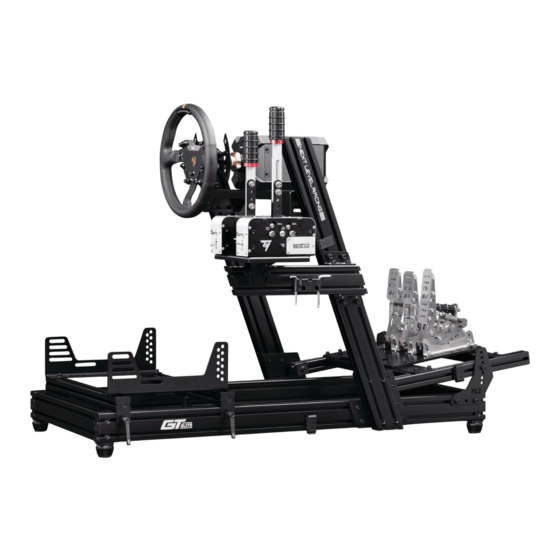
- Seite 1 T A K E R A C I N G T O T H E N E X T L E V E L® Video Instruction: bit.ly/nlrbuild INSTRUCTION MANUAL *ELECTRONICS NOT INCLUDED...
- Seite 2 T O T H E N E X T L E V E L® instruction booklet to fully optimize your product. N E X T L E V E L R A C I N G . C O M ASSEMBLY VIDEO bit.ly/nlrbuild @next_level_racing @nextlevelracingOfficial @nextlvlracing Next Level Racing FOLLOW support@nextlevelracing.com...
- Seite 3 • Please ensure T-Nuts are correctly placed within the extrusion. • Lay out and build the cockpit on a level surface. • The GT Elite is a 2 person build. • Do not force parts together. SEAT SLIDERS • Avoid cross threading bolts.
- Seite 4 Video Instruction: bit.ly/nlrbuild support@nextlevelracing.com 44 x M8 16mm BOLTS SEAT BRACKETS PEDAL ADJUSTMENT FINS 16 x M6 16mm BOLTS 12 x M8 20mm BOLTS 8 x M8 35mm BOLTS 8 x M8 40mm BOLTS 70 x M8 WASHERS WHEEL PLATE UPRIGHT CONNECTION PLATES 2 x M8 60mm BOLTS 4 x M8 16mm COUNTERSUNK BOLTS...
- Seite 5 • If in doubt consult the installation video or contact us at support@nextlevelracing.com • The GT Elite is a two person build with the complete cockpit a two person move • Beware of sharp edges on the extrusion pieces Install cable clips at the location you would like them during the build.
- Seite 6 Video Instruction: bit.ly/nlrbuild support@nextlevelracing.com PARTS: FRONT • • 4 x M8 45mm Bolts • • 4 x M8 Washers RIGHT REAR FRONT LEFT Align the threaded holes on the front and rear base extrusions with the pre-drilled holes on the right base extrusion.
- Seite 7 Video Instruction: bit.ly/nlrbuild support@nextlevelracing.com PARTS: PARTS: • • 4 x T-Slot Nuts • • 8 x M8 35mm Bolts Note: Recess holes to be on outside • • 4 x Adjustable Feet • • 8 x M8 Washers Note: Parts are labelled for left and right side application Note: Height of the foot can be adjusted only when it’s installed on to the cockpit.
- Seite 8 Video Instruction: bit.ly/nlrbuild support@nextlevelracing.com PARTS: PARTS: SIDE VIEW TOP VIEW • • 4 x M8 T-Nuts • • 8 x M8 T-Nuts PRE-DRILLED HOLE LEFT PRE-DRILLED HOLE RIGHT Note: For Shorter Users Please Skip to STEP 16a & 16b. Install 3 x T-Nuts into the top channel and 1 x T-Nut into the side channel of the left Pedal Arm. Repeat Install 2 x T-nuts into the inside channels of both Vertical Posts (Red Dots show placement).
- Seite 9 Video Instruction: bit.ly/nlrbuild support@nextlevelracing.com PARTS: PARTS: ALTERNATE PEDAL INSTALLATION PEDAL ADJUSTMENT RANGE Repeat on Other • • 2 x M8 20mm Bolts • • NIL FOR SHORTER USERS Side • • 2 x M8 Washers Align the holes on the Upright Connection Plate with the T-Nuts previously installed in STEP 16a. Bolt through and secure with Loosen the bolts on the Pedal Plates.
- Seite 10 Video Instruction: bit.ly/nlrbuild support@nextlevelracing.com PARTS: PARTS: • • Seat Brackets • • 6 x T-Nuts • • 4 x M8 Countersunk Bolts • • 4 x Sticky Felt Pads (35mm x 40mm) Butt-Kicker T-Nut Locations A) Install 2 x T-Nuts into the bottom channel of the front Seat Slider Member for the Butt-kicker Mount Pole. Install 2 x T-Nuts into the top channel of both Seat Slider members and attach Felt Pads to the bottom of the Seat Slider Members.
- Seite 11 Video Instruction: bit.ly/nlrbuild support@nextlevelracing.com PARTS: PARTS: Repeat OVER-HANGING SEAT BRACKET on Other • • 4 x M8 16mm Bolts • • 1 x Shifter Mounting Corner Side FOR TALLER USERS Brackets • • 4 x M8 Washers • • 2 x M8 16mm Bolts •...
- Seite 12 Video Instruction: bit.ly/nlrbuild support@nextlevelracing.com PARTS: PARTS: • • 1 x Shifter Arm • • 2 x M8 16mm Bolts • • 2 x M8 Washers • • 4 x T-Nuts Align the T-nuts previously installed into the Shifter Arm in STEP 31b with the holes on the bottom shifter arm bracket previously Install 2 x T-Nuts into both the top and bottom channels of the Shifter Arm.
- Seite 13 If in doubt consult the installation video or contact us on support@nextlevelracing.com Please ensure T-Nuts are correctly placed within the extrusion. Lay out and build the cockpit on a level surface. The GT Elite is a 2 person build. Do not force parts together. Avoid cross threading bolts.
- Seite 14 07 - Veuillez vous référer à l’image. Installez le pied réglable en hauteur NLR dans les écrous en T précédemment installés à l’ÉTAPE 05. nextlevelracing.com. Veuillez vous assurer que les écrous en T sont correctement placés dans l’extrusion. Disposez et construisez le cockpit sur une surface plane. Le GT Elite est une construction pour 2 08 - Veuillez vous référer à...
- Seite 15 04 – Raadpleeg de afbeelding. Lijn de schroefdraadgaten op de voorste en achterste basisextrusies uit met de voorgeboorde gaten op de linker basisextrusie. Bout door en zet vast met M8 bouten en ringen. port@nextlevelracing.com. Zorg ervoor dat T-Nuts correct in de extrusie zijn geplaatst. Leg de cockpit neer en bouw deze op een vlakke ondergrond. De GT Elite is een 2-persoons build. Forceer de onderdelen niet samen.
- Seite 16 04 – Fare riferimento all’immagine. Allineare i fori filettati sui profilati di base anteriore e posteriore con i fori preforati sul profilato di base sinistro. Avvitare e fissare utilizzando bulloni e rondelle M8. nextlevelracing.com. Assicurarsi che i dadi a T siano posizionati correttamente all’interno dell’estrusione. Disporre e costruire la cabina di pilotaggio su una superficie piana. La GT Elite è una build per 2 persone.
- Seite 17 ADVERTENCIA. No utilice herramientas eléctricas para el montaje, ya que un ajuste excesivo puede dañar el marco. En caso de duda, consulte el video de instalación o contáctenos en support@nextlevelracing. com. Asegúrese de que las tuercas en T estén colocadas correctamente dentro de la extrusión. Distribuya y construya la cabina sobre una superficie nivelada. El GT Elite es una construcción de 2 personas. No 05 - Consulte la imagen.
- Seite 18 08 – Siehe Bild. Richten Sie die Lasche des höhenverstellbaren NLR-Fußes mit dem Profil aus. Hinweis: Die Fußausrichtungslasche sollte im Kanal sitzen. port@nextlevelracing.com. Bitte stellen Sie sicher, dass die T-Muttern richtig in der Extrusion platziert sind. Legen Sie das Cockpit auf eine ebene Fläche und bauen Sie es auf. Der GT Elite ist ein 2-Personen-Build.
- Seite 19 Video Instruction: bit.ly/nlrbuild support@nextlevelracing.com 15b –画像を参照してください。 ペダルアームを直立接続プレートの穴に合わせます。 M8ボルト、 ワッシャー、 スクエアワッシャー、 フランジナットでボルトで固定します。 反対側で繰り返します。 16a –画像を参照してください。 1 xTナットをペダルアームのサイドチャネルに取り付けます。 反対側についても繰り返します。 16b –画像を参照してください。 直立接続プレートの穴を、 STEP16aで以前に取り付けたTナットに合わせます。 M8ボルトとワッシャーでボルトで固定します。 反対側で繰り返します。 17 –画像を参照してください。 A) 大きなペダルプレートを以前にSTEP15aに取り付けたTナットに合わせます。 B) M8ボルトとワッシャーを使用してボルトで固定します。 注:希望の位置になるまでペダルブラケットを締めな いでください。 18 –画像を参照してください。 A) 小さなペダルプレートを以前にSTEP15aに取り付けたTナットに合わせます。 B) M8ボルトとワッシャーを使用してボルトで固定します。 反対側で繰り返します。 注:位置合わせを簡単にする ためにラインレーザーラインを使用してください NEXTLEVELRACING®...
- Seite 20 03 - Consulte a imagem. Sugestão de instalação de 1 x clipe de gerenciamento de cabo no canal superior do membro da base traseira. Nota: Pressione a guia localizadora na parte de trás do clipe para instalar no tlevelracing.com. Certifique-se de que as porcas em T estão corretamente colocadas dentro da extrusão. Desenhe e construa o cockpit em uma superfície nivelada. O GT Elite é uma construção para 2 pessoas.
- Seite 21 27 - См. Изображение. Совместите отверстия на штанге Butt-kicker с Т-образными гайками, ранее установленными на ШАГЕ 22. Закрутите и закрепите 2 болтами M8. • GT Elite представляет собой сборку для двух человек с полной кабиной и возможностью перемещения для двух человек.
- Seite 22 Not: Pedal desteği için 2 x T-Somunları öne kaydırın. Not: Tekerlek direği için 4 x T-Somunları ortaya kaydırın Not: Koltuk sürgüleri için 2 x T-Somunları arkaya kaydırın. T-Somunların ekstrüzyon içine doğru şekilde yerleştirildiğinden emin olun. Kokpiti düz bir yüzeye yerleştirin ve inşa edin. GT Elite 2 kişilik bir yapıdır. Parçaları birbirine zorlamayın. Çapraz dişli cıvatalardan kaçının.
- Seite 23 K montáži nepoužívejte elektrické nářadí, protože přílišné utažení může poškodit rám. V případě pochybností se podívejte na instalační video nebo nás kontaktujte na support@nextlevelracing.com. Ujistěte se, že jsou T-matice správně umístěny ve výlisku. Rozložte a postavte kokpit na rovný povrch. GT Elite je postaven pro 2 osoby. Netlačte díly k sobě silou. Vyhněte se šroubům s křížovým závitem.
- Seite 24 Uwaga: Części są oznakowane dla aplikacji z lewej i prawej strony tlevelracing.com. Upewnij się, że nakrętki teowe są prawidłowo umieszczone w profilu. Rozłóż i zbuduj kokpit na równej powierzchni. GT Elite to konstrukcja dla 2 osób. Nie dociskaj części na siłę. Unikaj śrub z gwintem krzyżowym.
- Seite 25 .وتسم حطس ىلع ةدايقلا ةرمق ءانبب مقوGT Elite .عيمجتلا ويديف .ةدعاسم .ةعطاقتملا يغاربلا بنجت .ا ً عم ءازجألا ربجت ال .نيصخشل ءانب نع ة ر ابعbit.ly/nlrbuild. :ىلع دودولا انقيرفب لاصتالا ىجريف ، كجتنم عم معدلا نم ديزم ىلإ...
- Seite 26 Video Instruction: bit.ly/nlrbuild support@nextlevelracing.com NOTES NOTES...
- Seite 27 support@nextlevelracing.com support@nextlevelracing.com...