
Verwandte Anleitungen für Next Level Racing FLIGHT STAND PRO


Inhaltszusammenfassung für Next Level Racing FLIGHT STAND PRO
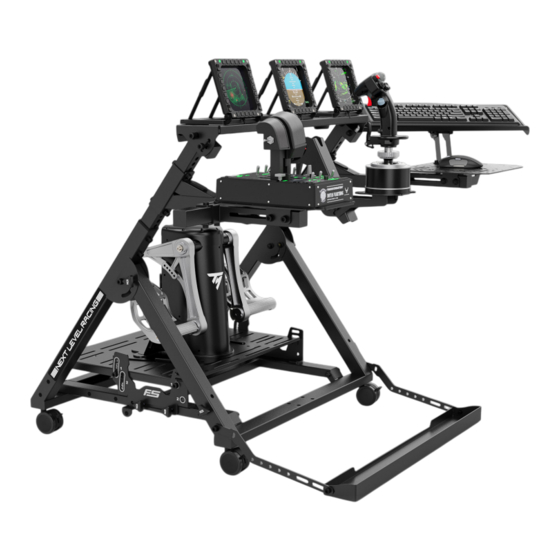
- Seite 1 T A K E I T T O T H E S K I E S Video Instruction: bit.ly/nlrbuild FLIGHT STAND INSTRUCTION MANUAL *ELECTRONICS NOT INCLUDED...
- Seite 2 We know you’re eager to start flying! Take your time with the instructions and follow this guide to assemble your product. You’ll be setting yourself up for success by following the instruction booklet to fully optimize your product. ASSEMBLY VIDEO bit.ly/nlrbuild @next_level_racing @nextlevelracingOfficial @nextlvlracing Next Level Racing FOLLOW support@nextlevelracing.com...
- Seite 3 Video Instruction: bit.ly/nlrbuild T A K E I T T O T H E S K I E S N E X T L E V E L R A C I N G . C O M...
-
Seite 4: Pre-Flight Checks
• If you require further support, consult the installation video or contact us at support@nextlevelracing.com • Keep your hands clear from any moving parts when unfolding the Flight Stand Pro to avoid injury. • Do not force parts together. •... - Seite 5 Video Instruction: bit.ly/nlrbuild IN THE *NOT TO SCALE PRE-ASSEMBLED FLIGHT STAND PRO 1 x PEDAL PLATE 1 x FLIGHT PLATE 1 x MOUSE PLATE 1 x CLAMP SPACER PLATE 2 x ADJUSTMENT ARM 1 x SWIVEL MOUNTING BRACKET 1 x MOUNTING BRACKET...
- Seite 6 support@nextlevelracing.com M8 ALLEN KEY M6 ALLEN KEY M5 ALLEN KEY 4 x CASTOR WHEELS 1 x NLR KEYBOARD MAT 1 x NLR MOUSE PAD M4 ALLEN KEY 38 x M8 16mm SOCKETHEAD BOLTS 24 x M6 16mm SOCKETHEAD BOLTS 2 x M8 70mm SOCKETHEAD BOLTS 14 x M5 16mm SOCKETHEAD BOLTS 16 x M8 55mm SOCKETHEAD BOLTS 14 x M4 16mm SOCKETHEAD BOLTS...
-
Seite 7: Inhaltsverzeichnis
Video Instruction: bit.ly/nlrbuild KEY STEPS MOUNTING LOCATION DIAGRAMS page 8 Hotas Plate page 8 Flight Plate page 9 Mouse Plate page 10 Wheel Plate page 11 GENERAL ASSEMBLY page 12 Pedal Plate Distance Adjustment page 14 Pedal Plate Angle Adjustment page 14 Flight Deck Angle Adjustment page 15... -
Seite 8: Mounting Location Diagrams
support@nextlevelracing.com MOUNTING LOCATIONS HOTAS PLATE PRODUCT LEGEND: TM HOTAS Warthog Stick / Winwing HOTAS Orion 2 VKB Gunfighter PRO MK.II Virpil Mongoos T-50CM3 with WarBRD Base Winwing Super Libra NOT TO SCALE... -
Seite 9: Flight Plate
Video Instruction: bit.ly/nlrbuild FLIGHT PLATE PRODUCT LEGEND: Logitech G X56 Throttle/HOTAS Logitech G X52 Throttle/HOTAS TMT.16000M / TCA Sidestick Airbus TM HOTAS Warthog Stick / Winwing HOTAS Orion 2 TM HOTAS Warthog Duel Throttle / Winwing Orion 2 Throttle TM TCA Quadrant Airbus Edition Throttle TM TCA Throttle Quadrant Boeing Edition TM TWCS Throttle Turtle Beach VelocityOne Flightstick... -
Seite 10: Mouse Plate
support@nextlevelracing.com MOUSE PLATE PRODUCT LEGEND: Virtual Fly TQ6+ Logitech G X56 Throttle/HOTAS Virtual Fly V3RNIO+ Logitech G X52 Throttle/HOTAS VKB Gladiator NXT TM 16000M / TCA Sidestick Airbus VKB Gunfighter PRO MK.II TM HOTAS Warthog Stick / Winwing HOTAS Orion 2 Virpil Mongoos T-50CM3 with WarBRD Base TM HOTAS Warthog Duel Throttle / Winwing Orion 2 Throttle Virpil Mongoos T-50CM3 Throttle... -
Seite 11: Wheel Plate
TM HOTAS Warthog Stick/ Winwing Orion 2 HOTAS Logitech G X56 Throttle/HOTAS Logitech G X52 Throttle/HOTAS Virtual Fly Yoko / Yoko+ Turtle Beach VelocityOne Yoke Flight Stand Pro Clamp Spacer Plate Flight Stand Pro HOTAS Mounting Bracket NOT TO SCALE... -
Seite 12: General Assembly
PARTS: • • Pre-Assembled Flight Stand Pro A) Cut the ties securing the Pre-Assembled Flight Stand Pro. B) Uninstall the pre-installed M8 Bolts and Washers. PARTS: Note: The Vertical Posts should be • • NIL extended until a minimum of 10... - Seite 13 Video Instruction: bit.ly/nlrbuild PARTS: • • 1 x M8 20mm Knob Secure the Pedal Frame with a M8 Knob. PARTS: • • 4 x M8 Square Washers Note: If setting up the Flight Stand on uneven floors, it is recommended to install with the Height Adjustable Feet to •...
-
Seite 14: Pedal Plate Distance Adjustment
support@nextlevelracing.com PARTS: Note: The threaded inserts on the Pedal Plate should • • 1 x Pedal Plate Hole Set 2 be mounted into the corresponding holes on the Hole Set 1 Pedal Brackets. • • 4 x M8 16mm Sockethead Bolts •... -
Seite 15: Flight Deck Angle Adjustment
Video Instruction: bit.ly/nlrbuild PARTS: • • 1 x Flight Deck • • 2 x M8 55mm Sockethead Bolts • • 2 x M8 Washers • • 2 x M8 Flange Nuts Align the mounting holes on the Flight Deck with the through holes on the Vertical Posts. Bolt through and secure with 2 x M8 Bolts, Washers and Flange Nuts. - Seite 16 support@nextlevelracing.com PARTS: • • 2 x M8 20mm Knobs • • 1 x Adjustment Arm A) Bolt through the Swivel Mounting Bracket curved slots and secure with 2 x M8 Knobs. B) Align the slots on the Adjustment Arm with the threaded inserts on the Swivel Arm. PARTS: •...
- Seite 17 Video Instruction: bit.ly/nlrbuild PARTS: • • NIL Align the mounting holes on the collar of the Swivel Flight Arm Assembly with the threaded inserts on the Vertical Posts. PARTS: • • 4 x M8 16mm Sockethead Bolts • • 4 x M8 Washers Bolt through and secure with 4 x M8 Bolts and Washers.
-
Seite 18: Flight Arm Assembly
support@nextlevelracing.com PARTS: FLIGHT ARM ASSEMBLY • • 1 x Adjustment Arm • • 1 x Mounting Bracket • • 2 x M8 20mm Low Profile Bolt • • 2 x M8 16mm Sockethead Bolt • • 2 x M8 Washers A) Align the slots on the Adjustment Arm with the threaded inserts on the Mounting Bracket. -
Seite 19: Flight/Swivel Arm Adjustment
Video Instruction: bit.ly/nlrbuild PARTS: • • 4 x M8 16mm Sockethead Bolts • • 4 x M8 Washers Tip: Ensure the plastic cap is not installed to allow for easy rotation of the Allen Key. A) Bolt through and secure with 4 x M8 Bolts and Washers. B) Tighten the Bolts using the provided Allen Key. -
Seite 20: Swivel Arm Function
support@nextlevelracing.com PARTS: SWIVEL ARM FUNCTION • • NIL Note: The swivel feature is recommended when using a Wheel Cradle for ease of access. Loosen the M8 Knobs securing the Swivel Arm to the Swivel Mounting Bracket. Swing the Swivel Arm to the desired position and tighten the M8 Knobs to secure. - Seite 21 Video Instruction: bit.ly/nlrbuild PARTS: • • 1 x HOTAS Swivel Bracket • • 2 x M8 16mm Sockethead Bolts • • 2 x M8 Washers A) Align the mounting holes on the HOTAS Swivel Bracket with the threaded inserts on the HOTAS Mounting Bracket. B) Bolt through and secure with 2 x M8 Bolts and Washers.
-
Seite 22: Optional: Extended Hotas Centre Pole
support@nextlevelracing.com PARTS: • • 1 x M8 70mm Sockethead Bolts • • 1 x M8 Washer • • 1 x M8 Flange Nut Bolt through and secure with M8 Bolt, Washer and Flange Nut. PARTS: • • 2 x M8 16mm Sockethead Bolts •... - Seite 23 Video Instruction: bit.ly/nlrbuild PARTS: • • 4 x M8 16mm Sockethead Bolts • • 4 x M8 Washers Bolt through and secure with 4 x M8 Bolts and Washers. PARTS: • • 1 x HOTAS Swivel Bracket • • 2 x M8 16mm Sockethead Bolts •...
- Seite 24 support@nextlevelracing.com PARTS: • • Pre-Assembled HOTAS Plate Align the curved slots on the Pre-Assembled HOTAS Plate with the threaded inserts on the HOTAS Swivel Bracket. PARTS: • • 2 x M8 16mm Sockethead Bolts • • 2 x M8 Washers Bolt through the curved slot on the Pre-Assembled HOTAS Plate and secure with 2 x M8 Bolts and Washers.
-
Seite 25: Hotas Centre Pole Height Adjustment
Video Instruction: bit.ly/nlrbuild PARTS: HOTAS CENTRE POLE HEIGHT ADJUSTMENT • • NIL Uninstall the 2 x M8 Bolts. Loosen the through Bolt securing the Pre-Assembled HOTAS Plate to the HOTAS Swivel Bracket. Adjust the HOTAS Plate to the desired height, install Bolts previously uninstalled and tighten to secure. PARTS: HOTAS CENTRE POLE ANGLE ADJUSTMENT •... -
Seite 26: Keyboard Plate Adjustment
support@nextlevelracing.com PARTS: • • 1 x Keyboard Plate Align the holes on the Keyboard Plate with the through holes on the Keyboard Angle Bracket. PARTS: • • 2 x M8 55mm Sockethead Bolts • • 2 x M8 Flange Nuts •... -
Seite 27: Wheel Cradle Installation
Video Instruction: bit.ly/nlrbuild PARTS: WHEEL CRADLE INSTALLATION • • Wheel Cradle Extension Arms • • 2 x M8 16mm Sockethead Bolts • • 2 x M8 Washers Align the mounting holes on the Wheel Cradle Extension Arms with the threaded inserts on the Frame. Bolt through and secure with 2 x M8 Bolts and Washers. - Seite 28 FLIGHT STAND PRO ENTRY LEVEL UPGRADE PATH NLR Pro Gaming Chair Leather & Suede Edition NLR HF8 Haptic Gaming Pad NLR Lite Free Standing Monitor Stand NLR VR Headset and Cup Holder...
- Seite 29 Video Instruction: bit.ly/nlrbuild FLIGHT STAND PRO ADVANCED UPGRADE PATH NLR Free Standing Triple Monitor Stand NLR Flight Seat Pro NLR Free Standing Keyboard & Mouse Stand NLR Floor Mat NLR Motion Plus Platform NLR Motion Platform V3...
- Seite 30 ADJUSTMENT POINTS The Flight Stand Pro is a fully adjustable cockpit making it perfect for flight enthusiasts of all sizes. Utilize the various adjustment points to achieve your desired position. YOKE FLIGHT ARMS CENTRE STICK RUDDERS CHAIR CRADLE ANGLE...
- Seite 31 Please do not use power tools for assembly as over tightening can damage parts. If you require further support, consult the installation video or contact us at support@nextlevelracing.com Keep your hands clear from any moving parts when unfolding the Flight Stand Pro to avoid injury. Do not force parts together.
- Seite 32 COMMENCER 01 – Reportez-vous à l’image. A) Coupez les attaches fixant le Flight Stand Pro pré-assemblé. B) Désinstallez les boulons et rondelles M8 préinstallés. 02 – Reportez-vous à l’image. A) Étendez les poteaux verticaux à la hauteur désirée. B) Installez les boulons et les rondelles précédemment désinstallés à l’étape 01B. Remarque : Les poteaux verticaux doivent être étendus jusqu’à ce qu’un minimum de 10 inserts filetés soient exposés pour permettre l’installation des Flight Arms dans les étapes futures.
- Seite 33 BEGIN 01 – Zie afbeelding. A) Knip de banden door waarmee de voorgemonteerde Flight Stand Pro is vastgezet. B) Verwijder de vooraf geïnstalleerde M8-bouten en ringen. 02 – Zie afbeelding. A) Schuif de verticale palen uit tot de gewenste hoogte. B) Installeer bouten en ringen die eerder in stap 01B zijn verwijderd. Opmerking: de verticale palen moeten worden uitgeschoven totdat er minimaal 10 inzetstukken met schroefdraad zichtbaar zijn om de installatie van Flight Arms in toekomstige stappen mogelijk te maken.
- Seite 34 INIZIO 01 – Fare riferimento all’immagine. A) Tagliare le fascette che fissano il Flight Stand Pro preassemblato. B) Disinstallare i bulloni e le rondelle M8 preinstallati. 02 – Fare riferimento all’immagine. A) Estendere i montanti verticali all’altezza desiderata. B) Installare i bulloni e le rondelle precedentemente disinstallati nel passaggio 01B. Nota: i montanti verticali devono essere estesi fino a quando non vengono esposti almeno 10 inserti filettati per consentire l’installazione dei bracci di volo nelle fasi successive.
- Seite 35 COMENZAR 01 – Consulte la imagen. A) Corte las ataduras que sujetan el Flight Stand Pro preensamblado. B) Desinstale los pernos y arandelas M8 preinstalados. 02 – Consulte la imagen. A) Extienda los Postes Verticales a la altura deseada. B) Instale los pernos y las arandelas que desinstaló previamente en el Paso 01B. Nota: Los postes verticales deben extenderse hasta que queden expuestos un mínimo de 10 insertos roscados para permitir la instalación de los brazos de vuelo en pasos futuros.
- Seite 36 START 01 – Siehe Bild. A) Schneiden Sie die Kabelbinder durch, mit denen der vormontierte Flight Stand Pro befestigt ist. B) Entfernen Sie die vorinstallierten M8-Bolzen und Unterlegscheiben. 02 – Siehe Bild. A) Verlängern Sie die vertikalen Pfosten auf die gewünschte Höhe. B) Bringen Sie die zuvor in Schritt 01B deinstallierten Schrauben und Unterlegscheiben an. Hinweis: Die vertikalen Pfosten sollten verlängert werden, bis mindestens 10 Gewindeeinsätze freigelegt sind, um die Installation von Flight Arms in zukünftigen Schritten zu ermöglichen.
- Seite 37 Video Instruction: bit.ly/nlrbuild FLIGHTSTAND PRO 取扱説明書 フライ トを始めたいと思っていることは承知しています。 時間をかけて説明書を読み、 このガイドに従って製品を組み立てて ください。 取扱説明書に従って製品を完全に最適化することで、 成功への準備を整えることができます。 飛行前チェック 警告 • 締めすぎると部品が損傷する可能性があるため、 組み立てに電動工具を使用しないでください。 • さらにサポートが必要な場合は、 取り付けビデオを参照するか、 support@nextlevelracing.com までお問い合わせください。 • けがをしないように、 フライ ト スタンドを展開するときは、 可動部品に手を近づけないでください。 • 部品を無理に組み立てないでください。 • クロススレッ ドボルトは避けて ください。 製品に関するサポートが必要な場合は、 support@nextlevelracing.com のフレンドリーなチームにご連絡ください。 警告 窒息の危険 3 歳未満のお子様や、...
- Seite 38 COMEÇAR 01 – Consulte a imagem. A) Corte os laços que prendem o Flight Stand Pro pré-montado. B) Desinstale os parafusos e arruelas M8 pré-instalados. 02 – Consulte a imagem. A) Estenda os Postes Verticais até a altura desejada. B) Instale os Parafusos e Arruelas previamente desinstalados no Passo 01B. Nota: Os Postes Verticais devem ser estendidos até que um mínimo de 10 inserções roscadas sejam expostas para permitir a instalação dos Braços de Voo em etapas futuras.
- Seite 39 НАЧИНАТЬ 01 – См. изображение. A) Разрежьте стяжки, которыми крепится предварительно собранный стенд Flight Stand Pro. B) Снимите предварительно установленные болты и шайбы M8. 02 – См. изображение. A) Выдвиньте вертикальные стойки на желаемую высоту. B) Установите болты и шайбы, ранее снятые на шаге 01B. Примечание. Вертикальные стойки должны быть расширены до тех пор, пока не будет видно как...
- Seite 40 BAŞLANGIÇ 01 – Resme bakın. A) Önceden Monte Edilmiş Flight Stand Pro’yu sabitleyen bağları kesin. B) Önceden takılmış M8 Cıvataları ve Pulları kaldırın. 02 – Resme bakın. A) Dikey Direkleri istenen yüksekliğe kadar uzatın. B) Daha önce Adım 01B’de kaldırılan Cıvataları ve Pulları takın. Not: Dikey Direkler, sonraki adımlarda Uçuş Kollarının takılmasına izin vermek için en az 10 dişli ek açığa çıkana kadar uzatılmalıdır.
- Seite 41 START 01 – viz obrázek. A) Odřízněte spojky zajišťující Pre-Assembled Flight Stand Pro. B) Odinstalujte předinstalované šrouby a podložky M8. 02 – Viz obrázek. A) Vysuňte vertikální sloupky do požadované výšky. B) Nainstalujte šrouby a podložky dříve odinstalované v kroku 01B. Poznámka: Vertikální sloupky by měly být vysunuty, dokud nebude odkryto minimálně 10 závitových vložek, aby bylo možné...
- Seite 42 POCZĄTEK 01 – Patrz obraz. A) Przetnij opaski mocujące wstępnie zmontowany stojak Flight Stand Pro. B) Odkręć wstępnie zainstalowane śruby i podkładki M8. 02 – Patrz obraz. A) Rozłóż słupki pionowe na żądaną wysokość. B) Zamontuj śruby i podkładki wcześniej zdemontowane w kroku 01B. Uwaga: Pionowe słupki należy rozłożyć do momentu odsłonięcia co najmniej 10 gwintowanych wkładek, aby umożliwić...
- Seite 43 Video Instruction: bit.ly/nlrbuild تاميلعت ليلدFLIGHTSTAND PRO .لماكلاب كجتنم نيسحتل تاميلعتلا بيتك عابتاب حاجنلل كسفن دادعإب موقتس .كجتنم عيمجتل ليلدلا اذه عبتاو تاميلعتلا عم كتقو ذخ !ناريطلا ءدبل قوشتم كنأ ملعن نحن ةلحرلا لبق ام تاصوحف ريذحت • .ءازجألا فلت ىلإ يدؤي نأ نكمي طبرلا ماكحإ يف طارفإلا نأ ثيح عيمجتلل ةيئابرهكلا تاودألا مادختسا مدع ىجري •...
- Seite 44 小零件不适合 3 岁以下儿童或任何倾向于将不可食用的物品放入口中的人。 开始 01 – 参考图像。 A) 切断固定预组装 Flight Stand Pro 的系带。 B) 卸载预装的 M8 螺栓和垫圈。 02 – 参考图像。 A) 将立柱延伸至所需高度。 B) 安装先前在步骤 01B 中卸载的螺栓和垫圈。 注意 : 应延长垂直柱, 直到至少露出 10 个螺纹插入件, 以便在以后的步骤中安装飞行臂。 03 – 参考图像。 A) 松开枢轴接头上的 M8 旋钮并展开飞行支架。 B) 将踏板框架上的槽与框架上的螺纹插件对齐。 警告 : 双手远离活动部件, 以免受伤。...
- Seite 45 Video Instruction: bit.ly/nlrbuild NOTES...
- Seite 46 support@nextlevelracing.com support@nextlevelracing.com...