
Verwandte Anleitungen für Tunze Osmolator 3


Inhaltszusammenfassung für Tunze Osmolator 3
- Seite 1 TUNZE ® Aquatic Eco Engineering x3154.8888 12/2023 Osmolator ® Gebrauchsanleitung 3154 Instructions for Use Mode d’emploi Istruzione per l’uso Instrucciones de uso...
-
Seite 2: Inhaltsverzeichnis
Inhalt Seite Table of Contents Page TUNZE Aquarientechnik GmbH ® Seeshaupter Straße 68 Product description Produktbeschreibung 82377 Penzberg - Germany Safety instructions Sicherheitshinweise Tel: +49 8856 2022 Fax: +49 8856 2021 Device Gerät info@tunze.com Power supply Stromversorgung www.tunze.com Magnet holder... - Seite 3 Sommaire Page Indice Pagina Contenido Página Description du produit Descripción del producto Descrizione del prodotto Observaciones de seguridad Sécurité d’utilisation Avvertenze per la sicurezza Aparato Appareil Dispositivo Suministro de corriente Alimentation Alimentazione di corrente Magnet Holder Magnet Holder Magnet Holder Datos técnicos Caractéristiques techniques Caratteristiche tecniche...
-
Seite 4: Produktbeschreibung
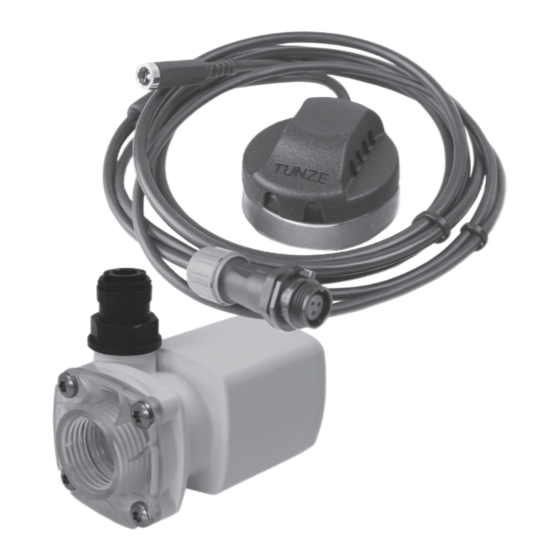
Produktbeschreibung Product description Der TUNZE Osmolator 3 3154.000 (1) ist ein einfacher und The TUNZE Osmolator 3 3154.000 (1) is a straightforward ® ® ® ® sicherer Wasserstandsregler mit optischem Regelsensor and safe water level controller with an optical control sensor und unabhängigem, thermischem Sicherheitssensor zur... -
Seite 5: Description Du Produit
Description du produit Descrizione del prodotto Descripción del producto L’Osmolator 3 3154.000 (1) de TUNZE est une régulation de Il TUNZE Osmolator 3 3154.000 (1) è un regolatore del El TUNZE Osmolator 3 3154.000 (1) constituye un ® ® ®... -
Seite 6: Sicherheitshinweise Gerät
Sicherheitshinweise — Gerät Safety instructions — Device Das Gerät ist nur für den Einsatz in trockenen The device is only suitable for use in dry interior rooms Innenräumen geeignet (1). (1). Die Steckkontakte vor Nässe schützen (2). Protect the plug contacts from moisture (2). Wassertemperatur für darin... -
Seite 7: Sécurité D'utilisation Appareil
Sécurité d’utilisation — Appareil Avvertenze per la sicurezza — Dispositivo Observaciones de seguridad — Aparato L’appareil peut être utilisé uniquement dans des locaux Il dispositivo è adatto esclusivamente all’impiego in El aparato sólo se puede hacer funcionar en interiores intérieurs secs (1). ambienti interni asciutti (1). -
Seite 8: Sicherheitshinweise - Stromversorgung
Sicherheitshinweise — Stromversorgung Safety instructions — Power supply Zur Stromversorgung ist ausschließlich das mitgelieferte Only use the included 12V SELV (safety extra low Netzteil 3154.120 mit 12V SELV (Sicherheits- voltage) power supply unit 3154.120(1). kleinspannung) zu verwenden (1). In order to prevent damage from water, the power supply should be placed above the waterline if possible, but not Zur Vermeidung von Wasserschäden das Netzteil directly above the water. -
Seite 9: Alimentation
Avvertenze per la sicurezza — Observaciones de seguridad — Sécurité d’utilisation — Alimentation Alimentazione di corrente Suministro de corriente Pour l’alimentation électrique, utiliser exclusivement le bloc Per l’alimentazione di corrente si usi esclusivamente Para el suministro de corriente se deberá utilizar únicamente el secteur 3154.120 avec 12V SELV (très basse tension de bloque de alimentación 3154.120 suministrado con 12 V SELV l’alimentatore in dotazione 3154.120 con 12 V di SELV... -
Seite 10: Technische Daten
Technische Daten Technical specifications Netzteil 3154.120 (1) Power supply unit 3154.120 (1) Nenneingangsspannung: 100-240 V Rated Input Voltage: 100-240 V Nenneingangsfrequenz: 50-60 Hz Rated input frequency: 50-60 Hz Nenneingangsstrom: 0,3-0,15 A Rated input current: 0.3-0.15 A Ausgangsspannung: 12V DC Output voltage: 12V DC Nennausgangsstrom: 1,0 A... -
Seite 11: Caractéristiques Techniques
Caractéristiques techniques Caratteristiche tecniche Datos técnicos Bloc secteur 3154.120 (1) Alimentatore 3154.120 (1) Bloque de alimentación 3154.120 (1) Tension d’entrée nominale : 100-240 V Tensione nominale d’ingresso: 100-240 V Tensión de entrada nominal: 100-240 V Fréquence d’entrée nominale : 50-60 Hz Frecuencia de entrada nominal: 50-60 Hz Frequenza nominale d’ingresso:... -
Seite 12: Ersatzteilliste
3154.000 ® * 3154.100 Sensor mit Saugring * 3154.102 Schutzkappe * 5030.020 Turbelle High Jet 5030 ® * 5030.025 TUNZE Tube Ø6x4mm - 3m ® * 0102.450 Schlauchhalter * 3154.120 Netzteil 12V SELV 5030.700 Antriebseinheit 5030.600 Kreisellager, O-Ringe, Schrauben 5030.130 Kreiseldeckel mit O-Ring 5030.200 Schlauchanschluss Ø6mm... -
Seite 13: Pièces De Rechange / Accessoires Optionnels
High Jet 5030 Turbelle High Jet 5030 Turbelle High Jet 5030 ® ® ® ® * 5030.025 TUNZE Tube Ø6x4mm ® Tuyeau TUNZE Tube Ø6x4mm - 3m Tubo TUNZE Tube Ø6x4mm - 3m Tubo TUNZE Tube Ø6x4mm - 3m ®... -
Seite 14: Inbetriebnahme Montage Des Sensors
Inbetriebnahme Initial operation Montage des Sensors Mounting the sensor Der Sensor wird einfach mittels des Magneten an der The sensor can be easily mounted on the aquarium pane Scheibe des Aquariums oder Filterbeckens montiert (1). or the filter basin using the magnet (1). The center of the Die Mitte des Sensors (Sensorkegel bei demontierter sensor (sensor cone is more visible when the protective Schutzkappe besser sichtbar) markiert den Wasserstand,... -
Seite 15: Mise En Service Montage Du Capteur
Mise en service Messa in funzione Puesta en funcionamiento Montage du capteur Montaggio del sensore Montaje del sensor Le capteur est simplement monté sur la vitre de l‘aquarium Il sensore viene montato al vetro dell’acquario o della El sensor de monta simplemente por medio de imanes ou du bassin de filtration à... -
Seite 16: Montage Der Pumpe
Inbetriebnahme Initial operation Montage der Pumpe Installation of the pump Die Pumpe wird vormontiert geliefert. Zur Inbetriebnahme The pump is delivered pre-assembled. The following sind noch folgende Schritte nötig: steps are necessary for putting the pump into service: Den mitgelieferten Schlauch (1) bis zum Anschlag in den Push the supplied tube (1) into the plug connector (2) as Steckverbinder (2) schieben. -
Seite 17: Montage De La Pompe
Mise en service Messa in funzione Puesta en funcionamiento Montage de la pompe Montaggio della pompa Montaje de la bomba La pompe est livrée préassemblée. Les étapes suivantes La pompa viene fornita premontata. Per la messa in La bomba se suministra montada previamente. Para su puesta sont encore nécessaires avant la mise en service : funzione sono necessari ancora i seguenti passaggi: en funcionamiento se han de realizar los siguientes pasos:... -
Seite 18: Anschluss Der Stromversorgung / Initialisierung
Inbetriebnahme Initial operation Anschluss der Stromversorgung Connection of the power supply Lay and install the power supply and the DC connection Das Netzteil und den DC-Anschluss an einem trockenen in a dry location. Ort verlegen und installieren. Das Netzteil (1) an den Sensor (2) anschließen (3). Connect (3) the power supply unit (1) to the sensor (2). -
Seite 19: Raccordement De L'alimentation / Initialisation
Mise en service Messa in funzione Puesta en funcionamiento Raccordement de l’alimentation Collegamento alla corrente Conexión del suministro de corriente Installer ou placer l’alimentation secteur et le connecteur Installare e disporre l’alimentatore e l’attacco DC in un Instalar o colocar el bloque de alimentación y la conexión DC dans un endroit sec. -
Seite 20: Funktionen
Funktionen Functions The Osmolator 3 consists of two independent sensors Der Osmolator 3 besteht aus zwei unabhängigen Sensoren ® ® in its housing. in seinem Gehäuse. An optical primary sensor (1), as is already known from Ein optischer Arbeitssensor (1), wie er auch schon vom Vorgängermodell Osmolator 3155 bekannt ist, überwacht the previous model Osmolator... -
Seite 21: Fonctions
Fonctions Funzioni Funciones L’Osmolator 3 est constitué de deux capteurs indépendants L’Osmolator 3 consiste di due sensori indipendente nel suo El Osmolator 3 consta de dos sensores independientes en su ® ® ® situés dans son boîtier. corpo. carcasa. Un capteur optique de régulation (1), comme celui déjà existant Un sensor óptico de trabajo (1), como se conoce también Un sensore ottico di esercizio (1), come presente già... - Seite 22 Funktionen Functions LED Codes LED codes Weißes Blinken – Initialisierung, Pumpenleistung White flashing – initialization, pump performance Rotes Blinken – 10min Timer Red Flashing – 10min timer Rotes Leuchten – Sicherheitsensor Red light – safety sensor Oranges Blinken – Trockenlauf Orange flashing –...
- Seite 23 Fonctions Funzioni Funciones Codes LED Codici LED Códigos LED Clignotement blanc – initialisation, puissance de la pompe Lampeggiamento bianco – inizializzazione, portata della Parpadeo blanco – Inicialización, rendimiento bomba pompa Clignotement rouge – minuterie 10min Parpadeo rojo – Temporizador 10 minutos Lampeggiamento rosso –...
-
Seite 24: Functionalities Primary Sensor / Safety Sensor
Funktionsweisen Functionalities Arbeitssensor Primary sensor Der Arbeitssensor arbeitet mit einen Infrarotstrahler und The primary sensor operates using an infrared emitter and -empfänger. Durch die unterschiedliche Lichtbrechung von receiver. Due to the different refraction of light by air or water, Luft und Wasser kann er sehr genau erkennen, wenn Wasser covering water can be detected very precisely. -
Seite 25: Principes De Fonctionnement Capteur De Régulation / Capteur De Sécurité
Principes de fonctionnement Funzionalità Modos de funcionamiento Capteur de régulation Sensore di esercizio Sensor de trabajo Le capteur de régulation fonctionne au moyen d’un émetteur Il sensore di esercizio funziona mediante un irradiatore e un El sensor de trabajo funciona por medio de radiador y et d’un récepteur infrarouge. -
Seite 26: Sicherheitstimer / Mindestdosierzeit
Funktionsweisen Functionalities Sicherheitstimer Safety timer Der Sicherheitstimer fängt mit jedem Start der Pumpe an The safety timer starts counting every time the pump zu zählen. Erfolgt nach 10 min von keinem der Sensoren is started. If none of the sensors command to stop the der Befehl die Pumpe zu stoppen, so wird sie automatisch pump after 10 minutes, it will be stopped automatically. -
Seite 27: Minuterie De Sécurité
Funzionalità Modos de funcionamiento Principes de fonctionnement Minuterie de sécurité Timer di sicurezza Temporizador de seguridad La minuterie de sécurité commence à compter à chaque Il timer di sicurezza inizia a contare con ogni avvio della El temporizador de seguridad comienza a contar con cada pompa. -
Seite 28: Pumpenleistung / Entlüftungsmodus
Functionalities Funktionsweisen Pump performance Pumpenleistung In order to operate the pump as quietly as possible, the Um die Pumpe möglichst leise zu betreiben, wird der Osmolator ® Osmolator 3 is not delivered with its maximum pump nicht mit der maximalen Pumpenleistung ausgeliefert. Mit einer ®... -
Seite 29: Puissance De La Pompe / Mode De Purge
Funzionalità Modos de funcionamiento Principes de fonctionnement Portata della pompa Puissance de la pompe Rendimiento de la bomba Per un funzionamento possibilmente silenzioso della pompa, Para que la bomba funcione lo más silenciosamente posible, el Pour que la pompe fonctionne le plus silencieusement possible, l’Osmolator 3 non viene fornito con la portata massima della ®... -
Seite 30: Funktionsweisen Trockenlaufschutz Mit Automatischem Wiederanlauf
Funktionsweisen Functionalities Trockenlaufschutz mit Dry runing protection with automatic restart automatischem Wiederanlauf The built-in dry-running protection prevents the pump Der eingebaute Trockenlaufschutz verhindert, dass die from overheating during dry running and the bearings Pumpe bei Trockenlauf überhitzt und die Lager vorzeitig from wearing out prematurely. -
Seite 31: Protection Contre La Marche À Sec
Grâce au redémarrage automatique, il suffit ici aussi Gracias al reinicio automático, basta con eliminar la causa l’eliminazione della causa per riportare in funzione d’éliminer la cause pour remettre en service l’Osmolator ® para que el Osmolator 3 vuelva a funcionar. l’Osmolator ®... -
Seite 32: Pflege Und Wartung
Pflege und Wartung Care and maintenance Regelmäßig die Funktion des Sensors anhand des Regularly check the function of the sensor based on the Wasserstands kontrollieren. Bei Bedarf oder alle 3 Monate water level. Clean the sensor if necessary or every 3 den Sensor reinigen. -
Seite 33: Entretien Et Maintenance
Entretien et maintenance Cura e manutenzione Conservación y mantenimiento Vérifiez régulièrement le fonctionnement du capteur basé sur le Controllare regolarmente il funzionamento del sensore in Verificar periódicamente el funcionamiento del sensor basado en el nivel del agua. Limpie el sensor según sea necesario o niveau d’eau. -
Seite 34: Garantiebedingungen
Thank you very much, that you have opted to purchase TUNZE Aquarientechnik GmbH ® Firma TUNZE Aquarientechnik GmbH entschieden a high-quality product from TUNZE Aquarientechnik ® ® Seeshaupter Straße 68 haben. Um Ihrem Vertrauen gerecht zu werden, GmbH. As the manufacturer, we regard it as our... -
Seite 35: Conditions De Garantie
Muchas gracias por haberse decidido a adquirir un producto qualité de la marque TUNZE Aquarientechnik GmbH. della TUNZE Aquarientechnik GmbH. Per ricambiare la de calidad de la compañía TUNZE Aquarientechnik GmbH. ® ® ® Afin d’honorer votre confiance, il nous est essentiel... - Seite 36 Ihre Rechtsmittel bei Verletzung case of a violation of the guarantee obligation shall be www.tunze.com der Gewährleistungspflicht auf die Rückgabe des von limited to returning the unit manufactured by TUNZE ® TUNZE Aquarientechnik GmbH hergestellten Gerätes Aquarientechnik GmbH for repair or replacement at the ®...
- Seite 37 ® Cet appareil manufacturé par TUNZE Aquarientechnik ® data di acquisto l’apparecchio prodotto da TUNZE GmbH se concede una garantía limitada por un periodo ® GmbH bénéficie d’une garantie limitée à une durée Aquarientechnik GmbH è coperto da una garanzia limitata de tiempo de sesenta (60) meses a partir de la fecha de légale de soixante mois (60) à...
- Seite 38 (e) defects or damage resulting from the use of the product in ® extended to the original purchaser only and is not transferable conjunction or connection with accessories, products, or ancillary or assignable to any other person or entity. / peripheral equipment not furnished or approved by TUNZE ®...
- Seite 39 AQUARIENTECHNIK GMBH ® THE RETURN OF THE AMOUNT OF THE PURCHASE PRICE AND TUNZE USA, LLC IN CONNECTION WITH THE SALE OF THIS PAID BY PURCHASER, AND UNDER NO CIRCUMSTANCES UNIT TO THE ORIGINAL PURCHASER, OR TO ANY SUBSEQUENT SHALL TUNZE BE LIABLE FOR ANY SPECIAL, INCIDENTAL OR ®...
-
Seite 40: Entsorgung
Entsorgung Smaltimento Nei Paesi dell’Unione Europea il simbolo del bidone (nach RL2002/96/EG) barrato indica che il prodotto, rientrando nelle disposizioni Gerät und Batterie dürfen nicht dem normalen Hausmüll emanate dalla Direttiva Europea 2002/96/EC, alla fine del beigefügt werden, sondern müssen fachgerecht entsorgt suo ciclo di vita deve essere conferito in centri di raccolta werden.