Herunterladen Inhalt Inhalt Diese Seite drucken
Hettich MIKRO 200 Gebrauchsanweisung
Vorschau ausblenden Andere Handbücher für MIKRO 200:
Inhaltsverzeichnis

Werbung

Verfügbare Sprachen

Verfügbare Sprachen

MIKRO 200 / 200 R
Inhalt des Dokuments / content of the document
Gebrauchsanweisung (DE)
Operating instructions (EN)
Mode d'emploi (FR)
Istruzioni per l'uso (IT)
Rotoren und Zubehör / Rotors and accessories
AB2400deenfrit
Rev.: 12 / 11.2023

Werbung

Inhaltsverzeichnis
loading

Inhaltszusammenfassung für Hettich MIKRO 200

  • Seite 1 MIKRO 200 / 200 R Inhalt des Dokuments / content of the document Gebrauchsanweisung (DE) Operating instructions (EN) Mode d'emploi (FR) Istruzioni per l'uso (IT) Rotoren und Zubehör / Rotors and accessories AB2400deenfrit Rev.: 12 / 11.2023...
  • Seite 2 Rev.: 12 / 11.2023 AB2400deenfrit...
  • Seite 3 Gebrauchsanweisung MIKRO 200 / 200 R Originalgebrauchsanweisung AB2400de Rev.: 12 / 11.2023 1 / 41...
  • Seite 4 ©2022 - Alle Rechte vorbehalten Andreas Hettich GmbH & Co. KG Föhrenstraße 12 D-78532 Tuttlingen/Deutschland Telefon: +49 (0)7461/705-0 Telefax: +49 (0)7461/705-1125 E-Mail: info@hettichlab.com, service@hettichlab.com Internet: www.hettichlab.com 2 / 41 Rev.: 12 / 11.2023 AB2400de...
  • Seite 5: Inhaltsverzeichnis

    Inhaltsverzeichnis Inhaltsverzeichnis Zu diesem Dokument........1.1 Anwendung dieses Dokuments......1.2 Gender-Hinweis.
  • Seite 6 Inhaltsverzeichnis Softwarebedienung........27 7.1 Zentrifugationsparameter......27 7.1.1 Relative Zentrifugalbeschleunigung RCF.
  • Seite 7: Zu Diesem Dokument

    Bildschirmelemente) Sicherheit Vorgesehene Zweckbestimmung Vorgesehene Zweckbestim- Bei der Zentrifuge MIKRO 200 / 200 R handelt es sich um ein In-vitro-Diag- mung nostikum gemäß der Verordnung über In-Vitro-Diagnostika (EU) 2017/746. Das Gerät dient zum Zentrifugieren sowie zur Anreicherung von Probenma- terial menschlichen Ursprungs für eine anschließende Weiterverarbeitung für diagnostische Zwecke.
  • Seite 8: Anforderungen An Das Personal

    Beachten aller Hinweise aus der Gebrauchsanweisung und die Einhaltung der Inspektions- und Wartungsarbeiten. Eine andere oder darüber hinausgehende Benutzung gilt als nicht bestimmungsgemäß. Für hieraus entstehende Schäden haftet die Firma Andreas Hettich GmbH & Co. KG nicht. ■...
  • Seite 9: Verantwortung Des Betreibers

    Sicherheit Verantwortung des Betreibers Für einen ordnungsgemäßen und sicheren Gebrauch des Geräts den Anweisungen in diesem Dokument folgen. Gebrauchsanweisung für späteres Nachschlagen aufbe- wahren. ■ Informationen bereitstellen Die Beachtung der Anweisungen in diesem Dokument hilft dabei: – Gefahrensituationen zu vermeiden. –...
  • Seite 10 Sicherheit GEFAHR Brand- und Explosionsgefahr durch Gefahrenstoffe in Proben. − Einschlägige Vorschriften und Richtlinien für den Umgang mit Chemikalien und Gefahrstoffen beachten. − Keine aggressiven Chemikalien verwenden (zum Bei- spiel: gefährliche, korrosive Extraktionsmittel wie Chloro- form, starke Säuren). WARNUNG Gefahren durch ungenügend oder nicht rechtzeitig durchge- führte Wartung.
  • Seite 11: Geräteübersicht

    Gerät während des Programmablaufs nicht ausschalten. − Gerät während des Programmablaufs nicht notentrie- geln. − Während des Programmablaufs nicht den Netzstecker ziehen. Geräteübersicht Technische Daten Hersteller Andreas Hettich GmbH & Co. KG, D-78532 Tuttlingen Modell MIKRO 200 2400 2400-01 Netzspannung (±10%) 200-240 V 1~ 110-127 V 1~ Netzfrequenz 50-60 Hz...
  • Seite 12 Störfestigkeit Klasse B Geräuschpegel £58 dB(A) (rotorabhängig) Abmessungen: Breite 275 mm Tiefe 344 mm Höhe 260 mm Gewicht ca. 11.5 kg Hersteller Andreas Hettich GmbH & Co. KG, D-78532 Tuttlingen Modell MIKRO 200 R 2405 2405-07 2405-01 Netzspannung (±10%) 200-240 V 1~ 200-240 V 1~ 110-127 V 1~ Netzfrequenz 50 Hz 60 Hz 50-60 Hz 10 / 41 Rev.: 12 / 11.2023...
  • Seite 13 Geräteübersicht Anschlusswert 450 VA 2450 VA 630 VA Stromaufnahme 1.9 A 2.0 A 5.0 A Kältemittel R134a max. Kapazität 30 x 2.0 ml max. zulässige Dichte 1.2 kg/dm³ max. Drehzahl (RPM) 15000 max. Beschleunigung 21382 (RCF) max. Kinetische Energie 5800 Nm Prüfpflicht nein (DGUV Regeln 100-500) (gilt nur in Deutschland) Umgebungsbedingungen (EN / IEC 61010-1): Aufstellungsort nur in Innenräumen Höhe...
  • Seite 14: Europäische Registrierung

    Geräteübersicht Höhe 260 mm Gewicht ca. 28 kg Typenschild Abb. 1: Typenschild Artikelnummer Seriennummer Revision Equipmentnummer Datamatrix Code evtl. Kennzeichung ob Medizinprodukt oder In-vitro-Diagnostikum Global Trade Item Number (GTIN) Herstellungsdatum Seriennummer 10 evtl. EAC-Zeichen, CE-Zeichen 11 Herstellungsland 12 Herstellungsdatum 13 Netzfrequenz 14 Maximal Kinetische Energie 15 Maximal zulässige Dichte 16 Herstelleradresse 17 evtl.
  • Seite 15: Wichtige Schilder Auf Der Verpackung

    Geräteübersicht Basic-UDI-DI Basic-UDI-DI Gerätezuordnung 040506740100109K MIKRO 200 / 200 R (ln-vitro Diagnostikum) Wichtige Schilder auf der Verpackung OBEN Dies ist die korrekte aufrechte Position der Versandverpackung für die Beförderung und/oder Lagerung. ZERBRECHLICHES PACKGUT Der Inhalt der Versandverpackung ist zerbrechlich, deshalb muss sie mit Vorsicht gehandhabt werden.
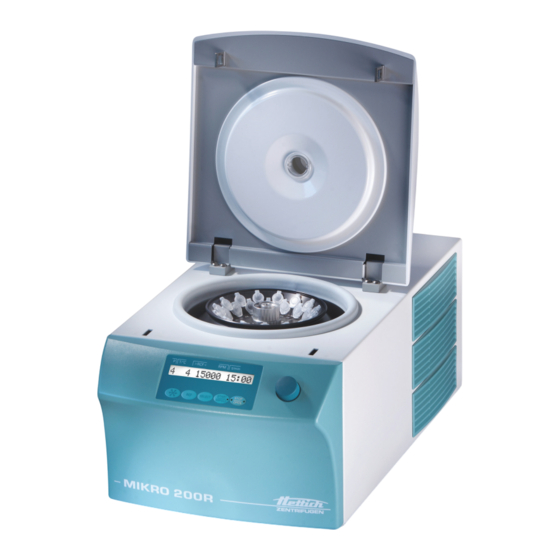
  • Seite 16: Bedien- Und Anzeigeelemente

    Geräteübersicht Achtung, allgemeine Gefahrenstelle. Vor Benutzung des Gerätes unbedingt die Hinweise zur Inbetriebnahme und Bedienung lesen und die sicherheitsrelevanten Hinweise beachten! Warnung vor Biogefährdung. Drehrichtung des Rotors. Die Ausrichtung des Pfeils zeigt die Drehrichtung des Rotors an. Symbol für die getrennte Sammlung von Elektro- und Elektronikgeräten, gemäß der Richtlinie 2012/19/EU (WEEE).
  • Seite 17: Anzeigeelemente

    Geräteübersicht 3.5.2 Anzeigeelemente ■ Taste leuchtet während des Zentrifugationslaufes, solange der Rotor noch nicht still steht. Abb. 4: Taste [START/IMPULS] ■ Die rechte Seite der Taste leuchtet, wenn sich die Zentrifuge im Auslauf befindet. Der Rotor steht noch nicht. ■ Die linke Seite der Taste leuchtet, wenn der Rotor still steht.
  • Seite 18: Originalersatzteile

    Transport und Lagerung Originalersatzteile Nur Originalersatzteile des Herstellers und zugelassenes Zubehör ver- wenden. Lieferumfang Folgendes Zubehör wird mit der Zentrifuge geliefert: ■ 1 Sechskant-Stiftschlüssel (SW5 x 100) ■ 1 Innensechskant-Winkelschraubendreher (SW2,5) ■ 2 Sicherungseinsatz ■ 1 Netzkabel ■ 1 Gebrauchsanweisung ■ 1 Hinweisblatt Transportsicherung Rotoren und das entsprechende Zubehör werden je nach Bestellung mitge- liefert.
  • Seite 19: Transportsicherung Befestigen

    Transport und Lagerung HINWEIS Beschädigungen am Gerät durch Kondensat. Bei einem Temperaturunterschied von kalt nach warm besteht die Gefahr, dass sich Kondensat an elektrotechni- schen Bauteilen bildet. Das sich bildende Kondensat kann einen Kurzschluss verursachen oder Elektronik zerstören. − Gerät mindestens 3 Stunden im warmen Raum auf- wärmen, bevor es an das Netz angeschlossen wird.
  • Seite 20: Inbetriebnahme

    Geräteseite Motorabdeckung Schrauben und Abstandshülsen Schaumstoffzylinder Deckel öffnen. Bei MIKRO 200 R: 1  ) unterhalb der Motorabdeckung ( 4  ) auf korrekten Sitz Faltenbalg ( 2  ) muss sich in der Nut des prüfen: Rand des Schleuderraums ( Faltenbalgs befinden.
  • Seite 21: Transportsicherung Entfernen

    Deckel öffnen. 6  ) entfernen. Schaumstoffzylinder ( Schaumstoffzylinder sicher aufbewahren. Bei MIKRO 200 R: 1  ) unterhalb der Motorabdeckung ( 4  ) auf korrekten Sitz Faltenbalg ( 2  ) muss sich in der Nut des prüfen: Rand des Schleuderraums ( Faltenbalgs befinden.
  • Seite 22: Aufstellen Und Anschließen Der Zentrifuge

    Inbetriebnahme Aufstellen und Anschließen der Zentrifuge Aufstellen der Zentrifuge WARNUNG Verletzungsgefahr durch zu geringem Abstand zur Zentri- fuge. − Während eines Zentrifugationslaufes dürfen sich gemäß EN / IEC 61010-2-020, in einem Sicherheitsbereich von 300 mm um die Zentrifuge herum, keine Personen, Gefahrstoffe und Gegenstände befinden. −...
  • Seite 23: Zentrifuge Ein- Und Ausschalten

    Inbetriebnahme HINWEIS Beschädigungen am Gerät durch Kondensat. Bei einem Temperaturunterschied von kalt nach warm besteht die Gefahr, dass sich Kondensat an elektrotechni- schen Bauteilen bildet. Das sich bildende Kondensat kann einen Kurzschluss verursachen oder Elektronik zerstören. − Gerät mindestens 3 Stunden im warmen Raum auf- wärmen, bevor es an das Netz angeschlossen wird.
  • Seite 24: Bedienung

    Bedienung Bedienung Deckel öffnen und schließen Deckel öffnen Personal: ■ Geschulter Benutzer Zentrifuge ist eingeschaltet. Rotor steht still. [STOP/OPEN] drücken. Taste �� Deckel entriegelt motorisch. Deckel öffnen. Der Deckel öffnet automatisch ca. 45°. Abb. 15: Deckel Um den Öffnungswinkel zu verändert, mit dem mitgelieferten Sechskant- Einstellschraube Stiftschlüssel die Einstellschraube ( 1 ) drehen.
  • Seite 25: Beladen

    Bedienung Deckel öffnen. Spannmutter des Rotors mit dem mitgelieferten Schlüssel lösen. �� Nach Überwinden des Abhebe-Druckpunkts löst sich der Rotor 4  ). vom Konus der Motorwelle ( Spannmutter drehen, bis sich der Rotor von der Motorwelle abheben lässt. Rotor entfernen. Abb.
  • Seite 26 Bedienung HINWEIS Beschädigungen am Gerät durch stark korrodierende Stoffe. Stark korrodierende Stoffe können die mechanische Festig- keit von Rotoren, Gehängen und Zubehörteilen beeinträch- tigen. − Keine stark korrodierende Stoffe zentrifugieren. Standard-Zentrifugiergefäße aus Glas sind belastbar bis RZB 4000 (DIN 58970 Teil 2). Personal: ■...
  • Seite 27: Bio-Sicherheitssystem Öffnen Und Schließen

    Bedienung BIO-Sicherheitssystem öffnen und schließen 6.4.1 Erläuterung Bei der Zentrifugation von gefährlichen Stoffen bzw. Stoffgemischen, die toxisch, radioaktiv oder mit pathogenen Mikroorganismen verseucht sind, sind durch den Benutzer geeignete Maßnahmen zu treffen. Es müssen grundsätzlich Zentrifugiergefäße mit speziellen Schraubver- schlüssen für gefährliche Substanzen verwendet werden. Bei Materialien der Risikogruppe 3 und 4 ist zusätzlich zu den verschließ- baren Zentrifugiergefäßen ein Bio-Sicherheitssystem zu verwenden (siehe Handbuch "Laboratory Bio-safety Manual"...
  • Seite 28: Zentrifugation Mit Zeitvorwahl

    Bedienung „¥“ stellen oder ein Dauerlaufprogramm Minuten und Sekunden auf abrufen. Taste [START/IMPULS] drücken. �� Zentrifugationslauf wird gestartet. [START/IMPULSE] leuchtet während des Zentrifugations- Taste laufs. „00:00“ . Die Zeitzählung beginnt bei Während des Zentrifugationslaufes werden die Drehzahl des Rotors oder der RCF-Wert, die Temperatur im Schleuderraum (nur bei Zentrifuge mit Kühlung), und die gelaufene Zeit angezeigt.
  • Seite 29: Schnellstopp-Funktion

    Softwarebedienung [START/IMPULSE] loslassen, um den Zentrifugationslauf zu Taste beenden. �� Auslauf erfolgt mit der eingestellten Bremsstufe. Bremsstufe wird angezeigt. Bei Stillstand des Rotors ertönt ein akustisches Signal. „OPEN“ „OEFFNEN“ wird angezeigt. Schnellstopp-Funktion Personal: ■ Geschulter Benutzer [STOP/OPEN] zweimal drücken. Taste ��...
  • Seite 30: Programmierung

    Softwarebedienung Wird im Ausnahmefall die, auf dem Gehänge angegebene, maximale Bela- dung überschritten, muss die Drehzahl ebenfalls reduziert werden. Die erlaubte Drehzahl lässt sich nach folgender Formel berechnen: Zum Beispiel: Maximale Drehzahl 4000 RPM, maximale Beladung 300 g, tatsächliche Beladung 350 g Bei Unklarheiten ist Auskunft beim Hersteller einzuholen. Programmierung 7.2.1 Schreibschutz für Programme...
  • Seite 31: Kühlung (Bei Zentrifugen Mit Kühlung)

    Softwarebedienung [SELECT] drücken, um den gewünschten Parameter Bei Bedarf: Taste [Drehkopf] einzustellen. anzuwählen und mit dem Um den Dauerlauf einzustellen müssen die Parameter t/min und t/sec [Drehknopf] auf 0 gestellt werden. Der Dauerlauf wird in der mit dem „¥“ angezeigt. Anzeige mit [SELECT] den Parameter „PROG STO“...
  • Seite 32: Machine Menu

    Softwarebedienung ■ Rotor steht still. ■ Deckel ist geöffnet. [Kühlung] drücken und gedrückt halten. Taste „t/min = X “ angezeigt. �� Nach 8 Sekunden wird Taste [Kühlung] drücken. „RPM = XXXX“ wird angezeigt. �� Vorkühldrehzahl [Drehknopf] die Vorkühldrehzahl einstellen. Mit dem [START/IMPULS] drücken.
  • Seite 33: Betriebsstunden Abfragen

    Reinigung und Pflege 7.4.2 Betriebsstunden abfragen Der Rotor steht still. Taste [SELECT] drücken und gedrückt halten. „SOUND/BELL“ angezeigt. �� Nach 8 Sekunden wird [SELECT] so oft drücken, bis „CONTROL:“ angezeigt wird. Taste „CONTROL:“ und die Betriebsstunden werden angezeigt. �� Taste [STOP/OPEN] drücken, um das Menü...
  • Seite 34: Hinweise Zur Reinigung Und Desinfektion

    Reinigung und Pflege Kap. Auszuführende Arbeiten Gerät desinfizieren       Zubehör desinfizieren       Wartung         Gummidichtung des Schleuderraums fetten       Gummidichtung des Bio-Sicherheitssystems fetten       Zubehör prüfen       Bio-Sicherheitssystem prüfen  ...
  • Seite 35: Reinigung

    Reinigung und Pflege ■ pH-Wert: 6 – 8 ■ Nicht korrosiv Reinigung Deckel öffnen. Gerät reinigen Gerät ausschalten und von der Spannungsversorgung trennen. Zubehör entnehmen. Gehäuse der Zentrifuge und den Schleuderraum mit Seife oder einem milden Reinigungsmittel und einem feuchten Tuch reinigen. Nach dem Einsatz von Reinigungsmitteln, die Reste des Reinigungs- mittels mit einem feuchten Tuch entfernen.
  • Seite 36: Wartung

    Reinigung und Pflege Deckel öffnen. Gerät ausschalten und von der Spannungsversorgung trennen. Zubehör entnehmen. Das Gehäuse und den Schleuderraum mit Desinfektionsmittel rei- nigen. Nach dem Einsatz von Desinfektionsmitteln, die Reste des Desinfekti- onsmittels mit einem feuchten Tuch entfernen. Die Flächen müssen unmittelbar nach der Reinigung getrocknet werden.
  • Seite 37: Störungsbehebung

    Motorwelle reinigen. Nach dem Einsatz von Reinigungsmitteln, die Reste des Reinigungs- mittels mit einem feuchten Tuch entfernen. Motorwelle und mit Hettich Tubenfett 4051 fetten. Überschüssiges Fett im Schleuderraum muss entfernt werden. Zubehör mit begrenzter Ver- Die Verwendung von bestimmten Zubehör ist zeitlich begrenzt. Aus Sicher- heitsgründen darf das Zubehör nicht mehr verwendet werden, wenn ent-...
  • Seite 38 Störungsbehebung Fehlerbeschreibung Ursache Abhilfe ■ keine Anzeige Keine Spannung. Netzein- Versorgungsspannung prüfen. gangssicherungen defekt. ■ Netzeingangssicherung prüfen. ■ Netzschalter befindet sich in Schalter- stellung ■ TACHO - ERROR 1, 2 Tacho defekt. Motor, Elektronik Deckel öffnen. defekt. ■ Netzschalter in Schalterstellung bringen.
  • Seite 39: Netz-Reset Durchführen

    Störungsbehebung Fehlerbeschreibung Ursache Abhilfe ■ KEYBOARD-ERROR Fehler/Defekt Bedienteil. NETZ-RESET durchführen. ■ Die linke Hälfte Kundendienst benachrichtigen. der Anzeige leuchtet. NETZ-RESET durchführen [0] bringen. Netzschalter in Schalterstellung 10 Sekunden warten. Netzschalter in Schalterstellung [I] bringen. Notentriegelung Bei einem Stromausfall kann der Deckel nicht motorisch entriegelt werden. Eine Notentriegelung von Hand muss durchgeführt werden.
  • Seite 40: Entsorgung

    Das Gerät kann über den Hersteller entsorgt werden. Für eine Rücksendung muss immer ein Rücksendeformular (RMA) angefordert werden. Bei Bedarf den technischen Service des Herstellers kontak- tieren. − Andreas Hettich GmbH & Co. KG − Föhrenstraße 12 − 78532 Tuttlingen, Germany −...
  • Seite 41 Entsorgung Gemäß der Richtlinie 2012/19/EU dürfen die Geräte nicht mehr mit dem Hausmüll entsorgt werden. Die Geräte sind nach der Stiftung Elektro-Altgeräte Register (EAR) zu den folgenden Gruppen zugeordnet: ■ Gruppe 1 (Wärmeüberträger) ■ Gruppe 5 (Kleingeräte) Mit dem Symbol der durchgestrichenen Abfalltonne wird darauf hinge- wiesen, dass das Gerät nicht mit dem Hausmüll entsorgt werden darf.
  • Seite 42: Index

    Index Index Personalqualifikationen..... . . 6 Personalunterweisung..... . . 7 Akustisches Signal Persönliche Schutzausrüstung.
  • Seite 43 Index Zentrifugation im Dauerlauf......25 mit höherer Stoffdichte....27 mit Zeitvorwahl.
  • Seite 44 Rev.: 12 / 11.2023 AB2400deenfrit...
  • Seite 45 Operating instructions MIKRO 200 / 200 R Translation of the original operating instructions AB2400en Rev.: 12 / 11.2023 1 / 39...
  • Seite 46 ©2022 – All rights reserved Andreas Hettich GmbH & Co. KG Föhrenstrasse 12 D-78532 Tuttlingen, Germany Telephone: +49 (0)7461 705-0 Fax: +49 (0)7461 705-1125 Email: info@hettichlab.com, service@hettichlab.com Internet: www.hettichlab.com 2 / 39 Rev.: 12 / 11.2023 AB2400en...
  • Seite 47 Table of contents Table of contents About this document........1.1 Use of this document.
  • Seite 48 Table of contents Software operation........7.1 Centrifugation parameters.
  • Seite 49: About This Document

    Intended use Intended use The centrifuge MIKRO 200 / 200 R is an in vitro diagnostic medical device in accordance with the In Vitro Diagnostic Medical Devices Regulation (EU) 2017/746. The device is used for centrifugation as well as enrichment of sample material of human origin for subsequent further processing for diag- nostic purposes.
  • Seite 50: Personnel Requirements

    Any other use or use beyond this is considered improper. Andreas Hettich GmbH & Co. KG shall not be liable for any damage arising from this.
  • Seite 51: Operator's Responsibility

    Safety Operator's responsibility Follow the instructions in this document for proper and safe use of the device. Keep the user manual for future reference. ■ Provide information Following the instructions in this document will help: – To avoid dangerous situations. –...
  • Seite 52 Safety WARNING Dangers due to insufficient maintenance or maintenance not carried out on time. − Follow maintenance intervals. − Check the device for visible damage or defects. If any visible damage or defects are present, take the device out of service and inform a service technician. WARNING Risk of electric shock due to ingress of water or other liq- uids.
  • Seite 53: Device Overview

    Do not trigger the emergency release on the device while the program is running. − Do not pull out the mains plug while the program is running. Device overview Technical data Manufacturer Andreas Hettich GmbH & Co. KG, D-78532 Tuttlingen Model MIKRO 200 Type 2400 2400-01 Mains voltage (±10%) 200-240 V 1~...
  • Seite 54 £58 dB(A) Noise level (rotor-dependent) Dimensions: Width 275 mm Depth 344 mm Altitude 260 mm Weight approx. 11.5 kg Manufacturer Andreas Hettich GmbH & Co. KG, D-78532 Tuttlingen Model MIKRO 200 R Type 2405 2405-07 2405-01 Mains voltage (±10%) 200-240 V 1~ 200-240 V 1~ 110-127 V 1~ Mains frequency...
  • Seite 55 Device overview max. speed (RPM) 15000 max. acceleration (RCF) 21382 max. kinetic energy 5800 Nm Obligation to perform checks (DGUV Rules 100-500) (valid only in Germany) Ambient conditions (EN / IEC 61010-1): Installation site indoors only Altitude up to 2000 m above sea level Ambient temperature 5 °C to 35 °C Humidity...
  • Seite 56: European Registration

    Device overview Rating plate Fig. 1: Rating plate Item number Serial number Revision Equipment number Data matrix code any labelling indicating whether medical device or in vitro diagnostic medical device Global Trade Item Number (GTIN) Date of manufacture Serial number 10 any EAC mark, CE mark 11 Country of manufacture 12 Date of manufacture...
  • Seite 57: Important Labels On The Packaging

    Device overview Basic-UDI-DI Basic-UDI-DI Device assignment 040506740100109K MIKRO 200 / 200 R (in vitro diagnostic medical device) Important labels on the packaging This is the correct upright position of the shipping container for transport and/or storage. FRAGILE GOODS The contents of the shipping container are fragile, so it must be handled with care.
  • Seite 58: Operating And Indicator Elements

    Device overview Attention, general danger area. Ensure you read the instructions for commissioning and operation and observe the safety instruc- tions before using the device. Biohazard warning. Direction of rotation of the rotor. The orientation of the arrow indicates the rotor's direction of rotation. Symbol for the separate collection of electrical and electronic equipment, in accordance with Directive 2012/19/EU (WEEE).
  • Seite 59: Indicator Elements

    Device overview 3.5.2 Indicator elements ■ The button lights up during the centrifugation run for as long as the rotor is not yet at a standstill. Fig. 4: [START/IMPULS] button ■ The right side of the button lights up when the centrifuge is in ramp- down.
  • Seite 60: Scope Of Delivery

    Transport and storage Scope of delivery The following accessories are supplied with the centrifuge: ■ 1 hex key (SW5 x 100) ■ 1 right-angled hex key (2.5 mm) ■ 2 Fuse link ■ 1 power cable ■ 1 user manual ■ 1 instruction sheet, transport lock Rotors and the corresponding accessories are supplied depending on the order.
  • Seite 61: Fastening The Transport Lock

    Motor cover Screws and spacer sleeves Foam cylinder Open the lid. For MIKRO 200 R: 1  ) under the motor cover ( 4  ) for correct seating: Check the bellows ( 2  ) must be in the groove of The edge of the centrifuging chamber ( the bellows.
  • Seite 62: Commissioning

    Commissioning Commissioning Unpacking the centrifuge CAUTION Danger of crushing due to parts falling out of the transport packaging. − Keep the device balanced during the unpacking process. − Only open the packaging at the points provided for this purpose. CAUTION Risk of injury from lifting heavy loads.
  • Seite 63: Setting Up And Connecting The Centrifuge

    6  ). Remove the foam cylinder ( Store the foam cylinder in a safe place. For MIKRO 200 R: 1  ) under the motor cover ( 4  ) for correct seating: Check the bellows ( 2  ) must be in the groove of The edge of the centrifuging chamber ( the bellows.
  • Seite 64 Commissioning NOTICE Damage to the samples and the device if the ambient temperature exceeds or falls below the respective max- imum/minimum permissible ambient temperature. − Comply with the maximum and minimum permissible ambient temperatures for installation of the device. − Do not place the device next to a heat source.
  • Seite 65: Switching The Centrifuge On And Off

    Operation Switching the centrifuge on and off. Switching the centrifuge on Personnel: ■ Trained user [I] . Set the mains switch to �� The buttons flash, depending on the centrifuge type. The following indicators appear one after the other, depending on the centrifuge type: ■...
  • Seite 66: Removing And Installing The Rotor

    Operation When the left side of the [STOP/OPEN] button flashes, press the [STOP/OPEN] button so that the motorised lid lock assumes the home position (open). Personnel: ■ Trained user Close the lid and press the front edge of the lid down gently. ��...
  • Seite 67: Loading

    Operation Loading Filling centrifuge tubes WARNING Risk of injury from contaminated sample material. Contaminated sample material escapes from the sample tube during centrifugation. − Use centrifuge tubes with special screw caps for haz- ardous substances. − For risk group 3 and 4 materials, use a biosafety system in addition to the sealable centrifuge tubes (see WHO's 'Laboratory Biosafety Manual').
  • Seite 68: Opening And Closing The Biosafety System

    Operation Check that the rotor is firmly seated. The centrifuge tubes must be distributed evenly over all locations on the rotor. No liquid must be allowed to enter the rotor and the centrifuging chamber when loading the rotor. With rotors, the centrifuge tubes must only be filled to the extent that no liquid can be ejected from the tubes during the centrifugation run.
  • Seite 69: Lid With Screw Cap Without Hole

    Operation 6.4.2 Lid with screw cap without hole Fig. 17: Biosafety system Rotary handle Rotor 2  ) centrally on the rotor ( 3  ). Closing Place the lid ( 2  ) at the rotary handle ( 1  ) clockwise until it is tightly Turn the lid ( closed.
  • Seite 70: Short-Time Centrifugation

    Software operation Ramp-down takes place with the selected brake level after the time has elapsed or if the centrifugation run is cancelled. �� The brake level is displayed. An audible signal sounds when the rotor comes to a standstill. ‘OPEN’ ‘OEFFNEN’ is displayed. [STOP/OPEN] button lights up when the The right side of the centrifuge is in ramp-down.
  • Seite 71: Centrifugation Of Substances Or Mixtures Of Substances

    Software operation RCF = Relative Centrifugal Force RPM = speed r = centrifuging radius in mm = distance from the centre of the axis of rotation to the bottom of the centrifuge tube. 7.1.2 Centrifugation of substances or mixtures of substances with a density higher than 1.2 kg/dm The density of the substances or mixtures of substances must not exceed 1.2 kg/dm³...
  • Seite 72: Opening Or Loading Programs

    Software operation [START/IMPULS] button. Press the �� The setting is stored. ‘*** lock ***’ is displayed briefly. If ON is set: ‘*** ok ***’ is displayed briefly. If OFF is set: 7.2.2 Opening or loading programs Use the [SELECT] button to select the ‘PROG RCL’ parameter. [Rotary knob] to set the desired program location.
  • Seite 73: Precooling The Rotor

    Software operation [Cooling] button. Press and hold the ‘t/min = X ’ is displayed after 8 seconds. �� [Rotary knob] to set the delay time. Use the [START/IMPULS] button. Press the �� The setting is stored. ‘*** ok ***’ is displayed briefly. [STOP/OPEN] button twice or wait 8 seconds to exit the Press the menu.
  • Seite 74: Querying Operating Hours

    Software operation [Rotary knob] . Turn to the right with the ‘ROTORCHG1’ is displayed. �� Internal operating hour of the last rotor change [Rotary knob] . Turn to the right with the ‘ROTORCHG2’ is displayed. �� Internal operating hour of the penultimate rotor change [Rotary knob] .
  • Seite 75: Cleaning And Care

    Cleaning and care Cleaning and care Overview table Chap. Task to execute Cleaning and care         Cleaning         Cleaning the device       Cleaning biosafety systems       Cleaning accessories      ...
  • Seite 76 Cleaning and care ■ The device and its accessories must not be cleaned in dishwashers. ■ Only perform hand cleaning and liquid disinfection. ■ The water temperature must not exceed 25 °C. ■ To prevent any corrosion due to use of detergents or disinfectants, it is essential to follow the special application instructions provided by the manufacturers of the detergent or disinfectant.
  • Seite 77: Maintenance

    Cleaning and care Disinfectant concentration and application time according to the manufacturer's instructions. Disinfecting the device CAUTION Risk of injury due to ingress of water or other liquids. − Protect the device against external liquids. − Do not disinfect the device using spray. Open the lid.
  • Seite 78: Troubleshooting

    Clean the motor shaft. Remove any detergent residues with a damp cloth after using deter- gents. Grease the motor shaft with Hettich Tubenfett 4051. Excess grease in the centrifuging chamber must be removed. Accessories with a limited The use of certain accessories is time-limited. For safety reasons, the...
  • Seite 79 Troubleshooting * Error number does not appear on the display. Fault description Cause Remedy ■ no display No power. Mains input fuses Check the supply voltage. defective. ■ Check the mains input fuse. ■ The mains switch is in switch position ■...
  • Seite 80: Performing A Mains Reset

    Troubleshooting Fault description Cause Remedy ■ The left half of Notify customer service. the display lights up. Performing a MAINS RESET [0] . Set the mains switch to Wait 10 seconds. Set the mains switch to [I] . Emergency release The lid cannot be unlocked by the motor in the event of a power failure.
  • Seite 81: Disposal

    The device can be disposed of via the manufacturer. A Return Material Authorisation (RMA) form must always be requested for a return. If necessary, contact the Technical Service Department of the manufacturer: − Andreas Hettich GmbH & Co. KG − Föhrenstraße 12 − 78532 Tuttlingen, Germany −...
  • Seite 82 Disposal ■ Group 1 (heat exchangers) ■ Group 5 (small appliances) The crossed-out wheelie bin symbol indicates that the device must not be disposed of with household waste. Regulations governing disposal of such devices may differ in individual countries. If necessary, contact the supplier. Fig.
  • Seite 83: Index

    Index Index Labels on the device......13 Accessories......15 on the packaging.
  • Seite 84 Rev.: 05 / 11.2023 AB2400ru...
  • Seite 85 Mode d'emploi MIKRO 200 / 200 R Traduction du mode d'emploi d'origine AB2400fr Rev.: 12 / 11.2023 1 / 42...
  • Seite 86 ©2022 - Tous droits réservés Andreas Hettich GmbH & Co. KG Föhrenstraße 12 D-78532 Tuttlingen/Allemagne Téléphone : +49 (0)7461/705-0 Fax : +49 (0)7461/705-1125 Courriel : info@hettichlab.com, service@hettichlab.com Internet : www.hettichlab.com 2 / 42 Rev.: 12 / 11.2023 AB2400fr...
  • Seite 87 Table des matières Table des matières À propos de ce document......1.1 Utilisation du présent document.
  • Seite 88 Table des matières Utilisation du logiciel........7.1 Paramètres de centrifugation.
  • Seite 89: Propos De Ce Document

    Utilisation prévue Utilisation prévue La centrifugeuse MIKRO 200 / 200 R est un dispositif médical de diagnostic in vitro conforme au règlement relatif aux dispositifs médicaux de diagnostic in vitro (UE) 2017/746. L'appareil sert à la centrifugation ainsi qu'à l'enri- chissement d'échantillons d'origine humaine pour un traitement ultérieur à...
  • Seite 90: Exigences Relatives Au Personnel

    énoncées dans les instructions d'utilisation et le respect des consignes d'inspection et de maintenance. Toute utilisation différente ou dépassant ce cadre est considérée comme non conforme. La société Andreas Hettich GmbH & Co. n'est pas respon- sable des dommages qui en résultent. ■...
  • Seite 91: Responsabilité De L'exploitant

    Sécurité ■ N'utiliser que des équipements de protection individuelle en bon état. ■ N'utiliser que des équipements de protection individuelle adaptés à la personne (par exemple en termes de taille). ■ Respecter les indications relatives aux autres équipements de protection lors d'activités spécifiques.
  • Seite 92 Sécurité DANGER Risque d'incendie et d'explosion dû à la présence de sub- stances dangereuses dans les échantillons. − Respecter les prescriptions et directives pertinentes pour la manipulation de produits chimiques et de sub- stances dangereuses. − Ne pas utiliser de produits chimiques agressifs (par exemple : agents d'extraction dangereux et corrosifs comme le chloroforme, acides forts).
  • Seite 93: Aperçu De L'appareil

    Ne pas déverrouiller l'appareil en urgence pendant le déroulement du programme. − Ne pas débrancher la fiche secteur pendant le déroule- ment du programme. Aperçu de l'appareil Données techniques Fabricant Andreas Hettich GmbH & Co. KG, D-78532 Tuttlingen Modèle MIKRO 200 Type 2400 2400-01 AB2400fr Rev.: 12 / 11.2023...
  • Seite 94 Aperçu de l'appareil Tension du réseau 200-240 V 1~ 110-127 V 1~ (±10%) Fréquence du réseau 50–60 Hz 50–60 Hz Puissance de raccorde- 240 VA 270 VA ment Courant absorbé 1,2 A 2,7 A Capacité max. 30 x 2,0 ml Densité max. autorisée 1,2 kg/dm³ Régime de rotation max. 15000 (tr/min) Accélération max. (ACR) 21382 Énergie cinétique max.
  • Seite 95 Aperçu de l'appareil Profondeur 344 mm  géog. 260 mm  Poids env. 11,5 kg Fabricant Andreas Hettich GmbH & Co. KG, D-78532 Tuttlingen Modèle MIKRO 200 R Type 2405 2405-07 2405-01 Tension du réseau 200-240 V 1~ 200-240 V 1~ 110-127 V 1~ (±10%) Fréquence du réseau 50 Hz 60 Hz 50–60 Hz...
  • Seite 96 Aperçu de l'appareil Classe de protection de l'appareil Ne convient pas à une utilisation dans un environnement explosif. CEM : Émissions de parasites, EN / IEC 61326-1, classe B Classe FCC B Immunité aux interfé- rences £53 dB(A) £54 dB(A) Niveau sonore (en fonction du rotor) Dimensions : Largeur 281 mm ...
  • Seite 97: Enregistrement Européen

    UDI-DI de base UDI-DI de base Affectation des appareils 040506740100109K MIKRO 200 / 200 R (agent de diagnostic in vitro) Étiquettes importantes sur l'emballage HAUT Il s'agit de la position verticale correcte de l'emballage d'expédition pour le transport et/ou le stockage.
  • Seite 98: Étiquettes Importantes Sur L'appareil

    Aperçu de l'appareil LIMITATION DE L'HUMIDITÉ DE L'AIR Le paquet expédié doit être stocké, transporté et manipulé dans la plage d'humidité indiquée (10 % à 80 %). LIMITATION D'EMPILEMENT EN FONCTION DU NOMBRE DE PIÈCES Nombre maximal de colis identiques pouvant être empilés sur le colis le plus bas, où 'n' repré- sente le nombre de colis autorisés.
  • Seite 99: Éléments De Commande Et D'affichage

    Aperçu de l'appareil Éléments de commande et d'affichage 3.5.1 Commande Fig. 2 : Commande (appareil avec refroidissement) Fig. 3 : Commande (appareil sans refroidissement) 3.5.2 Éléments d'affichage ■ La touche s'allume pendant le cycle de centrifugation tant que le rotor n'est pas encore arrêté. Fig.
  • Seite 100: Pièces De Rechange D'origine

    Aperçu de l'appareil ■ Allumer et éteindre l'appareil. Fig. 7 : [Interrupteur d'alimentation] ■ Démarrer le cycle de centrifugation, pour le pré-refroidissement du rotor (uniquement pour les centrifugeuses avec refroidissement). ■ Le régime de pré-refroidissement est réglable. La valeur par défaut est Fig.
  • Seite 101: Retour De Marchandises

    Transport et stockage Retour de marchandises Pour un retour, il faut toujours demander un formulaire original de retour (RMA) du fabricant. Sans un formulaire de retour original du fabricant, il n'est pas possible de réceptionner et de comptabiliser la marchandise de manière sûre chez le fabricant.
  • Seite 102: Fixer La Sécurité De Transport

    Vis et manchons d'écartement Cylindre en mousse Ouvrir le couvercle. Sur MIKRO 200 R : 1  ) sous le Vérifier le bon positionnement du soufflet d'étanchéité ( 4  ) : Le bord de la chambre de centrifugation ( 2  ) doit cache-moteur ( se trouver dans la gorge du soufflet d'étanchéité.
  • Seite 103: Retirer La Sécurité De Transport

    Mise en service ATTENTION Risque de blessure en soulevant des charges lourdes. − Prévoir un nombre adéquat d'assistants. − Tenir compte du poids. Voir ⮫  Chapitre 3.1 « Données techniques » à la page 9 . REMARQUE Dommages à l'appareil en cas de levage non conforme. −...
  • Seite 104: Mise En Place Et Raccordement De La Centrifugeuse

    Mise en service Conserver le cylindre en mousse en lieu sûr. Sur MIKRO 200 R : 1  ) sous le Vérifier le bon positionnement du soufflet d'étanchéité ( 4  ) : Le bord de la chambre de centrifugation ( 2  ) doit cache-moteur ( se trouver dans la gorge du soufflet d'étanchéité.
  • Seite 105: Mettre En Marche Et Arrêter La Centrifugeuse

    Mise en service Raccordement de la centrifu- REMARQUE geuse Dommages causés à l'appareil par du personnel non auto- risé − Les interventions et modifications sur les appareils par des personnes non autorisées se font à leurs propres risques et entraînent la perte de tous les droits de garantie et de responsabilité.
  • Seite 106: Utilisation

    Utilisation Utilisation Ouvrir et fermer le couvercle Ouvrir le couvercle Personnel : ■ Utilisateur formé La centrifugeuse est en marche. Le rotor s'arrête. [STOP/OPEN] . Appuyer sur la touche �� Le couvercle se déverrouille de manière motorisée. Ouvrir le couvercle. Le couvercle s'ouvre automatiquement à...
  • Seite 107: Démontage Et Remontage Du Rotor

    Utilisation Démontage et remontage du rotor Déposer le rotor Personnel : ■ Utilisateur formé Ouvrir le couvercle. Desserrer l'écrou de serrage du rotor à l'aide de la clé fournie. �� Après avoir dépassé le point de pression de décollement, le rotor se détache du cône de l'arbre moteur ( 4  ).
  • Seite 108 Utilisation REMARQUE Dommages à l'appareil dus à des substances fortement cor- rosives. Les substances fortement corrosives peuvent nuire à la résistance mécanique des rotors, des nacelles et des acces- soires. − Ne pas centrifuger de substances fortement corrosives. Les tubes de centrifugation standard en verre peuvent sup- porter des charges allant jusqu'à...
  • Seite 109: Ouvrir Et Fermer Le Système De Sécurité Bio

    Utilisation Ouvrir et fermer le système de sécurité BIO 6.4.1 Explication L'utilisateur doit prendre des mesures appropriées lors de la centrifugation de substances ou de mélanges de substances dangereuses qui sont toxi- ques, radioactives ou contaminées par des micro-organismes pathogènes. Il faut toujours utiliser des récipients de centrifugation avec des bouchons à...
  • Seite 110: Centrifugation Avec Présélection De La Durée

    Utilisation « ¥ » ou appeler un pro- Régler les minutes et les secondes sur gramme de marche en continu. Appuyer sur la touche [START/IMPULS] . �� Le cycle de centrifugation est lancé. [START/IMPULSE] s'allume pendant le cycle de centrifu- La touche gation.
  • Seite 111: Fonction D'arrêt Rapide

    Utilisation du logiciel [START/IMPULS] et la maintenir enfoncée. Appuyer sur la touche [START/IMPULS] s'allume pendant le cycle de centrifu- �� La touche gation. Le décompte du temps commence à 00:00. Pendant le cycle de centrifugation, le régime du rotor ou la valeur ACR, la température dans la chambre de centrifugation (unique- ment sur les centrifugeuses avec refroidissement) et le temps écoulé...
  • Seite 112: Centrifugation De Substances Ou De Mélanges De Sub- Stances D'une Densité Supérieure À 1,2 Kg/Dm 3

    Utilisation du logiciel 7.1.2 Centrifugation de substances ou de mélanges de substances d'une densité supéri- eure à 1,2 kg/dm Lors de la centrifugation à régime maximal, la densité des substances ou des mélanges de substances ne doit pas dépasser 1,2 kg/dm³. Pour les substances ou les mélanges de substances ayant une densité...
  • Seite 113: Saisir Ou Modifier Le Programme

    Utilisation du logiciel [Bouton Régler l'emplacement de programme souhaité à l'aide du rotatif] . [START/IMPULS] . Appuyer sur la touche « *** ok *** » s'affiche brièvement. �� Les données de centrifugation de l'emplacement de programme souhaité s'affichent Pour vérifier les paramètres : Appuyer plusieurs fois sur la touche [SELECT] .
  • Seite 114: Démarrer Le

    Utilisation du logiciel [START/IMPULS] . Appuyer sur la touche �� Le réglage est enregistré. « *** ok *** » s'affiche brièvement. [STOP/OPEN] ou attendre 8 Appuyer deux fois sur la touche secondes pour quitter le menu. 7.3.3 Démarrer le pré-refroidissement du rotor Le rotor s'arrête.
  • Seite 115: Consulter Les Heures De Service

    Utilisation du logiciel [Bouton rotatif] . Tourner vers la droite avec le « ROTORCHG1 » s'affiche. �� Heure de service interne du dernier changement de rotor [Bouton rotatif] . Tourner vers la droite avec le « ROTORCHG2 » s'affiche. �� Heure de service interne de l'avant-dernier changement de rotor [Bouton rotatif] .
  • Seite 116 Nettoyage et entretien [START/IMPULS] . Appuyer sur la touche �� Le réglage est enregistré. « *** ok *** » s'affiche brièvement. Nettoyage et entretien Tableau récapitulatif Chap. Tâches à effectuer Nettoyage et entretien         Nettoyage      ...
  • Seite 117: Nettoyage Et Entretien

    Nettoyage et entretien Instructions de nettoyage et de désinfection DANGER Risque de contamination de l'utilisateur en cas de nettoyage insuffisant ou de non-respect des consignes de nettoyage. − Respecter les consignes de nettoyage. − Porter un équipement de protection individuelle lors du nettoyage de l'appareil.
  • Seite 118: Désinfection

    Nettoyage et entretien Nettoyage des accessoires Nettoyer les accessoires avec le produit de nettoyage et un chiffon humide. Après l'utilisation de produits de nettoyage, enlever les restes de pro- duits de nettoyage avec un chiffon humide. Sécher les accessoires immédiatement après le nettoyage avec un chiffon non pelucheux et de l'air comprimé...
  • Seite 119: Maintenance

    Après l'utilisation de produits de nettoyage, enlever les restes de pro- duits de nettoyage avec un chiffon humide. Graisser l'arbre moteur avec de la graisse en tube Hettich 4051. L'excès de graisse dans la chambre d'essorage doit être éliminé. AB2400fr Rev.: 12 / 11.2023...
  • Seite 120: Dépannage

    Dépannage Accessoires à durée d'utilisa- L'utilisation de certains accessoires est limitée dans le temps. Pour des tion limitée raisons de sécurité, les accessoires ne doivent plus être utilisés lorsque soit le nombre maximal de cycles de fonctionnement autorisé indiqué sur ceux-ci, soit la date d'expiration indiquée sur ceux-ci est atteinte.
  • Seite 121: Effectuer Une Réinitialisation Du Réseau

    Dépannage Description d'erreur Origine Remède ■ CONTROL - ERROR 4, 6 Erreur de verrouillage du cou- Effectuer une RÉINITIALISATION DU vercle. RÉSEAU. ■ CONTROL - ERROR 8 Erreur de verrouillage du cou- Ouvrir le couvercle. vercle ■ Mettre l'interrupteur d'alimentation en [0] .
  • Seite 122: Déverrouillage D'urgence

    Dépannage [I] . Mettre l'interrupteur d'alimentation en position Déverrouillage d'urgence En cas de panne de courant, le couvercle ne peut pas être déverrouillé par un moteur. Un déverrouillage manuel d'urgence doit être effectué. AVERTISSEMENT Risque d'électrocution lors de travaux de maintenance et d'entretien sur un appareil sous tension.
  • Seite 123: Mise Au Rebut

    L'appareil peut être éliminé par le fabricant. Pour un retour, il faut toujours demander un formulaire de retour (RMA). Si nécessaire, contacter le service technique du fabricant. − Andreas Hettich GmbH & Co. KG − Föhrenstraße 12 − 78532 Tuttlingen, Allemagne −...
  • Seite 124 Mise au rebut Les appareils sont classés dans les groupes suivants selon la fondation Elektro-Altgeräte Register (EAR) : ■ Groupe 1 (échangeurs de chaleur) ■ Groupe 5 (petits appareils) Le symbole de la poubelle barrée indique que l'appareil ne doit pas être éliminé...
  • Seite 125: Index

    Index Index Graisser l'arbre 1, 2, 3 ... en caoutchouc......35 (Dés)activer le Graisser le joint signal acoustique.
  • Seite 126 Index Utilisation non prévue......6 Utilisation prévue......5 Vérifier la chambre de centrifugation.
  • Seite 127 Istruzioni per l'uso MIKRO 200 / 200 R Traduzione delle istruzioni per l'uso originali AB2400it Rev.: 12 / 11.2023 1 / 41...
  • Seite 128 ©2022 - Tutti i diritti riservati Andreas Hettich GmbH & Co. KG Föhrenstraße 12 D-78532 Tuttlingen/Germania Telefono: +49 (0)7461/705-0 Fax: +49 (0)7461/705-1125 E-mail: info@hettichlab.com, service@hettichlab.com Internet: www.hettichlab.com 2 / 41 Rev.: 12 / 11.2023 AB2400it...
  • Seite 129 Indice Indice Informazioni su questo documento......1.1 Campo applicativo del documento..... . 1.2 Nota sul genere.
  • Seite 130: Indice

    Indice Funzionamento del software......7.1 Parametri di centrifugazione......7.1.1 Accelerazione relativa della centrifuga RCF.
  • Seite 131: Informazioni Su Questo Documento

    Sicurezza Uso previsto Uso previsto La centrifuga MIKRO 200 / 200 R è un dispositivo medico-diagnostico in vitro conforme al regolamento sui dispositivi medici diagnostici in vitro (UE) 2017/746. Il dispositivo è utilizzato per la centrifugazione e l'arricchimento di materiale campione di origine umana per la successiva elaborazione a fini diagnostici.
  • Seite 132: Requisiti Del Personale

    Qualsiasi altra forma di utilizzo è da considerarsi non conforme. La ditta Andreas Hettich GmbH & Co. KG è responsabile per i danni eventualmente risultanti.
  • Seite 133: Responsabilità Dell'operatore

    Sicurezza Responsabilità dell'operatore Per un uso corretto e sicuro dell'apparecchio, seguire le istruzioni contenute in questo documento. Conservare le istruzioni per l'uso per future consultazioni. ■ Fornitura di informazioni L'osservanza delle istruzioni contenute nel presente documento aiuta: – a evitare situazioni di pericolo; –...
  • Seite 134 Sicurezza PERICOLO Pericolo di incendio e di esplosione per la presenza di sostanze pericolose nei campioni. − Osservare le normative e le linee guida pertinenti per la manipolazione di prodotti chimici e sostanze pericolose. − Non utilizzare sostanze chimiche aggressive (ad esempio, agenti estrattivi pericolosi e corrosivi come il cloroformio, acidi forti).
  • Seite 135: Panoramica Dell'apparecchio

    Non eseguire lo sblocco di emergenza durante l'esecu- zione del programma. − Non staccare la spina durante l'esecuzione del pro- gramma. Panoramica dell'apparecchio Dati tecnici Produttore Andreas Hettich GmbH & Co. KG, D-78532 Tuttlingen Modello MIKRO 200 Tipo 2400 2400-01 AB2400it Rev.: 12 / 11.2023...
  • Seite 136 Panoramica dell'apparecchio Tensione di rete (±10%) 200-240 V 1~ 110-127 V 1~ Frequenza di rete 50–60 Hz 50–60 Hz Valore di allaccio 240 VA 270 VA Consumo energetico 1,2 A 2,7 A Capacità max. 30  x   2,0  ml Densità max. ammissibile 1,2 kg/dm³ Velocità massima (RPM) 15000 Accelerazione massima 21382...
  • Seite 137 Panoramica dell'apparecchio Altitudine 260 mm Peso ca. 11,5 kg Produttore Andreas Hettich GmbH & Co. KG, D-78532 Tuttlingen Modello MIKRO 200 R Tipo 2405 2405-07 2405-01 Tensione di rete (±10%) 200-240 V 1~ 200-240 V 1~ 110-127 V 1~ Frequenza di rete 50 Hz 60 Hz 50–60 Hz Valore di allaccio...
  • Seite 138 Panoramica dell'apparecchio Classe di isolamento del dispositivo Non adatto all'uso in atmosfere potenzialmente esplosive. EMC: Emissione di interferenze, EN / IEC 61326-1, Classe B FCC Class B immunità alle interferenze Livello di rumore £53 dB(A) £54 dB(A) (a seconda del rotore) Dimensioni: Larghezza 281 mm Profondità 553 mm Altitudine 260 mm Peso...
  • Seite 139: Registrazione Europea

    Single Registration Number SRN: DE-MF-000010680 Basic-UDI-DI Basic-UDI-DI Assegnazione dell'apparecchio 040506740100109K MIKRO 200 / 200 R (Dispositivo diagno- stico in vitro) Etichette importanti sulla confezione ALTO Questa è la posizione verticale corretta dell'imballaggio della spedizione per il trasporto e/o lo stoccaggio.
  • Seite 140: Etichette Importanti Sull'apparecchio

    Panoramica dell'apparecchio LIMITE PILA DI CONFEZIONI IN BASE AL NUMERO DI PEZZI Numero massimo di confezioni identiche che possono essere impilate sulla confezione più bassa, dove "n" indica il numero di confezioni consentito. Il pacchetto più basso non è incluso in "n". Etichette importanti sull'apparecchio Le etichette sull'apparecchio non devono essere rimosse, coperte da altre o nascoste.
  • Seite 141: Elementi Di Visualizzazione

    Panoramica dell'apparecchio Fig. 3: Controllo (apparecchio senza raffreddamento) 3.5.2 Elementi di visualizzazione ■ Il pulsante si accende durante la centrifugazione finché il rotore non è ancora fermo. Fig. 4: Pulsante [START/ IMPULS] ■ Il lato destro del pulsante si illumina quando la centrifuga è in fase di decelerazione.
  • Seite 142: Pezzi Di Ricambio Originali

    Panoramica dell'apparecchio ■ Avviare il ciclo di centrifugazione. ■ Centrifugazione breve. L'esecuzione della centrifugazione avviene finché il tasto è premuto. Fig. 11: Pulsante [START/ ■ Salvare le voci e le modifiche. IMPULSE] ■ Interrompere il ciclo di centrifugazione. Il rotore si interrompe con il parametro di decelerazione preselezionato. ■...
  • Seite 143: Trasporto E Stoccaggio

    Trasporto e stoccaggio Trasporto e stoccaggio Condizioni di trasporto e stoccaggio Condizioni di trasporto AVVISO Danni all'apparecchio dovuti al mancato utilizzo delle prote- zioni di trasporto. − Fissare le protezioni di trasporto prima di trasportare l'apparecchio. AVVISO Danni all'apparecchio dovuti alla condensa. In presenza di una differenza di temperatura tra freddo e caldo, sussiste il rischio di formazione di condensa sui com- ponenti elettrotecnici.
  • Seite 144: Messa In Funzione

    Copertura del motore Viti e manicotti distanziatori Bombola di schiuma Aprire il coperchio. Nel MIKRO 200 R: 1  ) sotto il coperchio del motore ( 4  ) sia Controllare che il soffietto ( 2  ) deve montato correttamente: Il bordo della camera di centrifuga ( trovarsi nella scanalatura del soffietto.
  • Seite 145: Rimozione Della Sicurezza Di Trasporto

    Aprire il coperchio. 6  ). Rimuovere la bombola di schiuma ( Riporre al sicuro la bombola di schiuma. Nel MIKRO 200 R: 1  ) sotto il coperchio del motore ( 4  ) sia Controllare che il soffietto ( 2  ) deve montato correttamente: Il bordo della camera di centrifuga ( trovarsi nella scanalatura del soffietto.
  • Seite 146: Installazione E Collegamento Della Centrifuga

    Messa in funzione Installazione e collegamento della centrifuga Installazione della centrifuga AVVERTIMENTO Rischio di lesioni a causa della distanza insufficiente dalla centrifuga. − Durante una centrifugazione, secondo la norma EN / IEC 61010-2-020, non devono essere presenti persone, sostanze e oggetti pericolosi in un'area di sicurezza di 300 mm intorno alla centrifuga.
  • Seite 147: Accensione E Spegnimento Della Centrifuga

    Messa in funzione AVVISO Danni all'apparecchio dovuti alla condensa. In presenza di una differenza di temperatura tra freddo e caldo, sussiste il rischio di formazione di condensa sui com- ponenti elettrotecnici. La condensa che si forma può cau- sare un cortocircuito o distruggere i componenti elettronici. −...
  • Seite 148: Funzionamento

    Funzionamento Funzionamento Apertura e chiusura del coperchio Apertura del coperchio Personale: ■ Utente formato La centrifuga è accesa. Il rotore è fermo. [STOP/OPEN] . Premere il pulsante �� Il coperchio viene sbloccato da un motore. Aprire il coperchio. Il coperchio si apre automaticamente di circa 45°. Fig.
  • Seite 149: Caricamento

    Funzionamento Aprire il coperchio. Allentare il dado di fissaggio del rotore con la chiave in dotazione. �� Dopo aver superato il punto di pressione di sollevamento, il rotore 4  ). si stacca dal cono dell'albero motore ( Ruotare il dado di serraggio fino a quando il rotore può essere solle- vato dall'albero motore.
  • Seite 150 Funzionamento AVVISO Danneggiamento dell'apparecchio a causa di sostanze alta- mente corrosive. Le sostanze altamente corrosive possono compromettere la resistenza meccanica di rotori, supporti e accessori. − Non centrifugare sostanze altamente corrosive. Le provette da centrifuga in vetro standard possono essere caricate fino a RZB 4000 (DIN 58970 parte 2).
  • Seite 151: Apertura E Chiusura Del Sistema Di Biosicurezza

    Funzionamento Apertura e chiusura del sistema di biosicurezza 6.4.1 Spiegazione Quando si centrifugano sostanze pericolose o miscele di sostanze tossiche, radioattive o contaminate da microrganismi patogeni, l'utilizzatore è tenuto ad adottare misure adeguate. È necessario utilizzare sempre provette per centrifuga con tappi a vite spe- ciali per sostanze pericolose.
  • Seite 152: Centrifugazione Con Preselezione Del Tempo

    Funzionamento [START/IMPULS] . Premere il pulsante �� Il ciclo di centrifugazione viene avviato. [START/IMPULSE] è acceso durante la centrifugazione. Il tasto «00:00» . Il conteggio del tempo inizia a Durante la centrifugazione, vengono mostrati la velocità del rotore o il valore RCF, la temperatura nella camera di centrifuga (solo nella centrifuga con raffreddamento) e il tempo trascorso.
  • Seite 153: Funzione Di Arresto Rapido

    Funzionamento del software [START/IMPULSE] per interrompere il ciclo di Rilasciare il pulsante centrifugazione. �� Il run-out avviene con il livello di frenata impostato. Viene mostrato il livello di frenata. Quando il rotore si ferma, viene emesso un segnale acustico. «OPEN» «APRIRE» . Compare Funzione di arresto rapido Personale:...
  • Seite 154: Programmazione

    Funzionamento del software Se, in casi eccezionali, si supera il carico massimo indicato sul supporto, anche la velocità deve essere ridotta. La velocità consentita può essere calcolata secondo la seguente formula: Ad esempio: Velocità massima 4000 giri/min., carico massimo 300 g, carico effettivo 350 g In caso di dubbi, contattare il produttore.
  • Seite 155: Raffreddamento (Per Centrifughe Con Raffreddamento)

    Funzionamento del software [SELECT] per selezionare il para- All'occorrenza: premere il pulsante [Manopola rotante] . metro desiderato e impostarlo con il pulsante Per impostare il funzionamento continuo, i parametri t/min e t/sec [Manopola rotante] . Il funziona- devono essere impostati su 0 con «¥»...
  • Seite 156: Machine Menu

    Funzionamento del software Impostazione La velocità di preraffreddamento è regolabile da 500  giri/min. fino alla velo- cità massima del rotore, con incrementi di 10. È preimpostata a 10.000 giri/ minuto. ■ Il rotore è fermo. ■ Il coperchio è aperto. [Raffreddamento] . Premere e tenere premuto il tasto «t/min = X »...
  • Seite 157: Richiamo Delle Ore Di Esercizio

    Pulizia e cura 7.4.2 Richiamo delle ore di esercizio Il rotore è fermo. Premere e tenere premuto il tasto [SELECT] . «SOUND/BELL» . �� Dopo 8 secondi, appare [SELECT] finché non appare il parametro Premere il pulsante «CONTROL:» . �� Vengono mostrati «CONTROL:»...
  • Seite 158: Istruzioni Per La Pulizia E La Disinfezione

    Pulizia e cura Cap. Interventi da effettuare Pulire gli accessori       Disinfezione         Disinfettare l'apparecchio       Disinfettare gli accessori       Manutenzione         Lubrificazione della guarnizione in gomma della  ...
  • Seite 159: Pulizia

    Pulizia e cura Disinfettanti: ■ Disinfettanti per superfici (non disinfettanti per mani o strumenti) ■ Etanolo come unico principio attivo. Non disinfettare il vetro spia nel coperchio dell'apparecchio utilizzando miscele di etanolo-propanolo. ■ Concentrazione non inferiore al 30 % ■ Valore pH: 6 – 8 ■...
  • Seite 160: Manutenzione

    Pulizia e cura Disinfettare l'apparecchio ATTENZIONE Pericolo di ferimento dovuto all'ingresso di acqua o altri liquidi. − Proteggere l'unità dai liquidi provenienti dall'esterno. − Non disinfettare a spruzzo l'apparecchio. Aprire il coperchio. Spegnere l'apparecchio e scollegarlo dall'alimentazione. Togliere gli accessori. Pulire l'alloggiamento e la camera di centrifuga con un disinfettante.
  • Seite 161 Pulizia dell'albero motore. Dopo l'uso di detergenti, rimuovere i residui dello stesso strofinando con un panno umido. Lubrificazione dell'albero motore con il prodotto Hettich Tubenfett 4051. Il lubrificante in eccesso nella camera di centrifuga deve essere rimosso. Accessori con durata di uti- L'utilizzo di alcuni accessori è...
  • Seite 162: Risoluzione Dei Problemi

    Risoluzione dei problemi Risoluzione dei problemi Descrizione dell'errore Se il guasto non può essere eliminato in base alla tabella dei guasti, è necessario informare il servizio clienti. Indicare il tipo di centrifuga e il numero di serie. Entrambi i numeri sono riportati sulla targhetta della centri- fuga.
  • Seite 163: Eseguire Un Reset Di Alimentazione

    Risoluzione dei problemi Descrizione inconveniente Causa Rimedio ■ CONTROL-ERROR 21, 22, Errore/guasto elettronica. Eseguire un RESET DI ALIMENTA- 25, 27, 29 ZIONE. ■ CONTROL-ERROR 23 Errore/guasto pannello di con- Eseguire un RESET DI ALIMENTA- trollo. ZIONE. ■ SER I/O-ERROR 30, 31, 33, Errore/guasto elettronica.
  • Seite 164: Risoluzione Dei Problemi

    Codice ordine MIKRO 200 2400 T 3,15 AH/250 V E997 MIKRO 200 2400-01 T 5 AH/250 V E914 MIKRO 200 R 2405, 2405-07 T 5 AH/250 V E914 MIKRO 200 R 2405-01 T 8 AH/250 V E738 38 / 41 Rev.: 12 / 11.2023...
  • Seite 165: Smaltimento

    L'apparecchio può essere smaltito contattando il costrut- tore. Per il reso richiedere sempre l'apposito modulo (RMA). In caso di necessità contattare l'assistenza tecnica del costruttore. − Andreas Hettich GmbH & Co. KG − Föhrenstraße 12 − 78532 Tuttlingen, Germania − Telefono: +49 7461 705 1400 −...
  • Seite 166: Indice Analitico

    Indice analitico Indice analitico Immissione del del programma......28 Accelerazione relativa della centrifuga Installazione della centrifuga....20 RCF.
  • Seite 167 Indice analitico Uso improprio prevedibile..... 6 Uso non previsto......6 Uso previsto.
  • Seite 168 Rev.: 12 / 11.2023 AB2400deenfrit...
  • Seite 169: Rotoren Und Zubehör / Rotors And Accessories

    Rotoren und Zubehör / Rotors and accessories AB2400deenfrit Rev.: 12 / 11.2023...
  • Seite 170 2418-A + E3243 Winkelrotor 4-fach / Angle rotor 4-times E3243 PCR-Strips 2418-A 45° Kapazität / capacity Maße / dimensions  x L ---- 6 x 18 Anzahl p. Rotor / number p. rotor Drehzahl / speed 15000 15000 RZB / RCF 14338 14338 Radius / radius...
  • Seite 171 2428 2031 2023 2024 Winkelrotor 24-fach / Angle rotor 24-times 0536 2078 0788 45° Kapazität / capacity Maße / dimensions  x L 11 x 38 11 x 38 8 x 45 8 x 30 6 x 18 6 x 45 10,7 x 36 Anzahl p.
  • Seite 172 2434 2031 2023 2023 2024 Winkelrotor 24-fach / Angle rotor 24-times 0788 0536 2078 45° Kapazität / capacity Maße / dimensions  x L 11 x 38 11 x 38 8 x 45 8 x 30 6 x 18 6 x 45 10,7 x 36 Anzahl p.

Diese Anleitung auch für:

Mikro 200 r

Inhaltsverzeichnis