
Verwandte Anleitungen für StarLab ErgoOne FAST


Inhaltszusammenfassung für StarLab ErgoOne FAST
- Seite 1 This is your ErgoOne FAST ® User Manual. USER MANUAL · BEDIENUNGSANLEITUNG · MODE D'EMPLOI · ISTRUZIONI D'USO Passionate for science.
-
Seite 3: Inhaltsverzeichnis
User Manual _ _ _ _ _ _ _ _ _ _ _ _ _ _ _ _ _ _ _ _ _ _ _ _ _ _ _ _ _ _ _ _ _ _ _ _ _ _ _ _ _ _ _ _ _ _ _ _ _ 3 Bedienungsanleitung _ _ _ _ _ _ _ _ _ _ _ _ _ _ _ _ _ _ _ _ _ _ _ _ _ _ _ _ _ _ _ _ _ _ _ _ _ _ _ _ _ 33 Mode d‘emploi _ _ _ _ _ _ _ _ _ _ _ _ _ _ _ _ _ _ _ _ _ _ _ _ _ _ _ _ _ _ _ _ _ _ _ _ _ _ _ _ _ _ _ _ _ _ _ _ _ _ _ _ _ _... - Seite 4 Operation _ _ _ _ _ _ _ _ _ _ _ _ _ _ _ _ _ _ _ _ _ _ _ _ _ _ _ _ _ _ _ _ _ _ _ _ _ _ _ _ _ _ _ _ _ _ _ _ Charging the rechargeable battery _ _ _ _ _ _ _ _ _ _ _ _ _ _ _ _ _ _ _ _ _ _ _ _ _ _ _ _ _ _ _ 5.1.1...
-
Seite 5: Using This Manual
Operating instructions 1.1 Using this manual › R ead this user manual completely before using the device for the first time. Also observe the instructions for use of the accessories. › This user manual is part of the product and must always be easily accessible. › Enclose this user manual when transferring the device to third parties. 1.2 Danger symbols and danger levels 1.2.1 Hazard icons Biohazard Explosion Cuts Toxic substances Hazard point Material damage 1.2.2 Degrees of danger user manual The safety instructions in this indicate the following degrees of danger: WARNING May lead to severe injuries or death. -
Seite 6: Symbols Used
1.3 Symbols used Depiction Meaning › You a re requested to perform an action. Perform these actions in the sequence described. • List. References useful information. Glossary Elapse time Time required to empty a pipette from the upper part of the scale to the lowest scale graduation or to fully empty a measuring pipette or volumetric pipette. -
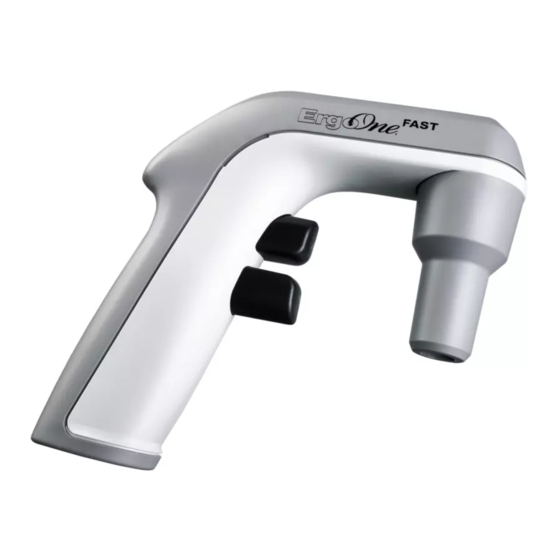
Seite 7: Product Description
Product description 2.1 Main illustration Fig. 1: ErgoOne FAST® Rechargeable battery status display Membrane filter Aspirating button Seal for filter adapter Dispensing button 10 Filter adapter Rechargeable battery compartment lid 11 Pressure compensation opening Connector socket 12 Pipette clamp Aspirating cone 13 Benchtop support (P7166-6306; not included) Pipette adapter ErgoOne FAST ·... -
Seite 8: Delivery Package
2.2 Delivery package Quantity Description ErgoOne® FAST Wall mount Sticky tape for wall mount Membrane filter, 0.2 µm, non-sterile, PTFE Membrane filter, 0.45 µm, non-sterile, PTFE (1 filter is built-in) Seal for filter adapter Filter adapter (Silicone) Aspirating cone Rechargeable battery compartment lid Lithium Polymer rechargeable battery, 3.7 V Power supply, 100-240V User manual Quickstart manual 2.3 Warranty For warranty claims, please contact your local supplier. If the housing of the pipette controller is opened by unauthorized individuals, or the device is misused, no warranty claim may be made. The rechargeable battery and all other wear parts are excluded from the warranty. 8 · ErgoOne FAST · Manual ®... - Seite 9 2.4 Materials NOTICE! Aggressive substances may damage the ErgoOne® FAST and accessories. Check the chemical resistance before using organic solvents or aggressive chemicals. Observe the cleaning instructions. The pipette controller assemblies are composed of the following materials: Component Material Housing, aspirating cone, aspiration button, Polypropylene (PP) dispensing button, membrane filter housing, wall holder Filter adapter Polytetrafluoroethylene (PTFE) Pipette adapter...
-
Seite 10: Intended Use
Safety 3.1 Intended use The pipette controller is intended for dispensing liquids. In-vivo applications (in or on the human body) are not allowed. The pipette controller may only be operated by skilled person n el who have received the appropriate training. All users must have read the user manual care- fully and must have become familiar with the device‘s mode of operation. 3.2 Warnings for intended use WARNING! Damage to health due to infectious liquids and pathogenic germs. › W hen handling infectious liquids and pathogenic germs, observe the national regulations, the biological security level of your laboratory, the material safety data sheets, and the manufacturer‘s application notes. › Wear personal protective equipment. › Follow the instructions regarding hygiene, cleaning and decontamination. › For complete instructions regarding the handling of germs or biological material in risk group II or higher, please refer to the “Laboratory Biosafety Manual“ (source: World Health Organization, current edition of the Laboratory Biosafety Manual). -
Seite 11: Information On Product Liability
CAUTION! Poor safety due to incorrect accessories and spare parts. The use of accessories and spare parts other than those recommended by us may impair the safety, functioning and precision of the device. We cannot be held liable or accept any liability for damage resulting from the use of inco rrect or non-recommended accessories and spare parts, or from the improper use of such equipment. -
Seite 12: Power Supply Assembly
Installation 4.1 Preparing installation › Use the delivery package details to check that the delivery is complete. › Check all parts for any transport damage. › Keep the transport carton and the packing material for subsequent safe transport or storage. 4.2 Power supply assembly Power plug adapters: a) EU, b) United Kingdom, c) USA, d) Australia Power supply Charging plug › I nsert the appropriate power plug adapter into the opening of the power supply. If there is any doubt as to which power plug adapter is required, you should consult an electrician. -
Seite 13: Removing The Discharge Protector
4.3 Removing the discharge protector ErgoOne® FAST is delivered with a rechargeable battery inside. WARNING! Injury caused by incorrect handling of the rechargeable battery. › O nly use rechargeable original batteries supplied by the ErgoOne® FAST manufacturer. › N ever pierce, crush or throw the rechargeable battery. › O nly use the rech argeable battery in the supplied device. › D o not touch a leaking rechargeable battery. › D o not use a damaged rechargeable battery. › D ispose of rechargeable batteries in accordance with the legal requirements. Prior to first usage please proceed as follows: 1. Slide the battery compartment lid open. 2. Remove the battery and discharge protection. 3. Install the battery. 4. Close the battery compartment lid. 4.4 Battery status display during operation 4.4.1 Ready for operation... -
Seite 14: Empty Battery
4.4.2 Empty battery Flashing red light: The rechargeable battery needs to be charged. 4.4.3 Charge battery Flashing red light: The rechargeable battery is <5% charged. Flashing yellow light: The rechargeable battery is 5-60% charged. Flashing green light: The rechargeable battery is 60-99% charged. 4.4.4 Battery is fully charged The rechargeable battery is >99% charged. If the power supply is connected when the battery is fully recharged, the battery status display lights up for approx. 30 seconds and no further charging will take place. 14 · ErgoOne FAST · Manual ®... -
Seite 15: Operation
Operation 5.1 Charging the rechargeable battery WARNING! Incorrect or damaged power supplies can lead to severe personal injury or damage to the device. Incorrect or damaged power supplies can cause electric shock or cause the device to overheat, catch fire, melt, short circuit, or cause similar damage. › U se only supplied the power supply to charge the device. The correct power supply can be identified by the ‚ErgoOne FAST‘ name on the unit. › Do not use a damaged Power supply. WARNING! Personal injury caused by incorrect handling of the rechargeable battery. › Do not disassemble or modify the rechargeable battery. -
Seite 16: Proceed As Follows
Proceed as follows: 1. Connect the power supply to the mains power socket. 2. Insert the charging plug of the power supply into the connector socket. The charging time depends on the char- ging state of the rechargeable battery. For a fully discharged rechargeable battery, this is about 3 hours. You can continue using the pipette controller during the charging process. Fig. 2: Loading the rechargeable battery 5.1.1 Preserving the battery capacity The battery capacity can be preserved over its service life to a great extent. 5.1.2 Long periods without operation – with charging stand ›... -
Seite 17: Inserting The Pipette
5.2 Inserting the pipette WARNING! Risk of cuts from shattered glass pipettes. Glass pipettes are fragile and may cause severe cuts if they break. › D o not use force to insert glass pipettes. › W ear your user protection (UP). › U se a towel to protect the hand used for insertion. › Pick up the pipette from above and carefully insert it in the aspirating cone until is positioned securely and air-tight. Fig. 3: Inserting the pipette ErgoOne FAST ·... -
Seite 18: Pipette Types
5.3 Pipette types Measuring pipettes and volumetric pipettes are divided into 3 classes: A, AS and B. Class A and AS pipettes are more precise than Class B pipettes. They vary according to the elapse time, which depends on the nominal volume and the design. Class AS pipettes are quick-drain pipettes. Volumetric pipettes have 1 or 2 marks and are adjusted to flow-out. Measuring pipettes have a scale and are divided into 4 types. Type 1 measuring pipette • Adjusted to flow-out. • Nominal volume is indicated by the lowest scale graduation. • Aspiration up to the zero line at the upper end of the pipette. • Dispensing to any scale graduation on the scale. 18 · ErgoOne FAST · Manual ®... - Seite 19 Type 2 measuring pipette • Adjusted to flow-out. • Nominal volume is indicated by the top scale graduation. • Aspiration to any scale graduation on the scale. • Dispensing until the pipette is completely empty. Measuring pipette type 3 and type 4 Type 3 measuring pipette • Adjusted to flow-out. • Nominal volume is indicated by the tip of the pipette. • Aspiration up to the zero line at the upper end of the pipette. • Dispensing to any scale graduation on the scale or until the pipette is completely empty.
-
Seite 20: Speed Control
5.4 Speed control The liquid aspiration speed is regulated continuously by controlling the pressure on the control buttons, i.e. how far in the button is pressed. Slowly aspirating or dispensing liquid To slowly aspirate or dispense liquid, press the corresponding control button lightly. Fig. 4: Slow aspiration Quickly aspirating or dispensing liquid To quickly aspirate or dispense liquid, press the corresponding control button firmly. -
Seite 21: Aspirating Liquid
5.5 Aspirating liquid The speed of aspirating liquid is adjusted steplessly. For this the control knob is pressed at different depths. NOTICE! Damage to device due to missing or damaged membrane filter. › D o not use the pipette controller if the membrane filter is not inserted. › R eplace the membrane filter if it is damaged. Consider the type of pipette used. 1. Immerse the pipette into the liquid. 2. S lowly press the aspirating button and keep it pressed down. The further the aspirating button is pressed, the quicker the liquid will be aspirated. 3. W ipe the pipette on the tube inner wall and remove it. Fig. 6: Aspirating liquid ErgoOne FAST ·... -
Seite 22: Dispensing Liquid
5.6 Dispensing liquid Consider the type of pipette used. After liquid dispensing, hold class AS quick-drain pipettes on the tube inner wall for 5 seconds to allow the liquid to drain. 5.6.1 Flow-out A valve will be opened during flow-out. The liquid drains from the pipette as a result of atmospheric pressure. 1. H old the pipette vertically and place ≤ 4 mm it on the tube inner wall. 2. Press the dispensing button lightly. Fig. 7: Allowing liquid to flow-out 22 · ErgoOne FAST · Manual ®... -
Seite 23: Blow-Out
5.6.2 Blow-out During blow out, the liquid will be dispensed using the pump. 1. H old the pipette vertically and place > 4 mm it on the tube inner wall. 2. Press the dispensing button. Fig. 8: Blowing out liquid ErgoOne FAST · Manual · 23 ®... -
Seite 24: Using The Wall Mount
5.7 Using the wall mount For storage, the pipette controller can be put in a wall mount. Please remove the serological pipette before using the wall mount. Fig. 9: ErgoOne® FAST with wall mount 5.7.1 Mounting the wall mount 1. Clean the mounting location on the wall and allow it to dry. 2. Remove the protective foil. 3. P ress the wall mount firmly against the wall. Allow the adhesive tape to dry for 24 hours. 5.7.2 Removing the wall mount 1. Rotate the wall mount to loosen the adhesive tape. 2. Remove the adhesive tape. 5.8 Using the benchtop support The optional benchtop support can also be used for storage. Fig. 10: Attaching the benchtop support › Insert the benchtop support in the groove. › To remove the benchtop support, press the sides of the benchtop support together. 24 · ErgoOne FAST ·... -
Seite 25: Maintenance
Maintenance 6.1 Disassembling the pipette clamp If liquid has entered the pipette clamp, the aspiration capacity may be decreased, or pipette clamp assemblies may be damaged. The pipette clamp must be disassembled in order to clean or replace the assemblies. 1. Turn the aspirating cone counterclockwise and remove it. 2. Remove the pipette adapter and membrane filter from the filter adapter. 3. Remove the membrane filter from the pipette adapter. 4. Use a narrow pointed object to pry the seal out of the filter adapter. 6.2 Cleaning 6.2.1 Cleaning the Pipette Controller Special service is not required. NOTICE! Damage to the device due to autoclaving. › D o not autoclave the pipette controller. To clean contaminated surfaces, proceed as follows: › Wipe the housing using a damp cloth. › Disinfect surfaces using alcohol (ethanol, propanol) or alcohol-containing disinfectants. ErgoOne FAST · Manual · 25 ®... -
Seite 26: Cleaning The Pipette Clamp
6.2.2 Cleaning the pipette clamp The pipette clamp assemblies can be replaced, cleaned or autoclaved as described below (121 °C, 1 bar overpressure for 20 min.) Aspirating cone • Can be wiped using a damp cloth • Can be disinfected with alcohol (ethanol, propanol) or alcohol-containing disinfectants. • Repeatedly autoclavable • Can be replaced Pipette adapter • Can be rinsed with demineralized water • Repeatedly autoclavable • Can be replaced Membrane filter •... -
Seite 27: Mounting The Pipette Clamp
6.3 Mounting the pipette clamp 1. P ush the seal with the groove up into the filter adapter. 2. Push the wide opening of the mem- brane filter into the narrow opening of the pipette adapter. 3. G uide the aspirating cone over the pipette adapter and turn it until it engages. 6.4 Checking the leak tightness 1. Insert the pipette. 2. Fill the pipette with water. 3. Hold the pipette vertically. 4. Observe the pipette outlet for approx. 30 seconds. Do not touch the pipette. Do not press the control buttons. No water may be allowed to escape. 5. If water escapes, disassemble and carefully reassemble the pipette clamp. 6.5 Replacing the rechargeable battery Proceed as follows: 1. Slide the battery compartment lid open. -
Seite 28: Troubleshooting
Troubleshooting 7.1 General errors Symptom/message Cause Remedy › Remove the pipette adapter • Pipette adapter and/or Liquid drips out of and membrane filter and membrane filter the pipette. reinsert them. inserted incorrectly. › Continue to carefully insert • Pipette not inserted the pipette. far enough. •... -
Seite 29: Technical Data
TECHNICAL DATA 8.1 Weight/dimensions 134 g (0.295 lb) (without rechargeable battery, Weight without pipette) 8.2 Mains/power supply device Input voltage 100 V – 240 V AC, ±10 % Frequency 50 Hz – 60 Hz Output voltage Input current 200 mA – 250 mA Output current 8.3 Rechargeable battery Type Lithium-Polymer Voltage 3.7 V Capacity 1100 mAh Charging time ~3 h Weight 26 g (0.057 lb) Number of dispensings ~2000 (with a 25 ml-pipette) 8.4 Ambient conditions... -
Seite 30: Transport, Storage And Disposal
Transport, storage and disposal 9.1 Decontamination before shipment Before sending the pipette controller to the authorized Technical Service for repairs you must decontaminate the pipette and fill out a Declaration of Decontamination. Please note the following: 9.2 Transport › The device may only be transported in its original packaging. Atmospheric Air temperature Relative humidity pressure General transport -25 °C – 60 °C 10 % – 95 % 30 kPa – 106 kPa Air freight -40 °C – 45 °C 10 % – 95 % 30 kPa – 106 kPa 9.3 Storage NOTICE! Damage to device due to incorrect storage. ›... -
Seite 31: Disposal
9.4 Disposal In case the product is to be disposed of, the relevant legal regulations are to be observed. Information on the disposal of electrical and electronic devices in the European Community: Within the European Community, the disposal of electrical devices is regulated by national regulations based on EU Directive 2012/19/EU pertaining to waste electrical and electronic equipment (WEEE). According to these regulations, any devices supplied after 13 August 2005, in the business-to-business sphere, to which this product is assigned, may no longer be disposed of in municipal or domestic waste. They are marked with the following symbol to indicate this: As disposal regulations may differ from country to country within the EU, please contact your supplier if necessary. - Seite 32 Disposal in the United Kingdom - Compliance with regards to UKCA regulatory requirements Electrical and electronic equipment (EEE) is regulated to reduce the amount of waste re- garding EEE. EEE producers must help to protect the environment and human health. Reduction is achieved through various measures in terms of recovery, reuse and recycling of products and components. For the United Kingdom (UK) ‘The Waste Electrical and Electronic Equipment Regulations 2013 (as amended)’ is the underpinning UK legislation.
- Seite 33 EEE is defined as follows: • which is dependent on electric currents or electromagnetic fields to work properly. • for generating, transferring and measuring these currents and fields. • designed for use with a voltage rating 1,000 volts or less for alternating current, and 1,500 volts or less for direct current. ‘Dependent on electric currents or electromagnetic fields to work properly’ means that the equipment needs electric currents or electromagnetic fields (not petrol or gas) to fulfil its basic function. So when the electric current is off, the equipment cannot fulfil its basic function. Where electrical energy is only used for support or control functions, the equipment is not covered by the regulations. Equipment that only needs a spark to start it (electronic ignition) and does not need electricity to fulfil its basic function includes: • petrol lawn mowers, • gas stoves. Products that are not connected to a mains supply may still be EEE. They can be wind- up, battery-powered and solar-powered products. Where a product has several func- tions and only one needs an electrical current, the product may still be EEE. Information on the disposal of Electrical and Electronic Equipment in the United Kingdom: Within the United Kingdom, the disposal of Electrical and Electronic Equipment (EEE) is regulated by national regulations based on Waste Electrical and Electronic Equipment Regulations 2013 (as amended) applicable for EEE.
-
Seite 34: Ordering Information
10 Ordering information Art. No. / Art.-Nr. Description ErgoOne® FAST S7166-0010 Pipette Controller P7166-6402 Wall mount P7166-6701 Sticky tape for wall mount P7166-6306 Benchtop support (not included) Membrane fi lter, 0.2 µm, P7166-6605 sterile, PTFE, pack of 5 Membrane filter, 0.45 µm, P7166-6800 sterile, PTFE, pack of 5 P7166-6904 Seal for filter adapter P7166-6002 Pipette adapter (silicone) P7166-6103 Aspirating cone P7166-6200 Battery compartment lid P7166-6501 Lithium Polymer Battery, 3.7 V... - Seite 35 User Manual _ _ _ _ _ _ _ _ _ _ _ _ _ _ _ _ _ _ _ _ _ _ _ _ _ _ _ _ _ _ _ _ _ _ _ _ _ _ _ _ _ _ _ _ _ _ _ _ _ 3 Bedienungsanleitung _ _ _ _ _ _ _ _ _ _ _ _ _ _ _ _ _ _ _ _ _ _ _ _ _ _ _ _ _ _ _ _ _ _ _ _ _ _ _ _ _ 33 Mode d‘emploi _ _ _ _ _ _ _ _ _ _ _ _ _ _ _ _ _ _ _ _ _ _ _ _ _ _ _ _ _ _ _ _ _ _ _ _ _ _ _ _ _ _ _ _ _ _ _ _ _ _ _ _ _ _...
- Seite 36 Bedienung _ _ _ _ _ _ _ _ _ _ _ _ _ _ _ _ _ _ _ _ _ _ _ _ _ _ _ _ _ _ _ _ _ _ _ _ _ _ _ _ _ _ _ _ _ _ _ Akku laden _ _ _ _ _ _ _ _ _ _ _ _ _ _ _ _ _ _ _ _ _ _ _ _ _ _ _ _ _ _ _ _ _ _ _ _ _ _ _ _ _ _ _ _ _ _ 5.1.1...
-
Seite 37: Anwendungshinweise
Anwendungshinweise 1.1 Anwendung dieser Anleitung › L esen Sie diese Bedienungsanleitung vollständig, bevor Sie das Gerät das erste Mal in Betrieb nehmen. Beachten Sie auch die Gebrauchsanweisungen des Zubehörs. › D iese Bedienungsanleitung ist Teil des Produkts. Bewahren Sie sie gut erreichbar auf. › F ügen Sie diese Bedienungsanleitung bei Weitergabe des Geräts an Dritte bei. 1.2 Gefahrensymbole und Gefahrenstufen 1.2.1 Gefahrensymbole Biogefährdung Explosion Schnittwunden Giftige Stoffe Gefahrenstelle Sachschaden 1.2.2 Gefahrenstufen Die Sicherheitshinweise in dieser Bedienungsanleitung haben die folgenden Gefahrenstufen: WARNUNG Kann zu schweren Verletzungen oder zum Tod führen. VORSICHT Kann zu leichten bis mittelschweren Verletzungen führen. ACHTUNG Kann zu Sachschäden führen. ErgoOne FAST · Bedienungsanleitung · 37 ®... -
Seite 38: Darstellungskonventionen
1.3 Darstellungskonventionen Darstellung Bedeutung › Sie werden zu einer Handlung aufgefordert. Führen Sie diese Handlungen in der beschriebenen Reihenfolge durch. • Auflistung Weist auf nützliche Informationen hin. 1.4 Glossar Ablaufzeit Z eit, die für die Entleerung vom oberen Skalenteil bis zum untersten Teilstrich oder bis zur vollständigen Entleerung einer Mess- oder Vollpipette benötig wird. 38 · ErgoOne FAST · Bedienungsanleitung ®... -
Seite 39: Produktbeschreibung
Produktbeschreibung 2.1 Gesamtillustration Abb. 1: ErgoOne® FAST Akkustatusanzeige Membranfilter Aufnahmeknopf Dichtung für Filteradapter Abgabeknopf Filteradapter Akkufachdeckel Druckausgleichsöffnung Steckbuchse Pipettenaufnahme Aufnahmekonus Ablageständer (P7166-6306; nicht enthalten) Pipettenadapter ErgoOne FAST · Bedienungsanleitung · 39 ®... -
Seite 40: Lieferumfang
2.2 Lieferumfang Anzahl Beschreibung ErgoOne® FAST Wandhalter Klebeband für Wandhalter Membranfilter, 0,2 µm, unsteril, PTFE Membranfilter 0,45 µm, unsteril, PTFE (1 Filter ist bereits im Gerät verbaut.) Dichtung für Filteradapter Adapter (Silikon) Aufnahmenkonus Akkufachdeckel Lithium Polymer Akku, 3,7 V Steckernetztteil, 100-240V Bedienungsanleitung Kurzbedienungsanleitung 2.3 Gewährleistung Nehmen Sie bei Gewährleistungsansprüchen Kontakt zu Ihrem lokalen Lieferanten auf. Bei missbräuchlicher Anwendung oder Öffnung des Gehäuses der Pipettierhilfe durch Unbefugte erfolgt keine Gewährleistung. Der Akku und alle weiteren Verschleißteile sind von der Gewährleistung ausgeschlossen. 40 · ErgoOne FAST · Bedienungsanleitung ®... -
Seite 41: Materialien
2.4 Materialien ACHTUNG! Aggressive Substanzen können ErgoOne® FAST und Zubehör beschädigen. › P rüfen Sie vor der Verwendung von organischen Lösungsmitteln und aggressiven Chemikalien die Chemikalienbeständigkeit. › B eachten Sie die Reinigungshinweise. Bauteile der Pipettierhilfe sind aus folgenden Materialien: Bauteil Material Gehäuse, Aufnahmekonus, Aufnahmeknopf, Polypropylen (PP) Abgabeknopf, Gehäuse des Membranfilters, Wandhalter Filteradapter Polybutylenterephthalat (PBT) Pipettenadapter Silikon Filtermembran Polytetrafluorethylen (PTFE) Dichtung für Filteradapter Hydrierter Acrylnitrilbutadien-Kautschuk (HNBR) Fluor-Polymer-Kautschuk (FKM),... -
Seite 42: Bestimmungsgemäßer Gebrauch
Allg. Sicherheitshinweise Bestimmungsgemäßer Gebrauch Die Pipettierhilfe ist für die Dosierung von Flüssigkeiten vorgesehen. In-vivo-Anwendungen (Anwendungen im oder am menschlichen Körper) sind nicht zulässig. Die Pipettierhilfe darf ausschließlich von entsprechend geschultem Fachpersonal bedient werden. Der Anwender muss die Bedienungsanleitung sorgfältig gelesen und sich mit der Arbeitsweise des Gerätes vertraut gemacht haben. 3.2 Gefährdungen bei bestim- mungsgemäßem Gebrauch WARNUNG! Gesundheitsschädigung durch infektiöse Flüssigkeiten und pathogene Keime. › B eachten Sie beim Umgang mit infektiösen Flüssigkeiten und pathogenen Kei- men die nationalen Bestimmungen, die biologische Sicherheitsstufe Ihres La- bors sowie die Sicherheitsdatenblätter und Gebrauchshinweise der Hersteller. › T ragen Sie Ihre persönliche Schutzausrüstung. › B eachten Sie die Hinweise zur Hygiene, Reinigung und Dekontamination. › E ntnehmen Sie umfassende Vorschriften zum Umgang mit Keimen oder biolo- gischem Material der Risikogruppe II oder höher dem „Laboratory Biosafety Manual“ (Quelle: World Health Organisation, Laboratory Biosafety Manual, in der jeweils aktuell gültigen Fassung). WARNUNG! Explosionsgefahr durch explosionsgefährdete Atmosphären und explosions gefährdete Stoffe. -
Seite 43: Hinweise Zur Produkthaftung
VORSICHT! Sicherheitsmängel durch falsche Zubehör- und Ersatzteile. Zubehör- und Ersatzteile, die nicht von uns empfohlen sind, beeinträchtigen die Sicher h eit, Funktion und Präzision des Geräts. Für Schäden, die durch nicht empfohlene Zubehör- und Ersatzteile oder unsachgemäßen Gebrauch verursacht werden, wird jede Gewährleistung und Haftung durch uns ausgeschlossen. › Verwenden Sie ausschließlich von uns empfohlenes Zubehör und Original- Ersatzteile. VORSICHT! Gefährdung von Personen bei grob fahrlässigem Gebrauch. › Richten Sie die Öffnung einer mit Pipette versehenen ErgoOne® FAST niemals auf sich oder andere Personen. › Lösen Sie die Flüssigkeitsabgabe nur aus, wenn dies gefahrlos möglich ist. › Stellen Sie bei allen Dosieraufgaben sicher, dass Sie sich und andere Personen nicht gefährden. ACHTUNG! Geräteschäden durch eintretende Flüssigkeit. › Tauchen Sie nur die serologische Pipette in die Flüssigkeit. › Legen Sie die Pipettierhilfe nicht mit gefüllter Pipette ab. -
Seite 44: Installation
Installation 4.1 Installation vorbereiten › K ontrollieren Sie anhand der Angaben zum Lieferumfang die Vollständigkeit der Lieferung. › P rüfen Sie alle Teile auf eventuelle Transportschäden. › H eben Sie den Transportkarton und das Verpackungsmaterial für einen späteren sicheren Transport oder Lagerung auf. 4.2 Netzteil zusammensetzen Netzsteckeradapter: a) EU, b) United Kingdom, c) USA, d) Australien Netzteil Ladestecker › S tecken Sie den für Ihre Stromversorgung erforderlichen Netzsteckeradapter in die Öffnung des Netzteils. Wenn Sie sich nicht sicher sind, welcher Netzsteckeradapter der Richtige ist, wenden Sie sich an eine Elektro-Fachkraft. 44 · ErgoOne FAST · Bedienungsanleitung ®... -
Seite 45: Entladesicherung Entfernen
4.3 Entladesicherung entfernen ErgoOne® FAST wird mit einem wiederaufladbarem Akku ausgeliefert. Warnung! Personenschäden durch falsche handhabung des Akkus. › V erwenden Sie nur einen Original-Akku des ErgoOne® FAST Herstellers. › D urchstechen, stauchen oder werfen Sie den Akku nicht. › V erwenden Sie den Akku nur in dem gelieferten Gerät. › B erühren Sie keinen undichten Akku. › V erwenden Sie keinen beschädigten Akku. › E ntsorgen Sie Akkus entsprechend den gesetzlichen Bestimmungen. Vor der ersten Inbetriebnahme entfernen Sie bitte die Entladesicherung: 1. Akkufachdeckel aufschieben. 2. Akku entnehmen und Entladesicherung entfernen. 3. Akku einsetzen. 4. Akkufachdeckel zuschieben. 4.4 Akkustatusanzeige bei Betrieb 4.4.1 Gerät ist betriebsbereit Licht leuchtet permanent Licht leuchtet permanent Licht leuchtet permanent... -
Seite 46: Akku Aufladen
4.4.2 Akku aufladen Licht blinkt rot: Der Akku ist leer und muss geladen werden. 4.4.3 Akku lädt Licht blinkt rot: Der Akku ist <5% geladen. Licht blinkt gelb: Der Akku ist 5-60% geladen. Licht blinkt grün: Der Akku ist 60-99% geladen. 4.4.4 Akku geladen Der Akku ist >99% geladen. Wird das Netzteil an einen aufgeladenen Akku angeschlossen, leuchtet die Akkustatusanzeige für ca. 30 Sekunden grün auf. Der Akku wird nicht geladen. 46 · ErgoOne FAST · Bedienungsanleitung ®... -
Seite 47: Bedienung
Bedienung 5.1 Akku laden WARNUNG! Falsche oder beschädigte Netzteile können schwere Personen- und Geräteschäden verursachen. Falsche oder beschädigte Netzteile können Stromschläge auslösen, das Gerät über h itzen, in Brand setzen, schmelzen, kurzschließen und ähnliche Schäden verursachen. › V erwenden Sie nur das mitgelieferte Netzteil zum Laden des Gerätes. Sie erkennen das korrekte Netzteil an dem Aufkleber „ErgoOne® FAST“ auf dem Netzteil. › Verwenden Sie kein beschädigtes Netzteil. WARNUNG! Personenschäden durch falsche Handhabung des Akkus. › D emontieren oder verändern Sie den Akku nicht. › D urchstechen, stauchen oder werfen Sie den Akku nicht. ›... -
Seite 48: Akkukapazität Erhalten
Gehen Sie folgendermaßen vor: 1. Netzteil in die Steckdose stecken. 2. Ladestecker des Netzteils in die Steckbuchse des Handgriffs stecken. Die Ladezeit ist abhängig vom Lade- zustand des Akkus und beträgt bei vollständig entladenem Akku ungefähr 3 Stunden. Sie können die Pipettierhilfe auch während des Ladevorgangs verwenden. Abb. 2: Akku laden 5.1.1 Akkukapazität erhalten Die Kapazität des Akkus kann über die Lebensdauer weitgehend erhalten werden. 5.1.2 Längere Nutzungspause – mit Ladeständer › D ie Pipette im angeschlossenen Ladeständer aufbewahren. Der Ladezustand des Akkus wird automatisch überwacht und aufgeladen. 5.1.3 Längere Nutzungspause – ohne Ladeständer 1. D en Akku vollständig laden, wenn die Pipette längere Zeit (> 4 Wochen) nicht genutzt wird. -
Seite 49: Pipette Einsetzen
5.2 Pipette einsetzen WARNUNG! Schnittwunden durch zersplitternde Glaspipetten. Glaspipetten sind zerbrechlich und können beim Zerbrechen zu schweren Schnittwunden führen. › S chieben Sie Glaspipetten nicht mit Gewalt ein. › T ragen Sie Ihre persönliche Schutzausrüstung (PSA). › S chützen Sie die einsetzende Hand mit einem Handtuch. › Pipette oben anfassen und vorsichtig in den Aufnahmekonus einschieben, bis sie sicher und luftdicht sitzt. Abb. 3: Pipette einsetzen ErgoOne FAST · Bedienungsanleitung · 49 ®... -
Seite 50: Pipettentypen
5.3 Pipettentypen Messpipetten und Vollpipetten werden in 3 Klassen eingeteilt: A, AS und B. Pipetten der Klasse A und AS sind genauer als Pipetten der Klasse B. Sie unterscheiden sich in der Ablaufzeit. Die Ablaufzeit ist abhängig vom Nennvolumen und der Bauform. Pipetten der Klasse AS sind schnell ablaufende Pipetten. Vollpipetten besitzen 1 oder 2 Marken und sind auf Auslaufen justiert. Messpipetten besitzen eine Skala und werden in 4 Typen eingeteilt. Messpipette Typ 1 • Auf Auslaufen justiert. • Nennvolumen wird durch den untersten Teilstrich angezeigt. • Aufnahme bis zur Nulllinie am oberen Ende der Pipette • Abgabe bis zu einem beliebigen Teilstrich der Skala 50 · ErgoOne FAST · Bedienungsanleitung ®... -
Seite 51: Messpipette Typ 3 Und Typ
Messpipette Typ 2 • Auf Auslaufen justiert. • Nennvolumen wird durch den obersten Teilstrich angezeigt. • Aufnahme bis zu einem beliebigen Teilstrich der Skala • Abgabe bis zur vollständigen Entleerung Messpipette Typ 3 und Typ 4 Messpipette Typ 3 • Auf Auslaufen justiert. • Nennvolumen wird durch die Spitze der Pipette angezeigt. • Aufnahme bis zur Nulllinie am oberen Ende der Pipette • Abgabe bis zu einem beliebigen Teilstrich der Skala oder • vollständige Entleerung Messpipette Typ 4 •... -
Seite 52: Geschwindigkeit Regeln
5.4 Geschwindigkeit regeln Die Geschwindigkeit der Flüssigkeitsaufnahme wird stufenlos geregelt. Der Bedienknopf wird dazu unterschiedlich tief gedrückt. Flüssigkeit langsam aufnehmen oder abgeben › Um Flüssigkeit langsam aufzuneh- men oder abzugeben, den jeweiligen Bedien k nopf leicht drücken. Abb. 4: Langsam aufnehmen Flüssigkeit schnell aufnehmen oder abgeben › Um Flüssigkeit schnell aufzunehmen oder abzugeben, den jeweiligen Bedienknopf tief drücken. Abb. 5: Schnell aufnehmen 52 · ErgoOne FAST · Bedienungsanleitung ®... -
Seite 53: Flüssigkeit Aufnehmen
5.5 Flüssigkeit aufnehmen Die Geschwindigkeit der Flüssigkeitsaufnahme wird stufenlos geregelt. Der Bedienknopf wird dazu unterschiedlich tief gedrückt. ACHTUNG! Geräteschaden durch fehlenden oder beschädigten Membranfilter. › P ipettierhilfe nicht ohne eingesetzten Membranfilter verwenden. › B eschädigten Membranfilter austauschen. Beachten Sie den Typ der verwendeten Pipette. 1. Pipette in die Flüssigkeit eintauchen. 2. A ufnahmeknopf langsam drücken und gedrückt halten. Je weiter Sie den Aufnahmeknopf drücken, um so schneller wird die Flüssigkeit aufgenommen. 3. P ipette an der Gefäßwand abstreifen und herausziehen. Abb. 6: Flüssigkeit aufnehmen ErgoOne FAST · Bedienungsanleitung · 53 ®... -
Seite 54: Flüssigkeit Abgeben
5.6 Flüssigkeit abgeben Beachten Sie den Typ der verwendeten Pipette. Halten Sie schnell ablaufende Pipetten der Klasse AS nach der Flüssigkeitsabgabe 5 Sekunden an die Gefäßwand, so dass die Flüssigkeit abläuft. 5.6.1 Auslaufen Beim Auslaufen wird ein Ventil geöffnet. Die Flüssigkeit läuft durch den atmosphärischen Druck aus der Pipette. 1. P ipette senkrecht halten und an die Gefäßwand anlegen. ≤ 4 mm 2. Abgabeknopf leicht drücken. Abb. 7: Flüssigkeit auslaufen lassen 54 · ErgoOne FAST · Bedienungsanleitung ®... -
Seite 55: Ausblasen
5.6.2 Ausblasen Beim Ausblasen wird die Flüssigkeit mit Hilfe der Pumpe abgegeben. 1. P ipette senkrecht halten und an die Gefäßwand anlegen. 2. Abgabeknopf drücken. > 4 mm Abb. 8: Flüssigkeit ausblasen ErgoOne FAST · Bedienungsanleitung · 55 ®... -
Seite 56: Wandhalter Verwenden
5.7 Wandhalter verwenden Die Pipettierhilfe kann zur Aufbewahrung in einen Wandhalter eingehängt werden. Bitte entfernen Sie die serologische Pipette, bevor Sie den Wandhalter nutzen. Abb. 9: ErgoOne® FAST mit Wandhalter 5.7.1 Wandhalter befestigen 1. Befestigungsstelle an der Wand reinigen und trocknen lassen. 2. Schutzfolie entfernen. 3. Wandhalter fest gegen die Wand drücken. Klebestreifen 24 Stunden trocknen lassen. 5.7.2 Entfernen der Wandhalterung 1. Drehen Sie die Wandhalterung, um das Klebeband zu lösen. 2. Entfernen Sie das Klebeband. 5.8 Ablageständer verwenden Sie können zur Ablage auch den mitgelieferten Ablageständer verwenden. Abb. 10: Ablageständer aufsetzen 1. Den Ablageständer in die Nut einsetzen. 2. Um den Ablageständer abzunehmen, den Ablageständer seitlich zusammendrücken. 56 · ErgoOne FAST · Bedienungsanleitung ®... -
Seite 57: Instandhaltung
Instandhaltung 6.1 Pipettenaufnahme demontieren Wenn Flüssigkeit in die Pipettenaufnahme gelangt ist, kann die Saugleistung verringert oder Bauteile der Pipettenaufnahme beschädigt worden sein. Zur Reinigung oder zum Tausch der Bauteile müssen Sie die Pipettenaufnahme demontieren. 1. Aufnahmekonus gegen den Uhrzeigersinn drehen und abnehmen. 2. Pipettenadapter mit Membranfilter aus Filteradapter abziehen. 3. Membranfilter vom Pipettenadapter ziehen. 4. Dichtung mit einem spitzen Gegenstand aus dem Filteradapter heraushebeln. 6.2 Reinigung 6.2.1 Pipettierhilfe reinigen Eine spezielle Wartung ist nicht erforderlich. ACHTUNG! Geräteschaden durch Autoklavieren. › P ipettierhilfe nicht autoklavieren. Um kontaminierte Oberflächen zu reinigen, gehen Sie folgendermaßen vor: › G ehäuse mit einem feuchten Tuch abwischen. › O berflächen mit Alkohol (Ethanol, Propanol) oder einem alkoholhaltigen Desinfektions- mittel desinfizieren. ErgoOne FAST · Bedienungsanleitung · 57 ®... -
Seite 58: Pipettenaufnahme Reinigen
6.2.2 Pipettenaufnahme reinigen Sie können die Bauteile der Pipettenaufnahme wie folgt tauschen, reinigen oder autoklavieren (121 °C, 1 bar Überdruck für 20 min). Aufnahmekonus • Mit feuchtem Tuch abwischbar • Mit Alkohol (Ethanol, Propanol) oder alkoholhaltigem • Desinfektionsmittel desinfizierbar • Mehrfach autoklavierbar • Austauschbar Pipettenadapter • Mit demineralisiertem Wasser abspülbar • Mehrfach autoklavierbar • Austauschbar Membranfilter • Bei Kontamination entsorgen • Nicht zu reinigen •... -
Seite 59: Pipettenaufnahme Montieren
6.3 Pipettenaufnahme montieren 1. D ichtung mit der Nut in den Filter- adapter hineindrücken. 2. B reite Öffnung des Membranfilters in die schmale Öffnung des Pipetten- adapters hineindrücken. 3. A ufnahmekonus über Pipetten- adapter stülpen und drehen bis er einrastet. 6.4 Dichtigkeit prüfen 1. Pipette einsetzen. 2. Pipette mit Wasser füllen. 3. Gefüllte Pipette senkrecht halten. 4. Austrittsöffnung der Pipette ca. 30 Sekunden beobachten. Die Pipette nicht berühren. Bedienknöpfe nicht betätigen. Es darf kein Wasser austreten. 5. S ollte Wasser austreten, demontieren Sie die Pipettenaufnahme und setzen Sie die Pipettenaufnahme wieder sorgfältig zusammen. 6.5 Akku wechseln Gehen Sie folgendermaßen vor: 1. Akkufachdeckel aufschieben. -
Seite 60: Problembehebung
Problembehebung 7.1 Allgemeine Fehler Symptom/ Meldung Mögliche Ursache Abhilfe • Pipettenadapter und / Flüssigkeit tropft › Pipettierhilfe nicht ohne oder Membranfilter eingesetzten Membranfilter aus der Pipette. verwenden. falsch eingesetzt. › Pipette vorsichtig weiter ein- • Pipette nicht weit schieben. genug eingeschoben. • Pipettenadapter › P ipettenadapter tauschen. beschädigt. -
Seite 61: Technische Daten
Technische Daten 8.1 Gewicht/Maße Gewicht 134 g (0,295 lb) (ohne Akku, ohne Pipette) 8.2 Netzteil Eingangsspannung 100 V – 240 V AC, ±10 % Frequenz 50 Hz – 60 Hz Ausgangsspannung Eingangsstrom 200 mA – 250 mA Ausgangsstrom 8.3 Akku Lithium-Polymer Spannung 3,7 V Kapazität 1100 mAh Ladezeit ~3 h Gewicht 26 g (0,057 lb) Anzahl Dosierungen ~2000 (bei einer 25 ml-Pipette) 8.4 Umgebungsbedingungen Umgebung Verwendung nur in Innenräumen. Umgebungstemperatur 5 °C – 40 °C Relative Luftfeuchte... -
Seite 62: Transport, Lagerung Und Entsorgung
Transport, Lagerung und Entsorgung 9.1 Dekontamination vor Versand Bevor Sie die Pipettierhilfe im Reparaturfall zum autorisierten Technischen Service oder zu Ihrem Vertragshändler schicken, müssen Sie die Pipette dekontaminieren und eine Dekontaminations e rklärung ausfüllen. Beachten Sie dazu bitte Folgendes: 9.2 Transport Transportieren Sie das Gerät ausschließlich in der Originalverpackung Lufttemperatur Relative Luftfeuchte Luftdruck Allgemeiner Transport -25 °C – 60 °C 10 % – 95 % 30 kPa – 106 kPa Luftfracht -40 °C – 45 °C 10 % – 95 % 30 kPa – 106 kPa 9.3 Lagerung ACHTUNG! Geräteschaden bei falscher Lagerung. › E ntfernen Sie den Akku, bevor Sie das Gerät für längere Zeit (> 2 Monate) nicht verwenden. › L agern Sie das Gerät nicht mit eingesetzter Pipette. -
Seite 63: Entsorgung
Kennzeichen ausgestattet: Da die Entsorgungsvorschriften innerhalb der EU von Land zu Land unterschiedlich sein können, bitten wir Sie im Bedarfsfall Ihren Lieferanten anzusprechen. In der Bundesrepublik Deutschland haben Sie die Möglichkeit, Ihre Altgeräte kostenfrei von uns abholen und entsorgen zu lassen. Falls Sie dies wünschen, kontaktieren Sie uns gerne per E-Mail an info@starlab.de oder telefonisch unter Tel.: +49 (0)40 6759 939 0. WARNUNG! Explosions- und Brandgefahr durch überhitzte Akkumulatoren und Batterien. › E rhitzen Sie Akkumulatoren und Batterien nicht über 60 °C und werfen Sie sie nicht ins Feuer. Akkumulatoren und Batterien entsorgen Entsorgen Sie Akkumulatoren und Batterien nicht im Hausmüll. -
Seite 64: Bestellinformationen
10 Bestellinformationen Art.-Nr. Beschreibung ErgoOne® FAST S7166-0010 Pipettierhilfe Wandhalter P7166-6402 P7166-6701 Klebeband für Wandhalter P7166-6306 Ablageständer (nicht mitgeliefert) Membranfilter 0,2 µm, steril, PTFE, 1 Satz P7166-6605 (5 Stück) Membranfilter 0,45 µm, steril, PTFE, 1 Satz P7166-6800 (5 Stück) P7166-6904 Dichtung für Filteradapter P7166-6002 Adapter (Silikon) P7166-6103 Aufnahmekonus P7166-6200 Akkufachdeckel P7166-6501 Lithium Polymer Akku, 3,7 V Steckernetzteil, P7166-6109 100-240V / 50-60Hz 64 · ErgoOne FAST ·... - Seite 65 User Manual _ _ _ _ _ _ _ _ _ _ _ _ _ _ _ _ _ _ _ _ _ _ _ _ _ _ _ _ _ _ _ _ _ _ _ _ _ _ _ _ _ _ _ _ _ _ _ _ _ 3 Bedienungsanleitung _ _ _ _ _ _ _ _ _ _ _ _ _ _ _ _ _ _ _ _ _ _ _ _ _ _ _ _ _ _ _ _ _ _ _ _ _ _ _ _ _ 33 Mode d‘emploi _ _ _ _ _ _ _ _ _ _ _ _ _ _ _ _ _ _ _ _ _ _ _ _ _ _ _ _ _ _ _ _ _ _ _ _ _ _ _ _ _ _ _ _ _ _ _ _ _ _ _ _ _...
- Seite 66 Fonctionnement _ _ _ _ _ _ _ _ _ _ _ _ _ _ _ _ _ _ _ _ _ _ _ _ _ _ _ _ _ _ _ _ _ _ _ _ _ _ _ _ _ _ _ Charger la batterie _ _ _ _ _ _ _ _ _ _ _ _ _ _ _ _ _ _ _ _ _ _ _ _ _ _ _ _ _ _ _ _ _ _ _ _ _ _ _ _ _ 5.1.1...
-
Seite 67: Mode D'emploi
Mode d’emploi 1.1 Utilisation de ce manuel › Lisez intégralement le présent manuel d‘utilisation avant de procéder à la première mise en service de l‘appareil. Respecter également les instructions d‘utilisation des accessoires. › C e manuel d‘utilisation fait partie du produit. Conservez-le bien accessible › L orsque vous remettez l‘appareil à un tiers, pensez toujours à y joindre le manuel d‘utilisation. 1.2 Symboles de danger et niveaux de danger 1.2.1 Symboles de danger Risques biologiques Explosion Coupures... -
Seite 68: Symboles Utilisés
1.3 Symboles utilisés Représentation Signification › Vous êtes prié de procéder à une intervention. Effectuez ces interventions dans l’ordre indiqué. Liste. • Signale des informations utiles. 1.4 Glossaire Durée Durée nécessaire au vidage, du repère supérieur au repère inférieur opérationnelle indiqué sur l‘échelle ou pour vider entièrement une pipette. 66 · ErgoOne FAST · Mode d‘emploi ®... -
Seite 69: Description Du Produit
DESCRIPTION DU PRODUIT 2.1 Vue d‘ensemble Fig. 1: ErgoOne FAST® Affichage de l’état de charge de la batterie Membrane de filtration Bouton d’aspiration Joint du filtre à membrane Bouton de distribution Adaptateur de filtre Capot du compartiment de la batterie Ouverture de compensation de pression rechargeable Prise de connexion Serrage de la pipette Cône d’aspiration Support de paillasse (P7166-6306; pas inclus) Adaptateur ErgoOne FAST · Mode d‘emploi · 69 ®... -
Seite 70: Pièces Incluses Dans La Livraison
2.2 Pièces incluses dans la livraison Quantity Description ErgoOne® FAST Support mural Adhésif pour support mural Membrane de filtration non stérile, 0,2 μm, PTFE Membrane de filtration non stérile, 0,45 μm, PTFE (1 membrane est déjà montée) Joint pour adaptateur de filtre Adaptateur de filtre (Silicone) Cône de fixation Couvercle de la batterie Batterie lithium-polymère, 3,7 V Alimentation, 100-240 V Manuel d‘utilisation Manuel abrégé 2.3 Garantie Pour les prestations se reportant à la garantie légale, veuillez prendre contact avec votre partenaire local. Aucune garantie n‘est appliquée en cas d‘utilisation abusive ou d‘ouverture du boîtier du pipeteur par des personnes non autorisées. La garantie ne prévoit pas le remplacement des batteries et des autres pièces d‘usure. 68 ·... -
Seite 71: Matériaux
2.4 Matériaux INFORMATION ! Les substances agressives peuvent endommager ErgoOne® FAST et les accessoires. › A vant d‘utiliser des solvants organiques et des produits chimiques agressifs, vérifiez la résistance chimique. › R espectez les consignes de nettoyage. Les matériaux des éléments du pipeteur sont les suivants: Pièce Matériau Boîtier, cône de fixation, bouton d‘aspiration, Polypropylène (PP) bouton de distribution, boîtier de la membrane de filtration, support mural Adaptateur de filtre Polybutylène téréphtalate (PBT) Adapateur de pipette Silicone Membrane de filtration Polytétrafluoroéthylène (PTFE) Joint pour adaptateur de filtre Caoutchouc butadiène-nitrile hydrogéné... -
Seite 72: Consignes Générales De Sécurité
Consignes générales de sécurité 3.1 Utilisation conforme Le pipeteur est prévu pour la distribution de liquides. Il ne convient pas aux applications in-vivo (effectuées sur ou dans le corps humain). Le pipeteur doit être utilisé exclusivement par un personnel spécialisé formé en conséquence. L‘utilisateur doit avoir lu avec précaution le manuel d‘utilisation et s‘être familiarisé avec le mode de fonctionnement de l‘appareil. 3.2 Avertissement pour l’utilisation conforme AVERTISSEMENT ! Risque pour la santé lié à la présence de liquides infectieux et de germes pathogènes. › E n cas de manipulation de liquides infectieux et de germes pathogènes, observez la réglementation nationale, le niveau de sécurité biologique de votre laboratoire ainsi que les fiches techniques de sécurité et les instructions d‘utilisation du fabricant. › Portez votre équipement de protection individuelle. ›... - Seite 73 AVERTISSEMENT ! Défaut de sécurité en raison d‘accessoires et de pièces de rechange incorrectes. Les accessoires et pièces de rechange non recommandés ont un effet négatif sur la sécurité, la fonction et la fidélité de l‘appareil. Nous déclinons toute responsabilité pour les dommages causés par des accessoires ou pièces de rechange non recommandés ou par une utilisation incorrecte. N‘utilisez que des accessoires et des pièces de rechange recommandés par nous. AVERTISSEMENT ! Mise en danger de personnes en cas de négligence grossière.
-
Seite 74: Installation
Installation 4.1 Préparer l‘installation › A l’aide des informations du bordereau de livraison, vérifiez si la livraison est complète. › C ontrôlez la présence de dommages causés par le transport. › Conservez l‘emballage de transport et le matériel d’emballage pour un transport ul- térieur en toute sécurité ou le stockage. 4.2 Assemblage du bloc d‘alimentation Adaptateur de prise : a) UE, b) Royaume Uni, c) Etats-Unis, d) Australie Chargeur Prise du chargeur ›... -
Seite 75: Retrait De La Sécurité Anti-Décharge
4.3 Retrait de la sécurité anti-décharge ErgoOne® FAST est fourni avec une batterie rechargeable. ATTENTION ! Blessure causée par une mauvaise manipulation de la batterie rechargeable. › N’utilisez que des batterie rechargeables d’origine fournies par le fabricant d’ErgoOne® FAST. › Ne jamais percer, écraser ou jeter la batterie rechargeable. › N’utilisez que la batterie rechargeable dans l’appareil fourni. › Ne touchez pas la batterie rechargeable qui fuit. › N’utilisez pas batterie rechargeable endommagée. › Éliminez les batteries rechargeables conformément aux dispositions légales. -
Seite 76: Batterie Vide
4.4.2 Batterie vide Lumière rouge clignotante : La batterie doit être chargée. 4.4.3 La batterie en charge Lumière rouge clignotante : La batterie est chargée à moins de 5 %. Lumière jaune clignotante : La batterie est chargée entre 5 et 60 %. Lumière verte clignotante : La batterie est chargée entre 60 et 99 %. 4.4.4 Batterie chargée La batterie est chargée à plus de 99 %. Lorsque le bloc d‘alimentation est raccordé à une batterie chargée, l‘affichage du statut de la batterie s‘allume pendant 30 secondes environ. La batterie ne se charge pas. -
Seite 77: Fonctionnement
Fonctionnement 5.1 Charger la batterie AVERTISSEMENT ! Un chargeur incorrect ou endommagé peut provoquer de graves blessures ou dommages. Un chargeur incorrect ou endommagé peut provoquer l’électrocution, la sur- chauffe de l’appareil, le mettre en feu, le faire fondre, le court-circuiter ou autres dommages. › U tilisez uniquement le bloc d’alimentation fourni pour charger l’appareil. Vous reconnaissez ce dernier par le nom ErgoOne® FAST inscrit sur l’alimentation électrique. › N e pas utiliser de chargeur endommagé. AVERTISSEMENT ! Tout maniement incorrect de la batterie constitue un danger. -
Seite 78: Procédez Comme Suit
Procédez comme suit: 1. B ranchez le bloc d‘alimentation au secteur. 2. G lissez la prise du chargeur dans la fiche de la poignée. La durée de charge dépend de l‘état de charge de la batterie et est d‘environ 3 heures lorsque la batterie est entière- ment déchargée. Vous pouvez utiliser également le pipe- teur pendant le processus de charge. Fig. 2: Chargement de la batterie 5.1.1 Préserver la capacité de la batterie La capacité de la batterie peut être préservée dans une large mesure pendant sa durée de vie. -
Seite 79: Mise En Place De La Pipette
5.2 Mise en place de la pipette AVERTISSEMENT ! Coupures avec des éclats de pipette en verre. Les pipettes en verre sont cassantes et leurs éclats peuvent causer des coupures. › I nsérez les pipettes sans forcer. › Portez votre équipement de protection individuelle (EPI). › Protégez la main qui met en place la pipette avec une serviette. › S aisissez la pipette par le haut et glissez-la soigneusement dans le cône de fixation jusqu‘à ce qu‘elle soit bien en place et ne laisse pas passer d‘air. -
Seite 80: Types De Pipettes
5.3 Types de pipette Les pipettes de mesure et les pipettes volumétriques sont réparties en 3 classes : A, AS et B. Les pipettes des classes A et AS sont plus précises que les pipettes de la classe B. Elles se distinguent au niveau du temps d‘écoulement. Le temps d‘écoulement dépend du volume nominal et de la forme de construction. Les pipettes de la classe AS sont des pipettes à écoulement rapide. Les pipettes volumétriques possèdent 1 ou 2 marques et sont ajustées pour les écoule- ments non forcés. Les pipettes de mesure possèdent une échelle et sont réparties en 4 types. Pipette de mesure type 1 • Ajustée pour les écoulements non forcés. • Le volume nominal est affiché par le trait le plus bas. • Collecte jusqu‘à la ligne zéro à l‘extrémité supérieure de la pipette. • Distribution jusqu‘à un trait quelconque de l‘échelle. 78 · ErgoOne FAST ·... - Seite 81 Pipette de mesure type 2 • Ajustée pour les écoulements non forcés. • Le volume nominal est affiché par le trait le plus haut. • Collecte jusqu‘à un trait quelconque de l‘échelle. • Distribution jusqu‘au vidage complet. . Pipette de mesure type 3 et type 4 Pipette de mesure type 3 • Ajustée pour les écoulements non forcés • Le volume nominal est affiché par la pointe de la pipette. • Collecte jusqu‘à la ligne zéro à l‘extrémité supérieure de la pipette. • Distribution jusqu‘à un trait quelconque de l‘échelle ou vidage complet. Pipette de mesure type 4 •...
-
Seite 82: Régulation De La Vitesse
5.4 Régulation de la vitesse La vitesse de l‘aspiration de liquide est régulée progressivement. Il suffit pour cela d‘enfoncer plus en moins le bouton-poussoir. Aspiration ou distribution lente de liquide › A fin de collecter ou distribuer lente- ment le liquide, appuyez légèrement sur le bouton-poussoir correspon- dant. Fig. 4: Aspiration lente Aspiration ou distribution rapide de liquide › A fin d‘aspirer ou distribuer rapide- ment le liquide, appuyez à fond sur le bouton-poussoir correspondant. Fig. 5: Aspiration rapide 80 · ErgoOne FAST · Mode d‘emploi ®... -
Seite 83: Aspiration Du Liquide
5.5 Aspiration de liquide La vitesse d‘aspiration du liquide se règle de manière linéaire, en changeant la pression exercée sur le bouton-poussoir. INFORMATION ! L‘appareil peut être endommagé en cas d‘absence de membrane de filtration ou de membrane endommagée. › N‘utilisez pas le pipeteur sans membrane de filtration mise en place. › R emplacez toute membrane endommagée. Respectez le type de la pipette utilisé. 1. Plongez la pipette dans le liquide. 2. A ppuyez lentement sur le bouton d‘aspiration et maintenez-le enfoncé. Plus vous appuyez sur le bouton d‘aspiration, plus le liquide est aspiré... -
Seite 84: Distribution Du Liquide
5.6 Distribution du liquide Respectez le type de la pipette utilisée. Maintenez les pipettes à écoulement rapide de la classe AS après la distribu- tion de liquide pendant 5 secondes sur la paroi de sorte que le liquide s‘écoule. 5.6.1 Ecoulement non forcé Une vanne s‘ouvre pour l‘écoulement non forcé. Le liquide s‘écoule hors de la pipette par le jeu de la pression atmosphérique. 1. M aintenez la pipette à la verticale et la placer contre la paroi. 2. A ppuyez légèrement sur le bouton de ≤ 4 mm distribution. Fig. 7: Écoulement non forcé du liquide 82 · ErgoOne FAST · Mode d‘emploi ®... -
Seite 85: Ecoulement Forcé
5.6.2 Ecoulement forcé Le liquide est distribué à l’aide de la pompe. 1. M aintenez la pipette à la verticale et la placer contre la paroi. > 4 mm 2. A ppuyez sur le bouton de distribu- tion. Fig. 8: Écoulement forcé du liquide ErgoOne FAST · Mode d‘emploi · 85 ®... -
Seite 86: Utilisation Du Support Mural
5.7 Utilisation du support mural Le pipeteur peut être suspendu pour stockage dans un support mural. Retirez la pipette sérologique avant d‘utiliser le support mural. Fig. 9: ErgoOne FAST avec support mural ® 5.7.1 Fixation du support mural 1. Nettoyez et laissez sécher l‘emplacement de fixation sur le mur. 2. Retirez le film protecteur. 3. Appliquez le support mural contre le mur. Laissez sécher l‘adhésif pendant 24 heures. 5.7.2 Retrait du support mural 1. Faire pivoter le support mural pour détacher l‘adhésif, tournez le support mural. 2. Retirez l‘adhésif. 5.8 Utilisation du support de paillasse Vous pouvez également utiliser le support de paillasse fourni. Fig. 10: Montage du support de paillasse 1. Insérez le support de paillasse dans la rainure. 2. Afin de retirer le support de paillasse, appuyez sur les côtés du support. 84 · ErgoOne FAST · Mode d‘emploi ®... -
Seite 87: Entretien
Entretien 6.1 Démontage du dispositif de fixation de la pipette Lorsque du liquide pénètre dans le dispositif de fixation de la pipette, la puissance d‘aspira- tion peut être réduite ou des composants de la fixation risquent d‘être endommagés. Pour nettoyer ou remplacer les composants, vous devez démonter ce dispositif de fixation. 1. T ournez le cône de fixation dans le sens contraire des aiguilles d’une montre et retirez-le. 2. Retirez l’adaptateur de la pipette avec la membrane de filtration de l’adaptateur du filtre. 3. Retirez la membrane de filtration de l’adaptateur de pipette. 4. Détachez le joint de l’adaptateur du filtre à l’aide d’un objet pointu. 6.2 Nettoyage 6.2.1 Nettoyage du pipeteur Une maintenance spéciale n‘est pas nécessaire. INFORMATION ! Tout autoclavage constitue un risque pour l‘appareil. › N e passez pas le pipeteur à l‘autoclave. Afin de nettoyer les surfaces contaminées, procédez de la manière suivante : ›... -
Seite 88: Nettoyage Du Dispositif De Fixation De La Pipette
6.2.2 Nettoyage du dispositif de fixation de la pipette Vous pouvez remplacer, nettoyer ou autoclaver les éléments du dispositif de fixation de la pipette (121 °C, 1 bar de surpression pendant 20 min) de la manière suivante. Cône de fixation • Nettoyez-le avec un chiffon humide • Il peut être désinfecté à l‘alcool (éthanol, propanol) ou avec un produit désinfectant à l‘alcool • Autoclavable plusieurs fois • Remplaçable Adaptateur de pipette • Lavable à l‘eau déminéralisée •... -
Seite 89: Montage Du Dispositif De Fixation De La Pipette
6.3 Montage du dispositif de fixation de la pipette 1. I nsérez le joint avec la rainure dans l‘adaptateur de filtre. 2. I nsérez la large ouverture de la membrane de filtration dans la petite ouverture de l‘adaptateur de pipette. 3. P lacez le cône de fixation au-dessus de l‘adaptateur de pipette et tournez jusqu‘à ce qu‘il s‘enclenche 6.4 Contrôle de l‘étanchéité 1. Insérez la pipette. 2. Remplissez la pipette d‘eau. 3. Maintenez la pipette remplie à la verticale. 4. Observez l‘ouverture de sortie de la pipette pendant 30 secondes environ. Ne touchez pas à la pipette. N’actionnez pas les boutons de commande. L‘eau ne doit pas sortir. -
Seite 90: Résolution De Problèmes
Resolution des problèmes 7.1 Pannes générales Symptôme/message Origine Dépannage • L‘adaptateur de la Du liquide s‘égoutte pipette et/ou la mem- › Retirez l‘adaptateur de la pipette de la pipette. brane de filtration n‘est et la membrane de filtration puis remettez-les en place. pas mis en place pro- prement. -
Seite 91: Données Techniques
Données techniques 8.1 Poids/Dimensions Poids 134 g (0,295 lb) (sans batterie, sans pipette) 8.2 Bloc d‘alimentation Tension d‘entrée 100 V – 240 V AC, ±10 % Fréquence 50 Hz – 60 Hz Tension de sortie Courant d‘entrée 200 mA – 250 mA Courant de sortie 8.3 Batterie Type Lithium-Polymer Tension 3,7 V Capacité 1100 mAh Durée de charge ~3 h Poids 26 g (0,057 lb) Nombre de distributions ~2000 (pour une pipette de 25 ml) 8.4 Conditions d‘environnement Environnement... -
Seite 92: Transport, Stockage Et Mise Au Rebut
Transport, stockage et mise au rebut 9.1 Décontamination avant expédition Avant d‘envoyer le pipeteur au S.A.V. agréé en cas de réparation, vous devez décontaminer la pipette et remplir une Déclaration de Décontamination. Pour cela, veuillez respecter les points suivants: 9.2 Transport › T ransportez l’appareil uniquement dans son emballage d’origine. Température Humidité relative Pression de l‘air de l‘air atmosphérique Transport conventionnel -25 °C – 60 °C 10 % – 95 % 30 kPa – 106 kPa Frêt aérien -40 °C – 45 °C 10 % – 95 % 30 kPa – 106 kPa 9.3 Stockage INFORMATION ! Dommages causés à l’appareil en raison d’un mauvais stockage. ›... -
Seite 93: Mise Au Rebut
9.4 Mise au rebut Veuillez respecter les dispositions légales correspondantes en cas de mise au rebut du produit. Informations sur la mise au rebut des appareils électriques et électroniques dans l‘Union Européenne: Au sein de l‘Union Européenne, les appareils électriques sont régis par des réglementa- tions nationales, basées sur la directive 2012/19/EU relative aux déchets d‘équipements électriques et électroniques (DEEE). D’après cette directive, il est désormais interdit de mettre au rebut les dispositifs industri- els (dont ce produit fait partie) livrés après le 13 Août 2005 avec les déchets municipaux ou domestiques. Pour faciliter leur identification, ces appareils seront pourvus du symbole suivant: Étant donné que les réglementations relatives à l’élimination des déchets au sein de l’UE peuvent varier d’un pays à l’autre, nous vous invitons en cas de besoin à contacter votre fournisseur. AVERTISSEMENT ! Risques d‘explosion et d‘incendie par des batteries ou piles surchauffés. -
Seite 94: Informations De Commande
10 Informations de commande Référence Description S7166-0010 Pipeteur ErgoOne® FAST P7166-6402 Support mural supplémentaire P7166-6701 Bande adhésive pour support mural Support de paillasse pour P7166-6306 ErgoOne® FAST P7166-6605 Filtre, 0,2 μm en PTFE, stérile P7166-6800 Filtre, 0,45 μm en PTFE, stérile P7166-6904 Joint pour adaptateur de filtre P7166-6002 Embout porte pipette en silicone P7166-6103 Cône d’aspiration Couvercle du compartiment P7166-6200 de la batterie P7166-6501 Batterie en lithium polymère 3,7 V P7166-6109... - Seite 95 User Manual _ _ _ _ _ _ _ _ _ _ _ _ _ _ _ _ _ _ _ _ _ _ _ _ _ _ _ _ _ _ _ _ _ _ _ _ _ _ _ _ _ _ _ _ _ _ _ _ _ 3 Bedienungsanleitung _ _ _ _ _ _ _ _ _ _ _ _ _ _ _ _ _ _ _ _ _ _ _ _ _ _ _ _ _ _ _ _ _ _ _ _ _ _ _ _ _ 33 Mode d‘emploi _ _ _ _ _ _ _ _ _ _ _ _ _ _ _ _ _ _ _ _ _ _ _ _ _ _ _ _ _ _ _ _ _ _ _ _ _ _ _ _ _ _ _ _ _ _ _ _ _ _ _ _ _ _...
- Seite 96 _ _ _ _ _ _ _ _ _ _ _ _ _ _ _ _ _ _ _ _ _ _ _ _ _ _ _ _ _ _ _ _ _ _ _ _ _ _ _ _ _ _ _ _ _ _ _ _ _ _ _ Caricamento della batteria _ _ _ _ _ _ _ _ _ _ _ _ _ _ _ _ _ _ _ _ _ _ _ _ _ _ _ _ _ _ _ _ _ _ _ 5.1.1...
-
Seite 97: Avvertenze Per L'utilizzo
Avvertenze per l‘utilizzo 1.1 Impiego delle presenti istruzioni › P rima di mettere in funzione l‘apparecchio per la prima volta, leggere le presenti istruzioni per l‘uso. Se necessario, attenersi alle istruzioni per l‘uso degli accessori. › Le presenti istruzioni per l‘uso fanno parte del prodotto e vanno conservate in un punto facilmente raggiungibile. › A ccludere sempre il manuale di istruzioni in caso di trasferimento dell‘apparecchio a terzi. 1.2 Simboli di pericolo e gradi di pericolo 1.2.1 Simboli di pericolo Rischio biologico... -
Seite 98: Convenzioni Grafiche
1.3 Convenzioni grafiche Illustrazione Significato › Operazioni senza un ordine predefinito Eseguire le azioni nell’ordine indicato. • Lista Informazioni utili. 1.4 Glossario Tempo richiesto per lo svuotamento di una pipetta graduata Durata del processo o volumetrica dall‘estermità superiore della scala graduata fino alla lineetta di gradazione più in basso oppure per lo svuotamento completo. 98 · ErgoOne FAST · Istruzioni d‘uso ®... -
Seite 99: Descrizione Del Prodotto
Descrizione del prodotto 2.1 Illustrazione generale Fig. 1: ErgoOne FAST® Indicatore stato batteria Filtro a membrana Pulsante di aspirazione Guarnizione per adattatore filtro Pulsante di rilascio 10 Adattatore del filtro Coperchio del comparto batteria 11 Apertura di bilanciamento della pressione Connettore femmina 12 Alloggiamento della pipetta Cono di aspirazione 13 Sostegno da bancone Adattatore pipette ErgoOne FAST ·... -
Seite 100: Dotazione
2.2 Dotazione Quantità Descrizione ErgoOne® FAST Supporto a parete Nastro adesivo per supporto a parete Filtro a membrana, 0,2 µm, non sterile, PTFE Filtro a membrana 0,45 µm, non sterile, PTFE (1 filtro è già montato) Guarnizione per adattatore filtro Adattatore del filtro (Silicone) Cono di aspirazione Coperchio del comparto batteria Batteria ricaricabile ai polimeri di litio, 3,7 V Alimentatore, 100-240V Manuale di istruzioni Guida rapida 2.3 Garanzia Nel caso in cui si voglia ricorrere alla garanzia contattare il distributore locale. L‘utilizzo improprio o l‘apertura del dispositivo da parte di persone non autorizzate fanno cessare il diritto alla garanzia. -
Seite 101: Materiali
2.4 Materiali AVVISO! Le sostanze aggressive possono danneggiare ErgoOne® FAST e gli accessori › V erificare la resistenza agli agenti chimici prima di utilizzare solventi organici e sostanze chimiche aggresssive. › A ttenersi alle indicazioni fornite per la pulizia. I componenti dell‘ausilio di pipettaggio sono costituiti dai seguenti materiali: Parte Materiale Alloggiamento, cono di aspirazione, Polipropilene (PP) pulsante di aspirazione, pulsante di rilascio, alloggia m ento del filtro a membrana, supporto a parete Adattatore del filtro Polibutilene tereftalato (PBT) Adattatore pipette Silicone Membrana del filtro Politetrafluoroetilene (PTFE) Guarnizione per adattatore filtro... -
Seite 102: Avvertenze Di Sicurezza Generali
Avvertenze di sicurezza generali Uso conforme Il pipettatore è destinato alla dispensazione di liquidi. Non sono consentite applicazioni in-vivo (applicazioni nel o sul corpo umano). Il pipettatore è destinato esclusivamente all‘impiego da parte di personale specializzato appositamente addestrato. L‘utilizzatore deve aver letto con cura le istruzioni per l‘uso e avere pertanto acquisito familiarità con la modalità di lavoro dell‘apparecchio. 3.2 Pericoli in caso di uso conforme AVVERTENZA! Danni alla salute dovuti a liquidi infettivi e germi patogeni. › P er il contatto con liquidi infettivi e germi patogeni, attenersi alle dispo- sizioni nazionali, al livello di sicurezza biologica del vostro laboratorio e alle schede di sicurezza e alle istruzioni per l‘uso dei produttori. -
Seite 103: Note Sulla Responsabilità Da Prodotto
ATTENZIONE! Rischi per la sicurezza dovuti ad accessori e pezzi di ricambio errati. Gli accessori e i pezzi di ricambio non raccomandati da STARLAB pregiudicano la sicurezza, il funzionamento e la precisione del dispositivo. Per i danni causati da accessori o pezzi di ricambio non raccomandati da STARLAB o dovuti ad un improprio utilizzo, si esclude ogni garanzia e responsabilità. › Usare esclusivamente accessori da noi raccomandati e parti di ricambio originali. ATTENZIONE! Pericolo per le persone in caso di uso improprio. › N on dirigere mai su di sè o su altre persone l‘apertura dell‘ErgoOne ® FAST dotato di una pipetta. -
Seite 104: Installazione
Installazione 4.1 Predisposizione dell‘installazione › C ontrollare la completezza della fornitura sulla base dei dati relativi alla dotazione. › V erificare l‘assenza di danni da trasporto su tutti i componenti. › Conservare il cartone da trasporto e il materiale d‘imballaggio per un successivo trasporto o immagazzinaggio sicuro. 4.2 Montare l‘alimentatore Adattatore per spina elettrica: a) EU, b) Regno Unito, c) USA, d) Australia Alimentatore Connettore di ricarica › I nserire nel foro dell‘alimentatore l‘adattatore per spina elettrica richiesto dal tipo di alimentazione. Nel caso in cui non si sia certi di quale tipo di adattatore per spina elettrica utilizzare, rivolgersi ad un elettricista specializzato. -
Seite 105: Rimuovere Il Dispositivo Di Sicurezza Antiscarica
4.3 Rimuovere il dispositivo di sicurezza antiscarica L‘ErgoOne® FAST viene consegnato con una batteria ricaricabile all‘interno. ATTENZIONE! Lesioni causate da un errato utilizzo della batteria ricaricabile. › Utilizzare esclusivamente batterie ricaricabili originali fornite dal produttore ErgoOne® FAST. › N on forare, schiacciare o lanciare mai la batteria ricaricabile. › U tilizzare solo la batteria ricaricabile dell’apparecchio fornito in dotazione. › N on toccare la batteria ricaricabile che perde. › N on utilizzare una batteria ricaricabile danneggiata. › S maltire le batterie ricaricabili in conformità con le disposizioni di legge. -
Seite 106: Batteria Scarica
4.4.2 Batteria scarica Luce rossa lampeggiante: La batteria deve essere ricaricata. 4.4.3 Batteria carica Luce rossa lampeggiante: La batteria ricaricabile ha una carica <5 %. Luce gialla lampeggiante: La batteria ricaricabile ha una carica tra il 5-60 %. Luce verde lampeggiante: La batteria ricaricabile ha una carica tra il 60-99 %. 4.4.4 Batteria a piena carica La batteria ricaricabile ha carica >99 %. Se l‘alimentatore viene connesso a batteria completamente carica, l‘indicatore di stato di carica si accende per circa 30 secondi e la batteria non verrà ricaricata. 106 · ErgoOne FAST · Istruzioni d‘uso ®... -
Seite 107: Uso
5.1 Caricamento della batteria AVVERTENZA! Un alimentatore errato o danneggiato potrebbe causare gravi lesioni alle persone e danneggiare l‘apparecchio. Un alimentatore errato o danneggiato potrebbe causare folgorazione, surriscal- dare l‘apparecchio, provocarne l‘incendio, la fusione, il cortocircuito o danni similari. › I mpiegare solo l‘alimentatore incluso nella consegna per ricaricare il dis- positivo. II corretto alimentatore è riconoscibile dal logo ErgoOne® FAST riportato su di esso. › N on utilizzare alimentatori danneggiati. AVVERTENZA! Danni a persone dovuti a un errato utilizzo. Non smontare o modificare la batteria. › N on perforare, schiacciare o lanciare la batteria. › U tilizzare la batteria ricaricabile solo nell’ErgoOne® FAST. › N on toccare batterie che presentano perdite. › N on utilizzare batterie danneggiate. Smaltire le batterie in conformità alle disposizioni di legge. AVVISO! Perdita della totale capacità di carica della batteria in casa di errata ricarica. › L a batteria fornita non è completamente carica. La batteria ricaricabile rag- giunge la piena capacità di ricarica una volta che si è scaricata ed è stata ricaricata più volte. -
Seite 108: Conservazione Della Capacità Della Batteria
Procedere nel modo seguente: 1. Inserire l‘alimentatore nella presa. 2. I nserire il connettore per la ricarica dell‘alimentatore nel connettore femmina dell‘impugnatura. La durata di ricarica dipende da livello di carica della batteria ed è pari a circa 3 ore se la batteria è completamente scarica. È possibile utilizzare il pipettatore anche durante la ricarica. -
Seite 109: Inserimento Della Pipetta
5.2 Inserimento della pipetta AVVERTENZA! Ferite da taglio a causa della rottura delle pipette di vetro. Le pipette di vetro si possono rompere e causare così ferite da taglio gravi. › N on inserire le pipette di vetro con violenza. › I ndossare i propri dispositivi di protezione individuale (DPI). › P roteggere la mano che esegue l‘operazione con un asciugamano. › Afferrare la pipetta dalla parte superiore e spingerla con cautela nel cono di aspirazione finchè questa si blocca in sede e risulta a tenuta d‘aria. -
Seite 110: Tipi Di Pipette
5.3 Tipi di pipette Le pipette graduate e le pipette volumetriche sono suddivise in 3 classi: A, AS e B. Le p i pette della classe A e AS sono più precise delle pipette della classe B. Le diverse pipette differiscono per tempo di scolamento. II tempo di scolamento dipende dal volume nominale e dalla struttura della pipetta. Le pipette della classe AS sono pipette a scolamento rapido. Le pipette volumetriche presentano 1 o 2 linee di graduazione e sono calibrate per scolamento. Le pipette graduate sono dotate di una scala graduata e si suddividono in 4 tipi. Pipetta graduata di tipo 1 • Calibrata per scolamento. • Il volume nominale viene indicato dalla lineetta di gradazione più in basso. • Aspirazione fino alla linea della zero all‘estremità superiore della pipetta. • Erogazione fino a una lineetta di gradazione qualsiasi della scala. 110 · ErgoOne FAST · Istruzioni d‘uso ®... - Seite 111 Pipetta graduata di tipo 2 • Calibrata per scolamento. • II volume nominale viene indicato dalla lineetta di gradazione più in alto. • Aspirazione fino a una lineetta di gradazione qualsiasi della scala. • Erogazione fino allo svuotamento completo. Pipetta graduata tipo 3 e tipo 4 Pipetta graduata tipo 3 • Calibrata per scolamento. • Il volume nominale viene indicato dal puntale della pipetta. • Aspirazione fino alla linea dello zero all‘estremità superiore della pipetta. • Erogazione fino a una linea di graduazione qualsiasi della scala o fino allo svuotamento completo.
-
Seite 112: Regolazione Della Velocità
5.4 Regolazione della velocità La velocità dell‘aspirazione di liquidi è regolata a livelli. Ogni livello può essere raggiunto premendo il pulsante di comando esercitando una pressione diversa. Aspirazione ed erogazione lenta del liquido › Per aspirare o erogare lentamente il liquido, premere leggermente il relativo pulsante di comando. Fig. 4: Aspirazione lenta Assorbire o rilasciare rapidamente il liquido › Per aspirare o erogare rapidamente il liquido, premere a fondo il relativo pulsante di comando. Fig. 5: Aspirazione veloce 112 · ErgoOne FAST · Istruzioni d‘uso ®... -
Seite 113: Aspirazione Liquido
5.5 Aspirazione liquido La velocità di aspirazione del liquido è regolata in modo continuo, senza scatti, premendo semplicemente il pulsante a profondità differenti. AVVISO! Danni all‘apparecchio causati da un filtro a membrana assente o danneggiato. › N on utilizzare il pipettatore senza aver inserito il filtro a membrana. › S ostituire il filtro a membrana se danneggiato. Fare attenzione al tipo di pipetta utilizzata. 1. Immergere La pipetta nel liquido. 2. P remere lentamente il pulsante di aspirazione e mantenerlo premuto. Più si preme il pulsante di aspirazi- one, e più velocemente il liquido verrà aspirato. 3. P ulire la pipetta passandola lungo la parete della provetta e poi toglierla. Fig. 6: Aspirazione liquido ErgoOne FAST · Istruzioni d‘uso · 113 ®... -
Seite 114: Erogazione Del Liquido
5.6 Erogazione del liquido Fare attenzione al tipo di pipetta utilizzata. Dopo la dispensazione, mantenere le pipette a deflusso rapido della classe AS per 5 secondi contra la parete della provetta, per far defluire tutto il liquido. 5.6.1 Fuoriuscita Alla fuoriuscita si apre una valvola. II liquido fuoriesce dalla pipetta grazie alla pressione atmosferica. 1. T enere la pipetta in posizione verticale e appoggiarla alla parete della provetta. ≤ 4 mm 2. P remere leggermente il pulsante di rilascio. Fig. 7: Lasciar fuoriuscire il liquido 114 · ErgoOne FAST · Istruzioni d‘uso ®... -
Seite 115: Soffiaggio
5.6.2 Soffiaggio Durante il soffiaggio il liquido viene rilasciato per mezzo della pompa. 1. T enere la pipetta in posizione verticale e appoggiarla alla parete della provetta. > 4 mm 2. Premere il pulsante di rilascio. Fig. 8: Soffiaggio del liquido ErgoOne FAST · Istruzioni d‘uso · 115 ®... -
Seite 116: Utilizzo Del Supporto A Parete
5.7 Utilizzo del supporto a parete Il pipettatore può essere appeso a un supporto a parete. Rimuovere la pipetta sierologica prima di utilizzare il supporto a parete. Fig. 9: ErgoOne® FAST con supporto a parete 5.7.1 Fissaggio del supporto a parete 1. Pulire e lasciare asciugare il punto di fissaggio sulla parete. 2. Rimuovere la pellicola protettiva. 3. F issare il supporto premendolo con forza contro la parete. Lasciar asciugare le strisce di adesivo per 24 ore. 5.7.2 Rimozione del supporto a parete 1. Per allentare le strisce di adesivo, girare il supporto a parete. 2. Rimuovere le strisce di adesivo. 5.7.2 Utilizzo del sostegno per l’appoggio Per riporre il dispositivo ci si può servire anche dell`apposito sostegno fornito in dotazione. Fig. 10: Fissaggio del sostegno per l`appoggio 1. Inserire il sostegno nella scanalatura. -
Seite 117: Manutenzione
Manutenzione 6.1 Smontaggio dell‘alloggia- mento della pipetta Se il liquido penetra nell‘alloggiamento della pipetta la potenza di aspirazione può risultare ridotta oppure i componenti dell‘alloggiamento della pipetta potrebbero essere danneggiati. Per la pulizia o la sostituzione dei componenti è necessario smontare l‘alloggiamento della pipetta. 1. Girare il cono di aspirazione in senso antiorario e rimuoverlo. 2. Estrarre l’adattatore della pipetta con il filtro a membrana dall’adattatore del filtro. 3. Togliere il filtro a membrana dall’adattatore per pipette. 4. R imuovere la guarnizione dall’adattatore del filtro facendo leva con un oggetto appuntito. 6.2 Pulizia 6.2.1 Pulizia dell‘ausilio di pipettaggio Non è necessaria una manutenzione speciale. AVVISO! Danni all‘apparecchio causati dal trattamento in autoclave. ›... -
Seite 118: Pulizia Dell'alloggiamento Della Pipetta
6.2.2 Pulizia dell‘alloggiamento della pipetta I componenti dell‘alloggiamento della pipetta possono essere sostituiti, puliti o trattati in autoclave (121 °C, sovrappressione di 1 bar per 20 min) come descritto di seguito. Cono di aspirazione • Può essere strofinato con un panno umido • Può essere disinfettato con alcool (etanolo, propanolo) o con un disinfettante a base di alcool • Autoclavabile più volte • Sostituibile Adattatore pipette • Può essere risciacquato con acqua demineralizzata • Autoclavabile più volte • Sostituibile Filtro a membrana •... -
Seite 119: Montaggio Dell'alloggiamento Della Pipetta
6.3 Montaggio dell‘alloggiamento della pipetta 1. I nserire la guarnizione con la scana- latura nell‘adattatore del filtro. 2. P remere l‘apertura grande del filtro a membrana nell‘apertura piccola dell‘adattatore per pipette. 3. M ettere il cono di aspirazione sopra all‘adattatore per pipette e girarlo fino a farlo entrare in posizione. 6.4 Controllo della tenuta 1. Inserire la pipetta. 2. Riempire la pipetta di acqua. 3. Tenere la pipetta cosi riempita in posizione verticale. 4. Osservare il foro di fuoriuscita della pipetta per circa 30 secondi. Non toccare la pipetta. Non azionare i pulsanti di comando. L’acqua non deve fuoriuscire. 5. S e l’acqua fuoriesce, smontare l’alloggiamento della pipetta e riassemblarlo con attenzione. 6.5 Sostituzione della batteria Procedere nel modo seguente: 1. Far scorrere di lato il coperchio del vano batterie. -
Seite 120: Risoluzione Dei Problemi
Risoluzione dei problemi 7.1 Anomali generiche Sintomo/messaggio Causa Rimedio • L‘adattatore della pipet- › Rimuovere l‘adattatore della Il liquido sgocciola ta e/o il filtro a membra- pipetta e il filtro sa membrana e fuori dalla pipetta. na sono inseriti in modo reinserirlo. errato • La pipetta non è inserita › Spingere la pipetta più avanti con completamente. -
Seite 121: Specifiche Tecniche
Specifiche tecniche 8.1 Peso/dimensioni Poids 134 g (0,295 lb) (senza alimentatore, senza pipetta) 8.2 Alimentatore Tensione in ingresso 100 V – 240 V AC, ±10 % Frequenza 50 Hz – 60 Hz Tensione in uscita Corrente in ingresso 200 mA – 250 mA Corrente in uscita 8.3 Batteria Tipo Polimeri di litio Tensione 3,7 V Capacità 1100 mAh Tempo di ricarica ~3 h Peso 26 g (0,057 lb) Numero di dispensazioni... -
Seite 122: Trasporto, Immagazzinamento E Smaltimento
Trasporto, immagazzinamento e smaltimento 9.1 Decontaminazione prima della spedizione È necessario decontaminare il pipettatore prima del suo invio al servizio di assistenza tecnica autorizzato per la riparazione o al distributore autorizzato per lo smaltimento. In questi casi osservare quanto segue. 9.2 Trasporto Utilizzare l‘imballaggio originale per il trasporto. Temperatura Pressione Umidità relativa dell‘aria atmosferica -25 °C – 60 °C 10 % – 95 % 30 kPa – 106 kPa Trasporto generale Trasporto aereo -40 °C – 45 °C 10 % – 95 % 30 kPa – 106 kPa... -
Seite 123: Smaltimento
9.4 Smaltimento In caso di smaltimento del prodotto rispettare le relative disposizioni di legge applicabili. Nota sullo smaltimento degli apparecchi elettrici ed elettronici nella Comunità Europea. Nell‘ambito della Comunità Europea lo smaltimento degli apparecchi elettrici viene defi- nito dalle normative nazionali che si basano sulla Direttiva UE 2012/19/EU sui Rifiuti di Apparati Elettrici ed Elettronici (RAEEI). In base a questa direttiva, tutti i dispositivi immessi sui mercato dopo il 13.08.2005 in ambito business-to-business (nel quale questa prodotto rientra) non devono essere smaltiti assieme ai rifiuti comunali o domestici. Per documentare tutto ciò i prodotti riportano la seguente indicazione: Poiché le normative in materia di smaltimento all’interno della UE possono divergere di Paese in Paese, Vi preghiamo di metter Vi in contatto con il Vostro fornitore in caso di necessità. -
Seite 124: Informazioni Per L'ordine
10 Infomazioni per L’ordine Codice Descrizione Pipettatore ErgoOne FAST S7166-0010 ® P7166-6402 Supporto a parete Nastro adesivo per supporto P7166-6701 a parete Supporto da bancone per P7166-6306 ErgoOne® FAST Filtro a membrana 0,2 μm, P7166-6605 PTFE (Sterile) Filtro a membrana 0,45 μm, P7166-6800 PTFE (Sterile) P7166-6904 Guarnizione per adattatore filtro P7166-6002 Adattatore pipette P7166-6103 Cono di aspirazione P7166-6200 Coperchio del comparto batteria Batteria ricaricabile ai P7166-6501 polimeri di litio... - Seite 125 ErgoOne FAST · Manual · 125 ®...
-
Seite 126: Ec Declaration Of Conformity
EC Declaration of Conformity Starlab International GmbH declare that the following product S7166-0010 ErgoOne FAST including charging adapter to which this declaration relates, is in conformity with the following standards or other normative documents: 2014/35/EU Low Voltage Directive EN 61010-1:2010/A1:2019 (Safety requirements far efectrical... - Seite 127 22143 Hamburg, Germany E-Mail: info@starlab.de www.starlabgroup.com Tel.: +49 (0)40 675 99 39 0 Klaus Ambos Fax: +49 (0)40 675 9939 20 CEO STARLAB International GmbH Authorised Managing Director Klaus Ambos Hamburg, 16.06.2022 Registry Court Amtsgericht [fi rst instance court] Hamburg Register number: HRB 122020 VAT ID no.
- Seite 128 Starlab International GmbH Neuer Höltigbaum 38 22143 Hamburg Germany T: +49 (0)40 675 99 39 0 F: +49 (0)40 675 99 39 20 info@starlab.de www.starlabgroup.com Starlab (UK), Ltd 5 Tanners Drive Milton Keynes MK14 5BU United Kingdom T: +44 (0)1908 283800 F: +44 (0)1908 283802 infoline@starlab.co.uk www.starlab.co.uk Starlab GmbH Neuer Höltigbaum 38 22143 Hamburg Germany T: +49 (0)40 675 99 39 0 F: +49 (0)40 675 99 39 20 info@starlab.de www.starlab.de Starlab FRANCE SARL...