Herunterladen Inhalt Inhalt Diese Seite drucken

Pari LC PLUS 022 Gebrauchsanweisung

Vernebler für pari inhalationssysteme
Inhaltsverzeichnis

Werbung

Verfügbare Sprachen
  • DE

Verfügbare Sprachen

  • DEUTSCH, seite 1
Gebrauchsanweisung
®
PARI LC PLUS
Model: PARI LC PLUS (Type 022)
Vernebler für PARI Inhalationssysteme
de

Werbung

Inhaltsverzeichnis
loading

Inhaltszusammenfassung für Pari LC PLUS 022

  • Seite 1 Gebrauchsanweisung ® PARI LC PLUS Model: PARI LC PLUS (Type 022) Vernebler für PARI Inhalationssysteme...
  • Seite 2 PARI Produkten und des optionalen Zubehörs. Daher werden in dieser Gebrauchsanweisung auch Merkmale beschrieben und illustriert, welche in Ihrem PARI Produkt nicht vorhanden sind, weil sie z. B. länderspezifisch und/oder optional sind. Bei der Verwendung der Systeme, Produkte und Funktionen sind die jeweils geltenden Ländervorschriften zu beachten.
  • Seite 3: Inhaltsverzeichnis

    – 3 – INHALTSVERZEICHNIS WICHTIGE HINWEISE............. Zweckbestimmung ............Indikation ................Kontraindikation..............Kennzeichnung..............Sicherheits- und Warnhinweise ........PRODUKTBESCHREIBUNG........... Lieferumfang ..............Überblick und Bezeichnungen.......... Produktvarianten .............. Produktkombinationen............Funktionsbeschreibung ............ Materialinformation ............Lebensdauer ..............ANWENDUNG ..............Therapie vorbereiten ............Therapie durchführen ............Therapie beenden ............WIEDERAUFBEREITUNG IN HÄUSLICHER UMGE- BUNG ................
  • Seite 4 – 4 – WIEDERAUFBEREITUNG IN PROFESSIONELLEN GESUNDHEITSEINRICHTUNGEN........Wiederaufbereitungszyklen ..........Grenzen der Aufbereitung ..........Vernebler ................Anschlussschlauch ............Visuelles Kontrollieren und Aufbewahren......FEHLERBEHEBUNG............TECHNISCHE DATEN............. Allgemeine Verneblerdaten ..........Aerosoldaten nach ISO 27427 ......... SONSTIGES ..............
  • Seite 5: Wichtige Hinweise

    Der Vernebler ist geeignet für die Behandlung von Patienten aller Altersgruppen. Nur für die Verneblertherapie zugelassene Lösungen und Sus- pensionen dürfen verwendet werden. Der Vernebler darf nur mit einem PARI Kompressor oder mit einer zentralen Gasversorgungsanlage verbunden werden. Für den Anschluss an einer zentralen Gasversorgungsanlage ist der PARI CENTRAL vorgesehen.
  • Seite 6: Indikation

    Wenn der Patient selbst nicht in der Lage ist, dieses Produkt sicher anzuwenden, muss die Therapie von der verantwortli- chen Person durchgeführt werden. Dieses PARI Produkt ist nur für Patienten geeignet, die selb- ständig atmen und bei Bewusstsein sind. Eine Anwendung dauert ca. 5 bis 10 Minuten, maximal jedoch 20 Minuten (je nach Flüssigkeitsmenge).
  • Seite 7: Kennzeichnung

    Einmalige Produktkennung Dieses Produkt erfüllt die Anforderungen der EU- Medizinprodukte-Verordnung 2017/745. Gebrauchsanweisung befolgen Mundstück mit Ausatemventil Einatemventil Anschlussschlauch Verneblereinsatz PARI LC PLUS Vernebler LC Unterbrecher Luftfilter für Kompressor Typ 128/130/152 Luftfilter für Kompressor Typ 041 Luftfilter für Kompressor Typ 028/085 Schlauchadapter Filterwechsler...
  • Seite 8: Sicherheits- Und Warnhinweise

    Die vorliegende Gebrauchsanweisung enthält wichtige In- formationen, Sicherheitshinweise und Vorsichtsmaßnah- men. Nur wenn der Anwender diese befolgt, kann dieses PARI Produkt sicher angewendet werden. Verwenden Sie dieses PARI Produkt nur wie in dieser Gebrauchsanweisung beschrieben. Die Gebrauchsanweisungen des verwendeten Kompressors und Zubehörs sowie die Gebrauchsinformation der verwende- ten Inhalationslösung müssen ebenfalls beachtet werden.
  • Seite 9: Allgemein

    – 9 – Allgemein Werden nicht zugelassene Lösungen oder Suspensionen für die Vernebelung verwendet, können die Aerosoldaten des Ver- neblers von den Angaben des Herstellers abweichen. Dieses Produkt ist nicht für eine Verwendung in einem Anäs- thesie-Atemsystem oder einem Atemsystem eines Beatmungs- geräts geeignet.
  • Seite 10: Meldung Von Schwerwiegenden Vorkommnissen

    – 10 – Gefahr durch verschluckbare Kleinteile Das Produkt enthält Kleinteile. Kleinteile können die Atemwege blockieren und zu einer Erstickungsgefahr führen. Bewahren Sie alle Produktbestandteile stets außer Reichweite von Babys und Kleinkindern auf. Hygiene Beachten Sie folgende Hygienehinweise: – Verwenden Sie nur gereinigte und getrocknete Produktbe- standteile.
  • Seite 11: Produktbeschreibung

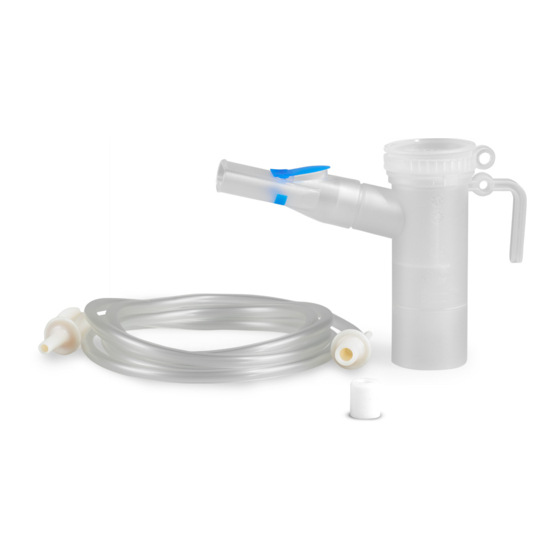
    (1) Vernebler (1a) Einatemventil (1b) Düsenaufsatz (1c) Verneblerunterteil (1d) LC Unterbrecher (1e) Mundstück (1f) Anschlussschlauch (2) Luftfilter für Kompressor 2.3 Produktvarianten PARI LC PLUS (Düsenaufsatz: transparent) Mit Mundstück zur Behandlung der Atemwege von Erwachse- nen und Kindern ab ca. 4 Jahren.
  • Seite 12: Produktkombinationen

    – 12 – 2.4 Produktkombinationen Der PARI Vernebler kann mit allen PARI Kompressoren oder über einen PARI CENTRAL mit einer zentralen Gasversor- gungsanlage verbunden werden. Der Vernebler kann mit diversem PARI Zubehör kombiniert werden. 2.5 Funktionsbeschreibung Der PARI Vernebler ist Teil eines PARI Inhalationssystems. Der Vernebler erzeugt bei Zufuhr...
  • Seite 13: Materialinformation

    Zubehör [siehe: WIEDERAUFBEREITUN G IN PROFESSIONELLEN GESUNDHEITSEINRICHTUNG EN, Seite 28] Wenn die zu erwartende Lebensdauer erreicht ist, erneuern Sie den betroffenen Produktbestandteil. Hierfür sind Vernebler- Nachkaufsets (Vernebler inkl. Anschlussschlauch) bzw. PARI Year Packs (Vernebler inkl. Anschlussschlauch und Luft- filter für einen Kompressor) erhältlich.
  • Seite 14: Anwendung

    – 14 – ANWENDUNG Alle nachfolgend beschriebenen Schritte müssen ordnungsge- mäß durchgeführt werden. Soll der Vernebler über einen PARI CENTRAL mit einer zen- tralen Gasversorgungsanlage verbunden werden, ist die Gebrauchsanweisung des PARI CENTRAL zu beachten. 3.1 Therapie vorbereiten Vernebler zusammenbauen VORSICHT Gefahr einer Therapiebeeinträchtigung Beschädigte Einzelteile sowie ein falsch montierter Vernebler...
  • Seite 15 – 15 – • Stecken Sie den Anschluss- schlauch an den Vernebler. Alternativ: • Stecken Sie den LC Unterbre- cher an den Vernebler. • Stecken Sie den Anschluss- schlauch auf den seitlichen Lufteinlass am LC Unterbre- cher. Mundstück verwenden • Stecken Sie das Mundstück an den Vernebler.
  • Seite 16 – 16 – Zubehör verwenden Informationen zur Montage von Zubehör finden Sie in der Gebrauchsanweisung des jeweiligen Zubehörs Vernebler befüllen • Stecken Sie den Vernebler in die dafür vorgesehene Halte- rung am Kompressor. • Ziehen Sie ggf. das Einatemventil ab. •...
  • Seite 17 – 17 – Wenn mehrere Inhalationslösungen nacheinander verwendet werden sollen: • Spülen Sie den Vernebler zwischen den einzelnen Anwen- dungen mit Trinkwasser aus. • Schütteln Sie überschüssiges Wasser aus dem Vernebler. • Befüllen Sie den Vernebler mit der nächsten Inhalationslö- sung wie beschrieben.
  • Seite 18: Therapie Durchführen

    – 18 – 3.2 Therapie durchführen Bevor eine Therapie durchgeführt wird, müssen alle in die- ser Gebrauchsanweisung enthaltenen Sicherheits- und Warnhinweise gelesen und verstanden worden sein. Halten Sie den Vernebler während der Therapie immer senkrecht. • Nutzen Sie gegebenenfalls den Schlauchadapter, um eine Verbindung zwischen dem An- schlussschlauch und dem Kompressor herzustellen.
  • Seite 19 – 19 – • Nehmen Sie den Vernebler aus der Halterung am Kom- pressor heraus und halten Sie ihn senkrecht. • Vergewissern Sie sich, dass alle Teile fest miteinander ver- bunden sind. •  GEFAHR! Lebensgefahr durch Stromschlag bei Gerä- tedefekt! Schalten Sie sofort den Kompressor aus und zie- hen Sie den Netzstecker aus der Steckdose, wenn der Ver-...
  • Seite 20: Mit Mundstück Inhalieren

    – 20 – Mit Mundstück inhalieren • Setzen Sie sich entspannt und aufrecht hin. • Nehmen Sie das Mundstück zwischen die Zähne und um- schließen Sie es mit den Lippen. • Atmen Sie möglichst langsam und tief durch das Mundstück ein und entspannt wieder aus.
  • Seite 21: Mit Zubehör Inhalieren

    – 21 – Wenn Sie trotz montiertem LC Unterbrecher eine Dauerverne- belung möchten: • Drehen Sie die Unterbrecher- taste im Uhrzeigersinn bis zum Anschlag. Æ Das Aerosol wird dauerhaft er- zeugt (Dauervernebelung). Mit Zubehör inhalieren Die Inhalation mit Zubehör (z. B. Masken) ist in der Gebrauchs- anweisung des jeweiligen Zubehörs beschrieben.
  • Seite 22: Wiederaufbereitung In Häuslicher Umgebung

    – 22 – WIEDERAUFBEREITUNG IN HÄUSLICHER UMGEBUNG Die Produktbestandteile müssen unmittelbar nach jeder An- wendung gründlich gereinigt und mindestens einmal wöchent- lich desinfiziert werden. Der Anschlussschlauch kann weder gereinigt noch desinfiziert werden. Trocknen Sie den Anschlussschlauch nach jeder Anwendung [siehe: Anschlussschlauch pflegen, Seite 27]. Die Lebensdauer des Anschlussschlauchs beträgt max.
  • Seite 23: Reinigen

    – 23 – 4.4 Reinigen Vorreinigen Alle Einzelteile müssen unmittelbar nach der Anwendung vor- gereinigt werden. AUSSTATTUNG: – Trinkwasser mit einer Temperatur von ca. 15 °C DURCHFÜHRUNG: • Spülen Sie alle verwendeten Einzelteile 2 Minuten lang un- ter fließendem Trinkwasser. Manuell reinigen AUSSTATTUNG: –...
  • Seite 24: In Der Geschirrspülmaschine

    – 24 – TROCKNEN: • Schütteln Sie das Wasser aus allen Einzelteilen. • Legen Sie alle Einzelteile auf eine trockene, saubere und saugfähige Unterlage und lassen Sie diese vollständig trocknen. In der Geschirrspülmaschine Die Einzelteile können in einer haushaltsüblichen Geschirrspül- maschine gereinigt werden, sofern diese an Leitungswasser mit Trinkwasserqualität angeschlossen ist.
  • Seite 25: Desinfizieren

    – 25 – 4.5 Desinfizieren Desinfizieren Sie alle Einzelteile im Anschluss an die Reini- gung. Nur gereinigte Bestandteile können wirksam desinfiziert werden. Nachfolgend sind die validierten Desinfektionsverfahren be- schrieben. In kochendem Wasser AUSSTATTUNG: – Sauberer Kochtopf – Trinkwasser DURCHFÜHRUNG: VORSICHT Infektionsgefahr durch Feuchtigkeit Feuchtigkeit begünstigt Keimwachstum.
  • Seite 26: Mit Einem Handelsüblichen, Thermischen Desinfektionsgerät Für Babyflaschen (Keine Mikrowelle)

    – 26 – Mit einem handelsüblichen, thermischen Desinfektionsgerät für Babyflaschen (keine Mikrowelle) AUSSTATTUNG: – thermisches Desinfektionsgerät mit einer Laufzeit von min- destens 6 Minuten DURCHFÜHRUNG: VORSICHT Infektionsgefahr durch unzureichende Desinfektion Eine unzureichende Desinfektion begünstigt Keimwachstum und erhöht damit die Infektionsgefahr. • Stellen Sie vor jeder Desinfektion sicher, dass das Des- infektionsgerät sauber und funktionsfähig ist.
  • Seite 27: Anschlussschlauch Pflegen

    – 27 – TROCKNEN: • Legen Sie nach Abschluss des Desinfektionsvorgangs alle Einzelteile auf eine trockene, saubere und saugfähige Un- terlage und lassen Sie sie vollständig trocknen. Oder lassen Sie alle Einzelteile für max. 24 Stunden im geschlossenen thermischen Desinfektionsgerät bis zur nächsten Verwen- dung.
  • Seite 28: Wiederaufbereitung In Professionellen Gesundheitseinrichtungen

    – 28 – WIEDERAUFBEREITUNG IN PROFESSIONELLEN GESUNDHEITSEINRICHTUNGEN Trocknen Sie den Anschlussschlauch nach jeder Anwendung [siehe: Anschlussschlauch, Seite 37]. 5.1 Wiederaufbereitungszyklen Ohne Patientenwechsel Vernebler ohne – Reinigung unmittelbar nach jeder An- Anschlussschlauch wendung sowie Zubehör (z. B. – Desinfektion einmal wöchentlich Maske) Vor einem Patientenwechsel Vernebler ohne –...
  • Seite 29: Vernebler

    • Tauschen Sie den Anschlussschlauch aus oder führen Sie eine maschinelle Reinigung und Desinfektion des An- schlussschlauches durch [siehe: Anschlussschlauch, Sei- te 37]. Es können alle Bestandteile eines PARI Verneblers und des verwendeten PARI Zubehörs gemäß den nachfolgend be- schriebenen Verfahren gereinigt, desinfiziert und sterilisiert werden.
  • Seite 30: Reinigen Und Desinfizieren

    – 30 – Reinigen und desinfizieren Manuell reinigen AUSSTATTUNG Das Verfahren wurde in Europa validiert unter Verwendung von: – pH-neutrales, enzymatisches Reinigungsmittel: ® Bode Bomix  plus (Konzentration: 0,1 %) – Trinkwasser mit einer Temperatur von ca. 15 °C – Einwirkzeit: 10 Minuten DURCHFÜHRUNG: VORSICHT Infektionsgefahr durch Keimwachstum Eine unzureichende Desinfektion begünstigt Keimwachstum und erhöht damit die Infektionsgefahr.
  • Seite 31 – 31 – SPÜLEN: • Spülen Sie alle Einzelteile gründlich unter fließendem Trink- wasser ca. 15 °C für 3 Minuten ab. TROCKNEN: • Schütteln Sie das Wasser aus allen Einzelteilen. • Legen Sie alle Einzelteile auf eine trockene, saubere und saugfähige Unterlage und lassen Sie diese vollständig trocknen.
  • Seite 32 – 32 – Reinigung mit Desinfektion Mithilfe einer chemischen Aufbereitung kann die Reinigung und Desinfektion in einem Arbeitsgang durchgeführt werden. Für den sicheren Umgang mit der Chemikalie beachten Sie die Gebrauchsinformation des Desinfektionsmittels. Maschinelle AUSSTATTUNG: Reinigung mit Das Verfahren wurde in Europa validiert unter Desinfektion: Verwendung von: –...
  • Seite 33 – 33 – Chemische AUSSTATTUNG: Reinigung mit Das Verfahren wurde in Europa validiert unter Desinfektion: Verwendung von: – Aldehydfreies Instrumenten-Desinfektionsmit- ® tel: Bode Bomix  plus (Konzentration: 2 %) Wirkstoffbasis: Quartäre Ammoniumverbin- dung – Trinkwasser ca. 15 °C – Einwirkzeit: 5 Minuten DURCHFÜHRUNG: • Reinigen und desinfizieren Sie die Einzelteile in einem Arbeitsschritt mit einer gemäß...
  • Seite 34 – 34 – Chemisch desinfizieren Für den sicheren Umgang mit der Chemikalie beachten Sie die Gebrauchsinformation des Desinfektionsmittels. AUSSTATTUNG: Das Verfahren wurde in Europa validiert unter Verwendung von: ® – Aldehydhaltiges Desinfektionsmittel: Bode Korsolex basic (Konzentration: 4 %) Wirkstoffbasis: Aldehydabspalter, Aldehyd –...
  • Seite 35 Desinfektionsmittel können bei Hautkontakt allergische Re- aktionen oder Schleimhautirritationen auslösen. • Spülen Sie das Produkt gründlich, so dass keine Rück- stände des Desinfektionsmittels auf dem PARI Produkt zurückbleiben. • Spülen Sie alle Teile gründlich unter fließendem Trinkwas- ser ca. 15 °C für 3 Minuten ab.
  • Seite 36: Sterilisieren

    – 36 – Sterilisieren VORSICHT Infektionsgefahr durch Restkeime Wenn sich an den Einzelteilen Verschmutzungen befinden, können trotz einer Sterilisation vermehrungsfähige Keime verbleiben. Dadurch besteht Infektionsgefahr. • Reinigen, desinfizieren und trocknen Sie vor einer Sterili- sation alle Einzelteile gründlich. • Verwenden Sie für die Reinigung und Desinfektion aus- schließlich validierte Verfahren.
  • Seite 37: Anschlussschlauch

    – 37 – 5.4 Anschlussschlauch Maschinell reinigen und desinfizieren AUSSTATTUNG: Das Verfahren wurde in Europa validiert unter Verwendung von: ® – Alkalisches Reinigungsmittel: Dr. Weigert neodisher MediClean forte – Neutralisator: Dr. Weigert neodisher Z – Reinigungs- und Desinfektionsgerät (RDG): RDG G7836 CD (Miele) (gemäß DIN EN ISO 15883) –...
  • Seite 38: Visuelles Kontrollieren Und Aufbewahren

    – 38 – Trocknen • Schließen Sie den Anschlussschlauch an eine Druckluft- quelle (Kompressor oder zentrale Gasversorgung) an. • Schalten Sie die Druckluftquelle ein. • Lassen Sie die Druckluftquelle so lange eingeschaltet, bis die Feuchtigkeit im Schlauch beseitigt ist. 5.5 Visuelles Kontrollieren und Aufbewahren Überprüfen Sie alle Einzelteile.
  • Seite 39: Fehlerbehebung

    – 39 – FEHLERBEHEBUNG Wenden Sie sich an den Hersteller bzw. Händler: – bei Fehlern, die in diesem Kapitel nicht aufgeführt sind – wenn das vorgeschlagene Vorgehen den Fehler nicht be- hebt Fehler Mögliche Ursache Abhilfe Aus dem Ver- Die Düse des Ver- Reinigen Sie den Vernebler.
  • Seite 40: Aerosoldaten Nach Iso 27427

    Fraktion [% < 5 µm] Aerosolanteil 11.6 17.9 28.1 [% < 2 µm] Aerosolanteil 32.4 35.3 38.1 [% > 2 µm < 5 µm] Aerosolanteil 56.0 46.8 33.8 [% > 5 µm] Aerosol Output [ml] 0.30 0.40 0.38 6) Betrieb mit PARI COMPACT2 Kompressor (Type 152). 7) MMAD = Medianer massenbezogener aerodynamischer Durchmesser 8) GSD = Geometrische Standardabweichung...
  • Seite 41: Sonstiges

    – 41 – Minimaler Nominaler Maximaler Kompressorf Kompressorf Kompressorf Düsenaufsatz luss luss luss (transparent) (3 l/min – (4 l/min – (6 l/min – 0,6 bar) 1,2 bar) 1,9 bar) Aerosol Outputrate 0.09 0.12 0.14 [ml/min] Restvolumen [ml] 1.28 1.15 1.14 (gravimetrisch bestimmt) Outputrate bezogen auf das Füllvolumen [%/ min] SONSTIGES...
  • Seite 42 – 42 –...
  • Seite 43 – 43 –...
  • Seite 44 ©2022 PARI GmbH Spezialisten für effektive Inhalation, 022D3000 A de 2022-09-27   PARI GmbH Spezialisten für effektive Inhalation Moosstraße 3 82319 Starnberg • GERMANY info@pari.de • www.pari.com...
  • Seite 45 Instructions for use ® PARI LC PLUS Model: PARI LC PLUS (Type 022) Nebulisers for PARI inhalation systems...
  • Seite 46 PARI products and optional accessories. For this reason, these instructions for use also describe and illustrate features not present in your PARI product because they are, for instance, country-specific and/or optional. When using the systems, products and functions, the applicable country-specific regula- tions must be observed.
  • Seite 47 – 3 – TABLE OF CONTENTS IMPORTANT INFORMATION.......... Intended purpose ............. Indication ................Contraindication ............... Labelling ................Safety and warning instructions ........PRODUCT DESCRIPTION ..........Components ..............Overview and product designations ......... Product variants ............... Product combinations ............Description of function ............Material information ............
  • Seite 48 – 4 – REPROCESSING IN PROFESSIONAL HEALTH INSTI- TUTIONS................Reprocessing cycles ............Processing limits .............. Nebuliser ................Connection tubing ............Visual inspection and storage .......... TROUBLESHOOTING ............. TECHNICAL DATA............General nebuliser data ............. Aerosol characteristics according to ISO 27427 ....FURTHER INFORMATION ..........
  • Seite 49: Important Information

    The nebuliser must only be connected with a PARI compressor or with a central gas supply system. The PARI CENTRAL is in- tended for the connection with the central gas supply system. This PARI product can be used in a home environment, as well as in professional health institutions.
  • Seite 50: Indication

    The frequency and duration of use is determined by profes- sional medical staff according to the individual needs of the patient. 1.2 Indication For treatment of diseases of the lower airways. 1.3 Contraindication There are no contraindications known to PARI GmbH. 2) Professional medical staff: Doctors, pharmacists, and physiotherapists.
  • Seite 51: Labelling

    Regulation 2017/745. Follow the instructions for use Mouthpiece with exhalation valve Inhalation valve Connection tubing Nebuliser insert PARI LC PLUS nebuliser LC interrupter Air filter for compressor types 128/130/152 Air filter for compressor type 041 Air filter for compressor types 028/085 Tubing adapter Filter changer...
  • Seite 52: Safety And Warning Instructions

    The user must follow these in order to guarantee safe op- eration of this PARI product. This PARI product must be used only as described in these in- structions for use. The instructions for use of the compressor and accessories used and the information for use of the inhalation solution used must also be followed.
  • Seite 53 – 9 – General If non-approved solutions or suspensions are used for nebulisation, then nebuliser aerosol characteristics may differ from the information provided by the manufacturer. This product is not suitable for use in an anaesthetic breathing system or a ventilator breathing system. Tracheotomised patients cannot inhale using a mouthpiece.
  • Seite 54 – 10 – Hazard due to small parts which can be swallowed The product contains small parts. Small parts can block the air- ways and lead to a choking hazard. Keep all components out of the reach of babies and infants at all times. Hygiene Comply with the following hygiene instructions: –...
  • Seite 55: Product Description

    (1c) Nebuliser lower part (1d) LC interrupter (1e) Mouthpiece (1f) Connection tubing (2) Air filter for compressor 2.3 Product variants PARI LC PLUS (nozzle insert: transparent) With mouthpiece for treatment of the airways in adults and chil- dren aged approx. 4 years and older.
  • Seite 56: Product Combinations

    The PARI nebuliser can be connected to all PARI compressors or to a central medical gas supply system via a PARI CENTRAL. The nebuliser can be used in combination with a range of PARI accessories. 2.5 Description of function The PARI nebuliser is part of a PARI inhalation system.
  • Seite 57: Material Information

    INSTITUTIONS, page 28] When the expected operating life has been reached, replace the affected component. For this, nebuliser replacement sets (a nebuliser with connection tubing) or PARI Year Packs (a nebuliser with connection tubing and an air filter for a com- pressor) are available.
  • Seite 58: Use

    All the steps described below must be carried out correctly. If the nebuliser is to be connected to a central gas supply sys- tem via a PARI CENTRAL, the instructions for use of the PARI CENTRAL must be followed. 3.1 Preparing for treatment...
  • Seite 59 – 15 – • Attach the connection tubing to the nebuliser. • Attach the LC interrupter to the nebuliser. • Insert the connection tubing in the air inlet on the side of the LC interrupter. Using the mouthpiece • Fit the mouthpiece onto the nebuliser.
  • Seite 60 – 16 – Using accessories Information on assembling accessories is included in the in- structions for use of the respective accessory Filling the nebuliser • Insert the nebuliser in the holder on the compressor in- tended for this purpose. • If applicable, detach the inhalation valve from the nebuliser. •...
  • Seite 61 – 17 – If several inhalation solutions are to be used one after the other: • Rinse the nebuliser out with drinking water between the indi- vidual applications. • Shake excess water out of the nebuliser. • Fill the nebuliser with the next inhalation solution as de- scribed.
  • Seite 62: Performing Treatment

    – 18 – 3.2 Performing treatment All the safety instructions and warnings in these instruc- tions for use must have been read and understood before any treatment is carried out. Always hold the nebuliser upright during treatment. • If necessary, use the tubing adapter to connect the connec- tion tubing and the com- pressor.
  • Seite 63 – 19 – • Take the nebuliser out of its holder on the compressor, and hold it upright. • Verify that all parts are firmly connected to each other. •  DANGER! Life-threaten- ing situation from electrocu- tion if there is a device fault! Switch the compressor off im- mediately, and disconnect the power plug from the mains...
  • Seite 64 – 20 – Inhaling with the mouthpiece • Sit in an upright position and relax. • Hold the mouthpiece between your teeth and enclose it with your lips. • Breathe in as slowly and deeply as possible through the mouthpiece, and out again calmly. •...
  • Seite 65: Ending The Treatment

    – 21 – Inhaling with accessories Inhalation with accessories (e.g. masks) is described in the in- structions for use of the respective accessory. 3.3 Ending the treatment To end the treatment, proceed as follows: • Switch the compressor off by shifting the on/off switch to "OFF”.
  • Seite 66: Reprocessing In A Home Environment

    – 22 – REPROCESSING IN A HOME ENVIRONMENT The product components must be cleaned thoroughly immedi- ately after each use, and disinfected at least once a week. The connection tubing cannot be cleaned or disinfected. Dry the connection tubing after each use [see: Care of the con- nection tubing, page 27].
  • Seite 67: Cleaning

    – 23 – 4.4 Cleaning Precleaning All individual parts must be precleaned immediately after use. EQUIPMENT: – Drinking water temperature of about 15 °C PROCEDURE: • Rinse all parts used for 2 minutes in running drinking water. Manual cleaning EQUIPMENT: – Drinking water temperature of at least 40 °C –...
  • Seite 68: In The Dishwasher

    – 24 – In the dishwasher The individual parts can be cleaned in a standard household dishwasher, provided it is connected to a mains water supply of drinking water quality. To ensure safety when handling the cleaning agent used, fol- low the corresponding instructions for use, particularly the ac- companying safety instructions.
  • Seite 69: Disinfecting

    – 25 – 4.5 Disinfecting Disinfect all individual components after cleaning. Only com- ponents that have been cleaned can be disinfected effectively. The validated disinfection procedures are described below. In boiling water EQUIPMENT: – Clean saucepan – Drinking water PROCEDURE: CAUTION Risk of infection due to moisture Moisture encourages the growth of bacteria.
  • Seite 70 – 26 – Using a standard thermal disinfector for baby bottles (not a microwave oven) EQUIPMENT: – Thermal disinfector with a runtime of at least 6 minutes PROCEDURE: CAUTION Risk of infection due to inadequate disinfection Inadequate disinfection encourages the growth of bacteria and thus increases the risk of infection.
  • Seite 71: Care Of The Connection Tubing

    – 27 – 4.6 Care of the connection tubing Dry the connection tubing after every inhalation session: • Connect the connection tubing to the compressor. • Switch your compressor on. • Let the compressor continue to run until all the moisture in the tube has been removed.
  • Seite 72: Reprocessing In Professional Health Institutions

    – 28 – REPROCESSING IN PROFESSIONAL HEALTH INSTITUTIONS Dry the connection tubing after each use [see: Connection tubing, page 37]. 5.1 Reprocessing cycles Single patient use Nebuliser excluding – Clean immediately after every use connection tubing and – Disinfect once per week accessories (e.g.
  • Seite 73: Nebuliser

    • Replace the connection tubing or carry out mechanical cleaning and disinfection of the connection tubing [see: Connection tubing, page 37]. All components of a PARI nebuliser and of the PARI accessor- ies used can be cleaned, disinfected, and sterilised as per the procedures described below.
  • Seite 74: Cleaning And Disinfecting

    – 30 – Cleaning and disinfecting Manual cleaning EQUIPMENT The method has been validated in Europe using: – pH-neutral, enzymatic cleaning agent: ® Bode Bomix  plus (concentration: 0.1%) – Drinking water temperature of about 15 °C – Application time: 10 minutes PROCEDURE: CAUTION Risk of infection due to growth of bacteria Inadequate disinfection encourages the growth of bacteria...
  • Seite 75 – 31 – RINSING: • Rinse all individual parts thoroughly under running drinking water at approx. 15 °C for 3 minutes. DRYING: • Shake the water out of all of the parts. • Place all parts on a dry, clean and absorbent surface, and allow them to dry completely.
  • Seite 76 – 32 – Cleaning with disinfection Cleaning and disinfection can be carried out in a single cycle using chemical reprocessing. To ensure safety when handling chemicals, observe the in- structions for use for the disinfectant. Mechanical EQUIPMENT: cleaning with The method has been validated in Europe using: disinfection: –...
  • Seite 77 – 33 – Chemical EQUIPMENT: cleaning with The method has been validated in Europe using: disinfection: – Aldehyde-free instrument disinfectant: Bode ® Bomix  plus (concentration: 2%) Active agent basis: Quaternary ammonium compound – Drinking water at about 15 °C – Application time: 5 minutes PROCEDURE: •...
  • Seite 78 – 34 – Chemical disinfection To ensure safety when handling chemicals, observe the in- structions for use for the disinfectant. EQUIPMENT: The method has been validated in Europe using: ® – Aldehyde-containing disinfectant: Bode Korsolex basic (concentration: 4%) Active agent basis: Aldehyde donor, aldehyde –...
  • Seite 79 Disinfectants can trigger allergic reactions or irritation of the mucous membrane on contact with the skin. • Rinse the product thoroughly to ensure that no residues of the disinfectant remain on the PARI product. • Rinse off all parts thoroughly in running drinking water at about 15 °C for 3 minutes.
  • Seite 80 – 36 – Sterilising CAUTION Risk of infection by residual germs If there is dirt on the parts, germs capable of reproduction may remain despite the sterilisation process. As a result, there is a danger of infection. • Clean, disinfect, and dry all parts thoroughly before steril- ising.
  • Seite 81: Connection Tubing

    – 37 – 5.4 Connection tubing Mechanical cleaning and disinfecting EQUIPMENT: The method has been validated in Europe using: ® – Alkaline cleaning agent: Dr. Weigert neodisher MediClean forte – Neutralising agent: Dr. Weigert neodisher Z – Cleaning and disinfection device: RDG G7836 CD (Miele) (conforming to DIN EN ISO 15883) –...
  • Seite 82: Visual Inspection And Storage

    – 38 – Drying • Connect the connection tubing to a compressed air source (compressor or central medical gas supply system). • Switch the compressed air source on. • Leave the compressed air source running until all the mois- ture in the tubing has been removed. 5.5 Visual inspection and storage Check all individual components.
  • Seite 83: Troubleshooting

    – 39 – TROUBLESHOOTING Contact the manufacturer or distributor: – in the event of faults that are not listed in this chapter – if the suggested procedure does not correct the fault Fault Possible cause Remedy No aerosol is The nebuliser nozzle Clean the nebuliser.
  • Seite 84: Aerosol Characteristics According To Iso 27427

    [% > 2 µm < 5 µm] Aerosol fraction 56.0 46.8 33.8 [% > 5 µm] Aerosol output [ml] 0.30 0.40 0.38 Aerosol output rate 0.09 0.12 0.14 [ml/min] 6) Operation with PARI COMPACT2 compressor (Type 152). 7) MMAD = Mass Median Aerodynamic Diameter 8) GSD = Geometric Standard Deviation...
  • Seite 85: Further Information

    – 41 – Minimum Nominal Maximum compressor compressor compressor Nozzle insert flow flow flow (transparent) (3 l/min. – (4 l/min. – (6 l/min. – 0.6 bar) 1.2 bar) 1.9 bar) Residual volume 1.28 1.15 1.14 [ml] (gravimetric) Percentage of fill volume emitted per minute [%/min.] FURTHER INFORMATION All product components may be disposed of with normal do- mestic waste.
  • Seite 86 – 42 –...
  • Seite 87 – 43 –...
  • Seite 88 ©2022 PARI GmbH Spezialisten für effektive Inhalation, 022D3001 A en 2022-09-27   PARI GmbH Spezialisten für effektive Inhalation Moosstraße 3 82319 Starnberg • GERMANY info@pari.de • www.pari.com...
  • Seite 89 Notice d’utilisation ® PARI LC PLUS Modèle : PARI LC PLUS (Type 022) Nébuliseur pour systèmes de nébulisation PARI...
  • Seite 90 également des caractéristiques pouvant ne pas s’appliquer à votre produit PARI, dans la mesure où elles sont spécifiques à un pays et/ou optionnelles, par ex. Lors de l’utilisation des systèmes, produits et fonctions, les réglementations nationales applicables doivent être respectées.
  • Seite 91 – 3 – TABLE DES MATIÈRES REMARQUES IMPORTANTES ........Utilisation prévue .............. Indications ................ Contre-indications ............Étiquetage ................ Consignes de sécurité et avertissements......DESCRIPTION DU PRODUIT.......... Étendue de livraison ............Vue d’ensemble et désignations ........Variantes du produit ............Combinaisons de produits ..........Description du fonctionnement .........
  • Seite 92 – 4 – CONSIGNES POUR RÉ-UTILISATION EN ÉTABLIS- SEMENT DE SANTÉ PROFESSIONNEL......Cycles de retraitement ............. Limites du retraitement ............. Nébuliseur ................ Tubulure de raccordement ..........Contrôle visuel et stockage ..........DÉPANNAGE..............CARACTÉRISTIQUES TECHNIQUES ......Caractéristiques générales du nébuliseur ......Caractéristiques de l’aérosol selon ISO 27427 ....
  • Seite 93: Remarques Importantes

    âges. Seules les solutions et suspensions approuvées pour la théra- pie par nébuliseur peuvent être utilisées. Le nébuliseur doit être utilisé avec un compresseur PARI ou un système d’alimentation centrale en gaz uniquement. PARI CENTRAL est spécialement conçu pour le raccordement à un système d’alimentation centrale en gaz.
  • Seite 94: Indications

    – 6 – Ce produit PARI est adapté uniquement aux patients qui res- pirent de manière autonome et qui sont conscients. La durée d’une séance est généralement de 5 à 10 minutes, au maximum de 20 minutes (selon la quantité de liquide). La fréquence et la durée de l’utilisation sont déterminées par un professionnel de la santé...
  • Seite 95: Étiquetage

    Suivre la notice d’utilisation Embout buccal avec valve expiratoire Einatemventil Tubulure de raccordement Insert de nébuliseur PARI LC PLUS Vernebler Interrupteur LC Filtre d’entrée d’air pour compresseur de type 128/130/152 Filtre d’entrée d’air pour compresseur de type 041 Filtre d’entrée d’air pour compresseur de type 028/085...
  • Seite 96: Consignes De Sécurité Et Avertissements

    La sécurité d'utilisation de ce produit PARI dé- pend du respect de la présente notice d'utilisation par l’uti- lisateur. Utilisez uniquement ce produit PARI de la manière décrite dans la présente notice d’utilisation. Les notices d’utilisation du compresseur et des accessoires uti- lisés, ainsi que la notice d’utilisation de la solution à...
  • Seite 97: Généralités

    – 9 – Généralités En cas d'utilisation de solutions ou suspensions non autorisées pour la nébulisation, les caractéristiques de l’aérosol du nébuli- seur peuvent différer des indications du fabricant. Ce produit n’est pas conçu pour être utilisé dans un système d’anesthésie par inhalation ou dans le système respiratoire d'un respirateur artificiel.
  • Seite 98 – 10 – Danger dû à la présence de petites pièces susceptibles d’être avalées Le produit contient de petites pièces. Les petites pièces peuvent bloquer les voies respiratoires et entraîner un risque d’asphyxie. Conservez toujours tous les éléments du produit hors de portée des bébés et des jeunes enfants.
  • Seite 99: Description Du Produit

    (1e) Embout buccal (1f) Tubulure de raccordement (2) Filtre d'entrée d'air pour compresseur 2.3 Variantes du produit PARI LC PLUS (insert pour gicleur : transparent) Avec embout buccal pour la thérapie des voies respiratoires des adultes et des enfants à partir d’environ 4 ans.
  • Seite 100: Combinaisons De Produits

    – 12 – 2.4 Combinaisons de produits Le nébuliseur PARI peut être raccordé avec tous les compres- seurs PARI ou avec un système d’alimentation centrale en gaz grâce à PARI CENTRAL. Le nébuliseur peut être combiné avec différents accessoires PARI. 2.5 Description du fonctionnement Le nébuliseur PARI fait partie d’un système d'inhalation PARI.
  • Seite 101: Information Sur Les Matériaux

    – 13 – 2.6 Information sur les matériaux Les éléments du produit sont fabriqués dans les matériaux sui- vants : Élément du Matériau produit Valve inspiratoire Polypropylène, silicone Insert pour gicleur Polypropylène Cuve du nébuliseur Polypropylène Interrupteur LC Polypropylène Embout buccal Polypropylène, élastomère thermosensible (avec valve expiratoire) Tubulure de...
  • Seite 102: Durée D'utilisation

    Remplacez tout élément du produit ayant atteint le terme de sa durée d'utilisation prévue. À cette fin, il existe des kits de réap- provisionnement pour nébuliseur (nébuliseur avec tubulure de raccordement) ou PARI Year Packs (nébuliseur avec tubulure de raccordement et filtre d'entrée d'air pour un compresseur).
  • Seite 103: Application

    Toutes les étapes décrites ci-dessous doivent être effectuées correctement. Si le nébuliseur doit être raccordé à un système d’alimentation centrale en gaz via PARI CENTRAL, il convient de respecter la notice d’utilisation du PARI CENTRAL. 3.1 Préparation de la thérapie Assemblage du nébuliseur ATTENTION Risque d’altération de l’efficacité...
  • Seite 104 – 16 – • Fixez la tubulure de raccorde- ment au nébuliseur. Autre possibilité : • Fixez l’interrupteur LC au né- buliseur. • Insérez la tubulure de raccor- dement dans l’entrée d’air laté- rale de l’interrupteur LC. Utilisation de l’embout buccal • Placez l’embout buccal sur le nébuliseur.
  • Seite 105 – 17 – Utilisation d’accessoires Vous trouverez les informations relatives au montage des ac- cessoires dans la notice d’utilisation de l’accessoire correspon- dant. Remplissage du nébuliseur • Insérez le nébuliseur dans le support prévu à cet effet sur le compresseur. •...
  • Seite 106 – 18 – Si plusieurs solutions pour nébulisation doivent être utilisées successivement : • Rincez le nébuliseur à l’eau potable entre chaque séance. • Secouez le nébuliseur pour éliminer l’excès d’eau. • Remplissez le nébuliseur avec la solution à inhaler suivante, comme indiqué.
  • Seite 107: Administration De La Thérapie

    – 19 – 3.2 Administration de la thérapie Avant de démarrer le traitement, l’utilisateur doit avoir lu et compris toutes les consignes de sécurité et les avertis- sements fournis dans la présente notice d’utilisation. Tenez toujours le nébuliseur à la verticale lors de la théra- pie.
  • Seite 108 – 20 – • Retirez le nébuliseur du sup- port du compresseur et main- tenez-le à la verticale. • Assurez-vous que toutes les pièces sont bien raccordées. •  DANGER ! Danger de mort par électrocution en cas de défaut de l’appareil ! Arrê- tez immédiatement le com- presseur et débranchez le bloc d’alimentation secteur de la...
  • Seite 109 – 21 – • Maintenez l’embout buccal entre les dents et serrez les lèvres autour de celui-ci. • Inspirez, si possible, lentement et profondément par l’em- bout buccal, puis expirez de manière détendue. • Effectuez l’inhalation jusqu’à ce que le bruit du nébuliseur change.
  • Seite 110: Fin De La Thérapie

    – 22 – Si vous souhaitez une nébulisation permanente et que l’inter- rupteur LC est monté : • Tournez la touche de l’interrup- teur dans le sens des aiguilles d’une montre jusqu’à la butée. Æ L’aérosol est produit en perma- nence (nébulisation perma- nente).
  • Seite 111: Consignes Pour Ré-Utilisation Dans Un Environnement Domestique

    – 23 – CONSIGNES POUR RÉ-UTILISATION DANS UN ENVIRONNEMENT DOMESTIQUE Les éléments du produit doivent être nettoyés soigneusement immédiatement après chaque séance et désinfectés au mini- mum une fois par semaine. La tubulure de raccordement ne peut être ni nettoyée ni désin- fectée.
  • Seite 112: Nettoyage

    – 24 – 4.4 Nettoyage Pré-nettoyage Toutes les pièces doivent être pré-nettoyées immédiatement après utilisation. ÉQUIPEMENT : – Eau potable à une température d’env. 15 °C RÉALISATION : • Rincez toutes les pièces utilisées sous un filet d’eau potable pendant 2 minutes. Nettoyage manuel ÉQUIPEMENT : –...
  • Seite 113 – 25 – SÉCHAGE : • Secouez toutes les pièces pour éliminer l’eau. • Placez toutes les pièces sur un support sec, propre et ab- sorbant et laissez-les sécher complètement. Au lave-vaisselle Les pièces peuvent être nettoyées dans un lave-vaisselle do- mestique s’il est raccordé...
  • Seite 114: Désinfection

    – 26 – 4.5 Désinfection Désinfectez toutes les pièces juste après le nettoyage. Seules les pièces nettoyées peuvent être désinfectées efficacement. Les procédures de désinfection validées sont décrites ci-des- sous. Dans l’eau bouillante ÉQUIPEMENT : – Récipient de cuisson propre – Eau potable RÉALISATION : ATTENTION Risque d’infection en raison de l’humidité...
  • Seite 115 – 27 – Avec un désinfecteur thermique commercial pour biberons (pas de micro-ondes) ÉQUIPEMENT : – Désinfecteur thermique pour une durée d’au moins 6 mi- nutes RÉALISATION : ATTENTION risque d’infection en cas de désinfection insuffisante Une désinfection insuffisante favorise la multiplication des germes et augmente ainsi le risque d’infections.
  • Seite 116: Entretien De La Tubulure De Raccordement

    – 28 – SÉCHAGE : • Une fois l’opération de désinfection terminée, placez toutes les pièces sur un support sec, propre et absorbant et lais- sez-les sécher complètement. Ou laissez toutes les pièces dans le désinfecteur thermique fermé jusqu’à la prochaine utilisation, dans une limite de 24 heures maximum.
  • Seite 117: Consignes Pour Ré-Utilisation En Établissement De Santé Professionnel

    – 29 – CONSIGNES POUR RÉ-UTILISATION EN ÉTABLISSEMENT DE SANTÉ PROFESSIONNEL Séchez la tubulure de raccordement après chaque utilisation [voir : Tubulure de raccordement, page 38]. 5.1 Cycles de retraitement Sans changement de patient Nébuliseur sans – Nettoyage immédiatement après tubulure de chaque utilisation raccordement ni –...
  • Seite 118: Nébuliseur

    [voir : Tubulure de raccordement, page 38]. Tous les composants d’un nébuliseur PARI et des acces- soires PARI utilisés peuvent être nettoyés, désinfectés et stéri- lisés selon la procédure qui suit. La tubulure de raccordement et l’élastique du masque doivent être traités séparément.
  • Seite 119: Nettoyage Et Désinfection

    – 31 – Nettoyage et désinfection Nettoyage manuel ÉQUIPEMENT La procédure a été validée en Europe avec les produits sui- vants : – Nettoyant enzymatique au pH neutre : ® Bode Bomix  plus (concentration : 0,1 %) – Eau potable à une température d’env. 15 °C –...
  • Seite 120 – 32 – RINÇAGE : • Rincez soigneusement toutes les pièces sous un filet d’eau potable à 15 °C, pendant 3 minutes. SÉCHAGE : • Secouez toutes les pièces pour éliminer l’eau. • Placez toutes les pièces sur un support sec, propre et ab- sorbant et laissez-les sécher complètement.
  • Seite 121 – 33 – Nettoyage avec désinfection Le nettoyage et la désinfection peuvent être réalisés en une seule opération au travers d’un retraitement chimique. Pour un maniement sûr du produit chimique, respectez la no- tice d’utilisation du désinfectant. Nettoyage en ÉQUIPEMENT : machine avec La procédure a été...
  • Seite 122 – 34 – Nettoyage ÉQUIPEMENT : chimique avec La procédure a été validée en Europe avec les désinfection : produits suivants : – Désinfectant pour instruments sans aldé- ® hyde : Bode Bomix  plus (concentration : 2 %) Base du principe actif : composé d’ammonium quaternaire –...
  • Seite 123 – 35 – Désinfection chimique Pour un maniement sûr du produit chimique, respectez la no- tice d’utilisation du désinfectant. ÉQUIPEMENT : La procédure a été validée en Europe avec les produits sui- vants : ® – Désinfectant à base d’aldéhydes : Bode Korsolex basic (concentration : 4 %) Base du principe actif : Séparateur d’aldéhydes, aldéhyde...
  • Seite 124 • Rincez le produit soigneusement, afin d’éliminer les rési- dus de désinfectant sur le produit PARI. • Rincez soigneusement toutes les pièces sous un filet d’eau potable à environ 15 °C, pendant 3 minutes.
  • Seite 125 – 37 – Stérilisation ATTENTION Risque d’infection lié à la présence de micro-organismes résiduels Les salissures sur les pièces sont susceptibles d’entraîner une multiplication des micro-organismes malgré la stérilisa- tion. Il en résulte un risque d'infection. • Nettoyez, désinfectez et séchez soigneusement toutes les pièces désassemblées avant la stérilisation.
  • Seite 126: Tubulure De Raccordement

    – 38 – 5.4 Tubulure de raccordement Nettoyage et désinfection en machine ÉQUIPEMENT : La procédure a été validée en Europe avec les produits sui- vants : ® – Nettoyant alcalin : Dr. Weigert neodisher MediClean forte – Neutralisant : Dr. Weigert neodisher Z – Laveur désinfecteur (LD) : LD G7836 CD (Miele) (conforme à...
  • Seite 127: Contrôle Visuel Et Stockage

    – 39 – Séchage • Raccordez la tubulure de raccordement à une source d’air comprimé (compresseur ou alimentation centrale en gaz). • Allumez la source d’air comprimé. • Maintenez la source d’air comprimé allumée jusqu’à élimi- nation de l'humidité dans la tubulure. 5.5 Contrôle visuel et stockage Contrôlez toutes les pièces.
  • Seite 128: Dépannage

    – 40 – DÉPANNAGE Adressez-vous au fabricant ou au distributeur : – en cas de pannes non spécifiées dans le présent chapitre – lorsque la procédure proposée n’élimine pas la panne Panne Cause possible Action corrective Aucun aéro- Le gicleur du nébuli- Nettoyez le nébuliseur.
  • Seite 129: Caractéristiques Techniques

    – 41 – CARACTÉRISTIQUES TECHNIQUES 7.1 Caractéristiques générales du nébuliseur Dimensions 10 cm × 9,5 cm × 4,5 cm Poids 27,5 g à 29,5 g Gaz moteur Air, oxygène Débit minimal du compresseur 3,0 l/min Pression de service minimale 0,5 bar / 50 kPa Débit maximal du compresseur 6,0 l/min Pression de service maximale 2,0 bar / 200 kPa Volume de remplissage minimum 2 ml...
  • Seite 130 44.0 53.2 66.2 (parvenant dans les poumons) [% < 5 µm] Proportion 11.6 17.9 28.1 d'aérosol [% < 2 µm] Proportion 32.4 35.3 38.1 d'aérosol [% > 2 µm < 5 µm] 6) Utilisation avec le compresseur PARI COMPACT2 (type 152) 7) MMAD = diamètre aérodynamique massique médian 8) GSD = écart type géométrique...
  • Seite 131: Divers

    – 43 – Débit Débit Débit minimal du nominal du maximal du Insert pour gicleur compresseur compresseur compresseur (transparent) (3 l/min - (4 l/min - (6 l/min - 0,6 bar) 1,2 bar) 1,9 bar) Proportion 56.0 46.8 33.8 d'aérosol [% > 5 µm] Émission d’aérosol 0.30 0.40 0.38 [ml] Débit d’aérosol [ml/ 0.09 0.12...
  • Seite 132 ©2022 PARI GmbH Spezialisten für effektive Inhalation, 022D3002 A fr 2022-09-27   PARI GmbH Spezialisten für effektive Inhalation Moosstraße 3 82319 Starnberg • GERMANY info@pari.de • www.pari.com...
  • Seite 133 Gebruiksaanwijzing ® PARI LC PLUS Model: PARI LC PLUS (Type 022) Vernevelaar voor PARI inhalatiesystemen...
  • Seite 134 Daarom worden in deze gebruiksaanwijzing ook kenmerken beschre- ven en geïllustreerd die in uw PARI product niet voorhanden zijn, bijvoorbeeld omdat ze landspecifiek en/of optioneel zijn. Bij gebruik van de systemen, producten en functies moeten de geldende nationale voorschriften in acht worden genomen.
  • Seite 135 – 3 – INHOUDSOPGAVE BELANGRIJKE AANWIJZINGEN ........Gebruiksdoel ..............Indicatie ................Contra-indicatie ..............Markering ................. Veiligheidsinstructies en waarschuwingen ....... PRODUCTBESCHRIJVING..........Levering................Overzicht en aanduidingen..........Productvarianten .............. Productcombinaties ............Beschrijving van de werking ..........Materiaalinformatie ............Levensduur............... GEBRUIK ................. Therapie voorbereiden ............. Therapie uitvoeren ............
  • Seite 136 – 4 – HYGIËNISCHE MAATREGELEN VOOR HERGEBRUIK IN PROFESSIONELE OMGEVINGEN......Voorbereidingscycli voor hergebruik ........ Grenzen van de hygiënische maatregelen voor hergebruik ................ Vernevelaar ..............Aansluitslang ..............Visueel controleren en opbergen ........VERHELPEN VAN FOUTEN ........... TECHNISCHE GEGEVENS ..........Algemene vernevelaargegevens ........Aerosolkenmerken conform ISO 27427 ......
  • Seite 137: Belangrijke Aanwijzingen

    Voor de aansluiting op een centrale gasvoorzieninginstallatie is de PARI CENTRAL bestemd. Dit PARI product mag zowel in de thuisomgeving als in profes- sionele zorginstellingen worden gebruikt. In de thuisomgeving mag dit PARI product maar voor één patiënt worden gebruikt (geen wisseling van patiënten).
  • Seite 138: Indicatie

    – 6 – Dit PARI product is alleen geschikt voor patiënten die zelfstan- dig ademen en bij bewustzijn zijn. Een behandeling duurt ca. 5 tot 10 minuten, maar maximaal 20 minuten (afhankelijk van de hoeveelheid vloeistof). De frequentie en duur van het gebruik worden afhankelijk van de individuele behoeften bepaald door medisch vakpersoneel 1.2 Indicatie...
  • Seite 139: Markering

    Unieke productidentificatie Dit product voldoet aan de eisen van de EU-verordening betreffende medische hulpmiddelen 2017/745. Gebruiksaanwijzing opvolgen Mondstuk met uitademventiel Einatemventil Aansluitslang Vernevelaarinzetstuk PARI LC PLUS Vernebler LC-onderbreker Luchtfilter voor compressor type 128/130/152 Luchtfilter voor compressor type 041 Luchtfilter voor compressor type 028/085 Slangadapter Filterwisselaar...
  • Seite 140: Veiligheidsinstructies En Waarschuwingen

    – 8 – 1.5 Veiligheidsinstructies en waarschuwingen Deze gebruiksaanwijzing bevat belangrijke informatie, vei- ligheidsinstructies en voorzorgsmaatregelen. Alleen wan- neer de gebruiker deze opvolgt, kan dit PARI product vei- lig worden gebruikt. Gebruik dit PARI product alleen zoals in deze gebruiksaanwij- zing is beschreven.
  • Seite 141 – 9 – Algemeen Als niet-toegestane inhalatieoplossingen of suspensies voor de verneveling worden gebruikt, kunnen de aerosolkenmerken van de vernevelaar afwijken van de gegevens van de fabrikant. Dit product is niet geschikt voor gebruik in een anesthesie- ademsysteem of in een ademsysteem van een beademingsap- paraat.
  • Seite 142: Gevaar Door Kleine Onderdelen Die Kunnen Worden Ingeslikt

    – 10 – Gevaar door kleine onderdelen die kunnen worden ingeslikt Het product bevat kleine onderdelen. Kleine onderdelen kun- nen de luchtwegen blokkeren en tot verstikkingsgevaar leiden. Berg alle onderdelen van het product steeds buiten bereik van baby’s en peuters op. Hygiëne Neem de volgende aanwijzingen aangaande de hygiëne in acht:...
  • Seite 143: Productbeschrijving

    (1a) Inademventiel (1b) Sproeieropzetstuk (1c) Onderste deel van de vernevelaar (1d) LC-onderbreker (1e) Mondstuk (1f) Aansluitslang (2) Luchtfilter voor compressor 2.3 Productvarianten PARI LC PLUS (sproeieropzetstuk: transparant) Met mondstuk voor de behandeling van de luchtwegen van vol- wassenen en kinderen vanaf ca. 4 jaar.
  • Seite 144: Productcombinaties

    – 12 – 2.4 Productcombinaties De PARI vernevelaar kan met alle PARI compressoren of via een PARI CENTRAL met een centrale gasvoorzieningsinstalla- tie worden verbonden. De vernevelaar kan met diverse PARI toebehoren worden ge- combineerd. 2.5 Beschrijving van de werking De PARI vernevelaar maakt deel uit van een PARI inhalatie- systeem.
  • Seite 145: Materiaalinformatie

    – 13 – 2.6 Materiaalinformatie De afzonderlijke productonderdelen bestaan uit de volgende materialen: Productonderdeel Materiaal Inademventiel Polypropyleen, silicone Sproeieropzetstuk Polypropyleen Onderste deel van Polypropyleen de vernevelaar LC-onderbreker Polypropyleen Mondstuk (met Polypropyleen, thermoplastisch elastomeer uitademventiel) Aansluitslang Polyvinylchloride Eindstuk slang Thermoplastisch elastomeer...
  • Seite 146: Levensduur

    MAATREGELEN VOOR HERGEBRUIK IN PROFESSIONELE OMGEVINGEN, pagina 28] Wanneer de verwachte levensduur is bereikt, dient u het be- treffende productonderdeel te vervangen. Hiervoor zijn aanvul- lende vernevelaarsets (vernevelaar incl. aansluitslang) of PARI Year Packs (vernevelaar incl. aansluitslang en luchtfilter voor een compressor) verkrijgbaar.
  • Seite 147: Gebruik

    – 15 – GEBRUIK Alle hieronder beschreven stappen moeten correct worden uit- gevoerd. Als de vernevelaar via een PARI CENTRAL met een centrale gasvoorzieningsinstallatie moet worden verbonden, moet de gebruiksaanwijzing van de PARI CENTRAL in acht worden ge- nomen. 3.1 Therapie voorbereiden...
  • Seite 148 – 16 – • Bevestig de aansluitslang op de vernevelaar. Alternatief: • Steek de LC-onderbreker op de vernevelaar. • Steek de aansluitslang op de luchtinlaat aan de zijkant van de LC-onderbreker. Mondstuk gebruiken • Steek het mondstuk op de ver- nevelaar.
  • Seite 149 – 17 – Toebehoren gebruiken Informatie over de montage van toebehoren vindt u in de ge- bruiksaanwijzing van het betreffende toebehoren Vernevelaar vullen • Plaats de vernevelaar in de daarvoor bedoelde houder op de compressor. • Trek zo nodig het inademventiel eraf. •...
  • Seite 150: Therapie Uitvoeren

    – 18 – Wanneer meerdere inhalatieoplossingen na elkaar moeten worden gebruikt: • Spoel de vernevelaar tussen de verschillende toepassingen uit met drinkwater. • Schud het overtollige water uit de vernevelaar. • Vul de vernevelaar op de beschreven wijze met de volgende inhalatieoplossing.
  • Seite 151 – 19 – • Steek de aansluitslang van de vernevelaar met een licht draaiende beweging in de persluchtaansluiting van de com- pressor. • Neem de vernevelaar uit de houder aan de compressor en houd hem rechtop. • Vergewis u ervan dat alle de- len vast met elkaar verbonden zijn.
  • Seite 152 – 20 – Met mondstuk inhaleren • Ga ontspannen en rechtop zitten. • Neem het mondstuk tussen de tanden en omsluit het met de lippen. • Adem zo langzaam en diep mogelijk door het mondstuk in en ontspannen weer uit. •...
  • Seite 153: Therapie Afsluiten

    – 21 – Inhaleren met toebehoren De inhalatie met toebehoren (bijv. maskers) is beschreven in de gebruiksaanwijzing van het betreffende toebehoren. 3.3 Therapie afsluiten Ga als volgt te werk om de therapie af te sluiten: • Schakel de compressor uit door de aan/uit-schakelaar op “OFF”...
  • Seite 154: Hygiënische Maatregelen Voor Hergebruik In De Thuisomgeving

    – 22 – HYGIËNISCHE MAATREGELEN VOOR HERGEBRUIK IN DE THUISOMGEVING De onderdelen van het product moeten onmiddellijk na elk ge- bruik grondig worden gereinigd en minstens één keer per week worden gedesinfecteerd. De aansluitslang kan niet worden gereinigd of gedesinfecteerd. Droog de aansluitslang na elk gebruik [zie: Aansluitslang ver- zorgen, pagina 27].
  • Seite 155: Reinigen

    – 23 – 4.4 Reinigen Voorreinigen Alle onderdelen moeten vlak voor het gebruik worden voorge- reinigd. UITRUSTING: – Drinkwater met een temperatuur van ca. 15 °C UITVOERING: • Spoel alle gebruikte onderdelen gedurende 2 minuten onder stromend drinkwater. Met de hand reinigen UITRUSTING: –...
  • Seite 156 – 24 – DROGEN: • Schud het water uit alle onderdelen. • Leg alle onderdelen op een droge, schone en absorberende ondergrond en laat ze volledig drogen. In de vaatwasmachine De afzonderlijke onderdelen kunnen worden gereinigd in een gewone vaatwasmachine als deze is aangesloten op leiding- water van drinkwaterkwaliteit.
  • Seite 157: Desinfecteren

    – 25 – 4.5 Desinfecteren Desinfecteer alle onderdelen onmiddellijk na de reiniging. Al- leen gereinigde onderdelen kunnen doeltreffend worden ge- desinfecteerd. Hierna zijn de gevalideerde desinfectiemethodes beschreven. In kokend water UITRUSTING: – Schone kookpan – Drinkwater UITVOERING: VOORZICHTIG Infectiegevaar door vocht Vocht bevordert de groei van kiemen.
  • Seite 158 – 26 – Met een gangbare thermische desinfector voor babyflessen (geen microgolfoven) UITRUSTING: – Thermische desinfector met een werkingstijd van minstens 6 minuten UITVOERING: VOORZICHTIG Infectiegevaar door onvoldoende desinfectie Een onvoldoende desinfectie bevordert de groei van kiemen en verhoogt daarmee het infectiegevaar. •...
  • Seite 159: Aansluitslang Verzorgen

    – 27 – DROGEN: • Leg alle onderdelen na afloop van het desinfectieproces op een droge, schone en absorberende ondergrond en laat ze volledig drogen. Of laat alle onderdelen gedurende max. 24 uur in de gesloten thermische desinfector tot aan het vol- gende gebruik.
  • Seite 160: Hygiënische Maatregelen Voor Hergebruik In Professionele Omgevingen

    – 28 – HYGIËNISCHE MAATREGELEN VOOR HERGEBRUIK IN PROFESSIONELE OMGEVINGEN Droog de aansluitslang na elk gebruik [zie: Aansluitslang, pagi- na 37]. 5.1 Voorbereidingscycli voor hergebruik Zonder wisseling van patiënten Vernevelaar zonder – Reiniging onmiddellijk na elk gebruik aansluitslang en – Desinfectie één keer per week toebehoren (bijv.
  • Seite 161: Vernevelaar

    [zie: Aansluitslang, pagina 37]. Alle onderdelen van een PARO vernevelaar en het gebruikte PARI toebehoren kunnen volgens de hierna beschreven me- thodes worden gereinigd, gedesinfecteerd en gesteriliseerd. De aansluitslang en de elastische band van het masker moe- ten afzonderlijk worden behandeld.
  • Seite 162: Reinigen En Desinfecteren

    – 30 – Reinigen en desinfecteren Met de hand reinigen UITRUSTING De methode is in Europa gevalideerd met gebruikmaking van: – ph-neutraal, enzymatisch reinigingsmiddel: ® Bode Bomix  plus (concentratie: 0,1%) – Drinkwater met een temperatuur van ca. 15 °C – Inwerktijd: 10 minuten UITVOERING: VOORZICHTIG infectiegevaar door de groei van kiemen...
  • Seite 163 – 31 – SPOELEN: • Spoel alle onderdelen gedurende 3 minuten grondig af on- der stromend drinkwater van ca. 15 °C. DROGEN: • Schud het water uit alle onderdelen. • Leg alle onderdelen op een droge, schone en absorberende ondergrond en laat ze volledig drogen.
  • Seite 164 – 32 – Reiniging met desinfectie Met behulp van een chemische voorbehandeling kunnen de reiniging en desinfectie in één bewerking worden uitgevoerd. Neem voor de veilige omgang met de chemische stof de ge- bruiksaanwijzing van het desinfectiemiddel in acht. Machinale UITRUSTING: reiniging met De methode is in Europa gevalideerd met...
  • Seite 165 – 33 – Chemische UITRUSTING: reiniging met De methode is in Europa gevalideerd met desinfectie: gebruikmaking van: – Aldehydevrij instrumenten-desinfectiemiddel: ® Bode Bomix  plus (concentratie: 2%) Werkzame stof: quaternaire ammoniumver- binding – Drinkwater van ca. 15 °C – Inwerktijd: 5 minuten UITVOERING: •...
  • Seite 166 – 34 – Chemisch desinfecteren Neem voor de veilige omgang met de chemische stof de ge- bruiksaanwijzing van het desinfectiemiddel in acht. UITRUSTING: De methode is in Europa gevalideerd met gebruikmaking van: ® – Aldehydehoudend desinfectiemiddel: Bode Korsolex basic (concentratie: 4%) Werkzame stof: Aldehyde-derivaat, aldehyde –...
  • Seite 167 Desinfectiemiddelen kunnen bij huidcontact allergische reac- ties of slijmvliesirritaties veroorzaken. • Spoel het product grondig, zodat geen resten van het des- infectiemiddel op het PARI product achterblijven. • Spoel alle onderdelen gedurende 3 minuten grondig af on- der stromend drinkwater van ca. 15 °C.
  • Seite 168 – 36 – Steriliseren VOORZICHTIG Infectiegevaar door resterende kiemen Als de afzonderlijke ondelen zijn vervuild, kunnen ziektekie- men zich ondanks de sterilisatie vermenigvuldigen. Daardoor bestaat er infectiegevaar. • Reinig, desinfecteer en droog alle onderdelen vóór een sterilisatie grondig. • Gebruik voor de reiniging en desinfectie uitsluitend gevali- deerde methodes.
  • Seite 169: Aansluitslang

    – 37 – 5.4 Aansluitslang Machinaal reinigen en desinfecteren UITRUSTING: De methode is in Europa gevalideerd met gebruikmaking van: ® – Alkalisch reinigingsmiddel: Dr. Weigert neodisher Medi- Clean forte – Neutralisator: Dr. Weigert neodisher Z – Reinigings- en desinfectieapparaat: RDG G7836 CD (Miele) (conform DIN EN ISO 15883) –...
  • Seite 170: Verhelpen Van Fouten

    – 38 – VERHELPEN VAN FOUTEN Neem contact op met de fabrikant of leverancier: – bij fouten die niet in dit hoofdstuk worden genoemd – wanneer de fout niet met de voorgestelde werkwijze kan worden verholpen Fout Mogelijke oorzaak Oplossing Uit de verne- De sproeier van de Reinig de vernevelaar.
  • Seite 171: Technische Gegevens

    – 39 – TECHNISCHE GEGEVENS 7.1 Algemene vernevelaargegevens Grootte 10 cm × 9,5 cm × 4,5 cm Gewicht 27,5 g tot 29,5 g Drijfgassen lucht, zuurstof Minimale compressorstroom 3,0 l/min Minimale bedrijfsdruk 0,5 bar / 50 kPa Maximale compressorstroom 6,0 l/min Maximale bedrijfsdruk 2,0 bar / 200 kPa Minimum vulvolume 2 ml Maximum vulvolume 8 ml 5) Zonder mondstuk; niet gevuld.
  • Seite 172: Aerosolkenmerken Conform Iso 27427

    (alveolen)fractie [% < 5 µm] Aerosolgehalte 11.6 17.9 28.1 [% < 2 µm] Aerosolgehalte 32.4 35.3 38.1 [% < 2 µm < 5 µm] Aerosolgehalte 56.0 46.8 33.8 [% > 5 µm] Aerosol Output [ml] 0.30 0.40 0.38 6) Gebruik met PARI COMPACT2 compressor (type 152). 7) MMAD = mediane aërodynamische massadiameter 8) GSD = geometrische standaardafwijking...
  • Seite 173: Diversen

    – 41 – Minimale Nominale Maximale compressors compressors compressors Sproeieropzetstuk troom troom troom (transparant) (3 l/min – (4 l/min – (6 l/min – 0,6 bar) 1,2 bar) 1,9 bar) Aerosol Outputrate 0.09 0.12 0.14 [ml/min] Restvolume [ml] 1.28 1.15 1.14 (gravimetrisch bepaald) Outputrate ten opzichte van het vulvolume [%/min] DIVERSEN Alle onderdelen van het product kunnen met het huisvuil wor-...
  • Seite 174 – 42 –...
  • Seite 175 – 43 –...
  • Seite 176 ©2022 PARI GmbH Spezialisten für effektive Inhalation, 022D3003 A nl 2022-09-27   PARI GmbH Spezialisten für effektive Inhalation Moosstraße 3 82319 Starnberg • GERMANY info@pari.de • www.pari.com...
  • Seite 177 Istruzioni per l'uso ® PARI LC PLUS Model: PARI LC PLUS (Type 022) Nebulizzatore per sistemi di inalazione PARI...
  • Seite 178 Immagini simili. Disclaimer Le presenti istruzioni per l’uso descrivono i componenti dei pro- dotti PARI e degli accessori opzionali. Pertanto le presenti istruzioni per l’uso contengono anche la descrizione e l’illustra- zione di caratteristiche non presenti nel prodotto PARI acqui- stato, ad esempio perché...
  • Seite 179 – 3 – INDICE INDICAZIONI IMPORTANTI ..........Finalità del prodotto ............Indicazioni ................ Controindicazioni .............. Contrassegno ..............Avvertenze e indicazioni di sicurezza....... DESCRIZIONE DEL PRODOTTO ........Entità della fornitura ............Panoramica e denominazioni ........... Varianti del prodotto ............Combinazioni di prodotti ........... Descrizione del funzionamento ........
  • Seite 180 – 4 – PREPARAZIONE IGIENICA IN AMBIENTI SANITARI PROFESSIONALI ............Cicli di preparazione igienica..........Limiti della preparazione igienica ........Nebulizzatore ..............Tubo di collegamento ............Controllo visivo e conservazione ........RISOLUZIONE DEGLI ERRORI ........DATI TECNICI..............Dati generali sul nebulizzatore ......... Caratteristiche dell'aerosol secondo la norma ISO 27427 ALTRO ................
  • Seite 181: Indicazioni Importanti

    I nebulizzatori PARI LC PLUS producono aerosol da inalare ai fini della terapia delle basse vie respiratorie. Il nebulizzatore, insieme a un compressore PARI o al PARI CENTRAL e ad alcuni accessori PARI, costituisce un sistema di inalazione. Il nebulizzatore è progettato per la terapia di pazienti di ogni fa- scia di età.
  • Seite 182: Indicazioni

    – 6 – Questo prodotto PARI è idoneo solo per pazienti in grado di re- spirare autonomamente e coscienti. Una sessione di inalazione dura circa 5-10 minuti e non può protrarsi oltre 20 minuti (in base alla quantità di liquido utilizza- ta). La frequenza e la durata dell'utilizzo verranno determinate dal...
  • Seite 183: Contrassegno

    UE 2017/745 relativo ai dispositivi medici. Seguire le istruzioni per l'uso Boccaglio con valvola di espirazione Einatemventil Tubo di collegamento Inserto nebulizzatore PARI LC PLUS Vernebler Interruttore LC Filtro dell'aria per compressore tipo 128/130/152 Filtro dell'aria per compressore tipo 041 Filtro dell'aria per compressore tipo 028/085 Adattatore per flessibile...
  • Seite 184: Avvertenze E Indicazioni Di Sicurezza

    Le presenti istruzioni per l'uso contengono importanti in- formazioni, indicazioni per la sicurezza e misure precau- zionali. Un utilizzo sicuro di questo prodotto PARI è possi- bile solo se l'utente rispetta tali avvertenze. Utilizzare questo prodotto PARI solo come descritto nelle pre- senti istruzioni per l'uso.
  • Seite 185: Informazioni Generali

    – 9 – Informazioni generali Se vengono utilizzate soluzioni o sospensioni non approvate per la nebulizzazione, ile caratteristiche dell'aerosol del nebu- lizzatore possono differire dalle indicazioni del produttore. Questo prodotto non è adatto per essere utilizzato in un siste- ma di respirazione-anestesia o in un sistema di respirazione artificiale.
  • Seite 186: Preparazione Igienica

    – 10 – Pericolo causato da piccole parti ingeribili Il prodotto contiene piccole parti. Le piccole parti, se ingerite, potrebbero bloccare le vie respiratorie e causare un rischio di soffocamento. Assicurarsi di tenere tutti i componenti del pro- dotto fuori dalla portata di neonati e bambini piccoli. Preparazione igienica Osservare le seguenti indicazioni igieniche: –...
  • Seite 187: Descrizione Del Prodotto

    (1e) Boccaglio (1f) Tubo di collegamento (2) Filtro dell'aria per compressore 2.3 Varianti del prodotto PARI LC PLUS (supporto dell'ugello: trasparente) Con boccaglio per la terapia delle vie respiratorie di adulti e bambini a partire da circa 4 anni di età.
  • Seite 188: Combinazioni Di Prodotti

    – 12 – 2.4 Combinazioni di prodotti Il nebulizzatore PARI può essere collegato a tutti i compressori PARI oppure tramite un PARI CENTRAL con impianto di ero- gazione centralizzata del gas. Il nebulizzatore può essere combinato con diversi accesso- ri PARI.
  • Seite 189: Informazioni Sui Materiali

    – 13 – 2.6 Informazioni sui materiali I singoli componenti del prodotto sono realizzati nei seguenti materiali: Componente del Materiale prodotto Valvola di Polipropilene, silicone aspirazione Supporto dell'ugello Polipropilene Parte inferiore del Polipropilene nebulizzatore Interruttore LC Polipropilene Boccaglio (con Polipropilene, elastomero termoplastico valvola di espirazione) Tubo di...
  • Seite 190: Durata

    A tal fine sono disponibili appo- siti set di ricambi nebulizzatore (nebulizzatore incl. tubo flessi- bile di collegamento) o PARI Year Pack (nebulizzatore incl. tu- bo flessibile di collegamento e filtro dell'aria per un compresso- re).
  • Seite 191: Utilizzo

    – 15 – UTILIZZO Eseguire regolarmente tutte le fasi descritte di seguito. Se il nebulizzatore deve essere collegato tramite un PARI CENTRAL con impianto di erogazione centralizzata del gas, si devono osservare le istruzioni per l'uso del PARI CENTRAL. 3.1 Preparazione della terapia...
  • Seite 192 – 16 – • Inserire il tubo di collegamento nel nebulizzatore. Alternativa: • Inserire l'interruttore LC nel ne- bulizzatore. • Inserire il tubo di collegamento nell'ingresso laterale dell'aria sull'interruttore LC. Utilizzo del boccaglio • Inserire il boccaglio nel nebu- lizzatore.
  • Seite 193 – 17 – Utilizzo di accessori Informazioni sul montaggio degli accessori sono disponibili nel- le istruzioni per l'uso del relativo accessorio. Riempimento del nebulizzatore • Inserire il nebulizzatore nel relativo sostegno sul compres- sore. • Eventualmente, estrarre la valvola di aspirazione dal nebu- lizzatore.
  • Seite 194 – 18 – Se devono essere usate più soluzioni per inalazione in successione: • Tra un'applicazione e l'altra pulire il nebulizzatore con acqua potabile. • Scuotere il nebulizzatore per rimuovere l'acqua in eccesso. • Riempire il nebulizzatore con la successiva soluzione per i- nalazione nel modo precedentemente descritto.
  • Seite 195: Esecuzione Della Terapia

    – 19 – 3.2 Esecuzione della terapia Prima di eseguire una terapia, è necessario aver letto e compreso tutte le avvertenze e le indicazioni di sicurezza contenute nelle presenti istruzioni per l'uso. Durante la terapia tenere il nebulizzatore sempre in posizio- ne verticale.
  • Seite 196 – 20 – • Estrarre il nebulizzatore dal so- stegno sul compressore e te- nerlo in posizione verticale. • Assicurarsi che tutti i compo- nenti siano fissati saldamente tra loro. •  PERICOLO! Pericolo di morte da folgorazione in ca- so di guasto dell'apparec- chio! Se si sospetta un guasto (ad es.
  • Seite 197 – 21 – Inalazione con il boccaglio • Sedersi tenendo una posizione eretta e rilassata. • Afferrare il boccaglio con i denti e stringerlo con le labbra. • Inspirare il più lentamente e profondamente possibile attra- verso il boccaglio ed espirare in modo rilassato. •...
  • Seite 198: Conclusione Della Terapia

    – 22 – Inalazione con accessori L'inalazione con accessori (ad esempio, maschere) è descritta nelle istruzioni per l'uso del relativo accessorio. 3.3 Conclusione della terapia Per concludere la terapia, procedere come descritto di seguito: • Spegnere il compressore portando l'interruttore on/off (acce- so/spento) su "OFF".
  • Seite 199: Preparazione Igienica In Ambienti Domestici

    – 23 – PREPARAZIONE IGIENICA IN AMBIENTI DOMESTICI È necessario pulire a fondo i componenti del prodotto subito dopo ogni utilizzo e disinfettarli almeno una volta alla settima- Non è possibile né pulire né disinfettare il flessibile di collega- mento. Asciugare il flessibile di collegamento dopo ogni utilizzo [vede- re: Cura del tubo di collegamento, a pagina 28].
  • Seite 200: Pulizia

    – 24 – 4.4 Pulizia Prima pulizia Tutti i componenti devono essere sottoposti ad una prima puli- zia subito dopo l’impiego. STRUMENTI: – Acqua potabile alla temperatura di circa 15 °C ESECUZIONE: • Risciacquare tutti i componenti utilizzati sotto l’acqua potabi- le corrente per 2 minuti. Pulizia manuale STRUMENTI: –...
  • Seite 201 – 25 – ASCIUGATURA: • Scuotere tutti i componenti per rimuovere l'acqua in ecces- • Posizionare tutti i singoli componenti su una superficie asciutta, pulita e assorbente, quindi lasciarli asciugare com- pletamente. In lavastoviglie I componenti possono essere lavati in una lavastoviglie per uso domestico, purché...
  • Seite 202: Disinfezione

    – 26 – 4.5 Disinfezione Disinfettare tutti i componenti subito dopo la pulizia. È possibile disinfettare in modo efficace solo componenti lavati. Di seguito vengono descritte le procedure di disinfezione con- validate. In acqua bollente STRUMENTI: – Pentola pulita – Acqua potabile ESECUZIONE: ATTENZIONE Pericolo di infezione causato da umidità...
  • Seite 203 – 27 – Con un apparecchio per la disinfezione termica dei biberon disponibile in commercio (senza microonde) STRUMENTI: – Apparecchio per disinfezione termica azionato per almeno 6 minuti ESECUZIONE: ATTENZIONE Pericolo di infezione causata da una disinfezione insuffi- ciente Una disinfezione non sufficiente favorisce la proliferazione di germi e batteri e aumenta in tal modo il rischio di infezioni.
  • Seite 204: Cura Del Tubo Di Collegamento

    – 28 – ASCIUGATURA: • Al termine della procedura di disinfezione posizionare tutti i componenti su una superficie asciutta, pulita e assorbente e lasciarli asciugare completamente. Oppure lasciare tutti i componenti in un apparecchio per disinfezione termica chiu- so per max. 24 ore fino all’utilizzo successivo. 4.6 Cura del tubo di collegamento Asciugare il tubo di collegamento dopo ogni inalazione: •...
  • Seite 205: Preparazione Igienica In Ambienti Sanitari Professionali

    – 29 – PREPARAZIONE IGIENICA IN AMBIENTI SANITARI PROFESSIONALI Asciugare il flessibile di collegamento dopo ogni utilizzo [vede- re: Tubo di collegamento, a pagina 38]. 5.1 Cicli di preparazione igienica Senza cambio di paziente Nebulizzatore senza – Pulizia subito dopo ogni utilizzo tubo di collegamento –...
  • Seite 206: Nebulizzatore

    [vedere: Tubo di collegamento, a pagina 38]. È possibile pulire, disinfettare e sterilizzare tutti i componenti del nebulizzatore PARI e degli accessori PARI utilizzati secon- do le procedure descritte di seguito. Il tubo di collegamento e l’elastico della maschera devono es- sere trattati a parte.
  • Seite 207: Pulizia E Disinfezione

    – 31 – Pulizia e disinfezione Pulizia manuale STRUMENTI La procedura è stata convalidata in Europa con l'utilizzo di: – Detergente enzimatico a pH neutro: ® Bode Bomix  plus (concentrazione: 0,1 %) – Acqua potabile alla temperatura di circa 15 °C – Tempo di azione: 10 minuti ESECUZIONE: ATTENZIONE Rischio di infezione causato da proliferazione di germi e...
  • Seite 208 – 32 – RISCIACQUO: • Risciacquare accuratamente tutti i componenti sotto l’acqua potabile corrente ad una temperatura di circa 15 °C per 3 minuti. ASCIUGATURA: • Scuotere tutti i componenti per rimuovere l'acqua in ecces- • Posizionare tutti i singoli componenti su una superficie asciutta, pulita e assorbente, quindi lasciarli asciugare com- pletamente.
  • Seite 209 – 33 – Pulizia con disinfezione Effettuando la preparazione igienica con un prodotto chimico, è possibile eseguire un'unica procedura di pulizia e disinfezione. Per un utilizzo sicuro del prodotto chimico osservare le istruzio- ni per l'uso del prodotto di disinfezione. Pulizia STRUMENTI: meccanica...
  • Seite 210 – 34 – Pulizia STRUMENTI: chimica con La procedura è stata convalidata in Europa con disinfezione: l'utilizzo di: – Prodotto di disinfezione per strumenti privo di ® aldeidi: Bode Bomix  plus (concentrazione: 2 %) Base del principio attivo: composto di ammo- nio quaternario –...
  • Seite 211 – 35 – Disinfezione chimica Per un utilizzo sicuro del prodotto chimico osservare le istruzio- ni per l'uso del prodotto di disinfezione. STRUMENTI: La procedura è stata convalidata in Europa con l'utilizzo di: ® – Prodotto di disinfezione a base di aldeidi: Bode Korsolex basic (concentrazione: 4 %) Base del principio attivo: separatore di aldeidi, aldeide –...
  • Seite 212 • Risciacquare a fondo il prodotto di modo che non riman- gano residui di prodotto di disinfezione sul prodotto PARI. • Risciacquare a fondo tutti i componenti per 3 minuti sotto l’acqua potabile corrente ad una temperatura di circa 15 °C.
  • Seite 213 – 37 – Sterilizzazione ATTENZIONE Pericolo di infezioni da patogeni residui Se sui singoli componenti è ancora presente dello sporco, nonostante la sterilizzazione, possono rimanere dei patogeni in grado di proliferare. Ciò comporta rischi di infezione. • Pulire, disinfettare e asciugare accuratamente tutti i singo- li componenti prima della sterilizzazione.
  • Seite 214: Tubo Di Collegamento

    – 38 – 5.4 Tubo di collegamento Pulizia e disinfezione meccaniche STRUMENTI: La procedura è stata convalidata in Europa con l'utilizzo di: ® – Detergente alcalino: Dr. Weigert neodisher MediClean forte – Neutralizzatore: Dr. Weigert neodisher Z – Apparecchio per pulizia e disinfezione (RDG): RDG G7836 CD (Miele) (a norma DIN EN ISO 15883) –...
  • Seite 215: Controllo Visivo E Conservazione

    – 39 – Asciugatura • Collegare il tubo di collegamento ad una fonte di aria com- pressa (compressore o alimentazione centralizzata di gas). • Accendere la fonte di aria compressa. • Lasciare accesa la fonte di aria compressa finché l’umidità dal tubo non è...
  • Seite 216: Dati Tecnici

    – 40 – DATI TECNICI 7.1 Dati generali sul nebulizzatore Dimensioni 10 cm × 9,5 cm × 4,5 cm Peso Tra 27,5 g e 29,5 g Gas di esercizio Aria, ossigeno Flusso minimo del compressore 3,0 l/min Pressione di esercizio minima 0,5 bar / 50 kPa Flusso massimo del compressore 6,0 l/min Pressione di esercizio massima 2,0 bar / 200 kPa Volume di riempimento minimo 2 ml...
  • Seite 217 Volume del residuo 1.28 1.15 1.14 [ml] (definito mediante analisi gravimetrica) Velocità di erogazione riferita al volume di riempimento [%/ min] 6) Utilizzo con compressore PARI COMPACT2 (Tipo 152). 7) MMAD = Diametro aerodinamico mediano di massa 8) GSD = Deviazione standard geometrica...
  • Seite 218: Altro

    – 42 – ALTRO Tutti i componenti del prodotto possono essere smaltiti con i normali rifiuti domestici. Rispettare le norme di smaltimento specifiche del relativo paese.
  • Seite 219 – 43 –...
  • Seite 220 ©2022 PARI GmbH Spezialisten für effektive Inhalation, 022D3004 A it 2022-09-27   PARI GmbH Spezialisten für effektive Inhalation Moosstraße 3 82319 Starnberg • GERMANY info@pari.de • www.pari.com...
  • Seite 221 Instrucciones de uso ® PARI LC PLUS Model: PARI LC PLUS (Type 022) Nebulizador para sistema de inhalación PARI...
  • Seite 222 Exención de responsabilidad Estas instrucciones de uso describen los componentes de los productos PARI y de los accesorios opcionales. Por lo tanto, en estas instrucciones de uso también se describen e ilustran características que no están presentes en su producto PARI, porque son específicas de cada país y/o son opcionales.
  • Seite 223 – 3 – CONTENIDO ADVERTENCIAS IMPORTANTES ........Finalidad de uso ............... Indicaciones ..............Contraindicaciones ............Identificación ..............Información sobre seguridad y advertencias....DESCRIPCIÓN DEL PRODUCTO........Componentes ..............Vista de conjunto y denominaciones ........ Variantes de producto ............Combinaciones de productos ........... Descripción del funcionamiento ........
  • Seite 224 – 4 – HIGIENE EN ENTORNOS SANITARIOS PROFESIO- NALES ................Ciclos de higienización ............. Límites de la higiene ............Nebulizador ..............Tubo flexible ..............Control visual y conservación........... RESOLUCIÓN DE PROBLEMAS........DATOS TÉCNICOS ............Datos generales sobre el nebulizador ......Datos del aerosol según ISO 27427 ........
  • Seite 225: Advertencias Importantes

    Solo se pueden utilizar soluciones y suspensiones permitidas para la terapia inhalada. El nebulizador solo debe conectarse a un compresor PARI o a un sistema de suministro de gas centralizado. Para la conexión a un sistema de suministro de gas centralizado se ha previsto el uso de PARI CENTRAL.
  • Seite 226: Indicaciones

    1.2 Indicaciones Enfermedades de las vías respiratorias bajas. 1.3 Contraindicaciones PARI GmbH no tiene constancia de que se hayan descrito contraindicaciones. 2) Con personal sanitario nos referimos a: médicos, farmacéuticos o fisioterapeutas.
  • Seite 227: Identificación

    Siga las instrucciones de uso. Boquilla con válvula de espiración Einatemventil Tubo flexible Nebulizador PARI LC PLUS Vernebler Dispositivo interruptor LC Filtro de aire para el compresor tipo 128/130/152 Filtro de aire para el compresor tipo 041 Filtro de aire para el compresor tipo 028/085...
  • Seite 228: Información Sobre Seguridad Y Advertencias

    Solo si el usuario las cumple y las respeta se podrá utilizar este producto PARI de forma segura. Utilice este producto PARI únicamente tal y como se indica en estas instrucciones de uso. También se deben respetar las instrucciones de uso del com- presor y de los accesorios utilizados, además de la informa-...
  • Seite 229 – 9 – Generalidades Si se utilizan soluciones o suspensiones no permitidas para la nebulización, los datos del aerosol del nebulizador podrían di- ferir de la información facilitada por el fabricante. Este producto no se puede utilizar en un sistema de anestesia por inhalación ni en el circuito de respiradores.
  • Seite 230 – 10 – Peligro por ingesta de piezas pequeñas El producto contiene piezas pequeñas. Las piezas pequeñas pueden obturar las vías respiratorias y suponer peligro de asfi- xia. Guarde siempre todos los componentes del producto fuera del alcance de bebés y niños pequeños. Higiene Siga estas instrucciones de higiene: –...
  • Seite 231: Descripción Del Producto

    (1e) Boquilla (1f) Tubo flexible (2) Filtro de aire para compresor 2.3 Variantes de producto PARI LC PLUS (adaptador de tobera: transparente) Con boquilla para el tratamiento de las vías respiratorias en adultos y niños a partir de unos 4 años.
  • Seite 232: Combinaciones De Productos

    – 12 – 2.4 Combinaciones de productos El nebulizador PARI puede conectarse a todos los compreso- res PARI o a un sistema de suministro de gas centralizado me- diante PARI CENTRAL. El nebulizador se puede combinar con varios accesorios PARI. 2.5 Descripción del funcionamiento El nebulizador PARI forma parte del sistema de inhala-...
  • Seite 233: Información Sobre El Material

    [véase: HIGIENE EN ENTORNOS SANITARIOS PROFESIONALES, página 28] Una vez finalizada la vida útil, renueve el componente afectado del producto. Para ello se ofrecen juegos de mantenimiento (nebulizador y tubo flexible) o PARI Year Packs (nebulizador, tubo flexible y filtro de aire para un compresor).
  • Seite 234: Modo De Uso

    Todos los pasos descritos a continuación deben llevarse a ca- bo debidamente. Si el nebulizador va a conectarse a un sistema de suministro de gas centralizado mediante PARI CENTRAL, deberán con- sultarse las instrucciones de uso del sistema PARI CENTRAL. 3.1 Preparación del tratamiento Montaje del nebulizador ATENCIÓN Pérdida de eficacia del tratamiento...
  • Seite 235 – 15 – • Conecte el tubo flexible al ne- bulizador. Alternativa: • Conecte el dispositivo interrup- tor LC al nebulizador. • Conecte el tubo flexible a la entrada de aire lateral del dis- positivo interruptor LC. Uso de la boquilla •...
  • Seite 236 – 16 – Uso de los accesorios Encontrará información sobre el montaje de los accesorios en las instrucciones de uso que acompañan al accesorio Llenado del nebulizador • Conecte el nebulizador al soporte del compresor previsto para tal fin. • Retire la válvula inspiratoria si fuera necesario. •...
  • Seite 237: Realización Del Tratamiento

    – 17 – Si se deben utilizar varias soluciones de inhalación sucesivamente: • Lave el nebulizador con agua potable después de cada uso. • Elimine el exceso de agua del nebulizador sacudiéndolo. • Introduzca en el nebulizador la siguiente solución para inha- lación siguiendo los pasos descritos.
  • Seite 238 – 18 – • Extraiga el nebulizador del so- porte del compresor y sujételo en posición vertical. • Asegúrese de que todos los componentes se encuentran unidos firmemente. •  ¡PELIGRO! ¡Peligro de muerte por descarga eléctri- ca en caso de avería del apa- rato! Apague inmediatamente el compresor y extraiga el en- chufe de la toma de corriente...
  • Seite 239 – 19 – Inhalación con boquilla • Colóquese sentado, en postura relajada y con la espalda er- guida. • Coloque la boquilla entre los dientes y cierre los labios alre- dedor de ésta. • Inspire y espire por la boquilla lo más profunda, lenta y rela- jadamente posible.
  • Seite 240 – 20 – Uso del dispositivo interruptor LC Si está montado el dispositivo interruptor LC, solo se generará aerosol cuando se pulse la tecla de interrupción. Haga lo si- guiente para inhalar e interrumpir la generación de aerosol du- rante la espiración: •...
  • Seite 241: Finalización Del Tratamiento

    – 21 – 3.3 Finalización del tratamiento Para finalizar el tratamiento haga lo siguiente: • Desconecte el compresor poniendo el interruptor de encen- dido/apagado en "OFF". • Vuelva a colocar el nebulizador en el soporte del compre- sor. • Extraiga el enchufe de la toma de corriente. Solo se puede garantizar que el aparato está...
  • Seite 242: Higiene En Entornos Domésticos

    – 22 – HIGIENE EN ENTORNOS DOMÉSTICOS Después de cada uso, limpie bien los componentes del pro- ducto y desinféctelos al menos una vez a la semana. El tubo flexible no se puede lavar ni desinfectar. Después de cada uso, seque el tubo flexible [véase: Manteni- miento del tubo flexible, página 27].
  • Seite 243: Limpieza

    – 23 – 4.4 Limpieza Limpieza previa Debe llevarse a cabo una limpieza previa de todos los compo- nentes después del uso. ELEMENTOS NECESARIOS: – Agua potable con una temperatura de unos 15 °C PROCEDIMIENTO: • Aclare todos los componentes utilizados durante 2 minutos con agua corriente potable.
  • Seite 244 – 24 – SECADO: • Elimine el exceso de agua de los componentes sacudiéndo- los. • Coloque todos los componentes sobre una base seca, lim- pia y absorbente y déjelos secar por completo. En el lavavajillas Los diferentes componentes pueden lavarse en un lavavajillas doméstico si está...
  • Seite 245: Desinfección

    – 25 – 4.5 Desinfección Desinfecte todos los componentes después del lavado. Solo es posible desinfectar con eficacia los componentes limpios. A continuación se describe el método de desinfección valida- En agua hirviendo ELEMENTOS NECESARIOS: – Olla limpia – Agua potable PROCEDIMIENTO: ATENCIÓN Peligro de infección por humedad...
  • Seite 246 – 26 – Con un aparato convencional de desinfección térmica de biberones (no en el horno microondas) ELEMENTOS NECESARIOS: – Aparato de desinfección térmica con una duración del pro- ceso mínima de 6 minutos PROCEDIMIENTO: ATENCIÓN Peligro de infección por desinfección insuficiente Una desinfección insuficiente favorece la proliferación de gérmenes y aumenta de ese modo el riesgo de infección.
  • Seite 247: Mantenimiento Del Tubo Flexible

    – 27 – 4.6 Mantenimiento del tubo flexible Después de cada inhalación seque el tubo flexible: • Conecte el tubo flexible al compresor. • Encienda el compresor. • Deje el compresor funcionando hasta que se haya elimina- do la humedad en el tubo. 4.7 Control Revise siempre todos los componentes del producto después de haberlos limpiado y desinfectado.
  • Seite 248: Higiene En Entornos Sanitarios Profesionales

    – 28 – HIGIENE EN ENTORNOS SANITARIOS PROFESIONALES Después de cada uso, seque el tubo flexible [véase: Tubo fle- xible, página 37]. 5.1 Ciclos de higienización Sin cambio de paciente Nebulizador sin tubo – Limpiar inmediatamente después de flexible y accesorios cada uso (p.
  • Seite 249: Nebulizador

    • Cambie el tubo flexible o realice una limpieza y des- infección automáticas [véase: Tubo flexible, página 37]. Todos los componentes del nebulizador PARI y de los acceso- rios PARI empleados se pueden limpiar, desinfectar y esterili- zar siguiendo el procedimiento descrito a continuación.
  • Seite 250: Limpieza Y Desinfección

    – 30 – Limpieza y desinfección Limpieza manual ELEMENTOS NECESARIOS El procedimiento está validado en Europa con: – Detergente enzimático con pH neutro: ® Bode Bomix  plus (concentración: 0,1 %) – Agua potable con una temperatura de unos 15 °C – Tiempo de actuación: 10 minutos PROCEDIMIENTO: ATENCIÓN Riesgo de infección por la proliferación de gérmenes...
  • Seite 251 – 31 – ACLARADO: • Aclare bien todos los componentes con agua corriente pota- ble a unos 15 °C durante 3 minutos. SECADO: • Elimine el exceso de agua de los componentes sacudiéndo- los. • Coloque todos los componentes sobre una base seca, lim- pia y absorbente y déjelos secar por completo.
  • Seite 252 – 32 – Limpieza con desinfección Con ayuda de la higienización química la limpieza y la des- infección se pueden realizar en una sola operación. Para manipular productos químicos con seguridad observe la información de uso del desinfectante. Limpieza ELEMENTOS NECESARIOS: automática El procedimiento está...
  • Seite 253 – 33 – Limpieza ELEMENTOS NECESARIOS: química con El procedimiento está validado en Europa con: desinfección: – Desinfectante de instrumentos sin aldehído: ® Bode Bomix  plus (concentración: 2 %) Principio activo de base: Compuesto de amo- nio cuaternario – Agua potable a unos 15 °C –...
  • Seite 254 – 34 – Desinfección química Para manipular productos químicos con seguridad observe la información de uso del desinfectante. ELEMENTOS NECESARIOS: El procedimiento está validado en Europa con: ® – Desinfectante con aldehído: Bode Korsolex basic (concen- tración: 4 %) Principio activo de base: Disociador de aldehído, aldehído –...
  • Seite 255 Si entra en contacto con la piel, el desinfectante podría pro- vocar reacciones alérgicas o irritación de las mucosas. • Aclare a fondo el producto PARI para eliminar todos los posibles restos del desinfectante. • Aclare bien todos los componentes con agua corriente pota- ble a unos 15 °C durante 3 minutos.
  • Seite 256 – 36 – Esterilización ATENCIÓN Peligro de infección por restos de gérmenes Si hay suciedad en los componentes, los gérmenes pueden seguir reproduciéndose a pesar de la esterilización. Esto su- pone un riesgo de infección. • Antes de la esterilización, limpie, desinfecte y seque a fondo todos los componentes.
  • Seite 257: Tubo Flexible

    – 37 – 5.4 Tubo flexible Limpieza y desinfección automáticas ELEMENTOS NECESARIOS: El procedimiento está validado en Europa con: ® – Detergente alcalino: Dr. Weigert neodisher MediClean forte – Neutralizador: Dr. Weigert neodisher Z – Dispositivo de limpieza y desinfección: RDG G7836 CD (Miele) (según DIN EN ISO 15883) –...
  • Seite 258: Control Visual Y Conservación

    – 38 – Secado • Conecte el tubo flexible a una fuente de aire comprimido (compresor o sistema de suministro de gas centralizado). • Conecte la fuente de aire comprimido. • Mantenga conectada la fuente de aire comprimido hasta que se haya eliminado la humedad del tubo. 5.5 Control visual y conservación Revise todos los componentes.
  • Seite 259: Resolución De Problemas

    – 39 – RESOLUCIÓN DE PROBLEMAS Diríjase al fabricante o al distribuidor en los casos siguientes: – Si se producen fallos que no se encuentran en este capítulo – Si no se puede subsanar el fallo con las instrucciones facili- tadas Fallo Posible causa...
  • Seite 260: Datos Del Aerosol Según Iso 27427

    < 5 µm] Proporción de 56,0 46,8 33,8 aerosol [% > 5 µm] Volumen de salida 0,30 0,40 0,38 de aerosol [ml] 6) Uso con el compresor PARI COMPACT2 (Tipo 152). 7) MMAD = Mediana del diámetro aerodinámico de la masa 8) GSD = Desviación estándar geométrica...
  • Seite 261: Información Adicional

    – 41 – Caudal Caudal Caudal Adaptador de mínimo del nominal del máximo del tobera compresor compresor compresor (transparente) (3 l/min – (4 l/min – (6 l/min – 0,6 bar) 1,2 bar) 1,9 bar) Velocidad de salida 0,09 0,12 0,14 de aerosol [ml/min] Volumen residual 1,28 1,15 1,14 [ml] (método...
  • Seite 262 – 42 –...
  • Seite 263 – 43 –...
  • Seite 264 ©2022 PARI GmbH Spezialisten für effektive Inhalation, 022D3005 A es 2022-09-27   PARI GmbH Spezialisten für effektive Inhalation Moosstraße 3 82319 Starnberg • GERMANY info@pari.de • www.pari.com...

Inhaltsverzeichnis