Herunterladen Inhalt Inhalt Diese Seite drucken
Medtronic Activa RC Installationsanleitung
Vorschau ausblenden Andere Handbücher für Activa RC:
Inhaltsverzeichnis

Werbung

Verfügbare Sprachen
  • DE

Verfügbare Sprachen

  • DEUTSCH, seite 33
Activa™ RC
37612
Multi-program rechargeable
neurostimulator
Activa™ RC
Neurostimulateur rechargeable multiprogramme
Activa™ RC
Multiprogrammierbarer wiederaufladbarer
Neurostimulator
Activa™ RC
Multiprogramma oplaadbare neurostimulator
Activa™ RC
Neurostimolatore ricaricabile multiprogrammabile
Activa™ RC
Επαναφορτιζόμενος νευροδιεγέρτης πολλαπλών
προγραμμάτων
Implant manual • Manuel d'implantation •
Implantationsanleitung • Implantatiehandleiding •
Manuale per l'impianto • Εγχειρίδιο εμφύτευσης
  Rx only

Werbung

Inhaltsverzeichnis
loading

Inhaltszusammenfassung für Medtronic Activa RC

  • Seite 1 Activa™ RC 37612 Multi-program rechargeable neurostimulator Activa™ RC Neurostimulateur rechargeable multiprogramme Activa™ RC Multiprogrammierbarer wiederaufladbarer Neurostimulator Activa™ RC Multiprogramma oplaadbare neurostimulator Activa™ RC Neurostimolatore ricaricabile multiprogrammabile Activa™ RC Επαναφορτιζόμενος νευροδιεγέρτης πολλαπλών προγραμμάτων Implant manual • Manuel d'implantation • Implantationsanleitung • Implantatiehandleiding • Manuale per l'impianto •...
  • Seite 3 Explanation of symbols on product or package labeling Refer to the appropriate product for symbols that apply. Open here Do not reuse Sterilized using ethylene oxide STERILE EO Date of manufacture Manufacturer Use by Serial number Consult instructions for use Conformité...
  • Seite 4 Medtronic and Medtronic logo are trademarks of Medtronic. All other brands are trademarks of a Medtronic company. 4 English  37612 2020-01-01...
  • Seite 5: Inhaltsverzeichnis

    Table of contents Description 7 Package contents 7 Patient identification card 7 Device specifications 7 Declaration of conformity 10   Information available for the Deep Brain Stimulation Therapies: The information for prescribers manual provides information about contraindications, warnings, precautions, adverse events, sterilization, and component disposal.
  • Seite 6 Instructions for use 11 Charging the neurostimulator battery 11 Verifying neurostimulator operation 11 Creating a pocket for the neurostimulator 12 Connecting the extension to the neurostimulator 12 Implanting the neurostimulator 14 Checking system integrity 15 Completing the implant procedure 15 6 English  37612 2020-01-01...
  • Seite 7: Description

    ! USA The patient identification card packaged with the device is temporary; a permanent card will be mailed to the patient when Medtronic receives the registration form. The implant registration form registers the device warranties and creates a record of the device in Medtronic’s implant data system.
  • Seite 8   Table 1. Operating values for the Activa RC Model 37612 neurostimulator Programmable parameter Operating range and resolution Number of defined groups 1 to 4 Number of programs per group 1 to 4 Amplitude (voltage mode) 0 to 10.5 V with 0.05 V or 0.1-V resolution Amplitude (current mode) 0 to 25.5 mA with 0.1-mA resolution...
  • Seite 9   Table 2. Physical characteristics of the Activa RC Model 37612 neurostimulator Description Value Connector type Octapolar, in-line 2.8-mm (0.110-in) spacing Height 54 mm (2.1 in) Length 54 mm (2.1 in) Thickness case 9 mm (0.4 in) connector 11 mm (0.4 in) Weight 40 g (1.4 oz)
  • Seite 10: Declaration Of Conformity

      Table 3. Material of components in the Activa RC Model 37612 package Components Material Material contacts human tissue Neurostimulator Case Titanium Connector block Polysulfone, silicone rubber, silicone medical adhesive Grommets, seals Silicone rubber Setscrews Titanium alloy Adhesive Silicone medical adhesive...
  • Seite 11: Instructions For Use

    Instructions for use Implanting physicians should be experienced in stereotactic and functional neurosurgery and have expertise with functional stereotactic neurosurgical treatment of movement disorders and should be thoroughly familiar with all product labeling. Warning: DO NOT use the recharger on an unhealed wound. The recharging system is not sterile, and contact with the wound can cause an infection.
  • Seite 12: Creating A Pocket For The Neurostimulator

    Note: The neurostimulator pocket may be flushed with a nonionic antibiotic solution. Caution: Do not submerge the neurostimulator in fluid. Fluids in the connection may result in stimulation at the connection site, intermittent stimulation, or loss of stimulation. Creating a pocket for the neurostimulator 1.
  • Seite 13 Figure 1. Insert the extension connectors into the neurostimulator. Note: Insert a connector plug (from an accessory kit) into unused neurostimulator socket. 4. For each extension or plug, fully insert the torque wrench (packaged with the neurostimulator) into each self-sealing grommet of the connector block and tighten each setscrew (Figure 2).
  • Seite 14: Implanting The Neurostimulator

    Figure 2. Tightening the setscrews in the self-sealing grommet. Implanting the neurostimulator 1. Place the neurostimulator into the subcutaneous pocket with the Medtronic logo facing outward, away from muscle tissue, and ensure that the extension is not bent sharply. Warnings: ▪...
  • Seite 15: Checking System Integrity

    Figure 3. Wrap excess extensions around the perimeter of the neurostimulator. Caution: Position the neurostimulator with the Medtronic logo facing outward. If implanted with the Medtronic logo facing inward, the neurostimulator will be difficult to charge. 2. Secure the neurostimulator to the muscle fascia with nonabsorbable silk.
  • Seite 16 2. Ensure that a patient control device is given to the patient. 3. Complete the device tracking and patient registration paperwork and return the documents to Medtronic. 16 English  37612 2020-01-01...
  • Seite 17 Explication des symboles des étiquettes sur le produit ou l'emballage Se reporter au produit approprié pour savoir quels symboles s'appliquent. Ouvrir ici Ne pas réutiliser Stérilisation par oxyde d'éthylène STERILE EO Date de fabrication Fabricant À utiliser jusqu'au Numéro de série Consulter le mode d'emploi Conformité...
  • Seite 18 Compatibilité conditionnelle à la résonance magnétique (RM) 18 Français  37612 2020-01-01...
  • Seite 19 Medtronic et le logo Medtronic sont des marques commerciales de Medtronic. Toutes les autres marques sont des marques commerciales d'une société Medtronic. 37612 2020-01-01  Français 19...
  • Seite 20 Table des matières Description 23 Contenu de l'emballage 23 Carte d'identification du patient 23 Caractéristiques techniques 23   Informations disponibles pour les thérapies de stimulation cérébrale profonde : Le manuel Informations destinées aux prescripteurs fournit des informations sur les contre-indications, les avertissements, les précautions, les effets indésirables, la stérilisation et l'élimination des composants.
  • Seite 21 Déclaration de conformité 26 Mode d'emploi 27 Chargement de la pile du neurostimulateur 27 Vérification du fonctionnement du neurostimulateur 27 Création d'une poche pour le neurostimulateur 28 Connexion de l'extension au neurostimulateur 28 Implantation du neurostimulateur 30 Vérification de l'intégrité du système 31 Fin de la procédure d'implantation 32 37612 2020-01-01  Français 21...
  • Seite 22 22 Français  37612 2020-01-01...
  • Seite 23: Contenu De L'emballage

    Description Le neurostimulateur Activa™ RC Modèle 37612 de Medtronic fait partie d'un système de neurostimulation utilisé pour la stimulation cérébrale profonde. Contenu de l'emballage ▪ Neurostimulateur ▪ Tournevis dynamométrique ▪ Documentation ▪ Carte de garantie ▪ Fiche d'inscription ▪ Carte d'identification du patient Carte d'identification du patient Le dispositif est livré...
  • Seite 24   Tableau 1. Paramètres de service du neurostimulateur Activa RC Modèle 37612 Paramètres programmables Plages de valeurs et résolutions Nombre de groupes définis 1 à 4 Nombre de programmes par grou- 1 à 4 Amplitude (mode de tension) De 0 à 10,5 V, avec une résolution de 0,05 V ou 0,1 V Amplitude (mode de courant) De 0 à...
  • Seite 25   Tableau 2. Caractéristiques physiques du neurostimulateur Activa RC Modèle 37612 Description Valeur Type de connecteur Octopolaire, coaxial, intervalles de 2,8 mm (0,110 pouce) Hauteur 54 mm (2,1 pouces) Longueur 54 mm (2,1 pouces) Épaisseur boîtier 9 mm (0,4 pouce)
  • Seite 26: Déclaration De Conformité

      Tableau 3. Matériaux des composants de l'emballage Activa RC Modèle 37612 Composants Matériaux Matériaux en contact avec les tissus hu- mains Neurostimulateur Boîtier Titane Bloc connecteur Polysulfone, caoutchouc silico- ne, adhésif médical en silicone Septum, joints Caoutchouc silicone Vis de fixation Alliage de titane Adhésif...
  • Seite 27: Mode D'emploi

    Mode d'emploi Les médecins implanteurs doivent connaître parfaitement la neurochirurgie stéréotaxique et fonctionnelle, le traitement neurochirurgical stéréotaxique fonctionnel des troubles du mouvement et les étiquetages des produits. Avertissement : NE PAS utiliser le chargeur sur une plaie non cicatrisée. Le chargeur n'est pas stérile et tout contact avec la plaie peut occasionner une infection.
  • Seite 28: Création D'une Poche Pour Le Neurostimulateur

    Attention : Ne pas implanter un neurostimulateur qui a chuté sur une surface dure d'une hauteur de 30 cm (12 po) ou plus, car il pourrait être endommagé et son fonctionnement pourrait être altéré. Remarque : La poche du neurostimulateur peut être rincée à l'aide d'une solution antibiotique non ionique.
  • Seite 29 Figure 1. Insérer les connecteurs de l'extension dans le neurostimulateur. Remarque : Insérer un bouchon du connecteur (fourni dans un kit d'accessoires) dans une connexion non utilisée du neurostimulateur. 4. Pour chaque extension ou bouchon, insérer à fond la clé dynamométrique (fournie avec le neurostimulateur) dans chaque septum auto-bloquant du bloc connecteur et serrer chaque vis de fixation (Figure 2).
  • Seite 30: Implantation Du Neurostimulateur

    Figure 2. Serrage des vis de fixation dans le septum auto-bloquant. Implantation du neurostimulateur 1. Placer le neurostimulateur dans la poche sous-cutanée, logo Medtronic vers l'extérieur, à l'opposé du tissu musculaire, et s'assurer que l'extension n'est pas pliée exagérément. Avertissements : ▪...
  • Seite 31: Vérification De L'intégrité Du Système

    Attention : Positionner le neurostimulateur avec le logo Medtronic vers l'extérieur. Si le neurostimulateur est implanté avec le logo Medtronic vers l'intérieur, il sera difficile à charger. 2. Fixer le neurostimulateur à l'aponévrose à l'aide d'une suture en soie non résorbable.
  • Seite 32: Fin De La Procédure D'implantation

    "Connexion de l'extension au neurostimulateur" à la page 28. Fin de la procédure d'implantation 1. Refermer et faire le pansement. 2. Donner une télécommande au patient. 3. Remplir les fiches d'enregistrement du patient et du dispositif et les renvoyer à Medtronic. 32 Français  37612 2020-01-01...
  • Seite 33: Erläuterung Der Symbole Auf Dem Produkt Oder Dem Verpackungsetikett

    Erläuterung der Symbole auf dem Produkt oder dem Verpackungsetikett Auf dem Produkt sind nur die jeweils gültigen Symbole angebracht. Hier öffnen Nicht wiederverwenden Sterilisiert mittels Ethylenoxid STERILE EO Herstellungsdatum Hersteller Zu verwenden bis einschließlich Seriennummer Gebrauchsanweisung beachten Conformité Européenne (Europäische Konformität). Dieses Symbol besagt, dass das Gerät in vollem Umfang den Anforderungen der Richtlinie 90/385/EWG über aktive implantierbare Medizinprodukte (Benannte Stelle: 0123) entspricht.
  • Seite 34 Bedingt MR-sicher 34 Deutsch  37612 2020-01-01...
  • Seite 35 Medtronic und das Medtronic Logo sind Marken von Medtronic. Alle anderen Marken sind Marken eines Medtronic Unternehmens. 37612 2020-01-01  Deutsch 35...
  • Seite 36 Inhalt Beschreibung 39 Verpackungsinhalt 39 Patienten-Identifikationskarte 39 Technische Daten 39 Konformitätserklärung 42   Verfügbare Informationen für Therapien mittels tiefer Hirnstimulation (DBS): Das Handbuch mit Informationen für den verordnenden Arzt enthält Informationen zu Kontraindikationen, Warnungen, Vorsichtsmaßnahmen, Nebenwirkungen, Sterilisation und Entsorgung der Komponenten. Die Anhänge für den verordnenden Arzt enthalten indikationsspezifische Angaben.
  • Seite 37 Gebrauchsanweisung 43 Laden der Neurostimulatorbatterie 44 Überprüfen der Funktionsfähigkeit des Neurostimulators 44 Erstellen einer Tasche für den Neurostimulator 44 Anschließen der Verlängerung an den Neurostimulator 44 Implantation des Neurostimulators 46 Überprüfen der Integrität des Systems 48 Abschluss der Implantation 48 37612 2020-01-01  Deutsch 37...
  • Seite 38 38 Deutsch  37612 2020-01-01...
  • Seite 39: Beschreibung

    Verwendung. Nach Eingang des Registrierungsformulars stellt Medtronic dem Patienten per Post eine dauerhafte Identifikationskarte zu. Das Registrierungsformular für das Implantat dient zur Feststellung der Garantiefristen. Für jedes Gerät wird ein entsprechender Eintrag in der Implantatedatenbank von Medtronic angelegt. Technische Daten Bei dem Neurostimulator handelt es sich um ein multiprogrammierbares wiederaufladbares Gerät, das über eine oder zwei Elektroden eine Stimulationstherapie abgibt.
  • Seite 40: Betriebsbereich Und Auflösung

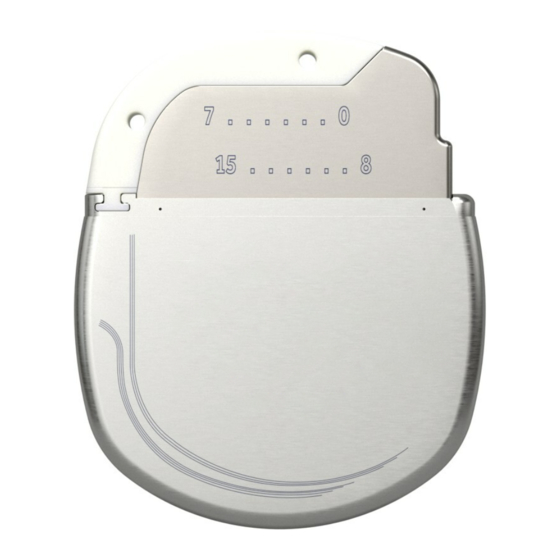
      Tabelle 1. Betriebsparameter des Neurostimulators Activa RC Modell 37612 Programmierbarer Parameter Betriebsbereich und Auflösung Gruppen 1 bis 4 Programme pro Gruppe 1 bis 4 Amplitude (Spannungsmodus) 0 V bis 10,5 V, Auflösung 0,05 V oder 0,1 V Amplitude (Strommodus) 0 mA bis 25,5 mA (Auflösung: 0,1 mA)
  • Seite 41   Tabelle 2. Äußere Merkmale des Neurostimulators Activa RC Modell 37612 Beschreibung Wert Konnektortyp Achtpolig, In-line, 2,8 mm (0,110 Zoll) Kontaktab- stand Höhe 54 mm (2,1 Zoll) Länge 54 mm (2,1 Zoll) Dicke Gehäuse 9 mm (0,4 Zoll) Konnektor 11 mm (0,4 Zoll)
  • Seite 42: Konformitätserklärung

      Tabelle 3. Materialien der im Lieferumfang des Neurostimulators Activa RC Modell 37612 enthaltenen Komponenten Komponente Materialien Kontakt mit menschli- chem Gewebe Neurostimulator Gehäuse Titan Konnektorblock Polysulfon, Silikonkautschuk, medizinischer Silikonkleber Dichtringe und Dichtungen Silikonkautschuk Schrauben Titanlegierung Klebstoff Medizinischer Silikonkleber Konformitätserklärung Medtronic erklärt hiermit, dass dieses Produkt den wesentlichen Anforderungen der...
  • Seite 43: Gebrauchsanweisung

    Gebrauchsanweisung Der implantierende Arzt muss über Erfahrungen auf dem Gebiet der stereotaktischen und funktionellen Neurochirurgie und der stereotaktischen und funktionellen neurochirurgischen Therapieformen zur Behandlung von Bewegungsstörungen verfügen. Vor der Anwendung muss sich der implantierende Arzt sorgfältig mit allen dem Produkt beiliegenden Informationen vertraut machen.
  • Seite 44: Laden Der Neurostimulatorbatterie

    Laden der Neurostimulatorbatterie Laden Sie die Neurostimulatorbatterie vor dem Öffnen der Verpackung vollständig auf. Anweisungen zum Aufladen der Batterie finden Sie im Benutzerhandbuch des Aufladesystems. Überprüfen der Funktionsfähigkeit des Neurostimulators Stellen Sie vor dem Öffnen der Sterilverpackung die Funktionsfähigkeit des Neurostimulators sicher, indem Sie den Neurostimulator mithilfe des Arzt- Programmiergeräts abfragen und den Ladezustand der Batterie kontrollieren.
  • Seite 45 Warnhinweis: Führen Sie die Stifte des Verlängerungssteckers nicht in den Konnektorblock ein, wenn die Schrauben nicht ausreichend weit herausgedreht sind. Wenn die Schrauben nicht ausreichend herausgedreht sind, können die Schrauben die Verlängerung beschädigen und die Verlängerung wird nicht fest und sicher im Konnektorblock sitzen. Abbildung 1.
  • Seite 46: Implantation Des Neurostimulators

    Implantation des Neurostimulators 1. Setzen Sie den Neurostimulator so in die subkutane Tasche ein, dass die mit dem Medtronic Logo beschriftete Seite nach außen weist, also von der Muskelschicht des Körpers abgewandt liegt, und dass die Verlängerung nicht scharf gebogen wird.
  • Seite 47 Wicklungen erfordert, kann die Telemetrie beeinträchtigt werden. Abbildung 3. Überschüssiges Verlängerungskabel um den Umfang des Neurostimulators wickeln. Vorsicht: Positionieren Sie den Neurostimulator so, dass das Medtronic Logo zur Körperoberfläche weist. Wird der Neurostimulator mit nach innen weisendem Medtronic Logo implantiert, kann es beim Aufladen zu Problemen kommen.
  • Seite 48: Überprüfen Der Integrität Des Systems

    Abschluss der Implantation 1. Schließen Sie alle Inzisionen und legen Sie einen Wundverband an. 2. Stellen Sie sicher, dass dem Patienten ein Patienten-Steuergerät ausgehändigt wurde. 3. Füllen Sie die Formulare für die Patientenregistrierung aus und senden Sie diese an Medtronic zurück. 48 Deutsch  37612 2020-01-01...
  • Seite 49 Verklaring van de symbolen op de productlabels Controleer het desbetreffende product om te zien welke symbolen van toepassing zijn. Hier openen Niet opnieuw gebruiken Gesteriliseerd met ethyleenoxide STERILE EO Productiedatum Fabrikant Uiterste gebruiksdatum Serienummer Raadpleeg de gebruiksaanwijzing Conformité Européenne (Europese Conformiteit). Dit symbool betekent dat het product volledig voldoet aan de Richtlijn AIMD 90/385/EEG (Aangemelde instantie 0123).
  • Seite 50 Medtronic en het Medtronic-logo zijn handelsmerken van Medtronic. Alle andere merken zijn handelsmerken van (een dochteronderneming van) Medtronic. 50 Nederlands  37612 2020-01-01...
  • Seite 51 Inhoudsopgave Beschrijving 53 Inhoud van de verpakking 53 Patiëntenidentificatiekaart 53 Productspecificaties 53   Beschikbare informatie over diepe hersenstimulatie (DBS)-therapie: Raadpleeg het desbetreffende informatieboekje voor voorschrijvend artsen voor contra-indicaties, waarschuwingen, voorzorgsmaatregelen, ongewenste voorvallen, sterilisatie en verwerking van verwijderde onderdelen. Raadpleeg het addendum bij het informatieboekje voor voorschrijvend artsen voor indicatiespecifieke informatie.
  • Seite 52 Conformiteitsverklaring 56 Gebruiksaanwijzing 57 De batterij van de neurostimulator opladen 57 De werking van de neurostimulator controleren 57 Creëren van een pocket voor de neurostimulator 58 De verlengkabel op de neurostimulator aansluiten 58 Implanteren van de neurostimulator 60 Systeemcontrole uitvoeren 61 Voltooien van de implantatieprocedure 62 52 Nederlands  37612 2020-01-01...
  • Seite 53: Inhoud Van De Verpakking

    Beschrijving De Activa™ RC-neurostimulator Model 37612 van Medtronic maakt deel uit van een neurostimulatiesysteem voor diepe hersenstimulatie (DBS). Inhoud van de verpakking ▪ Neurostimulator ▪ Momentschroevendraaier ▪ Productdocumentatie ▪ Garantiekaart ▪ Registratieformulier ▪ Patiëntenidentificatiekaart Patiëntenidentificatiekaart Bij dit apparaat wordt een patiëntenidentificatiekaart geleverd. Adviseer uw patiënten om de patiëntenidentificatiekaart altijd bij zich te dragen.
  • Seite 54   Tabel 1. Bedrijfsparameters voor de Activa RC-neurostimulator Model 37612 Programmeerbare parameter Bedrijfsparameters en resolutie Aantal gedefinieerde groepen 1 tot 4 Aantal programma's per groep 1 tot 4 Amplitude (spanningsmodus) 0 tot 10,5 V met een resolutie van 0,05 V of 0,1 V...
  • Seite 55   Tabel 2. Fysische eigenschappen van de Activa RC-neurostimulator Model 37612 Beschrijving Waarde Connectortype Achtpolig, in-line met 2,8 mm (0,110 inch) tussen- ruimte Hoogte 54 mm (2,1 inch) Lengte 54 mm (2,1 inch) Dikte Behuizing 9 mm (0,4 inch) Connector...
  • Seite 56: Conformiteitsverklaring

    Lijm Medische siliconenlijm Conformiteitsverklaring Medtronic verklaart dat dit product voldoet aan de essentiële vereisten zoals beschreven in Richtlijn 90/385/EEG (Actieve implanteerbare medische hulpmiddelen). Voor meer informatie kunt u contact opnemen met Medtronic. Zie de contactinformatie op de achterkant van deze handleiding.
  • Seite 57: Gebruiksaanwijzing

    Gebruiksaanwijzing De arts die de implantatie uitvoert, moet ervaring hebben met stereotactische en functionele neurochirurgie, deskundig zijn inzake functionele stereotactische neurochirurgische behandeling van bewegingsstoornissen, en bekend zijn met alle productdocumentatie. Waarschuwing: Gebruik de oplader NIET als de wond nog niet is genezen. Het oplaadsysteem is niet steriel en kan een infectie veroorzaken wanneer het met de wond in contact komt.
  • Seite 58: Creëren Van Een Pocket Voor De Neurostimulator

    Let op: Implanteer de neurostimulator niet als deze van een hoogte van 30 cm (12 inch) of meer op een hard oppervlak is gevallen. De neurostimulator kan in dat geval beschadigd zijn en niet goed meer werken. Opmerking: De neurostimulatorpocket kan worden gespoeld met een niet-ionische antibiotica-oplossing.
  • Seite 59: Waarschuwingen

    Afbeelding 1. Steek de verlengkabelconnectoren in de neurostimulator. Opmerking: Steek in een ongebruikte holte van de neurostimulator een connectorplug (uit de toebehorenset). 4. Steek de momentschroevendraaier (uit de verpakking van de neurostimulator) in elke afdichtring van het connectorblok en draai elke stelschroef vast (Afbeelding 2). Doe dit voor elke verlengkabel of plug.
  • Seite 60: Implanteren Van De Neurostimulator

    Afbeelding 2. Draai de stelschroeven vast in de afdichtringen. Implanteren van de neurostimulator 1. Plaats de neurostimulator in de subcutane pocket met het logo van Medtronic naar buiten gericht, dus van het spierweefsel afgewend, en voorkom dat de verlengkabel een scherpe bocht maakt.
  • Seite 61: Systeemcontrole Uitvoeren

    Afbeelding 3. Wikkel overtollige verlengkabel om de neurostimulator heen. Let op: Plaats de neurostimulator met het Medtronic-logo naar buiten gericht. Als de neurostimulator met het Medtronic-logo naar binnen gericht wordt geïmplanteerd, wordt het opladen van de neurostimulator bemoeilijkt.
  • Seite 62: Voltooien Van De Implantatieprocedure

    Voltooien van de implantatieprocedure 1. Sluit alle incisies en verbind deze zoals gebruikelijk. 2. Zorg dat de patiënt een patiëntenbesturingssysteem ontvangt. 3. Vul de formulieren voor de registratie van het apparaat en de patiënt in en stuur deze op naar Medtronic. 62 Nederlands  37612 2020-01-01...
  • Seite 63 Spiegazione dei simboli presenti sulle etichette del prodotto o della confezione Vedere il prodotto appropriato per sapere quali sono i simboli applicabili. Aprire qui Non riutilizzare Sterilizzato a ossido di etilene STERILE EO Data di fabbricazione Fabbricante Utilizzare entro Numero di serie Consultare le istruzioni per l'uso Conformité...
  • Seite 64 Idoneo alla risonanza magnetica (RM) in sicurezza condizionata 64 Italiano  37612 2020-01-01...
  • Seite 65 Medtronic e il logo Medtronic sono marchi di fabbrica di Medtronic. Tutti gli altri nomi commerciali sono marchi di fabbrica di una società Medtronic. 37612 2020-01-01  Italiano 65...
  • Seite 66 Sommario Descrizione 69 Contenuto della confezione 69 Tessera di identificazione del paziente 69 Specifiche del dispositivo 69   Informazioni disponibili per le terapie di stimolazione cerebrale profonda: Il manuale delle informazioni per i medici fornisce informazioni su controindicazioni, avvertenze, precauzioni, effetti indesiderati, sterilizzazione e smaltimento dei componenti.
  • Seite 67 Dichiarazione di conformità 72 Istruzioni per l'uso 73 Ricarica della batteria del neurostimolatore 73 Verifica del funzionamento del neurostimolatore 73 Creazione di una tasca per il neurostimolatore 74 Collegamento dell’estensione al neurostimolatore 74 Impianto del neurostimolatore 76 Verifica dell'integrità del sistema 77 Completamento della procedura di impianto 78 37612 2020-01-01  Italiano 67...
  • Seite 68 68 Italiano  37612 2020-01-01...
  • Seite 69: Contenuto Della Confezione

    Medtronic. Il modulo di registrazione dell'impianto serve a registrare le garanzie del dispositivo e a creare un archivio del dispositivo presso il sistema dei dati di impianto di Medtronic. Specifiche del dispositivo Il neurostimolatore è un dispositivo multiprogrammabile ricaricabile capace di erogare la stimolazione attraverso 1 o 2 elettrocateteri.
  • Seite 70   Tabella 1. Valori operativi del neurostimolatore Activa RC modello 37612 Parametro programmabile Intervallo operativo e risoluzione Numero di gruppi definiti Da 1 a 4 Numero di programmi per ciascun Da 1 a 4 gruppo Ampiezza (modalità di tensione) Da 0 a 10,5 V con risoluzione 0,05 V o 0,1 V Ampiezza (modalità...
  • Seite 71   Tabella 2. Caratteristiche fisiche del neurostimolatore Activa RC modello 37612 Descrizione Valore Tipo di connettore Ottopolare, in linea con spaziatura di 2,8 mm (0,110") Altezza 54 mm (2,1") Lunghezza 54 mm (2,1") Spessore cassa 9 mm (0,4") connettore 11 mm (0,4")
  • Seite 72: Dichiarazione Di Conformità

    Adesivo clinico al silicone Sì Dichiarazione di conformità Medtronic dichiara che questo prodotto è conforme ai requisiti essenziali della direttiva 90/385/CEE sui dispositivi medici impiantabili attivi. Per ulteriori informazioni, rivolgersi al locale rappresentante Medtronic elencato sul retro di copertina di questo manuale.
  • Seite 73: Istruzioni Per L'uso

    Istruzioni per l'uso I medici che eseguono l'impianto devono avere esperienza nelle procedure di neurochirurgia stereotassica e funzionale e competenza nel trattamento neurochirurgico stereotassico funzionale dei disturbi motori; inoltre, devono avere letto e compreso le etichette e la documentazione del prodotto. Avvertenza: NON utilizzare il caricatore su ferite non cicatrizzate.
  • Seite 74: Creazione Di Una Tasca Per Il Neurostimolatore

    neurostimolatore in modo da controllare che quest'ultimo sia operativo (per le istruzioni su come verificare il livello di carica della batteria, fare riferimento al manuale del software). Attenzione: non impiantare il neurostimolatore se è caduto su una superficie dura da un'altezza di 30 cm (12") o maggiore, poiché...
  • Seite 75 Figura 1. Inserimento dei connettori delle estensioni nel neurostimolatore. Nota: inserire uno spinotto del connettore (disponibile in un kit degli accessori) nella presa del neurostimolatore non utilizzata. 4. Per ogni estensione o spinotto, inserire a fondo il cacciavite torsiometrico (fornito in dotazione con il neurostimolatore) in ciascuna guarnizione autosigillante del blocco connettore e serrare ciascuna vite di arresto (Figura 2).
  • Seite 76: Impianto Del Neurostimolatore

    Figura 2. Serraggio delle viti di arresto nella guarnizione autosigillante. Impianto del neurostimolatore 1. Sistemare il neurostimolatore nella tasca sottocutanea con il lato riportante il logo Medtronic rivolto verso l'esterno e lontano dallo strato muscolare, accertandosi che l'estensione non formi angoli troppo stretti. Avvertenze: ▪...
  • Seite 77: Verifica Dell'integrità Del Sistema

    Attenzione: posizionare il neurostimolatore con il logo Medtronic rivolto verso l'esterno. Se il neurostimolatore viene impiantato con il logo Medtronic rivolto verso l'interno, potrà essere difficile ricaricare il neurostimolatore. 2. Fissare il neurostimolatore alla fascia muscolare con sutura di seta non assorbibile.
  • Seite 78: Completamento Della Procedura Di Impianto

    Completamento della procedura di impianto 1. Chiudere tutte le incisioni e medicarle. 2. Assicurarsi che al paziente sia stato consegnato un dispositivo di controllo del paziente. 3. Completare la documentazione di identificazione del dispositivo e di registrazione del paziente e spedirla a Medtronic. 78 Italiano  37612 2020-01-01...
  • Seite 79 Επεξήγηση των συμβόλων στη σήμανση του προϊόντος ή της συσκευασίας Ανατρέξτε στο κατάλληλο προϊόν για τα σύμβολα που ισχύουν. Ανοίξτε εδώ Μην το επαναχρησιμοποιείτε Αποστειρωμένο με οξείδιο του αιθυλενίου STERILE EO Ημερομηνία κατασκευής Κατασκευαστής Χρήση έως Αριθμός σειράς Συμβουλευτείτε τις οδηγίες χρήσης Conformité...
  • Seite 80 Μαγνητικός συντονισμός (MR) υπό όρους 80 Ελληνικά  37612 2020-01-01...
  • Seite 81 Το Medtronic και το λογότυπο Medtronic είναι εμπορικά σήματα της Medtronic. Όλες οι άλλες εμπορικές ονομασίες είναι εμπορικά σήματα μιας εταιρείας της Medtronic. 37612 2020-01-01  Ελληνικά 81...
  • Seite 82 Πίν. περιεχομένων Περιγραφή 85 Περιεχόμενα συσκευασίας 85 Κάρτα ταυτότητας ασθενούς 85 Προδιαγραφές προϊόντος 85   Διαθέσιμες πληροφορίες για τις θεραπείες εν τω βάθει διέγερσης του εγκεφάλου: Το εγχειρίδιο πληροφοριών για συνταγογραφούντες παρέχει πληροφορίες για αντενδείξεις, προειδοποιήσεις, προφυλάξεις, ανεπιθύμητα συμβάντα, αποστείρωση και απόρριψη εξαρτημάτων. Τα παραρτήματα πληροφοριών για συνταγογραφούντες...
  • Seite 83 Δήλωση συμμόρφωσης 89 Οδηγίες χρήσης 90 Φόρτιση της μπαταρίας του νευροδιεγέρτη 90 Επαλήθευση της λειτουργίας του νευροδιεγέρτη 91 Δημιουργία θυλακίου για τον νευροδιεγέρτη 91 Σύνδεση της προέκτασης στον νευροδιεγέρτη 91 Εμφύτευση του νευροδιεγέρτη 93 Έλεγχος ακεραιότητας συστήματος 94 Ολοκλήρωση της διαδικασίας εμφύτευσης 95 37612 2020-01-01  Ελληνικά 83...
  • Seite 84 84 Ελληνικά  37612 2020-01-01...
  • Seite 85: Περιεχόμενα Συσκευασίας

    ! USA Η κάρτα ταυτότητας ασθενούς που περιέχεται στη συσκευασία μαζί με το προϊόν είναι προσωρινή. Μια μόνιμη κάρτα θα σταλεί ταχυδρομικά στον ασθενή, όταν η Medtronic παραλάβει το έντυπο εγγραφής. Με το έντυπο εγγραφής του εμφυτεύματος καταχωρίζονται τα στοιχεία εγγύησης του...
  • Seite 86   Πίν. 1. Τιμές λειτουργίας για τον νευροδιεγέρτη Activa RC Μοντέλο 37612 Προγραμματιζόμενη παράμε- Εύρος λειτουργίας και ανάλυση τρος Number of defined groups (Αριθ- 1 έως 4 μός καθορισμένων ομάδων) Number of programs per group 1 έως 4 (Αριθμός προγραμμάτων ανά ομά- δα)
  • Seite 87   Πίν. 1. Τιμές λειτουργίας για τον νευροδιεγέρτη Activa RC Μοντέλο 37612 (συνέχεια) Προγραμματιζόμενη παράμε- Εύρος λειτουργίας και ανάλυση τρος SoftStart/Stop™ Off (Απενεργοποιημένη), On (Ενεργοποιημένη): Διάρ- κεια κλιμακωτής διέγερσης 1, 2, 4 ή 8 δευτερόλεπτα Cycling (Κυκλικός τρόπος λειτουρ- Off (Απενεργοποιημένος), On (Ενεργοποιημένος): 0,1 s γίας)
  • Seite 88   Πίν. 2. Φυσικά χαρακτηριστικά του νευροδιεγέρτη Activa RC Μοντέλο 37612 Περιγραφή Τιμή Τύπος συνδέσμου Οκταπολικός, διάστημα σε σειρά 2,8 mm (0,110 in) Ύψος 54 mm (2,1 in) Μήκος 54 mm (2,1 in) Πάχος θήκη 9 mm (0,4 in) σύνδεσμος...
  • Seite 89: Δήλωση Συμμόρφωσης

      Πίν. 3. Υλικό των εξαρτημάτων στη συσκευασία του Activa RC Μοντέλο 37612 Εξαρτήματα Υλικό Το υλικό έρχεται σε επαφή με ανθρώπινο ιστό Νευροδιεγέρτης Θήκη Τιτάνιο Ναι Σώμα συνδέσμου Πολυσουλφόνη, ελαστικό σιλικό- Ναι νης, ιατρικό αυτοκόλλητο σιλικό- νης Δακτύλιοι, στεγανοποιητικά...
  • Seite 90: Οδηγίες Χρήσης

    Οδηγίες χρήσης Οι ιατροί που πραγματοποιούν τις εμφυτεύσεις θα πρέπει να είναι πεπειραμένοι στη στερεοτακτική και λειτουργική νευροχειρουργική και να έχουν εμπειρογνωσία στη λειτουργική στερεοτακτική νευροχειρουργική θεραπεία κινητικών διαταραχών, καθώς και να είναι πλήρως εξοικειωμένοι με όλη τη σήμανση των προϊόντων. Προειδοποίηση: ΜΗ...
  • Seite 91: Επαλήθευση Της Λειτουργίας Του Νευροδιεγέρτη

    Επαλήθευση της λειτουργίας του νευροδιεγέρτη Πριν ανοίξετε τη στείρα συσκευασία του νευροδιεγέρτη, επαληθεύστε ότι ο νευροδιεγέρτης είναι λειτουργικός χρησιμοποιώντας τον προγραμματιστή κλινικού ιατρού για να υποβάλετε ερωτήματα στον νευροδιεγέρτη και για να διαβάσετε το επίπεδο φόρτισης της μπαταρίας του νευροδιεγέρτη. (Ανατρέξτε στο εγχειρίδιο του λογισμικού για οδηγίες σχετικά με το πώς να...
  • Seite 92 Προειδοποίηση: Μην εισαγάγετε τον σύνδεσμο της προέκτασης στο σώμα συνδέσμου εάν οι κοχλίες ρύθμισης δεν έχουν συμπτυχθεί επαρκώς. Εάν οι κοχλίες ρύθμισης δεν έχουν συμπτυχθεί, οι κοχλίες ρύθμισης ενδέχεται να προκαλέσουν βλάβη στην προέκταση και η προέκταση δεν θα εδραστεί πλήρως μέσα...
  • Seite 93: Εμφύτευση Του Νευροδιεγέρτη

    Εικ. 2. Σύσφιξη των κοχλιών ρύθμισης στον αυτοσφραγιζόμενο δακτύλιο. Εμφύτευση του νευροδιεγέρτη 1. Τοποθετήστε τον νευροδιεγέρτη μέσα στο υποδόριο θυλάκιο με το λογότυπο της Medtronic να είναι στραμμένο προς τα έξω, μακριά από τον μυϊκό ιστό και διασφαλίστε ότι η προέκταση δεν είναι λυγισμένη έντονα. Προειδοποιήσεις: ▪...
  • Seite 94: Έλεγχος Ακεραιότητας Συστήματος

    του νευροδιεγέρτη. Προσοχή: Τοποθετήστε τον νευροδιεγέρτη με το λογότυπο της Medtronic στραμμένο προς τα έξω. Εάν εμφυτευτεί με το λογότυπο της Medtronic στραμμένο προς τα μέσα, θα είναι δύσκολη η φόρτιση του νευροδιεγέρτη. 2. Στερεώστε τον νευροδιεγέρτη στη μυϊκή περιτονία με μη απορροφήσιμο μετάξι.
  • Seite 95: Ολοκλήρωση Της Διαδικασίας Εμφύτευσης

    Ολοκλήρωση της διαδικασίας εμφύτευσης 1. Κλείστε και επιδέστε όλες τις τομές. 2. Διασφαλίστε ότι η συσκευή ελέγχου ασθενούς έχει δοθεί στον ασθενή. 3. Συμπληρώστε τα έντυπα εντοπισμού του προϊόντος και εγγραφής του ασθενούς και επιστρέψτε τα έγγραφα στη Medtronic. 37612 2020-01-01  Ελληνικά 95...
  • Seite 96 Authorized Representative in the European Community Medtronic B.V. Earl Bakkenstraat 10, 6422 PJ Heerlen, The Netherlands Tel. +31-45-566-8000 Europe/Africa/Middle East Headquarters Medtronic International Trading Sàrl Route du Molliau 31, Case Postale 84 CH - 1131 Tolochenaz, Switzerland www.medtronic.eu Tel. +41-21-802-7000 Asia-Pacific Medtronic International Ltd.

Diese Anleitung auch für:

37612

Inhaltsverzeichnis