Vetus BOW PRO BOWB285 Installationshandbuch
Vorschau ausblenden
Andere Handbücher für BOW PRO BOWB285:
- Installationshandbuch (116 Seiten) ,
- Wartungs- und garantiehandbuch (52 Seiten)
Inhaltsverzeichnis
Werbung
Verfügbare Sprachen
Verfügbare Sprachen
Quicklinks
Installatie handleiding
Installationshandbuch
Manuel d' installation
Manual de instalación
BOWB285 - BOWB300 - BOWB320
Manuale d'installazione
Installationsvejledning
Installationsmanual
Installation manual
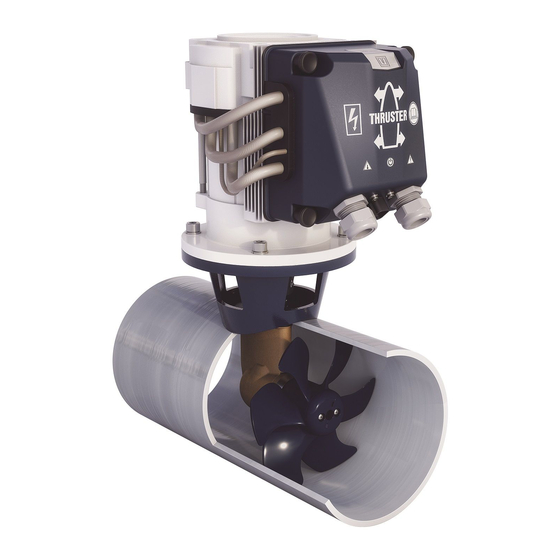
BOW PRO Thrusters
285 kgf - 300 kgf - 320 kgf - ø 300 mm
Copyright © 2021 Vetus b.v. Schiedam Holland
NEDERLANDS
ENGLISH
DEUTSCH
FRANÇAIS
ESPAÑOL
ITALIANO
DANSK
SVENSKA
NORSK
SUOMEKSI
POLSKI
Installasjons handbook
Asennusopas
Instrukcja instalacji
7
16
25
34
43
52
61
70
79
88
97
020814.01
Werbung
Inhaltsverzeichnis

Verwandte Anleitungen für Vetus BOW PRO BOWB285


Inhaltszusammenfassung für Vetus BOW PRO BOWB285
- Seite 1 Asennusopas Manuel d’ installation Installationsmanual Instrukcja instalacji Manual de instalación Installation manual BOW PRO Thrusters BOWB285 - BOWB300 - BOWB320 285 kgf - 300 kgf - 320 kgf - ø 300 mm Copyright © 2021 Vetus b.v. Schiedam Holland 020814.01...
- Seite 2 Käyttöohje tulee olla alusta käyttävien henkilöiden käytettävissä. Upewnić się, że użytkownik statku jest zaopatrzony w instrukcję obsługi. BOWB285 - BOWB300 - BOWB320 285 /300 / 320 kgf - ø 300 mm 48 Volt vetus® Installation manual BOW PRO Series Thrusters: BOWB285 - BOWB300 - BOWB320 020814.01...
-
Seite 3: Inhaltsverzeichnis
....Akkukapazität, akkukabel ..vetus® Installation manual BOW PRO Series Thruster: BOWB285 - BOWB300 - BOWB320 020814.01... - Seite 4 ..Capacidad de las baterías, cables de baterías ... . . vetus® Installation manual BOW PRO Series Thrusters: BOWB285 - BOWB300 - BOWB320 020814.01...
- Seite 5 ... . . Batteriets kapacitet, Battery capacity, Batterikablar Batterikapasitet, batterikabler Batterikabler ....vetus® Installation manual BOW PRO Series Thruster: BOWB285 - BOWB300 - BOWB320 020814.01...
- Seite 6 ..Pojemność akumulatora,kable akumulatora ....vetus® Installation manual BOW PRO Series Thrusters: BOWB285 - BOWB300 - BOWB320 020814.01...
-
Seite 7: Veiligheid
- Energieopslag De maximale aaneengesloten gebruiksinschakelduur en de - Energietoevoer stuwkracht zoals gespecificeerd bij de technische gegevens - Bediening zijn gebaseerd op de aanbevolen accucapaciteiten en ac- cuaansluitkabels. vetus® Installation manual BOW PRO Series Thruster: BOWB285 - BOWB300 - BOWB320 020814.01... -
Seite 8: Installatieaanbevelingen
Wij raden de installatie van 2 boegschroeven in één (1) tunnelbuis - De elektromotor dient steeds boven het maximale niveau van het af; er wordt geen verdubbeling van de stuwkracht bereikt! bilge-water te worden opgesteld. vetus® Installation manual BOW PRO Series Thrusters: BOWB285 - BOWB300 - BOWB320 020814.01... -
Seite 9: Overgang Van Tunnelbuis Naar Scheepsromp
- De spijlen moeten zodanig zijn opgesteld dat ze loodrecht staan op de te verwachten golfvorm. vetus® Installation manual BOW PRO Series Thruster: BOWB285 - BOWB300 - BOWB320 020814.01... -
Seite 10: Aanbrengen Van De Tunnelbuis
• Breng hierna eventueel een anti- N.B. De meegeleverde pakkingen zijn fouling aan. reeds elektrisch isolerend. De boutjes en de schacht dienen echter te wor- den voorzien van isolatiemateriaal, b.v. nylon busjes. vetus® Installation manual BOW PRO Series Thrusters: BOWB285 - BOWB300 - BOWB320 020814.01... -
Seite 11: Inbouw
Grease et op Controleer op mogelijke lekkage onmiddellijk nadat het schip te water is gelaten *) Een geschikt vet is VETUS ‘Shipping Grease’ , Art. code: VSG. vetus® Installation manual BOW PRO Series Thruster: BOWB285 - BOWB300 - BOWB320 020814.01... -
Seite 12: Eindmontage
20 - 25 Nm Molykote® G-n plus *) Een geschikt vet is VETUS ‘Shipping Grease’ , Art. code: VSG. vetus® Installation manual BOW PRO Series Thrusters: BOWB285 - BOWB300 - BOWB320 020814.01... -
Seite 13: Elektrische Installatie
Het aandraaimoment van bouten in de motorregelaar is maxi- In de ‘plus-kabel’ moet een hoofdschake- maal 10 Nm. laar worden opgenomen. Als schakelaar is een Vetus-accuschakelaar type BATSW600 zeer geschikt. vetus® Installation manual BOW PRO Series Thruster: BOWB285 - BOWB300 - BOWB320 020814.01... -
Seite 14: Aansluiten Can-Bus (Stuurstroom) Kabels
Hekschroef foutmeldingen in het CAN-bussysteem. Configureer een hekschroef door op de knop "PRESS FOR BOW OR STERN", aan de onderzijde van de kap, in te drukken. vetus® Installation manual BOW PRO Series Thrusters: BOWB285 - BOWB300 - BOWB320 020814.01... -
Seite 15: Technische Gegevens
6060 of 6062 (AlMg1SiCu) Gewicht Excl. tunnelbuis 60 kg 60 kg 60 kg S2 ‘t’ min. Gebruiksinschakelduur ‘t’ min. continu of max. ‘t’ min. per uur bij maximaal vermogen. vetus® Installation manual BOW PRO Series Thruster: BOWB285 - BOWB300 - BOWB320 020814.01... -
Seite 16: Safety
- Tunnel as specified in the technical details are based on the recom- - Energy storage mended battery capacities and battery cables. - Energy supply - Operation vetus® Installation manual BOW PRO Series Thrusters: BOWB285 - BOWB300 - BOWB320 020814.01... -
Seite 17: Installation Recommendations
We do not advise fitting 2 bow thrusters into one tunnel; this does ways well clear from the maximum bilge water level. not result in doubling the thrust! vetus® Installation manual BOW PRO Series Thruster: BOWB285 - BOWB300 - BOWB320 020814.01... -
Seite 18: Connection Of Thrust Tunnel To Ship's Hull
- The bars must be installed so they are perpendicular to the ex- pected waveform. vetus® Installation manual BOW PRO Series Thrusters: BOWB285 - BOWB300 - BOWB320 020814.01... -
Seite 19: Installation Of The Thrust Tunnel
NOTE: The gaskets supplied are al- required. ready electrically insulated. However the bolts and the shaft need to be fit- ted with insulation material, for exam- ple nylon bushes. vetus® Installation manual BOW PRO Series Thruster: BOWB285 - BOWB300 - BOWB320 020814.01... -
Seite 20: Installation
(22 - 26 ft.lbf ) Check for possible leaks immediately the ship returns to wa- ter. *) A suitable grease is VETUS ‘Shipping Grease’ , Art. code: VSG. vetus® Installation manual BOW PRO Series Thrusters: BOWB285 - BOWB300 - BOWB320 020814.01... -
Seite 21: Final Assembly
20 - 25 Nm Molykote® G-n plus *) A suitable grease is VETUS ‘Shipping Grease’ , Art. code: VSG. vetus® Installation manual BOW PRO Series Thruster: BOWB285 - BOWB300 - BOWB320 020814.01... -
Seite 22: Electrical Installation
55 Ah, 70 Ah, 90 Ah, 108 Ah, 120 Ah, 143 Ah, 165 Ah, 200 Ah and 225 Ah. For all fuses we can suppy a fuse holder, Vetus part no.: ZEHC100. We also recommend that each bow thruster is powered by its own See page for the size of the fuse to be used. -
Seite 23: Connecting Can Bus (Control Current) Cables
Configure a stern thruster by pressing the "PRESS FOR BOW corrosion problems, but also error messages in the CAN bus OR STERN" button on the underside of the cover. system. vetus® Installation manual BOW PRO Series Thruster: BOWB285 - BOWB300 - BOWB320 020814.01... -
Seite 24: Technical Data
60 kg (132 lbs) 60 kg (132 lbs) S2 ‘t’ min. Activation time ‘t’ min. continuously or a max. of ‘t’ min. per hour at maximum power. vetus® Installation manual BOW PRO Series Thrusters: BOWB285 - BOWB300 - BOWB320 020814.01... -
Seite 25: Sicherheitsbestimmungen
Die maximale Gebrauchseinschaltdauer hintereinander und - Energiespeicher die Antriebskraft, wie in den technischen Daten angegeben, basieren auf den empfohlenen Akkukapazitäten und Akkuan- - Energiezufuhr schlußkabeln. - Bedienung vetus® Installation manual BOW PRO Series Thruster: BOWB285 - BOWB300 - BOWB320 020814.01... -
Seite 26: Einbauhinweise
Wir raten davon ab, 2 Bugschrauben in einem (1) Tunnelrohr zung in jedem Fall notwendig. einzu-bauen. Eine Verdoppelung der Antriebskraft wird dadurch - Der Elektromotor soll immer oberhalb des höchstmöglichen Bil- nicht erreicht! genwasserniveaus aufgestellt werden. vetus® Installation manual BOW PRO Series Thrusters: BOWB285 - BOWB300 - BOWB320 020814.01... -
Seite 27: Übergang Vom Tunnelrohr Zum Schiffsrumpf
Herzlinie des Muschels mit der zu erwartenden Form der Bugwelle zusammenfällt. - Die Stäbe müssen so angebracht werden, dass sie senkrecht zu der zu erwartenden Bugwellenform stehen. vetus® Installation manual BOW PRO Series Thruster: BOWB285 - BOWB300 - BOWB320 020814.01... -
Seite 28: Anbringen Vom Tunnelrohr
• Danach gegebenenfalls ein be- rend. Die Schrauben und der Schaft wuchsverhinderndes Mittel auftra- müssen jedoch noch mit Isolations- gen. material, z.B. Nylonbuchsen, versehen werden. vetus® Installation manual BOW PRO Series Thrusters: BOWB285 - BOWB300 - BOWB320 020814.01... -
Seite 29: Einbau
30 - 35 Nm Grease chtunG Unmittelbar nach dem Stapellauf des Schiffes auf mögliche Lecks prüfen *) Ein geeignetes Fett ist das VETUS „Shipping Grease“, Artikelcode: VSG. vetus® Installation manual BOW PRO Series Thruster: BOWB285 - BOWB300 - BOWB320 020814.01... -
Seite 30: Endmontage
Welle des Elektromotors mitgenommen wird. 20 - 25 Nm Molykote® G-n plus *) Ein geeignetes Fett ist das VETUS „Shipping Grease“, Artikelcode: VSG. vetus® Installation manual BOW PRO Series Thrusters: BOWB285 - BOWB300 - BOWB320 020814.01... -
Seite 31: Stromversorgung
Ihre Bugschraube angegeben sind, basie- nen Kurzschluss mit dem untersten der 3 Anschlüsse des Mo- ren auf der empfohlenen Batterieleistung und den empfohle- tors an die Regelung verursachen kann! nen Batterie-Anschlusskabeln. vetus® Installation manual BOW PRO Series Thruster: BOWB285 - BOWB300 - BOWB320 020814.01... -
Seite 32: Anschließen Von Can-Bus (Steuerstrom)-Kabeln
Die Konfiguration im Lieferzustand gilt für den Einsatz als Bugstrahl- ruder. Heckstrahlruder Konfigurieren Sie ein Heckstrahlruder, indem Sie die Taste "PRESS FOR BOW OR STERN" auf der Unterseite der Abdeckung drücken. vetus® Installation manual BOW PRO Series Thrusters: BOWB285 - BOWB300 - BOWB320 020814.01... -
Seite 33: Technische Daten
Aluminium, 6060 oder 6062 (AlMg1SiCu) Gewicht Ohne Rohr 60 kg 60 kg 60 kg S2 „t“ min. Einschaltdauer „t“ Min. kontinuierlich oder max. „t“ Min. pro Stunde bei maximaler Leistung. vetus® Installation manual BOW PRO Series Thruster: BOWB285 - BOWB300 - BOWB320 020814.01... -
Seite 34: Sécurité
- Alimentation en énergie données techniques sont basées sur les capacités de batterie - Fonctionnement et les câbles de raccordement de batterie conseillés. vetus® Installation manual BOW PRO Series Thrusters: BOWB285 - BOWB300 - BOWB320 020814.01... -
Seite 35: Recommandations
- Assurez-vous que la position du moteur électrique est toujours seul tunnel tubulaire ; on n’obtiendra pas une force de propulsion bien au dessus le niveau de l’eau de cale. double ! vetus® Installation manual BOW PRO Series Thruster: BOWB285 - BOWB300 - BOWB320 020814.01... -
Seite 36: Adaption De La Tuyère À L'étrave
- Les barres devront être placées de telle façon qu’elles soient per- pendiculaires à la forme de la vague prévue. vetus® Installation manual BOW PRO Series Thrusters: BOWB285 - BOWB300 - BOWB320 020814.01... -
Seite 37: Installation De La Tuyère
électrique. une peinture maritime antisalissure. Par contre, les petits boulons et la gaine doivent être munis de matériau isolant, par exemple manchons en ny- lon. vetus® Installation manual BOW PRO Series Thruster: BOWB285 - BOWB300 - BOWB320 020814.01... -
Seite 38: Installation
Vérifier l’étanchéité dès la mise à l’eau du bateau. *) La graisse « Shipping » Vetus est parfaite pour ce type d'applica- tion. Code d'article : VSG. vetus® Installation manual BOW PRO Series Thrusters: BOWB285 - BOWB300 - BOWB320... -
Seite 39: Montage Final
électrique est prise. 20 - 25 Nm Molykote® G-n plus *) La graisse « Shipping » Vetus est parfaite pour ce type d'applica- tion. Code d'article : VSG. vetus® Installation manual BOW PRO Series Thruster: BOWB285 - BOWB300 - BOWB320... -
Seite 40: Alimentation Électrique
Les batteries Vetus type « SMF » et «AGM», fermées et qui ne re- Raccordement des fils de courant principal et quièrent pas d’entretien, se révèlent parfaites pour ce type de configuration de l'hélice d'étrave et/ou de poupe... -
Seite 41: Connexion Des Câbles Du Bus Can (Courant De Commande)
également les messages d'erreur dans le système de bus CAN. Hélice de poupe Configurer une hélice de poupe en appuyant sur le bouton "PRESS FOR BOW OR STERN" situé sous le couvercle. vetus® Installation manual BOW PRO Series Thruster: BOWB285 - BOWB300 - BOWB320 020814.01... -
Seite 42: Renseignements Techniques
60 kg S2 ‘t’ min. Durée de mise en marche ‘t’ min en continu ou au maximum ‘t’ min par heure en cas de puissance optimale. vetus® Installation manual BOW PRO Series Thrusters: BOWB285 - BOWB300 - BOWB320 020814.01... -
Seite 43: Seguridad
Para mantenimiento y garantía, refiérase al 'Manual de Mante- nimiento y Garantía' . vetus® Installation manual BOW PRO Series Thruster: BOWB285 - BOWB300 - BOWB320 020814.01... -
Seite 44: Recomendaciones
- El electromotor en todo momento deberá instalarse por encima conducto de propulsión (1); ¡no se logra ninguna duplicación de del nivel máximo del agua de sentina. la fuerza de propulsión! vetus® Installation manual BOW PRO Series Thrusters: BOWB285 - BOWB300 - BOWB320 020814.01... -
Seite 45: Acoplamiento Del Conducto De Propulsión Al Casco
- Las barras tienen que estar instaladas de tal forma que estén per- pendiculares al oleaje que se espere. vetus® Installation manual BOW PRO Series Thruster: BOWB285 - BOWB300 - BOWB320 020814.01... -
Seite 46: Instalación Del Conducto De Propulsión
Sin embargo, se mente, un producto contra la incrus- han de dotar los pernos y el mango tación. de material aislante, por ejemplo, de manguitos de nailó. vetus® Installation manual BOW PRO Series Thrusters: BOWB285 - BOWB300 - BOWB320 020814.01... -
Seite 47: Incorporación
Controlar si se presentan fugas inmediatamente tras la bota- dura de la embarcación. * ) Una grasa adecuada es VETUS Shipping Grease (Grasa náutica), Código de art.: VSG. vetus® Installation manual BOW PRO Series Thruster: BOWB285 - BOWB300 - BOWB320 020814.01... -
Seite 48: Montaje Final
20 - 25 Nm Molykote® G-n plus * ) Una grasa adecuada es VETUS Shipping Grease (Grasa náutica), Código de art.: VSG. vetus® Installation manual BOW PRO Series Thrusters: BOWB285 - BOWB300 - BOWB320 020814.01... -
Seite 49: El Suministro De Corriente
¡Asegúrese de que el terminal de cable del cable negativo no pueda provocar un cortocircuito con el conector inferior de los 3 conectores del motor en el regulador! vetus® Installation manual BOW PRO Series Thruster: BOWB285 - BOWB300 - BOWB320 020814.01... -
Seite 50: Conectar Los Cables Can Bus (Corriente De Control)
La configuración tal y como suministrada es para la aplicación como hélice de proa. Hélice de popa Configure una hélice de popa pulsando el botón "PRESS FOR BOW OR STERN" en la parte inferior de la cubierta. vetus® Installation manual BOW PRO Series Thrusters: BOWB285 - BOWB300 - BOWB320 020814.01... -
Seite 51: Especificaciones Técnicas
60 kg 60 kg S2 ‘t’ min. Duración de activación de uso ‘t’ min. de forma continua o como máximo ‘t’ min. por hora con máxima potencia. vetus® Installation manual BOW PRO Series Thruster: BOWB285 - BOWB300 - BOWB320 020814.01... -
Seite 52: Indicazioni Di Avvertimento
L'area di installazione dell'elica di prua e quello di installa- zione della batteria devono essere asciutti e ben ventilati. Queste istruzioni si riferiscono al montaggio dall’elica di prua e/o eli- ca di poppa Vetus della serie BOW PRO, tipo ‘BOWB285’ , ‘BOWB300’ , e ‘BOWB320’ . ttenzione Il sistema dell'elica di prua o di poppa consiste nei seguenti compo- Controllare eventuali perdite appena la nave ritorna in acqua. -
Seite 53: Suggerimenti Per L'installazione
- Il motore deve essere sempre collocato al di sopra del livello mas- Sconsigliamo l’installazione di 2 eliche di prua in un solo (1) tun- simo dell’acqua di sentina. nel; la propulsione non raddoppia! vetus® Installation manual BOW PRO Series Thruster: BOWB285 - BOWB300 - BOWB320 020814.01... -
Seite 54: Montaggio Del Tunnel Allo Scafo
- Le sbarre devono esse inserite in maniera tale da essere perfetta- prevista. mente perpendicolari alla formazione d’onda prevista. vetus® Installation manual BOW PRO Series Thrusters: BOWB285 - BOWB300 - BOWB320 020814.01... -
Seite 55: Installazione Del Tunnel
Al contrario, • Applicare successivamente un even- i bulloni ed il fuso devono essere do- tuale anti-incrostante. tati di materiale isolante, ad esempio bussole in nylon. vetus® Installation manual BOW PRO Series Thruster: BOWB285 - BOWB300 - BOWB320 020814.01... -
Seite 56: Installazione
30 - 35 Nm Grease ttenzione Controllare che non ci siano perdite subito dopo aver messo in acqua l’imbarcazione. *) Un grasso indicato è VETUS "Shipping Grease", Codice art.: VSG. vetus® Installation manual BOW PRO Series Thrusters: BOWB285 - BOWB300 - BOWB320 020814.01... -
Seite 57: Assemblaggio Finale
• Per controllare, far ruotare l’elica con la mano, deve poter girare senza attrito, pur essendo collegata all’albero del motore. 20 - 25 Nm Molykote® G-n plus *) Un grasso indicato è VETUS "Shipping Grease", Codice art.: VSG. vetus® Installation manual BOW PRO Series Thruster: BOWB285 - BOWB300 - BOWB320 020814.01... -
Seite 58: Alimentazione
Quando deve essere sostituito, assicurarsi di utilizzarne un ste nello stesso compartimento dell’elica di prua. atro della stessa taglia. Le batterie chiuse Vetus di tipo ‘SMF’ e ‘AGM’ , che non richiedono manutenzione, sono perfette a tale proposito. Allacciamento dei cavi elettrici principali e confi- Nel caso di batterie non ‘chiuse’... -
Seite 59: Collegamento Dei Cavi Can Bus (Corrente Di Controllo)
La configurazione preimpostata prevede l'installazione di un'elica di errore nel sistema CAN bus. prua. Elica di poppa Configurare un'elica di poppa premendo il pulsante "PRESS FOR BOW OR STERN" sul lato inferiore del coperchio. vetus® Installation manual BOW PRO Series Thruster: BOWB285 - BOWB300 - BOWB320 020814.01... -
Seite 60: Dati Tecnici
Tunnel escluso 60 kg 60 kg 60 kg S2 ‘t’ min. Durata di utilizzo ‘t’ min. in azionamento continuo o max. ‘t’ min. all’ora alla potenza massima. vetus® Installation manual BOW PRO Series Thrusters: BOWB285 - BOWB300 - BOWB320 020814.01... -
Seite 61: Sikkerhed
Den maksimale brugsindkoblingstid og den drivkraft, som er - Tunnel specificeret under Tekniske data, er baseret på de anbefalede - Energilagring batterikapaciteter og batteritilslutningskablerne. - Energiforsyning - Drift vetus® Installation manual BOW PRO Series Thruster: BOWB285 - BOWB300 - BOWB320 020814.01... -
Seite 62: Anbefalinger Til Montering
Vi fraråder at installere 2 bovskruer i ét (1) tunnelrør. På denne - El-motoren skal hele tiden befinde sig over det maksimale niveau måde opnår man ikke en fordobling af drivkraften! af bundvandet. vetus® Installation manual BOW PRO Series Thrusters: BOWB285 - BOWB300 - BOWB320 020814.01... -
Seite 63: Overgang Fra Tunnelrør Til Skibsskrog
- Stængerne skal være placeret, så at de står lodret i forhold til den forventede bølgeform. vetus® Installation manual BOW PRO Series Thruster: BOWB285 - BOWB300 - BOWB320 020814.01... -
Seite 64: Installering Af Tunnelrøret
• Påfør derefter eventuelt en antifou- OBS! De medfølgende pakninger giver lingmaling. allerede elektrisk isolering. Bolten og skaftet skal dog udstyres med isolati- onsmateriale, f.eks. nylonbøsninger. vetus® Installation manual BOW PRO Series Thrusters: BOWB285 - BOWB300 - BOWB320 020814.01... -
Seite 65: Indbygning
30 - 35 Nm Grease Kontroller for eventuel lækage umiddelbart efter at skibet er blevet søsat. *) Egnet fedt er VETUS ‘Shipping Grease’ , Art. kode: VSG. vetus® Installation manual BOW PRO Series Thruster: BOWB285 - BOWB300 - BOWB320 020814.01... -
Seite 66: Slutmontering
• Drej skruen med hånden for at kontrollere, at skruen kan drejes let og at elektromotorens aksel medtages. 20 - 25 Nm Molykote® G-n plus *) Egnet fedt er VETUS ‘Shipping Grease’ , Art. kode: VSG. vetus® Installation manual BOW PRO Series Thrusters: BOWB285 - BOWB300 - BOWB320 020814.01... -
Seite 67: Strømforsyning
Se side Tilspændingsmomentet for boltene i motorregulatoren er Hovedafbryderen monteres på det posi- maks. 10 Nm. tive kabel. Vetus batteriafbryder af typen BATSW600 er en egnet afbryder. vetus® Installation manual BOW PRO Series Thruster: BOWB285 - BOWB300 - BOWB320 020814.01... -
Seite 68: Tilslutning Af Can-Buskabler (Kontrolstrøm)
Dette forhindrer ikke kun farlige situationer og korrosi- onsproblemer, men også fejlmeddelelser i CAN-bussystemet. Hækskrue Konfigurer en hækskrue ved at trykke på knappen "PRESS FOR BOW OR STERN" på undersiden af dækslet. vetus® Installation manual BOW PRO Series Thrusters: BOWB285 - BOWB300 - BOWB320 020814.01... -
Seite 69: Tekniske Specifikatione
6060 eller 6062 (AlMg1SiCu) Vægt Ekskl. tunnelrør 60 kg 60 kg 60 kg S2 ‘t’ min. Brugsindkoblingstid ‘t’ min kontinuerligt eller maks. ‘t’ min. pr. time ved maksimal kraft. vetus® Installation manual BOW PRO Series Thruster: BOWB285 - BOWB300 - BOWB320 020814.01... -
Seite 70: Säkerhet
- Sidoprojektor som anges i de tekniska specifikationerna gäller under förut- - Tunnel sättning att systemet har rekommenderad batterikapacitet - Energilagring och batterikablar. - Energiförsörjning - Drift vetus® Installation manual BOW PRO Series Thrusters: BOWB285 - BOWB300 - BOWB320 020814.01... -
Seite 71: Rekommendationer För Montering
Vi avråder ifrån att montera två bogpropellrar i ett och samma - Elmotorn skall alltid placeras ovanför slagvattnets maximala nivå. tunnelrör; detta ger inte dubbelt så stor drivkraft! vetus® Installation manual BOW PRO Series Thruster: BOWB285 - BOWB300 - BOWB320 020814.01... -
Seite 72: Tunnelns Övergång Till Båtens Skrov
- En mantel skall placeras på sådan sätt i båtens skrov att mantelns max. 15º centrumlinje sammanfaller med bogsvallets förväntade utform- ning. - Stängerna ska placeras så att de står lodrätt mot den förväntade vågformen. vetus® Installation manual BOW PRO Series Thrusters: BOWB285 - BOWB300 - BOWB320 020814.01... -
Seite 73: Montering Av Tunnelröret
• Applicera sedan eventuellt botten- OBS! De medföljande packningarna färg. är inte elektriskt isolerande, och skall därför bytas ut mot ett isolerande ma- terial , t.ex. nylon. vetus® Installation manual BOW PRO Series Thruster: BOWB285 - BOWB300 - BOWB320 020814.01... -
Seite 74: Montering
30 - 35 Nm Grease Kontrollera omedelbart vid sjösättning att båten inte läcker. *) Ett lämpligt fett är Vetus ”Shipping Grease” (fett för marint bruk), art.nummer: VSG. vetus® Installation manual BOW PRO Series Thrusters: BOWB285 - BOWB300 - BOWB320 020814.01... -
Seite 75: Slutmontering
20 - 25 Nm Molykote® G-n plus *) Ett lämpligt fett är Vetus ”Shipping Grease” (fett för marint bruk), art.nummer: VSG. vetus® Installation manual BOW PRO Series Thruster: BOWB285 - BOWB300 - BOWB320... -
Seite 76: Elförsörjning
Bultarnas vridmoment i motorreglaget är maximalt 10 Nm. se sidan Huvudströmbrytaren måste vara utrustad med ‘positiv kabel’ . Vetus batterikontakt typ BATSW600 är en lämplig sådan kontakt. vetus® Installation manual BOW PRO Series Thrusters: BOWB285 - BOWB300 - BOWB320 020814.01... -
Seite 77: Ansluter Can-Buss (Styrström) Kablar
CAN- Konfigurera en akterpropeller genom att trycka på knappen "PRESS FOR BOW OR STERN" (tryck för bog eller akterpropeller) på skyddets bussningssystemet. undersida. vetus® Installation manual BOW PRO Series Thruster: BOWB285 - BOWB300 - BOWB320 020814.01... -
Seite 78: Tekniska Uppgifter
6060 eller 6062 (AlMg1SiCu) Vikt Exkl. tunnelrör 60 kg 60 kg 60 kg S2 ”t” min. Användningslängd ”t” min kontinuerligt eller max. ”t” min per timme vid maximal effekt. vetus® Installation manual BOW PRO Series Thrusters: BOWB285 - BOWB300 - BOWB320 020814.01... -
Seite 79: Sikkerhet
- Side thruster kraften som spesifisert under Tekniske data, er basert på de - Tunnel anbefalte batterikapasitetene og batteritilkoplingskablene, - Energilagring se ‘Installasjonsinstrukser’ . - Energiforsyning - Operasjon vetus® Installation manual BOW PRO Series Thruster: BOWB285 - BOWB300 - BOWB320 020814.01... -
Seite 80: Anbefalinger For Installasjon
Vi fraråder at man installerer 2 baugpropeller i ett og samme (1) tunnelrør. På denne måten oppnår man nemlig ikke en fordobling - Elektromotoren må hele tiden befinne seg over det høyeste ni- av skyvkraften! vået på bunnvannet. vetus® Installation manual BOW PRO Series Thrusters: BOWB285 - BOWB300 - BOWB320 020814.01... -
Seite 81: Overgang Fra Tunnelrør Til Skipsskrog
- Et skjell må inngå i skipsskroget på en slik måte at midtlinjen på max. 15º skjellet faller sammen med den forventede formen på baugbøl- gen. - Spindlene skal stilles opp slik at de står loddrett på bølgeformen som forventet. vetus® Installation manual BOW PRO Series Thruster: BOWB285 - BOWB300 - BOWB320 020814.01... -
Seite 82: Installering Av Tunnelrøret
• Påfør deretter eventuelt en antifou- N.B. De medsendte pakningene gir ling. ingen elektrisk isolering og må erstat- tes av isolasjonsmateriale, f.eks. nylon- plate. vetus® Installation manual BOW PRO Series Thrusters: BOWB285 - BOWB300 - BOWB320 020814.01... -
Seite 83: Innbygging
30 - 35 Nm Grease Kontroller umiddelbart at skipet ikke lekker etter at det har blitt sjøsatt. *) Et egnet fett er VETUS «Shipping Grease», Art.kode: VSG. vetus® Installation manual BOW PRO Series Thruster: BOWB285 - BOWB300 - BOWB320 020814.01... -
Seite 84: Sluttmontasje
• Drei propellen rundt for hånd for å kontrollere at den går lett rundt og at akselen på elektromotoren tas med. 20 - 25 Nm Molykote® G-n plus *) Et egnet fett er VETUS «Shipping Grease», Art.kode: VSG. vetus® Installation manual BOW PRO Series Thrusters: BOWB285 - BOWB300 - BOWB320 020814.01... -
Seite 85: Strømforsyning
Hovedbryter se sider Dreiemomentet for boltene i motorregulatoren er maksimalt Hovedbryteren må festes på den “positive 10 Nm. ledningen”. Vetus-batteriets brytertype BATSW600 er en passende bryter. vetus® Installation manual BOW PRO Series Thruster: BOWB285 - BOWB300 - BOWB320 020814.01... -
Seite 86: Koble Til Can Bus (Kontrollstrøm) Kabler
Dette forhindrer ikke bare farlige situasjoner og korrosjons problemer, men også feilmeldinger i CAN bussystemet. Konfigurer en akterpropell ved å trykke på "PRESS FOR BOW OR STERN" -knappen på undersiden av dekselet. vetus® Installation manual BOW PRO Series Thrusters: BOWB285 - BOWB300 - BOWB320 020814.01... -
Seite 87: Tekniske Data
Ekskl. tunnelrør 60 kg 60 kg 60 kg S2 ‘t’ min. Ved kontinuerlig innkobling er varigheten ‘t’ min eller maks. ‘t’ min per time ved maksimal effekt. vetus® Installation manual BOW PRO Series Thruster: BOWB285 - BOWB300 - BOWB320 020814.01... -
Seite 88: Turvallisuus
- Sivupotkuri - Tunneli - Energiavarasto - Energian syöttö - Toiminta Tutustu tarvittaessa kaikkien komponenttien asennusohjeisiin ennen koko järjestelmän käyttöönottoa. Huollon ja takuun osalta katso "Huolto- ja takuukäsikirja". vetus® Installation manual BOW PRO Series Thrusters: BOWB285 - BOWB300 - BOWB320 020814.01... -
Seite 89: Sijoitussuosituksia
Emme suosittele kahden keulapotkurin asentamista samaan tun- - Moottori tulee asentaa siten että se on aina pilssiveden maksimi- neliin sillä siten ei saavuteta kaksinkertaista tehoa. tason yläpuolella. vetus® Installation manual BOW PRO Series Thruster: BOWB285 - BOWB300 - BOWB320 020814.01... -
Seite 90: Tunnelin Liittäminen Aluksen Runkoon
- Syvennyksen keskilinja (katso kuva) tulisi olla oletetun keula-aal- max. 15º lon suuntainen. - Tangot täytyy olla asennettu siten että ne ovat kohtisuorassa odo- tettavissa olevaan aallon muodostukseen. vetus® Installation manual BOW PRO Series Thrusters: BOWB285 - BOWB300 - BOWB320 020814.01... -
Seite 91: Tunnelin Asennus
HUOMIOITAVAA: Laitteen mukana toi- mitettavat tiivisteet eristävät sähköi- sesti. Sen sijaan akseli ja pultit tulee eristää tunnelista esimerkiksi nylon- holkkien avulla. vetus® Installation manual BOW PRO Series Thruster: BOWB285 - BOWB300 - BOWB320 020814.01... -
Seite 92: Asennus
*) ennen kiristämistä. Outboard Gear 30 - 35 Nm Grease ärkeää Tarkista mahdolliset vuodot heti vesillelaskun yhteydessä. *) Sopiva rasva on VETUS ‘Shipping Grease’ , tuotekoodi: VSG. vetus® Installation manual BOW PRO Series Thrusters: BOWB285 - BOWB300 - BOWB320 020814.01... -
Seite 93: Lopullinen Asennus
• Tarkista käsin että potkuri pyörii kevyesti sen ollessa liitettynä säh- kömoottoriin. 20 - 25 Nm Molykote® G-n plus *) Sopiva rasva on VETUS ‘Shipping Grease’ , tuotekoodi: VSG. vetus® Installation manual BOW PRO Series Thruster: BOWB285 - BOWB300 - BOWB320 020814.01... -
Seite 94: Virransyöttö
3 liitännästä) ohjaimeen! Pääkytkin katso sivulla Pääkytkin täytyy olla liitetty positiiviseen Moottoriohjaimen mutterin kiristysmomentti on maksimis- johtoon. saan 10 Nm. Vetus-akun kytkin tyyppiä BATSW600 on sopiva kytkin. vetus® Installation manual BOW PRO Series Thrusters: BOWB285 - BOWB300 - BOWB320 020814.01... -
Seite 95: Can-Väylän (Ohjausvirran) Kaapeleiden Liittäminen
Peräohjailupotkuri kytkettävä yhteen keskuspisteeseen. Tämä estää vaarallisten Konfiguroi peräohjailupotkuri painamalla kannen alapuolella olevaa tilanteiden ja korroosio-ongelmien lisäksi myös CAN- "PRESS FOR BOW OR STERN" -painiketta. väyläjärjestelmän virheilmoitukset. vetus® Installation manual BOW PRO Series Thruster: BOWB285 - BOWB300 - BOWB320 020814.01... -
Seite 96: Tekniset Tiedot
6060 tai 6062 (AlMg1SiCu) Paino Ilman tunnelia n. 60 kg 60 kg 60 kg S2 ‘t’ min. Käyttöaika ‘t’ minuuttia jatkuvana tai maks. ‘t’ minuuttia tunnissa maksimiteholla. vetus® Installation manual BOW PRO Series Thrusters: BOWB285 - BOWB300 - BOWB320 020814.01... -
Seite 97: Bezpieczeństwo
- Układ przechowywania energii Maksymalny czas użycia oraz ciąg, podane w specyfikacjach - Układ zasilania energią technicznych, bazują na zalecanej pojemności akumulatora - Obsługa oraz jego kabli. vetus® Installation manual BOW PRO Series Thruster: BOWB285 - BOWB300 - BOWB320 020814.01... -
Seite 98: Zalecenia Dotyczące Instalacji
- Silnik elektryczny musi być ustawiony w taki sposób, aby zawsze Nie zalecamy montowania 2 silników sterujących w jednym tune- był dobrze widoczny z maksymalnego poziomu wody. lu; nie spowoduje to podwojenia ciągu! vetus® Installation manual BOW PRO Series Thrusters: BOWB285 - BOWB300 - BOWB320 020814.01... -
Seite 99: Podłączenie Tunelu Sterującego Do Kadłuba Okrętu
- Powinno to być zawarte w kadłubie okrętu w taki sposób, aby max. 15º jego środkowa część odpowiadała oczekiwanemu kształtowi fali dziobowej. Pręty muszą być zainstalowane tak, aby były prostopadle do oczeki- wanej fali. vetus® Installation manual BOW PRO Series Thruster: BOWB285 - BOWB300 - BOWB320 020814.01... -
Seite 100: Instalacja Silnika Sterującego
• W razie potrzeby zastosować farby UWAGA: dostarczone uszczelki są już przeciwporostowe. izolowane elektrycznie. Jednak śruby i wał muszą być wyposażone w mate- riał izolacyjny, na przykład tuleje nylo- nowe. vetus® Installation manual BOW PRO Series Thrusters: BOWB285 - BOWB300 - BOWB320 020814.01... -
Seite 101: Instalacja
Outboard Gear 30 - 35 Nm Grease WaGa Sprawdzić ewentualne nieszczelności natychmiast po powro- cie statku na wodę. *) Odpowiednim smarem jest VETUS „Shipping Grease”, kod art.: VSG. vetus® Installation manual BOW PRO Series Thruster: BOWB285 - BOWB300 - BOWB320 020814.01... -
Seite 102: Montaż Końcowy
20 - 25 Nm Molykote® G-n plus *) Odpowiednim smarem jest VETUS „Shipping Grease”, kod art.: VSG. vetus® Installation manual BOW PRO Series Thrusters: BOWB285 - BOWB300 - BOWB320 020814.01... -
Seite 103: Instalacja Elektryczna
łączą- Należy upewnić się, że końcówki kablowe „przewodów ujem- cych akumulator. nych” nie spowodują zwarcia z dolną częścią 3 przyłączy silnika na regulatorze! vetus® Installation manual BOW PRO Series Thruster: BOWB285 - BOWB300 - BOWB320 020814.01... -
Seite 104: Podłączanie Przewodów Magistrali Can
Pędnik dziobowy komunikacyjnej. Dostarczona konfiguracja jest odpowiednia dla pędnika dziobowego. Pędnik rufowy Skonfigurować pędnik rufowy naciskając przycisk "PRESS FOR BOW OR STERN" na spodniej stronie pokrywy. vetus® Installation manual BOW PRO Series Thrusters: BOWB285 - BOWB300 - BOWB320 020814.01... -
Seite 105: Dane Techniczne
Bez tunelu pędnika 60 kg 60 kg 60 kg S2 ‘t’ min. Czas użytkowania ‘t’ min ciągłej pracy lub maks. ‘t’ min na godzinę przy maksymalnej mocy. vetus® Installation manual BOW PRO Series Thruster: BOWB285 - BOWB300 - BOWB320 020814.01... -
Seite 106: Hoofdafmetingen
Principal dimensions Dimensioni principali Päämitat Hauptabmessungen Mål Główne wymiary Dimensions principales Huvudmått BOWB285/300/320 300 (11 “) “) ø “) “) “ DIA.) ø 300 “) “ DIA.) vetus® Installation manual BOW PRO Series Thrusters: BOWB285 - BOWB300 - BOWB320 020814.01... -
Seite 107: Aansluitschema's
Magistrala CAN to łańcuch, do którego dołączony jest ster strumie- niowy i panele. Na jednym końcu łańcucha musi być podłączony zasilacz (5), a ter- minator (8) musi być podłączony na drugim końcu! vetus® Installation manual BOW PRO Series Thruster: BOWB285 - BOWB300 - BOWB320 020814.01... - Seite 108 Alimentazione CAN-bus 6 Control voltage fuse Fusible régulateur de tension Fusibile della tensione di comando 7 Connection cable Câble de raccordement Cavo di collegamento 8 Terminator Terminateur Terminatore vetus® Installation manual BOW PRO Series Thrusters: BOWB285 - BOWB300 - BOWB320 020814.01...
- Seite 109 Panel sterowania pędnik dziobowy 4 Peräpotkurin ohjauspaneeli Panel sterowania pędnik rufowy 5 CAN-väylän syöttö Zasilanie magistrali CAN 6 Ohjausjännitteen sulake Bezpiecznik sterowania 7 Kytkentäkaapeli Kabel przyłączeniowy 8 Terminaattori Terminator vetus® Installation manual BOW PRO Series Thruster: BOWB285 - BOWB300 - BOWB320 020814.01...
- Seite 110 Alimentazione CAN-bus 6 Control voltage fuse Fusible régulateur de tension Fusibile della tensione di comando 7 Connection cable Câble de raccordement Cavo di collegamento 8 Terminator Terminateur Terminatore vetus® Installation manual BOW PRO Series Thrusters: BOWB285 - BOWB300 - BOWB320 020814.01...
- Seite 111 Panel sterowania pędnik dziobowy 4 Peräpotkurin ohjauspaneeli Panel sterowania pędnik rufowy 5 CAN-väylän syöttö Zasilanie magistrali CAN 6 Ohjausjännitteen sulake Bezpiecznik sterowania 7 Kytkentäkaapeli Kabel przyłączeniowy 8 Terminaattori Terminator vetus® Installation manual BOW PRO Series Thruster: BOWB285 - BOWB300 - BOWB320 020814.01...
- Seite 112 Batteria 3 Fusible principal Fusible principal Fusibile principale 4 Interrupteur principal Interruptor principal Interruttore principale 5 Dynamo Dínamo Dinamo 6 Démarreur Motor de arranque Motorino di avviamento vetus® Installation manual BOW PRO Series Thrusters: BOWB285 - BOWB300 - BOWB320 020814.01...
- Seite 113 1 Potkurin (tai peräpotkurin) liitäntärasia Skrzynka przyłączeniowa pędnika dziobowego (lub pędnik rufowy) 2 Akku Bateria 3 Pääsulake Główny bezpiecznik 4 Pääkatkaisin Główny przełącznik 5 Dynamo Dynamo 6 Käynnistysmoottori Rozrusznik vetus® Installation manual BOW PRO Series Thruster: BOWB285 - BOWB300 - BOWB320 020814.01...
-
Seite 114: Accucapaciteit, Accukabels
45.9 - 59.1 ft 2 x 120 mm 2 x AWG 0000 18 - 22 m 59.1 - 72.2 ft 2 x 150 mm 2 x AWG 300 MCM vetus® Installation manual BOW PRO Series Thrusters: BOWB285 - BOWB300 - BOWB320 020814.01... -
Seite 115: Pojemność Akumulatora,Kable
0 - 534.4 ft 2 x 95 mm 2 x AWG 000 162,9 - 205,7 m 0 - 674.9 ft 2 x 120 mm 2 x AWG 0000 vetus® Installation manual BOW PRO Series Thruster: BOWB285 - BOWB300 - BOWB320 020814.01... - Seite 116 FOKKERSTRAAT 571 - 3125 BD SCHIEDAM - HOLLAND b.v. TEL.: +31 (0)88 4884700 - sales@vetus.nl - www.vetus.com Printed in the Netherlands 020814.01 2021-06...