Herunterladen Inhalt Inhalt Diese Seite drucken
Sygonix TX 4 Bedienungsanleitung

Sygonix TX 4 Bedienungsanleitung

Raumthermostat mit display "tx.4"
Inhaltsverzeichnis

Werbung

Verfügbare Sprachen

Verfügbare Sprachen

D
Bedienungsanleitung
Raumthermostat
mit Display „tx.4"
Seite 2 - 44
GB
Operating instructions
Room thermostat
with display "tx.4"
Page 45 - 87
F
Mode d'emploi
Thermostat d'ambiance
avec écran « tx.4 »
Pages 88 - 131
Gebruiksaanwijzing
NL
Kamerthermostaat
met scherm „tx.4"
Pagina 132 - 174

Werbung

Inhaltsverzeichnis
loading

Inhaltszusammenfassung für Sygonix TX 4

  • Seite 1 Bedienungsanleitung Raumthermostat mit Display „tx.4“ Seite 2 - 44 Operating instructions Room thermostat with display “tx.4” Page 45 - 87 Mode d‘emploi Thermostat d’ambiance avec écran « tx.4 » Pages 88 - 131 Gebruiksaanwijzing Kamerthermostaat met scherm „tx.4“ Pagina 132 - 174...
  • Seite 2 © Copyright 2013 by Sygonix GmbH. Information légales Ce mode d‘emploi est une publication de la société Sygonix GmbH, Nordring 98a, D-90409 Nürnberg (www.sygonix.com). Tous droits réservés, y compris de traduction. Toute reproduction, quelle qu‘elle soit (p. ex. photocopie, mi- crofi...
  • Seite 3: Inhaltsverzeichnis

    Funktion H1 „HEAT OR COOL“ ..........33 b) Funktion H2 „VALVE PROTECT“ ......... 35 c) Funktion H3 „FROST PROTECT“ ......... 36 d) Funktion H4 „OPTIMUM START“ .........37 e) Funktion H5 „RESET ALL“ ........... 38 Die Haustechnik-Marke fürs ganze Haus. www.sygonix.com...
  • Seite 4: Einführung

    Alle enthaltenen Firmennamen und Produktbezeichnungen sind Warenzeichen der jeweiligen Inhaber. Alle Rechte vorbehalten. Kontakt: Telefonnummer: 0180 5 665544* E-Mail-Adresse: service@sygonix.com Website: www.sygonix.com * 0,14 €/Min. aus dem dt. Festnetz, maximal 0,42 €/Min. aus dem Mobilfunknetz, Preise aus dem Ausland können abweichen.
  • Seite 5: Bestimmungsgemäße Verwendung

    Das Blitzsymbol wird verwendet, wenn Gefahr für Ihre Gesundheit besteht, z.B. durch elektrischen Schlag. Dieses Symbol weist Sie auf besondere Gefahren bei Handhabung, Betrieb oder Bedienung hin. Das „Pfeil“-Symbol steht für spezielle Tipps und Bedien- hinweise. Die Haustechnik-Marke fürs ganze Haus. www.sygonix.com...
  • Seite 6: Sicherheitshinweise

    5. Sicherheitshinweise Lesen Sie zuerst die komplette Bedienungsanlei- tung durch, sie enthält wichtige Informationen für die richtige Montage und den Betrieb. Bei Schäden, die durch Nichtbeachten dieser Be- dienungsanleitung verursacht werden, erlischt die Gewährleistung/Garantie! Für Folgeschäden über- nehmen wir keine Haftung! Bei Sach- oder Personenschäden, die durch un- sachgemäße Handhabung oder Nichtbeachten der Sicherheitshinweise verursacht werden, überneh-...
  • Seite 7 - das Produkt nicht oder nicht richtig arbeitet (fl ackerndes Licht, austretender Qualm bzw. Brand- geruch, hörbare Knistergeräusche, Verfärbungen am Produkt oder angrenzenden Flächen) - das Produkt unter ungünstigen Verhältnissen gela- gert wurde - schwere Transportbeanspruchungen aufgetreten sind Die Haustechnik-Marke fürs ganze Haus. www.sygonix.com...
  • Seite 8 • Lassen Sie das Verpackungsmaterial nicht achtlos liegen, dieses könnte für Kinder zu einem gefährlichen Spielzeug werden. • Gehen Sie vorsichtig mit dem Produkt um, durch Stöße, Schläge oder dem Fall aus bereits geringer Höhe wird es beschädigt. • Sollten Sie noch Fragen haben, die in dieser Bedie- nungsanleitung nicht beantwortet werden, so wen- den Sie sich bitte an uns oder an einen anderen Fach- mann.
  • Seite 9: Bedienungselemente

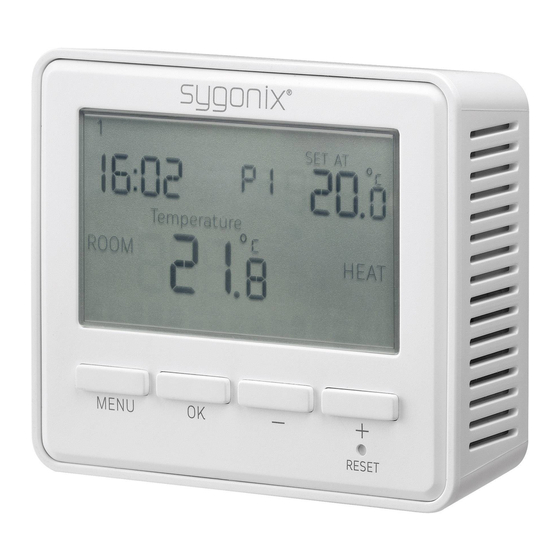
    6. Bedienungselemente LC-Display Taste „OK“ Taste „MENU“ Schraubklemmen Taste „–“ Taste „+“ Taste „RESET“ (versenkt angeordnet) Kontaktzungen zum Anschluss des Bedienteils Öffnungen für Schraubbefestigung 10 Schrauben zur Fixierung des Bedienteils auf der Montage- platte Die Haustechnik-Marke fürs ganze Haus. www.sygonix.com...
  • Seite 10: Montage Und Anschluss

    7. Montage und Anschluss Beachten Sie das Kapitel „Sicherheitshinweise“! • Montieren Sie den Raumthermostat nur auf einem stabilen Untergrund, z.B. an einer Unterputzdose in der Wand. Der Raumthermostat darf nur ortsfest montiert betrieben werden. • Der Raumthermostat muss in der bauseitigen Unterverteilung mit einer 10/16A-Sicherung abgesichert werden.
  • Seite 11 Damit das jeweilige Gerät abhängig von der Temperatur korrekt ein-/ausgeschaltet wird, muss im Einstellmenü „INSTALL SETTINGS“ in der Funktion H1 „HEAT OR COOL“ die gewünschte Betriebsart gewählt werden („HEAT“ = Heiz-Modus, „COOL“ = Kühl-Modus). Die Haustechnik-Marke fürs ganze Haus. www.sygonix.com...
  • Seite 12 • Achten Sie beim Anschluss darauf, dass die Leitungsadern nicht zu lang abisoliert werden und dadurch einen Kurzschluss auslösen. Wie schon beim Anschlussbild beschrieben, ist unbedingt dar- auf zu achten, dass ein Heizgerät an den Klemmen COM1 und NO1 angeschlossen wird und/oder ein Kühlgerät an den Klem- men COM2 und NO2.
  • Seite 13 (z.B. Stromausfall), müssen Sie das Datum und die Uhrzeit neu einstellen bzw. korrigieren. Die restlichen Program- mierungen bleiben erhalten. Bei kürzeren Unterbrechungen der Netzspannung bleiben Datum und Uhrzeit erhalten, da der Raumthermostat über eine interne Stützfunktion mittels einem Kondensator verfügt. Die Haustechnik-Marke fürs ganze Haus. www.sygonix.com...
  • Seite 14: Programmierung (Grundlagen) A) Grundsätzliche Informationen Zur Bedienung

    8. Programmierung (Grundlagen) a) Grundsätzliche Informationen zur Bedienung • Mit der Taste „MENU“ (3) können Sie das Einstellmenü des Raumthermostats aufrufen, eine Funktion verlassen (eine Menüebene zurückspringen) bzw. zur Normalanzeige zurück- kehren. • Die Taste „OK“ (2) dient zur Bestätigung. •...
  • Seite 15 Einstellung der Temperaturhysterese (bei welcher Temperatur- abweichung von der Solltemperatur der Verbraucher ein-/aus- geschaltet wird) • Funktion G11 „ENERGY CONSUME“ Anzeige der Zeitdauer, in welcher der angeschlossene Verbrau- cher aktiviert war • Funktion G12 „KEYLOCK“ Tastensperre aktivieren Die Haustechnik-Marke fürs ganze Haus. www.sygonix.com...
  • Seite 16 • Funktion G13 „BACKLIGHT“ Hintergrundbeleuchtung (bei Tastendruck) ein/aus ► Menü „INSTALL SETTINGS“ • Funktion H1 „HEAT OR COOL“ Umschalten zwischen Heiz- und Kühlbetrieb (abhängig vom gewünschten Betriebsmodus bzw. dem angeschlossenen Ver- braucher (Heiz- oder Kühlgerät) • Funktion H2 „VALVE PROTECT“ Kalkschutz für Heizkörperventil ein/aus •...
  • Seite 17: C) Anzeige Für Eingeschalteten Verbraucher

    Relais aktiviert ist (und da- mit ein angeschlossener Verbraucher eingeschaltet ist). • Heiz-Modus: Symbol „ “ Relais für Anschlussklemmen COM1/NC1/NO1 ist aktiviert • Kühl-Modus: Symbol „ “ Relais für Anschlussklemmen COM2/NC2/NO2 ist aktiviert Die Haustechnik-Marke fürs ganze Haus. www.sygonix.com...
  • Seite 18: Menü „User Settings

    9. Menü „USER SETTINGS“ • Drücken Sie wie in Kapitel 8. b) beschrieben kurz die Taste „MENU“ (3). In der untersten Displayzeile erscheint „USER SETTINGS“. • Mit den Tasten „–“ (5) und „+“ (6) können Sie umschalten zwi- schen „USER SETTINGS“ und „INSTALL SETTINGS“. Wählen Sie „USER SETTINGS“...
  • Seite 19: B) Funktion G2 „Program Setting

    Gehen Sie zur Programmierung in folgenden Schritten vor: Nach der Auswahl der Funktion G2 „PROGRAM SETTING“ und Bestätigung mit der Taste „OK“ (2) blinken am oberen Display- rand die Zahl(en) für die Wochentage bzw. Tagesblöcke. Die Haustechnik-Marke fürs ganze Haus. www.sygonix.com...
  • Seite 20 2. Wählen Sie einen der einzelnen Tage bzw. einen der Tages- blöcke mit den Tasten „–“ (5) und „+“ (6) aus. „1“ = Montag „2“ = Dienstag „3“ = Mittwoch „4“ = Donnerstag „5“ = Freitag „6“ = Samstag „7“ = Sonntag „1 2 3 4 5“...
  • Seite 21: C) Funktion G3 „Program Setback

    Nach der Auswahl der Funktion G3 „PROGRAM SETBACK“ und Bestätigung mit der Taste „OK“ (2) blinkt der Temperatur- Korrekturwert im Display. 2. Stellen Sie mit den Tasten „–“ (5) und „+“ (6) den Korrektur- wert ein (-3,0 °C..+3,0 °C). Die Haustechnik-Marke fürs ganze Haus. www.sygonix.com...
  • Seite 22 3. Bestätigen Sie die Einstellung mit der Taste „OK“ (2). Der Raumthermostat befi ndet sich daraufhin wieder im vor- herigen Menü zur Auswahl der Funktionen. 4. Zum Verlassen des Menüs und zur Rückkehr zur Normal- anzeige drücken Sie die Taste „MENU“ (3) ggf. mehrfach. Beachten Sie: Wenn durch den Korrekturwert das untere oder obere Temperaturlimit (Einstellung siehe Kapitel 9.
  • Seite 23: D) Funktion G4 „Program Copy

    Falls gewünscht, können Sie die Quelldaten auf einen weite- ren Tag umkopieren. Fahren Sie bei Schritt 4 fort. Zum Verlassen der Kopierfunktion und zur Rückkehr zur Nor- malanzeige drücken Sie die Taste „MENU“ (3) ggf. mehrfach. Die Haustechnik-Marke fürs ganze Haus. www.sygonix.com...
  • Seite 24: E) Funktion G5 „Clock Settings

    e) Funktion G5 „CLOCK SETTINGS“ Hier können Sie die Uhrzeitanzeige zwischen dem 12h- und 24h- Modus umschalten und das Datum und die Uhrzeit einstellen. Gehen Sie wie folgt vor: Nach der Auswahl der Funktion G5 „CLOCK SETTINGS“ und Bestätigung mit der Taste „OK“ (2) blinkt die Anzeige „12H“ bzw.
  • Seite 25: F) Funktion G6 „Summertime Set

    3. Bestätigen Sie die Auswahl mit der Taste „OK“ (2). Der Raumthermostat befi ndet sich daraufhin wieder im vor- herigen Menü zur Auswahl der Funktionen. Zum Verlassen des Menüs und zur Rückkehr zur Normal- anzeige drücken Sie die Taste „MENU“ (3) ggf. mehrfach. Die Haustechnik-Marke fürs ganze Haus. www.sygonix.com...
  • Seite 26: G) Funktion G7 „Flort Setting

    g) Funktion G7 „FLORT SETTINGS“ Durch die Verwendung eines zusätzlichen externen Temperatur- fühlers (nicht im Lieferumfang, als Zubehör erhältlich), der an den Klemmen RT1 und RT2 angeschlossen werden muss, ergeben sich weitere Einsatzmöglichkeiten durch den Raumthermostat, z.B. die zusätzliche Überwachung der Fußbodentemperatur einer Fußbodenheizung.
  • Seite 27 Wenn die Funktion G7 „FLORT SETTINGS“ eingeschaltet wurde (Einstellung „YES“), zeigt Ihnen das Display an- schließend wechselweise den Temperaturmesswert des internen und externen Fühlers: Interner Fühler: Anzeige „ROOM Temperature“ Externer Fühler: Anzeige „FLOOR Temperature“ Die Haustechnik-Marke fürs ganze Haus. www.sygonix.com...
  • Seite 28: H) Funktion G8 „Temp Limits

    h) Funktion G8 „TEMP LIMITS“ Sie können hier das untere und obere Temperaturlimit für die Pro- grammierung in der Funktion G2 einstellen. Durch die Einschränkung auf einen kleineren Temperaturbereich (z.B. nur auf +5..+30 °C) wird die Programmierung beschleunigt und man kann nicht versehentlich eine falsche Temperatur pro- grammieren.
  • Seite 29: I) Funktion G9 „Temp Calibrate

    Zum Verlassen des Menüs und zur Rückkehr zur Normal- anzeige drücken Sie die Taste „MENU“ (3) ggf. mehrfach. Wenn ein anderer Wert als 0,0 °C eingestellt wurde, hat sich nun die Temperaturanzeige im Display um den eingestellten Wert erhöht bzw. verringert. Die Haustechnik-Marke fürs ganze Haus. www.sygonix.com...
  • Seite 30: J) Funktion G10 „Swing Setting

    j) Funktion G10 „SWING SETTING“ Damit es nicht zu einem zu häufi gen Ein-/Ausschalten des ange- schlossenen Verbrauchers kommt, kann in der Funktion G10 die sogenannte Hysterese eingestellt werden. Dabei wird der Verbraucher erst dann eingeschaltet, wenn eine bestimmte Abweichung zur Solltemperatur über- bzw. unter- schritten wird (abhängig vom Betriebsmodus H1 („HEAT OR COOL“, Heizen oder Kühlen).
  • Seite 31: K) Funktion G11 „Energy Consume

    2. Drücken Sie die Taste „OK“ (2), so wird „MONTH“ (Monat) an- gezeigt. Jeder Monat steht für eine Einschaltdauer von 720 Stunden. 3. Drücken Sie die Taste „OK“ (2), so wird „YEAR“ (Jahr) ange- zeigt. Jedes Jahr steht für eine Einschaltdauer von 8640 Stunden. Die Haustechnik-Marke fürs ganze Haus. www.sygonix.com...
  • Seite 32: L) Funktion G12 „Keylock

    4. Drücken Sie die Taste „OK“ (2), so wird in der untersten Displayzeile „RESET“ angezeigt und im Display blinkt „NO“. 5. Mit den Tasten „–“ (5) und „+“ (6) kann nun zwischen „YES“ und „NO“ gewechselt werden. „YES“ = Einschaltdauer (Werte bei „WEEK“/„MONTH“/„YEAR“) zurücksetzen „NO“...
  • Seite 33: M) Funktion G13 „Backlight

    3. Bestätigen Sie die Auswahl mit der Taste „OK“ (2). Der Raumthermostat befi ndet sich daraufhin wieder im vor- herigen Menü zur Auswahl der Funktionen. Zum Verlassen des Menüs und zur Rückkehr zur Normal- anzeige drücken Sie die Taste „MENU“ (3) ggf. mehrfach. Die Haustechnik-Marke fürs ganze Haus. www.sygonix.com...
  • Seite 34: Menü „Install Settings

    10. Menü „INSTALL SETTINGS“ • Drücken Sie wie in Kapitel 8. b) beschrieben kurz die Taste „MENU“ (3). In der untersten Displayzeile erscheint „USER SETTINGS“. • Mit den Tasten „–“ (5) und „+“ (6) können Sie umschalten zwi- schen „USER SETTINGS“ und „INSTALL SETTINGS“. Wählen Sie „INSTALL SETTINGS“...
  • Seite 35 Achten Sie bei der Erstinbetriebnahme des Raumther- mostats unbedingt darauf, dass der richtige Betriebsmo- dus eingestellt ist, abhängig davon, ob Sie ein Heiz- oder Kühlgerät ansteuern wollen. In der Grundeinstellung ist „HEAT“ (Heiz-Modus) vorein- gestellt. Die Haustechnik-Marke fürs ganze Haus. www.sygonix.com...
  • Seite 36: B) Funktion H2 „Valve Protect

    b) Funktion H2 „VALVE PROTECT“ Bei Ansteuerung eines elektrisch betriebenen Heizkörperventils kann diese Funktion helfen, ein Verkalken des Ventils zu vermei- den. Ist die Kalkschutz-Funktion eingeschaltet, so wird der ange- schlossene Verbraucher jeden Tag um 10:00 Uhr (vormittags) für die Dauer von 1 bis 10 Minuten (einstellbar) aktiviert, unabhängig von der jeweils vorhandenen Programmierung.
  • Seite 37: C) Funktion H3 „Frost Protect

    3. Bestätigen Sie die Einstellung mit der Taste „OK“ (2). Der Raumthermostat befi ndet sich daraufhin wieder im vor- herigen Menü zur Auswahl der Funktionen. Zum Verlassen des Menüs und zur Rückkehr zur Normal- anzeige drücken Sie die Taste „MENU“ (3) ggf. mehrfach. Die Haustechnik-Marke fürs ganze Haus. www.sygonix.com...
  • Seite 38: D) Funktion H4 „Optimum Start

    d) Funktion H4 „OPTIMUM START“ Die Funktion „OPTIMUM START“ ist nur im Heiz-Modus (siehe Kapitel 10. a) verfügbar. Je nach angeschlossener Heizung, Raumgröße und Umgebungs- bedingungen kann der angeschlossene Verbraucher ggf. früher aktiviert werden, um die gewünschte Temperatur schneller zu er- reichen.
  • Seite 39: E) Funktion H5 „Reset All

    Sekunden (währenddessen sind alle Tasten ohne Funktion). Der Raumthermostat befi ndet sich daraufhin wieder im vor- herigen Menü zur Auswahl der Funktionen. Zum Verlassen des Menüs und zur Rückkehr zur Normal- anzeige drücken Sie die Taste „MENU“ (3) ggf. mehrfach. Die Haustechnik-Marke fürs ganze Haus. www.sygonix.com...
  • Seite 40: Sonstige Funktionen

    11. Sonstige Funktionen a) Raumthermostat aus-/einschalten Soll der Raumthermostat vorübergehend ausgeschaltet werden, um z.B. ein laufendes Programm für einige Tage zu unterbrechen, so gehen Sie wie folgt vor: Halten Sie in der normalen Anzeige des Raumthermostats (Uhrzeit/Temperatur im Display) die Taste „MENU“ (3) für 10 Sekunden gedrückt.
  • Seite 41: B) Manuelle Temperaturvorwahl

    Sie können die manuelle Betriebsart auch selbst beenden, indem Sie die Taste „MENU“ (3) oder „OK“ (2) kurz drücken. Wenn die manuelle Betriebsart beendet wurde, verschwindet das Hand-Symbol. Die Temperatursteuerung übernimmt nun wieder das eingestellte Programm. Die Haustechnik-Marke fürs ganze Haus. www.sygonix.com...
  • Seite 42: C) Manuelle Temperaturvorwahl Für 1

    c) Manuelle Temperaturvorwahl für 1..24 Stunden Die manuelle Temperaturvorwahl (siehe Kapitel 11. b) kann auch für eine feste Zeit von 1..24 Stunden gelten. Während dieser Zeit- dauer wird die bestehende Programmierung nicht ausgeführt. Diese Funktion ist nur dann möglich, wenn eine Pro- grammierung vorhanden ist (siehe Kapitel 9.
  • Seite 43: D) Manuelle Temperaturvorwahl Für 1

    Sie können die manuelle Temperaturvorwahl vorzeitig beenden, indem Sie die Taste „MENU“ (3) oder „OK“ (2) kurz drücken. Wenn die manuelle Temperaturvorwahl beendet wurde, ver- schwindet das Hand-Symbol. Die Temperatursteuerung über- nimmt nun wieder das eingestellte Programm. Die Haustechnik-Marke fürs ganze Haus. www.sygonix.com...
  • Seite 44: Störungsbeseitigung

    12. Störungsbeseitigung Verbraucher schaltet zu häufi g ein/aus • Stellen Sie im Menü „USER SETTINGS“ in der Funktion G10 „SWING SETTING“ einen höheren Wert ein (Grundeinstellung ist 0,5 °C). Manuelle Temperaturvorwahl nicht möglich • Führen Sie zunächst eine Programmierung durch, siehe Kapitel 9.
  • Seite 45: Wartung Und Reinigung

    0,2 °C bis 2,0 °C Frostschutz-Funktion: Ja (ein-/ausschaltbar) Kalkschutz-Funktion: Ja (ein-/ausschaltbar) Schaltkontakt: Relais, einpolig (ein Relais für Heiz-Modus, ein Relais für Kühl-Modus) Abmessungen: 97 x 85 x 36 mm (B x H x T) Gewicht: 220 g Die Haustechnik-Marke fürs ganze Haus. www.sygonix.com...
  • Seite 46 Table of Contents Page Introduction................46 2. Intended Use................47 3. Scope of Delivery ................47 4. Explanation of Symbols .............47 5. Safety Information..............48 6. Operating Elements ..............51 7. Installation and Connection ............. 52 8. Programming (Basics) a) General Information on Operation ........56 b) Calling up or Leaving the Main Menu ........
  • Seite 47: Introduction

    Contact: Phone Number: +49 180 5 665544* Email: service@sygonix.com Website: www.sygonix.com * 0.14 €/min. from German landlines, maximum 0.42 €/min. from mobile phones, prices from abroad may deviate. The home technology brand for the entire house. More information at www.sygonix.com...
  • Seite 48: Intended Use

    2. Intended Use The room thermostat can activate or deactivate a connected consumer according to temperature. Temperature measurement takes place via an internal sensor. An additional external temperature sensor is available as an ac- cessory. It can be used, e.g., for control in connection with a fl oor heating.
  • Seite 49: Safety Information

    • The product must only be operated with mains voltage (see „Technical Data“). Never try to operate the prod- uct with any other voltage. It would be destroyed by this. The home technology brand for the entire house. More information at www.sygonix.com...
  • Seite 50 A device for all-pin separation fro,m the mains voltage must be provided on the installation side (e.g. FI circuit breaker). • The product may be operated stationarily installed. • The product is constructed according to protection class II. • Do not use the product inside of rooms or in bad am- bient conditions where fl...
  • Seite 51 • If you have questions which remained unanswered in these operating instructions, please contact us or an- other expert. The home technology brand for the entire house. More information at www.sygonix.com...
  • Seite 52: Operating Elements

    6. Operating Elements LC display “OK” button “MENU” button Screw connectors Button “–” Button “+” Button “RESET” (recessed) Contact tabs for connection of the operating unit Apertures for screw-mounting 10 Screws for fastening the operating unit on the assembly plate...
  • Seite 53: Installation And Connection

    (not enclosed, can be ordered as accessories) can be connected. Note the connection chart on the following page. The home technology brand for the entire house. More information at www.sygonix.com...
  • Seite 54 Connection chart: COM2 COM1 N, L Terminal clamps for mains voltage COM1, NC1, NO1 Terminal clamps for heater COM2, NC2, NO2 Terminal clamps for cooling device RT1, RT2 Terminal clamp for external temperature sensor The room thermostat offers the option of connecting both a heater (electrical heater) and a cooler (fan, air conditioner).
  • Seite 55 Observe that the contact tabs (8) point up and the screws (10) down. Check for tight fi t of the assembly plate. The home technology brand for the entire house. More information at www.sygonix.com...
  • Seite 56 • First place the operating unit into the assembly plate at the top (roughly at an angle of 20°). Push the operating unit slightly down and turn it fl at onto the assembly plate. • First fasten the operating unit to the assembly plate with the two screws (10).
  • Seite 57: Programming (Basics) A) General Information On Operation

    (the time and the cur- rently measured temperature appears again). The following functions are available in the two menus (more pre- cise description in the next subchapters): The home technology brand for the entire house. More information at www.sygonix.com...
  • Seite 58 ► Menu “USER SETTINGS” • Function G1 “PROGRAM SELECT” Select programme memory (1, 2 or 3) • Function G2 “PROGRAM SETTING” Programming of the temperatures/times (P1..P7) • Function G3 “PROGRAM SETBACK” Temperature change for all programmes • Function G4 “PROGRAM COPY” Programme copying function •...
  • Seite 59 G2. The programming for a specifi c day can be copied to one or several days if required with the function G4. The home technology brand for the entire house. More information at www.sygonix.com...
  • Seite 60: C) Display For Activated Consumers

    c) Display for Activated Consumers An icon is displayed to the right of the room temperature display when the corresponding relay is activated (and a connected con- sumer therefore is activated). • Heating mode: Icon “ ” Relay for connection terminals COM1/NC1/NO1 is activated •...
  • Seite 61: Menu "User Settings

    The room thermostat is then in the previous menu for selec- tion of functions again. 4. To leave the menu and return to the regular display, push the button “MENU” (3), repeatedly if required. The home technology brand for the entire house. More information at www.sygonix.com...
  • Seite 62: B) Function G2 "Program Setting

    b) Function G2 “PROGRAM SETTING” The desired times and temperatures within which the room ther- mostat activates or deactivates the connected consumer accord- ing to temperature are set here. For example, you can specify that a temperature of 20.0 °C applies from 06:00 AM onwards, followed by a temperature of 18.0 °C from 09:00 AM onwards for the rest of the day.
  • Seite 63 You may now programme the next day if desired (for the copy function, see chapter 9. d). Use the button “MENU” (3) to return to the respective previ- ous programming step if desired. The home technology brand for the entire house. More information at www.sygonix.com...
  • Seite 64: C) Function G3 "Program Setback

    Note: Incorrect programming of times is automatically prevent- ed so that the switching processes are not confused. If you have, e.g., set a temperature of 20.0 °C from 06:00 onwards in memory slot “P1” and a temperature of 18.0 °C from 09:00 onwards in memory slot “P2”, the memory slot “P3”...
  • Seite 65 The temperature saved for P1 and P3 has changed based on the temperature limits (marked in bold at the top). If required, the temperatures in function G2 “PROGRAM SETTING” therefore must be accordingly reset manually! The home technology brand for the entire house. More information at www.sygonix.com...
  • Seite 66: D) Function G4 "Program Copy

    d) Function G4 “PROGRAM COPY” This function is used to copy the entire programme (times/tem- peratures) of a specifi c day to another day. Proceed as follows: After selecting this function G4 “PROGRAM COPY” and con- fi rming with “OK” (2), the number of the weekday fl ashes at the upper edge of the display and “PROGRAM COPY”...
  • Seite 67: E) Function G5 "Clock Settings

    (display “HOUR” at the bottom of the display). 10. Set the hours with the buttons “–” (5) or “+” (6) (for quick ad- justment, keep the respective button pushed). The home technology brand for the entire house. More information at www.sygonix.com...
  • Seite 68: F) Function G6 "Summertime Set

    11. Confi rm the setting with “OK” (2). The hours of the time fl ash in the display (display “MIN” at the bottom of the display). 12. Set the minutes with the buttons “–” (5) or “+” (6) (for quick adjustment, keep the respective button pushed).
  • Seite 69: G) Function G7 "Flort Setting

    If the room temperature is above 25.5 °C AND the fl oor tempera- ture below 27.5 °C, the connected consumer is activated and the symbol “ ” appears. The home technology brand for the entire house. More information at www.sygonix.com...
  • Seite 70 Proceed as follows: After selecting this function G7 “FLORT SETTINGS“ and con- fi rming with “OK“ (2), the display “YES“ or “NO“ fl ashes. 2. Use the buttons “–” (5) and “+” (6) to select: “YES” = External sensor activated “NO”...
  • Seite 71: H) Function G8 "Temp Limits

    The room thermostat is then in the previous menu for selec- tion of functions again. To leave the menu and return to the regular display, push the button „MENU“ (3), repeatedly if required. The home technology brand for the entire house. More information at www.sygonix.com...
  • Seite 72: I) Function G9 "Temp Calibrate

    i) Function G9 “TEMP CALIBRATE” This function permits calibrating the temperature with a reference value or setting a temperature offset. Assuming that the temperature display of another thermom- eter shows +22.0 °C and the display of the room thermostat shows +21.8 °C, an offset of +0.2 °C must be set for the function G9.
  • Seite 73: J) Function G10 "Swing Setting

    To leave the menu and return to the regular display, push the button “MENU” (3), repeatedly if required. Observe that a low hysteresis value leads to very fre- quent activation/deactivation of the consumer! The home technology brand for the entire house. More information at www.sygonix.com...
  • Seite 74: K) Function G11 "Energy Consume

    k) Function G11 “ENERGY CONSUME” For the operating duration of the consumer to be monitored, this function can display the time of how long the consumer was ac- tivated. Note: The time displayed is not the actual energy “consump- tion” (power consumption), but only the time during which the mains socket at the front of the universal ther- mostat was active.
  • Seite 75: L) Function G12 "Keylock

    To leave the menu and return to the regular display, push the button “MENU” (3), repeatedly if required. b) Selection of “YES” (Activate the Key Lock) Wait until the regular display appears again (after approx. 15 seconds). The home technology brand for the entire house. More information at www.sygonix.com...
  • Seite 76: M) Function G13 "Backlight

    With the keylock activated, the display shows a small lock icon next to the temperature. Nothing happens anymore now when pushing the button “–” (5) or “+” (6); when pushing the button “MENU” (3) or “OK” (2), the display “CODE” appears and the number “0” fl ashes. To revoke the key lock, enter the code “3”...
  • Seite 77: Menu "Install Settings

    • “COOL” = cooling mode The consumer is activated when the measured temperature is above the value programmed. Use this operating mode when the you want to control a cool- ing device/fan. The home technology brand for the entire house. More information at www.sygonix.com...
  • Seite 78 Proceed as follows: After selecting this function H1 “HEAT OR COOL” and confi rm- ing with “OK” (2), the display “HEAT“ or “COOL” fl ashes at the right edge of the display. 2. Use the buttons “–” (5) and “+” (6) to switch between “HEAT” and “COOL“...
  • Seite 79: B) Function H2 "Valve Protect

    To leave the menu and return to the regular display, push the button “MENU” (3), repeatedly if required. The function should only be activated if the room ther- mostat controls a suitable consumer. The home technology brand for the entire house. More information at www.sygonix.com...
  • Seite 80: C) Function H3 "Frost Protect

    c) Function H3 “FROST PROTECT” The function “FROST PROTECT” is only available in heat- ing mode (see chapter 10. a) or if the room thermostat was deactivated (see chapter 11 a). To protect a liquid-based heating from freezing, the frost-protec- tion function can be activated.
  • Seite 81: D) Function H4 "Optimum Start

    The room thermostat is then in the previous menu for selec- tion of functions again. To leave the menu and return to the regular display, push the button “MENU“ (3), repeatedly if required. The home technology brand for the entire house. More information at www.sygonix.com...
  • Seite 82: E) Function H5 "Reset All

    e) Function H5 “RESET ALL” This resets the room thermostat to factory settings. All settings and programming are lost irrevocably. Then proceed as described in the chapters above for programming. Proceed as follows: After selecting this function H5 “RESET ALL” and confi rming with “OK”...
  • Seite 83: Other

    (time/tem- perature in the display). Then the display “OFF” at the lower left of the display disap- pears. The room thermostat works again according to pro- gramming. The home technology brand for the entire house. More information at www.sygonix.com...
  • Seite 84: B) Manual Temperature Preselection

    b) Manual Temperature Preselection You can skip the present programming at any time and manually set the desired temperature. This function is available only if a programming is present (see chapter 9. b). This is not the case at initial commissioning (or after re- start).
  • Seite 85: C) Manual Temperature Preselection For 1

    “MENU” (3) or “OK” (2). If manual temperature preselection was terminated, the hand icon disappears. The temperature control is taken over by the set programme again. The home technology brand for the entire house. More information at www.sygonix.com...
  • Seite 86: D) Manual Temperature Preselection For 1

    d) Manual Temperature Preselection for 1..99 Days This function (also called holiday function) permits setting the temperature to a fi xed value for an extended period. The present programming is not performed during this time. This function is available only if a programming is present (see chapter 9.
  • Seite 87: Troubleshooting

    “USER SETTINGS”, function G8 “TEMP LIMITS”. A lower temperature limit of +5.0 °C and an upper limit of +45.0 °C is pre-set ex works. The temperature range can be limited accordingly if required. The home technology brand for the entire house. More information at www.sygonix.com...
  • Seite 88: Maintenance And Cleaning

    13. Maintenance and Cleaning Servicing or repair must only be carried out by a specialist or specialist workshop. The product contains no parts that require servicing. Therefore, never open/disassemble it. A dry, soft and clean cloth is suffi cient for cleaning the outside. Do not push the display or housing too strongly.
  • Seite 89 Fonction H4 « OPTIMUM START » ........123 e) Fonction H5 « RESET ALL » ..........124 11. Autres a) Thermostat d’ambiance arrêt / mise en marche .....125 b) Présélection manuelle de la température ......126 La marque de technique domestique pour toute la maison. Davantage d‘informations sur www.sygonix.com...
  • Seite 90: Introduction

    Tous droits réservés. Contact : N° de téléphone : +49 180 5 665544* Courriel : service@sygonix.com Site web : www.sygonix.com * 0,14 €/min depuis le réseau fi xe allemand, 0,42 €/min max. de- puis le réseau mobile allemand, les prix peuvent varier depuis...
  • Seite 91: Utilisation Conforme

    Ce symbole attire l’attention sur les dangers particuliers du- rant la manipulation, le fonctionnement et la commande. Le symbole de la « fl èche » renvoie à des conseils et consignes d’utilisation particuliers. La marque de technique domestique pour toute la maison. Davantage d‘informations sur www.sygonix.com...
  • Seite 92: Consignes De Sécurité

    5. Consignes de sécurité Lisez d’abord l’intégralité du mode d’emploi, il contient des informations importantes à propos du montage et de l’exploitation corrects. Tout dommage résultant d’un non-respect du pré- sent mode d’emploi entraîne l’annulation de la ga- rantie ! Nous déclinons toute responsabilité pour les dommages consécutifs ! De même, le constructeur n’assume aucune res- ponsabilité...
  • Seite 93 - le produit a été stocké dans des conditions défavo- rables - suite à de sévères contraintes liées au transport La marque de technique domestique pour toute la maison. Davantage d‘informations sur www.sygonix.com...
  • Seite 94 • Ne laissez pas le matériel d’emballage sans sur- veillance, il pourrait constituer un jouet dangereux pour les enfants. • Ce produit doit être manipulé avec précaution. Les coups, les chocs ou une chute, même d’une faible hauteur, pourraient l’endommager. •...
  • Seite 95: Éléments De Commande

    Lame de contact pour la connexion de l’unité de commande Orifi ces pour les fi xations par vis 10 Vis pour la fi xation de l’unité de commande sur la plaque de montage La marque de technique domestique pour toute la maison. Davantage d‘informations sur www.sygonix.com...
  • Seite 96: Montage Et Raccordement

    7. Montage et raccordement Observez le chapitre « Consignes de sécurité » ! • Montez uniquement le thermostat d’ambiance sur un support stable, par ex. sur une prise de courant encastrée dans le mur. Le thermostat d’ambiance est uniquement conçu pour un mon- tage stationnaire.
  • Seite 97 (« HEAT » = mode de chauffage, « COOL » = mode de climatisation) « INSTALL SETTINGS » via la fonction H1 « HEAT OR COOL » du menu de confi guration. La marque de technique domestique pour toute la maison. Davantage d‘informations sur www.sygonix.com...
  • Seite 98 • Lors du raccordement, veillez à ne pas trop dénuder les câbles, cela pourrait provoquer un court-circuit. Comme décrit plus haut sur le schéma des connexions, impéra- tivement veiller à raccorder un appareil de chauffage aux bornes COM1 et NO1 et / ou un climatiseur aux bornes COM2 et NO2. Après la mise en service, sélectionner le mode de chauffage ou de climatisation en fonction du type d’appareil raccordé.
  • Seite 99 En cas de coupure brève de la tension du secteur, la date et l’heure sont conservées grâce à la fonction de prise en charge interne du thermostat d’ambiance au moyen d’un condensa- teur. La marque de technique domestique pour toute la maison. Davantage d‘informations sur www.sygonix.com...
  • Seite 100: Programmation (Notions De Base)

    8. Programmation (notions de base) a) Informations fondamentales à propos de la commande • La touche « MENU » (3) permet d’ouvrir le menu de confi gura- tion du thermostat d’ambiance, de ressortir d’une fonction (re- tourner au niveau précédent du menu) ou de rétablir l’affi chage normal.
  • Seite 101 à la température de consigne à partir de laquelle les consommateurs sont allumés ou éteints) • Fonction G11 « ENERGY CONSUME » Affi chage de la durée durant laquelle le consommateur raccor- dé était activé La marque de technique domestique pour toute la maison. Davantage d‘informations sur www.sygonix.com...
  • Seite 102 • Fonction G12 « KEYLOCK » Activer la verrouillage des touches • Fonction G13 « BACKLIGHT » Activer et désactiver le rétroéclairage (en cas de pression sur une touche) ► Menu « INSTALL SETTINGS » • Fonction H1 « HEAT OR COOL » Commutation entre le mode de chauffage et le mode de clima- tisation (en fonction du mode de fonctionnement souhaité...
  • Seite 103: C) Affi Chage Pour Les Consommateurs Allumés

    • Mode de chauffage : Symbole « » Relais pour bornes de connexion COM1/NC1/NO1 est activé • Mode de refroidissement : Symbole « » Relais pour bornes de connexion COM2/NC2/NO2 est activé La marque de technique domestique pour toute la maison. Davantage d‘informations sur www.sygonix.com...
  • Seite 104: Menu « User Settings

    9. Menu « USER SETTINGS » • Appuyez brièvement sur la touche « MENU » (3) en procédant de la manière décrite dans le chapitre 8. b). L’indication « USER SETTINGS » s’affi che dans la dernière ligne de l’écran. •...
  • Seite 105: B) Fonction G2 « Program Setting

    GRAM SETTING » en appuyant sur la touche « OK » (2), le ou les chiffres pour les jours ou plages de jours de la semaine clignotent sur le bord supérieur de l’écran. La marque de technique domestique pour toute la maison. Davantage d‘informations sur www.sygonix.com...
  • Seite 106 2. Sélectionnez un jour précis ou une plages de jours à l’aide des touches « – » (5) et « + » (6). « 1 » = Lundi « 2 » = Mardi « 3 » = Mercredi « 4 » = Jeudi «...
  • Seite 107: C) Fonction G3 « Program Setback

    2. À l’aide des touches « – » (5) et « + » (6), défi nissez la valeur correctrice (-3,0 °C à +3,0 °C). La marque de technique domestique pour toute la maison. Davantage d‘informations sur www.sygonix.com...
  • Seite 108 3. Confi rmez le réglage à l’aide de la touche « OK » (2). Le thermostat d’ambiance retourne alors au menu précédent pour la sélection des fonctions. 4. Pour quitter le menu et retourner à l’affi chage normal, ap- puyez, le cas échéant plusieurs fois, sur la touche « MENU » (3). Veuillez noter : En cas de dépassement vers le bas ou vers le haut de la limite inférieure ou supérieure de la température en...
  • Seite 109: D) Fonction G4 « Program Copy

    Poursuivez à l’étape 4. Pour quitter la fonction de copie et retourner à l’affi chage normal, appuyez, le cas échéant plusieurs fois, sur la touche « MENU » (3). La marque de technique domestique pour toute la maison. Davantage d‘informations sur www.sygonix.com...
  • Seite 110: E) Fonction G5 « Clock Settings

    e) Fonction G5 « CLOCK SETTINGS » Vous pouvez ici basculer l’affi chage de l’heure entre le mode 12h et le mode 24h et défi nir la date et l’heure. Procédez de la manière suivante : Après avoir sélectionné puis validé la fonction G5 « CLOCK SETTINGS »...
  • Seite 111: F) Fonction G6 « Summertime Set

    Pour quitter le menu et retourner à l’affi chage normal, ap- puyez, le cas échéant plusieurs fois, sur la touche « MENU » (3). La marque de technique domestique pour toute la maison. Davantage d‘informations sur www.sygonix.com...
  • Seite 112: G) Fonction G7 « Flort Setting

    g) Fonction G7 « FLORT SETTINGS » L’utilisation d’une sonde de température externe supplémentaire (non fournie, à commander séparément), à raccorder aux bornes RT1 et RT2, offre de nouvelles possibilités d’utilisation pour le thermostat d’ambiance, par ex. la surveillance supplémentaire de la température d’un plancher chauffant.
  • Seite 113 : Sonde interne : Affi chage « ROOM Temperature » Sonde externe : Affi chage « FLOOR Temperature » La marque de technique domestique pour toute la maison. Davantage d‘informations sur www.sygonix.com...
  • Seite 114: H) Fonction G8 « Temp Limits

    h) Fonction G8 « TEMP LIMITS » Vous pouvez ici défi nir une limite inférieure et une limite supé- rieure pour la programmation de la température à partir de la fonction G2. Grâce à la limitation à une petite plage de température (par ex. uniquement +5 à...
  • Seite 115: I) Fonction G9 « Temp Calibrate

    échéant plusieurs fois, sur la touche « MENU » (3). En cas de défi nition d’une valeur autre que 0,0 °C, l’affi chage de la température sur l’écran a maintenant été augmenté ou dimi- nué. La marque de technique domestique pour toute la maison. Davantage d‘informations sur www.sygonix.com...
  • Seite 116: J) Fonction G10 « Swing Setting

    j) Fonction G10 « SWING SETTING » Afi n d’éviter des mises en marche et des arrêts fréquents du consommateur raccordé, il est possible de défi nir l’hystérèse à partir de la fonction G10. Le consommateur est alors uniquement allumé en présence d’un écart précis vers le haut ou vers le bas par rapport à...
  • Seite 117: K) Fonction G11 « Energy Consume

    3. Appuyez sur la touche « OK » (2), l’indication « YEAR » (année) s’affi che. Chaque année équivaut à une durée de fonctionnement de 8 640 heures. La marque de technique domestique pour toute la maison. Davantage d‘informations sur www.sygonix.com...
  • Seite 118: L) Fonction G12 « Keylock

    4. Appuyez sur la touche « OK » (2), l’indication « RESET » s’affi che sur la dernière ligne de l’écran et l’indication « NO » clignote sur l’écran. 5. À l’aide des touches « – » (5) et « + » (6), vous pouvez mainte- nant basculer entre les options «...
  • Seite 119: M) Fonction G13 « Backlight

    Pour quitter le menu et retourner à l’affi chage normal, ap- puyez, le cas échéant plusieurs fois, sur la touche « MENU » (3). La marque de technique domestique pour toute la maison. Davantage d‘informations sur www.sygonix.com...
  • Seite 120: Menu « Install Settings

    10. Menu « INSTALL SETTINGS » • Appuyez brièvement sur la touche « MENU » (3) en procédant de la manière décrite dans le chapitre 8. b). L’indication « USER SETTINGS » s’affi che dans la dernière ligne de l’écran. •...
  • Seite 121 à sélectionner le bon mode de fonctionnement selon que vous souhaitiez piloter un appareil de chauffage ou un climatiseur. Le mode de chauffage (« HEAT ») est présélectionné par défaut. La marque de technique domestique pour toute la maison. Davantage d‘informations sur www.sygonix.com...
  • Seite 122: B) Fonction H2 « Valve Protect

    b) Fonction H2 « VALVE PROTECT » En cas d’excitation d’une vanne de radiateur à commande élec- trique, cette fonction permet d’éviter un entartrage de la vanne. Lorsque la fonction anti-calcaire est activée, le consommateur raccordé est allumé tous les jours à 10h00 (du matin) pendant 1 à...
  • Seite 123: C) Fonction H3 « Frost Protect

    Pour quitter le menu et retourner à l’affi chage normal, ap- puyez, le cas échéant plusieurs fois, sur la touche « MENU » (3). La marque de technique domestique pour toute la maison. Davantage d‘informations sur www.sygonix.com...
  • Seite 124: D) Fonction H4 « Optimum Start

    d) Fonction H4 « OPTIMUM START » La fonction « OPTIMUM START » est uniquement dispo- nible en mode de chauffage (voir chapitre 10. a). En fonction du chauffage raccordé, de la taille de la pièce et des conditions ambiantes, le consommateur raccordé peut, le cas échéant, être allumé...
  • Seite 125: E) Fonction H5 « Reset All

    Pour quitter le menu et retourner à l’affi chage normal, ap- puyez, le cas échéant plusieurs fois, sur la touche « MENU » (3). La marque de technique domestique pour toute la maison. Davantage d‘informations sur www.sygonix.com...
  • Seite 126: Autres Fonctions

    11. Autres fonctions a) Thermostat d’ambiance arrêt / mise en marche Si vous souhaitez temporairement éteindre le thermostat d’am- biance, par ex. pour interrompre un programme en cours pendant quelques jours, procédez de la manière suivante : Maintenez la touche « MENU » (3) enfoncée pendant 10 se- condes sur l’écran normal du thermostat d’ambiance (heure / température sur l’écran).
  • Seite 127: B) Présélection Manuelle De La Température

    « OK » (2). Si le mode de fonctionnement manuel est terminé, le symbole de main disparaît de l’écran. La gestion de la température reprend le programme sélectionné. La marque de technique domestique pour toute la maison. Davantage d‘informations sur www.sygonix.com...
  • Seite 128: C) Présélection Manuelle De La Température Pour 1 À 24 Heures

    c) Présélection manuelle de la température pour 1 à 24 heures La présélection manuelle de la température (voir chapitre 11. b) peut également être valable pour une durée déterminée com- prise entre 1 et 24 heures. La programmation n’est pas exécutée pendant cette durée.
  • Seite 129: D) Présélection Manuelle De La Température Pour 1 À 99 Jours

    4. Défi nissez la durée souhaitée (1 à 99 jours) à l’aide des touches « – » (5) et « + » (6). Maintenez la touche correspon- dante enfoncée pour faire défi ler les chiffres plus rapidement. La marque de technique domestique pour toute la maison. Davantage d‘informations sur www.sygonix.com...
  • Seite 130: Dépannage

    5. Confi rmez le réglage à l’aide de la touche « OK » (2). L’écran normal est à nouveau affi ché sur le thermostat d’am- biance. Vous pouvez désactiver plus tôt la présélection manuelle de la température en appuyant brièvement sur la touche « MENU » (3) ou «...
  • Seite 131: Entretien Et Nettoyage

    être éliminés avec les ordures ménagères ! À la fi n de sa durée de vie, éliminez le produit conformé- ment aux dispositions légales en vigueur. La marque de technique domestique pour toute la maison. Davantage d‘informations sur www.sygonix.com...
  • Seite 132: Caractéristiques Techniques

    15. Caractéristiques techniques Tension de service : 230 V/CA, 50 Hz Puissance raccordée : 3 680 W (230 V/CA, 16 A) Points de commutation de la température : max. 7 par jour Plage de commande de la température : +5 °C à +45 °C Hystérèse : 0,2 °C à...
  • Seite 133 Functie H1 „HEAT OR COOL“ ..........163 b) Functie H2 „VALVE PROTECT“ ...........165 c) Functie H3 „FROST PROTECT“ ...........166 d) Functie H4 „OPTIMUM START“ .......... 167 e) Functie H5 „RESET ALL“ .............168 Het merk voor huistechniek voor het hele huis. Kijk voor meer informatie op www.sygonix.com...
  • Seite 134: Inleiding

    Alle vermelde bedrijfs- en productnamen zijn handelsmerken van de respectievelijke eigenaren. Alle rechten voorbehouden. Contact: Telefoonnummer: +49 180 5 665544* E-mailadres: service@sygonix.com Website: www.sygonix.com * 0,14 €/min. van een Duits vast netwerk, maximum 0,42 €/min. van een mobiel netwerk, prijzen uit het buitenland kunnen afwijken.
  • Seite 135: Voorgeschreven Gebruik

    Dit symbool verwijst naar speciale gevaren bij het ge- bruik, de ingebruikneming of bediening. Het „pijl“-symbool wijst op speciale tips en bedienings- voorschriften. Het merk voor huistechniek voor het hele huis. Kijk voor meer informatie op www.sygonix.com...
  • Seite 136: Veiligheidsvoorschriften

    5. Veiligheidsvoorschriften Lees eerst de volledige gebruiksaanwijzing. Ze be- vat belangrijke informatie voor de correcte montage en het correct gebruik. Bij schade veroorzaakt door het niet opvolgen van deze gebruiksaanwijzing, vervalt het recht op garan- tie! Voor vervolgschade die hieruit ontstaat, zijn wij niet aansprakelijk! Wij kunnen niet aansprakelijk worden gesteld voor materiële schade of persoonlijk letsel als gevolg van...
  • Seite 137 - het product onder ongunstige omstandigheden op- geslagen werd - wanneer er zware transportbelasting is opgetreden Het merk voor huistechniek voor het hele huis. Kijk voor meer informatie op www.sygonix.com...
  • Seite 138 • Laat verpakkingsmateriaal niet achteloos liggen. Dit kan voor kinderen gevaarlijk speelgoed zijn. • Behandel het product voorzichtig, door stoten, schok- ken of een val - zelfs van geringe hoogte - kan het beschadigen. • Gelieve u tot onze technische helpdesk of een andere vakman te wenden indien u vragen heeft die niet op- gehelderd worden in deze gebruiksaanwijzing.
  • Seite 139: Bedieningselementen

    Toets „RESET“ (verzonken opgesteld) Reedcontacten voor de aansluiting van het bedienpaneel Openingen voor schroefbevestiging 10 Schroeven ter fi xering van het bedienpaneel op de montage- plaat Het merk voor huistechniek voor het hele huis. Kijk voor meer informatie op www.sygonix.com...
  • Seite 140: Montage En Aansluiting

    7. Montage en aansluiting Houd rekening met het hoofdstuk “Veiligheidsvoor- schriften“! • Monteer de kamerthermostaat uitsluitend op een stabiele ondergrond,vb. aan een inbouwdoos in de muur. De kamer- thermostaat mag uitsluitend worden gebruikt wanneer het vast op een plaats is gemonteerd. •...
  • Seite 141 „INSTALL SETTINGS“ in de functie H1 „HEAT OR COOL“ de gewenste bedrijfsmodus worden gekozen („HEAT“ = verwarmingsmodus, „COOL“ = koelmodus). Het merk voor huistechniek voor het hele huis. Kijk voor meer informatie op www.sygonix.com...
  • Seite 142 • Let bij de aansluiting op dat de leidingsaders niet te lang wor- den gestript en daardoor eveneens een kortsluiting veroorza- ken. Zoals reeds bij de aansluitafbeelding is beschreven, moet wor- den opgelet dat een verwarmingsapparaat aan de klemmen COM1 en NO1 wordt aangesloten en/of een koelapparaat aan de klemmen COM2 und NO2.
  • Seite 143 De overige programmeringen blijven behouden. Bij kortere onderbrekingen van de netspanning blijven datum en tijd behouden aangezien de kamerthermostsaat via een interne steunfunctie over een condensator beschikt. Het merk voor huistechniek voor het hele huis. Kijk voor meer informatie op www.sygonix.com...
  • Seite 144: Programmering (Basisprincipes) A) Algemene Informatie Voor De Bediening

    8. Programmering (basisprincipes) a) Algemene informatie voor de bediening • Met de toets „MENU“ (3) kunt u het instelmenu van de kamer- thermostaat oproepen, een functie verlaten (een menuniveau terugkeren), resp. naar de normale weergave terugkeren. • De toets „OK“ (2) dient ter bevestiging. •...
  • Seite 145 • Functie G11 „ENERGY CONSUME“ Weergave van de tijdsduur in dewelke de aangesloten verbrui- ker geactiveerd was • Functie G12 „KEYLOCK“ Toetsenbordblokkering activeren Het merk voor huistechniek voor het hele huis. Kijk voor meer informatie op www.sygonix.com...
  • Seite 146 • Functie G13 „BACKLIGHT“ Achtergrondverlichting (bij druk op de toets) aan/uit ► Menu „INSTALL SETTINGS“ • Functie H1 „HEAT OR COOL“ Omschakelen tussen verwarmings- en koelbedrijf (afhankelijk van de gewenste bedrijfsmodus, resp. de aangesloten verbrui- ker (verwarmings- of koelapparaat) • Functie H2 „VALVE PROTECT“ Kalkbescherming voor radiatorventiel aan/uit •...
  • Seite 147: C) Weergave Voor Ingeschakelde Verbruiker

    (en zo een aangesloten verbruiker is ingeschakeld). • Verwarmingsmodus: Symbool „ “ Relais voor aansluitklemmen COM1/NC1/NO1 is geactiveerd • Koelmodus: Symbool „ “ Relais voor aansluitklemmen COM2/NC2/NO2 is geactiveerd Het merk voor huistechniek voor het hele huis. Kijk voor meer informatie op www.sygonix.com...
  • Seite 148: Menu User Settings

    9. Menu USER SETTINGS“ „ • Druk kort op de toets „MENU“ (3), zoals beschreven in hoofd- stuk 8. b). In de onderste dispalyregel verschijnt „USER SETTINGS“. • Met de toetsen „–“ (5) en „+“ (6) kunt u omschakelen tussen „USER SETTINGS“...
  • Seite 149: B) Functie G2 „Program Setting

    Na de selectie van de functie G2 „PROGRAM SETTING“ en be- vestiging met de toets „OK“ (2) knipperen de getallen voor de weekdagen, resp. dagblokken aan de bovenste schermrand. Het merk voor huistechniek voor het hele huis. Kijk voor meer informatie op www.sygonix.com...
  • Seite 150 2. Selecteer een van de afzonderlijke dagen, resp. een van de dagblokken met de toetsen „–“ (5) en „+“ (6). „1“ = maandag „2“ = dinsdag „3“ = woensdag „4“ = donderdag „5“ = vrijdag „6“ = zaterdag „7“ = zondag „1 2 3 4 5“...
  • Seite 151: C) Functie G3 "Program Setback

    „OK“ (2) knippert het temperatuur correc- tiewaarde op het scherm. 2. Stel met de toetsen „–“ (5) en „+“ (6) de correctiewaarde in (-3,0 °C..+3,0 °C). Het merk voor huistechniek voor het hele huis. Kijk voor meer informatie op www.sygonix.com...
  • Seite 152 3. Bevestig de instelling met de toets „OK“ (2). De kamerthermostaat bevindt zich daarop opnieuw in het vorige menu ter selectie van de functies. 4. Om het menu te verlaten en naar de normale weergave terug te keren, drukt u evt. meermaals op de toets „MENU“ (3). Let op: Als door de correctiewaarde de onderste of bovenste temperatuurgrens (instelling zie hoofdstuk 9.
  • Seite 153: D) Functie G4 "Program Copy

    Ga verder naar stap 4. Om de kopieerfunctie te verlaten en naar de normale weer- gave terug te keren, drukt u evt. meermaals op de toets „MENU“ (3). Het merk voor huistechniek voor het hele huis. Kijk voor meer informatie op www.sygonix.com...
  • Seite 154: E) Functie G5 „Clock Settings

    e) Functie G5 „CLOCK SETTINGS“ Hier kunt u de tijdsweergave omschakelen van 12u- naar 24u- modus en de datum en tijd instellen. Ga als volgt te werk: Na de selectie van functie G5 „CLOCK SETTINGS“ en beves- tiging met de toets „OK“ (2) knippert de aanduiding „12H“, resp.
  • Seite 155: F) Functie G6 "Summertime Set

    Om het menu te verlaten en naar de normale weergave terug te keren, drukt u evt. meermaals op de toets „MENU“ (3). Het merk voor huistechniek voor het hele huis. Kijk voor meer informatie op www.sygonix.com...
  • Seite 156: G) Functie G7 „Flort Setting

    g) Functie G7 “FLORT SETTINGS“ Door het gebruik van een bijkomende externe temperatuur- sensor (niet inbegrepen, als accessoire verkrijgbaar) die aan de klemmen RT1 en RT2 moet worden aangesloten, krijgt de kamer- thermostaat meerdere gebruikstoepassingen, vb. de bijkomende bewaking van de vloertemperatuur van een vloerverwarming. Na het inschakelen van de functie G7 „FLORT SETTINGS“...
  • Seite 157 (instelling „YES“), toont het scherm u vervolgens afwis- selend de temperatuurmeetwaarde van de interne en externe sensor: Interne sensor: aanduiding „ROOM Temperature“ Externe sensor: aanduiding „FLOOR Temperature“ Het merk voor huistechniek voor het hele huis. Kijk voor meer informatie op www.sygonix.com...
  • Seite 158: H) Functie G8 „Temp Limits

    h) Functie G8 „TEMP LIMITS“ U kunt hier de onderste en bovenste temperatuurgrens voor de programmering in de functie G2 instellen. Door de beperking tot een kleiner temperatuurbereik (vb. slechts op +5..+30 °C) wordt de programmering versneld en kan men niet per ongeluk een verkeerde temperatuur programmeren.
  • Seite 159: I) Functie G9 „Temp Calibrate

    „MENU“ (3). Als een andere waarde dan 0,0 °C werd ingesteld, werd de tem- peratuurweergave op het scherm met de ingestelde waarde verhoogd, resp. verlaagd. Het merk voor huistechniek voor het hele huis. Kijk voor meer informatie op www.sygonix.com...
  • Seite 160: J) Functie G10 „Swing Setting

    j) Functie G10 „SWING SETTING“ Opdat het niet tot een te vaak in-/uitschakelen van de aangeslo- ten verbruiker komt, kan in de functie G10 de zogenaamde hyste- rese worden ingesteld. Daarbij wordt de verbruiker pas ingeschakeld, wanneer een be- paalde afwijking tot de richttemperatuur wordt over-, resp. onder- schreden (afhankelijk van de bedrijfsmodus H1 („HEAT OR COOL“, verwarmen of koelen).
  • Seite 161: K) Functie G11 „Energy Consume

    Elk jaar staat voor een inschakelduur van 8640 uur. 4. Drukt u op de toets „OK“ (2) en in de onderste schermregel wordt „RESET“ weergegeven en in het display knippert „NO“. Het merk voor huistechniek voor het hele huis. Kijk voor meer informatie op www.sygonix.com...
  • Seite 162: L) Functie G12 „Keylock

    5. Met de toetsen –“ (5) en „+“ (6) kan nu tussen „YES“ en „NO“ worden gewisseld. „YES“ = inschakelduur (waarden bij „WEEK“/„MONTH“/ „YEAR“) terugzetten „NO“ = annuleren (waarden worden niet teruggezet) 6. Bevestig uw keuze met de toets „OK“ (2). De kamerthermostaat bevindt zich daarop opnieuw in het vorige menu ter selectie van de functies.
  • Seite 163: M) Functie G13 „Backlight

    Om het menu te verlaten en naar de normale weergave terug te keren, drukt u evt. meermaals op de toets „MENU“ (3). Het merk voor huistechniek voor het hele huis. Kijk voor meer informatie op www.sygonix.com...
  • Seite 164: Menu „Install Settings

    10. Menu „INSTALL SETTINGS“ • Druk kort op de toets „MENU“ (3), zoals beschreven in hoofd- stuk 8. b). In de onderste dispalyregel verschijnt „USER SETTINGS“. • Met de toetsen „–“ (5) en „+“ (6) kunt u omschakelen tussen „USER SETTINGS“ en „INSTALL SETTINGS“. Selecteer „INSTALL SETTINGS“...
  • Seite 165 In de basisinstelling is „HEAT“ (verwarmingsmodus) vooringesteld. Het merk voor huistechniek voor het hele huis. Kijk voor meer informatie op www.sygonix.com...
  • Seite 166: B) Functie H2 „Valve Protect

    b) Functie H2 „VALVE PROTECT“ Bij aansturing van een elektrisch aangedreven radiatorvetiel kan deze functie helpen om het verkalken van het ventiel te vermij- den. Als de kalkbeschermfunctie is ingeschakeld, wordt de aangeslo- ten verbruiker elke dag om 10.00u (in de voormiddag) gedurende 1 tot 10 minuten (instelbaar) geactiveerd, onafhankelijk van de respectievelijk aanwezige programmering.
  • Seite 167: C) Functie H3 „Frost Protect

    Om het menu te verlaten en naar de normale weergave terug te keren, drukt u evt. meermaals op de toets „MENU“ (3). Het merk voor huistechniek voor het hele huis. Kijk voor meer informatie op www.sygonix.com...
  • Seite 168: D) Functie H4 „Optimum Start

    d) Functie H4 „OPTIMUM START“ De functie „OPTIMUM START“ is uitsluitend in de verwar- mingsmodus (zie hoofdstuk 10. a) beschikbaar. Naargelang de aangesloten verwarming, kamergrootte en omge- vingsomstandigheden kan de aangesloten verbruiker evt. vroe- ger worden geactiveerd om de gewenste temperatuur sneller te bereiken.
  • Seite 169: E) Functie H5 „Reset All

    Om het menu te verlaten en naar de normale weergave terug te keren, drukt u evt. meermaals op de toets „MENU“ (3). Het merk voor huistechniek voor het hele huis. Kijk voor meer informatie op www.sygonix.com...
  • Seite 170: Overige Functies

    11. Overige functies a) Kamerthermostaat uit-/inschakelen Als de kamerthermostaat tijdelijk moet worden uitgeschakeld, vb. om een lopend programma voor enkele dagen te onderbre- ken, gaat u als volgt te werk: Houd in de normale weergave van de kamerthermostaat (tijd/temperatuur op het scherm) de toets „MENU“ (3) gedu- rende 10 seconden ingedrukt.
  • Seite 171: B) Manuele Temperatuurvoorkeuze

    „MENU“ (3) of „OK“ (2) te drukken. Als de manuele bedrijfsmodus werd beëindigd, verdwijnt het handsymbool. De temperatuursturing neemt nu opnieuw het ingestelde programma over. Het merk voor huistechniek voor het hele huis. Kijk voor meer informatie op www.sygonix.com...
  • Seite 172: C) Manuele Temperatuurvoorkeuze Voor 1

    c) Manuele temperatuurvoorkeuze voor 1..24 uur De manuele temperatuurvoorkeuze (zie hoofdstuk 11. b) kan ook voor een vaste tijd van 1..24 uur gelden. Tijdens deze periode wordt de bestaande programmering niet uitgevoerd. Deze functie is uitsluitend mogelijk als een programme- ring aanwezig is (zie hoofdstuk 9.
  • Seite 173: D) Manuele Temperatuurvoorkeuze Voor 1

    „MENU“ (3) of „OK“ (2) te drukken. Als de manuele temperatuurvoorkeuze werd beëindigd, verdwijnt het handsymbool. De temperatuursturing neemt nu opnieuw het ingestelde programma over. Het merk voor huistechniek voor het hele huis. Kijk voor meer informatie op www.sygonix.com...
  • Seite 174: Storingen Verhelpen

    12. Storingen verhelpen Verbruiker schakelt te vaak in/uit • Stel in het menu „USER SETTINGS“ in de functie G10 „SWING SETTING“ een hogere waarde in (basisinstelling is 0,5 °C). Manuele temperatuurvoorkeuze niet mogelijk • Voer eerst een programmering uit, zie hoofdstuk 9. b). Kamertemperatuur te hoog of te laag •...
  • Seite 175: Onderhoud En Reiniging

    Relais, eenpolig (een relais voor verwarmings- modus, een relais voor koelmodus) Afmetingen: 97 x 85 x 36 mm (B x H x D) Gewicht: 220 g Het merk voor huistechniek voor het hele huis. Kijk voor meer informatie op www.sygonix.com...

Inhaltsverzeichnis