Seite 1
ENGLISH DEUTSCH FRANÇAIS SVENSKA Spirocom L User manual • Gebrauchsanweisung • Manuel de l'utilisateur • Användarmanual 33902D91 2021-03...
Seite 2
Interspiro®, Oxydive® and Divator® are registered trademarks belonging to Interspiro. This publication may not be copied, photocopied, reproduced, translated, or converted to any electronic or machinereadable form in whole or in part, without prior written approval from...
Spirocom L • SpiroCom L • SpiroCom L • SpiroCom L Table of Contents Spirocom L ....................7 Safety notice ..................7 Safety terminology and symbols ..........7 Before use ..................9 Overview ................... 9 Main components ..............9 Install attachment bracket on mask ........... 10 Install Spirocom on mask ............
Seite 4
Spirocom L • SpiroCom L • SpiroCom L • SpiroCom L Einschalten der SpiroCom ............42 Batterie-Füllstand ..............42 Funkübertragung mit größerer Reichweite (PTT) ....... 42 Einstellen der Lautstärke ............42 Ausschalten der Spirocom ............43 Nach Gebrauch ................44 Austausch der Batterien ............
Seite 5
Spirocom L • SpiroCom L • SpiroCom L • SpiroCom L Montera Spirocom på masken ..........75 Montera mikrofonen på Inspire / Respire ........76 Montera mikrofonen i S-masken ..........77 Montera mikrofonen i Spiromaticmasken ........78 Montera mikrofonen i N/PE/ESA mask med nya täcklocket ..81 Montera mikrofonen i N/PE/ESA mask med gamla täcklocket ..
Spirocom L Safety notice The product must only be used with other approved Interspiro products. The apparatus must be maintained, serviced and tested as described in this user manual, Interspiro service manuals and Interspiro test instructions. Interspiro is not responsible for: •...
Seite 8
Spirocom L NOTICE The NOTICE type of hazard statement signifies that there may be a risk of damage to equipment or property.
Spirocom L Before use Overview The Spirocom L mask unit is made for wired communication with the long- range radio through an easy push-to-talk functionality. Main components 1. MODE button 2. PTT button 3. Display 4. Ear speaker 5. Microphone 6.
Spirocom L Technical data Spirocom L Ingress protection Rating Note IP67 For sealed unit, excluding radio cable and microphone. Frequency Region Frequency Europe 868 MHz 915 MHz Canada 915 MHz Approvals Approval Note Approved The mask mounted unit is intrinsically safe, GA Ex ia IIC T4, -30°C - + 60°C.
Seite 11
Spirocom L Put the attachment bracket on the mask. Install the long screw (supplied with the Spirocom) and the lock washer. Tighten the screw.
Spirocom L Install Spirocom on mask Put the Spirocom in position on the mask by placing the hooks over the visor frame. Quick connection version: Press the Spirocom against the mask until the locking peg locks into the hole in the attachment bracket.
Spirocom L Hand screw version: Press the Spirocom against the mask until it is possible to tighten the hand screw moderately in the hole in the attachment bracket. Make sure that the Spirocom is safely attached to the mask. Install microphone on Inspire / Respire mask Put the microphone cable between the lower visor frame and front piece of the mask.
Spirocom L Install microphone on S-mask Put the microphone cable between the lower visor frame and front piece of the mask. Loosen the hand screw on the speech diaphragm and turn the speech diaphragm up. Put the narrow part of the microphone in the slot in the mask.
Spirocom L If the speech diaphragm is in the correct position, the lip of the speech diaphragm covers the serial number on the breathing valve. Install microphone on Spiromatic mask Loosen the hand screws and remove the external speech cone/blank cover.
Seite 16
Spirocom L Put the microphone so that it is in the center of the front piece of the mask. Install the external speech cone and tighten the hand screws. Make sure the microphone cable is correctly installed in the slot in the speech cone.
Seite 17
Spirocom L Make sure that the locking lugs on the speech diaphragm is turned towards the locking plates. Hold the speech diaphragm by the edges and carefully press the speech diaphragm in place. NOTE: Do not press in the middle of the speech diaphragm, this can deform the speech diaphragm.
Spirocom L Install microphone on N/PE/ESA mask with new cover Remove the mask cover by pushing the locking tabs. Put the microphone into the front piece of the mask with the stop screw touching the edge. Put on the mask cover.
Spirocom L Make sure the microphone cable is correctly installed between the cover and the mask. Install microphone on N/PE/ESA mask with old cover Remove the mask cover by pushing the locking tabs.
Seite 20
Spirocom L Put the microphone into the front piece of the mask with the stop screw touching the edge. Put the outer end of the exhalation valve spring in the circular cavity on the inside of the mask cover. Insert the upper “hook” of the connector into the middle hole (in the upper...
Seite 21
Spirocom L Push the lower part of the mask cover towards mask until it locks. Make sure the microphone cable is correctly installed between the cover and the mask.
Spirocom L During use Power on the Spirocom Push the MODE button for 3 seconds. The display first shows the battery power level (ex. "b4") then shows “ON” (only applies to models with battery). Push the MODE button for 3 seconds. The display first shows the battery power level (ex.
Spirocom L Power off the Spirocom Push and hold the MODE button (approximately 7 seconds) until the display shows “- -” and the LED indicator shows a red light. Release the MODE button. Units without battery can also be powered off by switching off the radio.
NOTICE Always use the specified AAA alkaline batteries "Duracell MN2400" or "Energizer E92". Interspiro assumes no liability for mechanical, electrical or any other type of battery failure. Do not mix different brands of batteries and do not mix old and new batteries.
Spirocom L Remove the old batteries. Put in new batteries. Make sure the batteries are correctly installed, as shown on the back of the Spirocom. Close the battery cover lid and tighten the screw moderately. Handling the cable The cable must be handled with care. Do not twist or bend it too narrowly.
Spirocom L When storing the Spirocom: • Lay the cable carefully under the mask while checking that it has not been twisted or bent at the connection. Do not push the cable into the mask for storage as this both twists and bends the cable at the connection, which may cause damage to the cable and reduce its service life.
• Veränderungen / Manipulationen am Produkt durch Dritte Interspiro behält sich zu jeder Zeit Änderungen in diesem Dokument ohne vorherige Ankündigung vor – seien es typographische Fehler, Inkorrektheiten in der Information oder Verbesserungen und Änderungen an der Ausrüstung selbst.
Seite 28
SpiroCom L WARNUNG Der Gefahrenhinweis WARNUNG weist auf ein mögliches Risiko auf schwere oder tödliche Verletzungen hin. HINWEIS Der Gefahrenhinweis bezeichnet als HINWEIS weist auf das Risiko hin, dass die Ausrüstung oder Eigentum beschädigt werden kann.
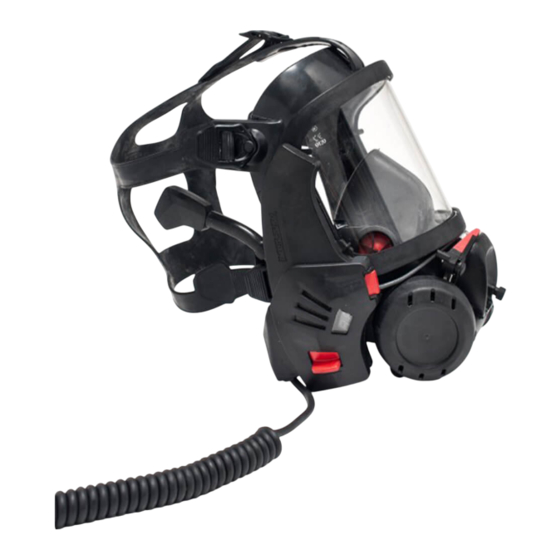
SpiroCom L Vor dem Einsatz Übersicht Die Maskeneinheit Spirocom L wurde für Kommunikation über Kabel mit dem Langstrecken-Funkgerät über eine einfache PTT-Funktionalität (Sprechen auf Knopfdruck). Hauptbestandteile 1. MODE-Knopf 2. PTT-Knopf 3. Display 4. Ohrlautsprecher 5. Mikrofon 6. LED-Anzeige 7. Funkkabel...
SpiroCom L Technische Daten der Spirocom L Schutz gegen Eindringen Schutzart Anmerkung IP67 Für abgedichtete Einheit ausschließlich Funkkabel und Mikrofon. Frequenz Region Frequenz Europa 868 MHz 915 MHz Kanada 915 MHz Zulassungen Zulassung Anmerkung geprüft Die montierte Maskeneinheit ist ein eigensicheres System, GA Ex nach IIC T4, -30°C - + 60°C.
Seite 31
SpiroCom L Die Befestigungsbügel an der Maske anbringen. Befestigen Sie die lange Schraube (im Lieferumfang des Spirocom enthalten) und die Sicherungsscheibe. Ziehen Sie die Schraube fest.
SpiroCom L Befestigung des Spirocoms an der Maske Das Spirocom ordnungsgemäß an der Maske positionieren, indem die Haken über den Sichtscheibenrahmen platziert werden. Version mit Schnellanschluss: das Spirocom auf die Maske drücken, bis der Arretierstift in dem Loch auf dem Befestigungsbügel einrastet.
SpiroCom L Version mit Schraube: Das Spirocom auf die Maske drücken, bis es möglich ist, die Rändelschraube vorsichtig in das Loch auf dem Befestigungsbügel einzudrehen. Kontrollieren Sie, dass das Spirocom sicher an der Maske befestigt wurde. Befestigung des Mikrofons an der Inspire /...
SpiroCom L Befestigung des Mikrofons an der S-Maske Platzieren Sie das Mikrofonkabel zwischen dem unteren Sichtscheibenrahmen und dem Vorderteil der Maske. Lösen Sie die Rändelschraube der Sprechmembran und drehen Sie die Sprechmembran nach oben. Stecken Sie den schmalen Teil des Mikrofons in den Schlitz in der Maske.
SpiroCom L Wenn die Sprechmembran richtig positioniert ist, deckt die Lasche der Sprechmembran die Seriennummer des Lungenautomaten ab. Befestigung des Mikrofons an der Spiromatic- Maske Lösen Sie die Rändelschrauben und entfernen Sie den externen Sprechkonus/Blinddeckel. Platzieren Sie das Mikrofonkabel zwischen dem unteren...
Seite 36
SpiroCom L Platzieren Sie das Mikrofon so, dass es sich in der Mitte des Vorderteils der Maske befindet. Installieren Sie den externen Sprechkonus und ziehen Sie die Rändelschrauben fest. Kontrollieren Sie, dass das Mikrofonkabel im Loch des Sprechkonus sitzt. Befestigen Sie die Verriegelungsösen mit den zwei Schrauben in der...
Seite 37
SpiroCom L Kontrollieren Sie, dass die Schrauben auf den Verriegelungsplatten ordnungsgemäß festgezogen sind, sodass sich die Verriegelungsplatten gleichmäßig drehen. Kontrollieren Sie, dass die Verriegelungsösen der Sprechmembran in Richtung der Sicherungsplatten zeigen. Halten Sie die Sprechmembran an den Kanten fest und drücken Sie die Sprechmembran vorsichtig in ihre Position.
SpiroCom L Befestigung des Mikrofons an einer N-/PE-/ESA- Maske mit neuer Abdeckung Entfernen Sie die Maskenabdeckung durch Drücken der Klemmlaschen. Platzieren Sie das Mikrofon so in dem Vorderteil der Maske, dass die Anschlagschraube die Kante berührt. Anbringen der Maskenabdeckung Click!
SpiroCom L Kontrollieren Sie, dass das Mikrofonkabel korrekt zwischen der Abdeckung und der Vollmaske befestigt wurde. Befestigung des Mikrofons an einer N-/PE-/ESA- Maske mit alter Abdeckung Entfernen Sie die Maskenabdeckung durch Drücken der Klemmlaschen.
Seite 40
SpiroCom L Platzieren Sie das Mikrofon so in dem Vorderteil der Maske, dass die Anschlagschraube die Kante berührt. Platzieren Sie das äußere Federende des Ausatemventils in die runde Spur auf der Innenseite der Maskenabdeckung. Führen Sie den oberen „Haken“ des Anschlusses in das mittlere Loch (im...
Seite 41
SpiroCom L Drücken Sie den unteren Teil der Maskenabdeckung auf die Maske, bis er einrastet. Kontrollieren Sie, dass das Mikrofonkabel korrekt zwischen der Abdeckung und der Vollmaske befestigt wurde.
SpiroCom L Während des Tauchgangs Einschalten der SpiroCom Halten Sie den MODE-Knopf 3 Sekunden lang gedrückt und lassen Sie sie wieder los. Auf dem Display wird Batteriezustand (z.B. „b4“) und dann „ON“ angezeigt. Drücken Sie die MODE-Taste 3 Sekunden lang. Das Display zeigt zuerst den Batteriestand an (z.
SpiroCom L Ausschalten der Spirocom Halten Sie den MODE-Knopf gedrückt (ca. 7 Sekunden), bis auf dem Display „- -“ angezeigt wird und die rote LED aufleuchtet. Lassen Sie den MODE-Knopf los. Geräte ohne Batterie können auch durch Ausschalten des Funkgerätess ausgeschaltet werden.
HINWEIS Verwenden Sie immer die vorgesehenen Alkali-Batterien „Duracell MN2400“ oder „Energizer E92“ im AAA-Format. Interspiro haftet nicht für mechanische, elektrische oder andere Fehler, die auf unsachgemäße Batterieverwendung zurückzuführen sind. Batterien verschiedener Marken nicht zusammen verwenden und nicht alte zusammen mit neuen Batterien verwenden.
SpiroCom L Lösen Sie die Schraube mit einem Schraubenzieher und öffnen Sie die Batteriefachabdeckung. Entfernen Sie die alten Batterien. Legen Sie neue Batterien ein. Stellen Sie sicher, dass Sie die Batterien ordnungsgemäß entsprechend der Abbildung auf der Rückseite des Spirocom einlegen.
SpiroCom L Bei der Lagerung des Spirocom: • Legen Sie das Kabel vorsichtig unter die Maske und achten Sie darauf, dass es an der Verbindung nicht verdreht oder verbogen wird. Pressen Sie das Kabel nicht zur Aufbewahrung in die Maske, da dies das Kabel an der Verbindung verdreht und verbiegt.
SpiroCom L Reinigung und Trocknung Achten Sie darauf, das Mikrofon festzuhalten, wenn Sie es von der Maske entfernen. Ziehen Sie nicht am Kabel. Reinigen Sie das Spirocom mit einem feuchten Schwamm und bei Bedarf mit einem milden Reinigungsmittel. Lassen Sie das Spirocom aufrecht trocknen.
SpiroCom L Notice de sécurité Ce produit ne doit être utilisé qu'avec d'autres produits Interspiro approuvés. L'appareil doit être entretenu, réparé et testé comme décrit dans ce manuel de l'utilisateur, les manuels d'entretien Interspiro et les instructions de tests d'Interspiro.
Seite 50
SpiroCom L REMARQUE Le terme REMARQUE est utilisé pour signaler un risque potentiel qui peut entraîner des dommages matériels.
SpiroCom L Avant utilisation Présentation L'appareil pour masque Spirocom L est conçu pour communiquer par câble vers la radio longue portée. Il est équipé de la fonction "Presser pour parler". Principaux composants 1. Bouton MODE 2. Bouton PTT (Push To Talk - Presser pour parler) 3.
SpiroCom L Données techniques du Spirocom L Indice de protection Indice Remarque IP67 Pour unité scellée, hors câble radio et microphone. Fréquence Région Fréquence Europe 868 MHz 915 MHz Canada 915 MHz Homologations Homologation Remarque Homologué Unité montée sur masque à sécurité intrinsèque, GA Ex ia IIC T4, -30°C - + 60°C.
Seite 53
SpiroCom L Placez le support de fixation sur le masque. Installez la vis longue (fournie avec le Spirocom) et la rondelle frein. Serrez la vis.
SpiroCom L Installez le Spirocom sur le masque. Positionnez le Spirocom sur le masque en plaçant les crochets sur le cadre de la visière. Version à raccordement rapide : Pressez le Spirocom contre le masque jusqu'à ce que la goupille d'arrêt se verrouille dans le trou du support de...
SpiroCom L Version avec vis à main : Pressez le Spirocom contre le masque jusqu'à ce que vous puissiez serrer modérément la vis à main dans le trou du support de fixation. Assurez-vous que le Spirocom est bien fixé au masque.
SpiroCom L Installez le microphone sur le masque S Passez le câble du microphone entre le bas de la monture de la visière et la partie avant du masque. Desserrez la vis à main de la membrane phonique et tournez la membrane phonique vers le haut.
SpiroCom L Si la membrane phonique est correctement positionnée, sa lèvre recouvre le numéro de série de la soupape respiratoire. Installez le microphone sur le masque Spiromatic Desserrez les vis à main et retirez le cône phonique externe/la plaque d'obturation.
Seite 58
SpiroCom L Positionnez le microphone de façon à ce qu'il soit au centre de la partie avant du masque. Installez le cône phonique externe en serrant les vis à main. Vérifiez que le câble du microphone est correctement installé dans la fente du cône phonique.
Seite 59
SpiroCom L Vérifiez que les vis des loquets sont correctement serrées de façon à ce que les loquets puissent tourner régulièrement. Vérifiez que les pattes d'arrêt de la membrane phonique sont tournées vers les loquets. Tenez la membrane phonique par les bords et insérez délicatement la membrane phonique en place.
SpiroCom L Installez le microphone sur le masque N / PE / ESA avec nouvelle protection Retirez la protection du masque en appuyant sur les loquets de verrouillage. Insérez le microphone dans la partie avant du masque. La vis supérieure...
Seite 61
SpiroCom L Placez la protection du masque. Click! Klick! Clic! Click! Click! Klick! Klick! Clic! Clic! Assurez-vous que le câble du microphone est correctement positionné entre la protection et le masque.
SpiroCom L Installez le microphone sur le masque N/PE/ESA avec ancienne protection Retirez la protection du masque en appuyant sur les loquets de verrouillage. Insérez le microphone dans la partie avant du masque. La vis supérieure doit toucher le bord.
Seite 63
SpiroCom L Placez le côté extérieur du ressort du clapet d'expiration dans la cavité circulaire à l'intérieur de la protection du masque. Insérez le "crochet" supérieur du connecteur dans le trou central (partie supérieure) de la protection du masque. Poussez la partie inférieure de la protection du masque vers le masque jusqu'à...
SpiroCom L Pendant l’utilisation Mise sous tension du SpiroCom Appuyez 3 secondes sur le bouton MODE puis relâchez-le. L'écran affiche le niveau de charge des piles (ex. "b4") et puis "ON". Appuyez sur le bouton MODE pendant 3 secondes. L'écran affiche d'abord le niveau de charge de la batterie (ex.
SpiroCom L Mise hors tension du Spirocom Maintenez le bouton MODE appuyé (environ 7 secondes) jusqu'à ce que l'écran affiche "- -" et que l'indicateur LED s'allume en rouge. Relâchez le bouton MODE. Les appareils sans batterie peuvent également être éteints en éteignant la radio.
REMARQUE Utilisez uniquement les piles alcalines AAA Duracell MN2400 ou Energizer E92 spécifiées. Interspiro décline toute responsabilité pour tout type de dysfonctionnement mécanique, électrique ou autre lié aux piles. Ne mélangez pas des piles de marques différentes et ne mélangez pas des piles neuves et des piles usagées.
SpiroCom L Desserrez la vis à l'aide d'un tournevis et ouvrez le couvercle du boîtier piles. Retirez les piles usagées. Insérez des piles neuves. Vérifiez que les pilles sont correctement insérées, conformément au schéma figurant au dos du Spirocom. Refermez le couvercle et serrez modérément la vis.
Seite 68
SpiroCom L Lors du stockage du Spirocom: • Placez soigneusement le câble sous le masque tout en vérifiant qu'il n'a pas été tordu ou plié au niveau de la connexion. Ne poussez pas le câble dans le masque pour le ranger car cela tord et plie le câble à...
SpiroCom L Nettoyage et séchage Assurez-vous de tenir le microphone lorsque vous le retirez du masque. Ne tirez pas sur le fil. Nettoyez le Spirocom avec une éponge humide. Utilisez un détergent doux le cas échéant. Laissez le Spirocom sécher à la verticale.
SpiroCom L Säkerhetsanvisningar Produkten får endast användas tillsammans med andra godkända produkter från Interspiro. Produkten måste underhållas, erhålla service samt testas enligt den här användarhandboken, Interspiros servicehandböcker och Interspiros testanvisningar. Interspiro ansvarar inte för: • kombinationer av produkter, om dessa inte säljs av Interspiro •...
Seite 72
SpiroCom L OBSERVERA OBSERVERA är en typ av riskangivelse som innebär att det kan finnas en risk för skada på utrustning eller egendom.
SpiroCom L Före användning Översikt Spirocom L maskenhet är utvecklad för trådbunden kommunikation med långdistansradion genom en enkel knapptryckning. Delar på Spirocom 1. MODE knapp 2. PTT knapp 3. Display 4. Hörlur 5. Mikrofon 6. LED indikator 7. Radiokabel...
SpiroCom L Tekniska data för Spirocom L Kapslingsklass Klass Notering IP67 Gäller för försluten enhet, exklusive radiokabel och mikrofon. Frekvens Region Frekvens Europa 868 MHz 915 MHz Kanada 915 MHz Godkännanden Godkännande Notering Godkänd Maskenhetens egensäkerhetsklass (Ex-klass) är GA Ex ia IIC T4, -30°C - + 60°C.
SpiroCom L Montera fästet. Montera låsbrickan och den långa skruven som medföljer Spirocom. Dra åt skruven. Montera Spirocom på masken Montera Spirocom på masken med krokarna runt maskhalvorna.
SpiroCom L Version med snabbfäste: Tryck Spirocom mot masken tills låspinnen klickar fast i fästets hål. Version med handskruv: Tryck Spirocom mot masken och skruva åt handskruven måttligt hårt. Säkerställ att Spirocom är ordentligt monterad på masken. Montera mikrofonen på Inspire / Respire Montera mikrofonkabeln mellan nedre delen av ramhalvorna och talkonan.
SpiroCom L Montera in mikrofonen i det avsedda hålet i talkonan. Montera mikrofonen i S-masken Montera mikrofonkabeln mellan nedre delen av ramhalvorna och talkonan. Lossa handskruven på talkonan och vrid den uppåt.
SpiroCom L Montera mikrofonen med den smala delen i spåret. Vrid tillbaka talkonan och skruva åt handskruven. När talkonan är i rätt position täcker dess nedre kant serienumret på andningsventilen. Montera mikrofonen i Spiromaticmasken Lossa handskruvarna och ta bort den externa talkonan/skyddet.
Seite 79
SpiroCom L Montera mikrofonkabeln mellan nedre delen av ramhalvorna och talkonan. Centrera mikrofonen i maskens front. Montera talkonan och dra åt handskruvarna. Se till att mikrofonkabeln är korrekt placerad i talkonans spår.
Seite 80
SpiroCom L Montera de medföljande låsplattorna i masken med skruvarna. Kontrollera att låsplattornas skruvar är korrekt åtdragna så att låsplattorna kan vridas jämnt. Kontrollera att talmembranets låsklackar är vända mot låsplattorna. Håll i talmembranets kanter och tryck försiktigt ner det på plats i masken.
SpiroCom L Lås talmembranet genom att vrida låsplattorna över låsklackarna med hjälp av en skruvmejsel eller liknande. Montera mikrofonen i N/PE/ESA mask med nya täcklocket Ta bort täcklocket genom att trycka in flikarna på täcklockets sidor.
Seite 82
SpiroCom L Montera mikrofonen i framdelen av masken. Tryck in mikrofonen tills stoppskruven går emot kanten. Montera täcklocket. Click! Klick! Clic! Click! Click! Klick! Klick! Clic! Clic! Se till att mikrofonkabeln är rätt monterad mellan täcklocket och masken.
SpiroCom L Montera mikrofonen i N/PE/ESA mask med gamla täcklocket Ta bort täcklocket genom att trycka in flikarna på täcklockets sidor. Montera mikrofonen i framdelen av masken. Tryck in mikrofonen tills stoppskruven går emot kanten. Placera ytteränden av fjädern i det runda hålet på insidan av täcklocket.
Seite 84
SpiroCom L Börja med att montera täcklocket med dess övre mittenhål på klacken. Tryck täcklocket mot masken tills det klickar fast. Se till att mikrofonkabeln är rätt monterad.
SpiroCom L Användning Starta enheten Tryck ner MODE-knappen 3 sekunder. Displayen visar först batterinivån (ex. "b4") och sedan "ON" (gäller modeller med batteri). Tryck ner MODE-knappen 3 sekunder. Displayen visar först batterinivån (ex. "b4") och sedan "ON" (gäller modeller med batteri).
Seite 86
SpiroCom L Släpp MODE-knappen. Enheter utan batteri kan även stängas av genom att stänga av radion. Enheten kommer automatiskt att stängas av om inget ljud kan registreras av mikrofonen under 30 minuter.
Batterierna får enbart bytas i en omgivning som man vet är säker. OBSERVERA Använd endast de specificerade alkaliska batterierna "Duracell MN2400" eller "Energizer E92" av AAA-typ. Interspiro tar inget ansvar för mekaniska, elektroniska eller några andra typer av fel på batterierna. Blanda inte olika batterifabrikat eller gamla och nya batterier.
SpiroCom L Ta ut de gamla batterierna. Sätt in nya batterier. Se till att batterierna är vända enligt märkningen på baksidan av enheten. Stäng batteriluckan och dra åt skruven måttligt. Hantering av kabeln Kabeln måste hanteras varsamt. Den ska inte vridas eller böjas för snävt.
SpiroCom L Vid förvaring av Spirocom: • Lägg kabeln försiktigt under masken medan du kontrollerar att den inte är vriden eller böjd vid anslutningen. Kabeln ska inte förvaras intryckt i masken eftersom den blir vriden och böjd vid anslutningen, vilket kan skada kabeln och förkorta dess livslängd.