DFI PM10-EC Benutzerhandbuch
System-platine

Verwandte Anleitungen für DFI PM10-EC


Inhaltszusammenfassung für DFI PM10-EC
- Seite 1 PM10-EC PM10-EL Mainboard User’s Manual Carte Mère Manuel Pour Utilisateur System-Platine Benutzerhandbuch Manual del Usuario de Placas Base 935-PM1001-000 61200226 Downloaded from www.Manualslib.com manuals search engine...
-
Seite 2: Trademarks
Copyright This publication contains information that is protected by copyright. No part of it may be reproduced in any form or by any means or used to make any transformation/adaptation without the prior written permission from the copyright holders. This publication is provided for informational purposes only. The manufacturer makes no representations or warranties with respect to the contents or use of this manual and specifically disclaims any express or implied warranties of merchantability or fitness for any... - Seite 3 Battery: • Danger of explosion if battery incorrectly replaced. • Replace only with the same or equivalent type recommend by the manufacturer. • Dispose of used batteries according to the batter y manufacturer’s instructions. Joystick or MIDI port: • Do not use any joystick or MIDI device that requires more than 10A current at 5V DC.
- Seite 4 Quick Setup Guide Table of Contents Chapter 1 Quick Setup Guide..........Chapter 2 English..............Chapter 3 Français..............Chapter 4 Deutsch ................. Chapter 5 Español ................. Downloaded from www.Manualslib.com manuals search engine...
-
Seite 5: Chapter 1 - Quick Setup Guide
Quick Setup Guide Chapter 1 - Quick Setup Guide Table of Contents 1.1 Mainboard Layout......................1.2 Jumpers............................. 1.3 Ports and Connectors....................1.4 Award BIOS Setup Utility..................Note: The user’s manual in the provided CD contains detailed information about the mainboard. If, in some cases, some information doesn’t match those shown in this manual, this manual should always be regarded as the most updated version. -
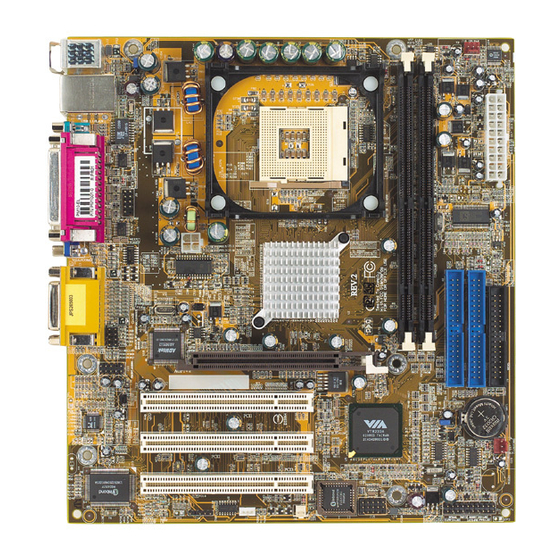
Seite 6: Mainboard Layout
Quick Setup Guide 1.1 Mainboard Layout PM10-EC CPU fan (J16) PS/2 power select (JP2) DIMM Standby power Power LED (J19) COM 1 (J5) Parallel (J11) COM 2 (J6) +12V power (ATXP1) IDE 2 (J9) VGA (CN1) (J4) Line P4M266 (CN5) - Seite 7 Quick Setup Guide PM10-EL CPU fan (J16) PS/2 power select (JP2) DIMM Standby power Power LED (J19) COM 1 (J5) Parallel (J11) COM 2 (J6) +12V power (ATXP1) IDE 2 (J9) VGA (CN1) (J4) Line P4M266 (CN5) AUX-in (J20) Line CD-in (J21) (CN4) DIMM 2...
-
Seite 8: Jumpers
Quick Setup Guide 1.2 Jumpers 1.2.1 Clear CMOS Data - JP1 1-2 On: Normal (default) 2-3 On: Clear CMOS Data 1 2 3 Clear CMOS (JP1) 1.2.2 Power Select for PS/2 Keyboard/Mouse - JP2 PS/2 power select (JP2) 1-2 On: Disable - VCC power 2-3 On: Enable - 5VSB power (default) -
Seite 9: Ports And Connectors
Quick Setup Guide 1.3 Ports and Connectors 1.3.1 PS/2 Mouse and PS/2 Keyboard Ports PS/2 Mouse PS/2 Keyboard Make sure to turn off your computer prior to connecting or disconnecting a mouse or keyboard. Failure to do so may damage the mainboard. 1.3.2 RJ45 Fast-Ethernet Port (PM10-EL only) RJ45 LAN Downloaded from... - Seite 10 Quick Setup Guide 1.3.3 Universal Serial Bus Ports USB 2 USB 1 USB 3/4 (J5) Additional USB Ports (USB 3 and USB 4) Function Function Function Ground UP5- UP6- Ground UP5+ UP6+ UP5+ Ground Ground UP5- N. C. The Wake-On-USB Keyboard/Mouse function, when enabled, allows a USB keyboard/Mouse to wake up a system that is in the S3 (STR - Suspend To RAM) state.
-
Seite 11: Serial Ports
Quick Setup Guide 1.3.4 Parallel Port Parallel Port 1.3.5 Serial Ports COM 1 Serial Port COM 2 (J6) Connect a serial port cable to J6 to use the COM 2 secondary serial port. Downloaded from www.Manualslib.com manuals search engine... - Seite 12 Quick Setup Guide 1.3.6 VGA Port VGA Port 1.3.7 Game/MIDI Port Game/MIDI Port Line-out Line-in Mic-in Front Audio (J22) Front Mic+ audio (J22) Ground Mic Power AuD_Vcc (Avcc) AuD_R_Out AuD_R_Return (GND) N. C. AuD_L_Out 1 0 AuD_L_Return (GND) Downloaded from www.Manualslib.com manuals search engine...
- Seite 13 Quick Setup Guide 1.3.8 Internal Audio Connectors AUX-in / CD-in Left audio channel Ground Ground Right audio channel CD-in (J21) AUX-in (J20) 1.3.9 Floppy and IDE Disk Drive Connectors FDD (J9) IDE 1 (J3) IDE 2 (J4) If you encountered problems while using an ATAPI CD-ROM drive that is set in Master mode, please set the CD-ROM drive to Slave mode.
- Seite 14 Quick Setup Guide 1.3.10 IrDA Connector 1 VCC 2 N. C. 3 IRRX 4 Ground 5 IRTX The sequence of the pin functions on some IrDA cable may be rever sed from the pin function defined mainboard. Make sure to connect the 1 2 3 4 5 cable to the IrDA IrDA (J10)
- Seite 15 Quick Setup Guide 1.3.12 Wake-On-LAN Connector 1 +5VSB 2 Ground 3 WOL The 5VSB power source of your power supply must support ≥720mA. 1 2 3 Wake-On-LAN (J7) 1.3.13 Wake-On-Ring Connector 1 Ground 2 RI# If you are using a modem add-in card, the 5VSB power source of your power...
-
Seite 16: Power Connectors
Quick Setup Guide 1.3.14 Power Connectors ATX power (J19) +12V power (ATXP1) +12V Power ATX Main Power 1 Ground 3.3V 1 1 3.3V 2 Ground 3.3V 1 2 -12V 3 +12V Ground 1 3 Ground 4 +12V 1 4 PS-ON Ground 1 5 Ground 1 6 Ground... - Seite 17 Quick Setup Guide 1.3.15 DIMM and PCI Standby Power LEDs DIMM Standby Power LED PCI Standby Power LED DIMM Standby Power LED This LED will turn red when the system’s power is on or when it is in the Suspend state (Power On Suspend or Suspend to RAM). It will not light when the system is in the Soft-Off state.
- Seite 18 Quick Setup Guide 1.3.16 Front Panel Connectors Front panel connectors (J12) Pin Assignment HD-LED HDD LED Power (Primary/Secondary IDE LED) G-LED Green LED Power (Green LED) Ground ATX-SW PWRBT+ (ATX power switch) PWRBT- G-SW Ground (Green switch) RESET Ground (Reset switch) H/W Reset SPEAKER Speaker Data...
-
Seite 19: Award Bios Setup Utility
Quick Setup Guide 1.4 Award BIOS Setup Utility 1.4.1 Main Menu Phoenix - AwardBIOS CMOS Setup Utility Standard CMOS Features Load Fail-Safe Defaults Advanced BIOS Features Load Optimized Defaults Advanced Chipset Features Set Supervisor Password Integrated Peripherals Set User Password Power Management Setup Save &... -
Seite 20: Advanced Bios Features
Quick Setup Guide 1.4.3 Advanced BIOS Features Phoenix - AwardBIOS CMOS Setup Utility Advanced BIOS Features Item Help Virus Warning Disabled CPU L1 & L2 Cache Enabled Menu Level CPU L2 Cache ECC Checking Enabled Quick Power On Self Test Enabled Allows you to choose First Boot Device... -
Seite 21: Integrated Peripherals
Quick Setup Guide 1.4.5 Integrated Peripherals Phoenix - AwardBIOS CMOS Setup Utility Integrated Peripherals Item Help VIA OnChip IDE Device Press Enter Press Enter VIA OnChip PCI Device Menu Level Super IO Device Press Enter Init Display First PCI Slot OnChip USB1.1 Controller All Enabled Disabled... -
Seite 22: Pnp/Pci Configurations
Quick Setup Guide 1.4.7 PnP/PCI Configurations Phoenix - AwardBIOS CMOS Setup Utility PnP/PCI Configurations Item Help PNP OS Installed Reset Configuration Data Disabled Menu Level Resources Controlled By Auto(ESCD) Default is Disabled. IRQ Resources Press Enter Select Enabled to reset Extended System PCI/VGA Palette Snoop Disabled Configuration Data... -
Seite 23: Chapter 2 - English
English Chapter 2 - English Table of Contents 2.1 Features and Specifications..................2.2 Using the Suspend to RAM Function............2.3 Supported Software..................... 2.4 Troubleshooting......................... Package Checklist The mainboard package contains the following items: The mainboard A user’s manual One card-edge bracket mounted with a serial port One IDE cable for ATA/33, ATA/66, ATA/100 or ATA/133 IDE drives One 34-pin floppy disk drive cable... -
Seite 24: Features And Specifications
English 2.1 Features and Specifications 2.1.1 Features Chipset • VIA P4M266/VT8233ACD ® Processor ® The mainboard is equipped with Socket 478 for installing a Pentium 4 processor. • Intel ® Pentium ® 4 processor (478-pin) • Supports up to 2.4GHz CPU speed •... - Seite 25 English Expansion Slots The mainboard is equipped with 1 universal AGP slot and 3 dedicated PCI slots. AGP is an interface designed to support high performance 3D graphics cards. It utilizes a dedicated pipeline to access system memory for texturing, z-buffering and alpha blending. The universal AGP slot supports AGP 2x with up to 533MB/sec.
- Seite 26 English Optimized Shared Memory Architecture (SMA) 8/16/32MB frame buffer using system memory Single cycle 128-bit 3D architecture 8M triangles/second setup engine 140M pixels/second tri-linear fill rate Next generation 128-bit 2D graphics engine High quality DVD video playback 2D/3D resolutions up to 1920x1440 •...
- Seite 27 English PCI Bus Master IDE Controller • Two PCI IDE interfaces support up to four IDE devices • Supports ATA/33, ATA/66, ATA/100 and ATA/133 hard drives • UDMA Modes 3, 4, 5 and 6 Enhanced IDE (data transfer rate up to 133MB/sec.) •...
- Seite 28 English 2.1.2 Intelligence Dual Function Power Button Depending on the setting in the “Soft-Off By PWRBTN” field of the Power Management Setup, this switch will allow the system to enter the Soft-Off or Suspend mode. Wake-On-Ring This feature allows the system that is in the Suspend mode or Soft Power Off mode to wake-up/power-on to respond to calls coming through an internal or external modem.
- Seite 29 English Wake-On-USB Keyboard/Mouse The Wake-On-USB Keyboard/Mouse function allows you to use a USB keyboard/Mouse to wake up a system that is in the S3 (STR - Suspend To RAM) state. Important: • If you are using the Wake-On-USB Keyboard/Mouse function for 2 USB ports, the 5VSB power source of your power supply must support ≥...
- Seite 30 English AC Power Failure Recovery When power returns after an AC power failure, you may choose to either power-on the system manually, let the system power-on automatically or return to the state where you left off before power failure occurs. Virus Protection Most viruses today destroy data stored in hard drives.
-
Seite 31: Using The Suspend To Ram Function
English 2.2 Using the Suspend to RAM Function ® ® ® ® ® If you are using the Windows 98 operating system, please follow the steps below. Select “Power Management Setup” in the main menu screen and press <Enter>. In the “ACPI Function” field, select “Enabled”. In the “ACPI Suspend Type”... - Seite 32 English 11. Click the Advanced tab. In the “When I press the power button on my computer” field, select “Standby”. 12. After completing the steps above and you want to power-off the computer, you do not need to go through the process of closing files, applications and operating system.
-
Seite 33: Supported Software
English 2.3 Supported Software 2.3.1 VIA Service Pack The CD in the mainboard package also comes with the VIA Service Pack. The service pack includes the following drivers. • VIA ATAPI Vendor Support Driver • AGP VxD Driver • IRQ Routing Miniport Driver •... - Seite 34 English 3. The “Welcome” screen will appear. Click “Next”. Please read the “VIA Service Pack readme” carefully before proceeding to step 4. 4. Follow the prompts on the screen to complete the installation. 5. Reboot the system for the drivers to take effect. 2.3.2 Audio Drivers and Software Applications The CD in the mainboard package also includes audio drivers and ...
- Seite 35 "Autorun" did not automatically start (which is, the Main Board Utility CD screen did not appear), please go directly to the root directory of the CD and double-click "Setup". 2. Please go to DFI's web site at "http://www.dfi.com/support1/ download2.asp" for the latest version of the drivers or software applications.
-
Seite 36: Troubleshooting
English 2.4 Troubleshooting This section of the manual is designed to help you with problems that you may encounter with your personal computer. To efficiently troubleshoot your system, treat each problem individually. This is to ensure an accurate diagnosis of the problem in case a problem has multiple causes. -
Seite 37: Power Supply
English 3. Make sure your video card’s output frequencies are supported by this monitor. The screen seems to be constantly wavering. 1. If the monitor is close to another monitor, the adjacent monitor may need to be turned off. Fluorescent lights adjacent to the monitor may also cause screen wavering. -
Seite 38: Parallel Port
English Excessively long formatting period. 1. If your hard drive takes an excessively long period of time to format, it is likely a cable connection problem. However, if your hard drive has a large capacity, it will take a longer time to format. -
Seite 39: Mainboard
English Keyboard Nothing happens when a key on the keyboard was pressed. 1. Make sure the keyboard is properly connected. 2. Make sure there are no objects resting on the keyboard and that no keys are pressed during the booting process. Mainboard 1. - Seite 40 Français Chapter 3 - Français Table des Matières 3.1 Caractéristiques et Spécifications..............3.2 Utilisation de la Fonction de Suspension sur RAM......3.3 Logiciels Supportés......................3.4 Dépannage..........................Liste de Vérification de l’Emballage L’emballage de la carte système contient les éléments suivants: ! La carte système ! Un manuel utilisateur ! Un carte montée par attache sur le côté...
-
Seite 41: Caractéristiques Et Spécifications
Français 3.1 Caractéristiques et Spécifications 3.1.1 Caractéristiques Chipset • VIA P4M266/VT8233ACD ® Processeur La carte est pourvue d’un Socket 478 permettant d’exploiter un processeur Pentium ® • Processeur Intel Pentium 4 (478 broches) ® ® • CPU pouvant aller jusqu’à 2.4 GHz •... - Seite 42 Français Logements d’Extension La carte système est équipée d’un slot AGP universel et 3 logements PCI dédiés. AGP est une interface conçue pour supporter des cartes graphiques 3D de haute performance. Elle utilise un pipeline dédié pour accéder à la mémoire système pour le texturage, le z-buffering et le mélange alpha.
- Seite 43 Français - Architecture de mémoire partagée (SMA) optimisé - 8/16/32 Mo de Frame Buffer utilisant la mémoire du système - Architecture 3D de 128 bits à un seul cycle - Moteur d’installation 8M triangles/secondes - Taux de remplissage tri-linéaire 140M pixels/secondes - Moteur 2D 128 bits de génération future - Lecture de vidéo DVD de haute qualité.
- Seite 44 Français Contrôleur IDE de BUS Maître PCI • Deux interfaces PCI IDE supportant jusqu’à quatre matériels IDE • Supporte des disques durs ATA/33, ATA/66, ATA/100 et ATA/ • IDE Améliorés Mode 3, 4, 5 et 6 UDMA (vitesse de transfert de données allant jusqu’à...
- Seite 45 Français 3.1.2 Intelligence Bouton d’Alimentation à Fonction Double En fonction du paramétrage dans le champ “Soft-Off By PWRBTN” du Programme d’Installation de la Power Management Setup, ce commutateur permettra à votre système d’entrer en mode Soft-Off ou Suspension. Wake-On-Ring Cette caractéristique permet au système qui se trouve en mode Suspension ou en mode Arrêt Alimentation par Logiciel de se réveiller/s’allumer pour répondre à...
- Seite 46 Français Clavier/Souris USB “Wake-On” (Wake-On-USB Keyboard/Mouse) La fonction Clavier/Souris USB “Wake-On” vous permet d’utiliser un clavier/Souris USB pour éveiller un système se trouvant en état S3 (STR-Suspension Sur RAM). Important: • Si vous utilisez les fonctions Clavier/Souris USB “Wake-On” (Wake-On-USB Keyboard/Mouse) pour 2 ports USB, la source d’alimentation 5VSB de votre bloc d’alimentation doit supporter ≥...
- Seite 47 Français du système d’exploitation. Ceci est du au fait que le système est capable de stocker tous les fichiers programmes et de données pendant toute la session d’utilisation dans la RAM (Mémoire à Accès Aléatoire) lorsque qu’il s’éteint. La session d’utilisation reprendra exactement où...
-
Seite 48: Utilisation De La Fonction De Suspension Sur Ram
Français 3.2 Utilisation de la Fonction de Suspension sur ® Si vous utilisez le système d’opération Windows 98, veuillez suivre les étapes suivantes. Sélectionnez “Power Management Setup” dans l’écran de programme principal et appuyez sur <Enter>. Dans le champ “ACPI Function”, sélectionnez “Enabled”. Dans le champ “ACPI Suspend Type”, sélectionnez “S3(STR)”. - Seite 49 Français 11. Cliquez sur l’onglet Avancé. Dans le champ “Quand j’appuie sur le bouton d’alimentation de mon ordinateur”, sélectionnez “Mise en Veille”. 12. Après avoir réalisé les étapes ci-dessus et si vous voulez éteindre l’ordinateur, vous n’avez pas besoin de passer par le processus de fermeture des fichiers, des applications et du système d’exploitation.
-
Seite 50: Logiciels Supportés
Français 3.3 Logiciels Supportés 3.3.1 VIA Service Pack Le CD contenu dans l’emballage de la carte système est aussi accompagné du VIA Service Pack. Le Service Pack comprend les pilotes suivants: • VIA ATAPI Vendor Support Driver • AGP VxD Driver •... - Seite 51 Français 2. Cliquez sur “VIA Service Pack”. 3. L’écran de “Welcome” apparaîtra. Cliquez sur “Next”. Veuillez lire soigneusement le fichier “VIA Service Pack readme” avant de passer à l’étape 4. 4. Suivez les invites d’écran pour réaliser l’installation. 5. Réamorcez le système pour que les pilotes soient opérationnels. 3.3.2 Pilotes Audio et Logiciels d’Applications Le CD contenu dans l’emballage de la carte système comprend aussi des pilotes audio et des logiciels de lecture audio pour...
- Seite 52 Français ® ® ® Le pilote pour Windows ME, Windows 2000 et Windows supporte le mode d’auto execution. Lorsque vous insérez le CD dans le lecteur du CD-ROM, une fenêtre d’auto execution apparaitra sur votre écran. Cliquez sur “Realtek LAN Drivers”, et suivez les instructions apparues sur l’écran pour compléter l’installation de votre carte réseau.
- Seite 53 CD Main Board Utility n’apparaîtra pas), veuillez aller directement au répertoire racine du CD et double cliquez sur “Setup”. 2. Veuillez vous rendre sur le site web de DFI à "http:// www.dfi.com/support1/download2.asp" pour trouver la dernière version des pilotes ou logiciel d’applications.
-
Seite 54: Dépannage
Français 3.4 Dépannage Ce chapitre du manuel est destiné à vous aider résoudre les problèmes éventuels que vous pourriez rencontrer avec votre ordinateur. Pour dépanner efficacement votre système, traitez chaque problème individuellement. Ceci permettra de faire un diagnostique exact du problème dans le cas ou celui-ci aurait des causes multiples. Certains des points les plus courants, à... - Seite 55 Français L’image bouge constamment. 1. Le moniteur a perdu sa synchronisation verticale. Ajustez la synchronisation verticale du moniteur. 2. Eloignez tous les objets, tel qu’un autre moniteur ou un ventilateur, qui pourrait créer un champ magnétique autour de l’affichage. 3. Assurez vous que les fréquences de sortie de votre carte vidéo sont supportées par ce moniteur.
-
Seite 56: Disque Dur
Français 4. L’espace est insuffisant sur la disquette. Utilisez une autre disquette comportant un espace de stockage adéquat. Disque Dur Défaillance du disque dur. 1. Assurez vous que le type correct de lecteur pour le disque dur a été entré dans le BIOS. 2. - Seite 57 Français 1. Assurez vous que le périphérique série est allumé et qu’il est en ligne. 2. Vérifiez que le périphérique est branché sur le port série correct au dos de l’ordinateur. 3. Vérifiez que le périphérique série connecté fonctionne, en le branchant à...
- Seite 58 Deutsch Chapter 4 - Deutsch Inhaltsverzeichnis 4.1 Leistungsmerkmale und Technische Daten..........4.2 Anwendung der Funktion “Suspendieren auf RAM”...... 4.3 Unterstützte Software....................4.4 Fehlersuche..........................Verpackungsliste In der Verpackung der Systemplatine sind folgende Artikel enthalten: ! Eine Systemplatine ! Ein Benutzerhandbuch ! Eine Kartenseite montiert mit einem Seriellen Port und einem Game/MIDI Port.
-
Seite 59: Leistungsmerkmale Und Technische Daten
Deutsch 4.1 Leistungsmerkmale und Technische Daten 4.1.1 Leistungsmerkmale Chipset • VIA P4M266/VT8233ACD ® Prozessor ® Das Systemboard ist mit Socket 478 zur Installation eines Pentium 4-Prozessors ausgerüstet. ® ® • Intel Pentium 4 Prozessor (478-polige) • Taktfrequenz bis 2.4GHz. • 400MHz Systemdatenbus Wichtig: Die Frequenzrate von einige, Prozessoren konnte vielleicht von Hersteller gesperrt sein. - Seite 60 Deutsch Erweiterungssteckfasssungen Die Systemplatine ist mit einer universellen AGP-Steckfassung ausgerüstet und 3 dedizierten PCI-Steckfassungen. AGP ist eine Schnittstelle, die zum Unterstützen der Hochleistungs- 3D-Grafikkarten bestimmt ist und die für den Zugriff zum Speicher für die Textur, das Z-Puffern und Alpha-Mischen eine dedizierte Leitung verwendet.
- Seite 61 Deutsch - 8/16/32MB Pufferbelegung des Systemspeichers - 128-bit 3D Einzeltakt Architektur - 8M triangle/second Setup Maschine - 140M Pixels/second tri-linearer Zeilenaufbau - 128-bit 2D Graphik Maschine der nächsten Generation - Hochqualitäts DVD Video Wiedergabe - 2D/3D Auflösung bis zu 1920x1440 •...
- Seite 62 Deutsch PCI-Bus-Master-IDE-Controller • Unterstützung von bis zu vier IDE-Geräten durch zwei PCI-IDE- Schnittstellen. • Unterstützung der Festplatten ATA/33, ATA/66, ATA/100 und ATA/133 • Erweitertes IDE des PIO-Modus 3, 4, 5 und 6 (Datenüber- tragungsgeschwindigkeit von bis zu 133MB/Sek.). • Verminderte CPU-Benutzung während Diskettenübertragung dank dem Bus-Master.
-
Seite 63: Intelligente Ausstattungsteile
Deutsch 4.1.2 Intelligente Ausstattungsteile Netzschalter mit doppelter Funktion Je nach der Einstellung im Feld “Soft-Off By PWRBTN” im Power Management Setup kann das System durch diesen Schalter ausgeschaltet oder in den Suspendier-Modus geschaltet werden. Aufwachen bei Klingeln (Wake-On-Ring) Mit diesem Merkmal kann das System, welches in den Suspend- oder Soft-Power-Off-Modus geschaltet ist, aufgeweckt/eingeschaltet werden, um eingehende Anrufe zu beantworten, die über ein internes oder externes Modem geleitet werden. - Seite 64 Deutsch Wake-On-USB Tastatur/Maus (Wake-On-USB Keyboard/Mouse) Mit der Wecken bei USB-Tastatur/Maus-Funktion können Sie ein System mit einem USB-Tastatur/Maus-Gerät aus dem S3-(STR- Suspend-To-RAM)-Status aufwecken. Wichtig: • Falls Sie die Wecken bei USB-Tastatu/Mausr-Funktion für 2 USB-Anschlüsse, unterstützt die 5VSB-Stromquelle Ihres Netzgerätes eine Leistung von ≥ 1.5A. •...
- Seite 65 Deutsch Wichtig: Die 5VSB-Stromquelle Ihres Netzgerätes muß eine Leistung von ≥ 1A unterstützen. Wiederherstellung der Wechselstromversorgung nach einem Ausfall Bei der Wiederherstellung der Stromversorgung nach einem Ausfall kann das System entweder manuell oder automatisch eingeschaltet werden, oder Sie können den Betrieb des Systems an der Stelle fortsetzen, wo der Betrieb durch den Stromausfall unterbrochen wurde.
-
Seite 66: Anwendung Der Funktion "Suspendieren Auf Ram
Deutsch 4.2 Anwendung der Funktion “Suspendieren auf RAM” ® Wenn Sie das Betriebssystem von Windows 98 verwenden, befolgen Sie bitte die Schritte unten. “Power Management Setup” in dem Hauptbildschirm auswählen, und die <Enter> drücken. Im Feld “ACPI Function” wählen Sie “Enabled” aus. Im Feld “ACPI Suspend Type”... - Seite 67 Deutsch 11. Auf das Register “Erweitert” klicken. Im Feld “Beim Drücken der Netztaste des PCs” wählen Sie “Standby” aus. 12. Nachdem Sie die obigen Schritte ausgeführt haben und den PC ausschalten möchten, muß der Vorgang zum Schließen der Dateien, Anwendungen und des Betriebssystems nicht ausgeführt werden.
-
Seite 68: Unterstützte Software
Deutsch 4.3 Unterstützte Software 4.3.1 VIA-Servicepackung Die VIA Service Pack ist auf der mit der Systemplatine mitgelieferten CD enthalten. In dieser Servicepackung sind die folgenden Treiber enthalten. • VIA ATAPI Vendor Support Driver • AGP VxD Driver • IRQ Routing Miniport Driver •... -
Seite 69: Audiotreiber Und Software-Anwendungsprogramm
Deutsch 2. Auf “VIA Service Pack” (VIA-Service-Paket) klicken. 3. Der “Welcome”-Schirm erscheint. Auf “Next” klicken. Lesen Sie die Datei “VIA Service Pack readme” gut durch, bevor Sie zu Schritt 4 gehen. 4. Zum Abschließen des Installierungsvorgangs die Anleitung auf dem Schirm befolgen. 5. - Seite 70 Deutsch Die Treiber von lokalem Datennetz für Windows ME, Windows 2000 und Windows XP unterstützen “Autoausführung”. Wenn Sie die CD in ein CD-ROM-Laufwerk hineinstecken, wird der “Autoausführungs”-Bildschirm auftauchen. Klicken Sie “Realtek Treiber von lokalem Datennetz”. Dann befolgen Sie die Bereitmeldungen auf dem Bildschirm, um Installation zu beenden.
- Seite 71 CD mit Main Board Utility für die Hauptplatine erscheint nicht), gehen Sie direkt zum Stammverzeichnis der CD und doppelklicken Sie auf “Setup”. 2. Auf der DFI-Webseite "http://www.dfi.com/suppor t1/ download2.asp" finden Sie die neuste Version der Treiber oder Software-Anwendungsprogramme.
-
Seite 72: Fehlersuche
Deutsch 4.4 Fehlersuche In diesem Kapitel finden Sie Hinweise zum Lösen von Problemen, die bei der Benutzung Ihres PCs auftreten können. Für eine erfolgreiche Fehlersuche in Ihrem System behandeln Sie jede Störung einzeln, um eine genaue Diagnose der Störung sicherzustellen, falls eine Störung mehrere Ursachen hat. -
Seite 73: Stromversorgung
Deutsch Das Bild scheint sich ständig zu bewegen. 1. Der Monitor hat seine vertikale Synchronisation verloren. Stellen Sie diese ein. 2. Entfernen Sie sämtliche Gegenstände, wie z.B. einen anderen Monitor oder einen Ventilator, die ein Magnetfeld um den Bildschirm erzeugen können. 3. -
Seite 74: Parallelanschluß
Deutsch Festplattenlaufwerk Ausbleiben der Funktion des Festplattenlaufwerks. 1. Stellen Sie sicher, daß der richtige Laufwerktyp für das Festplattenlaufwerk im BIOS eingegeben wurde. 2. Falls das System für zwei Festplattenlaufwerke konfiguriert wurde, stellen Sie sicher, daß das ladbare (erste) Festplattenlaufwerk als Master und das zweite Festplattenlaufwerk als Slave konfiguriert wurde. -
Seite 75: Systemplatine
Deutsch 2. Stellen Sie sicher, daß das Gerät an den richtigen seriellen Anschluß auf der Rückseite des Computers angeschlossen ist. 3. Stellen Sie sicher, daß das angeschlossene serielle Gerät funktioniert, indem Sie es an einen funktionierenden und richtig konfigurierten seriellen Anschluß anschließen. Funktioniert das serielle Gerät nicht, liegt das Problem entweder am Kabel oder am seriellen Gerät. - Seite 76 Español Chapter 5 - Español Tabla de los Contenidos 5.1 Características y Especificaciones............... 5.2 Utilizando la Función de Suspender a RAM.......... 5.3 Softwares Soportados....................5.4 Investigación de Conflictos..................Lista de Chequeo del Paquete El paquete del tablero de sistema contiene los siguientes artículos: ! El tablero de sistema ! Un manual de usuario ! Un soporte extremo de tarjeta sujetado con un puerto serial y...
-
Seite 77: Características Y Especificaciones
Español 5.1 Características y Especificaciones 5.1.1 Características Chipset • VIA P4M266/VT8233ACD ® Procesador La tarjeta madre del sistema esta equipada con un zócalo o enchufe 478 para instalar un procesador Pentium ® • Procesador Intel ® Pentium ® 4 (478-terminales) •... - Seite 78 Español Ranuras de Expansión El tablero del sistema es equipado con 1 ranura de AGP universal y 3 ranuras de PCI dedicados. AGP es un interfaz diseñado para apoyar alta ejecución de tarjetas de gráficas de 3D. Este utiliza conducto dedicado para acceder la memoria de sistema para textuarizar, z-tampón y mezcla alfa.
- Seite 79 Español - Arquitectura de Memoria Compartido Optimisado (SMA) - Memoria de uso de sistema de buffer principal de 8/16/32MB - Arquitectura 3D de 128-bit de ciclo singular - Triángulo de 8M/Motor de configuración segundo - Pixeles de 140M /Campo lleno de tri-lineal segundo - Motor gráfico de 128-bit 2D de generación próxima - Playback de video DVD de calidad alta - 2D/3D resolución hasta encima de 1920x1440...
- Seite 80 Español Controlador de IDE Maestro de Bus PCI • Dos interfaces de PCI IDE soporta hasta 4 dispositivos de IDE • Soporta las unidades duras de ATA/33, ATA/66, ATA/100 y ATA/133 • PIO Modo 3, 4, 5, y 6 Realzada IDE (tasa de transferencia de dato hasta 133MB/seg.) •...
- Seite 81 Español 5.1.2 Inteligencia Botón de Energía de Doble Función Dependiendo en la configuración en el campo de “Soft-Off By PWRBTN” de la Configuración de Power Management Setup, este interruptor permite el sistema de entrar al modo de Soft-Off o Suspender. Campaneo de Despertar (Wake-On-Ring) Esta característica permite el sistema que es en el modo de Suspender o en el modo de Soft Power Off a despierto/encendido...
- Seite 82 Español Teclado/Ratón de Wake-On-USB La función “Teclado/Ratón de Wake-On-USB” le permite a usted usar un teclado/Ratón de USB aparato para despertar un sistema que esta en el “S3 (STR-Suspend To RAM)” estado. Importante: • Si estas usando las funciones de teclado/Ratón de Wake- On-USB para 2 puertos de USB, el 5VSB potencia debe soportar una corrient (>) mas grande que ≥...
- Seite 83 Español Importante: El origen de energía de 5VSB de su fuente de alimentación debe soportar ≥ 1A. Recuperación de Fracaso de Energía AC Cuando la energía vuelve después del fracaso de energía AC, usted puede elegir a encender su sistema manualmente, dejar el sistema de encender automáticamente o volver al estado donde usted dejó...
- Seite 84 Español 5.2 Utilizando la Función de Suspender a RAM ® ® ® ® ® Si usted está utilizando el sistema operativo de Windows 98, favor de seguir los pasos de abajo. Selecciona “Power Management Setup” en la pantalla del menú principal y presiona <Enter>.
- Seite 85 Español 11. Cliquea el tab de Avanzado. En el campo de “Cuando presiono el botón de energía en mí computadora”, selecciona “Preparado”. 12. Después de completar los pasos de arriba y usted desea apagar la computadora, usted no necesita de ir por el proceso de encerrar los archivos, aplicaciones y sistema operativo.
- Seite 86 Español 5.3 Softwares Soportados 5.3.1 Paquete de Servicio VIA El CD en el paquete de tablero del sistema también viene con el VIA Service Pack. El paquete de servicio incluye los siguientes programas instaladores. • VIA ATAPI Vendor Support Driver •...
- Seite 87 Español Para instalar el Pquete de Servicio de VIA, favor de seguir los pasos debajos. 1. Insertar el CD que viene con el paquete del tablero de sistema en la unidad de CD-ROM. Aparecerá la pantalla de autocorrido (Main Board Utility CD). 2.
- Seite 88 Español 5.3.3 Controlador de LAN Interno para Windows (PM10-EL sólo) El driver de LAN para Windows NT ® 4.0, Windows ® 98 and ® Windows 98 SE no apoya con “Autorun”. Mientras el sistema ha descubierto el controlador de ethernet rápido de Realtek RTL8100, le guiará...
- Seite 89 CD de Main Board Utility), favor de ir directamente al directorio radical del CD y cliquea doblemente el "Setup". 2. Favor vaya al sitio de Web de DFT en "http://www.dfi.com/ support1/download2.asp" para la versión última de los drivers o aplicaciones de software.
- Seite 90 Español 5.4 Investigación de Conflictos Este capítulo del manual se diseña para ayudarlo con problemas que usted puede encontrar con su computadora personal. Para solucionar problemas su sistema eficazmente, trate cada problema individualmente. Algunas de las cosas más comunes para verificar cuando usted encuentra los problemas mientras usando su sistema se listan debajo.
- Seite 91 Español El cuadro constantemente está moviendo. 1. El amonestador ha perdido su sincronización vertical. Ajuste los monitores la sincronización vertical. 2. Márchese cualquier objeto, como otro amonestador o abanica que puede estar creando un campo magnético alrededor del despliegue. 3. Asegúrese que sus frecuencias de rendimiento de tarjeta de video son soportadas por este amonestador.
- Seite 92 Español Hard Drive Hard disk fracaso. 1. Asegúrese el tipo del paseo correcto para la unidad de disco duro se ha entrado en la BIOS. 2. Si el sistema se configura con dos unidades de disco duro, asegúrese el inicializadle (primero) la unidad de disco duro se configura como Amo y la segunda unidad de disco duro se configura como la Esclava.
- Seite 93 Español 1. Asegúrese que los devices de serie impulsan ha encendido y que el dispositivo es en línea. 2. Verifique que el dispositivo se tapa en el puerto en serie correcto adelante el trasero de la computadora. 3. Verifique que el dispositivo serie adjunto trabaja atándolo a un puerto en serie que está...