Rittal Blue e+ Montageanleitung
Vorschau ausblenden
Andere Handbücher für Blue e+:
- Montage-, installations- und bedienungsanleitung (52 Seiten) ,
- Montage-, installations- und bedienungsanleitung (58 Seiten) ,
- Montage-, installations- und bedienungsanleitung (72 Seiten)
Inhaltsverzeichnis
Verfügbare Sprachen
Verfügbare Sprachen
Quicklinks
Kapitel
Inhaltsverzeichnis

Verwandte Anleitungen für Rittal Blue e+


Inhaltszusammenfassung für Rittal Blue e+
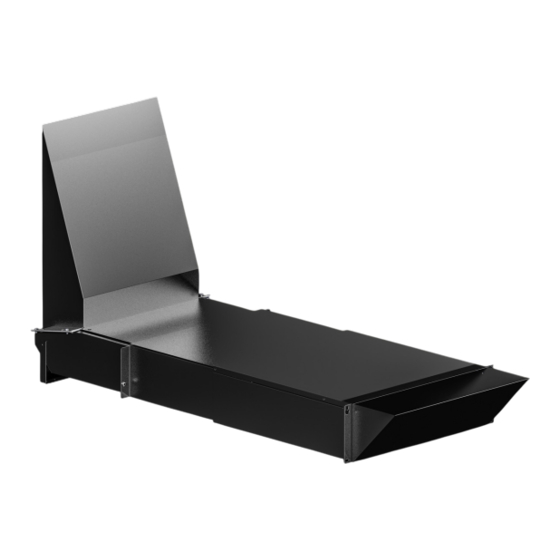
- Seite 1 Luftkanal Blue e+ Air duct Blue e+ 3312.820 Montageanleitung Assembly instructions...
-
Seite 2: Inhaltsverzeichnis
Rechtliches zur Betriebsanleitung............3 RoHS Compliance ................3 Aufbewahrung der Unterlagen............. 3 Copyright.................... 3 Sicherheitshinweise ............3 Lieferumfang ..............4 Voraussetzungen .............. 4 Montage des Luftkanals ........... 6 Aufsetzen des Ausblasschutzgitters ........ 13 Technische Daten ............14 Rittal Luftkanal Blue e+... -
Seite 3: Hinweise Zur Dokumentation
Dieses Dokument richtet sich an Personen, die mit der Installation von IT-Racks und Rack-Produkten betraut sind. Die Installation darf nur von geschulten Mitar- beitern durchgeführt werden. Rittal setzt voraus, dass Sie über die erforderliche Qualifikation zur Durchführung von Installationen verfügen und sich der Risiken bewusst sind, die beim Umgang mit Racks und Rack-Produkten auftreten kön-... -
Seite 4: Lieferumfang
Bauen Sie aufgrund des Türgewichts mit Kühlgerät eine Auflaufrolle ein: – Auflaufrolle TS 4538.000 – Auflaufrolle VX 8618.420 Bauen Sie die 19"-Ebenen mittig im Schrank ein. Dies gilt für alle Schrankvarianten (Breite 600 mm und 800 mm). Rittal Luftkanal Blue e+... -
Seite 5: Voraussetzungen
Stellen Sie die 19"-Vertikalschienen mit den vorgegebenen Mindestabständen zu Vorder- und Rücktür ein: – Abstand von Vordertür zu vorderen 19"-Vertikalschiene: 150 mm (Abb. 2). Abb. 2: Einstellen vordere 19"-Vertikalschiene – Mindestabstand Rücktür zu hinterer 19"-Vertikalschiene: 250 mm (Abb. 3). Rittal Luftkanal Blue e+... -
Seite 6: Montage Des Luftkanals
Die Schrauben müssen an den vorderen und hinteren 19"-Vertikalschienen auf der linken und rechten Seite gemäß Abb. 5 und Abb. 6 eingeschraubt werden. Hinweis: Die Schrauben dürfen noch nicht vollständig eingeschraubt werden, sondern nur einige Gewindegänge, so dass sie sicher in ihrer Position gehalten werden. Rittal Luftkanal Blue e+... - Seite 7 Montieren Sie auf der unteren Querstrebe auf der Rückseite des IT-Racks den hinteren Haltewinkel (Abb. 8). Der Haltewinkel wird hierzu mittig auf der Querstrebe mit vier selbstformenden M5x12 Schrauben (Schraube M5x12 selbstformend NZ/TX30) und einem An- zugsmoment von 5 Nm montiert. Rittal Luftkanal Blue e+...
- Seite 8 Ziehen Sie den Luftkanal auf der Rückseite aus, bis die Laschen am mittleren Luftkanalstück durch die hinteren 19"-Vertikalschienen hindurch gezogen sind. Kanten Sie anschließend die Laschen von Hand in einen rechten Winkel um (Abb. 11). Rittal Luftkanal Blue e+...
- Seite 9 Hängen Sie den Luftkanal analog wie auf der Rack-Vorderseite über die Schlüssellöcher auf die vorab eingedrehten Schrauben ein (Abb. 12). Abb. 12: Einhängen Luftkanal hinten Ziehen Sie die zuvor nur leicht eingedrehten Schrauben nun mit einem Anzugs- moment von 3 Nm fest (Abb. 13). Rittal Luftkanal Blue e+...
- Seite 10 Verbinden Sie den Luftkanal mit vier weiteren Schrauben (Flachkopfschraube I14583/5X16/TX25) und jeweils einer Kunststoffscheibe (Scheibe NZ/5,5) voll- ständig mit den 19"-Vertikalschienen (Abb. 14 und Abb. 15). Alle Schrauben müssen mit einem Anzugsmoment von 3 Nm angezogen wer- den. Abb. 14: Fixierung Luftkanal vorne Rittal Luftkanal Blue e+...
- Seite 11 Kontaktscheibe (Kontaktscheibe NZ/5,1 gezahnt) (Abb. 17). Das Anzugsmoment der Muttern beträgt 5 Nm. Abb. 17: Befestigung Luftkanal an Haltewinkel hinten Kleben Sie die Dichtung (B21 x H3 mm) auf die Anlagefläche des Luftkanal- Vertikalteils zum Luftkanal-Horizontalteil (Abb. 18). Rittal Luftkanal Blue e+...
- Seite 12 Befestigen Sie den Dichtungsstreifen (B10 x H10 x L372 mm) mittig an der hin- teren Wanne des Luftkanal-Horizontalteils (Abb. 20). Die Oberkante der Dichtung ist bündig mit der oberen Kante des Luftkanal- Endstücks. Abb. 20: Anbringen Dichtungsstreifen an hinterer Wanne des Luftkanals Rittal Luftkanal Blue e+...
-
Seite 13: Aufsetzen Des Ausblasschutzgitters
Bringen Sie sie dann an der Kontaktfläche zwischen Schutzgitter und Luftka- nal-Abdeckung vorne an (Abb. 22). Abb. 22: Dichtung Schutzgitter Das Schutzgitter wird zunächst über die vier Ausbrüche am Ausblas in Position gehalten (Abb. 23). Rittal Luftkanal Blue e+... -
Seite 14: Technische Daten
Abb. 24: Einsetzen der Spreiznieten Technische Daten Breite [mm] 19" Höhe [mm] 3 HE (Höhe des Luftkanal-Horizontalteils) Tiefe [mm] Minimal 445, ausziehbar auf maximal 845 Farbe RAL 9005 Material Stahlblech lackiert Gewicht [kg] ca. 12 Tab. 2: Technische Daten Rittal Luftkanal Blue e+...