Pelgrim IDK664 Anleitung
Inhaltsverzeichnis
Verfügbare Sprachen
Verfügbare Sprachen
Quicklinks
Kapitel
Inhaltsverzeichnis

Verwandte Anleitungen für Pelgrim IDK664


Inhaltszusammenfassung für Pelgrim IDK664
- Seite 1 IDK664 IDK332 Anleitung manual...
- Seite 2 Anleitung ..........3 – 31 manual .
-
Seite 3: Inhaltsverzeichnis
Inhalt Ihr Induktionskochfeld Bechreibung ..........4 Einführung . -
Seite 4: Ihr Induktionskochfeld
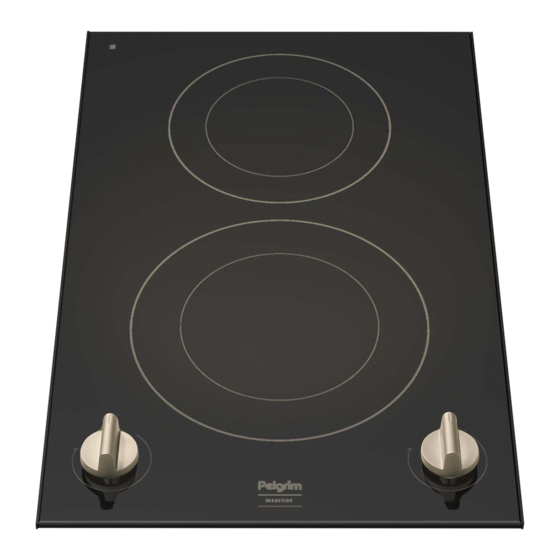
Ihr Induktionskochfeld Beschreibung 1. Zone vorne links 70 - 2300 Watt 2. Zone hinten links 40 - 1400 Watt 3. Zone hinten rechts 70 - 2300 Watt 4. Zone vorne rechts 40 - 1400 Watt 5. Kochstufen +/-... -
Seite 5: Einführung
Ihr Induktionskochfeld Einführung Dieses Induktionskochfeld wurde für den echten Hobbykoch entworfen. Das Kochen mit einem Induktionskochfeld bietet eine Reihe von Vorteilen. Es ist bequem, weil das Kochfeld schnell reagiert und auch auf äußerst niedrige Leistung eingestellt werden kann. Dank der hohen Leistung wird der Kochpunkt schnell erreicht. -
Seite 6: Allgemein
Ihr Induktionskochfeld Allgemein Inbetriebsetzung Induktion Im Gerät wird ein magnetisches Feld erzeugt. Wenn ein Topf mit eisernem Boden auf eine Kochzone gestellt wird, entsteht im Topfboden ein Induktionsstrom. Dieser Induktionsstrom erzeugt Hitze im Topfboden. Die Spule (1) im Kochfeld (2) erzeugt ein magnetisches Feld (3). -
Seite 7: Bedienung
Bedienung Bitte lesen Sie die gesonderten Sicherheitsvorschriften bevor Sie das Gerät in Betrieb nehmen! Einstellen Das Induktionskochfeld ist mit Restwärmeanzeige, (Kinder)sicherung, Ankochautomat und automatischer Kochzeitbegrenzung ausgestattet. Auf dieser und den nächsten Seiten können Sie lesen, wie diese Einrichtungen zu benutzen sind. Einschalten 1. - Seite 8 Bedienung Gewöhnungssache... Anfangs werden Sie überrascht sein von der schnellen Reaktion des Gerätes falls Sie auf eine Gasmulde oder Keramisches Kochfeld gekocht haben. Vor allem bei höheren Stufen wird der Kochpunkt sehr schnell erreicht. Damit Überkochen oder Trockenkochen vermieden wird, empfiehlt es sich, immer in der Nähe zu bleiben.
- Seite 9 Bedienung Stufe 9 Stellen Sie das Kochfeld nur dann auf Stufe 9 (Höchstleistung) ein, wenn Sie Wasser zum Kochen bringen möchten. Diese Stufe ist zu hoch zum Erhitzen von Butter oder Milch bzw. zum Auftauen. Lesen Sie die Kochtabellen, damit Sie mit der Technik vertraut werden.
-
Seite 10: Extra - Sicherheit
Bedienung Kindersicherung Ihre Kochplatte hat eine Kindersicherung, mit der Sie die Kochfelder sperren können, wenn sie nicht benutzt werden: Wenn das Gerat ausgeschaltet ist (hinsichtlich Reinigung) oder um nicht gemeintes Einschalten (von Kinder) zu verhüten. Einschalten Drehen Sie beide (mittleren) Knöpfe nach links (die anderen Knöpfe müssen auf Null stehen). - Seite 11 Bedienung Überhitzungssicherungen Am Gerät kann Überhitzung auftreten, wenn: der Topf die Wärme nicht einwandfrei leitet; Fett oder Öl auf einer hohen Stufe erhitzt wird; die Luftzirkulation (siehe auch Lüftungssicherung) unzureichend ist. Bei Überhitzung führt dies bei der betreffenden Kochzone, bzw. den Kochzonen zu einer der nachfolgenden Reaktionen: das Kochfeld wird die Leistung etwas zurück schalten;...
-
Seite 12: Kochgeschirr
Kochgeschirr Die optimale Benutzung der Kochmulde Die Wärmeverluste sind minimal, weil die Hitze im Topf selbst erzeugt wird. Bei kleineren Töpfen wird nur derjenige Teil der Zone aktiviert, der in Berührung mit dem Topfboden steht. Ein zusätzlicher Vorteil: Die Griffe eines Topfes werden nicht warm, da außen am Topf keine Strahlungswärme auftritt. - Seite 13 Kochgeschirr Sie können selbst mit Hilfe eines Magneten überprüfen, ob Ihr Kochgeschirr geeignet ist. Ein Topf ist geeignet, wenn der Topfboden vom Magneten angezogen wird; der Topf für den Elektroherd geeignet ist. Verwenden Sie nur Töpfe mit einer Mindestdicke von 2,25 mm und einem flachen Boden, der sich für den Gebrauch auf Induktionskochfeldern eignet.
- Seite 14 Kochgeschirr Geräusche im Topfboden Beim Kochen ist es möglich, dass Sie im Topfboden ein ratterndes Geräusch hören. Dieses Geräusch ist harmlos. Es wird verursacht durch die Einwirkung der Kochzone auf den Topfboden infolge der hohen Leistung. Bei einer niedrigeren Stufe wird das ratternde Geräusch leiser Schnellkochtöpfe Schnellkochtöpfe eignen sich ausgesprochen gut für Induktionskochfelder.
-
Seite 15: Bequem Kochen
Bequem Kochen Kochtabelle Die nachstehende Tabelle gilt nur als Leitfaden, weil der Einstellwert von der Menge und Zusammensetzung des Gerichts und vom Topf abhängt. - Töpfe, die vorher auf einer Gaskochmulde benutzt wurden, sind. Benutzen Sie die höchste Stufe zum: Speisen/Wasser schnell zum Kochen bringen;... - Seite 16 Bequem Kochen Benutzen Sie die mittlere Stufe zum: Garen von großen Mengen; Harte Gemüsesorten auftauen, z.B. grüne Bohnen. Benutzen Sie die niedrigste Stufe zum: Bouillon ziehen lassen; Rotkochen von Schmorbirnen; Bereiten von Schmorfleisch; Durchkochen von Gerichten; ...
-
Seite 17: Pflege
Pflege Allgemein Tägliche Reinigung Obwohl übergekochte Speisen nicht einbrennen können, empfiehlt es sich, das Kochfeld direkt nach Gebrauch zu reinigen. Zur täglichen Reinigung verwenden Sie am besten ein mildes Reinigungsmittel und ein feuchtes Tuch. Nachtrocknen mit Küchenpapier oder einem trockenen Tuch. Hartnäckige Flecken Auch hartnäckige Flecken lassen sich mit einem milden Reinigungsmittel (z.B. -
Seite 18: Störungen
Störungen Tabelle Wenn das Gerät nicht ordnungsgemäß funktioniert, bedeutet das nicht unbedingt, dass es defekt ist. Versuchen Sie eventuell, das Problem selbst zu lösen. Verständigen Sie den Kundendienst, wenn die nachstehenden Ratschläge keine Abhilfe verschaffen. Störung Ursache Abhilfe Bei der in Betrieb Setzung erscheint Normaler Betrieb. -
Seite 19: Allgemein
Störungen Algemein Ziehen Sie zu Rate bei den Kundendienst. Siehe dazu mitgelieferte Garantieschein oder die Internetseite www.hps.nl. Ein Gerät, dessen Kochfläche einen Bruch oder Riss aufweist, ist nicht mehr zu benutzen. Schalten Sie das Gerät sofort aus. Den Stecker aus der Steckdose ziehen oder den Zuleitungsschalter (bei festem Anschluss) auf 0 stellen oder die Sicherung(en) im Zählerschrank rausschrauben. -
Seite 20: Umweltaspekte
Umweltaspekte Entsorgung von Verpakkung und Gerät Die Verpackung des Gerätes ist wiederverwertbar. Folgendes kann benutzt worden sein: Pappe; Polyethylenfolie (PE); FKW-freies Polystyrol (PS-Hartschaum). Diese Materialien sind umweltgerecht und nach den geltenden behördlichen Vorschriften zu entsorgen. Das Typenschild ist gekennzeichnet mit einer Mülltonne, die durchgestrichen ist. -
Seite 21: Installation
Installation Allgemein Dieses Gerät entspricht den CE-Richtlinien. Typennummer, Energieart und Anschlusswert stehen auf dem Typenschild. Das Typenschild befindet sich an der Unterseite des Gerätes. Sicherheit Dieses Gerät darf nur von einem anerkannten Elektroinstallateur angeschlossen werden. Die Installation hat nach den geltenden Vorschriften des Landes und vor Ort zu erfolgen. -
Seite 22: Elektrischer Anschluß
Wenn ein fester Anschluss gewünscht wird, ist für einen allpoligen Schalter mit einem Kontaktabstand von mindestens 3 mm in der Zuleitung zu sorgen. Leistungstabelle Kochplattentyp IDK332 IDK664 Induktion Elektrischer Anschluß 230 V - 50 Hz Maximaler Leistung Kochzonen Vorne links 2300 W ununterbr. -
Seite 23: Viel Vorkommende Anschlüsse
Installation Das Gerät kann wie folgt angeschlossen werden: Viel vorkommende Anschlüsse 2-Phasen-Netzanschluss mit 2 Nulleitern (2 2N Wechselstrom 230 V / 50 Hz): Die Spannung zwischen Phase und Null ist 230 V Wechselstrom. Zwischen den Phasen kann eine Spannung von 0 V stehen, wenn sie im Zählerschrank an die gleiche Phase angeschlossen sind, aber auch 400 V, wenn sie an 2 verschiedene Phasen angeschlossen sind. -
Seite 24: Spezielle Anschlüsse
Installation 2-Phasen-Netzanschluss mit 1 Nullleiter (2 1N Wechselstrom 400 V / 50 Hz): Die Spannung zwischen den Phasen und dem Nullleiter ist 230 V Wechselstrom. Zwischen den Phasen steht eine Spannung von 400 V. Wenn keine Spannung von 400 V zwischen den Phasen vorhanden ist, ist von zwei Drähten die Rede, die von der gleichen Phase im Zählerschrank abgezweigt worden sind. - Seite 25 Installation Spezielle Anschlüsse 3-Phasen-Netzanschluss (3 Phasen Wechselstrom 230 V / 50 Hz): Die Spannung zwischen den Phasen und dem Nullleiter ist 230 V Wechselstrom. Sorgen Sie für Verbindungsbrücken zwischen den Anschlussstellen 3-4. Ihre Gruppen müssen mit minimal 16 A (3 Sicherungen) abgesichert sein. Das Anschlusskabel muss einen Aderdurchmesser von mindestens 2,5 mm haben.
-
Seite 26: Einbau
Sägen Sie den Ausschnitt in die Arbeitsplatte. Verfahren Sie dabei sorgfältig (siehe Tabelle). Sägen Sie eventuell vorhandene Trennwände auch aus. Der Abstand vom Ausschnittmaß bis zur Rückwand und / oder Seitenwand ist aus der Tabelle ersichtlich. Einbaumaße IDK664 Vorderseite voorzijde min.50 Einbaumaße IDK332... - Seite 27 Installation Abmessung Ausschnitt in die Arbeitsplatte Koppelprofil Koppelprofiel min.50 Wenn die Geräte sehr dicht nebeneinander montiert werden müssen, verwenden Sie das mitgelieferte Koppelprofil. Wenn das Koppelprofil nicht verwendet wird, halten Sie einen Mindestabstand von 60 mm zwischen den Aussparungen. Benötigter Freiraum: Dunstabzugshaube min.
- Seite 28 Installation Belüftung Die Elektronik im Gerät braucht Kühlung. An der Unterseite des Gerätes befinden sich die Lüftungs- öffnungen. Die Möglichkeit muss gegeben sein, dass durch diese Öffnungen kühle Luft ausgeblasen werden kann. An der Vorderseite ist das Gerät mit Ausblasöffnungen ausgestattet.
- Seite 29 “C” in die Seitenwand des Küchen- schranks zur Durchführung des Anschlußkabels. Das Kochfeld darf nur mit Pelgrim Backöfen kombiniert werden, nicht mit Combitrons. Achten Sie darauf, daß die Anschlußkabel frei beweglich sind. Wenn sich unter der Induktionskochfläche eine Schublade befindet, ist dafür zu sorgen, dass die Schublade nicht über den Rand hinaus gefüllt ist, um die Belüftung nicht zu...
- Seite 30 Installation Installation des Induktions-Kochfeldes über einem Combitron, einer Mikrowelle, einem Pelgrim-Backofen von 90 cm oder einem Backofen einer anderen Marke. Sägen Sie die Belüftungsöffnung(en) (1) aus, so dass die Gesamtfläche der Öffnungen minimal 100 cm beträgt. Siehe hierzu z.B. Abbildung mit 2 Öffnungen von je 50 cm...
- Seite 31 Installation 1. Prüfen Sie ob das Küchenmöbel und der Ausschnitt die Anforderungen erfüllen (siehe ‘Einbaumaße’ und ‘Sicherheitsmaßnahmen’). 2. Entfernen Sie die Schutzfolie des Dichtungsstreifens (A) und kleben Sie den Dichtungsstreifen in die Rille der Aluminiumprofile oder an die untere Seite der Glasplatte.
- Seite 64 kleben Sie hier das Gerätetypenschild ein stick the appliance identification card here Dieses Schild befindet sich an der Oberseite des Gerätes. This card is located on the top of the appliance. Halten Sie den Produktionscode (PCODE) und die vollständige Itemnummer (ITEMNR) bereit, wenn Sie mit der Kundendienstabteilung Kontakt aufnehmen.