Seite 9
接続ケーブルのコネクターを、モニター後面の DC 12V OUT 端子および LAN(10 / 100)端子に接続する。 ご注意 DC 12V OUT 端子にケーブルをつなぐときは、ケーブ ル先端の形と DC 12V OUT 端子の形を合わせるように して差し込んでください。 (10 / 100) 端子 DC 12V OUT 端子 端子の形を合わ せる 組み立て...
Seite 10
Joining the Stand and the Monitor..........13 Note Always verify that the unit is operating properly before use. SONY WILL NOT BE LIABLE FOR DAMAGES OF ANY KIND INCLUDING, BUT NOT LIMITED TO, COMPENSATION OR REIMBURSEMENT ON ACCOUNT OF THE LOSS OF...
Joining the monitor and the control unit • When you assemble the attachment stand, turn off the The BKM-38H is for joining a monitor and a BKM-17R monitor power before unplugging the cable. If you attach control unit.
Left stand (1) Assembly Joining the Stand and the Control Unit Right cover (1) You can join a control unit to a monitor, using the attachment stand. 1 Fit the control unit into the projection of the attachment stand to join them together. Left cover (1) 2 Attach the left and right stands to the sides of the control unit, using two screws C (4 ×...
Attach the left and right covers to the stands, using four Joining the Stand and the Monitor screws A (3 × 8) each. Turn the monitor upside down. Remove the four legs from the bottom of the monitor, and remove both left and right screws from the rear of the monitor.
Seite 14
Turn the monitor upright and place the monitor on the Plug the connecting cable into the DC 12V OUT and control unit with the stands attached. LAN (10/100) connectors at the side of the monitor. Fit the rear of the monitor into the joints to join them Note together.
Seite 15
Assemblage du socle et du moniteur ........18 Remarque Vérifiez toujours que l’appareil fonctionne correctement avant l’utilisation. Sony n’assumera pas de responsabilité pour les dommages de quelque sorte qu’ils soient, incluant mais ne se limitant pas à la compensation ou au remboursement, à...
Sécurité Caractéristiques • N’installez pas l’appareil près d’une source de chaleur Le socle de montage du contrôleur BKM-38H est une (radiateur ou bouche de chaleur, par exemple) ou dans un fixation permettant d’assembler un BVM-E251 et une endroit exposé à une poussière ou une humidité...
Socle gauche (1) Montage Assemblage du socle et de l’unité de commande Capot droit (1) Vous pouvez assembler une unité de commande et un moniteur à l’aide du socle de montage. 1 Placez l’unité de commande dans la partie saillante du socle de montage pour les assembler.
Fixez le capot droit et le capot gauche sur les socles au Assemblage du socle et du moniteur moyen des quatre vis A (3 × 8) pour chacun. Retournez le moniteur. Retirez les quatre pieds de la base du moniteur et les vis gauche et droite de l’arrière du moniteur.
Seite 19
Redressez le moniteur et placez-le sur l’unité de Branchez le câble de connexion dans les connecteurs commande avec les socles fixés. DC 12V OUT et LAN (10/100) situés sur le côté du moniteur. Placez l’arrière du moniteur dans les joints afin de les assembler.
Seite 20
Anbau eines Steuergeräts am Ständer ........23 Ständer und Monitor zusammenbauen ........24 Hinweis Bestätigen Sie vor dem Gebrauch immer, dass das Gerät richtig arbeitet. SONY KANN KEINE HAFTUNG FÜR SCHÄDEN JEDER ART, EINSCHLIESSLICH ABER NICHT BEGRENZT AUF KOMPENSATION ODER ERSTATTUNG, AUFGRUND VON VERLUST VON AKTUELLEN ODER ERWARTETEN PROFITEN DURCH FEHLFUNKTION DIESES GERÄTS ODER AUS...
Transportieren, Anbauen oder Zerlegen des Sicherheitsmaßnahmen Zusatzständers Handschuhe, um Verletzungen zu vermeiden. Hinweise zur sicheren Verwendung • Stellen Sie den Zusatzständer nicht in der Nähe von Wärmequellen, wie z. B. Heizkörpern oder Warmluftauslässen, oder an Orten auf, die starkem Staubniederschlag oder Feuchtigkeit ausgesetzt sind. •...
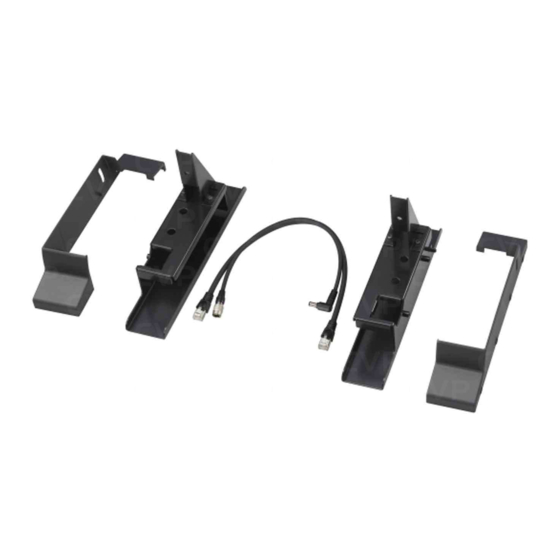
Abdeckung rechts (1) Mit der Controller-Standhalterung BKM-38H können ein BVM-E251 und ein Monitorsteuergerät BKM-17R zusammengebaut werden. Verbindung von Monitor und Steuergerät Abdeckung links (2) Der BKM-38H verbindet den Monitor mit dem Steuergerät BKM-17R. Abmessungen Mit angebautem Gerät Verbindungsstücke (2) Fuß (2) Schrauben A (3 ×...
Linke und rechte Abdeckung mit jeweils vier Zusammenbau Schrauben A (3 × 8) anbauen. Anbau eines Steuergeräts am Ständer Mit Hilfe des Zusatzständers können Sie ein Steuergerät und einen Monitor zu einer Einheit zusammenfügen. Schraube A 1 Steuergerät an den Führungsstiften des Zusatzständers ansetzen.
Den Monitor aufrichten und den Monitor mit Ständer und Monitor angebrachten Ständern auf das Steuergerät setzen. zusammenbauen Die Rückseite des Monitors in die Verbindungsstücke setzen, um diese zu verbinden. Den Monitor umdrehen. Hinweis Die vier Füße von der Unterseite des Monitors Schützen Sie den Monitor vor Kratzern, während Sie abnehmen und die Schrauben links und rechts von der ihn in die Verbindungsstücke einsetzen.
Seite 25
Anschlusskabel an die seitlich am Monitor angeordneten Anschlüsse DC 12V OUT und LAN (10/ 100) anschließen. Hinweis Achten Sie beim Anschließen des Kabels an den Anschluss DC 12V OUT darauf, den Stecker des Kabels richtig herum in den Anschluss DC 12V OUT am Monitor einzustecken.
Seite 26
Nota Verificare sempre che l’apparecchio stia funzionando correttamente prima di usarlo. LA SONY NON SARÀ RESPONSABILE DI DANNI DI QUALSIASI TIPO, COMPRESI, MA SENZA LIMITAZIONE A, RISARCIMENTI O RIMBORSI A CAUSA DELLA PERDITA DI PROFITTI ATTUALI O PREVISTI DOVUTA A GUASTI DI QUESTO APPARECCHIO, SIA DURANTE IL PERIODO DI VALIDITÀ...
Fissaggio di monitor e unità di controllo • Durante la fase di assemblaggio della base di supporto, Il BKM-38H fissa il monitor all’unità di controllo BKM- spegnere il monitor prima di scollegare il cavo di 17R. alimentazione. Se la base di supporto viene fissata al...
Base sinistra (1) Montaggio Fissaggio della base all’unità di controllo Coperchio destro (1) È possibile unire un’unità di controllo ad un monitor mediante la base di supporto. 1 Posizionare l’unità di controllo in corrispondenza della base di supporto per l’installazione. Coperchio sinistro (1) 2 Fissare le basi destra e sinistra ai lati dell’unità...
Fissare i coperchi destro e sinistro ai supporti, Fissaggio della base al monitor utilizzando quattro viti A (3 × 8) per ognuno. Capovolgere il monitor. Rimuovere i quattro piedini dalla parte inferiore del monitor e le viti di sinistra e destra dalla parte posteriore del monitor.
Seite 30
Raddrizzare il monitor e posizionarlo sull’unità di Collegare il cavo di collegamento nei connettori controllo con le basi collegate. DC 12V OUT e LAN (10/100) sul lato del monitor. Inserire la parte posteriore del monitor nei giunti per Nota fissarli insieme. Quando si collega il cavo al connettore DC 12V OUT, Nota verificare di collegare il connettore del cavo nel...
Seite 31
Nota Verifique siempre que esta unidad funciona correctamente antes de utilizarlo. SONY NO SE HACE RESPONSIBLE POR DAÑOS DE NINGÚN TIPO, INCLUYENDO PERO NO LIMITADO A LA COMPENSACIÓN O PAGO POR LA PÉRDIDA DE GANANCIAS PRESENTES O FUTURAS DEBIDO AL FALLO DE ESTA UNIDAD, YA SEA DURANTE LA VIGENCIA DE LA GARANTÍA O...
Seite 32
• Al montar el soporte de sujeción, apague la alimentación El BKM-38H acopla un monitor y una unidad de control del monitor antes de desenchufar el cable. Si fija el BKM-17R. soporte de sujeción con el monitor encendido, el cable puede quedar atrapado entre el monitor y el soporte de sujeción y provocar una descarga eléctrica.
Seite 33
Soporte izquierdo (1) Montaje Unión del soporte y la unidad de control Cubierta derecha (1) Se puede unir una unidad de control a un monitor utilizando el soporte de sujeción. 1 Monte la unidad de control en el saliente del soporte de sujeción para unirlos entre sí.
Seite 34
Fije las cubiertas izquierda y derecha a los soportes, Unión del soporte y el monitor utilizando cuatro tornillos A (3 × 8) en cada una. Gire el monitor boca abajo. Desmonte las cuatro patas de la parte inferior del monitor y los tornillos izquierdo y derecho de la parte posterior del monitor.
Seite 35
Ponga el monitor en posición vertical y colóquelo Enchufe el cable de conexión en los conectores DC sobre la unidad de control con los soportes instalados. 12V OUT y LAN (10/100) del lateral del monitor. Encaje la parte trasera del monitor en las uniones para Nota realizar el acoplamiento.
将左右盖安装到支座上,每个盖子使用 4 个螺钉 连接支座和监视器 A (3 × 8)。 将监视器上下翻转。 拆下监视器底部的 4 个支脚和监视器背面左右两侧 的螺钉。 螺钉 A 将接头放在左右支座上,并各用 2 个螺钉 B (4 × 8)牢牢固定。 螺钉 B 接头 接头 注意 将监视器平放在软布上。 控制单元 背面 使用螺钉 D(4 × 16)将附带的 2 个支脚安装至监 视器底部。 螺钉 D 将监视器转正,并将监视器放在已安装支座的控 制单元上。...
Seite 40
将连接电缆插入监视器侧部的 DC 12V OUT 和 注意 LAN (10/100) 接口。 在接头周围操作时保护好监视器以防止刮伤。 注意 将电缆连接到 DC 12V OUT 接口中时,务必按正 确的方向将电缆的接头插入监视器上的 DC 12V OUT 接口。 LAN (10/100) 接口 DC 12V OUT 接口 接头 按正确的方向插 入接头。 使用 2 个螺钉 B (4 × 8)将监视器固定至支座。 注意 当拧紧螺钉 B 以将监视器固定至支座时,请抵着 安装表面牢牢扶住监视器。...
各使用 4 顆螺絲 A (3 × 8) 附接左側和右側護蓋至 接合托架與顯示器 托架。 將顯示器上下倒置。 將 4 個支腳從顯示器底部拆下, 並將左側和右側的 螺絲從顯示器背面拆下。 螺絲 A 將連接支架接合左側和右側的托架, 各使用 2 顆螺 絲 B (4 × 8) 來固定。 螺絲 B 連接支架 連接支架 注意 將顯示器平放於軟布上。 控制元件 背面 使用螺絲 D (4 × 16) 將隨附的 2 個支腳接合顯示器 底部。...
Seite 45
將連接纜線插入顯示器側面的 DC 12V OUT 和 注意 LAN (10/100) 接口。 在連接支架周圍操作時請小心,以免顯示器被刮 傷。 注意 將纜線連接到 DC 12V OUT 接口時,務必將纜線 的接頭以正確的方向插入顯示器上的 DC 12V OUT 接口。 LAN (10/100) 接頭 DC 12V OUT 接頭 以正確的方向插 連接支架 入接頭。 使用 2 顆螺絲 B (4 × 8) 將顯示器固定到托架上。 注意...
Seite 46
스탠드와 모니터 결합 ............49 주의 사용 전에는 항상 정상적으로 작동하는지 확인하십시오. SONY 는 본체의 오류로 인한 현재 또는 장래 이익의 손실에 대한 손해에 대해서 보증기간 중이거나 보증기간 경과 후 또는 어떠한 이유에도 상관없이 배상이나 변상에 대한 일체의 책임을 지지 않습니다 .
• 모니터와 부착 스탠드 사이에 손가락이 끼이지 않도 록 주의하십시오. 모니터와 제어 기기 결합 • 부착 스탠드를 조립할 때는 먼저 모니터 전원을 끈 후 BKM-38H는 모니터와 BKM-17R 제어 기기를 결합하 에 케이블을 분리하십시오. 모니터 전원을 켠 상태로 는 데 사용됩니다. 부착 스탠드를 부착하면 케이블이 모니터와 부착 스...
좌측 스탠드 (1) 조립 스탠드와 제어 기기 결합 우측 커버 (1) 부착 스탠드를 사용하여 모니터에 제어 기기를 결합할 수 있습니다. 1 부착 스탠드의 프로젝션에 제어 기기를 장착하 여 두 장치를 결합합니다. 좌측 커버 (1) 2 나사 C (4 × 16) 2개를 사용하여 제어 기기의 양 쪽에...
각각 나사 A (3 × 8) 4개씩 사용하여 스탠드에 좌측 스탠드와 모니터 결합 및 우측 커버를 부착합니다. 위가 아래로 가게 모니터를 뒤집습니다. 모니터 하단에서 4개의 다리를 제거하고 모니터 뒷면에서 좌우 양쪽에 있는 나사를 제거합니다. 나사 A 좌측 및 우측 스탠드에 조인트를 놓고 각각 나사 B (4 ×...
Seite 50
연결 케이블을 모니터 측면의 DC 12V OUT과 LAN 참고 (10/100) 커넥터에 연결합니다. 모니터를 결합하기 위해 조인트 주변에서 작업 시 모니터에 흠집이 생기지 않도록 보호하십시오. 참고 케이블을 DC 12V OUT 커넥터에 연결하는 경우 케 이블의 커넥터를 모니터의 DC 12V OUT 커넥터에 올바른...
Seite 51
El material incluido en este manual contiene informacion このマニュアルに記載されている事柄の著作権は当社にあ propiedad de Sony Corporation y es para uso exclusivo de los り、説明内容は機器購入者の使用を目的としています。 compradores del equipo descrito en este manual. 従って、当社の許可なしに無断で複写したり、説明内容(操 Sony Corporation prohibe a titulo expreso la copia de 作、保守等)と異なる目的で本マニュアルを使用することを cualquier parte de este manual o su uso para ningun otro 禁止します。...