Videotec MAXIMUS MVX Bedienungsanleitung
Inhaltsverzeichnis
Verfügbare Sprachen
Verfügbare Sprachen
Quicklinks
ITALIANO
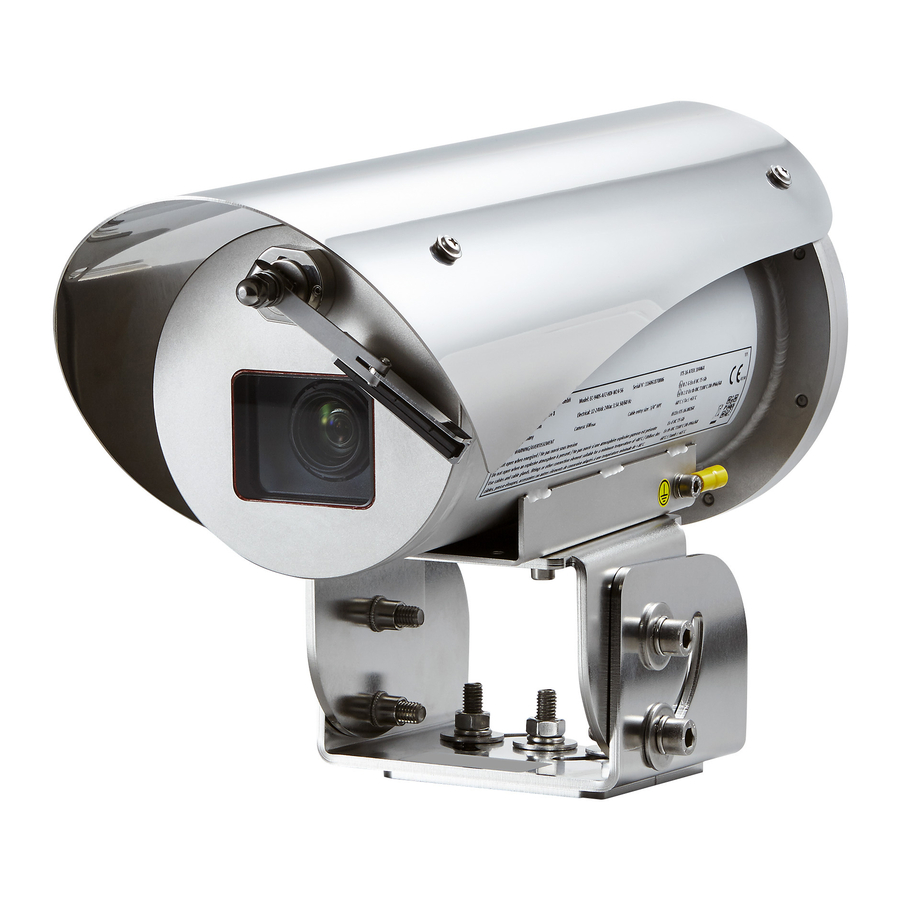
High-spec ex-proof Day/Night camera in a compact design
EN
English - Instruction manual
IT
Italiano - Manuale di istruzioni
FR
Français - Manuel d'instructions
DE
Deutsch - Bedienungsanleitung
MAXIMUS MVX
RU
Русский - Руководство по эксплуатации
PT
Português - Manual de instruções
KO
한국어 - 지침 설명서
Kapitel
Inhaltsverzeichnis
Fehlerbehebung

Verwandte Anleitungen für Videotec MAXIMUS MVX


Inhaltszusammenfassung für Videotec MAXIMUS MVX
- Seite 1 ITALIANO MAXIMUS MVX High-spec ex-proof Day/Night camera in a compact design English - Instruction manual Italiano - Manuale di istruzioni Русский - Руководство по эксплуатации Français - Manuel d’instructions Português - Manual de instruções 한국어 - 지침 설명서 Deutsch - Bedienungsanleitung...
- Seite 73 MNVCMVXCAM_1645_IT...
-
Seite 111: Hochleistung Ex-Geschützte Day/Night Kamera Im Kompaktem Design
DEUTSCH MAXIMUS MVX Hochleistung Ex-geschützte Day/Night Kamera im kompaktem Design Deutsch - Bedienungsanleitung... - Seite 113 Inhaltsverzeichnis D E U T S C H 1 Allgemeines ........................5 1.1 Schreibweisen ................................5 2 Anmerkungen zum Copyright und Informationen zu den Handelsmarken ..... 5 3 Identifizierung ....................... 5 3.1 Kennzeichnung des Produkts..........................5 4 Installation ........................6 4.1 Benutzerfeld ................................
- Seite 114 6.1.7.4 Menü Kommunikation ....................................22 6.1.8 Menü Default ..................................22 6.1.9 Menü Info ....................................22 6.2 Software-Schnittstelle............................23 6.2.1 Mindestanforderungen an den PC ..........................23 6.2.2 Konfigurationsvorgang über Software ..........................23 6.2.3 Installation der Software ..............................23 6.3 Web-Schnittstelle ..............................25 6.3.1 Home Seite ....................................25 6.3.2 Benutzersteuerung Seite ..............................26 6.3.3 Geräteparameter Seite ................................27 6.3.4 Gerätestatistiken Seite .................................27 6.3.5 Netzwerk-Konfiguration Seite ............................27...
-
Seite 115: Allgemeines
1 Allgemeines 2 Anmerkungen zum Copyright und Vor Installation und Anwendung der Einheit ist die gesamte gelieferte Dokumentation aufmerksam zu Informationen zu den lesen. Zum späteren Nachschlagen das Handbuch in Reichweite aufbewahren. Handelsmarken 1.1 Schreibweisen Die angeführten Produkt- oder Firmennamen sind Handelsmarken oder eingetragene Handelsmarken. -
Seite 116: Installation
4 Installation 4.2 Anschluss der Stromversorgung ACHTUNG! Die Installation und Wartung der Vorrichtung ist technischen Fachleuten Die elektrischen Anschlüsse nur vorbehalten. durchführen, wenn die Stromversorgung abgetrennt und die Trennvorrichtung offen Das externe Abschirmgeflecht des ist. mehradrigen Kabels (Armierung) muss geerdet werden. Im Zuge der Installation ist zu prüfen, ob die Merkmale der von der Anlage Alle nicht angeschlossenen Drähte sind... -
Seite 117: Anschluss Des Videokabels
4.3 Anschluss des Videokabels Die Anschlüsse nach den Angaben in der Tabelle vornehmen (standardgerecht: TIA/EIA-568-B). Die Anlage gehört zum Typ CDS (Cable ANSCHLUSS DER ETHERNET-KABEL Distribution System). Nicht an Kreisläufe Nummer des Pins Kabelfarbe SELV anschließen. Orange-Weiß Orange Die in diesem Kapitel beschriebenen Schritte können nur bei den Grün-Weiß... -
Seite 118: Anschluss Der Signalkabel
Das Produkt erkennt automatisch den Da keine Polarität vorhanden ist, können beide verwendeten Protokolltyp (PANASONIC Anschlüsse desselben Relais mit Wechsel- oder 850, PELCO D, VIDEOTEC MACRO). Gleichspannung verwendet werden. 4.5.2 Anschluss an Alarme und Relais Für weitere Infos bitte entsprechendes Kapitel beachten (6.1.7.1 Menü... -
Seite 119: Anschluss Der Waschanlage
Sollte der Standardwert der Leitung RS-485 zu ändern Für das Einschalten der Einheit die elektrische sein, kann dies über die Software PTZ Manager Versorgung anzulegen. erfolgen. Diese kann unter support.videotec.com Die elektrische Versorgung abtrennen, um die Einheit gratis heruntergeladen werden. abzuschalten. -
Seite 120: Konfiguration
6 Konfiguration 6.1.1.1 Verwendung des Steuerknüppels Alle Menüvorgänge werden mit dem Steuerknüppel Die Konfiguration des Geräts kann unter Verwendung veranlasst. folgender Instrumente erfolgen: Analoge Produktversionen • OSM-Schnittstelle (On Screen Menu): Konfiguration mittels Text auf analogem Videosignal. IP-Versionen des Produktes. Links Rechts •... -
Seite 121: Das Bewegen Innerhalb Der Menüs
6.1.1.2 Das Bewegen innerhalb der Menüs 6.1.1.3 Ändern von Parametern Jeder OSM-Bildschirm weist eine Liste mit Parametern Den Cursor auf den zu ändernden Parameter oder Untermenüs auf, die vom Bediener angewählt bewegen und bestätigen. Das Feld beginnt zu werden können. Um die verschiedenen Parameter blinken als Zeichen dafür, dass es geändert wird. -
Seite 122: Ändern Der Zahlenfelder
6.1.1.4 Ändern der Zahlenfelder 6.1.1.5 Ändern von Texten Den Cursor auf den zu ändernden Parameter Den Cursor auf den zu ändernden Parameter bewegen und bestätigen. bewegen und bestätigen. FOCUS ALARME 1 ------------------------ ------------------------ 1>FOCUSGESCHW. STATUS: OFFEN 2 AUTOFOCUS 1 ART N.O. - Seite 123 Es ist möglich, mit dem Joystick innerhalb des Menüs Verwenden Sie: zu navigieren. • LOESCHT: Die gesamte Textzeichenfolge löschen. • SPEICHERN: Speichern des neuen Textes vor dem EDIT TEXT: AREA Austritt aus dem Menü. ------------------------ • AUSGANG: Austritt aus dem Menü. Text: TEXT AREA1 ↑...
-
Seite 124: Konfiguration Über Osm
6.1.2 Konfiguration über OSM 6.1.5 Kameramenü Konfiguration: Auswahl einer der für die Es lassen sich zahlreiche Videokameras Kamera vorgegebenen Konfigurationen: einrichten. Prüfen Sie, ob die Kamera mit • Standard: Normaler Kamerabetrieb. der gewünschten Funktion kompatibel ist ( 12 Technische Daten, Seite 33). •... -
Seite 125: Menü Erweiterte Konfiguration
6.1.5.1 Menü Erweiterte Konfiguration 6.1.5.3 Menü Erweiterte Konfiguration (Focus) Durch Aufruf dieses Menüs lässt sich die Videokamera spezifischer konfigurieren. Ermöglicht die Konfiguration folgender Parameter: Zoom: Aufruf des Untermenüs Zoom. Focus-Geschwindigkeit: Einstellbar ist hier die Focusgeschwindigkeit. Die Focus: Aufruf des Untermenüs Focus. Geschwindigkeitswerte liegen in einem Bereich Belichtung: Aufruf des Untermenüs Belichtung. -
Seite 126: Menü Erweiterte Konfiguration (Belichtung)
6.1.5.4 Menü Erweiterte Konfiguration Das Menü konfiguriert sich basierend auf die installierte Kamera und der getroffenen Auswahl (Belichtung) selbst dynamisch. Dabei werden die Parameter, auf Ermöglicht die Konfiguration folgender Parameter: die eingewirkt werden kann, angezeigt. Modus: Art der Belichtungssteuerung - Die empfohlene Einstellung lautet Automatik. -
Seite 127: Menü Erweiterte Konfiguration (Infrarot)
6.1.5.5 Menü Erweiterte Konfiguration Um falsche Schaltungen zu vermeiden ist (Infrarot) es ratsam, die höchsten Werte sowohl für Ermöglicht die Konfiguration folgender Parameter: die Schwelle als auch die Verzögerung der Tagschaltung auszuwählen. IR-Modus: Wird hier OFF eingestellt, ist dauerhaft der Tagesmodus aktiviert. Wird ON eingestellt, ist dauerhaft der Nachtmodus INFRAROT aktiviert. -
Seite 128: Menü Erweiterte Konfiguration (Weißabgleich)
6.1.5.6 Menü Erweiterte Konfiguration (Wei 6.1.5.7 Menü Erweiterte Konfiguration ßabgleich) (Anderen) Ermöglicht die Konfiguration folgender Parameter: Ermöglicht die Konfiguration folgender Parameter: Modus: Einstellbar ist die Steuerung des Schärfe: Einstellung der Bildschärfe. Weißabgleichs. Folgende Werte sind möglich: Höhe Auflösung: Zum Einschalten der Funktion •... -
Seite 129: Menü Anzeigen
6.1.6 Menü Anzeigen 6.1.7 Menü Optionen Ermöglicht die Konfiguration folgender Parameter: Ermöglicht die Konfiguration folgender Parameter: Empfangene Befehle: Lautet die Einstellung Alarme: Gestattet den Zugriff auf das nicht auf OFF, kann der Modus gewählt werden, Alarmmenü. mit dem die empfangenen seriellen Befehle Waschanlage: Gestattet den Zugriff auf das angezeigt werden. -
Seite 130: Menü Alarme
6.1.7.1 Menü Alarme 6.1.7.2 Menü Waschanlage Vom Alarmmenü kann auf das Menü Alarm 1 Die Einheit bietet die Möglichkeit, einen zugegriffen werden, in dem sich die Parameter Scheibenwischer einzusetzen und eine Pumpe für die ändern lassen. Scheibenreinigung zu betätigen. Ermöglicht die Konfiguration folgender Parameter: Ermöglicht die Konfiguration folgender Parameter: Art: Eingestellt wird die Kontaktart: Ein: Aktivierung der Funktion Waschanlage... -
Seite 131: Menü Testfunktionen
6.1.7.3 Menü Testfunktionen 6.1.7.3.1 Menü Status I/O Innerhalb des Menüs lässt sich der Status einiger Verfügbar ist ein Diagnosemenü, mit dem sich Gerätekomponenten einsehen (zu Diagnosezwecken Funktionstests am Gerät vornehmen lassen. hilfreich). Ermöglicht die Konfiguration folgender Parameter: Eingangsalarm: Zeigt den Alarmstatus (aktiv oder Wiper aktivieren: Gestattet die Einschaltung nicht aktiv). -
Seite 132: Menü Kommunikation
6.1.7.4 Menü Kommunikation 6.1.8 Menü Default Ermöglicht die Konfiguration folgender Parameter: Setup löschen: Setzt alle Parameter wieder auf die werkseitigen Anfangseinstellungen. ACK Seriell: Aktiviert oder deaktiviert die ACK-Antwort bei jedem gesendeten Befehl Gerät neu starten: Gestattet den Neustart des (falls vom seriellen Kommunikationsprotokoll Gerätes. -
Seite 133: Software-Schnittstelle
Produkts (4.4 Anschluss der Ethernet-Kabel, Seite 7), mit der Konfiguration der IP-Parameter fortfahren. Das Produkte kann mit dem Protokoll Die IP-Adresse der einzelnen Einheiten ist separat mit ONVIF oder TCAM (VIDEOTEC) einem PC zu konfigurieren. funktionieren. Wenn das Protokoll ONVIF verwendet wird, sicherstellen, dass Die Einheit an das LAN-Netz anschließen, Strom... - Seite 134 Die Taste Add. anklicken. Die Kamera steht in der Liste der Vorrichtungen (Camera list) zur Verfügung und kann mittels Drag and Drop des Symbols in eines der nicht verwendeten Felder angezeigt werden. Abb. 38 Abb. 40 Der Kamera und der Gruppe einen Namen zuweisen. Zur Anzeige der Kameras auf mehreren Computern Das ONVIF oder TCAM Protokoll wählen und die muss der TVM-Client installiert werden und über...
-
Seite 135: Web-Schnittstelle
6.3 Web-Schnittstelle Ein Fenster wird angezeigt, in dem die Server hinzugefügt werden können, mit denen durch Drücken der Taste Add eine Verbindung hergestellt Nur für IP-Produktversionen werden kann. Beim ersten Anschluss eine Adresse zuweisen, die nicht 192.168.10.100 ist. (6.3.5 Netzwerk-Konfiguration Seite, Seite 27). -
Seite 136: Benutzersteuerung Seite
6.3.2 Benutzersteuerung Seite • Iris close/Iris open/Auto iris Um die Einrichtung via Browser zu steuern, wählen Sie den Eintrag Benutzersteuerung. Es öffnet sich ein neues Fenster mit einer virtuellen Tastatur zum Absenden von Befehlen. Abb. 48 • Wiper/Washer Abb. 49 •... -
Seite 137: Geräteparameter Seite
6.3.3 Geräteparameter Seite Ist die automatische DNS-Suche deaktiviert, muss trotzdem ein Wert für das Primär-DNS und das Unter dem Menüpunkt „Geräteparameter“ können Sekundär-DNS eingegeben werden (Beispiel: 8.8.8.8). Zusatzinformationen angezeigt werden. Abb. 53 6.3.4 Gerätestatistiken Seite Beim Menüpunkt Gerätestatistiken werden nur zur Information alle während des Betriebs des Gerätes gesammelten Statistiken wiedergegeben. -
Seite 138: Benutzer-Konfiguration Seite
6.3.6 Benutzer-Konfiguration Seite 6.3.8 Wiper Im Menü-Eintrag Benutzer-Konfiguration können Der Scheibenwischer ist bei die Benutzer verwaltet werden, die Zugriff auf die Aussentemperaturen unter 0°C oder bei Einrichtung haben. Die Nutzer „Administrator“ Frost nicht zu betätigen. können auf die gesamte Konfiguration des Geräts zugreifen. -
Seite 139: Encodereinstellungen Seite
6.3.10 Encodereinstellungen Seite 6.3.11 Werkzeuge Seite Unter dem Menüpunkt Encodereinstellungen können Im Menü-Eintrag Werkzeuge können die die 2 ersten Videoströme des Geräts konfiguriert gesamte Konfiguration der Einrichtung oder nur werden. Der erste Strom wird zwangsläufig mit dem bestimmte Abschnitte auf die vordefinierten Werte Algorithmus H.264/AVC komprimiert, während der zurückgesetzt werden. -
Seite 140: Spezialbefehle
8.3 Spezialbefehle SPEZIALBEFEHLE Aktion Befehl Protokoll VIDEOTEC MACRO ONVIF (auxiliary com- PANASONIC 850 PELCO D mand) Wiper Start Preset Speichern 85 tt:Wiper|On Preset Speichern 85 Preset Speichern 85 Aux 3 ON – Preset Speichern 54 Aux 3 ON Wip+ –... -
Seite 141: Wartung
Video-Encoders aktualisiert werden. Die Aktualisierung der Firmware kann von fern mit Konverter USB / Seriell 485 vorgenommen werden (nur Protokolle VIDEOTEC MACRO und PELCO D) (der Konverter gehört nicht zum Lieferumfang). Dieser Vorgang ist nur bei den analogen Produktversionen möglich. -
Seite 142: Problemlösung
11 Problemlösung PROBLEM Kein sichtbares Videostreaming (IP- Version). URSACHE Falsche Einstellung der IP-Parameter. Kontaktieren Sie bitte das autorisierte Kundenzentrum bei jedem nicht LÖSUNG Die IP-Adresse des Gerätes und die beschriebenen Problem oder falls das Konfiguration der computereigenen aufgelistete Problem weiterhin bestehen Netzwerkkarte prüfen. -
Seite 143: Technische Daten
12 Technische Daten 12.1 Kamera ANALOGKAMERAS (DAY/NIGHT) Day/Night 36x Day/Night 28x Hohe Empfindli- chkeit NTSC NTSC Opticher Zoom Wide Dynamic Range (ON, OFF, Auto) – True progressive SCAN – Digitale Bildstabilisierung Weißabgleich Auto, ATW, Indoor, Outdoor (Fix/Auto), Auto, ATW, Indoor, Outdoor (Fix/Auto), Natriumdampflampe (Fix/Auto), Natriumdampflampe (Fix/Auto), Manuell... - Seite 144 ANALOGKAMERAS (DAY/NIGHT) Day/Night 18x Day/Night 10x Hohe Empfindli- chkeit NTSC NTSC Opticher Zoom Wide Dynamic Range (ON, OFF, Auto) – True progressive SCAN – Digitale Bildstabilisierung – – Weißabgleich Auto, ATW, Indoor, Outdoor (Fix/Auto), Auto, ATW, Indoor, Outdoor, Manuell Natriumdampflampe (Fix/Auto), Manuell Horizontale Hochauflösung Bis zu 550 TV-Linien...
- Seite 145 MNVCMVXCAM_1645_DE...
- Seite 217 MNVCMVXCAM_1645_PT...
- Seite 253 MNVCMVXCAM_1645_KO...