Crivit HG03250 Montage-, Bedienungs- Und Sicherheitshinweise
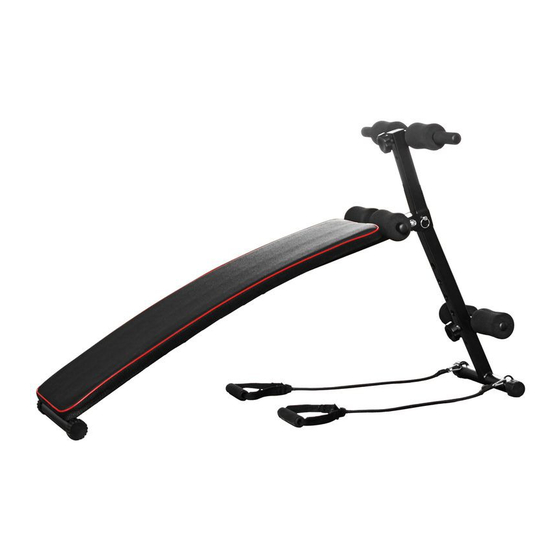
Trainingsbank
Vorschau ausblenden
Andere Handbücher für HG03250:
- Montage-, bedienungs- und sicherheitshinweise (55 Seiten) ,
- Montage-, bedienungs- und sicherheitshinweise (31 Seiten) ,
- Montage-, bedienungs- und sicherheitshinweise (52 Seiten)
Inhaltsverzeichnis
Verfügbare Sprachen
Verfügbare Sprachen
TRAININGSBANK / WORKOUT BENCH /
BANC DE MUSCULATION
TRAININGSBANK
Montage-, Bedienungs- und Sicherheitshinweise
BANC DE MUSCULATION
Instructions de montage, d'utilisation et consignes de sécurité
ŁAWKA TRENINGOWA
Wskazówki montażu, obsługi i bezpieczeństwa
TRÉNINGOVÁ LAVIČKA
Pokyny pre montáž, obsluhu a bezpečnostné pokyny
IAN 305649
WORKOUT BENCH
Assembly, operating and safety instructions
TRAININGSBANK
Montage-, bedienings- en veiligheidsinstructies
TRÉNINKOVÁ LAVICE
Pokyny k montáži, obsluze a bezpečnostní pokyny
Kapitel
Inhaltsverzeichnis

Verwandte Anleitungen für Crivit HG03250


Inhaltszusammenfassung für Crivit HG03250
- Seite 1 TRAININGSBANK / WORKOUT BENCH / BANC DE MUSCULATION TRAININGSBANK WORKOUT BENCH Montage-, Bedienungs- und Sicherheitshinweise Assembly, operating and safety instructions BANC DE MUSCULATION TRAININGSBANK Instructions de montage, d‘utilisation et consignes de sécurité Montage-, bedienings- en veiligheidsinstructies ŁAWKA TRENINGOWA TRÉNINKOVÁ LAVICE Wskazówki montażu, obsługi i bezpieczeństwa Pokyny k montáži, obsluze a bezpečnostní...
- Seite 2 DE / AT / CH Montage-, Bedienungs- und Sicherheitshinweise Seite GB / IE Assembly, operating and safety instructions Page FR / BE Instructions de montage, d‘utilisation et consignes de sécurité Page NL / BE Montage-, bedienings- en veiligheidsinstructies Pagina 28 Wskazówki montażu, obsługi i bezpieczeństwa Strona 36 Pokyny k montáži, obsluze a bezpečnostní...
-
Seite 5: Inhaltsverzeichnis
Einleitung ............................Seite Bestimmungsgemäße Verwendung ....................Seite Lieferumfang / Teilebezeichnung......................Seite Technische Daten ..........................Seite Sicherheitshinweise ........................Seite Montage ............................Seite Benötigtes Werkzeug .........................Seite Klappmechanismus ........................Seite Fitnessband ausrichten ......................Seite Trainingshinweise ........................Seite Aufwärmen ............................Seite Übungsvorschläge ........................Seite Dehnen ..............................Seite 11 Pflege, Lagerung ........................Seite 12 Entsorgung .............................Seite 12 Garantie ............................Seite 12 DE/AT/CH... -
Seite 6: Einleitung
Trainingsbank Technische Daten Max. Benutzerbelastung: 110 kg Einleitung Maße: aufgebaut ca. 136 x 57 x Wir beglückwünschen Sie zum Kauf 70 - 79,5 cm Ihres neuen Produkts. Sie haben sich (L x B x H) damit für ein hochwertiges Produkt ent- schieden. -
Seite 7: Besondere Vorsicht - Verletzungsgefahr Für Kinder
Anstrengung und Übertraining drohen schwere Stellen Sie die Länge des Fitnessbandes nicht Verletzungen. Bei Beschwerden, Schwächege- kürzer ein als die MIN-Markierung auf dem fühl oder Müdigkeit brechen Sie das Training Fitnessband (Abb. P). Besondere Vorsicht – Verletzungsge- sofort ab und kontaktieren Sie einen Arzt. fahr für Kinder! Bewahren Sie die Bedienungsanleitung mit den Übungsvorgaben stets griffbereit auf. -
Seite 8: Montage
Vermeidung von Sachschäden Schritt 4 (Abb. H) Schützen Sie den Artikel vor Sonneneinstrahlung. Anschließend befestigen Sie den Sicherungs- Kontakt mit scharfen, heißen, spitzen oder ge- splint wie dargestellt. Hinweis! Dieser Splint verhindert ein fährlichen Gegenständen vermeiden. Achten Sie darauf, dass Ihr Trainingsbereich frei von Einklappen des kompletten Standfußes. -
Seite 9: Trainingshinweise
Trainingshinweise die jeweiligen Übungen jeweils 2- bis 3-mal wieder- holen. Die nachfolgenden Übungen stellen nur eine Auswahl Aufwärmen der Hals- und Nacken- dar. Weitere Übungen finden Sie in einschlägiger muskulatur Fachliteratur. Wärmen Sie sich vor jedem Training gut auf. 1. Drehen Sie Ihren Kopf langsam nach links und Trainieren Sie nicht, wenn Sie sich krank oder nach rechts. -
Seite 10: Training Der Unteren Bauchmuskulatur (Abb. R)
nur eingeschränkt oder nicht durch- 2. Fixieren Sie die Füße unter der unteren Quer- führbar. stange und positionieren Sie die Knie unter der oberen Querstange. Training der Armmuskulatur (Abb. S) 3. Setzen Sie sich in dieser Position aufrecht auf die ACHTUNG! Achten Sie auf die maximale Trainingsbank. -
Seite 11: Dehnen
2. Platzieren Sie das Fitnessband hinter Ihrem Wiederholen Sie diese Übung 10–15 Mal à Körper und halten Sie es mit einer Hand hinter drei Sätze. dem Rücken (je kürzer Sie das Fitnessband ein- Wichtig: Führen Sie die Übung langsam aus. stellen, umso größer ist der Widerstand). -
Seite 12: Pflege, Lagerung
Pflege, Lagerung Die Garantieleistung gilt für Material- oder Fabrika- tionsfehler. Diese Garantie erstreckt sich nicht auf Bitte vergessen Sie nie, dass eine regelmäßige Produktteile, die normaler Abnutzung ausgesetzt Wartung und Reinigung zur Sicherheit und sind (z. B. Batterien) und daher als Verschleißteile Erhaltung Ihrer Trainingsbank beitragen. - Seite 61 OWIM GmbH & Co. KG Stiftsbergstraße 1 DE-74167 Neckarsulm GERMANY Model no.: HG03250 Version: 08 / 2018 Stand der Informationen · Last Information Update Version des informations · Stand van de informatie Stan informacji · Stav informací · Stav informácií: 07 / 2018 ·...