Herunterladen Inhalt Inhalt Diese Seite drucken
Parkside PKLL 7 C3 Originalbetriebsanleitung
Vorschau ausblenden Andere Handbücher für PKLL 7 C3:
Inhaltsverzeichnis

Werbung

Verfügbare Sprachen
  • DE

Verfügbare Sprachen

  • DEUTSCH, seite 1
KREUZLINIENLASER / CROSS LINE LASER /
NIVEAU LASER EN CROIX PKLL 7 C3
KREUZLINIENLASER
Originalbetriebsanleitung
NIVEAU LASER EN CROIX
Traduction des instructions d'origine
LASER KRZYŻOWY
Tłumaczenie oryginalnej instrukcji obsługi
KRÍŽOVÝ LÍNIOVÝ LASER
Preklad originálneho návodu na obsluhu
IAN 312017
CROSS LINE LASER
Translation of the original instructions
KRUISLIJNLASER
Vertaling van de originele gebruiksaanwijzing
KŘÍŽOVÝ LINIOVÝ LASER
Překlad originálního provozního návodu

Werbung

Inhaltsverzeichnis
loading

Inhaltszusammenfassung für Parkside PKLL 7 C3

  • Seite 1 KREUZLINIENLASER / CROSS LINE LASER / NIVEAU LASER EN CROIX PKLL 7 C3 KREUZLINIENLASER CROSS LINE LASER Originalbetriebsanleitung Translation of the original instructions NIVEAU LASER EN CROIX KRUISLIJNLASER Traduction des instructions d‘origine Vertaling van de originele gebruiksaanwijzing LASER KRZYŻOWY KŘÍŽOVÝ LINIOVÝ LASER Tłumaczenie oryginalnej instrukcji obsługi...
  • Seite 2 DE / AT / CH Originalbetriebsanleitung Seite GB / IE Translation of the original instructions Page FR / BE Traduction des instructions d‘origine Page NL / BE Vertaling van de originele gebruiksaanwijzing Pagina 58 Tłumaczenie oryginalnej instrukcji obsługi Strona 76 Překlad originálního provozního návodu Strana 94...
  • Seite 5: Inhaltsverzeichnis

    Legende der verwendeten Piktogramme ............Seite Einleitung ..............Seite Bestimmungsgemäßer Gebrauch ........Seite Teilebeschreibung ............Seite Lieferumfang ..............Seite Technische Daten ............. Seite Sicherheitshinweise ..........Seite Sicherheitshinweise für Batterien / Akkus ......Seite 12 Inbetriebnahme ............Seite 14 Batterien einsetzen / wechseln ........Seite 14 Ein- / Ausschalten..............
  • Seite 6: Legende Der Verwendeten Piktogramme

    Legende der verwendeten Piktogramme Lesen Sie die Bedienungsanleitung. Explosionsgefahr! Schutzhandschuhe tragen! Achtung! Die Anleitung muss in allen Fällen hinzugezogen werden, die mit diesem Symbol markiert sind. Schützen Sie sich vor Laserstrahlung! Nicht in den Laserstrahl blicken! Volt (Gleichstrom) Inkl. Alkaline-Batterien DE/AT/CH...
  • Seite 7: Einleitung

    Kreuzlinienlaser PKLL 7 C3 Einleitung Wir beglückwünschen Sie zum Kauf Ihres neuen Produkts. Sie haben sich damit für ein hochwertiges Produkt ent- schieden. Die Bedienungsanleitung ist Teil dieses Pro- dukts. Sie enthält wichtige Hinweise für Sicherheit, Gebrauch und Entsorgung. Machen Sie sich vor der Benutzung des Produkts mit allen Bedien- und Sicherheitshinweisen vertraut.
  • Seite 8: Teilebeschreibung

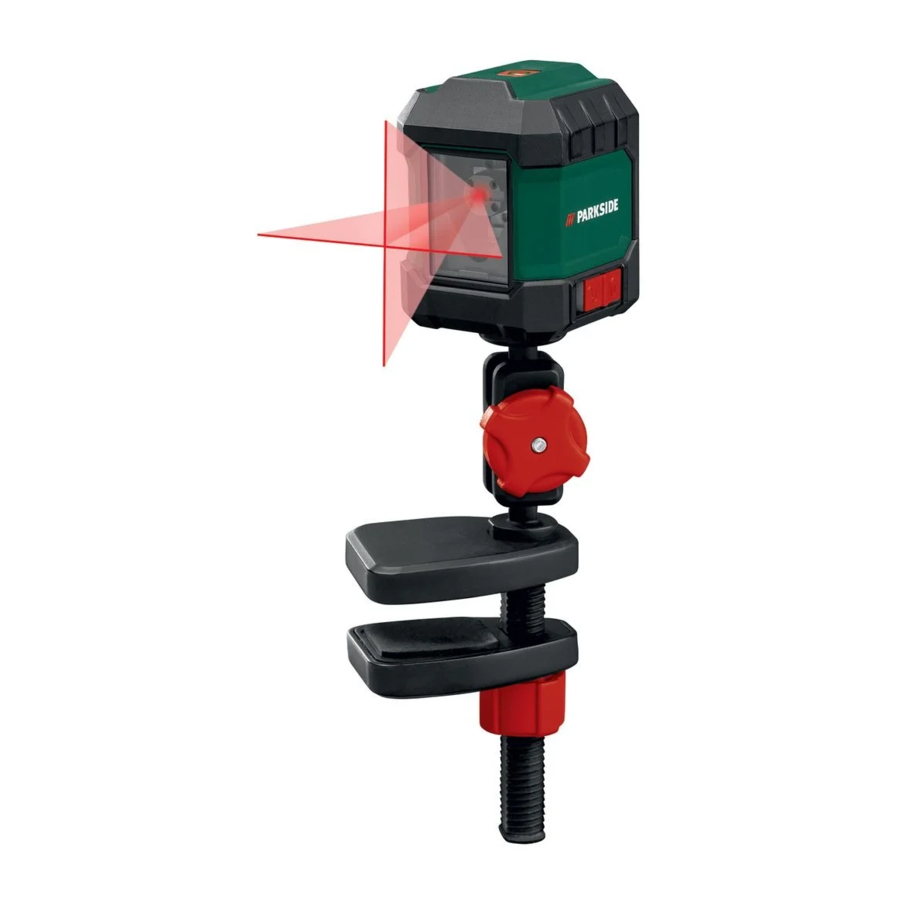
    Teilebeschreibung Ring-Taste LED-Kontrollleuchte (rot: Nivellierung aus, grün: Nivellierung ein) Batteriefach Batteriefachabdeckung LOCK-Schalter -Gewinde (Unterseite) Laseraustrittsöffnung -Schraube (zum Ausrichten mit dem -Gewinde des Kreuz- linienlasers) Befestigungsschraube Klemmbacke Spannmutter Lieferumfang 1 Kreuzlinienlaser 1 Klemme 2 1,5 V-Batterien, Typ AAA 1 Bedienungsanleitung Technische Daten Betriebsspannung: (Gleichstrom) Arbeitsbereich...
  • Seite 9: Sicherheitshinweise

    Selbstnivellierbereich typisch: ± 4° Nivellierzeit typisch: ca. 6 Sekunden Betriebstemperatur: +5 °C–35 °C Relative Luftfeuchte max.: ≤ 90 % Laserklasse: Wellenlänge (λ): 635 nm Maximale Leistung P max: 1 mW Aufnahme Klemme: Batterien: 2 x 1,5 V-Batterien, Typ AAA Gewicht Produkt: 240 g (mit Batterien) Gewicht Klemme: 160 g...
  • Seite 10 Testen Sie vor Gebrauch das Produkt auf bekannten Untergründen, um sicherzustellen, dass das Produkt korrekt funktioniert. Wenn Sie das Produkt auf eine Weise verwenden, die nicht vom Hersteller angegeben ist, können die Schutzfunktionen des Produkts beeinträchtigt werden. Die Anleitung muss in allen Fällen hinzugezogen werden, die mit diesem Symbol markiert sind.
  • Seite 11 Vermeiden Sie heftige Stöße oder Stürze des Messwerkzeuges. Durch Beschädigungen des Messwerkzeugs kann die Genauigkeit beeinträchtigt werden. Vergleichen Sie nach einem heftigen Stoß oder Sturz die Laserlinie zur Kontrolle mit einer bekannten waagrechten oder senkrechten Referenzlinie. Schalten Sie das Messwerkzeug aus, wenn Sie es transportieren. Beim Ausschalten wird die Pendeleinheit verriegelt, die sonst bei starken Bewegungen beschädigt werden kann.
  • Seite 12: Sicherheitshinweise Für Batterien / Akkus

    Das Betrachten des Laserstrahls mit optischen Instrumenten (z. B. Lupe, Vergrößerungsgläsern u. ä.) ist mit einer Augengefährdung verbunden. VORSICHT! Wenn andere als die hier angegebenen Bedienungs- oder Justiereinrichtungen benutzt oder andere Verfahrensweisen ausgeführt werden, kann dies zu gefährlicher Strahlungseinwirkung führen. Richten Sie den Laserstrahl niemals auf reflektierende Flächen, Personen oder Tiere.
  • Seite 13: Risiko Des Auslaufens Von Batterien / Akkus

    EXPLOSIONSGEFAHR! Laden Sie nicht auflad- bare Batterien niemals wieder auf. Schließen Sie Batterien / Akkus nicht kurz und / oder öffnen Sie diese nicht. Überhitzung, Brandgefahr oder Platzen können die Folge sein. Werfen Sie Batterien / Akkus niemals in Feuer oder Wasser. Setzen Sie Batterien / Akkus keiner mechanischen Belastung aus.
  • Seite 14: Risiko Der Beschädigung Des Produkts

    Risiko der Beschädigung des Produkts Verwenden Sie ausschließlich den angegebenen Batterietyp / Akkutyp! Setzen Sie Batterien / Akkus gemäß der Polaritätskennzeichnung (+) und (-) an Batterie / Akku und des Produkts ein. Reinigen Sie Kontakte an Batterie / Akku und im Batteriefach vor dem Einlegen! Entfernen Sie erschöpfte Batterien / Akkus umgehend aus dem Produkt.
  • Seite 15: Ein- / Ausschalten

    Verwenden Sie nur Batterien eines Herstellers und mit gleicher Kapazität. Nehmen Sie die Batterien aus dem Produkt, wenn Sie es längere Zeit nicht benutzen. Die Batterien können bei längerer Lage- rung korrodieren und sich selbst entladen. Ein- / Ausschalten Zum Einschalten des Produkts schieben Sie den LOCK-Schalter in die Position .
  • Seite 16: Ohne Nivellierautomatik Arbeiten

    Ist die automatische Nivellierung nicht möglich, z. B. weil die Unterseite des Messwerkzeugs mehr als 4° von der Waag- rechten abweicht oder das Produkt frei in der Hand gehalten wird, dann leuchtet die LED-Kontrollleuchte rot und die horizontalen und vertikalen Laserlinien werden ausgeschaltet. Hinweis 1: Das Arbeiten ohne Nivellierautomatik wird im- mer durch die rote LED-Kontrollleuchte angezeigt.
  • Seite 17: Arbeitshinweise

    Arbeitshinweise Verwenden Sie immer nur die Mitte der Laserlinie zum Markieren. Die Breite der Laserlinie ändert sich mit der Entfernung. Mit der Klemme arbeiten Mit der mitgelieferten Klemme können Sie das Produkt an ver- schiedenen Gegenständen befestigen. 1. Lösen Sie die Spannmutter , indem Sie diese gegen den Uhrzeigersinn drehen.
  • Seite 18: Arbeiten Mit Dem Stativ

    Arbeiten mit dem Stativ Sie können den Kreuzlinienlaser in eine stabile Position bringen und die Höhe mit einem Stativ (nicht im Lieferumfang enthalten) einstellen. Platzieren Sie den Kreuzlinienlaser mit dem -Gewinde -Schraube Ihres Stativs und ziehen Sie diese mit der Hand fest an.
  • Seite 19: Lagerung

    Lagerung Sollten Sie das Produkt längere Zeit nicht benutzen, entnehmen Sie die Batterien und lagern Sie es an einem sauberen, trockenen Ort ohne direkte Sonneneinstrahlung. Entsorgung Die Verpackung besteht aus umweltfreundlichen Materialien, die Sie über die örtlichen Recyclingstellen entsorgen können. Beachten Sie die Kennzeichnung der Verpackungs- materialien bei der Abfalltrennung, diese sind gekenn- zeichnet mit Abkürzungen (a) und Nummern (b) mit fol-...
  • Seite 20: Garantie

    zu. Über Sammelstellen und deren Öffnungszeiten können Sie sich bei Ihrer zuständigen Verwaltung informieren. Defekte oder verbrauchte Batterien / Akkus müssen gemäß Richtlinie 2006/66/EG und deren Änderungen recycelt werden. Geben Sie Batterien / Akkus und / oder das Produkt über die angebotenen Sammel einrichtungen zurück.
  • Seite 21: Vorgehen Im Garantiefall

    den Original-Kassenbon gut auf. Diese Unterlage wird als Nach- weis für den Kauf benötigt. Tritt innerhalb von 3 Jahren ab dem Kaufdatum dieses Produkts ein Material- oder Fabrikationsfehler auf, wird das Produkt von uns – nach unserer Wahl – für Sie kostenlos repariert oder ersetzt. Diese Garantie verfällt, wenn das Produkt beschädigt, nicht sachgemäß...
  • Seite 22: Service

    Wenn das Produkt einen Defekt aufweist, setzen Sie sich bitte per E-Mail oder Telefon mit der angegebenen Servicestelle in Verbindung. Sie erhalten eine Serviceadresse und können das defekte Produkt portofrei einsenden. Legen Sie den Kaufnachweis (Kassenbon) bei sowie eine entsprechende Information zum Defekt am Produkt und beschreiben Sie kurz, wann und unter welchen Umständen dieser aufgetreten ist.
  • Seite 23 List of pictograms used ........Page 24 Introduction ..............Page 25 Intended use ..............Page 25 Description of parts ............Page 26 Scope of delivery ............. Page 26 Technical data ..............Page 26 Safety notes ............... Page 27 Safety instructions for batteries / rechargeable batteries ................
  • Seite 24: List Of Pictograms Used

    List of pictograms used Please read the instructions for use. Danger of explosion! Wear safety gloves! Attention! - The manual must be consulted in all cases where this symbol is marked. Protect yourself from laser radiation! Do not stare into the laser beam! Volt (Direct Current) Alkaline batteries included 24 GB/IE...
  • Seite 25: Introduction

    Cross Line Laser PKLL 7 C3 Introduction We congratulate you on the purchase of your new product. You have chosen a high quality product. The instructions for use are part of the product. They contain important information concerning safety, use and disposal. Before using the product, please familiarise yourself with all of the safety information and instructions for use.
  • Seite 26: Description Of Parts

    Description of parts Ring-button LED indicator (red: levelling off, green levelling on) Battery compartment Battery compartment cover LOCK Switch -thread (underneath) Laser beam opening -screw (to align with -thread of cross line laser) Retaining screw Clamp Jaw Clamping Nut Scope of delivery 1 Cross line laser 1 Clamp 2 1.5 V-Batteries, Type AAA...
  • Seite 27: Safety Notes

    Typical levelling time: approx. 6 seconds Operating temperature: +5 °C–35 °C Max. relative humidity: ≤ 90 % Laser class: Wave length (λ): 635 nm Maximum performance P max: 1 mW Clamp mount: Batteries: 2 x 1.5 V-Batteries, Type AAA Product weight: 240 g (with batteries) Clamp weight: 160 g...
  • Seite 28 Test on known sources before use, to make sure that equipment is functioning correctly. If the equipment is used in a manner not specified by the man- ufacturer, the protection provided by the equipment may be impaired. The manual must be consulted in all cases where symbol is marked.
  • Seite 29 Turn the measuring tool off when you transport it. When it is switched off the pendulum unit is locked, which otherwise can be damaged in strong movements. Do not bring the measuring tool near to heart pacemakers. The magnet inside the measuring tool creates a field that can impair the function of pacemakers.
  • Seite 30: Safety Instructions For Batteries / Rechargeable Batteries

    Never direct the laser beam at people, animals or reflective surfaces. Even looking briefly into the laser beam can cause damage to the eyes. The laser assembly inside the equipment can be examined, repaired or replaced by the manufacturer only. If functional or other defects occur, please contact the service department listed either by telephone or by e-mail.
  • Seite 31 Risk of leakage of batteries / rechargeable batteries Avoid extreme environmental conditions and temperatures, which could affect batteries / rechargeable batteries, e.g. radiators / direct sunlight. If batteries / rechargeable batteries have leaked, avoid contact with skin, eyes and mucous membranes with the chemicals! Flush immediately the affected areas with fresh water and seek medical attention! WEAR PROTECTIVE GLOVES! Leaked or dam-...
  • Seite 32: Initial Use

    Initial use Check that the delivery is complete and that there is no visible damage. Remove the packaging material from the product. Inserting / Changing batteries Open the battery compartment cover as shown in the fig A1. Insert batteries into the battery compartment as shown in the fig A2.
  • Seite 33: Use Automatic Levelling System

    To switch the product off, push the LOCK switch to the position . When switched off, the pendulum unit is locked. Use automatic levelling system To work with automatic levelling, place the product on a level, firm surface, or fasten it with the -thread -screw of supplied clamp.
  • Seite 34: Working Without The Automatic Levelling System

    Working without the automatic levelling system Put the LOCK switch into the position . Push the ring-button on the top of the product. Now the product will release two laser lines from the laser beam open- that are not levelled. Operation without automatic lev- elling will always be indicated via the red LED indicator Push the ring-button on top again to turn off the product at...
  • Seite 35: Working With The Tripod

    5. Align the cross line laser. To do so, release the retaining screw by rotating anti-clockwise and move the cross line laser into the desired position. 6. Fix the position by fastening the retaining screw Working with the tripod You can place the cross line laser in a stable position and adjust the height using a tripod (not provided in scope of delivery).
  • Seite 36: Storage

    Have the measuring tool repaired by qualified professionals and only with original replacement parts. This ensures that the safety of the measuring tool is maintained. Storage If you will not be using the product for a prolonged period of time, remove the batteries and store it in a clean, dry place that is not exposed to direct sunlight.
  • Seite 37: Warranty

    To help protect the environment, please dispose of the product properly when it has reached the end of its use- ful life and not in the household waste. Information on collection points and their opening hours can be obtained from your local authority. Faulty or used batteries / rechargeable batteries must be recycled in accordance with Directive 2006/66/EC and its amendments.
  • Seite 38: Warranty Claim Procedure

    legal rights are not limited in any way by our warranty detailed below. The warranty for this product is 3 years from the date of purchase. Should this product show any fault in materials or manufacture within 3 years from the date of purchase, we will repair or replace it – at our choice –...
  • Seite 39: Service

    You will find the item number on the type plate, an engraving on the front page of the instructions (bottom left), or as a sticker on the rear or bottom of the appliance. If functional or other defects occur, please contact the service department listed either by telephone or by e-mail.
  • Seite 40 Légende des pictogrammes utilisés ..Page 41 Introduction ..............Page 42 Utilisation conforme ............Page 42 Descriptif des pièces ............Page 43 Contenu de la livraison ............ Page 43 Caractéristiques techniques ..........Page 43 Consignes de sécurité ........Page 44 Consignes de sécurité...
  • Seite 41: Légende Des Pictogrammes Utilisés

    Légende des pictogrammes utilisés Veuillez lire le mode d'emploi. Risque d'explosion ! Porter des gants de protection ! Attention ! Le mode d'emploi doit être consulté dans tous les cas signalés par ce symbole. Protégez-vous contre les rayons laser ! Ne regardez pas le rayon laser ! Volt (courant continu) Piles alcalines incluses FR/BE...
  • Seite 42: Introduction

    Niveau laser en croix PKLL 7 C3 Introduction Nous vous félicitons pour l‘achat de votre nouveau pro- duit. Vous avez opté pour un produit de grande qualité. Le mode d‘emploi fait partie intégrante de ce produit. Il contient des indications importantes pour la sécurité, l’utilisation et la mise au rebut.
  • Seite 43: Descriptif Des Pièces

    Descriptif des pièces Touche en anneau Voyant lumineux LED de contrôle (rouge : nivellement désactivé, vert : nivellement activé) Compartiment à piles Couvercle du compartiment à piles Bouton de verrouillage (LOCK) Filetage (face inférieure) Ouverture de sortie du laser (pour l‘alignement avec le filetage du niveau laser en croix) Vis de fixation...
  • Seite 44: Consignes De Sécurité

    Précision du nivellement : +/- 0,8 mm/m Zone de nivellement autonome typique : ± 4° Temps de nivellement typique : env. 6 secondes Température de fonctionnement : +5 °C–35 °C Humidité de l’air relative max. : ≤ 90 % Classe de laser : Longueur d’ondes (λ) : 635 nm Puissance P max. : 1 mW...
  • Seite 45 N’utilisez pas l’outil de mesure dans des atmosphères explosives où il y a des liquides inflammables, des gaz ou des poussières. Des étincelles peuvent notamment survenir dans le produit et sont susceptibles d’enflammer les poussières ou la vapeur. Avant utilisation, testez le produit sur des supports connus afin de vous assurer qu‘il fonctionne correctement.
  • Seite 46 s’il a été exposé à de fortes variations de température. Lors de températures ou variations de température extrêmes, la préci- sion du produit peut être altérée. Évitez les chocs violents ou la chute de l’outil de mesure. Des dommages causés sur l’outil pourraient en altérer sa précision. Comparez la ligne laser à...
  • Seite 47: Consignes De Sécurité Relatives Aux Piles / Aux Piles Rechargeables

    Ne regardez pas directement dans le faisceau laser ou dans l’ouverture du laser Regarder le faisceau laser à l’aide d’instruments optiques (par ex. loupe, loupe grossissante, etc.) peut représenter un risque pour les yeux. ATTENTION ! Si des commandes ou dispositifs de réglage autres que ceux spécifiés ici sont utilisés ou que d’autres pro- cédures sont effectuées, cela peut entraîner une exposition dangereuse au rayonnement.
  • Seite 48 RISQUE D‘EXPLOSION ! Ne rechargez jamais des piles non rechargeables. Ne court-circuitez pas les piles / piles rechargeables et / ou ne les ouvrez pas ! Autrement, vous risquez de provoquer une surchauffe, un incendie ou une explosion. Ne jetez jamais des piles / piles rechargeables au feu ou dans l’eau.
  • Seite 49: Risque D'endommagement Du Produit

    Retirez les piles / piles rechargeables, si vous ne comptez pas utiliser le produit pendant une période prolongée. Risque d‘endommagement du produit Exclusivement utiliser le type de pile / pile rechargeable spécifié. Insérez les piles / piles rechargeables conformément à l‘indi- cation de polarité...
  • Seite 50: Mise En Marche / Arrêt

    Veillez à ce que les piles soient insérées en respectant la pola- rité, comme indiqué sur la Fig. A2, avant de refermer le couvercle du compartiment à piles Remarque : Lorsque l’état de la batterie est faible, un voyant lumineux LED de contrôle rouge est allumé.
  • Seite 51: Travailler Sans Nivellement Automatique

    Une fois allumé, le système de nivellement automatique com- pense automatiquement les inégalités dans la plage autonive- lante de ± 4 °. Le nivellement s’effectue aussitôt que les lignes laser ne se déplacent plus et le voyant lumineux LED vert est allumé.
  • Seite 52: Instructions De Travail

    automatique est toujours indiqué par le voyant lumineux LED de contrôle rouge Appuyez de nouveau sur la touche en anneau située sur la face supérieure pour éteindre le produit dans ce mode. Instructions de travail Utilisez uniquement le centre de la ligne laser pour le mar- quage.
  • Seite 53: Travailler Avec Le Trépied

    Travailler avec le trépied Vous pouvez placer le niveau laser en croix dans une position stable et ajuster la hauteur avec un trépied (non fourni). Placez le niveau laser en croix ainsi le filetage sur la vis de votre trépied la pince et serrez-la fermement à la main. Ne for- cez pas trop.
  • Seite 54: Rangement

    Rangement Si vous n’utilisez plus le produit pendant une longue période, enlevez les piles et stockez-le dans un endroit propre, sec et protégé des rayons directs du soleil. Mise au rebut L’emballage se compose de matières recyclables pouvant être mises au rebut dans les déchetteries locales. Veuillez respecter l‘identification des matériaux d‘em- ballage pour le tri sélectif, ils sont identifiés avec des abbréviations (a) et des chiffres (b) ayant la significa-...
  • Seite 55: Garantie

    Pour obtenir des renseignements concernant les points de collecte et leurs horaires d’ouverture, vous pouvez contacter votre municipalité. Les piles / piles rechargeables défectueuses ou usagées doivent être recyclées conformément à la directive 2006/66/CE et ses modifications. Les piles et / ou piles rechargeables et / ou le pro- duit doivent être retournés dans les centres de collecte proposés.
  • Seite 56: Marche À Suive Pour Faire Fonctionner La Garantie

    Ce produit bénéficie d‘une garantie de 3 ans à compter de sa date d’achat. La durée de garantie débute à la date d’achat. Veuillez conserver le ticket de caisse original. Il fera office de preuve d’achat. Si un problème matériel ou de fabrication devait survenir dans 3 ans suivant la date d‘achat de ce produit, nous assurons à...
  • Seite 57: Service Après-Vente

    Le numéro de produit se trouve sur la plaque signalétique, de- vant à gauche sur la page de titre du mode d‘emploi ou sur un autocollant placé sur le côté inférieur du produit. Si le produit présente un défaut, prenez contact avec le service après-vente mentionné, soit par mail, soit par téléphone.
  • Seite 58 Legenda van de gebruikte pictogrammen ............Pagina 59 Inleiding ..............Pagina 60 Correct gebruik .............Pagina 60 Beschrijving van de onderdelen ........Pagina 61 Omvang van de levering ..........Pagina 61 Technische gegevens ............Pagina 61 Veiligheidsinstructies ........Pagina 62 Veiligheidsinstructies voor batterijen / accu‘s ....Pagina 65 Ingebruikname ............Pagina 67 Batterijen plaatsen / vervangen ........Pagina 67...
  • Seite 59: Legenda Van De Gebruikte Pictogrammen

    Legenda van de gebruikte pictogrammen Lees a.u.b. de gebruiksaanwijzing. Explosiegevaar! Veiligheidshandschoenen dragen! Let op! Raadpleeg de handleiding in alle gevallen waarin dit symbool wordt weergegeven. Bescherm u tegen laserstraling! Niet in de laserstraal kijken! Volt (gelijkstroom) Incl. alkaline-batterijen NL/BE...
  • Seite 60: Inleiding

    Kruislijnenlaser PKLL 7 C3 Inleiding Hartelijk gefeliciteerd met de aankoop van uw nieuwe product. U heeft voor een hoogwaardig product gekozen. De gebruiksaanwijzing is een deel van het product. Deze bevat belangrijke aanwijzingen voor veiligheid, gebruik en verwijde- ring. Maakt U zich voor de ingebruikname van het product met alle bedienings- en veiligheidsvoorschriften vertrouwd.
  • Seite 61: Beschrijving Van De Onderdelen

    Beschrijving van de onderdelen Ring-knop Led-controlelampje (rood: nivellering uit, groen: nivellering aan) Batterijvak Deksel van het batterijvak LOCK-schakelaar -schroefdraad (onderkant) Laser-opening -schroef (voor het afstellen met de -schroefdraad van de kruislijnlaser) Bevestigingsschroef Klembek Spanmoer Omvang van de levering 1 kruislijnlaser 1 klem 2 1,5 V-batterijen, type AAA 1 gebruiksaanwijzing...
  • Seite 62: Veiligheidsinstructies

    Zelfnivelleringsbereik typisch: ± 4° Nivelleringstijd typisch: ca. 6 seconden Bedrijfstemperatuur: +5 °C–35 °C Relatieve luchtvochtigheid max.: ≤ 90 % Laserklasse: Golflengte (λ): 635 nm Maximaal vermogen P max: 1 mW Klembevestiging: Batterijen: 2 x 1,5 V-batterijen, type AAA Gewicht product: 240 g (met batterijen) Gewicht klem: 160 g...
  • Seite 63 Test het product voor het gebruik op bekende ondergronden om er zeker van te zijn dat het product correct functioneert. Als u het product op een manier gebruikt die niet door de fa- brikant is aangegeven, kunnen de beschermende functies van het product worden beïnvloed.
  • Seite 64 righeid worden beïnvloed. Vergelijk na een heftige schok of val de laserlijn ter controle met een bekende horizontale of verticale referentie-lijn. Schakel het meetapparaat uit als het wordt vervoerd. Bij het uitschakelen wordt het pendelmechanisme vastgezet daar dit bij heftige bewegingen kan worden beschadigd. Breng het meetapparaat niet in de buurt van pacemakers.
  • Seite 65: Veiligheidsinstructies Voor Batterijen / Accu's

    VOORZICHTIG! Als er andere dan de hier genoemde be- dienings- of afstelfuncties worden gebruikt of andere handelin- gen worden uitgevoerd, kan dit tot gevaarlijke blootstelling aan straling leiden. Richt de laserstraal nooit op reflecterende oppervlakken, per- sonen of dieren. Slechts een kort zichtcontact met de laserstraal kan al leiden tot oogletsel.
  • Seite 66 Risico dat de batterijen / accu’s lekken Vermijd extreme omstandigheden en temperaturen die invloed op de batterijen / accu‘s zouden kunnen hebben bijv. radiatoren / direct zonlicht. Bij lekkende batterijen / accu‘s het contact van de chemicaliën met de huid, ogen en slijmvliezen vermijden! Spoel de desbe- treffende plekken direct af met schoon water en raadpleeg onmiddellijk een arts! DRAAG VEILIGHEIDSHANDSCHOENEN!
  • Seite 67: Ingebruikname

    Ingebruikname Controleer de levering op volledigheid en op zichtbare be- schadigingen. Verwijder al het verpakkingsmateriaal van het product. Batterijen plaatsen / vervangen Open het deksel van het batterijvak zoals weergegeven op afb. A1. Plaats de batterijen in het batterijvak zoals op afb. A2 is weergegeven.
  • Seite 68: In- / Uitschakelen

    In- / Uitschakelen Voor het inschakelen van het product schuift u de LOCK-scha- kelaar in de positie . Het product projecteert meteen na het inschakelen twee laserlijnen uit de laseropening Voor het uitschakelen van het product schuift u de LOCK- schakelaar in de positie .
  • Seite 69: Zonder Automatische Nivellering Werken

    opnieuw in. Controleer na een nieuwe nivellering de positie van de horizontale of verticale laserlijn ten opzichte van refe- rentiepunten om fouten te voorkomen. Opmerking 3: in deze modus heeft de bovenste ring-knop geen functie. Zonder automatische nivellering werken Schuif de LOCK-schakelaar in de positie .
  • Seite 70: Met De Klem Werken

    Met de klem werken Met de meegeleverde klem kunt u het product aan diverse voor- werpen bevestigen. 1. Maak de spanmoer los door deze tegen de klok in te draaien. 2. Plaats de klembekken op de gewenste plek. 3. Draai de spanmoer met de klok mee tot aan de aanslag.
  • Seite 71: Onderhoud En Reiniging

    Onderhoud en reiniging Het product is onderhoudsvrij. ATTENTIE! Dompel het product nooit onder in water of andere vloeistoffen. Bij het reinigen mag er geen vocht in het product binnendringen. Houd het product schoon om goed en veilig te kunnen werken. Gebruik voor het reinigen van de behuizing een droge doek.
  • Seite 72: Afvoer

    Afvoer De verpakking bestaat uit milieuvriendelijke grondstoffen die u via de plaatselijke recyclingcontainers kunt afvoeren. Neem de aanduiding van de verpakkingsmaterialen voor de afvalscheiding in acht. Deze zijn gemarkeerd met de afkortingen (a) en een cijfers (b) met de volgende betekenis: 1–7: kunststoffen / 20–22: papier en vezel- platen / 80–98: composietmaterialen.
  • Seite 73: Garantie

    Milieuschade door foutieve verwijdering van de batterijen / accu‘s! Batterijen / accu‘s mogen niet via het huisvuil worden weggegooid. Ze kunnen giftige zware metalen bevatten en vallen onder het chemisch afval. De chemische symbolen van de zware metalen zijn: Cd = cadmium, Hg = kwik, Pb = lood. Geef verbruikte batterijen / accu‘s daarom af bij een gemeentelijk inzamelpunt.
  • Seite 74: Garantieprocedure

    De garantie geldt voor materiaal- en productiefouten. Deze garan- tie is niet van toepassing op productonderdelen, die onderhevig zijn aan normale slijtage en hierdoor als aan slijtage onderhevige onderdelen gelden (bijv. batterijen) of voor beschadigingen aan breekbare onderdelen, zoals bijv. schakelaars, accu’s of derge- lijke onderdelen, die gemaakt zijn van glas.
  • Seite 75: Service

    Service Service Nederland Tel.: 0900 0400 223 (0,10 EUR/Min.) E-Mail: owim@lidl.nl Service Belgiё Tel.: 070 270 171 (0,15 EUR/Min.) E-Mail: owim@lidl.be NL/BE...
  • Seite 76 Legenda zastosowanych piktogramów ............Strona 77 Wstęp ................Strona 78 Przeznaczenie produktu ..........Strona 78 Opis części ..............Strona 79 Zawartość ...............Strona 79 Dane techniczne ............Strona 79 Wskazówki bezpieczeństwa ....Strona 80 Wskazówki bezpieczeństwa dla baterii / akumulatorów ..Strona 84 Uruchomienie ............Strona 85 Wkładanie / Wymiana baterii ........Strona 85 Włączanie / Wyłączanie ..........Strona 86 Użycie niwelacji automatycznej........Strona 86 Praca bez niwelacji automatycznej ......Strona 87...
  • Seite 77: Legenda Zastosowanych Piktogramów

    Legenda zastosowanych piktogramów Proszę przeczytać instrukcję obsługi. Niebezpieczeństwo wybuchu! Zakładać rękawice ochronne! Uwaga! Z instrukcji należy skorzystać we wszystkich przypadkach, które są oznaczone tym symbolem. Należy chronić się przed promieniowaniem laserowym! Nie wpatrywać się w promień lasera! Wolt (prąd stały) Z bateriami alkalicznymi w zestawie...
  • Seite 78: Wstęp

    Laser krzyżowy PKLL 7 C3 Wstęp Gratulujemy Państwu zakupu nowego produktu. Tym samym zdecydowali się Państwo na zakup produktu wysokiej jakości. Instrukcja obsługi jest częścią tego produktu. Zawiera ona ważne wskazówki dotyczące bezpieczeń- stwa, użytkowania i utylizacji. Przed pierwszym użyciem produktu należy zapoznać...
  • Seite 79: Opis Części

    Opis części Przycisk pierścieniowy Lampka kontrolna LED (czerwona: niwelacja wyłączona, zielona: niwelacja włączona) Komora na baterie Pokrywa komory na baterie Przełącznik LOCK Gwint (spód) Otwór wylotu lasera Śruba (do ustawiania z gwintem statywu liniowego lasera krzyżowego) Śruba mocująca Szczęka zaciskowa Nakrętka mocująca Zawartość...
  • Seite 80: Wskazówki Bezpieczeństwa

    Dokładność niwelacji: +/- 0,8 mm/m Zakres samoniwelacji typowy: ± 4° Czas niwelacji typowy: ok. 6 sekundy Temperatura robocza: +5°C–35°C Względna wilgotność powietrza maks.: ≤ 90 % Klasa lasera: Długość fal (λ): 635 nm Maksymalna moc P maks.: 1 mW Przyjęcie zacisku: Baterie: 2 x bateria 1,5 V, typ AAA...
  • Seite 81 lub pyły. W produkcie mogą wytworzyć się iskry, które zapalą pył lub opary. Przed użyciem sprawdzić produkt na znanym podłożu, aby upewnić się, że produkt poprawnie działa. Jeśli produkt używa się w sposób, który nie jest podany przez producenta, to może mieć to wpływ na funkcje zabezpiecza- jące produktu.
  • Seite 82 lub wahań temperatury precyzja produktu może być ograni- czona. Unikać mocnych uderzeń lub upadków urządzenia pomiaro- wego. Przez uszkodzenie urządzenia pomiarowego dokładność może zostać ograniczona. Po mocnym uderzeniu lub upadku należy porównać linię lasera ze znaną poziomą lub pionową linią referencyjną w celu kontroli. Podczas transportu wyłączyć...
  • Seite 83 Nigdy nie wpatrywać się bezpośrednio w promień lasera lub otwór wylotu lasera Oglądanie promienia laserowego instru- mentami optycznymi (np. przez lupę, szkło powiększające itp.) łączy się z uszkodzeniem wzroku. OSTROŻNIE! Jeśli używa się innych urządzeń manipulacyj- nych lub regulacyjnych lub stosuje inne metody postępowania niż...
  • Seite 84: Wskazówki Bezpieczeństwa Dla Baterii / Akumulatorów

    Wskazówki bezpieczeństwa dla baterii / akumulatorów ZAGROŻENIE ŻYCIA! Baterie / akumulatory należy trzymać poza zasięgiem dzieci. W przypadku połknięcia należy natychmiast udać się do lekarza! NIEBEZPIECZEŃSTWO WYBUCHU! Baterii jednorazowego użytku nie wolno ładować ponow- nie. Baterii / akumulatorów nie należy zwierać i / lub otwierać.
  • Seite 85: Uruchomienie

    W przypadku wycieku baterii / akumulatorów natychmiast usunąć je z produktu, aby uniknąć uszkodzeń. Używać wyłącznie baterii / akumulatorów tego samego typu. Nie zakładać razem nowych oraz zużytych baterii / akumula- torów! Jeżeli produkt nie jest przez dłuższy czas używany, baterie / akumulatorynależy wyjąć.
  • Seite 86: Włączanie/ Wyłączanie

    Włożyć baterie do komory na baterie , jak jest to pokazane na rys. A2. Uważać na to, aby baterie były włożone zgodnie z ich biegu- nowością, jak jest to pokazane na rys. A2, zanim ponownie zamknie się pokrywę komory na baterie Wskazówka: Przy niskim stanie baterii lampka kontrolna miga na czerwono.
  • Seite 87: Praca Bez Niwelacji Automatycznej

    Po włączeniu niwelacja automatyczna wyrównuje nierówności w zakresie samoniwelacji ±4° automatycznie. Niwelacja jest zakończona, jeśli linie lasera przestają się ruszać, a lampka kontrolna LED świeci na zielono. Jeśli automatyczna niwelacja nie jest możliwa, np. ponieważ dolna strona urządzenia pomiarowego odbiega ponad 4° od poziomu lub produkt trzymany jest swobodnie w ręku, wówczas lampka kontrolna LED świeci na czerwono, a poziome i...
  • Seite 88: Wskazówki Dotyczące Pracy

    Ponownie nacisnąć przycisk pierścieniowy u góry, aby wyłączyć produkt w tym trybie. Wskazówki dotyczące pracy Do zaznaczania należy zawsze używać tylko środka linii la- serowej. Szerokość linii lasera zmienia się wraz z odległością. Praca z zaciskiem Przy pomocy załączonego zacisku można mocować produkt do różnych przedmiotów.
  • Seite 89: Praca Ze Statywem

    Praca ze statywem Laser krzyżowy można umieścić w stabilnej pozycji i ustawić wy- sokość przy pomocy statywu (niedołączony). Laser krzyżowy umieścić z gwintem na śrubie statywu i dokręcić je ręcznie. Nie wykorzystywać nadmiernej siły, ponieważ może to uszkodzić produkt. Konserwacja i czyszczenie Niniejszy produkt nie wymaga konserwacji.
  • Seite 90: Przechowywanie

    Przechowywanie Jeśli produkt nie jest używany przez dłuższy czas, należy wy- jąć baterie i przechowywać go w czystym, suchym miejscu bez bezpośrednich promieni słonecznych. Utylizacja Opakowanie wykonane jest z materiałów przyjaznych dla środo- wiska, które można przekazać do utylizacji w lokalnym punkcie przetwarzania surowców wtórnych.
  • Seite 91: Gwarancja

    Z uwagi na ochronę środowiska nie wyrzucać urządze- nia po zakończeniu eksploatacji do odpadów domowych, lecz prawidłowo zutylizować. Informacji o punktach zbiorczych i ich godzinach otwarcia udziela odpowiedni urząd. Uszkodzone lub zużyte baterie / akumulatory muszą być poddane recyklingowi zgodnie z dyrektywą 2006/66/WE i jej zmianami. Oddać...
  • Seite 92: Postępowanie W Przypadku Podlegającym Gwarancji

    Produkt objęte jest 3 gwarancją, licząc od daty zakupu. Gwarancja wygasa w razie zawinionego przez użytkownika uszkodzenia produktu, niewłaściwego użycia lub konserwacji. W przypadku wystąpienia w ciągu 3 lat od daty zakupu wad ma- teriałowych lub fabrycznych, dokonujemy – według własnej oceny – bezpłatnej naprawy lub wymiany produktu.
  • Seite 93: Serwis

    Jeśli produkt wykazuje jakiekolwiek uszkodzenie, to należy skontaktować się telefonicznie lub mailowo z podanym punk- tem serwisowym. Otrzymają Państwo adres serwisowy, na który można bez- płatnie przesłać uszkodzony produkt. Załączyć potwierdzenie zakupu (paragon) oraz odpowiednią informację dotyczącą uszkodzenia produktu i krótko opisać, kiedy oraz w jakich okolicznościach pojawiło się...
  • Seite 94 Legenda použitých piktogramů ....Strana 95 Úvod ................Strana 96 Použití ke stanovenému účelu........Strana 96 Popis dílů ...............Strana 96 Obsah dodávky ............Strana 97 Technické údaje ............Strana 97 Bezpečnostní upozornění ......Strana 98 Bezpečnostní pokyny pro baterie a akumulátory ..Strana 101 Uvedení do provozu ........Strana 102 Vložení...
  • Seite 95: Legenda Použitých Piktogramů

    Legenda použitých piktogramů Přečtěte si návod k obsluze. Nebezpečí výbuchu! Noste ochranné rukavice! Pozor! Ve všech případech označených tímto sym- bolem se musí postupovat přesně podle návodu. Chraňte se před laserovým zářením! Nedívat se do laserového paprsku! Volt (stejnosměrný proud) Včetně alkalických baterií...
  • Seite 96: Úvod

    Křížový liniový laser PKLL 7 C3 Úvod Blahopřejeme Vám ke koupi nového výrobku. Rozhodli jste se pro kvalitní produkt. Návod k obsluze je součástí tohoto výrobku. Obsahuje důležité pokyny pro bezpeč- nost, použití a likvidaci. Před použitím výrobku se seznamte se všemi pokyny k obsluze a bezpečnostními pokyny.
  • Seite 97: Obsah Dodávky

    Přihrádka na baterie Kryt přihrádky na baterie Spínač LOCK Závit (dolní strana) Otvor pro výstup laserového paprsku Šroub (pro závit křížového laseru) Upevňovací šroub Upínací čelisti Upínací matka Obsah dodávky 1 křížový laser 1 svorka 2 baterie 1,5 V, typ AAA 1 návod k obsluze Technické...
  • Seite 98: Bezpečnostní Upozornění

    Třída laseru: Vlnová délka (λ): 635 nm Maximální výkon P max.: 1 mW Uložení svorky: Baterie: 2 x baterie 1,5 V, velikost Váha výrobku: 240 g (s bateriemi) Váha svorky: 160 g Rozměry výrobku: cca 67 x 66 x 84 mm Maximální...
  • Seite 99 Ve všech případech označených tímto symbolem se musí po- stupovat přesně podle návodu Tento výrobek mohou používat děti od 8 let, osoby se sníženými fyzickými, smyslovými nebo duševními schopnosti nebo s ne- dostatečnými zkušenostmi a znalostmi, jestliže budou pod do- hledem nebo byly poučeny o bezpečném používání...
  • Seite 100 Držte výrobek v odstupu od magnetických nosičů dat a přístrojů citlivých na magnetické pole. Působením magnetu může dojít k nevratným ztrátám dat. Chraňte se před laserovým zářením! LASER < 1 mW λ = 635 nm EN 60825-1:2014 Nedívejte se nikdy přímo do laserového paprsku resp. do výstupního otvoru Pozorování...
  • Seite 101: Bezpečnostní Pokyny Pro Baterie A Akumulátory

    Výrobkem vydávané spektrum záření během provozu nebo údržby: • vlnová délka: 635 nm • maximální výkon nebo výdej energie: < 1 mW Bezpečnostní pokyny pro baterie a akumulátory NEBEZPEČÍ OHROŽENÍ ŽIVOTA! Uchovávejte baterie a akumulátory mimo dosah dětí. V případě spolknutí okamžitě vyhledejte lékařskou pomoc! NEBEZPEČÍ...
  • Seite 102: Uvedení Do Provozu

    NOSTE OCHRANNÉ RUKAVICE! Vyteklé i poškozené baterie nebo akumulátory mohou při kontaktu s pokožkou způsobit její poleptání. Noste proto vhodné rukavice. V případě vytečení ihned odstraňte baterie nebo akumulátory z výrobku, abyste zabránili jeho poškození! Používejte jen baterie nebo akumulátory stejného typu. Ne- kombinujte staré...
  • Seite 103: Vložení A Výměna Baterií

    Vložení a výměna baterií Otevřete přihrádku na baterie , podle obr. A1. Vložte baterie do přihrádky na baterie podle obr. A2. Než uzavřete kryt přihrádky na baterie , zkontrolujte, jestli jsou baterie nasazené se správnou polaritou podle obr. A2. Upozornění: Při nízkém napětí baterie bliká červená LED kontrolka .
  • Seite 104: Práce Bez Automatické Nivelace

    Po zapnutí vyrovná automatika nerovnosti v rozmezí samočinné nivelace ±4°. Nivelace je ukončená jakmile se laserové linie nepohybují a LED kontrolka svítí zeleně. Jestliže není automatická nivelace možná, např. když je spodní strana výrobku odkloněná od vodorovné polohy o více než 4°...
  • Seite 105: Pracovní Pokyny

    Pracovní pokyny Na označení používejte vždy jen střed laserové linie. Šířka laserové linie se mění se vzdáleností. Použití svorky Dodanou svorkou můžete výrobek připevnit na různých předmětech. 1. Povolte upínací matku otáčením proti směru chodu hodino- vých ručiček. 2. Umístěte svorku na požadovaném místě.
  • Seite 106: Údržba A Čištění

    Údržba a čištění Výrobek nevyžaduje údržbu. POZOR! Neponořujte výrobek nikdy do vody nebo jiných tekutin. Při čištění nesmí vniknout do výrobku vlhkost. Udržujte výrobek v čistotě pro dobrou a bezpečnou práci. Na čištění tělesa používejte suchý hadr. Výstupní otvor pro laserový paprsek čistěte mírným proudem vzduchu.
  • Seite 107 Při třídění odpadu se řiďte podle označení obalových materiálů zkratkami (a) a čísly (b), s následujícím významem: 1–7: umělé hmoty / 20–22: papír a lepenka / 80–98: složené látky. Výrobek a obalové materiály jsou recyklovatelné, zlikvi- dujte je odděleně pro lepší odstranění odpadu. Logo Triman platí...
  • Seite 108: Záruka

    rtuť, Pb = olovo. Proto odevzdejte opotřebované baterie / akumulátory u komunální sběrny. Záruka Výrobek byl vyroben s nejvyšší pečlivostí podle přísných kvalitativ- ních směrnic a před odesláním prošel výstupní kontrolou. V případě závad máte možnost uplatnění zákonných práv vůči prodejci. Vaše práva ze zákona nejsou omezena naší...
  • Seite 109: Postup V Případě Uplatňování Záruky

    Postup v případě uplatňování záruky Pro zajištění rychlého zpracování Vašeho případu se řiďte následují- cími pokyny: Připravte si pokladní stvrzenku jako důkaz o zakoupení a číslo výrobku (např. IAN 12345). Číslo výrobku najdete na typovém štítku, vlevo na titulní stránce návodu k obsluze nebo na nálepce, na spodní straně výrobku.
  • Seite 110 Legenda použitých piktogramov ..Strana 111 Úvod ................Strana 112 Používanie v súlade s určeným účelom ..... Strana 112 Popis častí ..............Strana 113 Obsah dodávky ............Strana 113 Technické údaje ............Strana 113 Bezpečnostné upozornenia ..... Strana 114 Bezpečnostné upozornenia týkajúce sa batérií...
  • Seite 111: Legenda Použitých Piktogramov

    Legenda použitých piktogramov Prečítajte si návod na obsluhu. Nebezpečenstvo explózie! Noste ochranné rukavice! Pozor! Vo všetkých prípadoch, ktoré sú označené týmto symbolom, je potrebné nahliadnuť do návodu. Chráňte sa pred laserovým žiarením! Nepozerajte do laserového lúča! Volt (jednosmerný prúd) Vrát. alkalických batérií...
  • Seite 112: Úvod

    Krížový líniový laser PKLL 7 C3 Úvod Blahoželáme Vám ku kúpe Vášho nového výrobku. Roz- hodli ste sa pre veľmi kvalitný výrobok. Návod na obsluhu je súčasťou tohto výrobku. Obsahuje dôležité upozornenia týkajúce sa bezpečnosti, používania a likvidácie. Skôr ako začnete výrobok používať, oboznámte sa so všetkými pokynmi k obsluhe a...
  • Seite 113: Popis Častí

    Popis častí Kruhové tlačidlo LED-kontrolka (červená: nivelácia vypnutá, zelená: nivelácia zapnutá) Priečinok pre batérie Kryt priečinka pre batérie Spínač LOCK -závit (spodná strana) Výstupný otvor pre laserový lúč -skrutka (pre nasmerovanie so -závitom krížového lasera) Upevňovacia skrutka Upínacia čeľusť Upínacia matica Obsah dodávky 1 krížový...
  • Seite 114: Bezpečnostné Upozornenia

    Samonivelačná oblasť typicky: ± 4° Čas nivelácie typicky: cca. 6 sekundy Prevádzková teplota: +5 °C–35 °C Relatívna vlhkosť vzduchu max.: ≤ 90 % Laserová trieda: Vlnová dĺžka (λ): 635 nm Maximálny výkon P max: 1 mW Upínanie svorka: Batérie: 2 x 1,5 V batéria, typ AAA Hmotnosť...
  • Seite 115 Pred používaním otestujte výrobok na známych podkladoch, aby ste sa uistili, že výrobok funguje správne. Ak používate výrobok spôsobom, ktorý výrobca neuviedol, môže to mať vplyv na ochranné funkcie výrobku. Vo všetkých prípadoch, ktoré sú označené týmto symbolom , je potrebné nahliadnuť do návodu. Tento výrobok môžu používať...
  • Seite 116 Počas transportu merací nástroj vypnite. Pri vypnutí je kyvadlová jednotka zablokovaná, pretože by sa pri silných pohyboch mohla poškodiť. Merací nástroj držte v bezpečnej vzdialenosti od kardiostimu- látorov. Magnet vo vnútri meracieho nástroja vytvára pole, ktoré môže ovplyvňovať funkciu kardiostimulátorov. Držte merací...
  • Seite 117: Bezpečnostné Upozornenia Týkajúce Sa Batérií / Akumulátorových Batérií

    Nikdy nenasmerujte laserový lúč na reflektujúce povrchy, osoby alebo zvieratá. I krátky vizuálny kontakt s laserovým lúčom môže viesť k poškodeniu očí. Laser vo vnútri výrobku môže skontrolovať, opraviť alebo na- hradiť iba výrobca. Ak by sa vyskytli chyby funkcie alebo iné nedostatky, kontaktujte prosím telefonicky alebo e-mailom ser- visné...
  • Seite 118 Riziko vytečenia batérií / akumulátorových batérií Batérie / akumulátorové batérie nikdy nevystavujte extrémnym podmienkam a teplotám, ktoré by na ne mohli pôsobiť, napr. na vykurovacích telesách / priamom slnečnom žiarení. Ak batérie / akumulátorové batérie vytiekli, zabráňte kontaktu pokožky, očí a slizníc s chemikáliami! Ihneď vypláchnite postih- nuté...
  • Seite 119: Uvedenie Do Prevádzky

    Uvedenie do prevádzky Skontrolujte obsah dodávky ohľadom úplnosti a viditeľných poškodení. Odstráňte celý obalový materiál z výrobku. Výmena / vkladanie batérií Otvorte kryt priečinka pre batérie ako je zobrazené na obr. A1. Do priečinka pre batérie vložte batérie podľa obr. A2. Predtým, ako znovu zatvoríte kryt priečinka pre batérie dbajte na to, aby boli batérie vložené...
  • Seite 120: Používanie Nivelačnej Automatiky

    Používanie nivelačnej automatiky Pre používanie nivelačnej automatiky postavte výrobok na vodorovnú, pevnú podložku alebo ho upevnite pomocou závitu -skrutke priloženej svorky. Nivelačná automatika po zapnutí automaticky vyrovná nerov- nosti vrámci samonivelačnej oblasti ±4°. Nivelácia je ukončená, akonáhle sa už laserové línie nepohybujú a LED-kontrolka svieti zeleno.
  • Seite 121: Práca Bez Nivelačnej Automatiky

    Práca bez nivelačnej automatiky Spínač LOCK posuňte do pozície . Stlačte kruhové tlačidlo na hornej strane výrobku. Výrobok teraz z výstupného otvoru pre laserový lúč vysiela dve laserové línie, ktoré nie sú nivelované. Práca bez nivelačnej automatiky je vždy zobrazená prostredníctvom červenej LED- kontrolky Znova stlačte kruhové...
  • Seite 122: Práca So Statívom

    4. Umiestnite -závit krížového lasera na -skrutku svorky a pevne ju zatiahnite rukou. Nepoužite príliš veľkú silu, pretože by to mohlo poškodiť výrobok. 5. Nasmerujte krížový laser. Uvoľnite preto upevňovaciu skrutku tak, že ju otočíte v smere hodinových ručičiek a posúvate krížový...
  • Seite 123: Skladovanie

    jemne navlhčenou vatovou tyčinkou. Nevyvíjajte pritom silný tlak! Za účelom opravy smie výrobok otvárať iba kvalifikovaný odborník. Opravu meracieho nástroja smie vykonávať iba kvalifikovaný odborný personál a možno pritom používať iba originálne náhradné diely. Tým sa zabezpečí zachovanie bezpečnosti meracieho náradia. Skladovanie Ak výrobok dlhší...
  • Seite 124 Výrobok a obalové materiály sú recyklovateľné, zlikvi- dujte ich oddelene pre lepšie spracovanie odpadu. Triman-Logo platí iba pre Francúzsko. O možnostiach likvidácie opotrebovaného výrobku sa môžete informovať na Vašej obecnej alebo mestskej správe. Ak výrobok doslúžil, v záujme ochrany životného pros- tredia ho neodhoďte do domového odpadu, ale odo- vzdajte na odbornú...
  • Seite 125: Záruka

    Záruka Tento výrobok bol dôkladne vyrobený podľa prísnych akostných smerníc a pred dodaním svedomito testovaný. V prípade nedostat- kov tohto výrobku Vám prináležia zákonné práva voči predajcovi produktu. Tieto zákonné práva nie sú našou nižšie uvedenou záru- kou obmedzené. Na tento produkt poskytujeme 3-ročnú záruku od dátumu nákupu. Záručná...
  • Seite 126: Postup V Prípade Poškodenia V Záručnej Dobe

    Postup v prípade poškodenia v záručnej dobe Pre zaručenie rýchleho spracovania Vášho prípadu dodržte prosím nasledujúce pokyny: Majte pripravený pokladničný lístok ako dôkaz o kúpe ako aj číslo výrobku (napr. IAN 12345). Číslo výrobku nájdete na typovom štítku, vpredu vľavo na titul- nej strane návodu na obsluhu alebo na nálepke na spodnej strane výrobku.
  • Seite 127 OWIM GmbH & Co. KG Stiftsbergstraße 1 DE-74167 Neckarsulm GERMANY Model-No.: HG04643 Version: 01/2019 Stand der Informationen · Last Information Update · Version des informations Stand van de informatie · Stan informacji Stav informací · Stav informácií: 11 / 2018 Ident.-No.: HG04643112018-8 IAN 312017...

Inhaltsverzeichnis