Herunterladen Inhalt Inhalt Diese Seite drucken
Leister VARIANT T1 Bedienungsanleitung
Vorschau ausblenden Andere Handbücher für VARIANT T1:
Inhaltsverzeichnis

Werbung

Verfügbare Sprachen
  • DE

Verfügbare Sprachen

  • DEUTSCH, seite 1
VARIANT T1
Leister Technologies AG
Galileo-Strasse 10
CH-6056 Kaegiswil/Switzerland
Tel.
+41 41 662 74 74
Fax
+41 41 662 74 16
www.leister.com
sales@leister.com
®
D
GB
USA
F
E
P
I
NL

Werbung

Inhaltsverzeichnis
loading

Inhaltszusammenfassung für Leister VARIANT T1

  • Seite 1 ® VARIANT T1 Leister Technologies AG Galileo-Strasse 10 CH-6056 Kaegiswil/Switzerland Tel. +41 41 662 74 74 +41 41 662 74 16 www.leister.com sales@leister.com...
  • Seite 2: Inhaltsverzeichnis

    Wir gratulieren Ihnen zum Kauf eines Heissluft-Schweissautomaten VARIANT T1 Sie haben sich für einen erstklassigen Heissluft-Schweissautomaten entschieden, der aus hochwertigen Materialen besteht. Dieses Gerät wurde nach den neuesten Schweisstechnologien entwickelt und produziert. Jeder VARI- ANT T1 wird einer strengen Qualitätskontrolle unterzogen bevor er das Werk in der Schweiz verlässt.
  • Seite 3: Anwendung

    Bedienungsanleitung (Original-Bedienungsanleitung) Bedienungsanleitung vor Inbetriebnahme aufmerksam lesen und zur weiteren Verfügung aufbewahren. Leister VARIANT T1 Heissluft-Schweissautomat Anwendung Das Gerät soll nur in gut durchlüfteten Räumen eingesetzt werden. Bei Bedarf soll mit einer Absaugvorrichtung oder persönlicher Schutzausrüstung gearbeitet werden. Achten Sie darauf, das Material beim Schweissprozess nicht zu verbrennen.
  • Seite 4: Konformität

    Konformität Leister Technologies AG, Galileo-Strasse 10, CH-6056 Kaegiswil/Schweiz bestätigt, dass dieses Produkt in der von uns in Verkehr gebrachten Ausführung die Anforderungen der folgenden EU-Richtlinien erfüllt. Richtlinien: 2006/42, 2014/30, 2014/35, 2011/65 Harmonisierte Normen: EN 12100, EN 55014-1, EN 55014-2, EN 61000-6-2...
  • Seite 5: Gerätebeschreibung

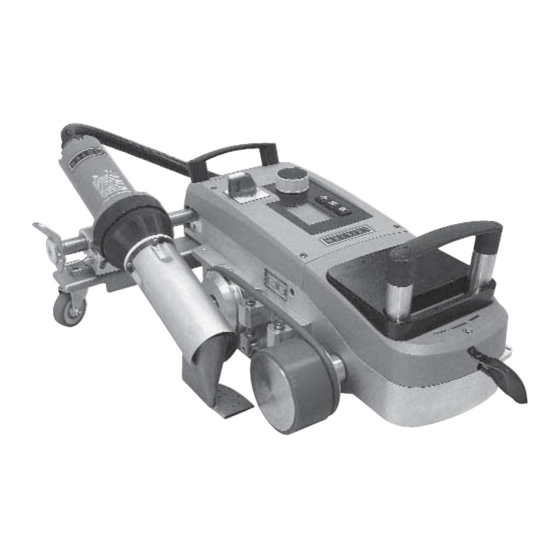
    22 Halterung für Netzanschlussleitung 32 Hebel für Spurfeineinstellung 11 Andrückrolle 23 Rundriemen 33 Griff Führungsstab 34 Düsenlehre Hauptschalter (3) Zum Ein- / Ausschalten des Heissluft-Schweissautomaten VARIANT T1 Bedienelemente (4) e-Drive Antrieb Der e-Drive dient als Navigator. Einstellen der Antriebsgeschwindigkeit Er hat zwei Funktionen:...
  • Seite 6 Programm) Enter, Bestätigen Info Icons Aktiv Icons Quick-Info Wie starte ich den Heissluft-Schweissautomaten VARIANT T1 ? 1. Netzanschlussleitung an das elektrische Netz anschliessen 2. Hauptschalter (3) EIN 3. Taste Antrieb drücken e-Drive drehen 4. Taste Heizung drücken e-Drive drehen 5.
  • Seite 7: Betriebsbereitschaft

    Betriebsbereitschaft • Vor Inbetriebnahme Netzanschlussleitung (1) und Stecker sowie Verlängerungskabel auf elektrische und mechanische Beschädigung überprüfen. • Die Grundeinstellung der Schweissdüse (9) wird im Werk vorgenommen • Grundeinstellung der Schweissdüse (9) kontrollieren – Die Kontrolle kann mittels Düsenlehre (34) oder gemäss Detail A und B erfolgen. Detail B Detail A 1 mm...
  • Seite 8 Schweissablauf • Vorbereitung Testschweissung gemäss Schweissanleitung des Materialherstellers und nationalen Normen oder Richtlinien vornehmen. Testschweissung überprüfen. – Schweissparameter Antrieb, Heizung und Gebläse einstellen (Kapitel 1, Arbeitsmodus) – Schweisstemperatur muss erreicht sein (Aufheizzeit ca. 1– 2 min.) • Start Schweissung – Führungsrolle (15) nach unten schwenken –...
  • Seite 9: Transportbereitschaft

    Transportbereitschaft • Führungsrolle (15) nach oben schwenken. • Heissluftgebläse (8) nach rechts schieben bis der Arretiernocken (10) in die Aussparung des Haltegriff es (28) einrastet. Heissluftgebläse (8) ist in Parkposition. • Absenken der Transportrollen (26) durch Schwenken des Griff es (27). Dadurch werden die Andrückrolle (11) und Umlenkrolle (12) für den Transport entlastet.
  • Seite 10: Sollwertanzeige

    Luftmenge angezeigt. Ist die Luftmenge 100 %, wird blinkend das Symbol mit der ge messenen Unter- /Überspannung angezeigt (Abb. 7). (Nur bei VARIANT T1 230 V~ möglich). Unter-/Überspannung kann das Schweissresultat beein- fl ussen! (Abb. 7) (Abb. 8) • Wird nach einer defi nierten Zeit keine Taste gedrückt, Schweissdüse (9) NICHT in Schweissposition, wird das Standby-Menü...
  • Seite 11: Einstellen Der Antriebsgeschwindigkeit

    • Durch Drücken der Taste Heizung während 3 Sekunden erscheint die Netzspannung unterhalb der Antriebs geschwindigkeit. Dieser Aufruf ist nur aus der Arbeitsanzeige möglich (Kapitel 1.2).(Nur bei VARIANT T1 230 V~ möglich). • Mit der Taste Antrieb oder Taste Gebläse kann in das jeweilige Menü...
  • Seite 12: Einstellen Der Luftmenge

    1. Arbeitsmodus 1.5 Einstellen der Luftmenge • Mit der Taste Gebläse kann die Luftmenge verändert werden. Die Luftmenge ist in 5 % - Schritten von 40 % – 100 % durch Drehen des e-Drive einstellbar. Die Einstellung wird nach 3 Sekunden übernommen, sofern innerhalb dieser 3 Sekunden keine Taste betätigt wurde.
  • Seite 13: Profi Le Wählen

    1. Arbeitsmodus 1.7 Profi le wählen • Ist die Anzeige rechts unten im Display (5) aktiviert, können durch Drü- cken des e-Drive Profile geladen werden. Anschliessend erscheint die Anzeige «Select Profi le». Durch Drehen des e-Drive kann ein Profi l ausgewählt werden. Die Profi...
  • Seite 14: Standby

    Err04 Triac defekt (einer oder beide Triacs sind defekt) Err08 Gebläsemotor defekt Err40 Unterspannung 25% (Netzspannung 75%) nur VARIANT T1 230 V~ 2. Profi le Setup 2.1 Profi le Setup Tastenkombination Tasten Antrieb und Heizung gedrückt halten und gleich- zeitig Hauptschalter EIN...
  • Seite 15: Profi Le Erstellen

    2. Profi le Setup 2.2 Profi le erstellen • Im Profi le Setup können 7 individuelle Profi le angelegt werden bei welchen der Name, und alle drei Parameter Antrieb , Heizung ,Gebläse frei eingestellt und anschliessend durch Drücken des e-Drive gespeichert werden können (Abb.21).
  • Seite 16 Fehler – Ursache – Massnahme • Maschine schaltet automatisch ab – Mit dem Standby-Betrieb wird die Maschine nach eingestellter Zeit automatisch abgeschaltet (werkseitig 40 Minuten eingestellt). Bei Bedarf Standby-Zeit erhöhen (Seite 15, 2. Profi le Setup, 2.3 Standby Setup). • Qualität der Schweissung ist mangelhaft –...
  • Seite 17 Fehler – Ursache – Massnahme • Schweissnahtbreite ist nicht konstant – Feineinstellung der Führungsrolle wie folgt vornehmen: – Schweissdüse (9) abkühlen (Seite 13, 1. Arbeitsmodus, 1.8 Abkühlen) – Schweissdüse (9) in Schweissposition bringen – Innensechskant-Schraube der Führungsrolle (15) lösen – Führungsrolle (15) in die gewünschte Position schieben –...
  • Seite 18 Schweissanwendungen...
  • Seite 19: Wartung

    Artikel Nr. 141.892 VARIANT T1, 230 V / 20 mm Schweissdüse / mit Euro Stecker Artikel Nr. 141.893 VARIANT T1, 400 V / 40 mm Schweissdüse / mit CEE Stecker (3LNPE) Artikel Nr. 141.894 VARIANT T1, 400 V / 20 mm Schweissdüse / mit CEE Stecker (3LNPE) Artikel Nr.
  • Seite 20 You have opted for a fi rst-class hot-air welding machine made of high-quality materials. This device has been developed and manufactured in accordance with the latest welding technologies. Every VARIANT T1 undergoes stringent quality checks before leaving the factory in Switzerland. Table of Contents...
  • Seite 21 (Translation of the original operating instructions) Read the operating instructions carefully before starting the device and keep them for future reference. Leister VARIANT T1 Hot-air welding machine Application The device should be used only in well-ventilated rooms. If necessary, work should be carried out with a fume hood or personal protective equipment.
  • Seite 22: Technical Data

    Conformity Leister Technologies AG, Galileo-Strasse 10, CH-6056 Kaegiswil/Switzerland confi rms that this product in the version put into circulation by us, fulfi ls the requirements of the following EU directives. Directives: 2006/42, 2014/30, 2014/35, 2011/65 Harmonised standards: EN 12100, EN 55014-1, EN 55014-2, EN 61000-6-2...
  • Seite 23: Device Description

    22 Holder for power supply cord 33 Guide bar handle 34 Nozzle gauge Main switch (3) For switching the hot-air welding machine VARIANT T1 On / Off Controls (4) e-Drive Drive The e-Drive serves as a navigator. Sets the drive speed...
  • Seite 24 7. Carry out a test weld according to the welding instructions of the material manufacturer and national standards or directives. Check test weld. 8. Welding How do I switch off the hot-air welding machine VARIANT T1? 1. Press e-Drive (Fig. 1). 2. Press «Cool down OK» e-Drive and allow to cool approx.
  • Seite 25 Operational Availability • Before putting into operation, check power supply cord (1) and connector as well as extension cable for electrical and mechanical damage. • The default setting for the welding nozzle (9) is made at the factory. • Check the default setting of the welding nozzle (9). –...
  • Seite 26 Welding Workfl ow • Preparation Carry out a test weld according to the welding instruction of the material manufacturer and national standards or guidelines. Check test weld. – Set welding parameters for drive, heating and blower (see Section 1, Work Mode). –...
  • Seite 27: Button Combinations

    Transport Readiness • Swivel guide roller (15) upwards. • Push hot-air blower (8) to the right until the locking cam (10) latches into the recess of the holding handle (28). The hot-air blower (8) is in the parked position. • Lower the transport rollers (26) by swivelling the handle (27). The pressure roller (11) and diverting roller (12) are relieved for transport in this way.
  • Seite 28: Setpoint Value Display

    100 %, the symbol will be displayed flashing with the measured undervoltage /overvoltage (Fig. 7). (Only possible with VARIANT T1 230 V~). Undervoltage/Overvoltage can aff ect the welding results! • If no button is pressed after a defi nite time (welding nozzle (9) (Fig. 7) (Fig.
  • Seite 29: Setting The Drive Speed

    3 seconds, the mains voltage will appear below the drive speed. This call-up is only possible from the Work display (Section 1.2). (Only possible with VARIANT T1 230 V~). • You can change to the relevant menu by pressing the Drive or Blower button.
  • Seite 30: Setting The Air Volume

    1. Work Mode 1.5 Setting the air volume • The air volume can be changed with the Blower button. The air volume can be set in 5% increments from 40% to 100% by turning the e-Drive .The setting is accepted after 3 seconds, as long as no button is pressed within these 3 seconds. If the air volume is set to 100%, no information will appear on the display (5) (Fig.
  • Seite 31: Selecting Profi Les

    1. Work Mode 1.7 Selecting Profi les • If the display at the right bottom of the display (5) is activated, profi les can be loaded by pressing the e-Drive . The display «Select Profi le» then appears. A profi le can be selected by turning the e-Drive .
  • Seite 32: Standby

    Err04 Triac defective (one or both Triacs are defective) Err08 Blower motor defective Err40 Undervoltage 25% (mains voltage 75%) only VARIANT T1 230 V~ 2. Profi le Setup 2.1 Profi le Setup Button Combination Keep Drive and Heating buttons pressed with main switch ON at the same time.
  • Seite 33: Creating Profi Les

    2. Profi le Setup 2.2 Creating Profi les • The Profi le Setup allows you to create 7 individual profi les for which the name, and all three parameters Drive , Heating Blower can be freely set and then saved by pressing the e-Drive (Fig.
  • Seite 34 Error – Cause – Remedy • Machine switches off automatically – The machine is automatically switched off after a set time with Standby mode (factory setting 40 minutes). If needed, increase standby time (Page 33, 2. Profi le Setup, 2.3 Standby Setup). •...
  • Seite 35 Error – Cause – Remedy • Weld seam width is not constant – Carry out fi ne adjustment of the guide roller as follows: – Allow welding nozzle (9) to cool (Page 31, 1. Work Mode, 1.8 Cooling) – Move welding nozzle (9) into welding position –...
  • Seite 36 Welding Applications...
  • Seite 37: Accessories

    Article no. 141.892 VARIANT T1, 230 V / 20 mm welding nozzle / with European plug Article no. 141.893 VARIANT T1, 400 V / 40 mm welding nozzle / with CEE plug (3LNPE) Article no. 141.894 VARIANT T1, 400 V / 20 mm welding nozzle / with CEE plug (3LNPE) Article no.
  • Seite 38 Questo apparecchio è stato sviluppato e prodotto sulla base delle più avanzate tecnologie nel campo della saldatura. Prima di uscire dallo stabilimento in Svizzera, tutti i modelli di VARIANT T1 sono sottoposti a un rigoroso controllo di qualità.
  • Seite 39: Modalità D'impiego

    (Traduzione del manuale di istruzioni originale) Prima dell‘attivazione leggere con attenzione le istruzioni d’uso e conservarle per ulteriori consultazioni. VARIANT T1 Leister Saldatrice automatica ad aria calda Modalità d‘impiego L’apparecchio è progettato per essere utilizzato esclusivamente all’interno di locali ben aerati. Ove necessario, durante le fasi operative è...
  • Seite 40: Smaltimento

    Conformità Leister Technologies AG, Galileo-Strasse 10, CH-6056 Kaegiswil/Svizzera dichiara che il presente prodotto, nella versione introdotta sul mercato, soddisfa i requisiti delle direttive CE riportate di seguito. Direttive: 2006/42, 2014/30,2014/35, 2011/65 Normative armonizzate: EN 12100, EN 55014-1, EN 55014-2, EN 61000-6-2...
  • Seite 41: Descrizione Dell'apparecchio

    Descrizione dell‘apparecchio Barra di guida 1 Cavo di collegamento alla rete 13 Premibarra 25 Viti di regolazione asse orientabile 2 Alloggiamento 14 Rullo orientabile 26 Rullo di trasporto 3 Interruttore principale 15 Rullo di guida 27 Maniglia per il dispositivo 4 Comandi 16 Peso supplementare d‘estrazione...
  • Seite 42 ENTER, conferma Icone di informazione Icone attive Informazioni rapide Accensione della saldatrice automatica ad aria calda VARIANT T1 1. Collegare il cavo di collegamento alla rete elettrica 2. Interruttore principale (3) ON 3. Premere il pulsante motore ruotare e-Drive 4.
  • Seite 43: Possibilità D'impiego

    Possibilità d‘impiego • Prima dell‘attivazione controllare la presenza di guasti elettrici e meccanici nel cavo di collegamento alla rete (1), nella spina elettrica e nel cavo di prolunga. • Presso lo stabilimento viene preimpostata la configurazione base dell‘ugello di saldatura (9). •...
  • Seite 44: Processo Di Saldatura

    Processo di saldatura • Preparazione Eff ettuare una saldatura di prova in base alle istruzioni di saldatura del produttore del materiale e alle normative o alle direttive nazionali. Verifi care la saldatura di prova. – Impostare i parametri di saldatura motore, riscaldamento e ventola (capitolo 1, modalità operativa) –...
  • Seite 45 Processo di saldatura – Al termine delle operazioni di saldatura con e-Drive (premere 2 volte), disattivare il riscaldamento. In questo modo si raff redda l‘ugello di saldatura (9) e la ventola si disattiva dopo 4 minuti in modo automatico (capitolo 1.8 Raff reddamento). –...
  • Seite 46: Modalità Operativa

    (Fig. 7). (Fig. 7) (Fig. 8) (Possibile solo con VARIANT T1 230 V~). La sottotensione/sovratensione può infl uire sul risultato della saldatura. • Se dopo un intervallo di tempo predefi nito non si preme nessun pulsate, l‘ugello di saldatura (9) NON si trova in posizione di saldatura, viene visualizzato il menu stand-by (capitolo 1.9, Stand-by).
  • Seite 47 È possibile acce- dere a questa funzione solo dalla visualizzazione operativa (capitolo 1.2). (Possibile solo con VARIANT T1 230 V~). • Con il pulsante del motore o il pulsante della ventola è...
  • Seite 48 1. Modalità operativa 1.5 Impostazione della portata d‘aria • Con il pulsante della ventola è possibile modifi care la portata d‘aria. È possibile regolare la portata d‘aria a scatti del 5% a partire dal 40% al 100% ruotando e-Drive . L‘impostazione viene acquisita dopo 3 secondi se non è stato selezionato nessun pulsante nell‘arco di 3 secondi.
  • Seite 49 1. Modalità operativa 1.7 Selezione di PROFILE • Se l‘indicazione è attivata sul display (5) in basso a destra, è possibile caricare i profi li premendo e-Drive . Quindi viene visualizzato il messaggio SELECT PROFILE. Ruotando e-Drive è possibile selezionare un profi lo. L‘utente può perso- nalizzare i profi...
  • Seite 50: Messaggi D'errore

    Triac difettoso (uno o entrambi i triac sono difettosi) Err08 Motore della ventola difettoso Err40 Sottotensione 25% (tensione di rete 75%) solo VARIANT T1 230 V~ 2. PROFILE SETUP 2.1 Combinazione di pulsanti PROFILE SETUP Tenere premuti i pulsanti del motore e del sistema di...
  • Seite 51: Standby Setup

    2. PROFILE SETUP 2.2 Creazione dei profi li • In PROFILE SETUP è possibile creare 7 profi li personalizzati in cui è possibile confi gurare liberamente il nome e tutti e tre i parametri motore , sistema di riscaldamento e ventola , e quindi memorizzarli premendo e-Drive (Fig.
  • Seite 52 Errore – Causa – Risoluzione • La macchina si disattiva automaticamente – Con il funzionamento in modalità stand-by la macchina viene disattivata in modo automatico una volta trascorso il tempo impostato (impostazione di fabbrica 40 minuti). In caso di necessità, aumentare la durata dello stand-by (pagina 51, 2. PROFILE SETUP, 2.3 STAND-BY SETUP). •...
  • Seite 53 Errore – Causa – Risoluzione • La larghezza della saldatura non è costante – Eff ettuare l‘impostazione di precisione del rullo di guida come riportato di seguito. – Far raff reddare l‘ugello di saldatura (9) (pagina 49, 1. Modalità operativa, 1.8 Raff reddamento). –...
  • Seite 54 Applicazioni della saldatura...
  • Seite 55 Cod. articolo 141.892 VARIANT T1, 230 V / ugello di saldatura da 20 mm / con spina Euro Cod. articolo 141.893 VARIANT T1, 400 V / ugello di saldatura da 40 mm / con spina CEE (3LNPE) Cod. articolo 141.894 VARIANT T1, 400 V / ugello di saldatura da 20 mm / con spina CEE (3LNPE) Cod.
  • Seite 56 Vous avez choisi une soudeuse automatique à air chaud de premier choix, fabriquée avec des matériaux de haute qualité. Cet appareil a été développé et produit selon les technologies de sou- dage les plus récentes. Chaque soudeuse VARIANT T1 est soumise à un contrôle strict de qualité avant de quitter l’usine en Suisse.
  • Seite 57 (Traduction de la notice d’utilisation originale) Lisez attentivement les instructions d’utilisation avant de mettre l’appareil en service et conservez-la à disposition pour une consultation ultérieure. Leister VARIANT T1 Soudeuse automatique à air chaud Application L‘appareil ne doit être utilisé que dans des locaux bien ventilés. Si nécessaire, il faudra recourir à un dispositif d‘aspiration ou à...
  • Seite 58: Caractéristiques Techniques

    Conformité Leister Technologies AG, Galileo-Strasse 10, CH-6056 Kaegiswil/Suisse atteste que le produit, dans la version que nous avons mise en circulation, satisfait aux exigences des directives CE suivantes. Directives : 2006/42, 2014/30, 2014/35, 2011/65 Normes harmonisées : EN 12100, EN 55014-1, EN 55014-2, EN 61000-6-2...
  • Seite 59: Description De L'appareil

    33 Poignée de la manette de guidage manette de guidage 34 Calibre pour buses Commutateur principal (3) Pour la mise sous tension/hors tension de la soudeuse automatique à air chaud VARIANT T1 Eléments de commande (4) e-Drive Entraînement Le bouton e-Drive sert de navigateur.
  • Seite 60 Contrôlez l’essai de soudage. 8. Soudage Comment mettre la soudeuse automatique à air chaud VARIANT T1 hors circuit ? 1. Appuyez sur le bouton e-Drive (ill. 1). 2. Appuyer sur le bouton e-Drive «...
  • Seite 61: Positionnement De L'appareil

    Etat de service • Avant la mise en service, contrôlez le câble d’alimentation secteur (1) et la fiche ainsi que le câble de prolongation à la recherche de dommages électriques et mécaniques. • Le réglage de base de la buse de soudage (9) est effectué en usine. •...
  • Seite 62 Cycle de soudage • Préparation Procédez à un essai de soudage conformément aux instructions de soudage du fabricant de matériaux et aux normes ou directives nationales. Contrôlez l’essai de soudage. – Réglez les paramètres de soudage Entraînement, Chauff age et Souffl erie (chapitre 1 Mode de travail) –...
  • Seite 63: Combinaisons De Touches

    Cycle de soudage – A la fi n des travaux de soudage, mettez le chauff age hors circuit au moyen du bouton e-Drive (appuyez 2 fois). La buse de soudage (9) est ainsi refroidie et la souffl erie s’arrête automatiquement au bout de 4 minutes environ (chapitre 1.8 Refroidissement).
  • Seite 64: Mode De Travail

    Si la quantité d’air est égale à 100 %, le symbole clignote et la sous-tension /surtension mesurée s’affi che (ill. 7). (possible uniquement pour VARIANT T1 230 V~). (ill. 7) (ill. 8) Une sous-tension/surtension peut avoir des répercussions sur le résultat du soudage !
  • Seite 65: Réglage De La Vitesse D'entraînement

    Vous pouvez appeler cette fonction uniquement à partir de l’affi chage de travail (chapitre 1.2). (possible uniquement pour VARIANT T1 230 V~). • Vous pouvez accéder au menu correspondant au moyen des touches Entraînement ou Souffl erie (ill.
  • Seite 66: Réglage De La Quantité D'air

    1. Mode de travail 1.5 Réglage de la quantité d’air • La quantité d’air peut être modifi ée à l’aide de la touche Souffl erie . Vous pouvez régler la quantité d’air par pas de 5 % sur une plage de 40 % – 100 % en tournant le bouton e-Drive .
  • Seite 67: Sélection Des Profi Ls

    1. Mode de travail 1.7 Sélection des profi ls • Si l’indication à droite en bas de l’écran (5) est activée, vous pouvez charger des profi ls en appuyant sur le bouton e-Drive . L’indication « Select Profi le » s’af- fi...
  • Seite 68: Mode Veille

    Triac défectueux (un Triac est défectueux ou les deux) Err08 Moteur de souffl erie défectueux Err40 Sous-tension 25 % (tension du secteur 75 %), uniquement VARIANT T1 230 V~ 2. Confi guration du profi l 2.1 Combinaison de touches de confi guration du profi l Maintenez les touches Entraînement et Chauffage...
  • Seite 69: Création De Profi Ls

    2. Confi guration du profi l 2.2 Création de profi ls • 7 profi ls diff érents peuvent être créés dans Confi guration du profi l, dans lesquels le nom et les trois paramètres Entraînement Chauff age , Souffl erie peuvent être réglés librement puis enregistrés en appuyant sur le bouton e-Drive (ill.
  • Seite 70 Erreurs – Cause – Action • La machine s’éteint automatiquement – En mode Veille, la machine s’éteint automatiquement après le temps réglé (réglage en usine : 40 minutes). Si nécessaire, augmentez le temps de veille (page 69, chapitres 2. Confi guration du profi...
  • Seite 71 Erreurs – Cause – Action • La largeur de soudure n’est pas constante – Procédez au réglage précis du rouleau de guidage comme suit : – Laissez refroidir la buse de soudage (9) (page 67, chapitres 1. Mode de travail et 1.8 Refroidissement) –...
  • Seite 72 Applications de soudage...
  • Seite 73: Maintenance Et Réparation

    Réf. 141.892 VARIANT T1, 230 V / buse de soudage 20 mm / avec prise européenne Réf. 141.893 VARIANT T1, 400 V / buse de soudage 40 mm / avec prise EURO (3LNPE) Réf. 141.894 VARIANT T1, 400 V / buse de soudage 20 mm / avec prise EURO (3LNPE) Réf.
  • Seite 74 Se ha decidido por una soldadora automática de aire caliente de primera clase, compuesta por materiales de calidad. Este equipo se ha desarrollado y fabricado conforme a las técnicas de soldadura más modernas. Todos los VARIANT T1 se someten a un estricto control de calidad antes de salir de la fábrica de Suiza.
  • Seite 75 (Traducción del manual de instrucciones original) Lea las instrucciones de funcionamiento atentamente antes de la puesta en funcionamiento y consérvelas para el futuro. Leister VARIANT T1 Soldadora automática de aire caliente Aplicación Este equipo debe utilizarse únicamente en espacios con buena ventilación. En caso necesario, se debe trabajar con un dispositivo de aspiración o un equipamiento de protección personal.
  • Seite 76: Datos Técnicos

    Conformidad Leister Technologies AG, Galileo-Strasse 10, CH-6056 Kaegiswil/Suiza declara que este producto, en la ver- sión que hemos introducido en circulación, cumple los requisitos de las siguientes directivas de la UE. Directivas: 2006/42, 2014/30, 2014/35, 2011/65 Normas armonizadas: EN 12100, EN 55014-1, EN 55014-2, EN 61000-6-2...
  • Seite 77: Descripción Del Equipo

    23 Correa 33 Mango del palo guía 34 Calibrador de boquillas Interruptor principal (3) Para conectar o desconectar la soldadora automática de aire caliente VARIANT T1 Elementos de manejo (4) e-Drive Accionamiento El e-Drive se utiliza como navegador. Ajuste de la velocidad de accionamiento Tiene dos funciones: Calefacción...
  • Seite 78: Iconos Informativos

    Iconos informativos Iconos activos Información rápida Cómo poner en marcha la soldadora automática de aire caliente VARIANT T1 1. Conectar el cable de conexión de red a la red eléctrica 2. Interruptor principal (3) ON 3. Pulsar la tecla de accionamiento girar e-Drive 4.
  • Seite 79: Posicionamiento Del Equipo

    Disponibilidad operativa • Antes de la puesta en funcionamiento, controlar que el cable de conexión de red (1) y el enchufe, así como el alargador, no tengan daños mecánicos ni eléctricos. • Los ajustes básicos de la boquilla de soldadura (9) se realizan en fábrica •...
  • Seite 80: Proceso De Soldadura

    Proceso de soldadura • Preparación Realizar una soldadura de prueba conforme a las instrucciones de soldadura del fabricante del material y las normas o directivas nacionales. Comprobar la soldadura de prueba. – Ajustar los parámetros de soldadura de accionamiento, calefacción y soplante (capítulo 1, modo de trabajo) –...
  • Seite 81 Transporte • Subir el rodillo guía (15). • Desplazar el soplante de aire caliente (8) hacia la derecha hasta que el talón de tope (10) encaje en el orifi cio del asidero (28). El soplante de aire caliente (8) se encuentra en la posición de parada. •...
  • Seite 82: Modo De Trabajo

    Si la cantidad de aire es 100%, se mostrará el símbolo intermitente con la sobre infratensión medida (fig. 7). (Solo posible en VARIANT T1 230 V~). (Fig. 7) (Fig. 8) ¡La sobre/infratensión puede afectar al resultado de la soldadura! •...
  • Seite 83 3 segundos, aparece la tensión de red de- bajo de la velocidad de accionamiento. Esta consulta sólo es posible en los indicadores de trabajo (capítulo 1.2). (Solo posible en VARIANT T1 230 V~). • Con la tecla de accionamiento o la tecla del soplante se puede cambiar al menú...
  • Seite 84: Ajuste De La Cantidad De Aire

    1. Modo de trabajo 1.5 Ajuste de la cantidad de aire • Con la tecla de soplante se puede modifi car la cantidad de aire. La cantidad de aire se puede ajustar en pasos de 5% desde 40% hasta 100% girando el e-Drive .
  • Seite 85 1. Modo de trabajo 1.7 Selección de perfi l • Si está activado el indicador en la parte inferior derecha de la pantalla (5), se pueden cargar perfi les pulsando el e-Drive . A continuación, aparece el indicador «Select Profi le». Al girar el e-Drive se puede seleccionar un perfi...
  • Seite 86: Mensajes De Error

    Err08 Avería en el motor del soplante Err40 Tensión insufi ciente 25% (tensión de red 75%), sólo VARIANT T1 230 V~ 2. Confi guración de perfi les 2.1 Combinación de teclas para confi guración de perfi les Mantener pulsadas las teclas de accionamiento y calefacción y activar al...
  • Seite 87 2. Confi guración de perfi les 2.2 Creación de un perfi l • En la confi guración de perfi les, se pueden crear 7 perfi les individu- ales en los que se pueden ajustar libremente el nombre y los tres parámetros de accionamiento , calefacción , soplante...
  • Seite 88: Preguntas Frecuentes

    Preguntas frecuentes Error – Causa – Medidas • La máquina se desconecta automáticamente – Con el modo Standby, la máquina se desconectará automáticamente cuando transcurra el tiempo ajustado (el ajuste de fábrica es de 40 minutos). En caso necesario, aumentar el tiempo de standby (página 87, 2. Confi...
  • Seite 89 Preguntas frecuentes Error – Causa – Medidas • El ancho de la costura de soldadura no es constante – Realizar el ajuste del rodillo guía de la siguiente forma: – Enfriar la boquilla de soldadura (9) (página 85, 1. Modo de trabajo, 1.8 Enfriamiento) –...
  • Seite 90 Aplicaciones de soldadura...
  • Seite 91: Servicio Y Reparaciones

    Referencia 141.892 VARIANT T1, 230 V / 20 mm boquilla de soldadura / con europlug Referencia 141.893 VARIANT T1, 400 V / 40 mm boquilla de soldadura / con enchufe CEE (3LNPE) Referencia 141.894 VARIANT T1, 400 V / 20 mm boquilla de soldadura / con enchufe CEE (3LNPE) Referencia 147.739 VARIANT T1, 200 V / 40 mm boquilla de soldadura / sin enchufe...
  • Seite 92 Escolheu uma máquina de soldadura a ar quente excelente, que consiste de materiais de elevada qualidade. Este aparelho foi desenvolvido e produzido de acordo com as tecnologias de soldadura mais recentes. Cada VARIANT T1 é submetida a um controlo de qualidade antes de sais da fábrica na Suíça.
  • Seite 93 (Tradução do manual de instruções original) Ler atentamente o manual de instruções antes da colocação em funcionamento e guardar para disponibilização. Leister VARIANT T1 Máquina de soldadura a ar quente Aplicação O aparelho somente deve ser usado em espaços bem ventilados. Se necessário, deve trabalhar-se com um dispositivo de aspiração ou com equipamento de proteção pessoal.
  • Seite 94: Dados Técnicos

    Conformidade Leister Technologies AG, Galileo-Strasse 10, CH-6056 Kaegiswil/Suíça confirma, que este produto, co- locado por nós no mercado na seguinte versão, cumpre os requisitos das seguintes directivas da UE. Directivas: 2006/42, 2014/30, 2014/35, 2011/65 Normas harmonizadas: EN 12100, EN 55014-1, EN 55014-2, EN 61000-6-2...
  • Seite 95: Descrição Do Aparelho

    11 Rolo de pressão 23 Correias roliças 33 Pega vareta guia 34 Calibre do bocal Interruptor principal (3) Para ligar / desligar da máquina de soldadura a ar quente VARIANT T1 Elementos de comando (4) e-Drive Actuador O e-Drive serve como navegador.
  • Seite 96 Enter, Confi rmar Ícones de informação Ícones activos Informação rápida Como ligo a máquina de soldadura a ar quente VARIANT T1 ? 1. Ligar o cabo de alimentação à rede eléctrica 2. Interruptor principal (3) LIGADO 3. Premir botão Actuador rodar e-Drive 4.
  • Seite 97: Posicionamento Do Aparelho

    Operacionalidade • Antes da colocação em funcionamento verificar o cabo de alimentação (1) e a ficha, bem como, a ex- tensão quanto a danos eléctricos e mecânicos. • A configuração base do bocal de soldadura (9) é efectuada na fábrica •...
  • Seite 98 Processo de soldadura • Preparação Proceder à soldagem de teste de acordo com o fabricante do material e as normas ou directivas nacionais. Verifi car soldagem de teste. – Ajustar actuador de parâmetros de soldadura, aquecimento e ventilador (capítulo 1, modo de trabalho) –...
  • Seite 99 Operacionalidade de transporte • Rodar o rolo guia (15) para cima. • Deslocar ventilador de ar quente (8) para a direita até que o came de bloqueio (10) encaixe no entalhe da pega de fixação (28). Ventilador de ar quente (8) encontra-se na posição de estacionamento. •...
  • Seite 100 100 %, é apresentado o símbolo com a /sobretensão medida (fi g. 7). (Apenas possível no VARIANT T1 230 V~). (fi g. 7) (fi g. 8) A sub/sobretensão pode infl uenciar o resultado da soldadura! •...
  • Seite 101 3 segundos, aparece a tensão de rede por baixo da velocidade do actuador. Esta consulta apenas é possível a partir da indi- cação de trabalho (capítulo 1.2). (Apenas possível no VARIANT T1 230 V~). • Com o botão Actuador ou o botão Ventilador pode ser mudado para o respectivo menu.
  • Seite 102 1. Modo de trabalho 1.5 Ajuste da quantidade de ar • Com o botão ventilador , a quantidade de ar pode ser alterada. A quantidade de ar é ajustável em passos de 5% de 40% – 100%, rodando e-Drive . O ajuste é assumido após 3 segundos, desde que dentro destes 3 segundos não for accionado qualquer botão.
  • Seite 103 1. Modo de trabalho 1.7 Seleccionar perfi s • Se a indicação à direita em baixo no visor (5) estiver activa, podem ser carregados perfi s, premindo e-Drive . De seguida aparece a indicação «Select Profi le». Rodando e-Drive pode ser seleccionado um perfi l. Os perfi s FREE 1–7 podem ser defi...
  • Seite 104: Mensagem De Erro

    Triac avariado (um ou ambos os Triacs avariados) Err08 Motor do ventilador avariado Err40 Subtensão 25% (tensão de rede 75%) apenas VARIANT T1 230 V~ 2. Setup de perfi s 2.1 Setup de perfi s Combinação de botões Manter os botões Actuador...
  • Seite 105: Standby Setup

    2. Setup de perfi s 2.2 Criar perfi s • No Setup de perfi s podem ser criados 7 perfi s individuais, nos quais podem ser livremente ajustados o nome, e todos os três parâmet- ros Actuador Aquecimento , Ventilador e de seguida, premindo e-Drive podem ser memorizados (fi...
  • Seite 106 FAQ (Perguntas frequentes) Erro – Causa – Medida • Máquina desliga-se automaticamente – Com o funcionamento Standby, a máquina é desligada automaticamente após tempo ajustado (de fábrica estão ajustados 40 minutos). Em caso de necessidade aumentar tempo Standby (página 105, 2. Setup de perfi s, 2.3 Standby Setup). •...
  • Seite 107 FAQ (Perguntas frequentes) Erro – Causa – Medida • A largura da costura de soldadura não é constante – Proceder o ajuste preciso do rolo guia da seguinte forma: – Arrefecer bocal de soldadura (9) (Página 103, 1. Modo de trabalho, 1.8 Arrefecer) –...
  • Seite 108 Aplicações de soldadura...
  • Seite 109: Manutenção

    N.º de artigo 141.892 VARIANT T1, 230 V / 20 mm bocal de soldadura / com ficha Euro N.º de artigo 141.893 VARIANT T1, 400 V / 40 mm bocal de soldadura / com ficha CEE (3LNPE) N.º de artigo 141.894 VARIANT T1, 400 V / 20 mm bocal de soldadura / com ficha CEE (3LNPE) N.º...
  • Seite 110 U heeft gekozen voor een eerste klas hetelucht-lasautomaat, die uit hoogwaardige materialen is samengesteld. Dit apparaat werd volgens de nieuwste lastechnologie ontwikkeld en geproduceerd. Elke VARIANT T1 wordt aan een strenge kwaliteitscontrole onderworpen voordat hij de fabriek in Zwitserland verlaat.
  • Seite 111: Hetelucht-Lasautomaat

    Bedieningshandleiding (Vertaling van de originele gebruiksaanwijzing) Bedieningshandleiding vóór de inwerkingstelling aandachtig lezen en voor later gebruik bewaren. Leister VARIANT T1 Hetelucht-lasautomaat Aanwending Gebruik het apparaat uitsluitend in goed geventileerde ruimten. Indien nodig moet met een afzuiginstallatie of per- soonlijke beschermuitrusting worden gewerkt. Let erop dat het materiaal tijdens het lassen niet verbrandt. Controleer met de producent van het materiaal of het materiaal schadelijke additieven bevat.
  • Seite 112: Technische Gegevens

    Conformiteit Leister Technologies AG, Galileo-Strasse 10, CH-6056 Kaegiswil/Zwitserland bevestigt dat dit product in de door ons in omloop gebrachte uitvoering aan de eisen van de volgende EU-richtlijnen voldoet. Richtlijnen: 2006/42, 2014/30, 2014/35, 2011/65 Geharmoniseerde normen: EN 12100, EN 55014-1, EN 55014-2, EN 61000-6-2...
  • Seite 113: Beschrijving Van Het Apparaat

    22 Houder voor netsnoer 33 Greep geleidingsstaaf 11 Aandrukrol 23 Ronde riem 34 Mondstukkaliber Hoofdschakelaar (3) Voor het in- / uitschakelen van de hetelucht-lasautomaat VARIANT T1 Bedieningselementen (4) e-Drive Aandrijving De e-Drive dient als navigator. Instellen van de aandrijfsnelheid Deze heeft twee functies:...
  • Seite 114: Profi Elen Selecteren

    7. Testlas volgens lashandleiding van de materiaalfabrikant en nationale normen of richtlijnen uitvoeren. Testlas controleren. 8. Las Hoe schakel ik de hetelucht-lasautomaat VARIANT T1 uit? 1. e-Drive indrukken (afb. 1). 2. «Cool down OK» e-Drive indrukken en ca. 4 minuten laten afkoelen (afb 2).
  • Seite 115: Bedrijfsklaar Maken

    Bedrijfsklaar maken • Vóór inbedrijfstelling netsnoer (1) en stekker, evenals verlengsnoer op elektrische en mechanische bescha- diging controleren. • De basisinstelling van het lasmondstuk (9) wordt in de fabriek uitgevoerd • Basisinstelling van het lasmondstuk (9) controleren – De controle kan met mondstukkaliber (34) of volgens detail A en B plaatsvinden. detail A detail B 1 mm...
  • Seite 116 Afl oop lasproces • Voorbereiding Testlas volgens lashandleiding van de materiaalfabrikant en de nationale normen of richtlijnen uitvoeren. Testlas controleren. – Lasparameters Aandrijving, Verwarming en Ventilator instellen (hoofdstuk 1, Functiemodus) – Lastemperatuur moet bereikt zijn (opwarmtijd ca. 1– 2 min.) •...
  • Seite 117 Transportklaar maken • Geleidingsrol (15) naar boven zwenken. • Heteluchtventilator (8) naar rechts schuiven tot de arrêteerpal (10) in de uitsparing van de sluitgreep (28) valt. Heteluchtventilator (8) is nu in parkeerpositie. • Verlagen van de transportrollen (26) door verdraaien van de greep (27). Daardoor worden de aandrukrol (11) en de omkeerrol (12) voor het transport ontlast.
  • Seite 118 100 %, dan wordt het symbool knipperend met de geme- ten onder- /overspanning weergegeven (afb. 7). (alleen bij VARIANT T1 230 V~ mogelijk). Onder-/overspanning kan het lasresultaat beïnvloeden! (afb. 7) (afb. 8) • Wordt er na een vastgelegde tijd geen toets ingedrukt, en is het lasmondstuk (9) NIET in laspositie, dan wordt het standby-menu weergegeven (hoofdstuk 1.9, Standby).
  • Seite 119 • Door de toets Verwarming 3 seconden lang in te drukken verschijnt de netspan- ning onder de aandrijfsnelheid. Deze oproep is alleen vanuit de toestandsweergave mogelijk (hoofdstuk 1.2). (alleen bij VARIANT T1 230 V~ mogelijk). • Met de toets Aandrijving of de toets Ventilator kan naar het betreff ende menu worden gewisseld.
  • Seite 120 1. Functiemodus 1.5 Instellen van de luchtstroom • Met de toets Ventilator kan de luchtstroom worden veranderd. De luchtstroom is door verdraaien van de e-Drive instelbaar van 40% tot 100% in stappen van 5%. De instelling word na 3 seconden geaccepteerd, tenzij binnen deze 3 seconden een andere toets werd ingedrukt.
  • Seite 121: Afkoelen

    1. Functiemodus 1.7 Profi elen selecteren • Is de weergave rechtsonder op de display (5) geactiveerd, dan kunnen door indrukken van de e-Drive profi elen worden geladen. Daarna verschijnt de tekst «Select Profi le». Door verdraaien van de e-Drive kan nu een profi el worden geselecteerd.
  • Seite 122: Standby

    Err04 Triac defect (één of beide Triacs zijn defect) Err08 Ventilatormotor defect Err40 Spanning 25% te laag (netspanning 75%) alleen VARIANT T1 230 V~ 2. Profi le Setup 2.1 Profi le Setup toetscombinatie Toetsen Aandrijving en Verwarming ingedrukt houden en geli-...
  • Seite 123: Profi Elen Vastleggen

    2. Profi le Setup 2.2 Profi elen vastleggen • Profi le Setup kunnen 7 individuele profi elen worden vastgelegd, waar- bij de naam en alle drie parameters Aandrijving Verwarming en Ventilator vrij kunnen worden ingesteld en dan door het indrukken van de e-Drive kunnen worden opgeslagen (afb.21).
  • Seite 124 Storing – Oorzaak – Maatregel • Machine schakelt zich automatisch uit – Met de standby-functie wordt de machine na een ingestelde tijd automatisch uitgeschakeld (in de fabriek op 40 minuten ingesteld). Indien gewenst standby-tijd verhogen (pagina 123, 2. Profi le Setup, 2.3 Standby Setup). •...
  • Seite 125 Storing – Oorzaak – Maatregel • Lasnaadbreedte is niet constant – Fijninstelling van de geleidingsrol als volgt uitvoeren: – Lasmondstuk (9) laten afkoelen (pagina 121, 1. Functiemodus, 1.8 Afkoelen) – Lasmondstuk (9) in laspositie brengen – IInbusschroef van de geleidingsrol (15) losdraaien –...
  • Seite 126 Lastoepassingen...
  • Seite 127: Service En Reparatie

    Artikel no. 141.892 VARIANT T1, 230 V / 20 mm lasmondstuk / met Eurostekker Artikel no. 141.893 VARIANT T1, 400 V / 40 mm lasmondstuk / met CEE- stekker (3LNPE) Artikel no. 141.894 VARIANT T1, 400 V / 20 mm lasmondstuk / met CEE- stekker (3LNPE) Artikel no.
  • Seite 128 ® © Copyright by Leister Your authorised Service Centre is: Leister Technologies AG Galileo-Strasse 10 CH-6056 Kaegiswil/Switzerland Tel. +41 41 662 74 74 Fax +41 41 662 74 16 www.leister.com sales@leister.com...

Inhaltsverzeichnis