Herunterladen Inhalt Inhalt Diese Seite drucken

Werbung

Verfügbare Sprachen
  • DE

Verfügbare Sprachen

  • DEUTSCH, seite 1
2
5
3
4
>
1
y
man_D115.indd 1
D 115
GEBRAUCHSANWEISUNG
INSTRUCCIONES DE USO
MANUEL D'UTILISATION
OPERATING MANUAL
ISTRUZIONI D'USO
GEBRUIKSAANWIJZING
NAVODILA ZA UPORABO
2
12
22
32
42
52
62
20-04-15 10:20

Werbung

Inhaltsverzeichnis
loading

Inhaltszusammenfassung für Qlima D 115

  • Seite 1 D 115 GEBRAUCHSANWEISUNG INSTRUCCIONES DE USO MANUEL D’UTILISATION OPERATING MANUAL > ISTRUZIONI D’USO GEBRUIKSAANWIJZING NAVODILA ZA UPORABO man_D115.indd 1 20-04-15 10:20...
  • Seite 2 Sehr geehrte Damen und Herren, herzlichen Glückwunsch zum Kauf Ihres Entfeuchters! Sie haben ein hochwertiges Produkt erworben, das Ihnen jahrelang Freude machen wird, vorausgesetzt, Sie benutzen das Gerät vorschriftsmäßig. Lesen Sie daher zunächst diese Gebrauchsanweisung, so dass Sie wissen, wie Sie Ihren Entfeuchter seiner optimalen Lebensdauer zuführen. Wir gewähren Ihnen namens des Herstellers 2 Jahre Garantie auf eventuelle Material- oder Produktionsfehler.
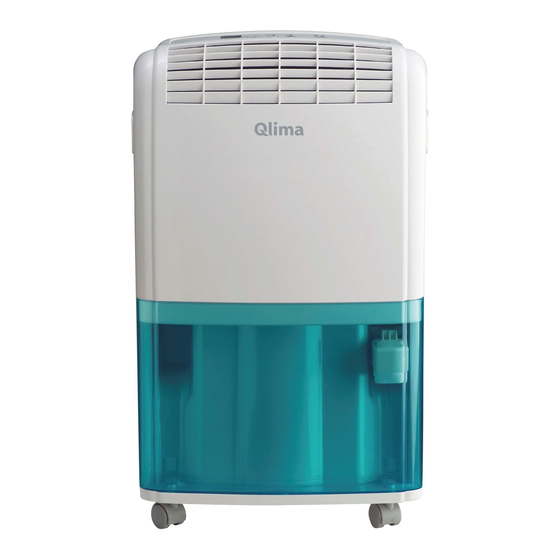
  • Seite 3 HAUPTBAUTEILE Bedienungstastatur Auslass für trockene Luft Herausnehmbarer Wasserbehälter Einlass für feuchte Luft Luftfilter Auslauf (ø 13 mm) mit Deckel Bewegliches Rad Stecker und Kabel Griff man_D115.indd 3 20-04-15 10:20...
  • Seite 4 WAS SIE VORHER WISSEN MÜSSEN Lesen Sie bitte vor der Anwendung des Geräts sorgfältig die Bedienungsanleitung und bewah- ren Sie sie für eine zukünftige Einsichtnahme auf. Das Gerät nur dann installieren, wenn die örtlich geltenden bzw. nationalen Vorschriften, Verordnungen und Normen erfüllt sind. Dieses Produkt ist für den Gebrauch als Luftentfeuchter in Wohngebäuden bestimmt, und darf nur in trockener Umgebung, unter normalen...
  • Seite 5 WICHTIG Das Gerät muss immer über eine geerdete Steckdose angeschlossen werden. Sie sollten das Gerät auf keinen Fall anschließen wenn der Stromanschluss nicht geerdet ist. Der Stecker sollte immer leicht zugänglich sein wenn das Gerät angeschlossen ist. Lesen Sie diese Bedienungsanleitung bitte sorgfältig durch und befolgen Sie die Anweisungen.
  • Seite 6 • Leeren Sie den Wasserbehälter bevor Sie das Gerät verschieben. • Das Gerät auf keinen Fall mit Chemikalien in Berührung bringen. • Das Gerät auf keinen Fall in Wasser tauchen. • S t e c k e n S i e k e i n e G e g e n s t ä n d e i n d i e Öffnungen des Gerätes.
  • Seite 7: Bedienung

    VORSICHT! ≥ 10 cm • Benutzen Sie das Gerät auf keinen Fall mehr wenn das Stromkabel oder der Stecker beschädigt sind. Klemmen Sie das ≥ 10 cm ≥ 10 cm Stromkabel nicht ab und verhindern Sie ≥ 20 cm Kontakt mit scharfen Kanten. •...
  • Seite 8 Wenn Sie das Gerät zum ersten Mal benutzen und die -Lampe aufleuchtet, nehmen Sie bitte den Wasserbehälter aus dem Gerät und setzen ihn so wieder ein, dass er sich in der richtigen Position befindet. Drücken Sie auf die -Taste, um den Entfeuchter einzuschalten. Über die Einstelltasten stellen Sie die gewünschte Luftfeuchtigkeit ein.
  • Seite 9 Auf Wunsch lässt sich am Gerät ein Abflussschlauch als permanenter externer Wasserabfluss anbringen. Gehen Sie dazu folgendermaßen vor: Lösen Sie den Deckel an der Rückseite. Nehmen Sie den Gummistopfen aus dem Auslauf. Schließen Sie einen Abflussschlauch an und sorgen Sie dafür, dass das Ende des Schlauchs niedriger liegt als der Anschluss des Schlauchs.
  • Seite 10: Garantiebedingungen

    TABELLE ZUR STÖRINGSSUCHE Bevor Sie den technischen Kundendienst zu Hilfe rufen, bitten wir Sie zunächst Folgendes zu kontrollieren. Problem Ursache Abhilfe Der Stecker steckt nicht in der Stecken Sie den Stecker in die Steckdose. Steckdose. Die Feuchtigkeit wurde zu Stellen Sie die Feuchtigkeit hoch eingestellt.
  • Seite 11: Technische Daten

    Zur Vorbeugung von unnötigen Kosten empfehlen wir Ihnen, zunächst immer erst genau in der Bedienungsanleitung nachzulesen. Finden Sie darin keine Lösungsmöglichkeit, wenden Sie sich bitte an Ihren Händler. TECHNISCHE DATEN Modell D 115 Energieverbrauch 0,32 Spannung V / Hz / Ph 220-240 / ~ 50 / 1 Stromstärke (nom.
  • Seite 12 LEISTUNGSGRAFIK Nom. Leistung 80 % RH 60 % RH 50 % RH T [°C] (unverbindliche Richtwerte) Entsorgen Sie elektrische Geräte nicht im Hausmüll, nutzen Sie die Sammelstellen in Ihrer Gemeinde. Fragen Sie Ihre Gemeindeverwaltung nach den Standorten der Sammelstellen. Wenn elektrische Geräte unkontrolliert entsorgt werden, können während der Verwitterung gefährliche Stoffe ins Grundwasser und damit in die Nahrungskette gelangen, oder Flora und Fauna auf Jahre vergiftet werden.
  • Seite 13 man_D115.indd 13 20-04-15 10:20...
  • Seite 14 Estimado cliente, Le felicitamos por la compra de su deshumidificador. Acaba de adquirir un producto de alta calidad, que le proporcionará pleno confort durante muchos años, siempre que lo utilice debidamente. Por lo tanto, le recomendamos que lea primero este manual de instrucciones, para prolongar la vida útil de su deshumidificador.
  • Seite 15 COMPONENTES PRINCIPALES Panel de control Salida del aire seco Depósito extraíble de agua Entrada para aire húmedo Filtro de aire Tubo de evacuación (ø 13 mm) con tapón Rueda multidireccional Enchufe y cable man_D115.indd 15 20-04-15 10:20...
  • Seite 16: Medidas De Seguridad

    MEDIDAS DE SEGURIDAD La instalación deberá responder por completo a las disposiciones, reglamentos y normas locales en vigor. El aparato está indicado para utilizarlo exclu- sivamente en el hogar. Compruebe si la tensión de red es la correcta. El aparato se debe utilizar exclu- sivamente en un deshumificador con toma de tie- rra, voltaje 220-240 V / ~50 Hz.
  • Seite 17 IMPORTANTE El aparato debe estar conectado siempre con una toma a tierra. En caso de que la corriente eléctrica no esté provista de una toma a tierra, está absolutamente prohibido conectar el mismo. Cuando el aparato esté conectado, el acceso a la clavija tendrá que poder hacerse sin que haya obstáculos por medio.
  • Seite 18 salida de aire. • Previo el transporte del aparato, vacíe siempre el depósito de agua. • Procure que el aparato no entre nunca en con- tacto con productos químicos. • No sumerja nunca en agua el aparato. • No inserte objetos en las aberturas del aparato. •...
  • Seite 19 ¡ATENCIÓN! • Nunca use el aparato en caso de que el ≥ 10 cm cable o el enchufe esté dañado. Procure que el cable no quede atrapado y que no ≥ 10 cm ≥ 10 cm entre en contacto con objetos cortantes. •...
  • Seite 20: Filtro De Aire

    Pulse el botón para activar el deshumidificador. Los mandos reguladores usan para ajustar el nivel de humedad deseado. El higrostáto es ajustable del 30% al 80%. Cada vez que se pulse el botón, el valor incrementa en un 5%. El panel indica la humedad seleccionada (SET HUMIDITY) y también la humedad relativa (ROOM HUMIDITY).
  • Seite 21 Saque el tapón de goma del tubo de evacuación. Acople una goma y procure que el extremo de la goma quede más bajo que el acoplamiento de la goma. Si el extremo de la goma no queda por debajo del nivel de acoplamiento, el agua no puede salir.
  • Seite 22 AVERÍAS Antes de solicitar asistencia técnica, verifique los siguientes puntos: Problema Causa Solución El aparato no funciona. El aparato no está bien enchu- Enchufe correctamente el fado. aparato. El grado de humedad requeri- Ajuste un valor inferior para el do es demasiado alto. grado de humedad requerido.
  • Seite 23: Especificaciones Técnicas

    Si el manual no ofrece ninguna solución, lleve el deshumidificador a su distribuidor para su ulterior reparación. ESPECIFICACIONES TÉCNICAS Modelo D 115 Consumo de energia 0,32 Voltaje V / Hz / Ph 220-240 / ~ 50 / 1 Intesidad de corriente (nom.
  • Seite 24 TABLA DE FUNCIONAMIENTO Nom. capacidad 80 % RH 60 % RH 50 % RH 12 15 18 27 30 T [°C] (Úsese exclusivamente como se indica) No deseche ningún dispositivo electrónico junto a los residuos habituales. Utilice los contenedores e instalaciones adecuadas para la recogida de este tipo de materiales. Consulte la normativa vigente y contacte con la administracion correspondiente para obtener informacion acerca de las instalaciones de recogida disponibles.
  • Seite 25 man_D115.indd 25 20-04-15 10:20...
  • Seite 26 Pour assurer une durée de vie optimale de votre déshumidificateur, lisez d’abord ces instructions d’utilisation. Les produits Qlima sont garantis contre tout vice de fabrication ou de conception pendant une durée de 2 ANS à compter de la date d’achat.
  • Seite 27 PIÈCES PRINCIPALES Tableau de commande Sortie d’air Réservoir d’eau amovible Entrée d’air Filtre à air Embout d’évacuation d’eau (ø 13 mm) avec bouchon Roulette Cordon d’alimentation Poignée man_D115.indd 27 20-04-15 10:20...
  • Seite 28: Prescriptions De Sécurité

    PRESCRIPTIONS DE SÉCURITÉ Lisez attentivement ce manuel d’utilisation avant d’utiliser l’appareil et conservez-le pour toute référence ultérieure. Installez cet appareil unique- ment s’il est conforme à la législation, aux ordon- nances et aux normes locales et nationales. Ce produit a été conçu pour être utilisé comme dés- humidificateur dans des maisons résidentielles, et il doit être utilisé...
  • Seite 29 IMPORTANT L’appareil DOIT toujours être branché sur une prise de terre. Si l’alimentation électrique n’est pas connectée à la terre, l’appareil ne doit absolument pas être branché. La fiche électrique doit toujours être facilement accessible lorsque l’appareil est branché. Lisez soigneusement ce manuel et suivez les instructions;...
  • Seite 30 tie d’air. • Videz le réservoir d’eau avant de déplacer l’ap- pareil. • Ne mettez jamais l’appareil en contact avec des produits chimiques. • Ne trempez l’appareil dans de l’eau. • N’enfilez aucun objet dans les diverses ouver- tures de l’appareil. •...
  • Seite 31 toyage et de l’entretien de l’appareil sauf s’ils sont encadrés. ATTENTION! • N’utilisez jamais l’appareil avec un cordon ≥ 10 cm ou une fiche électrique endommagé. Ne serrez jamais le cordon électrique et évitez tout contact avec des arêtes tranchantes. ≥...
  • Seite 32 Veillez à ce que le réservoir d’eau soit correctement placé. Si vous utilisez l’appareil pour la première fois et que le témoin lumineux s’allume, retirez le réservoir d’eau de l’appareil puis replacez-le dans la bonne position. Pour allumer le déshumidificateur, appuyez sur la touche .
  • Seite 33 Retirez le bouchon en caoutchouc de l’embout d’évacuation d’eau. Branchez un tuyau de drainage sur l’embout d’évacuation d’eau (ø 13 mm). Veillez à ce que le tuyau d’évacuation soit en pente. L’extrémité du tuyau où l’eau s’évacue doit se trouver plus bas que l’appareil. Sinon, l’eau ne pourra pas s’évacuer et cela peut provoquer des dégâts des eaux dans votre intérieur.
  • Seite 34: Les Conditions De Garantie

    TABLEAU DES PANNES Avant de demander une assistance technique, contrôlez d’abord les points suivants: Problème Origines Solutions L’appareil ne fonc- L’appareil n’est pas branché. Branchez l’appareil. tionne pas. Le niveau d’humidité souhaité Baissez le niveau d’humidité est trop élevé. souhaité. Le réservoir d’eau est plein.
  • Seite 35: Spécification Techniques

    Pour éviter des dépenses inutiles, nous vous conseillons de toujours consulter en premier lieu mode d’emploi. Si celui-ci ne donne pas de résultat, emmenez le déshumidificateur à réparer chez votre distributeur. SPÉCIFICATION TECHNIQUES Modèle D 115 Puissance absorbée 0,32 Tension secteur V / Hz / Ph 220-240 / ~ 50 / 1 Intensité...
  • Seite 36 GRAPHIQUE DES PERFORMANCES Pourcentage d’humidité 80 % RH 60 % RH 50 % RH T [°C] (Ce tableau ne peut être utiliser à titre indicatif) Ne pas jeter des appareils électriques avec les déchets managers municipaux non triés. Utiliser des équipements de collecte séparés. Contacter votre gouvernement local pour toute information concernant les systèmes de collecte disponibles.
  • Seite 37 man_D115.indd 37 20-04-15 10:20...
  • Seite 38 Dear Sir, Madam, Congratulations with the purchase of your dehumidifier. You have acquired a high quality product which will give you many years of pleasure, if you use it responsibly. Please read the user’s manual first in order to ensure the optimum life span of your dehumidifier. On behalf of the manufacturer, we provide a two-year warranty on material- or manufacturing defects.
  • Seite 39: Important Components

    IMPORTANT COMPONENTS Control panel Dry air outlet Removable water container Humid air inlet Air filter Drainage spout (ø 13 mm) with cap Castor Plug and cord Handle man_D115.indd 39 20-04-15 10:20...
  • Seite 40: Safety Instructions

    SAFETY INSTRUCTIONS Read this user manual carefully before using the appliance and keep it for future reference. Install this device only when it complies with local/ national legislation, ordinances and standards. This product is intended to be used as a dehumidi- fier in residential houses and is only suitable for use in dry locations, in normal household condi- tions, indoors in living room, kitchen and garage.
  • Seite 41 Before connecting the unit, check the following: • The voltage supply must correspond with the mains voltage stated on the rating label. • The socket and power supply must be suitable for the current stated on the rating label. • The plug on the cable of the device must fit into the wall socket.
  • Seite 42 device to the electric power supply. If there is no suitable, earthed wall socket available, have one installed by a recognised electrician. • Children should be supervised to ensure that they do not play with the appliance. • Have any repairs only carried out by a recog- nised service engineer or your supplier.
  • Seite 43: Operation

    THE CONTROL PANEL This light indicates that the defrost function has been activated. This is necessary to prevent excessive formation of ice in the device. This light indicates that the water container is full. The device switches off automatically. ON-/OFF-button Ventilator-button Timer button Adjustment buttons hydrostat...
  • Seite 44: Air Filter

    display. When the pre-set time has elapsed, the device will switch off. Press the -button to turn the device off. AIR FILTER The dehumidifier is equipped with a screen filter; to remove bigger dust particles. NOTE! • Never use the dehumidifier without the screen filter! •...
  • Seite 45: Troubleshooting

    Clean the housing with a soft, damp cloth. Never use aggressive chemicals, petrol, detergents or other cleansing solutions. For maintenance of the filters, refer to Chapter “Air Filter”. NOTE! Never use this dehumidifier without the screen filter. STORAGE If the machine will not be used for a long period of time, take the following steps: Remove the plug from the socket and empty the container.
  • Seite 46: Conditions Of Warranty

    To prevent unnecessary expenses, we recommend that you always carefully read the user’s manual first. If this does not provide a solution, take the dehumidifier to your distributor for repair. TECHNICAL SPECIFICATIONS Model D 115 Power consumption 0.32 Power supply V / Hz / Ph 220-240 / ~ 50 / 1 Current (nom.
  • Seite 47 Subject to change without prior notice. PERFORMANCE GRAPH Nom. capacity 80 % RH 60 % RH 50 % RH T [°C] (to be used as indication only) Do not dispose of electrical appliances as unsorted municipal waste, use separate collection facilities.
  • Seite 48 Per una durata ottimale del suo Qlima, La invitiamo a leggere le presenti istruzioni d’uso. La informiamo inoltre che questo apparecchio è coperto da una garanzia di 2 anni.
  • Seite 49: Componenti Principali

    COMPONENTI PRINCIPALI Pannello di controllo Uscita aria deumidificata Vaschetta di raccolta dell’acqua Ingresso aria umida Filtro dell’aria Bocchetta di scarico (ø 13 mm) con tappo Ruota girevole Spina e cavo di alimentazione Maniglia > man_D115.indd 49 20-04-15 10:20...
  • Seite 50: Istruzioni Per La Sicurezza

    ISTRUZIONI PER LA SICUREZZA Prima di usare l’apparecchiatura, leggere atten- tamente il presente manuale e conservarlo come riferimento futuro. Installare questo dispositivo soltanto quando è conforme con la legislazione, le ordinanze e gli standard locali/nazionali. Questo prodotto è destinato a essere usato come deumi- dificatore nelle case ad uso residenziale ed è...
  • Seite 51 dopo tre minuti, a causa del ritardo automatico, adottato allo scopo di proteggere il compressore. IMPORTANTE L’apparecchio DEVE essere collegato ad un impianto elettrico dotato di messa a terra. Se tale tipo di collegamento non è disponibile, è vietato collegare l‘apparecchio alla rete di alimentazione.
  • Seite 52 ria, tranne nei casi in cui vi è sorveglianza e sono impartite istruzioni per l’uso dell’apparecchio da parte di persone responsabili della sicurezza degli utenti. • Questo apparecchio è stato prodotto in conformi- tà alla normativa CE sulla sicurezza. Ciò nonostan- te è...
  • Seite 53 servizio clienti o da personale con qualifiche ade- guate in modo da non correre alcun rischio. • Il dispositivo può essere usato da bambini a par- tire dagli 8 anni di età e da persone con capacità fisiche, sensoriali o mentali ridotte o con man- canza di esperienza e conoscenze a condizione che siano state fornite istruzioni e supervisione in merito a un uso sicuro del dispositivo accer-...
  • Seite 54: Uso Dell'apparecchio

    Pulsante Ventilatore Pulsante Timer Pulsanti di regolazione idrostato USO DELL’APPARECCHIO Inserire la spina di alimentazione nella presa di corrente a 220 V. Verificare il corretto posizionamento della vaschetta dell’acqua. Se si utilizza l’apparecchio per la prima volta e l’indicatore luminoso si accende, è...
  • Seite 55: Filtro Dell'aria

    FILTRO DELL’ARIA Il deumidificatore D115 è dotate di un filtro a garza: per rimuovere le particelle di polvere più grandi. AVVERTENZA • Non utilizzare mai l’apparecchio senza il filtro di garza! • Il filtro a garza deve esser pulito regolarmente con un’aspirapolvere per evitare l’ostruzione del passaggio dell’aria.
  • Seite 56: Individuazione Guasti

    aggressive, benzina, detergenti o alter sostanze per la pulizia. Pulire il filtro a crivello ad intervalli regolari usando un aspiratore. Si veda anche il capitolo “Filtro Aria”. AVVERTENZA Non usare mai il condizionatore senza il filtro di garza. COME RIPORRE L’APPARECCHIO Se l’apparecchio deve rimanere inutilizzato per un lungo periodo di tempo, seguire i seguenti accorgimenti: Togliere la spina dalla presa e svuotare la vaschetta dell’acqua.
  • Seite 57: Condizioni Di Garanzia

    CONDIZIONI DI GARANZIA Il deumidificatore ha una garanzia di due anni a decorrere dalla data di acquisto. Entro tale termine saranno effettuati gratuitamente tutti gli interventi di riparazione in conseguenza di difetti di fabbricazione o vizi del materiale. Nella fattispecie si applicano le seguenti disposizioni: •...
  • Seite 58: Specifiche Tecniche

    SPECIFICHE TECNICHE Model D 115 Potenza assorbita 0,32 Tensione di rete V / Hz / Ph 220-240 / ~ 50 / 1 Amperaggio (nom. / max.) 1,6 / 2 Riduzione dell'umidità (tasso di humidità relativa pari al 80% L / 24h ad una temperatura di 32°C)
  • Seite 59 No disponga de las aparatos eléctricas como basura sin triar, debe utilizar facilitades separadas de la colección. Se ponga en contacto con su gobierno local para la información sobre la sistemas disponibles de la colección. Si las aparatos eléctricas están deshecho en terraplenes o basureros, las sustancias peligrosas puede infiltrarse en agua subterránea y hacer entrar en cadena de alimento al dañar su salud y bienestar.
  • Seite 60 Geachte mevrouw, mijnheer, Van harte gefeliciteerd met de aankoop van uw ontvochtiger. U heeft een kwaliteitsproduct aangeschaft waar u nog vele jaren plezier van zult hebben, mits u het apparaat verantwoord gebruikt. Lees daarom eerst deze gebruiksaanwijzing voor een optimale levensduur van uw ontvochtiger. Wij geven u namens de fabrikant twee jaar garantie op mogelijke materiaal- of fabricagefouten.
  • Seite 61 BELANGRIJKE ONDERDELEN Bedieningspaneel Uitlaat van droge lucht Uitneembaar waterreservoir Inlaat van vochtige lucht Luchtfilter Afvoertuit (ø 13 mm) met dop Zwenkwieltje Stekker en snoer Handvat man_D115.indd 61 20-04-15 10:20...
  • Seite 62: Veiligheidsvoorschriften

    VEILIGHEIDSVOORSCHRIFTEN Lees deze gebruikershandleiding aandachtig alvo- rens het toestel te gebruiken en bewaar het voor later. Installeer dit toestel enkel wanneer het vol- doet aan de lokale/nationale wetgeving, regel- geving en normen. Dit product is bedoeld om gebruikt te worden als een luchtontvochtiger in woningen en is alleen geschikt voor gebruik binnenshuis in woonkamers, keukens en gara- ges op droge plaatsen, in normale huishoude-...
  • Seite 63 BELANGRIJK Het apparaat MOET altijd geaard worden aangesloten. Als de stroomvoorziening niet geaard is, mag u het apparaat absoluut niet aansluiten. De stekker moet altijd makkelijk toegankelijk zijn als het apparaat is aangesloten. Lees deze gebruiksinstructie zorgvuldig en volg de aanwijzingen. Controleer voor het aansluiten van het apparaat of: •...
  • Seite 64 • Breng het apparaat nooit in contact met chemi- caliën. • Het apparaat nooit in water onderdompelen. • Steek geen voorwerpen in de openingen van het apparaat. • Haal altijd eerst de stekker uit het stopcontact voordat het apparaat of een onderdeel ervan moet worden schoongemaakt of vervangen.
  • Seite 65 LET OP! • Gebruik het apparaat nooit met een ≥ 10 cm beschadigd snoer of stekker. Klem het snoer nooit af en voorkom contact met ≥ 10 cm ≥ 10 cm scherpe kanten. • Niet volgen van de aanwijzingen kan ≥...
  • Seite 66 druk op de toets verhoogt de waarde met 5%. Het display toont de gewenste luchtvochtigheid (SET HUMIDITY) als ook de werkelijke luchtvochtigheid (ROOM HUMIDITY). Het apparaat begint te ontvochtigen wanneer de luchtvochtigheid in de ruimte hoger is dan de ingestelde waarde. Bij het bereiken van de ingestelde waarde slaat het apparaat automatisch af, om opnieuw in werking te treden wanneer de luchtvochtigheid in de ruimte weer stijgt.
  • Seite 67 Leg het uiteinde van de afvoerslang in een afvoerput. Wanneer u geen gebruik meer wenst te maken van de permanente waterafvoer ontkoppel dan de afvoerslang van het apparaat. Plaats de rubberen stop weer terug in de afvoertuit en draai de dop weer vast. Zorg ervoor dat het waterreservoir juist geplaatst is. REINIGING PAS OP! Schakel eerst de unit uit en trek de stekker uit het stopcontact voor u het...
  • Seite 68: Garantievoorwaarden

    STORINGSTABEL Voordat u om technische ondersteuning vraagt, dient u de volgende zaken te controleren: Probleem Oorzaak Oplossing Het apparaat werkt De stekker zit niet in het stop- Steek de stekker in het stop- niet. contact. contact. De ingestelde luchtvochtig- Stel een lagere luchtvochtig- heid is te hoog.
  • Seite 69: Technische Specificaties

    Wanneer deze geen uitkomst biedt, breng de ontvochtiger dan ter reparatie naar uw dealer. TECHNISCHE SPECIFICATIES Model D 115 Opgenomen vermogen 0,32 Netspanning V / Hz / Ph 220-240 / ~ 50 / 1 Stroomsterkte (nom. / max.) 1,6 / 2 Ontvochtigingscpaciteit (ontvochtiging bij 32°C, 80% RH)
  • Seite 70 CAPACITEITSGRAFIEK Nom. capaciteit 80 % RH 60 % RH 50 % RH 12 15 18 27 30 T [°C] (waarden zijn indicatief) Werp elektrische apparatuur niet weg bij het huisvuil; lever het in op de daarvoor aangewezen plaats. Neem contact op met de plaatselijke autoriteiten voor informatie waar apparatuur kan worden ingeleverd.
  • Seite 71 man_D115.indd 71 20-04-15 10:20...
  • Seite 72 Spoštovani, Čestitamo Vam ob nakupu Vašega Qlima razvlaževalca. Je zelo enostaven za uporabo in lahkotno premičen. Kupili ste visoko kakovosten izdelek, ki Vam bo ob pravilni uporabi več let zagotavljal udobje. Slabo prezračevanje je razlog vlažnemu vonju in plesni v omarah, shrambah itd. Qlima razvlaževalec ta problem učinkovito odpravi.
  • Seite 73 POMEMBNI DELI Kontrolna plošča Odprtine za izpuh suhega zraka Premični vodni rezervoar Odprtina za vstop vlažnega zraka Zračni filter Odprtina za izpust vode s čepom Kolesca Kabel in vtič Ročaji man_D115.indd 73 20-04-15 10:20...
  • Seite 74: Varnostna Navodila

    VARNOSTNA NAVODILA Pred uporabo izdelka pazljivo preberite ta navodi- la za uporabo in jih shranite za nadaljnjo pomoč. Izdelek uporabljajte le, če je skladen z lokalno/ nacionalno zakonodajo, predpisi in standardi. Ta izdelek je namenjen izključno uporabi kot razvla- ževalec zraka v stanovanjih in stanovanjskih hišah in je primeren za uporabo izključno v suhih, not- ranjih prostorih kot so dnevna soba, kuhinja ali garaža in v normalnih bivalnih pogojih.
  • Seite 75 Preden priključite enoto, preverite naslednje: • napetost napajalnika se mora ujemati z označeno omrežno napetostjo. • vtičnica in napajalnik morata biti ustrezna označe- nemu toku. • vtikač naprave mora biti ustrezen stenski vtičnici. • naprava mora biti postavljena na ploski in stabilni površini.
  • Seite 76 naj vam jo namesti kvalificiran električar. • Otroke imejte pod nadzorom, da se z napravo ne bi igrali. • popravila naj izvede le kvalificiran serviser ali vaš dobavitelj. Sledite navodilom za uporabo in vzdrže- vanje kot je prikazano v navodilih te naprave. •...
  • Seite 77: Zračni Filter

    Gumb časovnika Gumb za nastavitve /hidrostat DELOVANJE Napravo vklopite v električno omrežje. Prepričajte se, da je vodni rezervoar v napravo pravilno vstavljen . Če ob prvi uporabi naprave posveti lučka , vodni rezervoar izvlecite in ga pravilno vstavite nazaj v ležišče.
  • Seite 78 ODVAJANJE VODE Ko je vodni rezervoar poln, posveti lučka , naprava pa se samodejno ugasne. Rezervoar izpraznite in ga vsatvite nazaj vležišče. Naprava se bo ponovno samodejno prižgala. Možna je namestitev cevi za stalno odvajanje vode. Sledite naslednjim korakom: Odvijte pokrov iz zadnjega dela ohišja. Iz odprtine za izpust vode odstranite gumijasti čep.
  • Seite 79: Garancijski Pogoji

    POJAVLJANJE TEŽAV Preden pokličete servisno službo, preverite naslednje: Problem Vzrok Rešitev Naprava ne deluje. Napajalni kabel ni vkljucen. Vkljucite napajalni kabel v vticnico. Nastavljena zahtevana vla- Znižajte nastavitev želene žnost je previsoka. vlažnosti. Posoda za vodo je polna. Odstranite vodo iz posode. Posoda za vodo ni bila pravil- Pravilno namestite posodo za no namešcena.
  • Seite 80: Tehnični Opis

    TEHNIČNI OPIS D 115 Poraba energije 0,32 Napajanje V / Hz / Ph 220-240 / ~ 50 / 1 Tok (nom. / max) 1,6 / 2 Zmogljivost razvlaževanja (Odstranjevanje vlage pri 32°C, L / 24h 80%RH) Zmogljivost razvlaževanja (Odstranjevanje vlage pri 27°C,...
  • Seite 81 GRAF DELOVANJA Nom. zmogljivost 80 % RH 60 % RH 50 % RH 12 15 18 27 30 T [°C] (uporabljati le kot je označeno) Izrabljenih električnih napravne odstranite med nerazvrščene komunalne odpadke, uporabite ločene zbiralnice. Za informacije o razpoložljivih sistemih zbiranja se obrnite na lokalne oblasti. Če električne naprave odstranite na odlagališčih ali smetiščih, lahko pride do uhajanja nevarnih snovi v podtalnico in v verigo preskrbe s hrano, do škode za zdravje in dobro počutje.
  • Seite 82: Garancijski List

    Garancijski rok začne teči z dnem prodaje končnemu kupcu, kar dokažete s potrjenim garancijskim listom in originalnim računom podjetja, ki je proizvod prodalo. GARANCIJSKI ROK: model doba 2 leti Qlima Tectro, Appliance 1 leti Proizvod: Tip: Serijska št.: Ime in sedež podjetja, ki je proizvod prodalo: Pečat podjetja:...
  • Seite 83 man_D115.indd 83 20-04-15 10:20...
  • Seite 84 Jos haluat huoltoapua, lisätietoja tai laitteen kanssa tulee ongelmia, tutustu verkkosivustoon osoitteessa www.qlima.com tai kysy neuvoa PVG kuluttajapalvelukeskuksesta (www.qlima.com). If you need information or if you have a problem, please visit the our website (www.qlima.com) or contact our sales support (you find its phone number on www.qlima.com) Per informazioni e in caso di problemi, visitate il sito Web www.qlima.com oppure contattate il Centro Assistenza Clienti (per conoscere il...

Inhaltsverzeichnis