Inhaltsverzeichnis
Werbung
Verfügbare Sprachen
Verfügbare Sprachen
Werbung
Kapitel
Inhaltsverzeichnis

Verwandte Anleitungen für Omnitronic UHF Serie


Inhaltszusammenfassung für Omnitronic UHF Serie
-
Seite 2: Inhaltsverzeichnis
Inhalt 1 Einführung Einführung ........2 Willkommen bei Omnitronic! Schön, dass Sie sich für eines unserer Produkte entschieden haben. 1.1 Produktmerkmale ......2 Sicherheitshinweise ....... 3 Diese Bedienungsanleitung zeigt Ihnen, wie Sie das Bedienelemente und Anschlüsse .. 4 Funkmikrofonsystem in Betrieb nehmen und nutzen. Damit 3.1 UHF-301 Empfänger ...... -
Seite 3: Sicherheitshinweise
2 2 2 2 Sicherheitshinweise • Bitte lesen Sie vor der Verwendung des Produkts diese Anleitung. Sie enthält wichtige Hinweise für den korrekten Betrieb. Bewahren Sie diese Anleitung für weiteren Gebrauch auf. • Die Funkmikrofonsysteme der UHF-300-Serie bestehen aus dynamischen Handmikrofonen mit integriertem Sender, die zur drahtlosen Signalübertragung an die Empfangseinheit dienen. -
Seite 4: Bedienelemente Und Anschlüsse
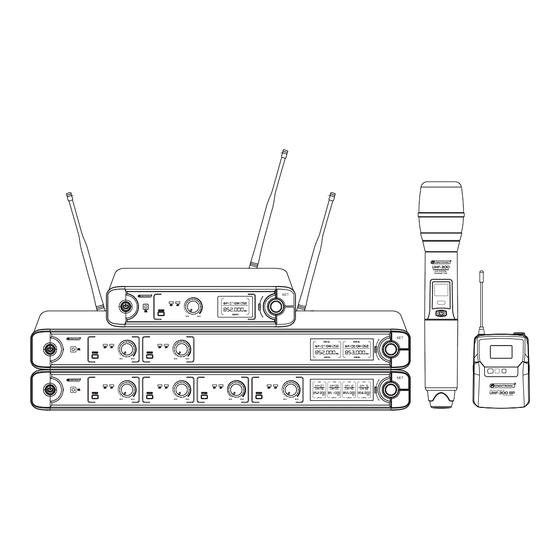
3 3 3 3 Bedienelemente und Anschlüsse 3.1 UHF-301 Empfänger Element Funktion Netzschalter Zum Ein-/Ausschalten des Geräts 2 Sekunden drücken. Infrarot-Schnittstelle Zur Synchronisation von Empfänger und Funkmikrofon die Infrarot- Schnittstellen in max. 20 cm Abstand zueinander halten. Taste SYNC Zur Synchronisation mit dem Funkmikrofon. Statusanzeigen RF: Zeigt eine bestehende Funkverbindung zum Mikrofon an. -
Seite 5: Uhf-302 Empfänger
3.2 UHF-302 Empfänger Element Funktion Empfangseinheit 1 Empfangseinheit 2 Netzschalter Zum Ein-/Ausschalten des Geräts 2 Sekunden drücken. Infrarot-Schnittstelle Zur Synchronisation von Empfänger und Funkmikrofon die Infrarot- Schnittstellen in max. 20 cm Abstand zueinander halten. Taste SYNC Zur Synchronisation mit dem Funkmikrofon. Statusanzeigen RF: Zeigt eine bestehende Funkverbindung zum Mikrofon an. -
Seite 6: Uhf-304 Empfänger
3.3 UHF-304 Empfänger Element Funktion Empfangseinheit 1 Empfangseinheit 2 Empfangseinheit 3 Empfangseinheit 4 Netzschalter Zum Ein-/Ausschalten des Geräts 2 Sekunden drücken. Infrarot-Schnittstelle Zur Synchronisation von Empfänger und Funkmikrofon die Infrarot- Schnittstellen in max. 20 cm Abstand zueinander halten. Taste SYNC Zur Synchronisation mit dem Funkmikrofon. -
Seite 7: Handmikrofon
3.4 Handmikrofon Element Funktion LCD-Anzeige Zeigt die Übertragungsfrequenz und die Batteriekapazität. Infrarot-Schnittstelle Zur Synchronisation mit dem Empfänger. Ein-/Ausschalter Zum Ein-/Ausschalten 2 Sekunden drücken. Batteriefach Legen Sie hier zwei 1,5-V-Batterien ein. Sendeantenne 3.5 Taschensender Element Funktion Sendeantenne Taste MUTE Zum Stummschalten des Taschensenders. Mikrofonanschluss Mini-XLR-Buchse zum Anschluss des Lavalier- oder Kopfbügelmikrofons. -
Seite 8: Inbetriebnahme
4 4 4 4 Inbetriebnahme 4.1 Empfänger aufstellen Stellen Sie den Empfänger auf eine ebene Fläche und schließen Sie die Empfangsantennen an die Antennenbuchsen an. Richten Sie die Antennen V-förmig nach oben aus. Für den Einbau in ein 19“-Rack (483 mm) sind Montagewinkel im Lieferumfang enthalten. Die Winkel sind zum Anbau an die Seitenwangen des Empfängers vorgesehen. -
Seite 9: Bedienung
5 5 5 5 Bedienung Schalten Sie den Empfänger ein und führen Sie die folgenden Schritte für jede Empfangseinheit getrennt durch. 1) Stellen Sie die Empfangseinheit auf einen unbenutzten und störungsfreien Übertragungskanal ein (Abschnitt 5.1). 2) Schalten Sie den Sender ein und synchronisieren Sie ihn mit der Empfangseinheit. Halten Sie dazu die Infrarotschnittstelle des Senders vor die Infrarotschnittstelle des Empfängers in max. -
Seite 10: Problembehebung
6 6 6 6 Problembehebung Problem Lösung Gerät lässt sich nicht • Überprüfen Sie die Anschlussleitung des Netzteils und eventuelle anschalten. Verlängerungsleitungen. Kein Ton; RF-Anzeige am • Sicherstellen, dass Sender und Empfänger eingeschaltet sind. Empfänger leuchtet nicht auf. • Batterieanzeige des Senders überprüfen, um sicherzustellen, dass die Batterien Strom liefern. -
Seite 11: Technische Daten
8 8 8 8 Technische Daten UHF-301 / UHF-302 / UHF-304 System: Non-Diversity, 1/2/4 Kanäle Trägerfrequenz: 823-832 MHz und 863-865 MHz Empfangsfrequenzen: Reichweite: 50 m (bei Sichtkontakt) RF-Ausgangsleistung: 10 mW Modulationsverfahren: Frequenzstabilität: 10 ppm Empfindlichkeit: 6 dBµV Geräuschspannungsabstand: >80 dB Frequenzbereich: 50-18000 Hz (±3 dB) Schwellenwert:... -
Seite 12: Funkfrequenzen In Mhz
8.2 Funkfrequenzen in MHz Kanal Gruppe 1 Gruppe 2 Gruppe 3 Gruppe 4 Gruppe 5 Gruppe 6 Gruppe 7 Gruppe 8 Gruppe 9 Gruppe 0 823.875 864.350 863.100 830.850 863.100 823.375 823.875 823.100 823.200 826.900 824.500 863.975 863.500 829.000 863.500 826.125 824.500 823.500... - Seite 24 © © © © OMNITRONIC 201 OMNITRONIC 201 OMNITRONIC 2018 8 8 8 OMNITRONIC 201 D00119770 Version 1.0 Omnitronic is a brand of Steinigke Showequipment GmbH Andreas-Bauer-Str. 5 97297 Waldbüttelbrunn, Germany...