
Verwandte Anleitungen für NSK Varios 170


Inhaltszusammenfassung für NSK Varios 170
- Seite 1 BUILT-IN MODULE Multi Function Ultrasonic Scaler Varios 170 OPERATION MANUAL OPERATION MANUAL Please read this Operation Manual carefully before use, and file for future reference. OM-E0840E 001...
- Seite 2 • USE ONLY NSK genuine tips when using NSK Varios Ultrasonic Scaler ( Varios 170 or Varios 170 LUX ) problems such as damage, failure and accident of Handpieces resulting from use of Non-NSK Tips are not included in the warranty. The following are the possible failure that could happen when using the Non-NSK Tips;...
- Seite 3 WARNING • When operating the product always consider the safety of the patient. • Use by medical professional, such as doctor or dental hygienist, is intended. • Check the vibration outside the patient’s oral cavity before use. If any abnormalities are found, stop using immediately and contact dealer.
-
Seite 4: Specification
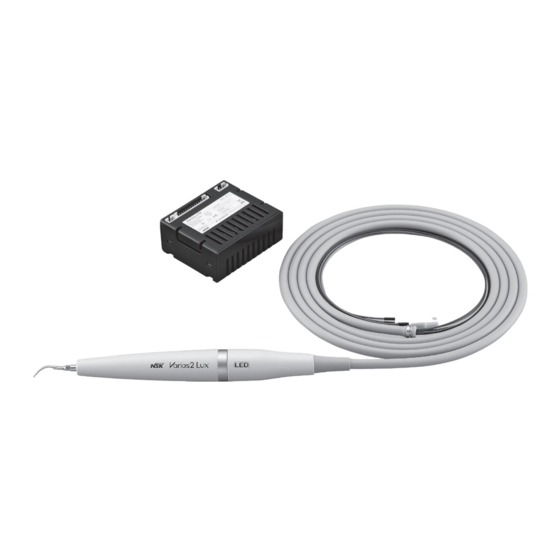
: 10 - 85 % Atmospheric pressure : 500 - 1060 hPa 2. Component Names Varios 170 ( Non-Optic ) Varios 170 LUX ( Optic ) Parts Name Quantity Varios2 Handpiece ( Non-Optic ) Varios2 LUX Handpiece ( Optic ) - Seite 5 3. Mounting and Removing the Handpiece Align the Dots on the Handpiece and the Handpiece Cord. Push Dots handpiece into connector. To remove the handpiece, grip the Handpiece and Handpiece Cord and pull to part handpiece and cord. ( Fig. 1 ) WARNING Handpiece Handpiece backend...
- Seite 6 5. Provided Scaler Tips The end of the Tip is thin and for supragingival fine scaling and interdental scaling. The round cross-section allows tooth surfaces to be finished without causing damage. Apply the top of the Tip on the tooth plane and move it sideways finely in the same way as G8 Tip.
- Seite 7 2 ) Check wear of the Tip. 3 ) See the green, yellow and red line to check wear of the Tip. *See below what each color means. At NSK we recommend to replace a Tip when the Tip meets the yellow line ( wear of 1mm ) to guarantee safe and effective use.
-
Seite 8: Care And Maintenance
6. Care and Maintenance 6-1 Cleaning of Optic Fiber ( Varios 170 LUX ) Optic Fiber End Face Wipe the debris off the end of the Optic Fibers at the handpiece with alcohol soaked cotton swab. ( Fig. 10 ) -
Seite 9: Troubleshooting
Autoclave Procedure 1 ) Clean and Remove the Tip after use. ( Refer to 4 ) 2 ) Wipe dirt and debris from the products, and wipe clean with alcohol-immersed cotton swab or cloth. Do not use a wire brush. 3 ) Insert those into the Sterilization Case or an autoclave pouch. -
Seite 10: Spare Parts
Handpiece Cord inmost. on and off. LED does not illuminate. Tip oscillate, but Disconnection in the Handpiece (Varios 170 LUX) Handpiece LED does Contact dealer.* Cord, or failure in Module. not turn on. * Repairs cannot be made by the customer. - Seite 11 Symbols TUV Rhineland of North America is a Nationally Recognized Testing Laboratory (NRTL) in the United States and is accredited by the Standards Council of Canada to certify electro-medical products with Canadian National Standards. This conforms to CE European Directive of “Medical Manufacturer.
-
Seite 12: Bestimmungsgemäßer Gebrauch
RF-Geräte in der Umgebung des Geräts. • Verwenden Sie nur echte NSK-Aufsätze für den NSK Varios Ultraschallscaler (Varios 170 oder Varios 170 LUX). Probleme wie zum Beispiel eine Beschädigung, ein Ausfall oder eine Störung von Handstücken aufgrund der Verwendung von anderen als NSK-Aufsätzen werden von der Garantie nicht abgedeckt. - Seite 13 • Denken Sie beim Verwenden des Geräts stets an die Sicherheit des Patienten. • Es ist zur Verwendung durch medizinisches Fachpersonal wie zum Beispiel durch einen Arzt/eine Ärztin oder einen Dentalhygieniker /eine Dentalhygienikerin bestimmt. • Überprüfen Sie vor dem Verwenden die Vibrationen außerhalb des Mundes des Patienten. Sollte Ihnen etwas unnormal vorkommen, stellen Sie die Verwendung sofort ein und setzen Sie sich mit Ihrem Händler in Verbindung.
-
Seite 14: Spezifikation
Temperatur : - 10 - 60 °C Lagerungsumgebung Feuchte : 10 - 85 % Atmosphärischer Druck : 500 - 1060 hPa 2. Bezeichnung der Komponenten Varios 170 ( Nicht Lichtleitfaser) Varios 170 LUX ( Lichtleitfaser) BEZEICHNUNG DER TEILE ANZAHL (Nicht Lichtleitfaser) Varios2 Handstück (Lichtleitfaser) Varios2 LUX Handstück... -
Seite 15: Anbringen Und Entfernen Des Handstücks
3. Anbringen und Entfernen des Handstücks Richten Sie die Punkte am Handstück und am Handstückkabel PUNKTE zueinander aus. Drücken Sie beide geradlinig ineinander. Zum Entfernen des Handstücks greifen Sie das Handstück und das Handstückkabel und ziehen Sie sie gerade auseinander. ( Abb. -
Seite 16: Mitgelieferte Scaler-Aufsätze
ACHTUNG beim Verwenden der Aufsätze • Während des Schleifens wird der Aufsatz nach und nach abgetragen. Wenn der Aufsatz abgenutzt ist, wird der Hub kleiner und die Abtragleistung geringer. Wenn die Leistung geringer wird, wechseln Sie den Aufsatz aus. • Bringen Sie den Aufsatz immer mit dem gelieferten Drehmomentschlüssel an, da der Aufsatz sonst nicht ausreichend vibriert. -
Seite 17: Verwenden Der Aufsatzkarte
3) Stellen Sie die Abnutzung des Aufsatzes mit der grünen, gelben und roten Linie fest. *Die Bedeutung jeder Farbe finden Sie unten. Bei NSK wird empfohlen, den Aufsatz auszuwechseln, wenn der Aufsatz die gelbe Linie erreicht (Abnutzung 1 mm), um einen sicheren und effizienten Einsatz zu gewährleisten. -
Seite 18: Pflege Und Wartung
Aufsatzes regelmäßig anhand der Aufsatzkarte und ersetzen Wirksamkeit Sie den Aufsatz rechtzeitig durch einen neuen. Abb.9 6. Pflege und Wartung 6-1 Reinigen des Ringlichts (Varios 170 LUX) RINGLICHT Wischen Sie Verschmutzungen am Ende der Optik am Handstück mit einem in Alkohol getränkten Wattebausch ab (Abb. 10). -
Seite 19: Verwenden Der Aufsatzabdeckung S ( Optional )
7. Verwenden der Aufsatzabdeckung S ( Optional ) Nehmen Sie die Aufsatzabdeckung S und schieben Sie den Aufsatz hinein. Zum Entfernen nehmen Sie die Aufsatzabdeckung S und ziehen das Handstück heraus (Abb. 13). Die Aufsatzabdeckung S dient nicht als Werkzeug zum Auswechseln von Aufsätzen. SCHLITZ AUFSATZ ACHTUNG... -
Seite 20: Problembeseitigung
STERILISIERBOX Sie können das Handstück, den Aufsatz und den Drehmomentschlüssel zusammen mit der beiliegenden Sterilisierbox sterilisieren. 1) Nehmen Sie den Aufsatz mit dem Drehmomentschlüssel vom Handstück. 2) Legen Sie den Drehmomentschlüssel (mit Aufsatz) in die Sterilisierbox. Sie können vier Drehmomentschlüssel und Aufsätze auf einmal hineinlegen. 3) Nehmen Sie das Handstück vom Handstückkabel und reinigen Sie diese. -
Seite 21: Entsorgen Des Geräts
Stecken Sie das Handstückkabel ganz fest in das LED geht an und geht an und aus Handstück Handstück-LED leuchtet nicht auf (Varios 170 Aufsatz vibriert, LUX) aber Handstück- Aufsatz vibriert, aber Handstück-LED Setzen Sie sich mit Ihrem Händler in Verbindung*... - Seite 22 Symbols TUV Rhineland of North America ist eine national anerkannte Prüfeinrichtung (NRTL) in den Vereinigten Staaten und vom Standards Council of Canada zugelassen, um elektromedizinische Geräte gemäß den Canadian National Standards zu zertifizieren. Die EU-Richtlinie 93/42/EEC wurde bei der Entwicklung und Herstellung dieses Hersteller.
-
Seite 24: Manuel D'utilisation
• Veillez à attacher les inserts NSK d’origine lorsque vous utilisez le détartreur ultrasonique Varios de NSK ( Varios 170 ou Varios 170 LUX ) . Les problèmes tels que les dommages, les pannes et les accidents liés aux pièces à main qui sont causés par l'utilisation d'inserts autres que les inserts originaux de NSK ne sont pas couverts par la garantie. - Seite 25 AVERTISSEMENT • Lorsque vous utilisez le produit, veillez toujours à la sécurité du patient. • Cet appareil est conçu pour être utilisé par des professionnels de la médecine, comme par exemple des médecins ou des hygiénistes dentaires. • Vérifiez la vibration en dehors de la cavité buccale du patient avant d’utiliser l’appareil. En cas d’anomalie, arrêtez immédiatement d’utiliser l’appareil et contactez votre revendeur.
-
Seite 26: Spécifications
: 10 - 85 % stockage Pression atomosphérique : 500 - 1060 hPa 2. Noms des composants Varios 170 ( Non-lumière ) Varios 170 LUX ( Lumière ) Nom des pièces Quantité Pièce à main Varios2 (Non-Optic) (Optic) Pièce à main Varios2 Cordon de la pièce à... - Seite 27 3. Montage et démontage de la pièce à main Alignez les points sur la pièce à main et le cordon d'alimentation de la pièce à main. Enfoncez-les en ligne droite. Point Pour démonter la pièce à main, tenez la pièce à main et le cordon d’alimentation de la pièce à...
- Seite 28 Précautions d’utilisation de l’insert • Lors de la découpe, l’insert s’usera progressivement. Plus l’insert s’usera, plus le mouvement deviendra petit et la puissance de découpe diminuera. Remplacez l'insert une fois le niveau trop bas. • Veillez à monter l’insert avec la clé dynamométrique fournie, sans quoi l’insert ne générera pas assez de vibrations. •...
- Seite 29 3 ) Contrôlez la ligne verte, jaune et rouge pour vérifier l’usure de l’insert. *Cf. ci-dessous pour la signification de chaque couleur. NSK vous recommande de remplacer l’insert lorsqu’il arrive à la ligne jaune ( usure d’1mm ) afin de garantir une utilisation sûre et efficace.
-
Seite 30: Entretien
6. Entretien 6-1 Nettoyage de la fibre optique Face extrême de la fibre optique ( Varios 170 LUX ) Eliminez les débris de l’extrémité des fibres optiques au niveau de la pièce à main avec un coton-tige imbibé d’alcool. (Fig. 10) AVERTISSEMENT N’utilisez pas d’outils pointus et aiguisés pour... - Seite 31 7. Comment utiliser le couvercle insert S ( Option ) Maintenez le couvercle insert S et insérez-le dans l’insert. Pour l’enlever, prenez le couvercle insert S et la pièce à main et Fente séparez-les en tirant dessus. ( Fig. 13 ) Insert Le couvercle insert S n’est pas conçu pour être utilisé...
-
Seite 32: Pannes Et Dispositions À Prendre
Boîtier de stérilisation Vous pouvez stériliser la pièce à main, l’insert et la clé dynamométrique en même temps en utilisant le boîtier de stérilisation fourni. 1 ) Enlevez l’insert de la pièce à main à l’aide de la clé dynamométrique. 2 ) Placez la clé... -
Seite 33: Pièces Détachées
à main s’allume et pièce à main s’éteint ne s’allume pas L’insert oscille mais ( Varios 170 LUX ) Déconnexion du cordon de la pièce a la DEL de la pièce à Contactez votre revendeur* main, ou dysfonctionnement du boîtier main ne s’allume pas... - Seite 34 Symboles TUV Rhineland of North America est un Nationally Recognized Testing Laboratory (NRTL) aux Etats-Unis (un Laboratoire de test reconnu au niveau national) et est accrédité par le Conseil des Normes du Canada pour certifier les produits électro-médicaux conformément aux normes nationales canadiennes. La norme UE CE93/42 a été...
- Seite 36 RF. • Asegúrese de conectar puntas genuinas de NSK al utilizar el detartrador ultrasónico NSK Varios ( Varios 170 or Varios 170 LUX). En caso contrario, podría tener problemas como el daño, fallo y accidente de las piezas de mano por el uso de puntas que no sean NSK que no estarían cubiertos por la garantía.
- Seite 37 PRECAUCIÓN • Debe utilizar la punta en el rango de potencia descrito en la guía de potencia de la punta. Si la utiliza fuera del rango de potencia, la punta puede romperse o dañarse en un sitio operativo. • Al utilizar el producto, piense siempre en la seguridad del paciente. •...
-
Seite 38: Caraterísticas Técnicas
Temperatura - 10 - 60 °C Entorno de almacenamiento Humedad : 10 - 85 % Presión atmosférica : 500 - 1060 hPa 2. Nombres de los compontes Varios 170 LUX ( Varios 170 ( No Óptico Óptico Nom des pièces Quantité... - Seite 39 3. Montaje y retirada de la pieza de mano Alinee los puntos en la pieza de mano y el cable de la pieza de Punto mano. Vuela a apretarlos directamente. Retire la pieza de mano, coja la pieza de mano y el cable de la pieza de mano y tire de ellos directamente.
- Seite 40 Precaución para el uso de la punta • Compruebe la punta antes de su uso. ( No enjuagar, dañar, doblar u oxidar ) • No supere el nivel de potencia máximo para las puntas. Podría dañar la estructura del diente y de las puntas. •...
- Seite 41 3) Mire la línea verde, amarilla y roja para comprobar el desgaste de la punta. * A continuación, consulte el significado de cada color. En NSK, recomendamos sustituir una punta cuando ésta alcance la línea amarilla (desgaste de 1 mm) para garantizar la seguridad y eficacia de uso.
-
Seite 42: Cuidado Y Mantenimiento
Fig.9 punta por una nueva, a su debido momento. 6. Cuidado y Mantenimiento 6-1 Limpieza de la fibra óptica ( Varios 170 LUX ) Cara final de la fibra óptica Limpie los desechos de la extremidad de las fibras ópticas en la pieza de mano con un paño humedecido con alcohol. - Seite 43 7. Cómo utilizar la tapa de la punta S ( Opcional ) Agarre la tapa de la punta S e introdúzcala en la punta. Para retirarla, coja la tapa de la punta S y la pieza de mano, tire Ranura de ellas.
-
Seite 44: Soluciones De Problemas
Caja de esterilización Puede esterilizar la pieza de mano, punta y llave para puntas a la vez usando la caja de esterilización proporcionada. 1 ) Retire la punta de la pieza de mano usando la llave para puntas. 2 ) Coloque la llave para puntas ( con punta ) en la caja de esterilización. Puede colocar cuatro llaves para puntas y la punta a la vez. - Seite 45 La punta oscila pero la ( Varios 170 LUX ) La punta oscila pero la luz de la pieza de luz de la pieza de mano Póngase en contacto con su distribuidor*...
- Seite 46 Símbolos TUV Rhineland of North America es un laboratorio de ensayo reconocido a nivel nacional (NRTL) en EE.UU., y está acreditado por el Consejo canadiense de normas para certificar productos electro-médicos, de acuerdo con las normas nacionales canadienses. Se ha aplicado la directiva de la UE 93/42/CEE en el Fabricante.
-
Seite 48: Precauzioni Di Utilizzo E Funzionamento
Non utilizzare apparecchi in radiofrequenza in prossimità del prodotto. • Assicurarsi di utilizzare punte originali NSK con gli ablatori a ultrasuoni NSK Varios (Varios 170 o Varios 170 LUX). Eventuali problemi quali danni, guasti e incidenti ai manipoli derivanti dall’uso di punte non originali NSK non saranno coperti dalla garanzia. - Seite 49 ATTENZIONE • Usare la punta entro l’intervallo di potenza descritto nella relativa sezione delle istruzioni per l’uso della punta. Un eventuale uso della punta non rientrante nell’intervallo di potenza raccomandato, potrebbe causarne la rottura o danneggiare la zona trattata. • Durante l’utilizzo del prodotto dare sempre priorità alla sicurezza del paziente. •...
-
Seite 50: Nomenclatura Delle Parti
: 10 - 85 % Ambiente conservazione Atmosferica : 500 - 1060 hPa Temperatura : - 10 - 60 °C 2. Nomenclatura delle parti Varios 170 LUX ( Ottico) Varios 170 ( Non Ottico) Nomenclatura delle parti Quantità (Non Ottico) - Seite 51 3. Montaggio e rimozione del manipolo Allineare tra loro i punti impressi sul manipolo e sul cordone del Punto manipolo. Premere saldamente. Per rimuovere il manipolo, afferrare il manipolo e il relativo cordone e tirare senza inclinarli. ( Fig.1 ) AVVERTENZA Manipolo Parte posteriore del...
- Seite 52 Precauzioni per l’uso della punta • Verificare l’assenza di polvere nella parte interna della vite della punta prima di utilizzarla. Se sporche, le punte non genereranno sufficienti vibrazioni. • Rimuovere sempre la punta prima di scollegare il manipolo. In caso contrario, si potrebbero riportare lesioni alla mano dovute alla punta.
- Seite 53 3) Osservare le linee verdi, gialle e rosse per verificare lo stato di usura della punta. *Per la spiegazione del significato dei colori vedere qui sotto. NSK raccomanda la sostituzione della punta quando la punta raggiunge la linea gialla (usura di 1 mm) per garantire un uso sicuro ed efficiente della stessa.
-
Seite 54: Cura E Manutenzione
Efficienza punta non appena necessario. Fig.9 6. Cura e manutenzione 6-1 Pulizia della fibra ottica ( Varios 170 LUX ) Estremità della fibra ottica Usando un bastoncino di cotone idrofilo imbevuto di alcool, rimuovere le impurità accumulatesi sull’estremità della fibra ottica. - Seite 55 7. Uso del coperchio per punte S ( Optional ) Afferrare il coperchio per punte S e inserirlo nella punta. Per estrarlo, afferrare il coperchio per punte S e il manipolo e Scanalatura tirarli in direzioni opposte. ( Fig. 13 ) Punta Il coperchio per punte S non è...
-
Seite 56: Guasti E Soluzioni
Astuccio di sterilizzazione È possibile sterilizzare contemporaneamente il manipolo, la punta e la chiave per punte usando l’astuccio di sterilizzazione fornito. 1 ) Rimuovere la punta dal manipolo usando l’apposita chiave. 2 ) Posizionare la chiave per punte ( con la punta ) nell’astuccio di sterilizzazione. -
Seite 57: Parti Di Ricambio
Problema Probabile causa Causa Soluzione L’acqua non arriva all’ Controllare il circuito dell’acqua e la sua — unità di manipolo erogazione verso il Riunito Rimuovere il manipolo La manopola di regolazione dell’acqua Ruotare la manopola di regolazione dell’ dal cordone del è... - Seite 58 Simboli TUV Rheinland of North America è un laboratorio di test riconosciuto a livello nazionale (NRTL, Nationally Recognized Testing Laboratory) negli Stati Uniti ed è accreditato dallo Standards Council of Canada per certificare le apparecchiature elettromedicali in conformità agli standard nazionali canadesi. Questo dispositivo medicale è...
- Seite 60 2018.10.00 01 タ...