Inhaltsverzeichnis
Werbung
Verfügbare Sprachen
Verfügbare Sprachen
Quicklinks
Werbung
Inhaltsverzeichnis

Verwandte Anleitungen für Medela Mini Electric


Inhaltszusammenfassung für Medela Mini Electric
- Seite 1 Mini Electric ™ Instructions for use Gebrauchsanweisung Mode d‘emploi Istruzioni per l‘uso Gebruiksaanwijzing All parts that touch breastmilk are free free Bisphenol-A Bisphenol-A free free...
- Seite 2 Parts List XIII Teileliste XIII Liste des pièces XIII Elenco componenti XIII Onderdelenlijst XIII...
-
Seite 3: Inhaltsverzeichnis
Instructions for use Gebrauchsanweisung Mode d’emploi Istruzioni per l’uso Gebruiksaanwijzing... -
Seite 4: Indications For Use
Mini Electric Breastpump Mother’s milk is the best nutrition for babies. Mini Electric gives you and your baby optimal support during the breastfeeding period. The attractive small electric breastpump is especially suitable for occasional pumping at home or on the go. -
Seite 5: Instructions For Use
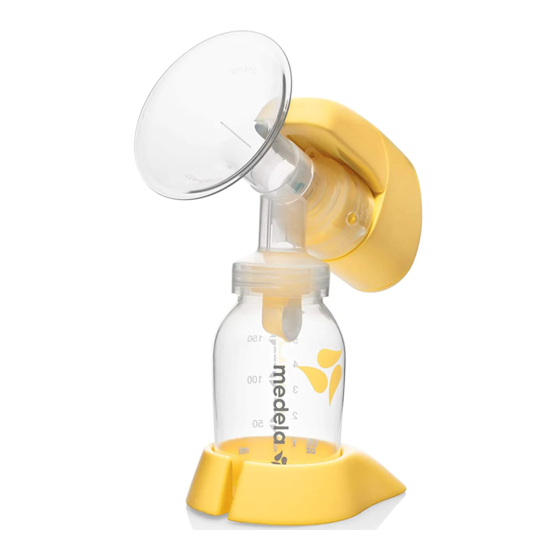
(Electromagnetic compatibility) and needs to be installed and put into service according to the EMC information provided in these instructions for use. • There are no user-serviceable parts inside the Mini Electric. Do not attempt to repair the Mini Electric Breastpump yourself. SAVE THIS INSTRUCTION MANUAL... - Seite 6 Assembly Instructions Snap membrane onto valve until membrane lies completely flat. Push assembled valve and membrane onto breastshield. Ensure sidewise position of valve as indicated on picture. Screw bottle into breastshield. a b c Align the raised edge on the breast- shield back with the ridge on the underside of the battery cover and press the motor firmly onto the shield.
-
Seite 7: Electrical Operation
Operation Electrical operation Insert the metal plug on the end of the mains adapter cord into the hole on the side of the motor unit. Plug the electrical connector on the end of mains adapter cord into power jack (3 V DC). Battery operation To install the batteries, slide off the cover of the battery compartment. - Seite 8 • Do you feel the breast emptying all over? • Is your nipple pain-free? If your answer to any of the above questions is «No», try a larger (or smaller) breastshield. Medela PersonalFit ™ Breastshield: Available in five sizes – because one size does not fit all.
-
Seite 9: Cleaning And Hygiene
VIlI Cleaning and Hygiene Follow these cleaning instructions unless you are told otherwise by your healthcare professional. Important • Use drinking water quality for any of the following described cleaning procedures. • Clean parts immediately after use to avoid dry up of milk residues and to prevent from growth of bacteria. - Seite 10 VIlI Cleaning and Hygiene Hygiene • Wash hands thoroughly with soap and water before touching the breast and pump parts. • Avoid touching the inside of bottles and lids. • Clean the breast and surrounding area with a damp cloth. •...
- Seite 11 Troubleshooting If the motor is Check not running • mains/battery power is present • the device is switched on If there is low Make sure or no suction • the breastshield forms a complete seal around the breast. • all connections of the kit and breastpump are secure. •...
-
Seite 12: Parts List
XIII Parts List Article numbers Breastshield (24 mm) 810.7084 Valve head 810.0475 Valve membrane 820.7013 Bottle (150 ml) 811.0021 Bottle stand 810.0462 810.0474 810.7062 Disc 810.0473 Motor unit 600.0579 Mains adapter (EURO) 920.0015 Mains adapter (UK) 920.0017 Mains adapter (US/JP) 920.0013 Mains adapter (AUS/NZ) 920.0016... -
Seite 13: Indikationen Für Die Anwendung
Mini Electric Brustpumpe Muttermilch ist die beste Nahrung für Babys. Mini Electric unterstützt Sie und Ihr Kind optimal während der Stillzeit. Die attraktive kleine elektrische Brustpumpe eignet sich besonders gut für gelegentliches Abpumpen zu Hause oder unterwegs. Indikationen für die Anwendung Die Mini Electric Brustpumpe ist eine elektrische Brustpumpe: •... - Seite 14 EMV (Elektromagnetische Verträglichkeit) und muss entsprechend den in dieser Gebrauchsanweisung gegebenen EMV-Informationen installiert und in Betrieb genommen werden. • Die Mini Electric Brustpumpe enthält keine durch den Benutzer zu wartenden Teile. Versuchen Sie nicht, die Mini Electric Brustpumpe selbst zu reparieren. BEWAHREN SIE DIESE GEBRAUCHSANWEISUNG SORGFÄLTIG AUF...
- Seite 15 Montage-Anleitung Die Membrane auf den Ventilkopf auf- stecken bis sie vollkommen flach liegt. Das mit der Membrane zusammen- gesetzte Ventil auf die Brusthaube stecken. Die seitliche Positionierung des Ventils prüfen, wie auf Abbildung ersichtlich. Flasche auf die Brusthaube schrauben. a b c Das zylinderförmige Teil unterhalb des Batteriedeckels in den hinteren Teil der Brusthaube einführen und den...
-
Seite 16: Akkubetrieb
Betrieb Netzbetrieb Den Metallstecker am Ende des Netzadapterkabels in die Öffnung auf der Seite des Motors stecken. Den elektrischen Stecker am Ende des Netzadapterkabels in den Stromanschluss stecken (3 V DC). Akkubetrieb Zum Einlegen der Batterien ziehen Sie den Deckel des Batteriefachs heraus. -
Seite 17: Auswahl Der Brushaube
Spüren Sie, wie sich die Brust überall entleert? • Ist Ihre Brustwarze schmerzfrei? Wählen Sie bitte eine grössere (oder kleinere) Brusthaube, wenn Sie eine dieser Fragen mit «Nein» beantworten. Medela PersonalFit ™ Brusthaube: Erhältlich in fünf Grössen - weil eine Grösse nicht für alle passt. -
Seite 18: Reinigung Und Hygiene
VIlI Reinigung und Hygiene Befolgen Sie diese Reinigungsanweisungen, es sei denn, Ihr medizinisches Fachpersonal hat Ihnen etwas anderes empfohlen. Wichtig • Verwenden Sie Trinkwasserqualität für alle nachfolgend beschriebenen Reinigungsverfahren. • Reinigen Sie die Teile sofort nach dem Abpumpen, um das Eintrocknen von Milchresten und das Wachstum von Bakterien zu verhindern. -
Seite 19: Muttermilch Aufbewahren / Auftauen
Hygiene • Hände gründlich mit Wasser und Seife waschen, bevor Sie die Brust und die Pumpenteile anfassen. • Vermeiden Sie es die Innenseite von Flaschen und Deckeln zu berühren. • Die Brust und den umgebenden Bereich mit einem feuchten Tuch reinigen. •... -
Seite 20: Störungen Beheben
Störungen beheben Motor läuft Kontrollieren nicht • Netzstrom/Akku vorhanden ist • das Gerät eingeschaltet ist Stellen Sie sicher Wenn die • dass die Brusthaube gut anliegend auf der Brust aufliegt. Pumpe zu • dass alle Verbindungen richtig zusammengesetzt sind. schwach •... -
Seite 21: Teileliste
XIII Teileliste Artikelnummern Brusthaube (24 mm) 810.7084 Ventilkopf 810.0475 Ventilmembrane 820.7013 Flasche (150 ml) 811.0021 Standfuss 810.0462 Schutzhaube 810.0474 Deckel mit Öffnung 810.7062 Deckeleinlage 810.0473 Motoreinheit 600.0579 Netzadapter (EURO) 920.0015 Netzadapter (UK) 920.0017 Netzadapter (US/JP) 920.0013 Netzadapter (AUS/NZ) 920.0016 Enthält kein Bisphenol-A, DEHP (Phthalate, Weichmacher) oder Latex. Technische Änderungen vorbehalten. -
Seite 22: Recommandations Importantes
Mini Electric Tire-Lait Le lait de la mère est le meilleur aliment pour les bébés. Mini Electric vous offre, à votre enfant et à vous-même, un soutien optimal au cours de la période de l’allaitement. Le tire-lait mini électrique est idéal pour une expression occasionnelle du lait maternel à la maison ou en déplacement. -
Seite 23: Mode D'emploi
• Les appareils de communication portables et mobiles peuvent influencer le Mini Electric. • Le Mini Electric nécessite des précautions spéciales en ce qui concerne la Compatibilité Electro Magnétique, et doit être installé et mis en service conformément aux directives sur la CEM indiquées dans ce mode d’emploi. -
Seite 24: Instructions D'assemblage
Instructions d‘assemblage Enclencher la membrane sur la valve jusqu’à ce que la membrane repose bien à plat. Assembler la valve et la membrane avec le connecteur de la téterelle. S’assurer de la position latérale de la valve comme indiqué sur la photo. Visser le biberon sur la téterelle. - Seite 25 En service Fonctionnement sur secteur Insérer la fiche métallique située à l’extrémité du fil de l’adaptateur dans l’orifice situé sur le côté du bloc moteur. Insérer la fiche du cordon d‘alimentation dans la sortie du tire-lait. Branchez ensuite le chargeur dans une prise de courant standard (3 V DC).
- Seite 26 Vos mamelons sont-ils indolores? Si vous avez répondu «Non» à l’une des questions ci-dessus, essayez une téterelle plus grande (ou plus petite). Téterelle PersonalFit ™ Medela : disponible en cinq tailles – parce qu’une seule taille ne convient pas à toutes les mamans.
-
Seite 27: Nettoyage Et Hygiène
VIlI Nettoyage et hygiène Respecter la marche à suivre pour le nettoyage et l’entretien de votre tire-lait, à moins que votre professionnel de santé ne vous conseille de procéder autrement. Important • Utiliser de l’eau potable pour toutes les procédures de nettoyage ci-après. - Seite 28 VIlI Nettoyage et hygiène Hygiène • Se laver soigneusement les mains au savon et à l’eau avant de toucher le sein et les pièces du tire-lait. • Eviter de toucher l’intérieur des flacons et des bagues. • Nettoyer le sein et la zone qui l’entoure au moyen d’un linge humide.
- Seite 29 Dépannage Si le moteur ne Contrôler fonctionne pas • le branchement du cable d’alimentation et l’état de la batterie • si l’appareil est allumé S’il n’y a pas Assurez-vous que d’aspiration • la téterelle est placée de manière hermétique sur du sein. ou si l’aspira- •...
-
Seite 30: Liste Des Pièces
XIII Liste des pièces Numéros d’article Téterelle (24 mm) 810.7084 Valve 810.0475 Membrane 820.7013 Biberon (150 ml) 811.0021 Support 810.0462 Capuchon de protection 810.0474 Bague 810.7062 Disque de transport 810.0473 Bloc-moteur 600.0579 Adaptateur (EURO) 920.0015 Adaptateur (UK) 920.0017 Adaptateur (US/JP) 920.0013 Adaptateur (AUS/NZ) 920.0016... -
Seite 31: Istruzioni Per L'uso
Mini Electric Tiralatte Il latte materno è il nutrimento migliore per i neonati. Mini Electric assicura alla madre e al bambino un ottimo sostegno nel periodo dell’allattamento. Il piccolo, attraente tiralatte elettrico è particolarmente indicato per l’estrazione occasionale del latte a casa o in viaggio. - Seite 32 • Nel Mini Electric non vi sono parti riparabili dal cliente. Non tentate di riparare da soli il tiralatte Mini Electric. CONSERVATE QUESTO MANUALE D’ISTRUZIONI...
-
Seite 33: Istruzioni Di Montaggio
Istruzioni di montaggio Adattate la membrana sulla valvola finché la membrana non sia completa- mente piatta. Spingete la valvola assemblata e la membrana sulla coppa per il seno. Assicurate la posizione della valvola lateralmente, come indicato in figura. Avvitate la bottiglia nella coppa per il seno. -
Seite 34: Funzionamento Elettrico
Utilizzo Funzionamento elettrico Inserire il connettore dell’adattatore di corrente nel foro sul lato dall’unità motore. Inserite nel jack di alimentazione il connettore elettrico disposto all’estremità del cavo del trasformatore (3 V DC). Funzionamento della batteria Per inserire le pile, fare scorrere il coperchio dell’apposito scomparto. - Seite 35 Se la vostra risposta ad una delle suddette domande è «No», provate una coppa per il seno più grande o più piccola. Coppa per il seno Medela PersonalFit ™ : disponibile in cinque diverse misure – perché una sola misura non va bene per tutte.
-
Seite 36: Pulizia E Misure Igieniche
VIlI Pulizia e misure igieniche Seguite queste istruzioni di pulizia a meno che il vostro consulente sanitario non vi abbia detto cose diverse. Importante • Usate acqua potabile per ognuna della operazioni di pulizia descritte qui di seguito. • Pulite le parti subito dopo l’uso per evitare l’essiccazione di residui di latte e prevenire la formazione di batteri. - Seite 37 Misure • Lavate a fondo le mani con sapone prima di toccare il seno igieniche e le parti dell’apparecchio. • Evitate di toccare la parte interna di poppatoi e delle ghiere. • Pulite il seno e l’area circostante con un panno umido. •...
-
Seite 38: Risoluzione Dei Problemi
Risoluzione dei problemi Se il motore Controllo non funziona • l’alimentazione da rete o da batteria è presente • l’apparecchio è acceso Assicuratevi Se l’aspirazion • che la coppa aderisca completamente al contorno del seno. e è scarsa o • tutte le connessioni del kit e del tiralatte siano sicure. inesistente •... -
Seite 39: Elenco Componenti
XIII Elenco componenti Numeri articoli Coppa per il seno (24 mm) 810.7084 Testa della valvola 810.0475 Membrana della valvola 820.7013 Poppatoio (150 ml) 811.0021 Supporto 810.0462 Cappuccio tettarella 810.0474 Ghiera 810.7062 Disco 810.0473 Unità motore 600.0579 Trasformatore (EURO) 920.0015 Trasformatore (UK) 920.0017 Trasformatore (US/JP) 920.0013... -
Seite 40: Belangrijke Veiligheidsaanwijzingen
Mini Electric Borstkolf Moedermelk is de beste voeding voor een baby. Mini Electric helpt u en uw baby opti- maal gedurende de borstvoedingsperiode. De aantrekkelijke kleine elektrische borstkolf is vooral geschikt voor moeders die af en toe afkolven, thuis of onderweg. -
Seite 41: Gebruiksaanwijzing
(elektromagnetische compatibiliteit) nodig en het apparaat moet geïnstalleerd en in bedrijf gezet worden volgens de EMC-informatie in deze gebruiksaanwijzing. • De Mini Electric bevat geen onderdelen die door de gebruiker gerepareerd kunnen worden. Probeer niet de Mini Electric borstkolf zelf te repareren. - Seite 42 Montage Plaats membraan op ventiel tot mem- braan volkomen vlak ligt. Duw combinatie ventiel/membraan op borstschild. Zorg voor zijdelingse positie van ventiel zoals in afbeelding. Schroef flesje in borstschild. a b c Lijn de verhoogde rand van de ach- terkant van het borstschild uit met de richel aan de onderkant van de bat- terijdeksel en druk de motor stevig op het schild.
-
Seite 43: Elektrische Werking
Gebruik Elektrische werking Steek de metalen stekker aan het eind van het snoer in het gat aan de zijkant van de motoreenheid. Plug de elektrische connector aan het eind van het snoer van de netstroomadapter in elektriciteitscontact (3 V DC). Gebruik met accu Om de batterijen te installeren schuift u de deksel van het batterijvak af. - Seite 44 • Hebt u geen pijn aan uw tepel? Als uw antwoord op een van de bovenstaande vragen «Nee» is, probeer dan een groter (of kleiner) borstschild. Medela PersonalFit ™ borstschild: verkrijgbaar in vijf maten – omdat één maat niet iedereen past.
- Seite 45 VIlI Reinigen en hygiëne Voer deze reinigingsinstructies uit tenzij uw medisch adviseur u anders instrueert. Belangrijk • Gebruik voor de hierna beschreven reinigingsprocedures water van drinkwaterkwaliteit. • Maak onderdelen onmiddellijk na het gebruik schoon om te voorkomen dat melkresten opdrogen en om de groei van bacte- riën tegen te gaan.
- Seite 46 VIlI Reinigen en hygiëne Hygiene • Was uw handen grondig met water en zeep voordat u uw borst en onderdelen van de pomp aanraakt. • Raak de binnenkant van flesjes en deksels niet aan. • Maak de borst en de huid eromheen met een vochtige doek schoon.
- Seite 47 Storingen Als de motor Controleren niet loopt • netvoeding/batterijspanning aanwezig • het apparaat is ingeschakeld Als er weinig Controleer of geen • of het borstschild de borst rondom geheel afsluit. zuigkracht is • of alle aansluitingen van de set en de borstkolf goed bevestigd zijn.
-
Seite 48: Onderdelenlijst
XIII Onderdelenlijst Artikelnummers Borstschild (24 mm) 810.7084 Vacuümklep 810.0475 Membraan 820.7013 Melkflesje (150 ml) 811.0021 Standaard 810.0462 Speenkap 810.0474 Ringdeksel 810.7062 Dekselinleg 810.0473 Motoreenheid 600.0579 Netstroomadapter (EURO) 920.0015 Netstroomadapter (UK) 920.0017 Netstroomadapter (US/JP) 920.0013 Netstroomadapter (AUS/NZ) 920.0016 Bevat geen Bisphenol-A, DEHP (Phthalate) of latex. Technische wijzigingen voorbehouden. - Seite 49 Notes...
-
Seite 50: Emc
Complies IEC 60000-3-3 Warning: The Mini Electric should not be used adjacent to or stacked with other equipment. If adjacent or stacked use is necessary, the Mini Electric should be observed to verify normal operation in the configuration in which it will be used. The Mini Electric was not tested for immunity to electromagnetic disturbances. - Seite 51 Begleitpapiere beachten Respecter les consignes des documents d’accompagnement Consultare la documentazione allegata Zie bijgevoegde documenten MINI ELECTRIC BREASTPUMP Must not be disposed of together with household refuse WITH RESPECT TO ELECTRIC SHOCK FIRE, Darf nicht zusammen mit Hausmüll entsorgt werden AND MECHANICAL HAZARDS ONLY IN Ne doit pas être éliminé...
- Seite 52 SALeS itALy United Kingdom Medela AG, Medical Technology Medela Italia Srl Medela UK Ltd. Lättichstrasse 4b Via Turrini, 19 - Loc. Bargellino Huntsman Drive 6341 Baar 40012 Calderara di Reno (BO) Northbank Industrial Park Switzerland Italy Irlam, Manchester M44 5EG...