Clearaudio TT2 Bedienungsanleitung
Tangential tonarm
Vorschau ausblenden
Andere Handbücher für TT2:
- Bedienungsanleitung (28 Seiten) ,
- Bedienungsanleitung (36 Seiten)
Inhaltsverzeichnis
Verfügbare Sprachen
Verfügbare Sprachen
T
T
2
T
T
2
T
a
n
g
e
n
t
i
a
l
t
o
T
a
n
g
e
n
t
i
a
l
t
o
Hi-Fi Components
Spardorfer Str. 150 D-91054 Erlangen Tel. +49 9131/40300100 FAX +49 09131/40300119
www.clearaudio.de
n
e
a
r
m
/
T
a
n
g
n
e
a
r
m
/
T
a
n
g
clearaudio
www.analogshop.de
info@clearaudio.de / copyright clearaudio 2014
e
n
t
i
a
l
T
o
n
a
r
m
e
n
t
i
a
l
T
o
n
a
r
m
User manual
Bedienungsanleitung
©
electronic
TT 2
GmbH
Version 1.9_03.04.14_E+D
Kapitel
Inhaltsverzeichnis

Verwandte Anleitungen für Clearaudio TT2


Inhaltszusammenfassung für Clearaudio TT2
- Seite 1 User manual Bedienungsanleitung TT 2 © clearaudio electronic Hi-Fi Components GmbH Spardorfer Str. 150 D-91054 Erlangen Tel. +49 9131/40300100 FAX +49 09131/40300119 www.clearaudio.de www.analogshop.de info@clearaudio.de / copyright clearaudio 2014 Version 1.9_03.04.14_E+D...
-
Seite 14: Bedienungsanleitung
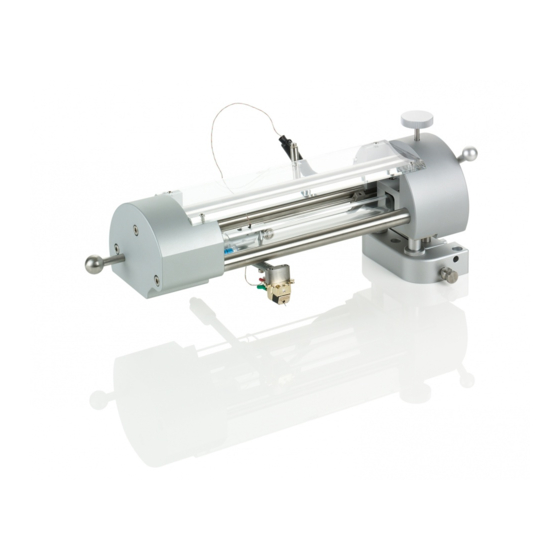
TT 2 User manual / Bedienungsanleitung Sehr verehrte clearaudio – Kundin, sehr verehrter clearaudio - Kunde, Wir gratulieren Ihnen! Sie haben sich für einen der besten Tonarme, den neuen clearaudio TT 2 - Tangentialtonarm entschieden. Ein erstklassiges, in aufwändiger Handarbeit gefertigtes Produkt der clearaudio electronic GmbH. - Seite 15 User manual / Bedienungsanleitung Inhaltsverzeichnis 1. Lieferumfang 2. Befestigung der Tonarmbasis 3. Aufsetzen des TT 2 - Tonarms 4. TT 2 Einstellungen 5. Wartung und besondere Hinweise 6. Technische Daten Garantiebedingungen Seite / Page 15 clearaudio electronic GmbH 2014...
-
Seite 16: Lieferumfang
Tonarm angepassten Verpackung, die einen sicheren Transport garantiert. Bitte bewahren Sie diese Verpackung für den Fall eines Transports auf. TT 2 Bitte kontrollieren Sie den Lieferumfang Ihres neu erworbenen clearaudio Tangentialtonarms. TT 2 Achten Sie vor der Entnahme des clearaudio –... -
Seite 17: Befestigung Der Tonarmbasis
TT 2 User manual / Bedienungsanleitung 2. Befestigung der Tonarmbasis Montage der Tonarmbasis auf einem clearaudio Laufwerk: Befestigen Sie die Tonarmbasis auf der sauberen Oberfläche des Laufwerkchassis mit den drei mitgelieferten Innensechskantschrauben (Siehe Abb. 2 unten) und dem passenden Inbusschlüssel (Größe 3). Achten Sie auf passgenauen Sitz und planebene Montageflächen. -
Seite 18: Aufsetzen Des Tt 2 Tonarms
Führungsbohrungen auf die Trägerstäbe der Tonarmbasis auf und schieben Sie den Tonarm so weit auf die Trägerstäbe, bis der mittlere Gewindestab vollständig in der Bohrung des Tonarmbasis versinkt. Abb.5: Aufsetzen des Tonarms clearaudio electronic GmbH 2014 Seite / Page 18... - Seite 19 Abb.8: Drehen des Headshells Abb.9: Position nach Einsetzen des Headshells Abstand zwischen Headshell- Schraube und Ca. 1,5 cm / Damanten des Tonabnehmers ca. 6,2 cm / 62 Abb.10: Korrekte Position des Tonarms (Draufsicht) clearaudio electronic GmbH 2014 Seite / Page 19...
-
Seite 20: Tt 2 Einstellungen
Weiß: linker Kanal / L+ Blau: linker Kanal / L- Setzen Sie den Tonabnehmer durch Betätigen des Lifthebels an der Seite des Tonarms vorsichtig auf die LP oder die Einstellschablone auf. Seite / Page 20 clearaudio electronic GmbH 2014... -
Seite 21: Vta-Einstellung
Sie auch die mitgelieferte Einstellschablone verwenden. Um die Höhe Ihres Tonarmes zu verstellen, drehen Sie die Rändelschraube auf der Oberseite des Tonarms (siehe Abbildung 14) in die jeweilige Richtung. Abb.14: Höhenverstellung Seite / Page 21 clearaudio electronic GmbH 2014... -
Seite 22: Einstellung Des Azimuth (Vertikale Position Des Tonabnehmer - Diamanten In Der Rille)
Stellen Sie die korrekte Auflagekraft Ihres Tonabnehmers laut der Herstelleranleitung ein. Zur Einstellung der korrekten Auflagekraft empfehlen wir die digitale Tonabnehmerwaage „Weight Watcher“ von clearaudio (Art.: AC094;auch erhältlich über www.analogshop.de). 4.3 Einstellung des Azimuth (Vertikale Position des Tonabnehmer - Diamanten in der Rille) Bitte gehen Sie in dem folgenden Schritt äußerst vorsichtig vor! - Seite 23 Vor dem erstmaligen Benutzen oder nach längerem Stillstand müssen Sie den Lift ca. 4-5 x betätigen, damit sich das Fett im Tonarmlift lösen kann und die Liftbank gleichmäßig und ordnungsgemäß abgesenkt werden kann. TT 2 Der clearaudio - Tonarm ist nun komplett justiert und spielbereit. Seite / Page 23 clearaudio electronic GmbH 2014...
-
Seite 24: Wartung Und Besondere Hinweise
5. Wartung und besondere Hinweise Bitte senden Sie die beigelegte Garantiekarte innerhalb von zwei Wochen korrekt ausgefüllt an clearaudio zurück, da sonst nur die gesetzliche Garantiezeit von 2 Jahren bestehen würde. Die Einstellung der Saphirlagerschrauben im Wagen auf keinen Fall verändern, sie sind ab Werk optimal justiert and anschließend gesichert worden. -
Seite 25: Technische Daten
Abmessungen (B*H*T) in mm: Ca. 300 mm x 100 mm x 70mm Garantie: 5 Jahre* (siehe Kapitel 5 und Seite 26) * nur bei korrekt ausgefüllter und innerhalb von 14 Tagen an clearaudio eingesandter Garantiekarte. Bitte beachten: Dieser Tonarm ist für Tonabnehmer ab 7 gr. Eigengewicht geeignet! Sollte Ihr Tonabnehmer leichter sein, benutzen Sie bitte zusätzlich ein Gewicht... -
Seite 26: Warranty Information
RETAIN YOUR PURCHASE RECEIPT Your purchase receipt is your permanent record of a valuable purchase. It should be kept in a safe place to be referred to as necessary for insurance purposes or when corresponding with clearaudio. IMPORTANT When seeking warranty service, it is the responsibility of the consumer to establish proof and date of purchase. Your purchase receipt or invoice is adequate for such proof.