Clearaudio UNIVERSAL Bedienungsanleitung
Drehtonarm
Vorschau ausblenden
Andere Handbücher für UNIVERSAL:
- Bedienungsanleitung (40 Seiten) ,
- Bedienungsanleitung (28 Seiten) ,
- Bedienungsanleitung (40 Seiten)
Verfügbare Sprachen
Verfügbare Sprachen
Quicklinks
U
n
i
v
e
r
s
U
n
i
v
e
r
s
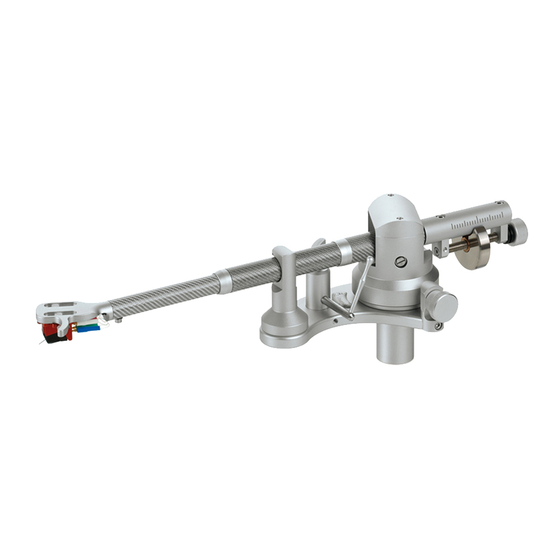
Radial tonearm / Drehtonarm
Universal tonearm with
VTA-Lifter (optional)
Hi-Fi Components
Spardorfer Str. 150 D-91054 Erlangen Tel. +49 9131/40300100 FAX +49 9131/40300119
www.clearaudio.de
a
l
/
U
n
i
a
l
/
U
n
i
clearaudio electronic
www.analogshop.de
info@clearaudio.de / copyright clearaudio 2014
v
e
r
s
a
l
1
v
e
r
s
a
l
1
User manual
Bedienungsanleitung
Universal Tonarm mit
VTA-Lifter (optional)
2
"
2
"
®
GmbH
Version 1.8_03.04.2014_E+D
Kapitel

Verwandte Anleitungen für Clearaudio UNIVERSAL


Inhaltszusammenfassung für Clearaudio UNIVERSAL
- Seite 1 Universal Tonarm mit Universal tonearm with VTA-Lifter (optional) VTA-Lifter (optional) ® clearaudio electronic Hi-Fi Components GmbH Spardorfer Str. 150 D-91054 Erlangen Tel. +49 9131/40300100 FAX +49 9131/40300119 www.clearaudio.de www.analogshop.de info@clearaudio.de / copyright clearaudio 2014 Version 1.8_03.04.2014_E+D...
-
Seite 12: Universal 9
Universal 9“ / 12“ User manual / Bedienungsanleitung Sehr verehrte clearaudio-Kundin, sehr geehrter clearaudio-Kunde, Universal Universal 12“, optional: mit VTA-Lifter) Sie haben mit dem - Tonarm (Optional: einen der besten Drehtonarme der High-End Welt erworben. Ein genialer Radial-Tonarm mit einer extrem reibungsreduzierten Lagerung und raffinierten Optionen für die Feinjustage des Headshells, des Azimuths, sowie des VTA, sogar während des... - Seite 13 Universal 9“ / 12“ User manual / Bedienungsanleitung Inhaltsverzeichnis 1. Lieferumfang Universal 2. Montage des Tonarm Universal 3. Einstellungen des Tonarms 4. Service 5. Technische Daten Garantieinformationen Seite/Page 13 clearaudio electronic GmbH 2014...
-
Seite 14: Lieferumfang
- 66,0 gr. (Edelstahl) - 85,0 gr. (Edelstahl) 4. Aluminium - Schraubenzieher Hilfreiches Zubehör: • clearaudio Cartridge alignment gauge Art. Nr. AC005 / IEC; auch erhältlich über: www.analogshop.de • clearaudio Weight Watcher Art.Nr. AC094; auch erhältlich über www.analogshop.de Seite/Page 14... -
Seite 15: Montage Des Universal Tonarm
Bei Bedarf fordern Sie bitte Hinweise für Fremdlaufwerke an oder wenden Sie sich an den jeweiligen Hersteller. 2.1 Drehtonarm Universal mit VTA-Lifter: Abb. 2: Ansicht Universal Tonarm mit VTA-Lifter Befestigen Sie den VTA-Lifter mit Hilfe der beiliegenden Schrauben auf die vormontierte Tonarmbasis (siehe Abb. 3 und 4). -
Seite 16: Einstellung Der Tonarmhöhe Mit Vta-Lifter
Drehtonarm-Einstellschablone / IEC (Art. Nr. AC 005, auch erhältlich über (www.analogshop.de)! Beachten Sie hierbei, dass der Abstand der Spindel zum Drehpunkt des Tonarms exakt 222 mm (für Universal 9“) und 295 mm (für Universal 12“) betragen muss! (siehe Abb. 5a+b). Den Abstand können Sie durch Drehen der Tonarmbasis einstellen. -
Seite 17: Drehtonarm Universal Ohne Vta-Lifter
über www.analogshop.de)! Dabei müssen Sie darauf achten, dass der Abstand der Spindel zum Drehpunkt des Tonarms exakt 222 mm (für Universal 9“) und 295 mm (für Universal 12“) betragen muss! (siehe Abb. 11). Den Abstand können Sie durch Drehen der Tonarmbasis einstellen. -
Seite 18: Einstellung Der Tonarmhöhe Ohne Vta-Lifter
Gehen Sie hierbei bitte äußerst vorsichtig vor! 3.1 Einstellen der Auflagekraft Schieben Sie eines der drei (für Universal 12“) bzw. fünf (für Universal 9“) mitgelieferten „Turbo Weights” (Gegengewicht) auf die Bronzebuchse und schrauben diese fest. Stellen Sie das Auflagegewicht des Tonabnehmers durch Verschieben des Gegengewichtes nach vorne oder hinten ein. -
Seite 19: Einstellung Antiskating
Universal 9“ / 12“ User manual / Bedienungsanleitung Zurodnung der Gegengewichte für verschiedene Tonabnehmer, bei einer eingestellten Auflagekraft von 2,8 gr.für Universal 9“: Gegengewicht in Gramm Tonabnehmereinstellbereich Von..bis 18,3 gr. 2,9 gr. 5,3 gr. 31,5 gr. 5,1 gr. 8,9 gr. -
Seite 20: Service
4. Service Bitte senden Sie uns die beigelegte Garantiekarte korrekt ausgefüllt innerhalb von zwei Wochen zu. Universal Ist eine Reparatur erforderlich, sollte der clearaudio einem autorisierten Fachhändler übergeben oder direkt an den Hersteller geschickt werden clearaudio electronic GmbH Spardorfer Str 150... -
Seite 21: Technische Daten
* nur bei korrekt ausgefüllter und innerhalb von 14 Tagen eingesandter Garantiekarte. Änderungen bleiben vorbehalten. Lieferbar solange Vorrat reicht. Für Druckfehler keine Haftung. Irrtümer vorbehalten- Kopien und Abdrucke – auch nur auszugsweise – bedürfen der schriftlichen Genehmigung durch die clearaudio electronic GmbH. clearaudio electronic GmbH 2014 Stand: April 2014 Seite/Page 21 ... - Seite 22 RETAIN YOUR PURCHASE RECEIPT Your purchase receipt is your permanent record of a valuable purchase. It should be kept in a safe place to be referred to as necessary for insurance purposes or when corresponding with clearaudio. IMPORTANT When seeking warranty service, it is the responsibility of the consumer to establish proof and date of purchase. Your purchase receipt or invoice is adequate for such proof.