Herunterladen Inhalt Inhalt Diese Seite drucken
bürkert MP07 Betriebsanleitung

bürkert MP07 Betriebsanleitung

Mehrfachblöcke/modulare pneumatische grundschiene
Vorschau ausblenden Andere Handbücher für MP07:
Inhaltsverzeichnis

Werbung

Verfügbare Sprachen

Verfügbare Sprachen

F l u i d C o n t r o l S y s t e m s
Mehrfachblöcke / Block Assemblies / Blocs multiples
Type 6518, Type 6519
Modulare pneumatische Grundschiene /
Modular Pneumatic Basic Rail /
Profil pneumatique modulaire
Type MP07
Betriebsanleitung / Operating Instructions / Instructions de service

Werbung

Inhaltsverzeichnis
loading

Inhaltszusammenfassung für bürkert MP07

  • Seite 1 F l u i d C o n t r o l S y s t e m s Mehrfachblöcke / Block Assemblies / Blocs multiples Type 6518, Type 6519 Modulare pneumatische Grundschiene / Modular Pneumatic Basic Rail / Profil pneumatique modulaire Type MP07 Betriebsanleitung / Operating Instructions / Instructions de service...
  • Seite 2 Bürkert • avez des suggestions concernant ces instructions de service Nous • sommes à votre disposition aux adresses et numéros de téléphone de la couverture Typ 6518/6519 u. Typ MP07...
  • Seite 3 Betriebsanleitung-Nr. 803 150...
  • Seite 4: Inhaltsverzeichnis

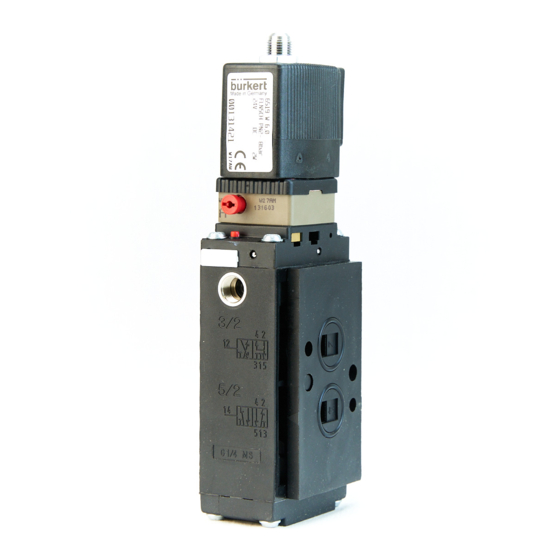
    Mehrfachblöcke Typ 6518, Typ 6519 modulare pneumatische Grundschiene Typ MP07 Inhalt: ALLGEMEINE SICHERHEITSHINWEISE DARSTELLUNGSMITTEL ALLGEMEINE BESCHREIBUNG Ventilaufbau Wirkungsweisen der Ventile Typ 6518 / 6519 Medien Elektrischer Anschluß MONTAGE, INBETRIEBNAHME UND WARTUNG Aufbau von Mehrfachblöcken mit der modularen pneumatischen Grundschiene MP07 Demontage der Module Weitere Einsatzmöglichkeiten der Anschlußmodule - rechts -...
  • Seite 5: Allgemeine Sicherheitshinweise

    In dieser Betriebsanleitung werden folgende Darstellungsmittel verwendet: markiert einen Arbeitsschritt, den Sie ausführen müssen ACHTUNG! kennzeichnet Hinweise, bei deren Nichtbeachtung Ihre Ge- sundheit oder die Funktionsfähigkeit des Gerätes gefährdet ist kennzeichnet wichtige Zusatzinformationen, Tips und HINWEIS Empfehlungen Typ 6518/6519 u. Typ MP07...
  • Seite 6: Allgemeine Beschreibung

    Arbeitsanschlüsse 2 (B) / 4 (A) sowie Versorgungs- und Entlüftungsanschlüsse 1 (P) / 3 (S) / 5 (R) mit G1/4-Innengewinde oder Steckanschluß für Schlauchdurch- messer 8 mm • die Ventile können auf den modularen pneumatischen Grundschienen Typ MP07 zu Ventilblöcken montiert werden • beliebige Einbaulage, vorzugsweise mit Magnetsystem oben die Ventile sind auch in explosionsgeschützter Ausführung verfügbar...
  • Seite 7: Medien

    Gerätesteckdose ist zur Wahl der Kabelganges um 4 x 90° versetzt montierbar • weitere elektrische Anschlußmöglichkeiten siehe Typ 6014 bzw. 8640 ACHTUNG! Achten Sie beim Verschrauben der Gerätesteckdose mit der Spule auf einwandfreien Sitz der Flachdichtung! Typ 6518/6519 u. Typ MP07...
  • Seite 8: Montage, Inbetriebnahme Und Wartung

    Ventilblock ist druckbeaufschlagt (entlüften Sie das System, bevor Sie Leitungen oder Geräte demontieren) Aufbau von Mehrfachblöcken mit der modularen pneumatischen Grundschiene MP07 Sie erhalten durch die Kombination von 2fach- und 3fach- Grundmodulen beliebig große Ventilblöcke. HINWEIS Beginnen Sie den Aufbau zweckmäßig mit dem Anschlußmodul - links - (Bild 1).
  • Seite 9: Demontage Der Module

    Hängen Sie den Ventilblock mit der oberen Nut in die Normschiene ein. Rasten Sie die unteren Klemmstücke in die Normschiene ein. Ziehen Sie die Schrauben an den Klemmstücken fest. Demontage Lösen Sie die Klemmschrauben (ca. 4 Umdrehungen). Entnehmen Sie den Block nach oben von der Normschiene. Typ 6518/6519 u. Typ MP07...
  • Seite 10: Wandmontage

    4.4.2 Wandmontage Befestigen Sie den Ventilblock mit M5-Schrauben direkt an der Wand. Bild 2: Befestigung des Ventilblocks Befestigung von Einzelventilen (Bild 3) Befestigen Sie das Einzelventil mit M4-Schrauben direkt an der Wand. ACHTUNG! Verspannen Sie das Ventilgehäuse beim Einbau nicht! 4.5.1 Steckanschlüsse HINWEIS Für die Steckanschlüsse müssen die Schlauchleitungen folgende...
  • Seite 11: Demontage Der Steckanschlüsse

    Funktion: Die impulsgesteuerten Magnetventile arbeiten mit zwei Spulen, die im Wechsel geschaltet werden. ACHTUNG! Beachten Sie die Angabe “Impuls” auf dem Typenschild! Vermeiden Sie gleichzeitige Impulsgabe auf beide Spulen! HINWEIS Mit der Handbetätigung sind die Ventile umsteuerbar. Typ 6518/6519 u. Typ MP07...
  • Seite 12: Störungen

    Störungen Störung Behebung mögliche Ursache Überprüfen Sie den elektri- Ventile schalten nicht: keine oder nicht ausreichen- schen Anschluß. de Betriebsspannung; Stellen Sie die Betriebsspan- nung laut Typenschild sicher. Bringen Sie die Handbetätigung Handbetätigung nicht in in Null-Stellung. neutraler Stellung; Führen Sie die Druck- Druckversorgung nicht aus- versorgung möglichst großvolu- reichend oder nicht vorhan-...
  • Seite 13: Notizen

    NOTIZEN Typ 6518/6519 u. Typ MP07...
  • Seite 14 Block Assemblies Type 6518, 6519 Modular Pneumatic Basic Rail Type MP07 Contents: GENERAL SAFETY INSTRUCTIONS SYMBOLS USED GENERAL DESCRIPTION Valve Construction Valve operations of the Type 6518 / 6519 Media Electrical connections INSTALLATION, INITIALISATION AND SERVICE Setting up block assemblies using the modular pneumatic rail...
  • Seite 15: General Safety Instructions

    ATTENTION! indicates information which must be followed. Failure to do this could endanger your health or the functionality of the device NOTE indicates important additional information, tips and recommendations Type 6518/6519 and type MP07...
  • Seite 16: General Description

    5 (R) with G 1/4 internal thread or plug connection for 8 mm hose external diameter • the valves can be mounted on the modular pneumatic basic rail Type MP07 • can be mounted in any position, preferably with the magnetic system at the top...
  • Seite 17: Media

    4 x 90° • refer to types 6014 or 8640 for other connection possibilities ATTENTION! When screwing down the instrument socket onto the coil, ensure that the flat seal is well seated! Type 6518/6519 and type MP07...
  • Seite 18: Installation, Initialisation And Service

    (vent the system before dismantling lines or devices) Setting up block assemblies using the modular pneumatic rail MP07 With combination of two-way and three-way base modules, you can assemble valve blocks of any size. It is advisable to start the assembly with the left-hand connector NOTE module.
  • Seite 19: Dismantling The Module

    Hang the valve block onto the upper groove of the standard rail. Latch the lower clamp into the standard rail. Firmly tighten the screws on the clamp. Dismounting Loosen the clamping screws (by about 4 revolutions). Remove the block upwards from the standard rail. Type 6518/6519 and type MP07...
  • Seite 20: Wall Mounting

    4.4.2 Wall mounting Fix the module system directly to the wall using M5 screws. Figure 2: Mounting the valve block Mounting single valves (Fig. 3) Fix the single valve directly to the wall using M4 screws. ATTENTION! When mounting, do not distort the valve body! 4.5.1 Plug-in connections NOTE For plug-in connections, the hose lines must meet the following...
  • Seite 21: Dismantling The Plug-In Connections

    Function: The pulse-controlled solenoid valves operate with two coils connected alternately. ATTENTION! Observe the “Pulse” data on the rating plate! Avoid simultaneous pulse input to both coils! NOTE The valves can be reversed with the manual actuator. Type 6518/6519 and type MP07...
  • Seite 22: Faults

    Faults Fault Correction Possible cause Valve does not switch: Operational voltage too low Check the electrical supply or not present; connections. Ensure that the electrical power supply is the same as that spe- cified on the rating plate. Set the manual override to the Manual override not in neu- zero position.
  • Seite 23: Notes

    NOTES Type 6518/6519 and type MP07...
  • Seite 24 Blocs multiples type 6518, 6519 profil pneumatique modulaire type MP07 TABLE DES MATIERES: INDICATIONS GENERALES DE SECURITE MODES DE REPRÉSENTATION DESCRIPTION GENERALE Construction de la vanne Fonctionnement des vannes du type 6518, 6519 Fluides Raccordement électrique MONTAGE, MISE EN SERVICE ET ENTRETIEN...
  • Seite 25: Indications Generales De Securite

    ATTENTION! caractérise des indications dont l’observation peut mettre en danger votre santé ou la fonctionnalité de l’appareil REMARQUE caractérise des indications supplémentaires, des conseils et des recommandations Type 6518 / 6519 et type MP07...
  • Seite 26: Description Generale

    1 (P) / 3 (S) / 5 (R) au choix avec taraudage intérieur G 1/4 ou raccord à fiche pour diamètre de tuyau souple de 8 mm • Les vannes peuvent être montées sur les profils pneumatiques modulaires MP07 • Position de montage quelconque, de préférence avec système magnétique en haut Les vannes sont aussi disponibles en exécution antidéflagrante...
  • Seite 27: Fluides

    La prise d’appareil peut être montée inversée de 4 x 90° pour le choix du passage du câble • Autres possibilités de raccordement électrique, voir type 6014, resp. 8640 ATTENTION! Veiller en vissant la prise d’appareil avec la bobine à une application parfaite du joint plat! Type 6518 / 6519 et type MP07...
  • Seite 28: Montage, Mise En Service Et Entretien

    (purger le système avant de démonter les conduites ou appareils) Montage de blocs multiples avec le profil modulaire pneumatique type MP07 On obtient en combinant des modules de base doubles ou triples des blocs de vannes de dimensions illimitées. REMARQUE Commencer de préférence le montage par le module de...
  • Seite 29: Démontage Des Modules

    Emboîter la pièce de serrage inférieure dans le profil normalisé. Serrer les vis sur les pièce de serrage. Démontage Dévisser les vis de serrage (env. 4 tours). Enlever le bloc du profil normalisé, vers le haut. Type 6518 / 6519 et type MP07...
  • Seite 30: Montage Mural

    4.4.2 Montage mural Fixer le bloc de vannes avec 4 vis M4 directement contre la paroi. Figure 2: Fixation du bloc de vannes Fixation des vannes seules (Fig. 3) Fixer la vanne seule avec les vis M4 directement contre la paroi. ATTENTION! Ne pas déformer le boîter de vanne au montage! 4.5.1 Raccords à...
  • Seite 31: Démontage Des Raccords À Fiches

    ATTENTION! Observer l’indication «Impulsion» sur la plaquette signalétique! Eviter de donner simultanément une impulsion sur les deux bobines! REMARQUE Les vannes peuvent être commutées avec l’actionnement manuel. Type 6518 / 6519 et type MP07...
  • Seite 32: Dérangements

    Dérangements Dérangement Cause possible Remède Les vannes ne Tension de service ab- Vérifier le raccordement électrique. commutent pas: sente ou insuffisante; Assurer la tension de service selon la plaquette signalétique. Actionnement manuel pas en Placer l’actionnement manuel en position neutre. position neutre;...
  • Seite 33: Notes

    NOTES Type 6518 / 6519 et type MP07...
  • Seite 34 Instructions de service N 803 150...
  • Seite 35 Type 6518 / 6519 et type MP07...
  • Seite 36 Berlin: Tel. (0 30) 67 97 17-0 Dresden: Tel. (03 59 52) 36 30-0 Frankfurt: Tel. (0 61 03) 94 14-0 Steuer- und Regeltechnik Hannover: Tel. (05 11 ) 9 02 76-0 Christian-Bürkert-Str. 13-17 Dortmund: Tel. (0 23 73) 96 81-0 74653 Ingelfingen München: Tel.

Diese Anleitung auch für:

65196518

Inhaltsverzeichnis