I+ME ACTIA eCOM Box Benutzerhandbuch

Inhaltszusammenfassung für I+ME ACTIA eCOM Box
- Seite 1 Getting started eCOM Box COMMUNICATION INTERFACE GB version on page 16 onwards I + M E A C T I A G m b H...
-
Seite 3: Inhaltsverzeichnis
1. Vorwort Sehr geehrte Kundin, sehr geehrter Kunde, wir bedanken uns für den Kauf dieses Produkts. Die eCOM Box wurde EMV-geprüft nach Industrienorm und erfüllt auch diese Norm. Die CE-und FCC-Konformität wurden nachgewiesen, die entsprechenden Erklärungen sind beim Hersteller hinterlegt. -
Seite 4: Bestimmungsgemäße Verwendung
Box die Spannungsmessung der Fahrzeugbatteriespannung (KL30) und der Spannung an einer KL15. Der Anschluss der eCOM Box an ein Fahrzeug erfolgt über einen am Gerät vorhandenen 15-poligen SUB-D-Stecker, an dem ein optional erhältliches OBD-Kabel oder eine optional erhältliche Break-Out-Box angeschlossen werden kann. -
Seite 5: Sicherheitshinweise
Leitungstreiber und Elektronik zur Spannungsmessung) ist nur gegeben, sofern die eCOM Box über die Fahrzeugschnittstelle mit Batteriespannung versorgt ist. Eine Spannungsversorgung der eCOM Box über die 9-polige SUB-D-Buchse ist nicht möglich. Das Vbat-Pin an dieser Buchse (Pin9) ist lediglich ein strombegrenzter Spannungsausgang für die eventuell notwendige Versorgung eines angeschlosse-... -
Seite 6: Lieferumfang
USB-Anschlusskabel Länge: 1m MI03300307 - D-SUB 9-Adapterkabel Adapterkabel zum Anschluss eines CAN- Monitoring-Tools MI04100038 - eCOM Box -Getting started dieser Beipackzettel Folgende Teile sind optional als Zubehör erhältlich: IME4103704 - eCOM OBD-Kabel OBD-Anschlußkabel Länge: 3m IME4103701 - Part F IP... -
Seite 7: Handhabung Und Inbetriebnahme
D-SUB 9-Adapterkabel zum Anschluss eines CAN-Monitoring-Tools an die eCOM Box Die Versorgung der eCOM Box erfolgt über das OBD-Kabel oder den Part F IP. Damit werden der Mikrocontroller der eCOM Box und auch die galvanisch getrennten Leitungs- treiber mit Spannung versorgt. Das optional erhältliche Steckernetzteil ist nicht erforder- lich. -
Seite 8: Software
Rahmen einer Kundensupportanfrage die Aufforderung zur Erstellung von Logfiles erfolgt. Nach erfolgreichem Abschluss der Installation stehen dem Anwender zwei Applikationen im Startmenu zur Verfügung. Dies sind: TKSelection -Tool zum Auswählen einer eCOM Box im Netzwerk, TKAdministration -Tool zum Konfigurieren, Testen und Updaten der eCOM Box. Seite 6... - Seite 9 Updatemanagement Update der eCOM Box-Firmware Zur Nutzung der eCOM Box als D-PDU API Interface ist zuerst die Toolkit-Software (sofern nicht bereits auf dem Rechner vorhanden) und dann die zugehörige D-PDU API- Software auf dem angeschlossenen PC zu installieren. Mit der Installation werden alle zur Nutzung der Schnittstelle benötigten Dateien auf dem PC entsprechend abgelegt.
- Seite 10 6. Software Die folgende Abbildung zeigt die für die eCOM Box nötigen Einstellungen: Abbildung 2: D-PDU API Installationsoptionen Die Checkbox „Install full versioned D-PDU API“ muss markiert werden, wenn man mehrere Versionen der D-PDU API-Software auf einem Rechner benötigt. Der Standardinstallationspfad ist: {Programme}\I+ME Actia GmbH\XS D PDU API.
-
Seite 11: Netzwerk Und Netzwerkkonfiguration
6.2 Netzwerk und Netzwerkkonfiguration Um die eCOM Box in ihr Netz zu integrieren, schließen Sie es bitte direkt an ihr Netzwerk an oder benutzen sie den mit gelieferten USB-TO-LAN-Umsetzer und versorgen es am Fahrzeuginterface (15 poliger SUB-D-Stecker) über das optional erhältliche OBD-Kabel oder mittels der Break-Out-Box eCOM Box Part F IP über ein Labornetzteil mit Strom. - Seite 12 Konfigurationseinstellungen mit dem TKAdministrations-Tool erforderlich. Dabei ist zu beachten, dass jede Konfiguration eine funktionsfähige Unicast-Kommunikation zwischen PC und eCOM Box (d.h. beide Geräte im gleichen IP-Subnetz) voraussetzt. Die folgende Abbildung zeigt den Dialog im TKAdministration-Tool , der eine Einstellung des eCOM Box-Netzwerkinterfaces ermöglicht.
- Seite 13 Zahl verwendet. Im Auslieferungszustand ist dies die Zahl „00“. Eine Ände- rung dieser Zahl muss über den Konfigurationsdialog im TKAdministration-Tool erfolgen. Voraussetzung hierfür ist, dass der PC und die eCOM Box im gleichen Subnetz arbeiten. Die folgende Abbildung zeigt den Bereich des Konfigurationsdialogs in dem der Name der eCOM Box eingestellt werden kann.
-
Seite 14: Toolkit Selection
6. Software 6.3 Toolkit Selection Nachdem die Netzwerkeinstellungen vorgenommen wurden, sollte überprüft werden, ob das gewünschte VCI in ihrem Netz auch ausgewählt wurde. Das Programm TKSelection bietet die Auswahl eines VCIs. Dies ist wichtig, wenn mehrere VCIs in ihrem Netz integriert sind und eines für die Diagnoseapplikation auf dem Testrechner ausgewählt werden muss. -
Seite 15: D-Pdu Api Funktionstest
Hierzu startet man die Applikation und kann in dem folgenden Dialog den Start Button betätigen. Sofern die Installation erfolgreich war und die mittels TKSelection ausgewählte eCOM Box über das Netzwerk per Unicast erreichbar ist, werden alle Tests erfolgreich abgeschlossen durch einen OK Haken in der jeweiligen Checkbox markiert. -
Seite 16: Technische Daten
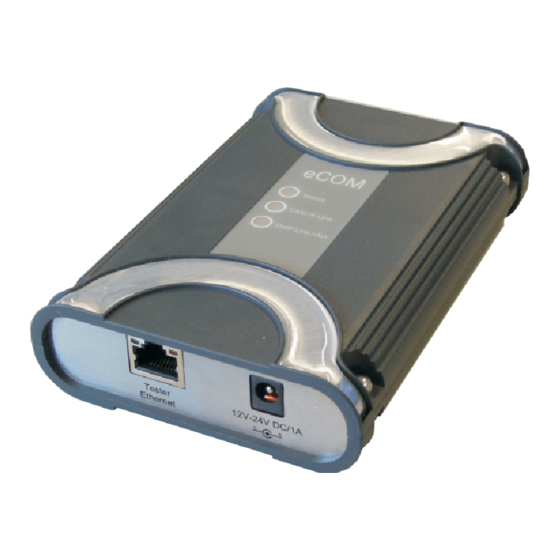
-K-Line (im Daimler AG-Umfeld nicht unterstützt) -LIN (im Daimler AG-Umfeld nicht unterstützt) -Fahrzeug-Ethernet (DoIP, ISO 13400, im Daimler AG- Umfeld nicht unterstützt) -KL 15, KL 30 LED Status: -eCOM Box nicht stromversorgt AN - Rot -Bootprozess aktiv AN - Grün -Betriebsbereit Blinkend Grün... -
Seite 17: Kundenhinweis
200mA VEH_GND Kundenhinweis Das von Ihnen gekaufte Produkt von I+ME ACTIA unterliegt der Richtlinie 2002/96/EG über Elektro- und Elektronik-Altgeräte (WEEE) des Europäischen Parlaments bzw. des EU- Ministerrats. Dieses Gerät ist in Ländern, die diese Richtlinie bereits als Gesetz verabschiedet haben, nicht vor dem 13. August 2005 im Handel erhältlich und sollte nicht im Rahmen des normalen Hausmülls entsorgt werden.