Herunterladen Inhalt Inhalt Diese Seite drucken

Werbung

Verfügbare Sprachen
  • DE

Verfügbare Sprachen

  • DEUTSCH, seite 41
LUNCH BOX
Operating instruction
GB
Mode d'emploi
F
Instruccions de manejo
E
Gebruiksaanwijzing
NL
Bedienungsanleitung
D
Istruzioni per l'uso
I

Werbung

Inhaltsverzeichnis
loading

Inhaltszusammenfassung für PERFECTPRO Lunch box

  • Seite 1 LUNCH BOX Operating instruction Mode d’emploi Instruccions de manejo Gebruiksaanwijzing Bedienungsanleitung Istruzioni per l’uso...
  • Seite 2 I I I I Important Safety Instructions 1. Read these instructions. 2. Keep these instructions. 3. Heed all warnings 4. Follow all instructions 5. Do not use this apparatus near water. 6. Clean only with dry cloth. 7. Do not block any ventilation openings. Install in accordance with the instructions.
  • Seite 3 10. Protect the power cord from being walked on or pinched particularly at plug, convenience receptacles, and the point where they exit from the apparatus. 11. Only use attachments/accessories specified by the manufacturer. 12. Use only with the cart, stand, tripod, bracket, or table specified by the manufacturer, or sold with the apparatus.
  • Seite 5: Lcd Display

    Controls Volume Control Tuning Control FM antenna LCD display Power On/Off Band Selection Preset Station Speaker Battery Compartment AC power cord storage LCD Display Band Indicator Frequency Preset Stations Low Battery Indicator...
  • Seite 6: Power The Radio

    Power the radio 1. Battery operation Installing the batteries, first turn battery cover fixture anti-clockwise to loosen and pull down the battery cover. Insert 4 x C size (UM-2) battery into the compartment. Ensure the battery is inserted in accordance with the diagram shown. Close the battery cover and fasten the fixture by turning clockwise.
  • Seite 7: Manual Tuning

    2. AC operation Before you plug the AC power cord into the AC socket, be sure the voltage is correct. If you have batteries in the radio and use the AC power cord, the batteries will automatically be disconnected. AC power storage is designed to store the cord when the radio is not in use.
  • Seite 8: Display Backlight

    Memory presets recall Storing stations in preset memories There are 5 memory presets for each waveband. 1. Press the Power button to turn on the radio. 2. Tune to the required station using Tuning Control. 3. Press and hold down the required preset until the radio beeps. The preset number will appear in the display and the station will be stored under chosen preset button.
  • Seite 9 Setting tuning step Tuning steps on some countries are different from where you purchase the radio. If you buy the radio in Europe and intend to use in Northern America or some Latin American countries, you may have to adjust tuning step so the radio may continue to serve you well.
  • Seite 10: Specifications

    Specifications Frequency Coverage: FM 87.50 – 108 MHz AM ( MW ) 520 – 1710 kHz ( 10 kHz ) 522 – 1629 kHz ( 9 kHz ) AC Power: AC 120V/60Hz/10W (USA ) AC 230V/50Hz/10W (Europe ) Batteries: 4 x UM-2 ( C Size ) Output Power: 2 Watt 10% T.H.D.
  • Seite 12: Consignes De Sécurité Importantes

    Consignes de sécurité importantes 1. Lisez ces consignes. 2. Conservez ces consignes. 3. Respectez les avertissements. 4. Suivez toutes les instructions. 5. N’utilisez pas cet appareil près de points d’eau. 6. Nettoyez cet appareil uniquement avec un chiffon sec. 7. Ne couvrez pas les orifices de ventilation de l’appareil. Installez l’appareil en vous référant aux instructions du mode d’emploi.
  • Seite 13 10. Ne placez pas le cordon d’alimentation dans un endroit où il pourrait être piétiné ou pincé, notamment au niveau de la fiche. Reliez le cordon d’alimentation à une prise murale facilement accessible, prenez le temps d’installer l’appareil et de localiser les différents cordons et connecteurs.
  • Seite 14 16. L’indication d’un risque d’électrocution présent ainsi que le symbole associé sont indiqués sur le panneau inférieur de l’appareil. 17. L’appareil ne doit pas être exposé à des égouttements ainsi qu’à des éclaboussures. Aucun récipient rempli de liquide ne doit être placé sur l’appareil. 18.
  • Seite 15: Écran Lcd

    Commandes Commande de réglage du volume Commande de réglage du tuning Antenne FM Écran LCD Commutateur d’alimentation Sélecteur de bande Station préréglée Haut-parleur Compartiment à piles Support du cordon d’alimentation Écran LCD Indicateur de bande Fréquence Stations préréglées Indicateur de batterie faible...
  • Seite 16: Mise En Marche De La Radio

    Mise en marche de la radio 1. Installation des piles Pour installer les piles, tournez tout d’abord le verrou du compartiment à piles dans le sens contraire des aiguilles d’une montre puis retirez le couvercle du compartiment à piles. Insérez 4 piles de taille C ( UM-2 ) dans le compartiment. Assurez-vous d’insérer les piles en respectant le diagramme ci-dessous.
  • Seite 17: Réglage Manuel Des Stations Radio

    2. Raccordement au secteur Avant de raccorder la radio à une prise de courant, assurez-vous que sa tension corresponde bien à celle de votre installation secteur. Lorsque vous avez installé des piles dans la radio et que vous raccordez l’appareil au secteur, les piles seront déconnectées automatiquement.
  • Seite 18: Rétro Éclairage

    Rappel de stations préréglées Enregistrement de stations dans la mémoire de préréglage 5 stations radio pré réglables sont disponibles pour chaque bande. 1. Appuyez sur le commutateur d’alimentation pour mettre la radio en marche. 2. Réglez la station radio en utilisant la commande de réglage du tuning.
  • Seite 19 Procédure de réglage du pas de fréquence radio La procédure de réglage du pas de fréquence radio varie selon le pays où vous vous situez. Si vous achetez votre radio en Europe et que vous tentez de l’utiliser en Amérique du nord ou dans certains pays d’Amérique latine, vous devrez modifier le pas de fréquence radio pour pouvoir continuer à...
  • Seite 20: Spécifications Techniques

    Spécifications techniques Gamme de fréquences: FM 87.50 – 108 MHz AM ( MW ) 520 – 1710 kHz ( 10 kHz ) 522 – 1629 kHz ( 9 kHz ) Alimentation C.A.: 120V/60Hz/10W (États unis) 230V/50Hz/10W (Europe) Piles: 4 piles UM-2 (Taille C) Puissance de sortie: 2 Watt 10% T.H.D.
  • Seite 22: Instrucciones Importantes De Seguridad

    Instrucciones importantes de seguridad 1. Lea atentamente las instrucciones. 2. Guarde estas instrucciones. 3. Preste atención a las advertencias. 4. Siga las instrucciones. 5. No use este aparato cerca del agua. 6. Limpie sólo con un paño seco. 7. No obstruya ningún agujero de ventilación. Instale el aparato siguiendo las instrucciones.
  • Seite 23 10. Proteja el cable de alimentación con el fin de evitar de andar sobre el o pinchado y evite receptáculos convenientes y el punto donde salen del aparato. 11. Solo use accesorios especificados por su fabricante. 12. Use solo con la carretilla, soporte, trípode, o mesa especificado por el fabricante o vendidos con el aparato.
  • Seite 24: Pantalla Lcd

    Botones Botón de volumen Botón de sintonización Antena FM Pantalla LCD Botón de encendido/apagado Selección de banda Estación preprogramada Altavoz Compartimiento para baterías Almacenamiento del cable de alimentación AC Pantalla LCD Indicador de banda Frecuencia Estaciones preprogramadas Indicador de batería baja...
  • Seite 25 Encienda la radio 1. Funcionamiento de la batería Para instalar las baterías, en primer lugar, gire en el sentido de las agujas del reloj los enseres fijos para aflojar y retire la tapa de la batería. Inserte 4 baterías de tamaño C ( UM-2 ) en el compartimiento.
  • Seite 26: Sintonización Manual

    2. Funcionamiento del cable AC Antes de enchufar el cable de alimentación AC en la toma de corriente AC, asegúrese de que el voltaje es correcto. Si tiene baterías en la radio y usa el cable de alimentación AC, las baterías se desconectarán automáticamente.
  • Seite 27: Luz De Fondo

    Rellamada preprogramada de sintonización Guardar estaciones en memorias preestablecidas Hay 5 memorias preestablecidas para cada ancho de banda. 1. Pulse el botón de encendido para encender la radio. 2. Sintonice la estación requerida usando el control de sintonización. 3. Pulse y mantenga pulsando el botón de preprogramación hasta que la radio suene.
  • Seite 28 Ajustar los pasos de sintonización Los pasos de sintonización en algunos países son diferentes y depende del lugar ha comprado la radio. Si compra la radio en Europa e quiere usarla en América del Norte o países de América del Norte, tendrá que ajustar los pasos de sintonización con el fin de que la radio funcione bien.
  • Seite 29: Especificaciones

    Especificaciones Cobertura de frecuencia: FM 87.50 – 108 MHz AM ( MW ) 520 – 1710 kHz ( 10 kHz ) 522 – 1629 kHz ( 9 kHz ) Alimentación AC: AC 120V/60Hz/10W (Estados Unidos) AC 230V/50Hz/10W (Europa ) Baterías: 4 x UM-2 ( Tamaño C) Salida eléctrica: 2 Watt 10% T.H.D.
  • Seite 31: Belangrijke Veiligheidsvoorschriften

    Belangrijke Veiligheidsvoorschriften 1. Lees deze instructies. 2. Bewaar deze instructies. 3. Houd u aan alle waarschuwingen. 4. Volg alle instructies. 5. Gebruik dit apparaat niet in de buurt van water. 6. Maak het alleen schoon met een droge doek. 7. Voorkom het blokkeren van ventilatieopeningen. Volg bij het installeren van het apparaat de instructies.
  • Seite 32 10. Bescherm het snoer en zorg dat ervoor dat er niet op gelopen kan worden en dat hij niet klem kan komen te zitten, vooral bij de stekkerdozen en de plek waar het snoer uit het apparaat komt. 11. Gebruik alleen hulpmiddelen/accessoires die gespecificeerd zijn door de fabrikant.
  • Seite 33 16. Een aanduiding voor Schokgevaren en een bijpassend grafisch symbool zijn voorzien aan de onderkant van dit apparaat. 17. Stel dit apparaat niet bloot aan druppelend of spetterend water en plaats geen voorwerpen die gevuld zijn met vloeistoffen op het apparaat. 18.
  • Seite 34 Bedieningsonderdelen Volumeknop Afstemknop FM-antenne LCD-scherm Aan/Uit-schakelaar Band Selectie Geheugenknoppen voor Voorkeurzenders Luidspreker Batterijcompartiment Opslag voor stroomsnoer LCD-scherm Band-Indicator Frequentie Voorkeurzenders ‘Batterij bijna leeg’ Indicator...
  • Seite 35 Voeding voor de radio 1. Gebruik met batterijen Draai, voor het installeren van de batterijen, eerst het kapje tegen de klok in om het los te maken en trek het vervolgens naar beneden. Plaats 4 x C ( UM-2 ) batterijen in het compartiment. Zorg ervoor dat de batterijen er volgens het getoonde plaatje ingeplaatst zijn.
  • Seite 36: Handmatig Afstemmen

    2. Gebruik met wisselstroom voeding Controleer voor u het stroomsnoer op het stopcontact aansluit dat het voltage juist is. Als de radio batterijen bevat, dan worden deze bij het gebruik van netvoeding automatisch afgesloten. De opslagruimte voor het stroomsnoer is bedoeld voor wanneer de radio niet gebruikt wordt.
  • Seite 37 Oproepen voorkeurzenders Voorkeurzenders in het geheugen opslaan Voor elke golflengte zijn 5 geheugenplekken voor voorkeurzenders beschikbaar. 1. Druk op de Aan/Uit-knop om de radio aan te zetten. 2. Draai de Afstemknop om de gewenste zender te kiezen. 3. Houd de gewenste geheugenknop ingedrukt totdat de radio een piepgeluid geeft.
  • Seite 38 Afstemstap instellen De stapgrootte die gebruikt wordt bij het afstemmen kan in sommige landen verschillen van het land waar de radio gekocht is. Als u de radio in Europa koopt, maar hem in de Noord Amerika of sommige Latijns Amerikaanse landen wilt gebruiken, dan moet u wellicht de afstemstap aanpassen zodat u de radio goed kunt gebruiken.
  • Seite 39 Specificaties Frequentiebereik: FM 87,50 – 108 MHz AM ( middengolf ) 520 – 1710 kHz ( 10 kHz ) 522 – 1629 kHz ( 9 kHz ) Voeding: Wisselstroom 120V/60Hz/10W ( V.S. ) Wisselstroom 230V/50Hz/10W ( Europa ) Batterijen: 4 x UM-2 ( afmeting C ) Uitgangsvermogen: 2 Watt 10% T.H.D.
  • Seite 41: Wichtige Sicherheitshinweise

    Wichtige Sicherheitshinweise 1. Lesen Sie sich diese Anleitung durch. 2. Bewahren Sie diese Anleitung auf. 3. Achten Sie auf alle Warnhinweise. 4. Befolgen Sie alle Anweisungen. 5. Benutzen Sie dieses Gerät nicht in der Nähe von Wasser. 6. Nur mit einem trockenem Tuch reinigen. 7.
  • Seite 42 10. Schützen Sie das Netzkabel vor Druckeinwirkung, insbesondere am Stecker, Steckdosen oder am Ausgangspunkts des Geräts. 11. Verwenden Sie lediglich vom Hersteller angegebenes Zubehör. 12. Das Gerät darf nur dann mit Wagen, Gestellen, Dreifüßen, Halterungen oder Tischen verwendet werden, wenn diese vom Hersteller entsprechend angegeben wurden oder zusammen mit dem Gerät verkauft wurden.
  • Seite 43 17. Dieses Gerät sollte keinen Wassertropfen und -spritzern ausgesetzt werden. Gegenstände die mit Flüssigkeiten gefüllt sind sollten nicht auf das Gerät gestellt werden. 18. Um Stromschlägen vorzubeugen, benutzen Sie das Gerät bei Regen oder Nässe nur mit Batterien, wenn Sie es im Freien verwenden.
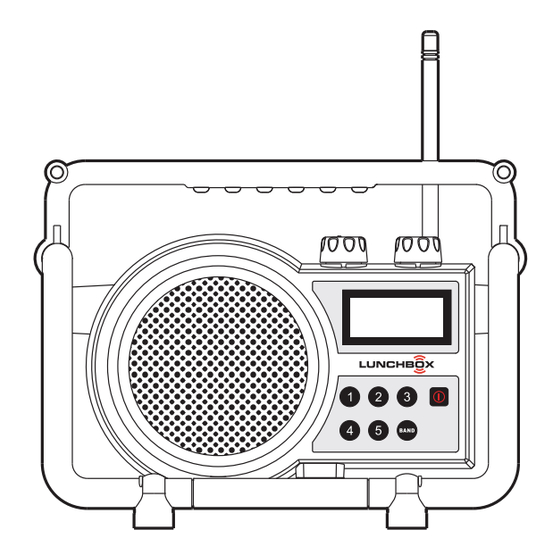
  • Seite 44: Lcd-Display

    Bedienelemente Lautstärkeregelung Sendersuche UKW-Antenne LCD-Display Ein-/Ausschalter Frequenzbandauswahl Senderspeicher Lautsprecher Batteriefach Netzkabelfach LCD-Display Frequenzbandanzeige Frequenz Senderspeicher Batteriestandsanzeige...
  • Seite 45: Einschalten Des Radios

    Einschalten des Radios 1. Batteriebetrieb Zum Einlegen der Batterien öffnen Sie zunächst das Batteriefach, indem Sie die Halterung entgegen dem Uhrzeigersinn drehen. Legen Sie 4 Batterien des Typs C (UM-2) ein. Vergewissern Sie sich, dass die Batterien entsprechend der Abbildung eingelegt werden.
  • Seite 46: Manuelle Sendersuche

    2. Netzanschluss Bevor Sie das Netzkabel an einer Steckdose anschließen, vergewissern Sie sich bitte, dass die Netzspannung geeignet ist. Wenn sich im Radio Batterien befinden, wird der Batteriebetrieb bei Netzanschluss automatisch deaktiviert. Die Kabelhalterung ist dazu gedacht das Kabel aufzubewahren, wenn das Radio nicht benutzt wird.
  • Seite 47: Aufrufen Von Gespeicherten Sendern

    Speicherplatzsuche Speichern von Sendern F¨¹r jedes Frequenzband stehen 5 Speicherplätze zur Verfügung. 1. Betätigen Sie den Ein-/Ausschalter zum Einschalten des Radios. 2. Stellen Sie den gewünschten Sender mithilfe des Frequenzreglers ein. 3. Halten Sie die gewünschte Sendertaste gedrückt bis Sie einen Signalton hören.
  • Seite 48: Löschen Gespeicherter Sender

    Frequenzstufen Die Frequenzstufen sind u. U. in anderen Ländern andern als in dem Land, in dem Sie dieses Radio erworben haben. Wenn Sie das Radio in Europa gekauft haben und planen es in Nord- oder Lateinamerika zu benutzen, kann es sein, dass Sie für eine weitere Benutzung die Frequenzeinstufung neu einstellen müssen.
  • Seite 49: Technische Daten

    Technische Daten Frequenzbereich: UKW 87,50 – 108MHz MW 520 – 1710 kHz (10 kHz) 522 – 1629 kHz (9 kHz) Stromversorgung: AC 120V/60Hz/10W (USA) AC 230V/50Hz/10W (Europa) Batterien: 4 x UM-2 (Größe C) Ausgangsleistung: 2 Watt 10% T.H.D. @ 100 Hz @ Batterie 6V 5 Watt 10% T.H.D.
  • Seite 51: Importanti Istruzioni Di Sicurezza

    Importanti istruzioni di sicurezza 1. Leggere le istruzioni. 2. Conservare le istruzioni. 3. Seguire tutti i consigli indicati. 4. Seguire tutte le istruzioni. 5. Non usare l‘unita‘ nelle vicinanze di sorgenti d‘acqua. 6. Usare solamente un panno asciutto per la pulizia. 7.
  • Seite 52 10. Non calpestare il cavo elettrico e non pizzicarlo a prese, recettacoli oppure in punti d‘uscita dall‘unita‘. 11. Usare solamente allegati/accessori specificati dal costruttore. 12. Usare solamente carrelli, supporti, treppiedi, mensole o tavole specificate dal costruttore o vendute con l‘unita‘. Quando viene usato un carrello, prestare la massima attenzione durante lo spostamente per evitare cadute.
  • Seite 53 Controlli Controllo volume Controllo sintonizzazione Antenna FM LCD display Accensione/Spegnimento Selezione banda Pre-impostazione stazione Altoparlante Compartimento batteria Cavo elettrico AC LCD Display Indicatore di banda Frequenza Pre-impostazione stazioni Indicatore livello batteria...
  • Seite 54: Accensione Della Radio

    Accensione della radio 1. Uso delle batterie Installare le batterie. Ruotare in senso antiorario il coperchio del compartimento batterie ed aprirlo. Inserire batterie 4 x C ( UM-2 ) all‘interno del compartimento. Assicurarsi che le batterie vengano inserite in accordo alla polarita‘ indicata nel seguente diagramma. Chiudere il coperchio delle baterrie e ruotarlo in senso orario fino a quando viene udito un suono di click.
  • Seite 55: Sintonizzazione Manuale

    2. Uso della corrente Prima di connettere il cavo AC nella presa elettrica, assicurarsi che il voltaggio sia corretto. Se le batterie sono presenti all‘interno della radio e viene usato il cavo elettrico per l‘alimentazione, le batteria automaticamente verranno disconnesse. E‘...
  • Seite 56 Pre-impostazione memoria Memorizzazione delle stazioni. 5 memorie pre-impostate in ogni singola banda. 1. Premere il pulsante Power per accendere la radio. 2. Sintonizzare la stazione richiesta usando la manopola di sintonizzazione. 3. Tenere premuto il pulsante di pre-impostazione fino a quando viene udito un suono di beep .
  • Seite 57 Procedura di sintonizzazione La procedura di sintonizzazione in alcuni paesi potrebbe essere differente dal luogo di acquisto dell‘unita‘. Se la radio e‘ stata acquistata in Europa e verra‘ usata in Nord America oppure in alcuni paesi dell‘America Latina, potrebbe essere necessario regolare la sintonizzazione della radio.
  • Seite 58 Specifiche Copertura di frequenza: FM 87.50 – 108 MHz AM ( MW ) 520 – 1710 kHz ( 10 kHz ) 522 – 1629 kHz ( 9 kHz ) Alimentazione AC: AC 120V/60Hz/10W ( USA ) AC 230V/50Hz/10W ( Europa ) Batterie: 4 x UM-2 ( Dimensione C ) Alimentazione in uscita: 2 Watt 10% T.H.D.
  • Seite 59 381R36L-A...

Inhaltsverzeichnis