Herunterladen Inhalt Inhalt Diese Seite drucken
Orbis ORUS RF Anleitung

Orbis ORUS RF Anleitung

Digitales uhrenthermostat

Werbung

Verfügbare Sprachen

Verfügbare Sprachen

ORUS RF
CRONOTERMOSTATO
Digital por radiofrecuencia
Manual del Usuario
User Manual
RADIOFREQUENCY DIGITAL PROGRAMMABLE THERMOSTAT
Manual
DIGITALES UHRENTHERMOSTAT PER RADIOFREQUENZ

Werbung

Inhaltsverzeichnis
loading

Inhaltszusammenfassung für Orbis ORUS RF

  • Seite 1 ORUS RF CRONOTERMOSTATO Digital por radiofrecuencia Manual del Usuario User Manual RADIOFREQUENCY DIGITAL PROGRAMMABLE THERMOSTAT Manual DIGITALES UHRENTHERMOSTAT PER RADIOFREQUENZ...
  • Seite 3 ■ Funciones avanzadas Seite ■ Tipo de ajuste Seite ■ Sustitución de la batería Seite ■ Normas de referencia Seite ■ Programas invernales Seite ■ Programas estivales Seite - 1 - Manual de Instrucciones Cronotermostato digital por radiofrecuencia ORUS RF...
  • Seite 4 • Programación semanal con tres valores de T3 : +2 ÷ +35°C temperatura controlables en el curso del día T2 : +2 ÷ +35°C T1 : +2 ÷ +35°C - 2 - Manual de Instrucciones Cronotermostato digital por radiofrecuencia ORUS RF...
  • Seite 5 Por otro lado, se aconseja montar el cronotermostato aproximadamente a 150 cm del suelo. El montaje puede ser sobre pared o sobre caja de mecanismos. - 3 - Manual de Instrucciones Cronotermostato digital por radiofrecuencia ORUS RF...
  • Seite 6 ORUS RF Actuador remoto a 1 Carga o más canales Para obtener más detalles sobre la configuración del dispositivo, consulte el capítulo CONFIGURACIÓN Y PRUEBA DEL ACTUADOR REMOTO. - 4 - Manual de Instrucciones Cronotermostato digital por radiofrecuencia ORUS RF...
  • Seite 7: Advertencias De Seguridad

    ■ El ORUS RF es un cronotermostato electrónico para pared de programación semanal, con comunicación por radiofrecuencia, adecuado para ambientes con grado de contaminación 2. Código Modelo Descripción OB324900 Orus RF Cronotermostato semanal ADVERTENCIAS DE SEGURIDAD ■ Durante la instalación y el funcionamiento del dispositivo (cronotermostato +...
  • Seite 8 En modalidad estival, T1 no es programable y corresponde a aire acondicionado OFF. ■ ACTUADOR REMOTO • Para obtener información sobre las características técnicas del actuador remoto consulte la documentación suministrada con el dispositivo. - 6 - Manual de Instrucciones Cronotermostato digital por radiofrecuencia ORUS RF...
  • Seite 9: Elementos De Control

    Borra la fecha y la hora pero no la configuración de las programaciones (para hacer esto ver “Restauración de parámetros por defecto” pág. 26) (pulsación con una punta o boligrafo). - 7 - Manual de Instrucciones Cronotermostato digital por radiofrecuencia ORUS RF...
  • Seite 10 20) Campo “Activación aire acondicionado” 21) Campo “Activación calefacción” 22) Campo “Reloj” 23) Campo no utilizado 24) Campo “Transmisión por radiofrecuencia” 25) Campo “Unidad de medida” 26) Campo “Apagado” - 8 - Manual de Instrucciones Cronotermostato digital por radiofrecuencia ORUS RF...
  • Seite 11: Configuración Del Reloj

    1 el campo de los minutos. Pulsar la tecla “ ” para confirmar. (En caso de que la configuración del reloj tenga lugar tras un reseteo, el campo “segundos” no será configurable. - 9 - Manual de Instrucciones Cronotermostato digital por radiofrecuencia ORUS RF...
  • Seite 12 Una vez configurado el día pulsar la tecla “ ” para salir del menú. Al salir de este procedimiento, la indicación del reloj deja de parpadear, en el campo (16) vuelve a visualizarse la temperatura ambiente. - 10 - Manual de Instrucciones Cronotermostato digital por radiofrecuencia ORUS RF...
  • Seite 13 “PRG”, y parpadea entonces el segmento del campo (17) coincidente con la hora del reloj. - 11 - Manual de Instrucciones Cronotermostato digital por radiofrecuencia ORUS RF...
  • Seite 14 Pulsando la tecla “ ” se confirma el programa para ese día y se pasa al día siguiente hasta llegar al domingo, tras lo cual se vuelve al funcionamiento normal. - 12 - Manual de Instrucciones Cronotermostato digital por radiofrecuencia ORUS RF...
  • Seite 15 “ ” se confirma el cambio y se vuelve al funcionamiento normal. En las características técnicas se informa de los límites de configuración para cada temperatura. - 13 - Manual de Instrucciones Cronotermostato digital por radiofrecuencia ORUS RF...
  • Seite 16: Funcionamiento Manual

    Se pasa del programa manual al programa automático simplemente de nuevo la tecla “ ” durante 3 segundos al menos. - 14 - Manual de Instrucciones Cronotermostato digital por radiofrecuencia ORUS RF...
  • Seite 17 - 15 - Manual de Instrucciones Cronotermostato digital por radiofrecuencia ORUS RF...
  • Seite 18 Si durante la temporización se pasa a funcionamiento manual o apagado, la temporización finaliza. - 16 - Manual de Instrucciones Cronotermostato digital por radiofrecuencia ORUS RF...
  • Seite 19 De la misma manera, si la unidad de medida está en días, en el cómputo se incluye el día actual. Las temporizaciones en horas terminan al final de la hora, las de los días a medianoche. - 17 - Manual de Instrucciones Cronotermostato digital por radiofrecuencia ORUS RF...
  • Seite 20: Programación Avanzada

    • Elegir mediante las teclas “ ” y “ ” el modo de ajuste deseado y pulsar “ ” para confirmar y pasar al ajuste del parámetro siguiente. - 18 - Manual de Instrucciones Cronotermostato digital por radiofrecuencia ORUS RF...
  • Seite 21 10, 20 o 30 minutos. Para una descripción más detallada sobre como operar en la elección del tipo de ajuste se remite al capítulo “TIPO DE AJUSTE” en la pág. 26. - 19 - Manual de Instrucciones Cronotermostato digital por radiofrecuencia ORUS RF...
  • Seite 22 En el campo (22) aparece “dEG=” y en el campo (25) parpadea la unidad de medida elegida. Pulsar indistintamente las teclas “ ” y “ ” para cambiar las unidades y “ ” para confirmar. - 20 - Manual de Instrucciones Cronotermostato digital por radiofrecuencia ORUS RF...
  • Seite 23 • Durante el procedimiento de prueba, en el campo (22) aparece “oUt=”, en el campo (16) parpadea “tSt” y en el campo (15) aparece “on” u “oFF” para indicar la - 21 - Manual de Instrucciones Cronotermostato digital por radiofrecuencia ORUS RF...
  • Seite 24 Para habilitar/deshabilitar el bloqueo del teclado, se remite al capítulo “FUNCIONES AVANZADAS”. Horas de funcionamiento del aparato Se pueden visualizar las horas de funcionamiento del aparato (relé en posición ON). - 22 - Manual de Instrucciones Cronotermostato digital por radiofrecuencia ORUS RF...
  • Seite 25 ” se sale del menú y se vuelve al funcionamiento automático. Si no se pulsa ninguna tecla durante la programación de estos parámetros, se vuelve al funcionamiento automático tras 45 segundos. - 23 - Manual de Instrucciones Cronotermostato digital por radiofrecuencia ORUS RF...
  • Seite 26: Funciones Avanzadas

    Los valores preestablecidos para el cambio horario automático son: – cambio invierno  verano : último domingo de marzo hora 02:00 – cambio verano  invierno : último domingo de octubre hora 03:00 - 24 - Manual de Instrucciones Cronotermostato digital por radiofrecuencia ORUS RF...
  • Seite 27 ” (valor mínimo). En el campo (16) aparecerá el valor medido. Para poner a cero los valores máximo/ mínimo memorizados, pulsar durante al menos 3 segundos la tecla “ ”/“ ”. - 25 - Manual de Instrucciones Cronotermostato digital por radiofrecuencia ORUS RF...
  • Seite 28 Se establece en el dispositivo la mitad de la banda de ajuste que se desea. El rango para este parámetro es 0,5 ÷ 5,0°C con resolución 0,1°C. - 26 - Manual de Instrucciones Cronotermostato digital por radiofrecuencia ORUS RF...
  • Seite 29: Sustitución De La Batería

    El funcionamiento en este estado puede continuar ya que la batería mantiene una tensión que permite el funcionamiento del microcontrolador. - 27 - Manual de Instrucciones Cronotermostato digital por radiofrecuencia ORUS RF...
  • Seite 30: Normas De Referencia

    Se declara la conformidad con las Directivas Comunitarias 1999/5/CE (R&TTE) 2004/108/CE (Compatibilidad electromagnética) con referencia a las siguientes normas armonizadas: ETSI EN 300 220-1, ETSI EN 300 220-2 ETSI EN 301 489-1, ETSI EN 301 489-3 - 28 - Manual de Instrucciones Cronotermostato digital por radiofrecuencia ORUS RF...
  • Seite 31 T1 ■ ■ ■ ■ ■ ■ ■ ■ ■ ■ ■ ■ ■ ■ ■ ■ ■ ■ ■ ■ ■ ■ ■ ■ 0 1 2 3 4 5 6 7 8 9 10 11 12 13 14 15 16 17 18 19 20 21 22 23 - 29 - Manual de Instrucciones Cronotermostato digital por radiofrecuencia ORUS RF...
  • Seite 32 T1 ■ ■ ■ ■ ■ ■ ■ ■ ■ ■ ■ ■ ■ ■ ■ ■ ■ ■ ■ ■ ■ ■ ■ ■ 0 1 2 3 4 5 6 7 8 9 10 11 12 13 14 15 16 17 18 19 20 21 22 23 - 30 - Manual de Instrucciones Cronotermostato digital por radiofrecuencia ORUS RF...
  • Seite 33 ■ Timing Page ■ Advanced programming Page ■ Advanced functions Page ■ Regulation type Page ■ Battery replacement Page ■ Reference standards Page ■ Winter programs Page ■ Summer programs Page - 31 - ORUS RF Programmable Thermostat User Manual...
  • Seite 34 • Display of the operation status, time, day and internal temperature • Weekly programming with three temperature T3 : +2 ÷ +35°C values controllable during the day T2 : +2 ÷ +35°C T1 : +2 ÷ +35°C - 32 - ORUS RF Programmable Thermostat User Manual...
  • Seite 35 It is moreover advised to install the environment programmable thermostat at about 150 cm from the floor. Assembly can be wall or box 503 coverage - 33 - ORUS RF Programmable Thermostat User Manual...
  • Seite 36 The remote actuator activates the load after a radiofrequency signal sent by the programmable thermostat ORUS RF. ORUS RF Remote actuator Load 1 or more channels For details about the configuration of the devices, see the section CONFIGURATION AND REMOTE ACTUATOR TEST - 34 - ORUS RF Programmable Thermostat User Manual...
  • Seite 37: Safety Warnings

    ■ ORUS RF is an electronic wall-mounting weekly programmable thermostat for load control via radio frequency signal. It is suitable for environments with a pollution degree of 2. Code Model Description OB324900 Orus RF Digital programmable thermostat RF control white SAFETY WARNINGS ■...
  • Seite 38 In summer mode, T1 cannot be set and corresponds to the air conditioning OFF. ■ REMOTE ACTUATOR • For details about technical specifications refer to the remote actuator documentation supplied with the instrument. - 36 - ORUS RF Programmable Thermostat User Manual...
  • Seite 39: Control Elements

    13) “ ” Key: deletes date and time but not the set programs (to do this see "Restoring default parameters" page 56) (the key is reachable only with a point). - 37 - ORUS RF Programmable Thermostat User Manual...
  • Seite 40: Display Indications

    19) “Timer" Field 20) “Air conditioning activation” Field 21) “Heating activation” Field 22) “Clock” Field 23) Not used Field 24) “Radio frequency transmission” Field 25) “Unit of measurement” Field 26) “Off” Field - 38 - ORUS RF Programmable Thermostat User Manual...
  • Seite 41: Clock Setting

    Press the “ ” key to confirm. (In case the setting of the clock takes place after a reset, the “seconds" field is not adjustable. Therefore, the first parameter to set will be the “minutes” field). - 39 - ORUS RF Programmable Thermostat User Manual...
  • Seite 42 Once the day is set, press the “ " key to exit the menu. Upon exiting such procedure the clock indication will not flash any more; field (16) will display the environment temperature again. - 40 - ORUS RF Programmable Thermostat User Manual...
  • Seite 43 “ ” key to move on to the next day. • If no program satisfies the user's needs, choose any program and press the “PRG” key again; this will bring the segment of the corresponding field (17) to flash. - 41 - ORUS RF Programmable Thermostat User Manual...
  • Seite 44 “Px” flashing on field (16). Pressing the “ ” key confirms the program for that day and moves on to the next until Sunday appears, after which operation goes back to normal mode. - 42 - ORUS RF Programmable Thermostat User Manual...
  • Seite 45 “ ” key it is possible to confirm the change and return to normal operation. The setting limits are reported in the technical characteristics. - 43 - ORUS RF Programmable Thermostat User Manual...
  • Seite 46: Manual Operation

    To move from the manual program to the automatic one, simply press the “ ” key again for at least 3 seconds. - 44 - ORUS RF Programmable Thermostat User Manual...
  • Seite 47 The potential of the summer operation is the same as the one of the winter operation; therefore the setting of all parameters can be carried out following the procedures reported in this instructions manual. - 45 - ORUS RF Programmable Thermostat User Manual...
  • Seite 48 If in automatic status you set a timing, such automatic status will be maintained until the end of the timing; operation will then switch to automatic. If, during the timing, operation is switched to manual or off, the timing ends. - 46 - ORUS RF Programmable Thermostat User Manual...
  • Seite 49 In the same way, if the measurement unit is in days, the count also includes the current one. Timing in hours terminate on the hour, the ones in days at midnight. - 47 - ORUS RF Programmable Thermostat User Manual...
  • Seite 50: Advanced Programming

    • Using the “ ” and “ ” keys, choose the desired regulation mode and press “ ” to confirm and move to the setting of the next parameter. - 48 - ORUS RF Programmable Thermostat User Manual...
  • Seite 51 10, 20 or 30 minutes. For a wider description on how to operate the regulation type choice, please refer to the chapter “REGULATION TYPE” on page 56. - 49 - ORUS RF Programmable Thermostat User Manual...
  • Seite 52 Field (22) displays the writing “dEG=” and on field (25) the measurement unit currently set will flash. Press the “ ” or “ ” keys indifferently to change the unit and “ " to confirm. - 50 - ORUS RF Programmable Thermostat User Manual...
  • Seite 53 • If the modality-test is actived, the display shows “ ” when the relay is in position ON, while the absence of this symbols indicates that the relay is OFF. The switching - 51 - ORUS RF Programmable Thermostat User Manual...
  • Seite 54 (such value is of 5 digits, 3 on field (22) and 2 on field (16) and it is to be read from left to right. In the example the value is of 1274 hours). - 52 - ORUS RF Programmable Thermostat User Manual...
  • Seite 55 “ ” key will exit the menu and return to automatic operation. If no key is pressed during setting of these parameters, automatic operation will be restored after 45 seconds. - 53 - ORUS RF Programmable Thermostat User Manual...
  • Seite 56: Advanced Functions

    The default values set for the automatic time change are: - winter  summer change: last Sunday of March at 02:00 - summer  winter change: last Sunday of October at 03:00 - 54 - ORUS RF Programmable Thermostat User Manual...
  • Seite 57 (maximum value) or “ ” (minimum value). Field (16) will display the value measured. To reset the minimum/maximum value memorized, press the “ ” / “ ” key for at least 3 seconds. - 55 - ORUS RF Programmable Thermostat User Manual...
  • Seite 58 The necessary parameters for the definition of this mode are: • the regulation band • the regulation period The regulation band represents the temperature interval, centered on the setpoint, in which the proportional regulation is checked. - 56 - ORUS RF Programmable Thermostat User Manual...
  • Seite 59: Battery Replacement

    Operation in this status may continue until the battery - 57 - ORUS RF Programmable Thermostat User Manual...
  • Seite 60: Reference Standards

    Compliance with Community Directives 1999/5/CE (R&TTE) 2004/108/EC (Electromagnetic compatibility) is declared with reference to the following harmonized standards: ETSI EN 300 220-1 ETSI EN 300 220-2 ETSI EN 301 489-1 ETSI EN 301 489-3 - 58 - ORUS RF Programmable Thermostat User Manual...
  • Seite 61 T1 ■ ■ ■ ■ ■ ■ ■ ■ ■ ■ ■ ■ ■ ■ ■ ■ ■ ■ ■ ■ ■ ■ ■ ■ 0 1 2 3 4 5 6 7 8 9 10 11 12 13 14 15 16 17 18 19 20 21 22 23 - 59 - ORUS RF Programmable Thermostat User Manual...
  • Seite 62 T1 ■ ■ ■ ■ ■ ■ ■ ■ ■ ■ ■ ■ ■ ■ ■ ■ ■ ■ ■ ■ ■ ■ ■ ■ 0 1 2 3 4 5 6 7 8 9 10 11 12 13 14 15 16 17 18 19 20 21 22 23 - 60 - ORUS RF Programmable Thermostat User Manual...
  • Seite 63: Inhaltsverzeichnis

    ■ On-Off Befehl der Tastatur Seite ■ Zeitsteuerung Seite ■ Frostschutztemperatur Programmierung Seite ■ Fortgeschrittene Funktionen Seite ■ Einstellungsart Seite ■ Batteriewechsel Seite ■ Referenznormen Seite ■ Winterprogramme Seite ■ Sommerprogramme Seite - 61 - Digitales Uhrenthermostat ORUS RF - Manual...
  • Seite 64 Uhrzeit, Wochentag und Umgebungstemperatur, intern und extern • Wöchentliche Programmierung mit drei T3 : +2 ÷ +35°C kontrollierbaren Temperaturwerten im Verlauf T2 : +2 ÷ +35°C des Tages T1 : +2 ÷ +35°C - 62 - Digitales Uhrenthermostat ORUS RF - Manual...
  • Seite 65: Montage

    Sonnenlicht und Orte mit übermäßiger oder fehlender Ventilation. Außerdem wird empfohlen, das Uhrenthermostat in ca. 150 cm Höhe über dem Boden zu installieren. Die Montage kann Aufputz oder in UP- Dosen ausgeführt werden. - 63 - Digitales Uhrenthermostat ORUS RF - Manual...
  • Seite 66: Abmessungen

    Die Last wird ferngesteuert per Aktor aktiviert, der aus der Ferne vom Uhrenthermostat kontrolliert wird. ORUS RF Ferngesteuerter Aktor Last mit 1 oder mehr Kanälen Um weitere Einzelheiten über die Konfiguration des Gerätes zu erhalten, siehe Kapitel KONFIGURATION UND TEST DES FERNGESTEUERTEN AKTORS - 64 - Digitales Uhrenthermostat ORUS RF - Manual...
  • Seite 67: Sicherheitshinweise

    ■ ORUS RF ist ein elektronisches Uhrenthermostat für Aufputzmontage mit wöchentlicher Programmierung, Kommunikation per Radiofrequenz, geeignet für Umgebungen mit Verschmutzungsgrad 2. Artikelnummer Modell Eigenschaften OB324900 ORUS RF wöchentliches Uhrenthermostat SICHERHEITSHINWEISE ■ Bei Installation und Betrieb des Gerätes (Uhrenthermostat + ferngesteuerter Aktor) müssen folgende Hinweise befolgt berücksichtigt werden: 1) Das Gerät muss von qualifiziertem Personal, unter strikter Einhaltung der...
  • Seite 68 T1 ≤ T2 ≤ T3. Im Sommermodus ist T1 nicht programmierbar und entspricht Klimaanlage in OFF. ■ FERNGESTEUERTER AKTOR • Information über technische Daten des ferngesteuerten Aktors finden Sie in den dem Gerät beigefügten Unterlagen. - 66 - Digitales Uhrenthermostat ORUS RF - Manual...
  • Seite 69: Kontrollelemente/ Displayinformation

    Objekt oder Kugelschreiberspitze drücken) 13) Taste “ ”: löscht Datum und Uhrzeit, aber nicht die Konfiguration der Programme (um dies auszuführen siehe “Reset der Default Parameter” Seite 86) (mit spitzem Objekt oder Kugelschreiberspitze drücken). - 67 - Digitales Uhrenthermostat ORUS RF - Manual...
  • Seite 70: Displayanzeigen

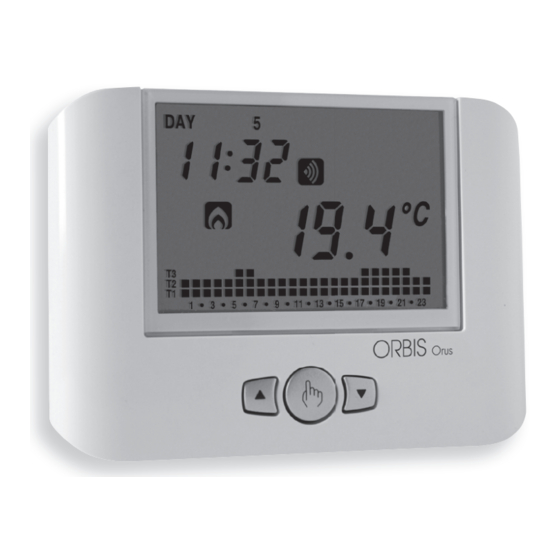
    18) Feld “Aktivierung manueller Betrieb” 19) Feld “Zeitsteuerung” 20) Feld “Aktivierung Klimaanlage” 21) Feld “Aktivierung Heizung” 22) Feld “Uhr” 23) Feld unbenutzt 24) Feld “Übertragung per Radiofrequenz” 25) Feld “Messeinheit” 26) Feld “Off” - 68 - Digitales Uhrenthermostat ORUS RF - Manual...
  • Seite 71: Inbetriebnahme/ Reset

    Sekunden auf Null zu stellen und um 1 das Feld der Minuten zu verringern. Taste “ ” zum Bestätigen drücken. (Wenn die Konfiguration der Uhr nach einem Reset ausgeführt wird, ist das Feld „Sekunden“ nicht konfigurierbar. - 69 - Digitales Uhrenthermostat ORUS RF - Manual...
  • Seite 72 Wenn der Tag konfiguriert ist, Taste “ ” drücken, um das Menü zu verlassen. Wenn man diesen Vorgang verlässt, hört die Anzeige der Uhr auf zu blinken, das Feld (16) zeigt wieder die Umgebungstemperatur an. - 70 - Digitales Uhrenthermostat ORUS RF - Manual...
  • Seite 73: Konfiguration Der Programme

    ” drücken. • Wenn keines der Programme die Anforderungen des Benutzers erfüllt, wählt man irgendein Programm und drückt erneut Taste “PRG”, dann blinkt das Segment in Feld (17), das der Uhrzeit entspricht. - 71 - Digitales Uhrenthermostat ORUS RF - Manual...
  • Seite 74 Mit Taste “ ” bestätigen wir das Programm für diesen Tag und gehen auf den nächsten Tag über und weiter bis zum Sonntag, danach kehren wir zum normalen Betrieb zurück. - 72 - Digitales Uhrenthermostat ORUS RF - Manual...
  • Seite 75: Konfiguration Der Temperaturen

    Wert geändert werden und mit Taste “ ” bestätigen wir die Änderung und kehren zum normalen Betrieb zurück. In den technischen Daten werden die Grenzwerte der Konfigurierung für jede Temperatur angegeben. - 73 - Digitales Uhrenthermostat ORUS RF - Manual...
  • Seite 76: Manueller Betrieb

    Tasten drückt, kann die Konfiguration der Temperatur geändert werden. Man kann vom manuellen Programm wieder auf das automatische Programm übergehen, indem man einfach erneut die Taste “ ” mindestens 3 Sekunden lang drückt. - 74 - Digitales Uhrenthermostat ORUS RF - Manual...
  • Seite 77: Sommer-/ Winterbetrieb

    45 Sekunden nach der zuletzt getätigten Handhabung. Die Möglichkeiten des Sommerbetriebs sind die gleichen für den Winterbetrieb, deswegen kann die Konfiguration aller Parameter gemäß der in diesem Manual angegeben Verfahren ausgeführt werden. - 75 - Digitales Uhrenthermostat ORUS RF - Manual...
  • Seite 78: On-Off Befehl Der Tastatur

    Wenn man im automatischen Modus eine Zeitsteuerung programmiert, wird dieser Modus bis Beendigung der Zeitsteuerung beibehalten und geht anschließend auf den Modus Antifrost/Off über. Wenn man während der Zeitsteuerung auf manuellen Betrieb wechselt oder ausschaltet, endet die Zeitsteuerung. - 76 - Digitales Uhrenthermostat ORUS RF - Manual...
  • Seite 79 Anmerkung: Bei der Stundenzählung ist die aktuelle Stunde der Programmierung inbegriffen. Desgleichen, wenn die Messeinheit Tage sind, ist der aktuelle Tag in der Zählung inbegriffen. Die Zeitsteuerungen in Stunden enden mit Ablauf der Stunde, die in Tagen um Mitternacht. - 77 - Digitales Uhrenthermostat ORUS RF - Manual...
  • Seite 80: Frostschutztemperatur Programmierung

    (Programmierung ON-OFF) oder “P” (proportionale Programmierung). • Mit den Tasten “ ” und “ ” die gewünschte Einstellungsart wählen und “ ” zum Bestätigen drücken und zur Einstellung des nächsten Parameters übergehen. - 78 - Digitales Uhrenthermostat ORUS RF - Manual...
  • Seite 81 ” und “ ” blinkt um den Wert zu erhöhen oder zu verringern. Eine genauere Beschreibung für das Vorgehen zur Wahl der Einstellungsart ist im Kapitel “EINSTELLUNGSART” auf Seite 86 zu finden. - 79 - Digitales Uhrenthermostat ORUS RF - Manual...
  • Seite 82 Im Feld (22) erscheint “dEG=” und im Feld (25) blinkt die gewählte Messeinheit. Die Tasten “ ” oder “ ” drücken, um die Messeinheit zu wechseln und “ ” zum Bestätigen. - 80 - Digitales Uhrenthermostat ORUS RF - Manual...
  • Seite 83: Kommunikationstest

    • Während des Testvorgangs erscheint im Feld (22) “oUt=”, im Feld (16) blinkt “tSt” und im Feld (15) erscheint “on” oder “oFF”, um anzuzeigen ob der Testmodus aktiviert ist oder nicht. - 81 - Digitales Uhrenthermostat ORUS RF - Manual...
  • Seite 84 ” zum Bestätigen drücken. Um die Tastensperre zu aktivieren oder deaktivieren, siehe Kapitel “FORTGESCHRITTENE FUNKTIONEN”. Betriebsstunden des Gerätes Es besteht die Möglichkeit, die Betriebsstunden des Geräts abzulesen (Relais in Position ON). - 82 - Digitales Uhrenthermostat ORUS RF - Manual...
  • Seite 85 Menü, wenn wir Taste “ ” drücken und kehren zum automatischen Betrieb zurück. Wenn während der Programmierung dieser Parameter keine Taste gedrückt wird, funktioniert nach 45 Sekunden wieder der automatische Betrieb. - 83 - Digitales Uhrenthermostat ORUS RF - Manual...
  • Seite 86: Fortgeschrittene Funktionen

    Die voreingestellten Werte für den automatischen Uhrzeitwechsel sind: – Umstellung Winter  Sommer: letzter Sonntag im März um 02:00 Uhr – Umstellung Sommer  Winter: letzter Sonntag im Oktober um 03:00 Uhr - 84 - Digitales Uhrenthermostat ORUS RF - Manual...
  • Seite 87 ” (Höchstwert) oder “ ” (Mindestwert). Im Feld (16) erscheint der gemessene Wert. Um die gespeicherten Höchst- und Mindestwerte auf Null zu stellen, drücken Sie mindestens 3 Sekunden lang Taste “ ”/“ ”. - 85 - Digitales Uhrenthermostat ORUS RF - Manual...
  • Seite 88: Einstellungsart

    • Einstellungsperiode. Die Bandeinstellung stellt den Temperaturbereich dar, der auf den gewählten Wert ausgerichtet ist, an dem die proportionale Einstellung angewandt wird Im Gerät wird die Hälfte der gewünschten Bandeinstellung festgelegt. - 86 - Digitales Uhrenthermostat ORUS RF - Manual...
  • Seite 89: Batteriewechsel

    Batterie, wobei das Display ausgeschaltet ist, der Verbrauch reduziert und alle Funktionen unterbrochen werden, mit Ausnahme der Uhr. In diesem Zustand kann der Betrieb weiterlaufen, da die Batterie eine Spannung beibehält, die den - 87 - Digitales Uhrenthermostat ORUS RF - Manual...
  • Seite 90: Referenznormen

    Es wird die Einhaltung der EU-Richtlinien erklärt 2006/95/CE (Niederspannung) 2004/108/CE (elektromagnetische Kompatibilität) in Bezug auf folgende harmonisierte Normen: ETSI EN 300 220-1, ETSI EN 300 220-2 ETSI EN 301 489-1, ETSI EN 301 489-3 - 88 - Digitales Uhrenthermostat ORUS RF - Manual...
  • Seite 91: Winterprogramme

    T1 ■ ■ ■ ■ ■ ■ ■ ■ ■ ■ ■ ■ ■ ■ ■ ■ ■ ■ ■ ■ ■ ■ ■ ■ 0 1 2 3 4 5 6 7 8 9 10 11 12 13 14 15 16 17 18 19 20 21 22 23 - 89 - Digitales Uhrenthermostat ORUS RF - Manual...
  • Seite 92: Sommerprogramme

    T1 ■ ■ ■ ■ ■ ■ ■ ■ ■ ■ ■ ■ ■ ■ ■ ■ ■ ■ ■ ■ ■ ■ ■ ■ 0 1 2 3 4 5 6 7 8 9 10 11 12 13 14 15 16 17 18 19 20 21 22 23 - 90 - Digitales Uhrenthermostat ORUS RF - Manual...
  • Seite 96 ORBIS Zeitschalttechnik GmbH Robert-Bosch Str. 3 D - 71088 Holzgerlingen Tel.: 07031 / 8665-0; Fax: 07031 / 8665-10 E-mail: Info@orbis-zeitschalttechnik.de http://www.orbis-zeitschalttechnik.de ORBIS TECNOLOGÍA ELÉCTRICA, S.A. Lérida, 61 E–28020 MADRID Teléfono:+ 34 91 5672277; Fax:+34 91 5714006 E-mail: info@ orbis.es http://www.orbis.es...

Inhaltsverzeichnis