Herunterladen Inhalt Inhalt Diese Seite drucken
Orbis ORUS Montage

Orbis ORUS Montage

Digitales uhrenthermostat
Vorschau ausblenden Andere Handbücher für ORUS:
Inhaltsverzeichnis

Werbung

Verfügbare Sprachen
  • DE

Verfügbare Sprachen

ORUS
CRONOTERMOSTATO
DIGITAL
Manual de Instrucciones
User Manual
DIGITAL PROGRAMMABLE THERMOSTAT
Manuale d'Uso
CRONOTERMOSTATO DIGITALE
Manuel d'utilisation
CHRONOTHERMOSTAT NUMÉRIQUE

Werbung

Inhaltsverzeichnis
loading

Inhaltszusammenfassung für Orbis ORUS

  • Seite 1 ORUS CRONOTERMOSTATO DIGITAL Manual de Instrucciones User Manual DIGITAL PROGRAMMABLE THERMOSTAT Manuale d’Uso CRONOTERMOSTATO DIGITALE Manuel d’utilisation CHRONOTHERMOSTAT NUMÉRIQUE...
  • Seite 3: Inhaltsverzeichnis

    Comando On-Off del teclado Página Temporizaciones Página Programación avanzada Página Funciones avanzadas Página Tipo de ajuste Página Sustitución de la batería Página Normas de referencia Página Programas invernales Página Programas estivales Página - 1 - Manual de Instrucciones - ORUS...
  • Seite 4 • Programación semanal con tres valores de T3 : +2 ÷ +35 °C temperatura controlables en el curso del día T2 : +2 ÷ +35 °C T1 : +2 ÷ +35 °C - 2 - Manual de Instrucciones - ORUS...
  • Seite 5: Montaje

    Por otro lado, se aconseja montar el cronotermostato aproximadamente a 150 cm del suelo. El montaje puede ser sobre pared o sobre caja de mecanismos. - 3 - Manual de Instrucciones - ORUS...
  • Seite 6: Dimensiones

    DIMENSIONES ESQUEMA DE CONEXIONES X.Temp 100K X.Code - 4 - Manual de Instrucciones - ORUS...
  • Seite 7: Advertencias De Seguridad

    ORUS es un cronotermostato electrónico semanal de pared que ejecuta acciones de tipo 1B con software de clase A y que se adapta a ambientes con un grado de contaminación 2 y una categoría de sobrecarga III (EN 60730-1) Modelo...
  • Seite 8 24.0 MANUAL La regulación de los niveles de temperatura está sujeta a la siguiente condición: T1 ≤ T2 ≤T3. En modalidad estival, T1 no es programable y corresponde a aire acondicionado OFF. - 6 - Manual de Instrucciones - ORUS...
  • Seite 9: Elementos De Control / Informaciones En Pantalla

    13) Tecla “ ”: Borra la fecha y la hora pero no la configuración de las programaciones (para hacer esto ver “Restauración de parámetros por defecto” pág. 26) (pulsación con una punta o boligrafo). - 7 - Manual de Instrucciones - ORUS...
  • Seite 10 19) Campo “Temporizaciones” 20) Campo “Activación aire acondicionado” 21) Campo “Activación calefacción” 22) Campo “Reloj” 23) Campo “Marcador” 24) Campo “Emisión por radiofrecuencia” (no utilizado) 25) Campo “Unidad de medida” 26) Campo “Apagado” - 8 - Manual de Instrucciones - ORUS...
  • Seite 11: Puesta En Marcha / Reset

    1 el campo de los minutos. Pulsar la tecla “ ” para confirmar. (En caso de que la configuración del reloj tenga lugar tras un reseteo, el campo “segundos” no será configurable. - 9 - Manual de Instrucciones - ORUS...
  • Seite 12 Al salir de este procedimiento, la indicación del reloj deja de parpadear, en el campo (16) vuelve a visualizarse la temperatura ambiente, mientras que, si la sonda externa está conectada, en el campo (15) se visualiza la temperatura externa. - 10 - Manual de Instrucciones - ORUS...
  • Seite 13: Configuración De Los Programas

    • Si ninguno de los programas satisface las exigencias del usuario, se elige cualquier programa y se pulsa de nuevo la tecla “PRG”, y parpadea entonces el segmento del campo (17) coincidente con la hora del reloj. - 11 - Manual de Instrucciones - ORUS...
  • Seite 14 (16). • Pulsando la tecla “ ” se confirma el programa para ese día y se pasa al día siguiente hasta llegar al domingo, tras lo cual se vuelve al funcionamiento normal. - 12 - Manual de Instrucciones - ORUS...
  • Seite 15: Configuración De Las Temperaturas

    “ ” se confirma el cambio y se vuelve al funcionamiento normal. En las características técnicas se informa de los límites de configuración para cada temperatura. - 13 - Manual de Instrucciones - ORUS...
  • Seite 16: Funcionamiento Manual

    2 teclas se puede modificar la configuración de la temperatura. Se pasa del programa manual al programa automático simplemente presionando de nuevo la tecla “ ” durante 3 segundos al menos. - 14 - Manual de Instrucciones - ORUS...
  • Seite 17: Funcionamiento Verano / Invierno

    Las posibilidades del funcionamiento estival son las mismas que las del invernal, por lo que la configuración de todos los parámetros puede hacerse siguiendo los procedimientos indicados en este manual de instrucciones. - 15 - Manual de Instrucciones - ORUS...
  • Seite 18: Comando On-Off Del Teclado

    Si durante la temporización se pasa a funcionamiento automático o apagado, la temporización finaliza. Funcionamiento automático Si en estado automático se programa una temporización, dicho estado se mantiene hasta el final de la temporización, tras lo cual se pasa al funcionamiento anticon- - 16 - Manual de Instrucciones - ORUS...
  • Seite 19 De la misma manera, si la unidad de medida está en días, en el cómputo se incluye el día actual. Las temporizaciones en horas terminan al final de la hora, las de los días a medianoche. - 17 - Manual de Instrucciones - ORUS...
  • Seite 20: Programación Avanzada

    (programación ON-OFF) o bien “P” (programación proporcional). Elegir mediante las teclas “ ” y “ ” el modo de ajuste deseado y pulsar “ ” para confirmar y pasar al ajuste del parámetro siguiente. - 18 - Manual de Instrucciones - ORUS...
  • Seite 21 10, 20 o 30 minutos. Para una descripción más detallada sobre como operar en la elección del tipo de ajuste se remite al capítulo “TIPO DE AJUSTE” en la pág. 26. - 19 - Manual de Instrucciones - ORUS...
  • Seite 22 Presencia de la sonda externa El cronotermostato permite conectar una sonda de temperatura externa que permite la visualización (y el posible ajuste) de la temperatura medida en el lugar en el que ésta se coloque. - 20 - Manual de Instrucciones - ORUS...
  • Seite 23 Elegir mediante las teclas “ ” y “ ” “Int” Si se quiere utilizar la sonda interna o “Ext” si se quiere utilizar la sonda externa y pulsar “ ” para confirmar la selección. - 21 - Manual de Instrucciones - ORUS...
  • Seite 24 El valor máximo memorizable es de 65535 horas. Para poner a cero el contador, pulsar la tecla “ ” durante 3 segundos cuando se esté en el menú visualización del contador. - 22 - Manual de Instrucciones - ORUS...
  • Seite 25: Funciones Avanzadas

    Si se selecciona ON se visualizan entonces otros dos menús, que definen respectivamente el cambio horario de – invierno  verano – verano  invierno (en el campo (20) aparece el símbolo “ ”. - 23 - Manual de Instrucciones - ORUS...
  • Seite 26 Nota: Un interruptor de encendido a apagado (y viceversa) a distancia llevará a cabo como antes con un par de minutos de retraso. - 24 - Manual de Instrucciones - ORUS...
  • Seite 27 (16) se mostrará el valor relativo a la interna. Para poner a cero los valores máximo/ mínimo memorizados, pulsar durante al menos 3 segundos la tecla “ ” / “ ”. - 25 - Manual de Instrucciones - ORUS...
  • Seite 28: Tipo De Ajuste

    • el ajuste de la banda • el período de ajuste. El ajuste de la banda representa el rango de temperatura, centrado en el valor seleccionado, en el que se aplica el ajuste proporcional. - 26 - Manual de Instrucciones - ORUS...
  • Seite 29: Sustitución De La Batería

    La sustitución de la batería ha de efectuarse en el tiempo máximo de un minuto, mientras la pantalla parpadea. - 27 - Manual de Instrucciones - ORUS...
  • Seite 30: Normas De Referencia

    NORMAS DE REFERENCIA Se declara la conformidad con las Directivas Comunitarias 2006/95/CE (Baja Tensión) 2004/108/CE (Compatibilidad electromagnética) con referencia a las siguientes normas armonizadas: EN 60730-2-7, EN 60730-2-9 EN 61000-6-1, EN 61000-6-3 - 28 - Manual de Instrucciones - ORUS...
  • Seite 31: Programas Invernales

    T1 I I I I I I I I I I I I I I I I I I I I I I I I 0 1 2 3 4 5 6 7 8 9 10 11 12 13 14 15 16 17 18 19 20 21 22 23 - 29 - Manual de Instrucciones - ORUS...
  • Seite 32: Programas Estivales

    T1 I I I I I I I I I I I I I I I I I I I I I I I I 0 1 2 3 4 5 6 7 8 9 10 11 12 13 14 15 16 17 18 19 20 21 22 23 - 30 - Manual de Instrucciones - ORUS...
  • Seite 33 Page ■ Timing Page ■ Advanced programming Page ■ Advanced functions Page ■ Regulation type Page ■ Battery replacement Page ■ Reference standards Page ■ Winter programs Page ■ Summer programs Page - 31 - Orus Programmable Thermostat User Manual...
  • Seite 34 • Weekly programming with three tempera- T3 : +2 ÷ +35 °C ture values controllable during the day T2 : +2 ÷ +35 °C T1 : +2 ÷ +35 °C - 32 - Orus Programmable Thermostat User Manual...
  • Seite 35 It is moreover advised to install the environment programmable thermostat at about 150 cm from the floor. Assembly can be wall or box 503 coverage - 33 - Orus Programmable Thermostat User Manual...
  • Seite 36: Connection Diagram

    DIMENSIONS CONNECTION DIAGRAM X.Temp 100K X.Code - 34 - Orus Programmable Thermostat User Manual...
  • Seite 37: Safety Warnings

    ■ Orus is an electronic wall-mounting weekly programmable thermostat that executes B1 type actions with a class A software and is suitable for environments with a pollution degree of 2 and overvoltage category III (EN 60730-1). Model Description ORUS Black...
  • Seite 38 25.0 20.0 24.0 MANUAL Regulation of temperature levels is subjected to the following condition: T1 ≤ T2 ≤T3. In summer mode, T1 cannot be set and corresponds to the air conditioning OFF. - 36 - Orus Programmable Thermostat User Manual...
  • Seite 39: Control Elements

    13) “ ” Key: deletes date and time but not the set programs (to do this see “Restoring default parameters” page 56) (the key is reachable only with a point). - 37 - Orus Programmable Thermostat User Manual...
  • Seite 40 19) “Timer” Field 20) “Air conditioning activation” Field 21) “Heating activation” Field 22) “Clock” Field 23) “Phone dial” Field 24) “Radio frequency transmission” Field (not used) 25) “Unit of measurement” Field 26) “Off” Field - 38 - Orus Programmable Thermostat User Manual...
  • Seite 41: Clock Setting

    Press the “ ” key to confirm. (In case the setting of the clock takes place after a reset, the “seconds” field is not adjustable. Therefore, the first parameter to set will be the “minutes” field). - 39 - Orus Programmable Thermostat User Manual...
  • Seite 42 Upon exiting such procedure the clock indication will not flash any more; field (16) will display the environment temperature again, while, if the external probe is connected, field (15) will display the external temperature. - 40 - Orus Programmable Thermostat User Manual...
  • Seite 43 “ ” key to move on to the next day. • If no program satisfies the user's needs, choose any program and press the “PRG” key again; this will bring the segment of the corresponding field (17) to flash. - 41 - Orus Programmable Thermostat User Manual...
  • Seite 44 “Px” flashing on field (16). Pressing the “ ” key confirms the program for that day and moves on to the next until Sunday appears, after which operation goes back to normal mode. - 42 - Orus Programmable Thermostat User Manual...
  • Seite 45 “ ” key it is possible to confirm the change and return to normal operation. The setting limits are reported in the technical characteristics. - 43 - Orus Programmable Thermostat User Manual...
  • Seite 46: Manual Operation

    ” key; pressing one of the 2 keys again will allow modification of the temperature setting. To move from the manual program to the automatic one, simply press the “ ” key again for at least 3 seconds. - 44 - Orus Programmable Thermostat User Manual...
  • Seite 47 The potential of the summer operation is the same as the one of the winter operation; therefore the setting of all parameters can be carried out following the procedures reported in this instructions manual. - 45 - Orus Programmable Thermostat User Manual...
  • Seite 48: Automatic Operation

    If, during the timing, operation is switched to automatic or off, the timing ends. Automatic operation If in automatic status you set a timing, such automatic status will be - 46 - Orus Programmable Thermostat User Manual...
  • Seite 49 In the same way, if the measurement unit is in days, the count also includes the current one. Timing in hours terminate on the hour, the ones in days at midnight. - 47 - Orus Programmable Thermostat User Manual...
  • Seite 50: Advanced Programming

    Regulation type (only for winter operation) • Field (22) will display the writing “rEG=” and on field (16) letter “O” (ON-OFF programming) or “P” (proportional programming) will flash. - 48 - Orus Programmable Thermostat User Manual...
  • Seite 51 It is possible to choose between 10, 20 or 30 minutes. For a wider description on how to operate the regulation type choice, please refer to the chapter “REGULATION TYPE” on page 56. - 49 - Orus Programmable Thermostat User Manual...
  • Seite 52 “ ” to confirm. External probe presence The programmable thermostat allows to connect a remote external temperature probe for the displaying (and in case also regulation) of the temperature measured where the probe is placed. - 50 - Orus Programmable Thermostat User Manual...
  • Seite 53 ” and “ ” keys, choose “Int” if you want to use the internal probe or “Est” if you want to use the external probe and press “ ” to confirm the choice. - 51 - Orus Programmable Thermostat User Manual...
  • Seite 54 The maximum memorizable value is of 65535 hours. To reset the counter, press the “ ” key for about 3 seconds when you are in the counter view menu. - 52 - Orus Programmable Thermostat User Manual...
  • Seite 55: Advanced Functions

    If the choice is ON, then two other menus will be displayed, which define respectively the hour change from - winter  summer - summer  winter (on field (20) the “ ” symbol will appear) - 53 - Orus Programmable Thermostat User Manual...
  • Seite 56 Note: the OFF command from keypad has priority on the OFF command from the dial; therefore to command activations and deactivations with the dial, the programmable thermostat must not be off. - 54 - Orus Programmable Thermostat User Manual...
  • Seite 57: Keypad Lock

    field (16) will display the value relevant to the internal one. To reset the minimum/maximum value memorized, press the “ ”/“ ” key for at least 3 seconds. - 55 - Orus Programmable Thermostat User Manual...
  • Seite 58: Restoring Default Parameters

    The necessary parameters for the definition of this mode are: • the regulation band • the regulation period The regulation band represents the temperature interval, centered on the setpoint, in which the proportional regulation is checked. - 56 - Orus Programmable Thermostat User Manual...
  • Seite 59: Battery Replacement

    Operation in this status may continue until the battery keeps a voltage such to allow operation to the microcontroller. - 57 - Orus Programmable Thermostat User Manual...
  • Seite 60: Reference Standards

    REFERENCE STANDARDS Compliance with Community Directives 2006/95/EC (low voltage) 2004/108/EC (Electromagnetic compatibility) is declared with reference to the following harmonized standards: EN 60730-2-7, EN 60730-2-9 EN 61000-6-1, EN 61000-6-3 - 58 - Orus Programmable Thermostat User Manual...
  • Seite 61 T1 I I I I I I I I I I I I I I I I I I I I I I I I 0 1 2 3 4 5 6 7 8 9 10 11 12 13 14 15 16 17 18 19 20 21 22 23 - 59 - Orus Programmable Thermostat User Manual...
  • Seite 62 T1 I I I I I I I I I I I I I I I I I I I I I I I I 0 1 2 3 4 5 6 7 8 9 10 11 12 13 14 15 16 17 18 19 20 21 22 23 - 60 - Orus Programmable Thermostat User Manual...
  • Seite 63 ■ Temporizzazioni Pagina ■ Programmazione avanzata Pagina ■ Funzioni avanzate Pagina ■ Tipo di regolazione Pagina ■ Sostituzione batteria Pagina ■ Norme di riferimento Pagina ■ Programmi invernali Pagina ■ Programmi estivi Pagina - 61 - Manuale d’Uso Cronotermostato - ORUS...
  • Seite 64 • Programmazione settimanale con tre valori • Programmazione settimanale con tre valori T3 : +2 ÷ +35 °C di temperatura controllabili lungo l’arco T2 : +2 ÷ +35 °C della giornata T1 : +2 ÷ +35 °C - 62 - Manuale d’Uso Cronotermostato - ORUS...
  • Seite 65 Si consiglia inoltre di montare il cronotermostato ambiente a circa 150 cm dal pavimento. Il montaggio può essere a parete oppure a copertura scatola 503 - 63 - Manuale d’Uso Cronotermostato - ORUS...
  • Seite 66 DIMENSIONI SCHEMA DI COLLEGAMENTO - 64 - Manuale d’Uso Cronotermostato - ORUS...
  • Seite 67: Avvertenze Di Sicurezza

    ORUS è un cronotermostato settimanale da parete elettronico che esegue azioni di tipo 1B con software di classe A ed è adatto ad ambienti con grado di inquinamento 2 e categoria di sovratensione III (EN 60730-1) Modello Descrizione ORUS Nero...
  • Seite 68 23.0 18.0 25.0 20.0 24.0 MANUALE La regolazione dei livelli di temperatura soggiace alla condizione seguente: T1 ≤ T2 ≤T3. In modalità estiva, T1 non è impostabile e corrisponde a condizionatore OFF. - 66 - Manuale d’Uso Cronotermostato - ORUS...
  • Seite 69: Elementi Di Controllo

    13) Tasto “ ”: cancella la data e l’ora ma non le programmazioni impostate (per far questo vedere “Ripristino parametri di default” pag. 86) (il tasto è raggiungibile solo con una punta). - 67 - Manuale d’Uso Cronotermostato - ORUS...
  • Seite 70: Indicazioni A Display

    19) Campo “Temporizzazioni” 20) Campo “Attivazione condizionamento” 21) Campo “Attivazione riscaldamento” 22) Campo “Orologio” 23) Campo “Combinatore telefonico” 24) Campo “Trasmissione a radiofrequenza” (non utilizzato) 25) Campo “Unità di misura” 26) Campo “Spento” - 68 - Manuale d’Uso Cronotermostato - ORUS...
  • Seite 71: Impostazione Orologio

    Premere il tasto “ ” per confermare. (Nel caso in cui l’impostazione dell’orologio avvenga dopo un reset, il campo “secondi” non è impostabile. Pertanto il primo parametro da impostare sarà il campo “minuti”. - 69 - Manuale d’Uso Cronotermostato - ORUS...
  • Seite 72 All’uscita di tale procedura l’indicazione dell’orologio non lampeggia più, sul campo (16) ritorna la visualizzazione della temperatura ambiente, mentre, se la sonda esterna è collegata, il campo (15) visualizza la temperatura esterna. - 70 - Manuale d’Uso Cronotermostato - ORUS...
  • Seite 73 “ ”. • Se nessun programma soddisfa le esigenze dell’utente, si sceglie un qualsiasi programma e si ripreme il tasto “PRG”, a questo punto lampeggia il segmento del campo (17) relativo. - 71 - Manuale d’Uso Cronotermostato - ORUS...
  • Seite 74 • Premendo il tasto “ ” si conferma il programma per quel giorno e si passa al giorno successivo finché si arriva a domenica, dopo di ché si ritorna in funzionamento normale. - 72 - Manuale d’Uso Cronotermostato - ORUS...
  • Seite 75 ” si può modificarne il valore e con il tasto “ ” si conferma il cambiamento e si ritorna al funzionamento normale. I limiti di impostazione per i set sono riportati nelle caratteristiche tecniche. - 73 - Manuale d’Uso Cronotermostato - ORUS...
  • Seite 76: Funzionamento Manuale

    ”, premendo ancora uno dei 2 tasti si può modificare l’impostazione della temperatura. Si passa dal programma manuale al programma automatico semplicemente premendo di nuovo il tasto “ ” per almeno 3 secondi. - 74 - Manuale d’Uso Cronotermostato - ORUS...
  • Seite 77 45 secondi dall’ultima operazione. Le potenzialità del funzionamento estate sono speculari a quelle del funzionamento inverno, per cui l’impostazione di tutti i parametri può essere fatta seguendo le procedure riportate in questo manuale di istruzioni. - 75 - Manuale d’Uso Cronotermostato - ORUS...
  • Seite 78 Se durante la temporizzazione si passa in funzionamento automatico o spento, la temporizzazione termina. Funzionamento automatico Se nello stato automatico si imposta una temporizzazione, tale stato automatico vie- ne mantenuto fino al termine della temporizzazione, poi si passa al funzionamento - 76 - Manuale d’Uso Cronotermostato - ORUS...
  • Seite 79 Allo stesso modo, se l’unità di misura è in giorni, nel conteggio è incluso anche il giorno corrente. Le temporizzazioni in ore terminano allo scadere dell’ora, quelle in giorni alla mezzanotte. - 77 - Manuale d’Uso Cronotermostato - ORUS...
  • Seite 80: Programmazione Avanzata

    “0” (programmazione ON-OFF) oppure “P” (programmazione proporzionale). Scegliere tramite i tasti “ ” e “ ” il modo di regolazione voluto e premere “ ” per confermare e passare all’impostazione del parametro successivo. - 78 - Manuale d’Uso Cronotermostato - ORUS...
  • Seite 81 E’ possibile scegliere tra 10, 20 o 30 minuti. Per una descrizione più ampia su come operare la scelta del tipo di regolazione si rimanda al capitolo “TIPO DI REGOLAZIONE” a pag. 86. - 79 - Manuale d’Uso Cronotermostato - ORUS...
  • Seite 82 ” per confermare. Presenza sonda esterna Il cronotermostato consente di collegare una sonda di temperatura esterna remotabile per la visualizzazione (ed eventualmente la regolazione) della temperatura misurata ove è posta la sonda. - 80 - Manuale d’Uso Cronotermostato - ORUS...
  • Seite 83 Scegliere tramite i tasti “ ” e “ ” “Int” se si vuole utilizzare la sonda interna oppure “Ext” se si vuole utilizzare la sonda esterna e premere “ ” per confermare la scelta. - 81 - Manuale d’Uso Cronotermostato - ORUS...
  • Seite 84 Il valore massimo memorizzabile è di 65535 ore. Per azzerare il contatore, premere il tasto “ ” per circa 3 secondi quando ci si trova nel menù visualizzazione del contatore. - 82 - Manuale d’Uso Cronotermostato - ORUS...
  • Seite 85: Funzioni Avanzate

    Se la scelta è ON allora vengono visualizzati altri due menù, che definiscono rispettivamente il cambio orario da – inverno  estate – estate  inverno (sul campo (20) compare il simbolo ” “. - 83 - Manuale d’Uso Cronotermostato - ORUS...
  • Seite 86 OFF da combinatore, pertanto per comandare accensioni e spegnimenti tramite combinatore il cronotermostato non deve essere spento. Nota: la commutazione da acceso a spento (e viceversa) da remoto avviene al più entro con paio di minuti di ritardo . - 84 - Manuale d’Uso Cronotermostato - ORUS...
  • Seite 87: Blocco Tastiera

    (15) compare il valore relativo alla sonda esterna mentre sul campo (16) compare il valore relativo alla sonda interna. Per azzerare il massimo/minimo valore memorizzato, premere per almeno 3 secondi il tasto “ ” / “ “. - 85 - Manuale d’Uso Cronotermostato - ORUS...
  • Seite 88 I parametri necessari per la definizione di questa modalità sono: • la banda di regolazione • il periodo di regolazione. La banda di regolazione rappresenta l’intervallo di temperatura, centrato sul setpoint, in cui si attua la regolazione proporzionale. - 86 - Manuale d’Uso Cronotermostato - ORUS...
  • Seite 89: Sostituzione Batteria

    La sostituzione della batteria deve avvenire nel tempo massimo di un minuto in condizioni di display lampeggiante. - 87 - Manuale d’Uso Cronotermostato - ORUS...
  • Seite 90: Norme Di Riferimento

    NORME DI RIFERIMENTO La conformità alle Direttive Comunitarie 2006/95/CE (Bassa Tensione) 2004/108/CE (Compatibilità Elettromagnetica) è dichiarata in riferimento alle seguenti norme armonizzate:: CEI EN 60730-2-7, CEI EN 60730-2-9 CEI EN 61000-6-1, CEI EN 61000-6-3 - 88 - Manuale d’Uso Cronotermostato - ORUS...
  • Seite 91 T1 I I I I I I I I I I I I I I I I I I I I I I I I 0 1 2 3 4 5 6 7 8 9 10 11 12 13 14 15 16 17 18 19 20 21 22 23 - 89 - Manuale d’Uso Cronotermostato - ORUS...
  • Seite 92 T1 I I I I I I I I I I I I I I I I I I I I I I I I 0 1 2 3 4 5 6 7 8 9 10 11 12 13 14 15 16 17 18 19 20 21 22 23 - 90 - Manuale d’Uso Cronotermostato - ORUS...
  • Seite 93 ■ Programmation avancée Page ■ Fonctions avancées Page ■ Type de réglage Page ■ Remplacement de la batterie Page ■ Normes de référence Page ■ Programmes d’hiver Page ■ Programmes d’été Page - 91 - Chronothermostat numérique ORUS - Manuel d’utilisation...
  • Seite 94 • Programmation hebdomadaire avec trois valeurs T3 : +2 ÷ +35 °C de température qui peuvent être contrôlés T2 : +2 ÷ +35 °C pendant la journée T1 : +2 ÷ +35 °C - 92 - Chronothermostat numérique ORUS - Manuel d’utilisation...
  • Seite 95: Montage

    On conseille en outre de monter le chronothermostat ambiante à eviron 150 cm du plancher. Le montage peut être mural ou en couverture boîte 503 - 93 - Chronothermostat numérique ORUS - Manuel d’utilisation...
  • Seite 96: Dimensions

    DIMENSIONS SCHÉMAS DE BRANCHEMENT X.Temp 100K X.Code - 94 - Chronothermostat numérique ORUS - Manuel d’utilisation...
  • Seite 97: Notices De Sécurité

    ORUS est un chronothermostat hebdomadaire mural électronique qui execute actions de type 1B avec software de classe A et est apte aux mileaux avec degré de pollution 2 et catégorie de surtension III (EN 60730-1) Modèle Description ORUS Nero Chronothermostat hebdomadaire mural...
  • Seite 98 20.0 24.0 MANUEL Le réglage des niveaux de température se plie à la condition suivante: T1 ≤ T2 ≤T3. En modalité estivale, T1 n’est pas établiable et correspond au conditionateur OFF. - 96 - Chronothermostat numérique ORUS - Manuel d’utilisation...
  • Seite 99 13) Touche “ ” annule la date et l’heure mais non les programmations établiées (pour faire cela consulter “Rétablissement paramètres de défaut” page 116). (La touche est joignable seulement avec une pointe). - 97 - Chronothermostat numérique ORUS - Manuel d’utilisation...
  • Seite 100: Eléments De Contrôle / Indications Sur L'écran

    19) Champ “Temporisations” 20) Champ “Activation conditionnement” 21) Champ “Activation chauffage” 22) Champ “Horloge” 23) Champ “Combinateur téléphonique” 24) Champ “Transmission à radiofréquence” (non ulitisé) 25) Champ “Unité de mesure” 26) Champ “Étenit” - 98 - Chronothermostat numérique ORUS - Manuel d’utilisation...
  • Seite 101: Démarrage Initial / Reset

    1 le champ minutes ou sur le touché “ ” pour metre au zéro le champ secondes. Appuyer sur le touché “ ” puor confirmer. (Dans le cas où le réglage de l’horloge - 99 - Chronothermostat numérique ORUS - Manuel d’utilisation...
  • Seite 102 À la sortie de cette procédure l’indication de l’horloge ne clignote plus, sur le champ (16) retourne l’affichage de la température ambiante, alors que,si la sonde externe est connectée, le champ (15) visualise la température externe. - 100 - Chronothermostat numérique ORUS - Manuel d’utilisation...
  • Seite 103: Affichage Programmes

    ”. • Si aucun programme satisfait les exigences de l’utilisateur, on choisit un programme quelconque et on reappuie le touché “PRG”, à ce point le segment du champ (17) relatif clignote. - 101 - Chronothermostat numérique ORUS - Manuel d’utilisation...
  • Seite 104 En appuyant la touche “ ” on confirme le programme pour ce jour et on passé au jour suivant jusqu’ à ce que on arrive à dimanche, après quoi on retourne en fonctionnement normal. - 102 - Chronothermostat numérique ORUS - Manuel d’utilisation...
  • Seite 105: Réglage Des Températures

    ” on peut en modifier le valeur et avec la touche “ ” on confirme le changement et on retourne au fonctionnement normal. Les limites de réglage pour les set sont indiqués dans les caractéristique techniques. - 103 - Chronothermostat numérique ORUS - Manuel d’utilisation...
  • Seite 106: Fonctionnement Manuel

    2 touches on peut modifier l’impostation de la température. On passe du programme manuel au programme automatique simplement en appuyant de nouveau la touche “ ” pour au moins 3 secondes. - 104 - Chronothermostat numérique ORUS - Manuel d’utilisation...
  • Seite 107: Fonctionnement Été / Hiver

    Les potentialités du fonctionnement été sont spéculaires aux potentilaités du fonctionnement hiver, donc l’impostation de tous les paramètres peut être faite en suivant les procédures indiquées dans ce manuel d’instructions. - 105 - Chronothermostat numérique ORUS - Manuel d’utilisation...
  • Seite 108: Commande On-Off De Clavier

    Si pendant la temporisation on passe au fonctionnement automatique ou éteint, la temporisation termine. Fonctionnement automatique Si dans l’état automatique on affiche une temporisation, cet état automatique sera - 106 - Chronothermostat numérique ORUS - Manuel d’utilisation...
  • Seite 109 Pareillement, si l’unité de mesure est en jours, dans le comptage aussi le jour courant est inclus. Les temporisations en heures terminent à l’issue de l’heure, les tempori- sations en jours à minuit. - 107 - Chronothermostat numérique ORUS - Manuel d’utilisation...
  • Seite 110: Programmation Avancée

    (programmation proportionnelle) clignotante • Choisir à travers les touches “ ” et “ ” le mode de réglage voulu et appuyer “ ” pour confirmer et passer à l’établissement du paramètre suivant. - 108 - Chronothermostat numérique ORUS - Manuel d’utilisation...
  • Seite 111 10, 20 ou 30 minutes. Pour une description plus ample à propos de comment opérer la choix du type de réglage on renvoie au chapitre “TYPE DE RÊGLAGE” à la page. 116. - 109 - Chronothermostat numérique ORUS - Manuel d’utilisation...
  • Seite 112 Présence sonde externe Le chronothermostat consent de connecter une sonde de températue externe remotable pour la visualisation (et éventuellement le réglage) de la température mesurée où se trouve la sonde externe. - 110 - Chronothermostat numérique ORUS - Manuel d’utilisation...
  • Seite 113 Choisir à travers les touches “ ” et “ ” “Int” si on veut utiliser la sonde interne ou “Est” si on veut utiliser la sonde externe et appuyer “ ” pour confirmer la choix. - 111 - Chronothermostat numérique ORUS - Manuel d’utilisation...
  • Seite 114 Le valeur maximum memorisable est de 65535 heures. Pour mettre à zéro le compteur, appuyer sur la touche “ ” pour 3 secondes environ quand on est dans le menu de visualisation du compteur. - 112 - Chronothermostat numérique ORUS - Manuel d’utilisation...
  • Seite 115: Fonctions Avancées

    Si la choix est ON on visualise autres deux menus,qui définissent respectivement le change horaire de – hiver  été – été  hiver (sur le champ (20) comparait le symbole “ ”). - 113 - Chronothermostat numérique ORUS - Manuel d’utilisation...
  • Seite 116 Note: le commande OFF de clavier a priorité sur le commande OFF de combinateur, donc pour commander allumages et arrêts à travers combinateur le chronothermostat ne doit pas être éteint. - 114 - Chronothermostat numérique ORUS - Manuel d’utilisation...
  • Seite 117 (16) comparaît le valeur relatif à la sonde interne. Pour mettre à zéro le maximum/ minimum valeur mémorisé, appuyer pour au moins 3 secondes sur la touche “ ”/“ ”. - 115 - Chronothermostat numérique ORUS - Manuel d’utilisation...
  • Seite 118: Type De Réglage

    La bande de réglage représente l’intervalle de temérature centré, sur le setpoint, ou on réalise le réglage proportionnel. Dans le dispositif on établit la moitié de la bande de réglage qui on désire. - 116 - Chronothermostat numérique ORUS - Manuel d’utilisation...
  • Seite 119: Remplacement De La Batterie

    Le remplacement de la batterie doit arriver dans le temps maxi- mum d’ un minute en conditions d’écran clignotant. - 117 - Chronothermostat numérique ORUS - Manuel d’utilisation...
  • Seite 120: Normes De Référence

    être beaucoup plus long. NORMES DE RÉFÉRENCE La conformità aux Directives Communautaires 2006/95/CE (Basse Tension) 2004/108/CE (Compatibilité Êlectromagnetique) Est déclarée avec référence aux normes harmonisées suivantes: EN 60730-2-7, EN 60730-2-9 EN 61000-6-1, EN 61000-6-3 - 118 - Chronothermostat numérique ORUS - Manuel d’utilisation...
  • Seite 121: Programmes D'hiver

    T1 I I I I I I I I I I I I I I I I I I I I I I I I 0 1 2 3 4 5 6 7 8 9 10 11 12 13 14 15 16 17 18 19 20 21 22 23 - 119 - Chronothermostat numérique ORUS - Manuel d’utilisation...
  • Seite 122: Programmes D'été

    T1 I I I I I I I I I I I I I I I I I I I I I I I I 0 1 2 3 4 5 6 7 8 9 10 11 12 13 14 15 16 17 18 19 20 21 22 23 - 120 - Chronothermostat numérique ORUS - Manuel d’utilisation...
  • Seite 127 ORBIS ITALIA S.p.A. Via L. Da Vinci, 9/B 20060 Cassina De’ Pecchi - MI Tel. 02/95343454 Fax 02/9520046 e-mail: info@orbisitalia.it http://www.orbisitalia.it...
  • Seite 128 ORBIS TECNOLOGÍA ELÉCTRICA, S.A. Lérida, 61 E–28020 MADRID Teléfono:+ 34 91 5672277; Fax:+34 91 5714006 E-mail: info@ orbis.es http://www.orbis.es...
  • Seite 129 ORUS DIGITALES UHRENTHERMOSTAT Manual...
  • Seite 131 Konfiguration der Programme Seite Konfiguration der Temperaturen Seite Handbetrieb Seite Sommer/ Winterbetrieb Seite On-Off Befehl der Tastatur Seite Zeitsteuerung Seite Fortgeschrittene Programmierung Seite Fortgeschrittene Funktionen Seite Einstellungsart Seite Batteriewechsel Seite Referenznormen Seite Winterprogramme Seite Sommerprogramme Seite - 1 - Manual - ORUS...
  • Seite 132 Digitales Uhrenthermostat ORUS • Garantiert Komfort und Kontrolle des Verbrauchs im Sommer wie im Winter (Heizung/ Klimaanlage) • Stromversorgung: 1 Alkalibatterie 1,5 V AA • Montage Aufputz oder in UP-Dosen • Anzeige des Betriebsstatus, Uhrzeit, Wochentag und Umgebungstemperatur, intern und extern •...
  • Seite 133: Montage

    Wärmequellen, direktes Sonnenlicht und Orte mit übermäßiger oder fehlender Ventilation. Außerdem wird empfohlen, das Uhrenthermostat in ca. 150 cm Höhe über dem Boden zu installieren. Die Montage kann Aufputz oder in UP-Dosen ausgeführt werden. - 3 - Manual - ORUS...
  • Seite 134: Abmessungen

    ABMESSUNGEN ANSCHLUSSSCHEMA X.Temp 100K X.Code - 4 - Manual - ORUS...
  • Seite 135: Sicherheitshinweise

    ORUS ist ein elektronisches, wöchentliches Uhrenthermostat für Aufputzmontage, das Aktionen Typ lB mit Software Klasse A ausführt, geeignet für Umgebungen mit Verschmutzungsgrad 2 und Überspannungskategorie III (EN 60730-1). Modell Eigenschaften ORUS weiss Uhrenthermostat wöchentlich ORUS schwarz Uhrenthermostat wöchentlich SICHERHEITSHINWEISE Bei Installation und Betrieb des Produktes müssen folgende Hinweise befolgt berücksichtigt werden:...
  • Seite 136 Die voreingestellten Temperaturwerte sind folgende (in °C): Winterbetrieb Sommerbetrieb 15,0 23,0 18,0 25,0 20,0 24,0 MANUAL Die Regelung der Temperaturniveaus unterliegt folgender Voraussetzung: T1 ≤ T2 ≤T3. Im Sommermodus ist Tl nicht programmierbar und entspricht Klimaanlage in OFF. - 6 - Manual - ORUS...
  • Seite 137 Objekt oder Kugelschreiberspitze drücken) 13) Taste “ ”: löscht Datum und Uhrzeit, aber nicht die Konfiguration der Programme (um dies auszuführen siehe "Reset der Default Parameter" Seite 26) (mit spitzem Objekt oder Kugelschreiberspitze drücken). - 7 - Manual - ORUS...
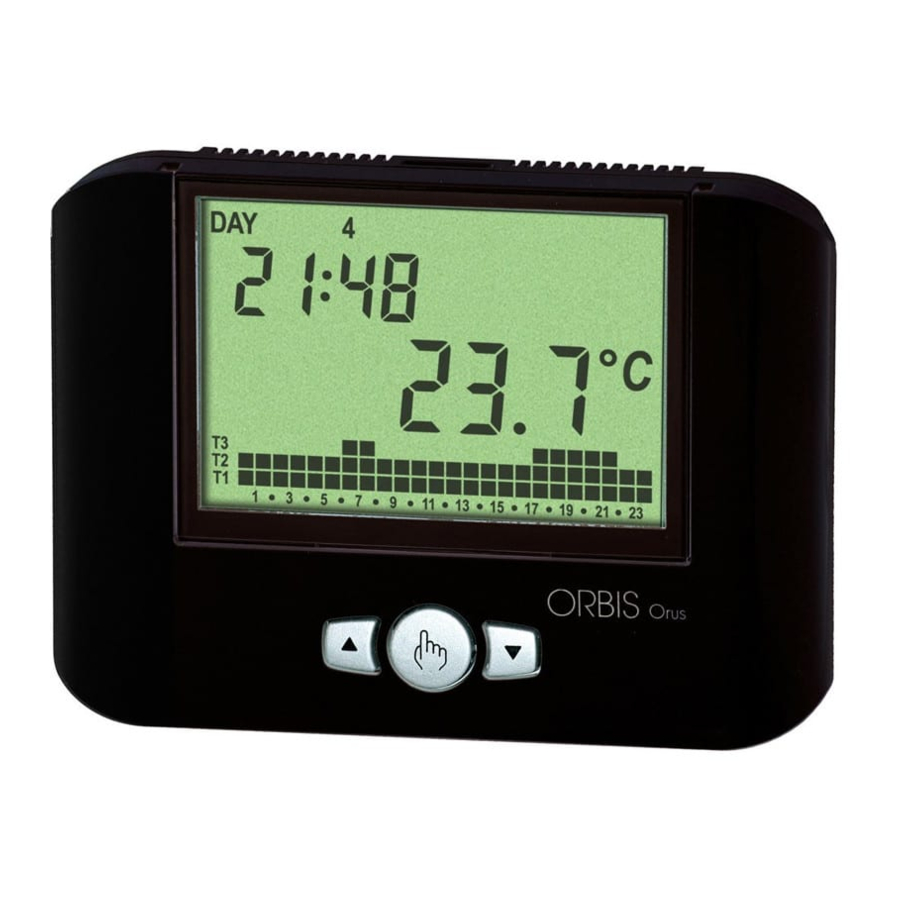
  • Seite 138: Displayanzeigen

    17) Feld “konfiguriertes Programm” 18) Feld “Aktivierung manueller Betrieb” 19) Feld “Zeitsteuerung” 20) Feld “Aktivierung Klimaanlage” 21) Feld “Aktivierung Heizung” 22) Feld “Uhr” 23) Feld “Wähleinrichtung” 24) Feld “Radiofrequenzemission” (unbenutzt) 25) Feld “Messeinheit” 26) Feld “Off” - 8 - Manual - ORUS...
  • Seite 139: Inbetriebnahme / Reset

    Sekunden auf Null zu stellen und um 1 das Feld der Minuten zu verringern. Taste “ ” zum Bestätigen drücken. (Wenn die Konfiguration der Uhr nach einem Reset ausgeführt wird, ist das Feld „Sekunden“ nicht konfigurierbar). - 9 - Manual - ORUS...
  • Seite 140 Wenn man diesen Vorgang verlässt, hört die Anzeige der Uhr auf zu blinken, das Feld (16) zeigt wieder die Umgebungstemperatur an, wenn aber der externe Sensor angeschlossen ist, wird im Feld (15) die externe Temperatur angezeigt. - 10 - Manual - ORUS...
  • Seite 141: Konfiguration Der Programme

    Tast “ “ drücken. • Wenn keines der Programme die Anforderungen des Benutzers erfüllt, wählt man irgendein Programm und drückt erneut Taste “PRG”, dann blinkt das Segment in Feld (17), das der Uhrzeit entspricht. - 11 - Manual - ORUS...
  • Seite 142 Stand zurück in dem “Px” im Feld (16) blinkt. • Mit Taste “ ” bestätigen wir das Programm für diesen Tag und gehen auf den nächsten Tag über und weiter bis zum Sonntag, danach kehren wir zum normalen Betrieb zurück. - 12 - Manual - ORUS...
  • Seite 143: Konfiguration Der Temperaturen

    ” und “ ” kann der Wert geändert werden und mit Taste “ ” bestätigen wir die Änderung und kehren zum normalen Betrieb zurück. In den technischen Daten werden die Grenzwerte für jede Temperatur angegeben. - 13 - Manual - ORUS...
  • Seite 144: Manueller Betrieb

    Tasten drückt, kann die Konfiguration der Temperatur geändert werden. Man kann vom manuellen Programm wieder auf das automatische Programm übergehen, indem man einfach erneut die Taste “ ” mindestens 3 Sekunden lang drückt. - 14 - Manual - ORUS...
  • Seite 145: Sommer/ Winterbetrieb

    ” drücken oder 45 Sekunden nach der zuletzt getätigten Handhabung. Die Möglichkeiten des Sommerbetriebs sind die gleichen für den Winterbetrieb, deswegen kann die Konfiguration aller Parameter gemäß der in diesem Manual angegeben Verfahren ausgeführt werden. - 15 - Manual - ORUS...
  • Seite 146: On-Off Befehl Der Tastatur

    Modus bis Beendigung der Zeitsteuerung beibehalten und geht anschließend auf automatischen Betrieb über. Wenn man während der Zeitsteuerung auf automatischen Betrieb wechselt oder ausschaltet, endet die Zeitsteuerung. Automatischer Betrieb Wenn man im automatischen Modus eine Zeitsteuerung programmiert, wird dieser - 16 - Manual - ORUS...
  • Seite 147: Zeitgesteuertes Ausschalten

    Anmerkung: Bei der Stundenzählung ist die aktuelle Stunde der Program- mierung inbegriffen. Desgleichen, wenn die Messeinheit Tage sind, ist der aktuelle Tag in der Zählung inbegriffen. Die Zeitsteuerungen in Stunden enden mit Ablauf der Stunde, die in Tagen um Mitternacht. - 17 - Manual - ORUS...
  • Seite 148: Fortgeschrittene Programmierung

    Feld (16) blinkt der Buchstabe “0” (Programmierung ON-OFF) oder “P” (proportionale Programmierung). Mit den Tasten “ ” und “ ” die gewünschte Einstellungsart wählen und “ ” zum Bestätigen drücken und zur Einstellung des nächsten Parameters übergehen. - 18 - Manual - ORUS...
  • Seite 149 Wert zu erhöhen oder zu verringern. Man kann zwischen 10, 20 oder 30 Minuten wählen. Eine genauere Beschreibung für das Vorgehen zur Wahl der Einstellungsart ist im Kapitel "EINSTELLUNGSART” auf Seite 26 zu finden. - 19 - Manual - ORUS...
  • Seite 150: Messeinheit Der Temperatur

    Messeinheit zu wechseln und “ ” zum Bestätigen. Präsenz des externen Sensors Das Uhrenthermostat verfügt über die Möglichkeit einen Sensor für externe Temperatur anzuschließen, der die Anzeige (und mögliche Einstellung) der an seinem Platzierungspunkt gemessenen Temperatur ermöglicht. - 20 - Manual - ORUS...
  • Seite 151: Kapazität

    Mit den Tasten “ ” und “ ” wählen wir “Int”, wenn wir den internen Sensor aktivieren wollen oder “Ext”, wenn wir den externen Sensor aktivieren wollen und wir drücken “ ” um die Wahl zu bestätigen. - 21 - Manual - ORUS...
  • Seite 152: Passwort Für Tastensperre

    (für den Winterbetrieb und für den Sommerbetrieb). Der maximale, speicherbare Wert beträgt 65535 Stunden. Um den Zähler auf Null zu stellen, Taste “ ” 3 Sekunden lang drücken, wenn man sich im Menü der Zähleranzeige befindet. - 22 - Manual - ORUS...
  • Seite 153: Ladezustand Der Batterie

    Wechsel der Uhrzeit aus. Wenn wir “ON” wählen, dann werden 2 Menüs angezeigt, die jeweils den Wechsel von – Winter  Sommer – Sommer  Winter bestimmen (im Feld (20) erscheint das Symbol “ ”. - 23 - Manual - ORUS...
  • Seite 154: Befehl Des Telefonischen Aktors

    OFF Befehl, um telefonisch ein- oder ausschalten zu befehlen, darf das Uhrenthermostat deshalb nicht ausgeschaltet sein. Anmerkung: Eine Unterbrechung vom Einschalten auf Ausschalten (und umgekehrt) aus der Ferne wird mit einigen Minuten Verzögerung ausgeführt. - 24 - Manual - ORUS...
  • Seite 155: Tastensperre

    Sensor gehörige Wert, während im Feld (16) der Wert des internen Sensors angezeigt wird. Um die gespeicherten Höchst- und Mindestwerte auf Null zu stellen, drücken Sie mindestens 3 Sekunden lang Taste “ ” / “ ”. - 25 - Manual - ORUS...
  • Seite 156: Einstellungen Für Notfälle

    Diese Regelung schaltet das Relais ON oder OFF innerhalb eines vorgegebenen Einstellungszyklus gemäß der Abweichung der gemessenen Temperatur vom gewählten Wert. Die notwendigen Parameter zur Definition dieses Modus sind: • Bandeinstellung • Einstellungsperiode. Die Bandeinstellung stellt den Temperaturbereich dar, der auf den gewählten Wert - 26 - Manual - ORUS...
  • Seite 157: Batteriewechsel

    Ausnahme der Uhr. In diesem Zustand kann der Betrieb weiterlaufen, da die Batterie eine Spannung beibehält, die den Betrieb des Mikrosteue- rungsschalters ermöglicht. Der Batteriewechsel muss in hö- chstens einer Minute ausgeführt werden, während das Display blinkt. - 27 - Manual - ORUS...
  • Seite 158: Referenznormen

    Wartezeit sehr viel größer sein. REFERENZNORMEN Es wird die Einhaltung der EU-Richtlinien erklärt 2006/95/CE (Niederspannung) 2004/108/CE (elektromagnetische Kompatibilität) in Bezug auf folgende harmonisierte Normen: EN 60730-2-7, EN 60730-2-9 EN 61000-6-1, EN 61000-6-3 - 28 - Manual - ORUS...
  • Seite 159: Winterprogramme

    T1 I I I I I I I I I I I I I I I I I I I I I I I I 0 1 2 3 4 5 6 7 8 9 10 11 12 13 14 15 16 17 18 19 20 21 22 23 - 29 - Manual - ORUS...
  • Seite 160: Sommerprogramme

    T1 I I I I I I I I I I I I I I I I I I I I I I I I 0 1 2 3 4 5 6 7 8 9 10 11 12 13 14 15 16 17 18 19 20 21 22 23 - 30 - Manual - ORUS...
  • Seite 164 ORBIS Zeitschalttechnik GmbH R o b e r t - B o s c h S t r . 3 D - 710 8 8 H o l z g e r l i n g e n T e l . : 0 70 31 / 8 665- 0 ;...

Inhaltsverzeichnis