Herunterladen Inhalt Inhalt Diese Seite drucken
Inhaltsverzeichnis

Werbung

Verfügbare Sprachen

Verfügbare Sprachen

All manuals and user guides at all-guides.com
Bedienungsanleitung
Internet Unterbau-Radio RF-IR-Kitchen1
Best.-Nr. 1577237
Operating Instructions
Internet fitted radio RF-IR-Kitchen1
Item No. 1577237
Notice d'emploi
Radio encastrable internet RF-IR-Kitchen1
N° de commande 1577237
Gebruiksaanwijzing
Internet onderbouwradio RF-IR-Kitchen1
Bestelnr. 1577237
Seite 2 - 26
Page 27 - 51
Page 52 - 76
Pagina 77 - 101

Werbung

Inhaltsverzeichnis
loading

Inhaltszusammenfassung für Renkforce RF-IR-Kitchen1

  • Seite 1 All manuals and user guides at all-guides.com Bedienungsanleitung Internet Unterbau-Radio RF-IR-Kitchen1 Best.-Nr. 1577237 Seite 2 - 26 Operating Instructions Internet fitted radio RF-IR-Kitchen1 Item No. 1577237 Page 27 - 51 Notice d’emploi Radio encastrable internet RF-IR-Kitchen1 N° de commande 1577237...
  • Seite 2: Inhaltsverzeichnis

    All manuals and user guides at all-guides.com Inhaltsverzeichnis Seite Einführung ................................3 Symbol-Erklärung ..............................3 Bestimmungsgemäße Verwendung ........................4 Lieferumfang ................................4 Sicherheitshinweise .............................5 Merkmale und Funktionen ...........................6 Einzelteile und Bedienelemente ..........................7 Aufstellung/Montage ............................8 Anschluss ................................9 a) Elektrischer Anschluss ...........................9 b) Anschluss von Zusatzgeräten ........................9 10.
  • Seite 3: Einführung

    All manuals and user guides at all-guides.com 1. Einführung Sehr geehrte Kundin, sehr geehrter Kunde, wir bedanken uns für den Kauf dieses Produkts. Dieses Produkt entspricht den gesetzlichen, nationalen und europäischen Anforderungen. Um diesen Zustand zu erhalten und einen gefahrlosen Betrieb sicherzustellen, müssen Sie als Anwender diese Bedienungsanleitung beachten! Diese Bedienungsanleitung gehört zu diesem Produkt.
  • Seite 4: Bestimmungsgemäße Verwendung

    All manuals and user guides at all-guides.com 3. Bestimmungsgemäße Verwendung Das Produkt dient zur Wiedergabe von Internet-Radiosendern. Außerdem kann Musik über Ihr Netzwerk wiedergegeben werden (UPnP / DLNA). Zusätzlich ist eine Uhr mit Weckfunktion integriert. Die Verbindung zum Internet und zu Ihrem Netzwerk kommt über WLAN zu Stande. Das beiliegende Netzteil ist nur für den Anschluss an 100-240 V/AC 50/60 Hz Wechselspannung zugelassen.
  • Seite 5: Sicherheitshinweise

    All manuals and user guides at all-guides.com 5. Sicherheitshinweise Lesen Sie sich die Bedienungsanleitung aufmerksam durch und beachten Sie insbesondere die Sicherheitshinweise. Falls Sie die Sicherheitshinweise und die Angaben zur sachgemäßen Handhabung in dieser Bedienungsanleitung nicht befolgen, übernehmen wir für dadurch resultierende Personen-/Sachschäden keine Haftung.
  • Seite 6: Merkmale Und Funktionen

    All manuals and user guides at all-guides.com • Fassen Sie das Netzteil niemals mit feuchten oder nassen Händen an. Es besteht die Gefahr eines lebensgefährlichen elektrischen Schlages! • Beachten Sie, dass das Anschlusskabel des Netzteils nicht gequetscht, geknickt, durch scharfe Kanten beschädigt oder anderweitig mechanisch belastet wird.
  • Seite 7: Einzelteile Und Bedienelemente

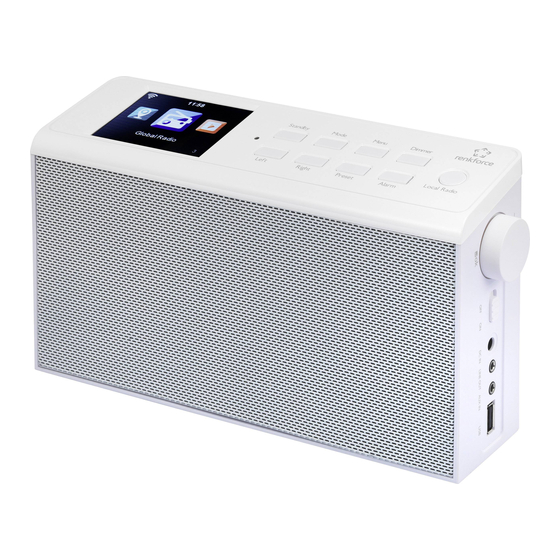
    All manuals and user guides at all-guides.com 7. Einzelteile und Bedienelemente 1 Display 2 Taste LEFT 3 Taste STANDBY 4 Taste RIGHT 5 Taste MODE 6 Taste PRESET 7 Taste MENU 8 Taste ALARM 9 Taste DIMMER 10 Taste LOCAL RADIO 11 Drehregler VOLUME 12 Ein/Aus-Schalter 13 Netzteilbuchse DC IN...
  • Seite 8: Aufstellung/Montage

    All manuals and user guides at all-guides.com 8. Aufstellung/Montage Berücksichtigen Sie bei der Wahl des Aufstell- bzw. Montageortes die Raumgegebenheiten, wie z.B. die Lage der nächsten Steckdose etc. Achten Sie bei der Auswahl des Aufstell- bzw. Montageortes auch darauf, dass direktes Sonnenlicht, Vibrationen, Staub, Hitze, Kälte und Feuchtigkeit vermieden werden müssen.
  • Seite 9: Anschluss

    All manuals and user guides at all-guides.com 9. Anschluss a) Elektrischer Anschluss Die Netzsteckdose, an die das Netzteil angeschlossen wird, muss sich in der Nähe des Gerätes befinden und leicht zugänglich sein, damit das Netzteil im Fehlerfall schnell und einfach von der Netzstromversorgung getrennt werden kann. Stellen Sie sicher, dass die Spannungsangabe auf dem Netzteil mit der Netzspannung Ihres Stromversorgers übereinstimmt.
  • Seite 10: Bedienung

    All manuals and user guides at all-guides.com 10. Bedienung In dieser Bedienungsanleitung werden die englisch-sprachigen Bezeichnungen im Menü des Internet- Radios benutzt. Die Bedeutungen dieser Bezeichnungen sind in Klammern hinzugefügt. a) Grundfunktionen Ein-/Ausschalten und Standby • Schieben Sie den Ein/Aus-Schalter (12) in die Stellung ON, um das Gerät einzuschalten. • Zum Ausschalten schieben Sie den Ein/Aus-Schalter (12) wieder in die Stellung OFF.
  • Seite 11: Spracheinstellung

    All manuals and user guides at all-guides.com Spracheinstellung • Nach dem ersten Start wird ein Menüfenster für die Spracheinstellung angezeigt. • Wählen Sie Ihre gewünschte Sprache mit dem Drehregler VOLUME (11) aus. • Bestätigen Sie die Auswahl, indem Sie den Drehregler VOLUME (11) drücken. Konfiguration der WLAN-Verbindung • Als nächstes erscheint eine Abfrage, ob Sie die WLAN-Verbindung bei jedem Einschalten prüfen wollen.
  • Seite 12: Menü-Übersicht

    All manuals and user guides at all-guides.com c) Menü-Übersicht Nachfolgend finden Sie eine Übersicht aller Punkte, die Sie im Menü anwählen können. Außerdem ist beschrieben, was Sie bei welchem Menüpunkt einstellen können bzw. welche Funktion hinter dem entsprechenden Punkt steht. Die jeweils aktive Einstellung erkennen Sie durch die weiß unterlegte Schrift. Bitte beachten Sie, dass sich einzelne Konfigurationspunkte oder deren Übersetzung durch Softwareupdates ändern können.
  • Seite 13 All manuals and user guides at all-guides.com „INFORMATION CENTER“ (Informations-Center) • „WEATHER INFORMATION“ (Wetter-Information) Hier können Sie sich verschiedene Wetterinformationen von bestimmten Städten anzeigen lassen. Die Auswahl erfolgt nach Kontinenten, Staat, Land und Stadt. Die Daten werden aktuell vom Internet abgerufen. • „FINANCIAL INFORMATION“...
  • Seite 14 All manuals and user guides at all-guides.com - „CHECK NETWORK WHEN POWER ON“ (Netzwerk prüfen beim Anschalten) Im letzten Punkt dieses Untermenüs haben Sie die Möglichkeit die automatische Netzwerkprüfung beim Einschalten des Radios aus- bzw. einzuschalten. Wenn diese Funktion aktiviert ist, wird nach dem Einschalten bei fehlender Internetverbindung das Menü für die Netzwerkeinrichtung angezeigt.
  • Seite 15 All manuals and user guides at all-guides.com • „LANGUAGE“ (Sprache) Hier können Sie Ihre gewünschte Menüsprache auswählen. • „DIMMER“ (Dimmer) - POWER SAVING“ (Energiesparmodus) Hier stellen Sie die Displayhelligkeit für den Standby-Modus ein. - „TURN ON“ (Einschalten) Hier stellen Sie die Displayhelligkeit für den Normalbetrieb ein. • „DISPLAY“...
  • Seite 16 All manuals and user guides at all-guides.com • „PLAYBACK SETUP“ (Wiedergabe-Einstellung) Hier können Sie wählen, wie die Titelwiedergabe erfolgen soll - „OFF“ (Aus) Titelwiederholung ausgeschaltet - „REPEAT ALL“ (alle wiederholen) alle Titel werden wiederholt - „REPEAT ONE“ (eins wiederholen) der aktuelle Titel wird wiederholt - „SHUFFLE“...
  • Seite 17: Betriebsart Internet-Radio

    All manuals and user guides at all-guides.com d) Betriebsart Internet-Radio Umschalten auf Internet Radio • Um in die Betriebsart Internet-Radio umzuschalten, scrollen Sie im Hauptmenü mit dem Drehregler VOLUME (11) oder den Tasten LEFT (2) und RIGHT (4) solange nach links oder rechts, bis in der Mitte des Displays „INTERNET RADIO“...
  • Seite 18: Sender Zu Den Favoriten Hinzufügen

    All manuals and user guides at all-guides.com Sender zu den Favoriten hinzufügen: • Gerade gehörten Sender zu den Favoriten hinzufügen - Drücken Sie die Taste PRESET (6) lang, bis die Favoritenliste erscheint. - Wählen Sie mit dem Drehregler VOLUME (11) den gewünschten Speicherplatz aus. - Drücken Sie den Drehregler VOLUME (11), um den Sender zu speichern.
  • Seite 19: Usb-Wiedergabe

    All manuals and user guides at all-guides.com USB-Wiedergabe Verbinden Sie keinen MP3-Player mit der USB-Schnittstelle (16), wenn er über Batterien betrieben wird. Die Stromversorgung der USB-Schnittstelle (16) kann die eingelegten Batterien laden und somit zu Überhitzung bzw. auch Explosion der Batterien führen. Sollte das USB-Speichermedium nicht erkannt werden, ziehen Sie es bitte nochmals heraus und stecken es erneut ein.
  • Seite 20: Löschen Der Playlist

    All manuals and user guides at all-guides.com Playlist (Wiedergabeliste) • Um einen gerade abgespielten Titel zu Ihrer Wiedergabeliste hinzuzufügen, drücken Sie den Drehregler VOLUME (11) lang, bis im Display ein Symbol links neben der Uhrzeitanzeige erscheint. • Der aktuelle Titel wurde der Wiedergabeliste hinzugefügt. • Um einen Titel aus der Titelliste der Wiedergabeliste hinzuzufügen, markieren Sie ihn und drücken den Drehregler VOLUME (11) lang, bis im Display ein Symbol links neben der Uhrzeitanzeige erscheint.
  • Seite 21: Dlna-Wiedergabe

    All manuals and user guides at all-guides.com f) DLNA-Wiedergabe • Das Internet-Radio unterstützt zusätzlich die DLNA-Wiedergabe. • Das heißt, Sie können von einem kompatiblen Gerät, welches sich im selben Netzwerk befindet, Musik direkt auf dem Internet-Radio abspielen. • Das Ganze funktioniert z.B. mit dem Media Player von Windows . Voraussetzung ist allerdings, dass Media Sharing ® aktiviert ist.
  • Seite 22: Alarm Ausschalten

    All manuals and user guides at all-guides.com • Navigieren Sie zum Punkt „SOUND MELODY“ (Sound: Melodie) und öffnen Sie ihn. Hier stellen Sie den Weckton ein: „BEEP“ (Ton) Signalton „MELODY“ (Melodie) Weckmelodie „INTERNET RADIO“ Radiowiedergabe vom Internet „USB“ Wiedergabe vom USB-Stick Beim Wecken mit Internet Radio müssen Sie einen Sender aus Ihren gespeicherten Favoriten auswählen.
  • Seite 23: My Mediau

    All manuals and user guides at all-guides.com h) My mediaU Sie können sich im Internet mit Hilfe Ihres Computers Ihre eigenen Favoritenlisten mit Internet Radio Sendern erstellen und verwalten. Gehen Sie dazu folgendermaßen vor. • Öffnen Sie auf Ihrem Computer die Webseite „http://www.mediayou.net/web/index.php“ (ohne Anführungszeichen). • Legen Sie ein Nutzerkonto mit Ihrer E-Mail-Adresse und einem Passwort an.
  • Seite 24: Behebung Von Störungen

    All manuals and user guides at all-guides.com 12. Behebung von Störungen Sie haben Probleme, das Internet Radio an Ihrem WLAN anzumelden. • Überprüfen Sie, ob ein anderes Gerät, wie z.B. ein Computer oder ein Tablet über das WLAN auf das Internet zugreifen kann.
  • Seite 25: Wartung Und Reinigung

    All manuals and user guides at all-guides.com Sie können keine Ordner freigeben, weil die Funktion nicht angezeigt wird. • Aktivieren Sie die Funktion File-Sharing in Ihrem System. Das Internet Radio muss den gewählten Sender immer wieder zwischenspeichern und die Wiedergabe stockt dadurch. • Der Internet Radio Sender wird über eine Breitbandverbindung übertragen.
  • Seite 26: Entsorgung

    All manuals and user guides at all-guides.com 14. Entsorgung Elektronische Geräte sind Wertstoffe und gehören nicht in den Hausmüll. Entsorgen Sie das Produkt am Ende seiner Lebensdauer gemäß den geltenden gesetzlichen Bestimmungen. 15. Technische Daten Betriebsspannung ..........100-240 V/AC 50/60 Hz (Netzteil) / 5,9 V/DC (Internet-Radio) Leistungsaufnahme ..........0,15 / 6 W (ausgeschaltet/max.) Ausgangsleistung ..........3 W Display ..............240 x 320 pixel TFT Farbbildschirm...
  • Seite 27 All manuals and user guides at all-guides.com Table of Contents Page Introduction ................................28 Explanation of Symbols .............................28 Intended Use ..............................29 Scope of Delivery ...............................29 Safety Notes ..............................30 Features and Functions .............................31 Components and Control Elements ........................32 Installation/Setup ...............................33 Connection .................................34 a) Electric Connection ............................34 b) Connection of Additional Devices ........................34 10.
  • Seite 28: Introduction

    All manuals and user guides at all-guides.com 1. Introduction Dear Customer, thank you for purchasing this product. This product complies with the statutory national and European requirements. To maintain this status and to ensure safe operation, you as the user must observe these operating instructions! These operating instructions are part of this product.
  • Seite 29: Intended Use

    All manuals and user guides at all-guides.com 3. Intended Use The product is used to play back internet radio stations. It can also play back music via your network (UPnP / DLNA). A clock with alarm function is integrated as well. The connection to the internet and your network is made by WiFi.
  • Seite 30: Safety Notes

    All manuals and user guides at all-guides.com 5. Safety Notes Read the operating instructions attentively and particularly observe the safety notes. If the safety notes and the information in these operating instructions regarding proper handling are not observed, we assume no liability for any resulting injury/property damage. In such cases, the warranty/guarantee will also lapse.
  • Seite 31: Features And Functions

    All manuals and user guides at all-guides.com • Never replace a damaged connection cable of the mains adapter. If the connection cable is damaged, the mains unit is unusable and must be disposed of. It must not be repaired. • All persons that operate this device, install, commission or service it must observe these operating instructions.
  • Seite 32: Components And Control Elements

    All manuals and user guides at all-guides.com 7. Components and Control Elements 1 Display 2 LEFT button 3 STANDBY button 4 RIGHT button 5 MODE button 6 PRESET button 7 MENU button 8 ALARM button 9 DIMMER button 10 LOCAL RADIO button 11 VOLUME dial 12 On/off switch 13 Mains adapter socket DC IN...
  • Seite 33: Installation/Setup

    All manuals and user guides at all-guides.com 8. Installation/Setup When selecting the set-up or mounting location, please take into consideration the room layout such as the whereabouts of the nearest socket, etc. When selecting the set-up or installation site, observe that direct sunlight, vibration, dust, heat, cold and moisture must be avoided.
  • Seite 34: Connection

    All manuals and user guides at all-guides.com 9. Connection a) Electric Connection The mains socket to which the mains unit is connected must be close to the device and easily accessible to quickly separate the mains adapter from the mains voltage in case of an error. Ensure that the voltage indication on the mains adapter matches the mains voltage of your power supply.
  • Seite 35: Operation

    All manuals and user guides at all-guides.com 10. Operation a) Basic Functions Switching On/Off, Standby • Push the on/off switch (12) to the ON position in order to switch on the device. • To switch it off, push the on/off switch (12) back into the position OFF. • In order to switch standby operation on or off, push the STANDBY (3) button.
  • Seite 36: Language Settings

    All manuals and user guides at all-guides.com Language Settings • A menu window for the language setting is displayed after the first start. • Choose your desired language with the dial switch VOLUME (11). • Confirm your selection by pushing the dial switch VOLUME (11). Configuration of the WLAN-connection • Next, you will see the query of whether you want to check the wireless connection at each activation. • Select YES or NO with the dial switch VOLUME (11).
  • Seite 37: Menu Overview

    All manuals and user guides at all-guides.com c) Menu overview Below, you will find an overview of all items that you can select in the menu. There also is a description of what you can set in which menu item or which function is behind the corresponding item. You can tell the respective active setting by the writing with a white background. Please observe that individual configuration items or their translation may be changed by software updates.
  • Seite 38 All manuals and user guides at all-guides.com "INFORMATION CENTER" • "WEATHER INFORMATION" Here, you can have various weather information for specific towns displayed. Selection takes place by continent, state, country and town. The data are currently called from the internet. • "FINANCIAL INFORMATION" Here, different stock data, such as the "DOW JONES" or the "DAX", are displayed. The data are also called from the internet.
  • Seite 39 All manuals and user guides at all-guides.com - "CHECK NETWORK WHEN POWER ON" In the last item of this submenu, you can switch the automatic network check when turning the radio off and on. If this function is activated, the menu for the network setup is displayed after activation when there is no internet connection.
  • Seite 40 All manuals and user guides at all-guides.com • "LANGUAGE" Here, you can choose your desired menu language. • "DIMMER" - "POWER SAVING" Here, you can set the display brightness for the standby mode. - "TURN ON" Here, you can set the display brightness for the regular mode. • "DISPLAY"...
  • Seite 41 All manuals and user guides at all-guides.com • "PLAYBACK SETUP" Here, you can choose how the tracks are to be played back. - "OFF" Track repetition off - "REPEAT ALL" All tracks are repeated. - "REPEAT ONE" The current track is repeated. - "SHUFFLE"...
  • Seite 42: Operating Mode Internet Radio

    All manuals and user guides at all-guides.com d) Operating Mode Internet Radio Switching to Internet Radio • In order to switch the operating mode internet radio, use the dial switch VOLUME (11) or the LEFT (2) and RIGHT (4) buttons to scroll to the left or right in the main menu until "INTERNET RADIO" is displayed in the middle of the display.
  • Seite 43: Operating Mode Media-Center

    All manuals and user guides at all-guides.com Adding stations to favourites: • Adding the currently active station to favourites: - Hold the button PRESET (6) until the favourites list appears. - Select the desired memory slot with the dial switch VOLUME (11). - Push the dial switch VOLUME (11) to save the station.
  • Seite 44: Usb-Playback

    All manuals and user guides at all-guides.com USB-playback Do not connect an MP3-player to the USB interface (16) if it is battery-operated. The USB interface (16) power supply may load the inserted batteries and cause overheating or explosion of a battery. If the USB storage medium is not recognised, remove it and insert it again.
  • Seite 45 All manuals and user guides at all-guides.com Playlist • In order to add the currently played track to your playback list, keep the dial switch VOLUME (11) pushed until the display shows an icon to the left of the time display. • The current track has been added to the playback list.
  • Seite 46: Dlna Playback

    All manuals and user guides at all-guides.com f) DLNA Playback • The internet radio additionally supports DLNA-playback. • This means that you can play back music right on the internet radio with a compatible device in the same network. • This works, e.g., with Windows Media Player.
  • Seite 47: Switching Off The Alarm

    All manuals and user guides at all-guides.com • Navigate to the item "SOUND MELODY" and open it. Set the alarm sound here: "BEEP" Signal sound "MELODY" Wake-up melody "INTERNET RADIO" Radio playback from the internet "USB" Playback from the USB drive For the alarm function using the internet radio, you need to select a station from your saved favourites.
  • Seite 48: My Mediau

    All manuals and user guides at all-guides.com h) My mediaU Using your computer, you can create and choose your own favourite lists of Internet radio stations on the Internet. Proceed as follows: • On your computer, open the web page “http://www.mediayou.net/web/index.php” (without quotes). • Create a user account with your email address and password.
  • Seite 49: Troubleshooting

    All manuals and user guides at all-guides.com 12. Troubleshooting You have problems logging on the internet radio to your WiFi. • Check if another device, such as a computer or tablet, can access the internet through the WiFi. • Check if your router's DHCP server is running, whether the static IP address is properly configured with the entire configuration (subnet mask, standard gateway) in the internet radio.
  • Seite 50: Maintenance And Cleaning

    All manuals and user guides at all-guides.com You cannot release any folders because the function is not displayed: • Enable the file sharing function on your system. The internet radio must buffer the chosen station now and then, which causes playback to stutter. • The internet radio station is transmitted through a broadband connection. If the bandwidth of your internet connection is too low or if it is utilised to capacity by another application, there may be breaks.
  • Seite 51: Disposal

    All manuals and user guides at all-guides.com 14. Disposal Electronic devices are recyclable and should not be disposed of in household waste. Dispose of the product according to the applicable statutory provisions at the end of its service life. 15. Technical Data Operating voltage ..........100-240 V/AC 50/60 Hz (mains adapter) / 5.9 V/DC (internet radio) Power intake .............0.15 / 6 W (off/max.) Output power ............3 W...
  • Seite 52 All manuals and user guides at all-guides.com Sommaire Page Introduction ................................53 Explication des symboles ..........................53 Utilisation conforme ............................54 Contenu ................................54 Consignes de sécurité ............................55 Caractéristiques et fonctions ..........................56 Pièces détachées et éléments de commande ....................57 Installation/Montage ............................58 Raccordement ..............................59 a) Raccordement électrique ..........................59 b) Raccordement d’accessoires ........................59 10.
  • Seite 53: Introduction

    All manuals and user guides at all-guides.com 1. Introduction Cher client, chère cliente, Nous vous remercions d’avoir acheté ce produit. Ce produit est conforme aux exigences légales nationales et européennes. Pour maintenir cet état et garantir un fonctionnement en toute sécurité, vous devez en tant qu’utilisateur respecter ce mode d’emploi ! Ce mode d’emploi appartient à ce produit. Il contient des instructions importantes pour la mise en service et la manipulation. Prenez-le en considération même lorsque vous transmettez ce produit à un tiers. Par conséquent, conservez ce mode d’emploi pour vous y référer ultérieurement ! Pour toute question technique, veuillez vous adresser à : France (email): technique@conrad-france.fr Suisse: www.conrad.ch www.biz-conrad.ch 2. Explication des symboles Le symbole avec l’éclair dans le triangle est utilisé lorsqu’il existe un risque pour votre santé, p. ex. par un choc électrique.
  • Seite 54: Utilisation Conforme

    All manuals and user guides at all-guides.com 3. Utilisation conforme Le produit reproduit les stations de radio internet. De la musique peut en outre être reproduite par votre réseau (UPnP/ DLNA). D’autre part une horloge avec fonction réveil est intégrée. La connexion à internet et à votre réseau est établie actuellement par WLAN. L’alimentation électrique fournie n’est autorisée que pour le raccordement à la tension alternative 100-240 V/CA 50/60 Hz. L’alimentation électrique de la radio internet ne doit s’effectuer que par le bloc d’alimentation fourni.
  • Seite 55: Consignes De Sécurité

    All manuals and user guides at all-guides.com 5. Consignes de sécurité Lisez attentivement tout le mode d’emploi et observez notamment les consignes de sécurité. Nous déclinons toute responsabilité pour les dommages corporels et matériels résultant d’une manipulation non conforme, si vous ne suivez pas les consignes de sécurité et les indications. D’autre part, dans de tels cas la garantie légale/commerciale est annulée.
  • Seite 56: Caractéristiques Et Fonctions

    All manuals and user guides at all-guides.com • Observez que le câble d’alimentation du bloc d’alimentation n’est pas coincé, plié, endommagé par des arêtes pointues ou alourdi autrement mécaniquement. Évitez une charge thermique excessive du bloc d'alimentation liée à une chaleur ou un froid important. Ne modifiez pas le bloc d’alimentation. Dans le cas contraire, le bloc d’alimentation peut être endommagé. Un bloc d’alimentation endommagé peut entraîner un choc électrique mortel. • Ne touchez pas un bloc d’alimentation présentant des dommages. Débranchez d’abord la prise de courant correspondante de tous les pôles (p.
  • Seite 57: Pièces Détachées Et Éléments De Commande

    All manuals and user guides at all-guides.com 7. Pièces détachées et éléments de commande 1 Écran 2 Touche LEFT 3 Touche STANDBY 4 Touche RIGHT 5 Touche MODE 6 Touche PRESET 7 Touche MENU 8 Touche ALARM 9 Touche DIMMER 10 Touche LOCAL RADIO 11 Bouton rotatif VOLUME 12 Interrupteur Marche/Arrêt...
  • Seite 58: Installation/Montage

    All manuals and user guides at all-guides.com 8. Installation/Montage Lors du choix du lieu d’installation ou de montage, tenez compte de l’espace réel, comme par exemple la position de la prise électrique suivante, etc. Lors du choix du lieu d’installation ou de montage, veillez également à éviter la lumière directe du soleil, les vibrations, la poussière, la chaleur, le froid et l’humidité. Il ne doit pas y avoir de transformateurs ou moteurs puissants à proximité de l’appareil. Ne percez ou ne vissez pas de vis supplémentaire dans le boîtier pour la fixation. Cela endommagerait l’appareil. Veillez à une installation ou un montage stable, car les chutes d’objets sont des risques d’accidents non négligeables. En raison de la diversité des peintures utilisées et des vernis pour meubles, il n'est pas à exclure que les pieds de l’appareil, en raison d’une réaction chimique, pourraient laisser des résidus visibles sur les meubles. Par conséquent, l’appareil ne doit pas être posé sur des surfaces de meubles de valeur sans protection adaptée. • Si vous souhaitez monter l’appareil, placez-le avec les pieds du boîtier sur une surface plane et droite qui peut supporter la charge de l’appareil. • Pour le montage sous une armoire ou planche vissez les supports de montage fournis sur le lieu de montage souhaité. L’inscription UP/FRONT doit pointer vers le haut et l’avant (les languettes de fixation doivent donc pointer vers l’avant de l’appareil).
  • Seite 59: Raccordement

    All manuals and user guides at all-guides.com 9. Raccordement a) Raccordement électrique La prise de courant sur laquelle le bloc d’alimentation est branché doit se trouver à proximité de l’appareil et être facile d’accès pour débrancher rapidement et simplement le bloc d’alimentation en cas de défaillance. Assurez-vous que l’indication de tension sur le bloc d’alimentation est conforme à la tension de secteur de votre fournisseur de courant. N’essayez jamais de faire fonctionner le bloc d’alimentation sur une autre tension. Soyez prudent en manipulant des blocs d’alimentation et des raccordements au réseau. La tension de secteur peut provoquer des chocs électriques mortels. Ne laissez pas le câble posé librement mais placez-le de manière professionnelle pour éviter les risques d’accidents.
  • Seite 60: Utilisation

    All manuals and user guides at all-guides.com 10. Utilisation Dans ce mode d'emploi les désignations du menu de la radio internet sont en anglais. Les significations de ces désignations sont ajoutées entre parenthèses. a) Fonctions de base Marche/Arrêt et Standby • Poussez l’interrupteur Marche/Arrêt (12) en position ON pour mettre l’appareil sous tension. • Pour éteindre poussez l’interrupteur Marche/Arrêt (12) de nouveau en position OFF. • Pour activer ou désactiver le mode Standby, appuyez sur la touche STANDBY (3). En mode Standby l’écran (1) indique l’heure et la météo (si actif dans le menu).
  • Seite 61: Configuration De La Langue

    All manuals and user guides at all-guides.com Configuration de la langue • Après le premier démarrage une fenêtre de menu pour la configuration de la langue s’affiche. • Sélectionnez la langue souhaitée avec le bouton rotatif VOLUME (11). • Confirmez la sélection en appuyant sur le bouton rotatif VOLUME (11). Configuration de la connexion WLAN • Ensuite une requête apparaît, si vous voulez vérifier la connexion WLAN à chaque mise en marche. • Sélectionnez YES ou NO avec le bouton rotatif VOLUME (11). • Confirmez la sélection en appuyant sur le bouton rotatif VOLUME (11).
  • Seite 62: Aperçu Du Menu

    All manuals and user guides at all-guides.com c) Aperçu du menu Vous avez ensuite un aperçu de toutes les options que vous pouvez sélectionner dans le menu. Il y a de plus une description de ce que vous pouvez paramétrer avec les options de menu ou quelles fonctions se trouvent derrière les options correspondantes. Vous reconnaissez chaque paramètre actif par l’écriture blanche.
  • Seite 63 All manuals and user guides at all-guides.com « INFORMATION CENTER » (centre d’informations) • « WEATHER INFORMATION » (informations météo) Ici vous pouvez afficher différentes informations météo de villes déterminées. La sélection se fait par continent, état, pays et ville. Ces données en cours sont accessibles via internet. • « FINANCIAL INFORMATION » (informations financières) Ici s’affichent différentes informations boursières telles que le « DOW JONES » ou le « DAX ». Ces données en cours sont également accessibles via internet. • « SYSTEM INFOMATION » (information système)) Cette option indique les informations en cours sur le système et le réseau sans fil.
  • Seite 64 All manuals and user guides at all-guides.com - « CHECK NETWORK WHEN POWER ON » (vérifier le réseau à chaque mise en marche) Dans la dernière option de ce sous-menu vous avez la possibilité de contrôler automatiquement le réseau en allumant ou éteignant la radio. Si cette fonction est activée le menu de l’installation réseau s’affiche en cas de connexion internet défaillante.
  • Seite 65 All manuals and user guides at all-guides.com • « LANGUAGE » (langue) Ici vous pouvez sélectionner la langue du menu souhaitée. • « DIMMER » (gradateur) - « POWER SAVING » (mode veille) Ici vous réglez la luminosité de l’écran pour le mode Standby. - « TURN ON » (mise en marche) Ici vous réglez la luminosité de l’écran pour le mode normal. • « DISPLAY » (affichage) Ici vous pouvez choisir votre affichage monochrome ou couleur. • « POWER MANAGEMENT » (réglages puissance) Ici se règle le temps à partir duquel la radio internet passe automatiquement en mode Standby lorsque l’appareil n’est pas utilisé et/ou lorsqu'il n’y a pas de réseau. • « SLEEP TIMER » (minuterie de veille) Dans cette option de menu vous pouvez configurer la minuterie de veille. Lorsque vous l’activez (il faut sélectionner un horaire), alors la radio s’éteint automatiquement à partir de l’heure sélectionnée. Vous pouvez sélectionner les horaires suivants : 15, 30, 60, 90, 120, 150 ou 180 minutes • « BUFFER » (mémoire tampon) Vous pouvez sélectionner ici une mémoire tampon pour la réception de la radio entre 2, 4 et 8 secondes.
  • Seite 66 All manuals and user guides at all-guides.com • « PLAYBACK SETUP » (réglage de la reproduction) Ici vous pouvez choisir comment exécuter la reproduction des titres. - « OFF » (arrêt) répétition du titre désactivée - « REPEAT ALL » (répéter tout) tous les titres sont répétés - « REPEAT ONE » (répéter un) le titre en cours est répété - « SHUFFLE » (aléatoire) les titres sont reproduits en mode aléatoire • « DEVICE » (appareil) - « RENAME (AirMusic) » (renommer (AirMusic)) Ici vous pouvez modifier le nom de la radio internet pour la fonction DLNA. Pour saisir le nom procédez comme pour le mot de passe au chapitre « Première installation ». - « AIR MUSIC CONTROL APP » (appli AirMusic Control) Un code QR est affiché ici, qui simplifie l’installation de l’appli AirMusic Control pour la lecture DLNA de votre smartphone (dans la mesure où votre smartphone ne supporte pas déjà en série la reproduction DLNA).
  • Seite 67: Modes De Fonctionnement Radio Internet

    All manuals and user guides at all-guides.com d) Modes de fonctionnement radio internet Basculement sur radio internet • Pour basculer sur le mode de fonctionnement radio internet, faites défiler dans le menu principal avec le bouton rotatif VOLUME (11) ou les touches LEFT (2) et RIGHT (4) aussi longtemps à gauche ou à droite jusqu’à ce que « INTERNET RADIO » s’affiche au centre de l’écran. • Appuyez ensuite sur le bouton rotatif VOLUME (11) pour activer la fonction. Sélectionner la station radio internet • Pour sélectionner une station radio internet, ouvrez une des options de menu : « MY FAVORITE » (mes favoris) stations enregistrées précédemment « RADIO STATION/MUSIC » (station de radio/musique)
  • Seite 68: Mode De Fonctionnement Media-Center

    All manuals and user guides at all-guides.com Ajouter des stations aux favoris • Ajouter des stations déjà écoutées aux favoris - Appuyez sur la touche PRESET (6) longtemps jusqu’à ce que la liste des favoris apparaisse. - Sélectionnez avec le bouton rotatif VOLUME (11) l’espace de stockage souhaité. - Appuyez sur le bouton rotatif VOLUME (11) pour enregistrer la station. • Ajouter des stations de la liste de stations aux favoris - Marquez la station souhaitée dans la liste de stations - Appuyez sur la touche PRESET (6) longtemps jusqu’à ce que la liste des favoris apparaisse.
  • Seite 69 All manuals and user guides at all-guides.com Reproduction USB Ne connectez aucun lecteur MP3 à l’interface USB (16) s’il fonctionne sur piles. L’alimentation électrique de l’interface USB (16) peut charger les piles insérées et ainsi conduire à une surchauffe ou à l’explosion des piles. Si le support de stockage USB n’est pas détecté, retirez-le encore une fois et réinsérez-le. Seuls des supports de stockage USB peuvent être utilisés sur l’interface USB. Les lecteurs MP3 avec port USB s’activent à l’insertion dans ce port le plus souvent dans le mode PC. Dans ce mode il n’est pas possible de lire des fichiers musicaux. Vous pouvez toutefois connectez des lecteurs MP3 ou d’autres périphériques pour la reproduction au port AUX IN (15). • Insérez une clé USB avec des pistes musicales dans l’interface USB (16).
  • Seite 70: Playlist (Liste De Lecture)

    All manuals and user guides at all-guides.com Playlist (liste de lecture) • Pour ajouter un titre déjà joué à votre liste de lecture, appuyez sur le bouton rotatif VOLUME (11) jusqu’à ce qu’un symbole apparaisse à l’écran à gauche à côté de l’affichage de l’heure. • Le titre en cours a été ajouté à la liste de lecture. • Pour ajouter un titre à votre liste de lecture, marquez le et appuyez sur le bouton rotatif VOLUME (11) jusqu’à ce qu’un symbole apparaisse à l’écran à gauche à côté de l’affichage de l’heure. • Le titre sélectionné a été ajouté à la liste de lecture. • La liste de reproduction peut être appelée depuis le menu du Media Center dans l’option « MY PLAYLIST » (ma playlist). • Des titres de la liste de reproduction peuvent être joués en appuyant sur le bouton rotatif VOLUME (11). • Pour supprimer un titre de la liste de lecture, marquez-le dans la playlist et appuyez longuement sur le bouton rotatif VOLUME (11).
  • Seite 71: Reproduction Dlna

    All manuals and user guides at all-guides.com f) Reproduction DLNA • La radio internet supporte en plus la lecture DLNA. • C’est-à-dire que vous pouvez jouer de la musique directement sur la radio internet depuis un appareil compatible qui se trouve dans le même réseau. • Le tout fonctionne par exemple avec le système Media Player de Windows .
  • Seite 72: Arrêter L'alarme

    All manuals and user guides at all-guides.com • Naviguez sur l’option « SOUND MELODY » (mélodie sonore) et ouvrez-la. Vous réglez ici le son du réveil : « BEEP » (son) signal sonore « MELODY » (mélodie) mélodie de réveil « INTERNET RADIO » retransmission radio d'Internet « USB » reproduction de la clé USB Pour le réveil avec la radio internet vous devez sélectionner une station depuis vos favoris enregistrés. Si la station radio internet n’est pas trouvée pendant le processus de réveil, parce que par exemple il n’y a aucune connexion WLAN, le signal sonore standard est diffusé automatiquement au bout d’une minute. Avec le réveil via USB, insérez une clé USB avec des pistes musicales dans l’interface USB (16). Sélectionnez au réglage le morceau sur la clé...
  • Seite 73: My Mediau

    All manuals and user guides at all-guides.com h) My mediaU Vous pouvez créer et gérer vos propres listes de favoris avec des émetteurs radio sur Internet à l’aide de votre ordinateur. Procédez comme suit. • Ouvrez dans votre ordinateur le site web : « http://www.mediayou.net/web/index.php » (sans les guillemets). • Créer un compte d’utilisateur avec votre adresse courriel et un mot de passe. • Dès que vous avez créé le compte, inscrivez-vous et enregistrez votre radio internet. • Pour l’enregistrement de votre radio internet, vous avez besoin de l’adresse MAC (caractérisée sur le site web par un numéro de série).
  • Seite 74: Dépannage

    All manuals and user guides at all-guides.com 12. Dépannage Vous avez des problèmes pour connecter la radio internet à votre WLAN. • Vérifiez si un autre appareil comme un ordinateur ou une tablette peut avoir accès à internet via le WLAN. • Contrôlez si le serveur DHCP fonctionne dans votre routeur, ou si vous avez configuré correctement tous les paramètres de l’adresse IP fixe dans la radio internet (masque de sous-réseau, standard gateway).
  • Seite 75: Maintenance Et Nettoyage

    All manuals and user guides at all-guides.com Vous ne pouvez pas libérer de dossier parce que la fonction n’est pas affichée. • Activez la fonction File-Sharing dans votre système. La radio internet doit toujours sauvegarder temporairement la station sélectionnée et la lecture est instable.
  • Seite 76: Élimination

    All manuals and user guides at all-guides.com 14. Élimination Les appareils électriques sont recyclables et ne font pas partie des déchets ménagers. Éliminez le produit à la fin de son cycle de vie conformément à la législation en vigueur. 15. Données techniques Tension de service ........100-240 V/CA 50/60 Hz (bloc d’alimentation) / 5,9 V/CC (radio internet) Puissance absorbée .......0,15/6 W (éteint/max) Puissance de sortie ........3 W Écran ............240 x 320 pixels écran couleur TFT Heures de réveil ........2 + alarme NAP Raccordements ........AUX IN, LINE OUT...
  • Seite 77 All manuals and user guides at all-guides.com Inhoudsopgave Pagina Inleiding ................................78 Verklaring van symbolen ............................78 Voorgeschreven gebruik ............................79 Leveringsomvang ..............................79 Veiligheidsvoorschriften .............................80 Kenmerken en functies ............................81 Afzonderlijke onderdelen en bedieningselementen ...................82 Opstelling/montage ............................83 Aansluiten ................................84 a) Elektrische aansluiting ..........................84 b) Aansluiting van bijkomende apparaten ......................84 10.
  • Seite 78: Inleiding

    All manuals and user guides at all-guides.com 1. Inleiding Geachte klant, Hartelijk dank voor de aanschaf van dit product. Dit product voldoet aan de wettelijke nationale en Europese voorschriften. Volg de instructies van de gebruiksaanwijzing op om deze status van het apparaat te handhaven en een ongevaarlijke werking te garanderen! Deze gebruiksaanwijzing hoort bij dit product.
  • Seite 79: Voorgeschreven Gebruik

    All manuals and user guides at all-guides.com 3. Voorgeschreven gebruik Het product is bestemd om internetradiozenders af te spelen. Bovendien kan er muziek via uw netwerk worden afgespeeld (UPnP / DLNA). Daarenboven is er een klok met wekfunctie geïntegreerd. De verbinding met het internet en uw netwerk gebeurt via WLAN. De meegeleverde netadapter is alleen goedgekeurd voor aansluiting op 100-240 V/AC 50/60 Hz wisselspanning. De stroomvoorziening van de internetradio mag alleen plaatsvinden via de meegeleverde netadapter.
  • Seite 80: Veiligheidsvoorschriften

    All manuals and user guides at all-guides.com 5. Veiligheidsvoorschriften Lees aandachtig de gebruiksaanwijzing en let in het bijzonder op de veiligheidsvoorschriften. Als u de veiligheidsvoorschriften en de informatie met betrekking tot het correct gebruik in deze gebruiksaanwijzing niet volgt, zijn wij niet aansprakelijk voor de resulterende persoonlijke letsels/ materiële schade.
  • Seite 81: Kenmerken En Functies

    All manuals and user guides at all-guides.com • Let dat de aansluitkabel van de netadapter niet platgedrukt, geknikt, door scherpe kanten beschadigd of op andere wijze mechanisch belast wordt. Vermijd overmatige thermische belasting van de netadapter door te grote hitte of koude. Verander de netadapter niet. Indien u hier niet op let, dan kan de netadapter beschadigd raken.
  • Seite 82: Afzonderlijke Onderdelen En Bedieningselementen

    All manuals and user guides at all-guides.com 7. Afzonderlijke onderdelen en bedieningselementen 1 Scherm 2 Toets LEFT 3 Toets STANDBY 4 Toets RIGHT 5 Toets MODE 6 Toets PRESET 7 Toets MENU 8 Toets ALARM 9 Toets DIMMER 10 Toets LOCAL RADIO 11 Draaiknop VOLUME 12 Aan-/uitschakelaar 13 Netdeelbus DC IN...
  • Seite 83: Opstelling/Montage

    All manuals and user guides at all-guides.com 8. Opstelling/montage Houd bij de keuze van de opstel- of montageplaats rekening met de ruimtelijke omstandigheden, zoals de positie van de dichtstbijzijnde contactdoos etc. Let bij de keuze van de opstel- of montageplaats ook op dat blootstelling aan direct zonlicht, trillingen, stof, hitte, kou en vocht moet worden voorkomen.
  • Seite 84: Aansluiten

    All manuals and user guides at all-guides.com 9. Aansluiten a) Elektrische aansluiting Het stopcontact waaraan de netadapter wordt aangesloten, moet zich in de buurt van het apparaat bevinden en makkelijk toegankelijk zijn zodat het apparaat in geval van storingen snel en zonder gevaren van de netspanning kan worden gescheiden.
  • Seite 85: Bediening

    All manuals and user guides at all-guides.com 10. Bediening In deze gebruiksaanwijzing worden de Engelstalige omschrijvingen in het menu van de internetradio gebruikt. De betekenis van deze omschrijvingen zijn tussen haakjes toegevoegd. a) Basisfuncties In-/uitschakelen, stand-by • Schuif de aan-/uitschakelaar (12) in de stand AAN om het apparaat in te schakelen. • Om het apparaat uit te schakelen, zet u de aan-/uitschakelaar (12) terug in de stand OFF.
  • Seite 86 All manuals and user guides at all-guides.com Taalinstelling • Na de eerste start wordt een menuvenster voor de taalinstelling weergegeven. • Kies uw gewenste taal met de draaiknop VOLUME (11). • Bevestig de keuze door op de draaiknop VOLUME (11) te drukken. Configuratie van de WLAN-verbinding • Vervolgens verschijnt de vraag of u de WLAN-verbinding wilt controleren telkens u het apparaat inschakelt.
  • Seite 87: Menu-Overzicht

    All manuals and user guides at all-guides.com c) Menu-overzicht Hieronder vindt u een overzicht van alle punten, die u in het menu kunt selecteren. Bovendien is beschreven wat u bij welk menupunt kunt instellen of welke functie na het overeenkomstig punt staat. De respectievelijk actieve instelling herkent u door de wit weergegeven tekst.
  • Seite 88 All manuals and user guides at all-guides.com "INFORMATION CENTER" (Informatiecentrum) • "WEATHER INFORMATION" (Weersinformatie) Hier kunt u allerhande weersinformatie van bepaalde steden weergeven. De keuze gebeurt volgens continenten, staat, land en stad. De gegevens worden nu van het internet opgeroepen. • "FINANCIAL INFORMATION" (financiële informatie) Hier worden allerhande beursgegevens, zoals bv.
  • Seite 89 All manuals and user guides at all-guides.com - "CHECK NETWORK WHEN POWER ON" (Netwerk testen bij inschakelen) In het laatste punt van die submenu heeft u de mogelijkheid om bij het inschakelen van de radio, de automatische netwerkcontrole in of uit te schakelen. Wanneer deze functie geactiveerd is, wordt na het inschakelen bij ontbrekende internetverbinding het menu voor de netwerkinstelling weergegeven.
  • Seite 90 All manuals and user guides at all-guides.com • "LANGUAGE" (Taal) Hier kunt u de gewenste menutaal selecteren. • "DIMMER" (Dimmer) - "POWER SAVING" (energiespaarmodus) Hier stelt u de schermhelderheid voor de stand-bymodus in. - "TURN ON" (Inschakelen) Hier stelt u de schermhelderheid voor de normale modus in. • "DISPLAY"...
  • Seite 91 All manuals and user guides at all-guides.com • "PLAYBACK SETUP" (afspeelnstelling) Hier kunt u kiezen hoe de nummmerweergave moet gebeuren - "OFF" (Uit) Nummerherhaling uitgeschakeld - "REPEAT ALL" (alles herhalen ) alle nummers worden herhaald - "REPEAT ONE" (een nummer herhalen) het huidige nummer wordt herhaald - "SHUFFLE"...
  • Seite 92: Bedrijfsmodus Internetradio

    All manuals and user guides at all-guides.com d) Bedrijfsmodus internetradio Naar internetradio omschakelen • Om naar de bedrijfsmodus internetradio om te schakelen, scrollt u in het hoofdmenu met de draaiknop VOLUME (11) of de toetsen LEFT (2) en RIGHT (4) naar links of rechts tot in het midden van het scherm "INTERNET RADIO"...
  • Seite 93: Bedrijfsmodus Media Center

    All manuals and user guides at all-guides.com Zenders aan de favorieten toevoegen: • Net beluisterde zenders aan de favorieten toevoegen - Druk dan lang op de toets PRESET (6) tot de favorietenlijst verschijnt. - Kies met de draaiknop VOLUME (11) de gewenste geheugenplaats. - Druk op de draaiknop VOLUME (11) om de zender op te slaan.
  • Seite 94: Usb-Weergave

    All manuals and user guides at all-guides.com USB-weergave Verbind geen MP3-speler met de USB-poort (16) wanneer deze via batterijen wordt aangedreven. De stroomvoorziening van de USB-poort (16) kan de geïnstalleerde batterijen opladen en daardoor tot de oververhitting of het ontploffen van de batterijen leiden. Als het USB-opslagmedium niet wordt herkend, verwijdert u het nogmaals en sluit u het dan opnieuw aan.
  • Seite 95 All manuals and user guides at all-guides.com Playlist (afspeellijst) • Om een reeds afgespeeld nummer aan uw afspeellijst toe te voegen, drukt u lang op de draaiknop VOLUME (11) tot op het scherm een symbool links naast de tijdsaanduiding verschijnt. • Het huidige nummer werd aan de afspeellijst toegevoegd.
  • Seite 96: Dlna-Weergave

    All manuals and user guides at all-guides.com f) DLNA-weergave • De internetradio ondersteunt bovendien de DLNA-weergave. • Dat betekent dat u van een compatibel apparaat, dat zich in hetzelfde netwerk bevindt, muziek rechtstreeks op de internetradio kunt afspelen. • Het geheel functioneert bv. met de mediaspeler van Windows .
  • Seite 97: Alarm Uitschakelen

    All manuals and user guides at all-guides.com • Navigeer naar het punt "SOUND MELODY" (Sound: Melodie) en open het. Hier stelt u de wektoon in: "BEEP" (Geluid) Geluidssignaal "MELODY" (Melodie) Wekmelodie "INTERNET RADIO" Radio van het internet "USB" Afspelen van een USB-stick Bij het wekken met internetradio moet u nog een zender uit uw opgeslagen favorieten kiezen.
  • Seite 98: My Mediau

    All manuals and user guides at all-guides.com h) My mediaU U kunt op het internet met behulp van uw computer een eigen favorietenlijst met internetradiozenders maken en beheren. Ga daarvoor als volgt te werk. • Open daarvoor op uw computer de website “http://www.mediayou.net/web/index.php” (zonder aanhalingstekens). • Maak nu een gebruikersaccount aan met uw e-mailadres en een wachtwoord.
  • Seite 99: Verhelpen Van Storingen

    All manuals and user guides at all-guides.com 12. Verhelpen van storingen U hebt problemen om de internetradio aan uw WLAN aan te melden: • Controleer of een ander apparaat, zoals bv. een computer of tablet via WLAN op het internet toegang kan krijgen. • Controleer of de DHCP-server in uw router loopt, resp.
  • Seite 100: Onderhoud En Reiniging

    All manuals and user guides at all-guides.com U kunt geen mappen vrijgeven omdat de functie niet wordt weergegeven: • Activeer de functie File Sharing in uw systeem. De internetradio moet de gekozen zender altijd opnieuw tussenopslaan en het afspelen blokkeert daardoor. • De internetradio wordt via een breedbandverbinding overgedragen.
  • Seite 101: Afvoer

    All manuals and user guides at all-guides.com 14. Afvoer Elektronische apparaten kunnen gerecycled worden en horen niet thuis in het huisvuil. Het product dient na afloop van de levensduur volgens de geldende wettelijke voorschriften te worden afgevoerd. 15. Technische gegevens Bedrijfsspanning ..........100-240 V/AC 50/60 Hz (netadapter) / 5,9 V/DC (internetradio) Vermogensopname ..........0,15 / 6 W (uitgeschakeld/max.) Uitgangsvermogen ...........3 W Scherm .............240 x 320 pixels, TFT-kleurenscherm Wektijden ............2 + NAP alarm...
  • Seite 102 All manuals and user guides at all-guides.com...
  • Seite 103 All manuals and user guides at all-guides.com...
  • Seite 104 All manuals and user guides at all-guides.com Dies ist eine Publikation der Conrad Electronic SE, Klaus-Conrad-Str. 1, D-92240 Hirschau (www.conrad.com). Alle Rechte einschließlich Übersetzung vorbehalten. Reproduktionen jeder Art, z. B. Fotokopie, Mikroverfilmung, oder die Erfassung in elektronischen Datenverarbeitungsanlagen, bedürfen der schriftlichen Genehmigung des Herausgebers. Nachdruck, auch auszugsweise, verboten.

Diese Anleitung auch für:

Zp2-zi-20

Inhaltsverzeichnis