Seite 1
Programador de Riego Residencial AUT OM ATI C Manual de Operación e Instrucciones de Programación. SYS TEM OFF Programmateurs EC pour CUR REN T TIM E/D AY Sites Résidentiels MA NUA L-A LL STA TIO NS STA RT TIM ES Manuel de l’utilisateur et instructions de programmation...
Setting Station Run Times (Length of Watering for Each Area)... 8 INSTALLATION Setting Days To Water ............8 EC Components ................ 1-2 Selecting Specific Days of the Week to Water......8 Mounting the Controller to Wall............ 3 Selecting Interval Watering ............8 Connecting Valves and Transformer...........
Seite 4
EC COMPONENTS � � � � � � � � � � � � � � � � � �� �� AUTOMATIC AUTOMATIC ��������� ��������� �� �� � �� SYSTEM OFF SYSTEM OFF CURRENT TIME/DAY CURRENT TIME/DAY ���������� ���������� ����������������...
Seite 5
AC power. Even without a 9-volt battery the EC will keep track of time for up to 1 month and System Off – Allows user to discontinue all programs and stop all retain the program indefinitely in the event of a power outage.
Make sure that there is a sufficient length of conduit so it enters the NOTE: The indoor EC is not water or weather resistant, conduit cover. There are two small notches on and must be installed indoors or in a protected area.
NOTE: Outdoor model is water and weather resistant. ditional wire coming from the master valve will go in the screw slot Connecting the outdoor EC to the primary power should marked P. only be done by a licensed electrician following all local codes.
A Hunter weather sensor or other type of micro-switch weather sensor NOTE: Complete this section only if you have a pump can be connected to the EC. The purpose of this sensor is to stop start relay installed. A pump start relay is a device that watering when weather conditions dictate.
WATERING SCHEDULE FORM HUNTER EC PROGRAM A PROGRAM B PROGRAM C DAY OF THE WEEK INTERVAL (Choose 1 to 31 days) PROGRAM START TIMES LOCATION STATION RUN TIME STATION RUN TIME STATION RUN TIME STATION NOTES:...
The time and day have now been set. You can turn the dial to AUTOMATIC to display the current time. The EC display shows time and day when the controller is idle. The display changes when the dial is rotated to indicate the specific programming information to enter.
PROGRAMMING THE CONTROLLER (cont.) Selecting Specific Days of the Week to Water 1. With the cursor on a specific day (the NOTE: If a program has all four-start times turned off, cursor always starts with 1), press the then that program is off. (All other program details are button to activate a particular day of the retained.) Because there are no start times, there will week to water.
Programmable Rain Off To view the new adjusted run times, simply turn the rotary dial to SYSTEM OFF the SET STATION RUN TIMES position, the displayed run time will be This feature permits the user to stop all pro- updated accordingly as the seasonal adjustment is made. grammed waterings for a designated period from 1 to 7 days.
HIDDEN FEATURES 8. Return dial to AUTOMATIC (program will water the entire program beginning with the station number last left in the display, then Programmable Delay Between Stations controller will return to automatic mode with no change in the previously set program). This feature allows the user to insert a delay between when AUTOMATIC one station turns off and the next station turns on.
Verify AC power and wiring. Correct any errors. Display is blank with AC power to terminal and Controller may be damaged by power surge. Call your dealer or Hunter installer. with a new battery. Time of day display is blinking.
TROUBLESHOOTING GUIDE (cont.) PROBLEM CAUSES SOLUTIONS Automatic irrigation does not start at AM/PM of time of day not set correctly. Correct AM/PM of time of day. start time and controller is not in the AM/PM of start time not set correctly. Correct AM/PM of start time.
Seite 16
CERTIFICATE OF CONFORMITY TO EUROPEAN DIRECTIVES Hunter Industries declares that the irrigation controller Model EC complies with the standards of the European Directives of “electromagnetic compatibility” 87/336/EEC and “low voltage” 73/23/EEC. __________________________________ Project Engineer Hunter Industries Incorporated • The Irrigation Innovators...
Seite 17
PROGRAMMADOR DE RIEGO RESIDENCIAL Manual de Operación e Instrucciones de Programación. SUMARIO Programación del programador (Continuación) Regulación de tiempos de riego (riego por cada área) ..8 INTRODUCCION E INSTALACION Regulación de los días de riego .......... 8 Componentes del programador ..........1-2 Seleción de días especificos de riego semanales .......
COMPONENTES DEL PROGRAMADOR AUTOMATICO AUTOMATIC AUTOMATIC AUTOMATIC AUTOMATIC AUTOMATICO SYSTEM OFF SYSTEM OFF PARADO CURRENT TIME/DAY CURRENT TIME/DAY DIA/HORA SYSTEM OFF SYSTEM OFF PARADO CURRENT TIME/DAY CURRENT TIME/DAY DIA/HORA MARCH MANUAL -- MANUAL-ALL STATIONS MANUAL-ALL STATIONS START TIMES START TIMES HORAS DE ARRANQUE CICLO COMPLETO MARCH MANUAL --...
Seite 19
13. Conexión de Pila de 9 V – La pila alcalina podrá ser utilizada en El transformador es incluído y provee corriente al programador EC. ausencia de corriente AC. Aún sin pila, el EC mantendrá el tiempo hasta 1 mes y retendrá el programa indefinidamente en el caso de no tener energía.
Hay NOTA: El programador EC de interior no es a prueba de dos pequeñas hendiduras en la parte izqui- agua o resistente en la intemperie, debe ser instalado erda de la cubierta para tender los cables de en el interior del hogar o en una área protegida.
NOTA: El modelo para exteriores es resistente al agua 1. En la válvula maestra, conecte el cable común a cualquier cable y a las inclemencias del tiempo. La conexión del EC del solenoide de la válvula. Conecte el cable adicional y note que para exteriores corriente de entrada sólo la debe...
El pluviómetro Hunter Weather o otro tipo de micro-switch puede ser NOTA: Utilice esta sección unicamente si cuenta con conectado al EC. El propósito del pluviómetro es el de detener el riego una bomba de relevo. Una bomba de relevo es un cuando las condiciones del clima lo requiera.
FORMULARIO DEL CALENDARIO DE RIEGO HUNTER EC PROGRAMA A PROGRAMA B PROGRAMA C DIA DE LA SEMANA INTERVALO (Seleccione de 1 a 31 dias) ARRANQUE DEL CICLO DE RIEGO ESTACION LOCALIZACIÓN TIEMPO DE RIEGO TIEMPO DE RIEGO TIEMPO DE RIEGO...
Pulse las teclas ó para seleccionar el día de La pantalla del EC muestra el día y la hora al estar desocupado. La la semana (1 a 7) correspondiente. pantalla cambia al girar el selector indicando información específica La hora y el día han sido ajustados. Usted podrá seleccionar de programación.
PROGRAMACION DEL PROGRAMADOR 3. El programador mostrará siete días de la semana con el icono arriba del número. El icono representa “abierto” para el día (continuación) seleccionado y el icono “Apagado”. Seleccion de Días Específicos de Riego Semanales NOTA: Si un programa tiene todos los arranques 1.
Apagado en lluvia programable Para utilizar esta característica siga los siguientes pasos. SYSTEM OFF 1. Seleccione AJUSTE TEMPORAL. APAGADO Esta opción permite parar todos los riegos 2. La pantalla demostrará un número intermi- programados durante un periodo indicado de 1 a SEASONAL ADJUSTMENT tente y un símbolo de %, al igual que una 7 días.
FUNCIONES OCULTAS 3. Pulse la tecla hasta visualizar la estación de arranque deseada. 4. El arranque de la estación estará intermitente en la pantalla. Con Retraso programable entre estaciones las teclas ó podrá seleccionar la cantidad de tiempo por Esta función permite introducir un retraso entre estaciones cuando estación que desea regar si esta es diferente a la demostrada en una estación se apaga y la siguiente se pone en funcionamiento la pantalla.
Llame a su distribuidor o instalador corriente en la terminal y pila nueva. debido a una sobrecarga. de Hunter. Hora del día intermitente en la pantalla. La unidad ha sido conectada por primera vez. Ajuste el día y la hora.
GUIA DE LOCALIZACION DE AVERIAS (continuación) PROBLEMA CAUSAS SOLUCIONES Pantalla congelada, o pantalla que Subida transitoria de energía. Restablezca el programador según la página muestra información incorrecta. 10 “Borrado de memoria del programador/ Restablicimiento del programador” (RESET). El riego automático no se inicia AM/PM hora del día no ha sido Corregir AM/PM hora del día.
CERTIFICADO DE CONFORMIDAD PARA LA COMUNIDAD EUROPEA Hunter Industries declara que el programador de riego modelo EC cumple con los estandares de los directivos europeos de “compatibilidad electromagnética” 87/336/EEC y “bajo voltaje” 73/23/EEC. ___________________________________ Ingeniero del Proyecto Hunter Industries Incorporated • Los Innovadores del Riego...
Seite 31
Réglage des temps d’arrosage (durée d’arrosage de chaque zone) 8 INTRODUCTION ET INSTALLATION Réglage des jours d’arrosage ..........8 Elements du programmateur EC ..........1-2 Sélection des jours spécifiques de la semaine à arroser .... 8 Montage mural d’un programmateur ..........3 Sélection des intervalles entre arrosages ........
ELEMENTS DU PROGRAMMATEUR EC AUTOMATIC AUTOMATIC Marche AUTOMATIC Marche SYSTEM OFF SYSTEM OFF Arrêt CURRENT TIME/DAY CURRENT TIME/DAY Réglage Heure/Jour Réglage Heure/Jour SYSTEM OFF Arrêt CURRENT TIME/DAY Marche Manuelle -- Réglage MANUAL-ALL STATIONS MANUAL-ALL STATIONS START TIMES START TIMES Cycle Complet...
Seite 33
A – Ecran de visualisation à cristaux liquides Zone bornier de raccordement - pour raccorder les fils du transforma- teur et des vannes de leur source jusqu’au programmateur. Temps d’arrosage - permet à l’utilisateur de programmer le temps d’arrosage de 1 minute à 4 heures. Touche de réinitialisation - Permet de réenclencher le programmateur.
5. Remettre le panneau d’accès par le bas au EC. 2. Faire glisser l’encoche (B) située en haut du programmateur sur la vis. 3. Fixer le programmateur en mettant 3 vis dans les trous (C) situés BRANCHEMENT DES VANNES ET DU sous la zone du bornier de raccordement.
Note: Les modèles extérieurs sont résistants à l’eau et aux intempéries. Le branchement du EC extérieur à 1. Au niveau de la vanne maîtresse, raccorder le commun à un des l’alimentation générale doit être fait par un électricien fils du solénoïde de la vanne.
BRANCHEMENT D’UN RELAIS DE POMPE BRANCHEMENT D’UN PLUVIOMÈTRE Sur votre programmateur EC, il est possible de brancher un pluvio- NOTE: Cette section n’est applicable que si un relais de mètre Mini-Clik Hunter, ou tout autre type de pluviomètre à contact.
TABLEAU DE PROGRAMMATION HUNTER EC PROGRAMME A PROGRAMME B PROGRAMME C JOURS SEMAINE INTERVALLE (1 à 31 jours) PROGRAMME DEPART CYCLE EMPLACEMENT STATION TEMPS ARROSAGE STATION TEMPS ARROSAGE STATION TEMPS ARROSAGE STATION NOTES:...
EC indique l’heure et le jour. L’affichage se modifie en 5. Le chiffre 1 doit clignoter indiquant le premier jour de la semaine. tournant le sélecteur rotatif pour entrer des informations spécifiques Appuyez sur les touches pour sélectionner le jour de la...
Suppression d’un départ de cycle programmé Réglage des jours d’arrosage RÉGLAGE DÉPARTS CYCLE Mettez le sélecteur sur la position RÉGLAGE 1. Mettez le sélecteur sur la position JOURS D’ARROSAGE. DÉPARTS CYCLE arrosage, et appuyez sur les 2. L’écran indique le dernier programme sélectionné (A, RÉGLAGE touches jusqu’à...
Les positions MARCHE MANUELLE - UNE STATION et MARCHE MANU- Marche automatique MARCH E ELLE - CYCLE COMPLET ainsi que la touche « Démarrage et Avance » Après avoir programmé, mettez le sélecteur sur permettent de mettre le pluviomètre en dérivation. «...
NOTE: NOTE: La programmation initiale doit toujours s’effec- La station qui apparaît à l’écran lorsque vous mettez tuer dans la position 100%. le sélecteur sur MARCHE sera la première station à fonc- tionner. Le programmateur mettra l’arrosage en route seule- ment en ordre séquentiel.
Le programmateur peut avoir été endommagé Contacter votre distributeur ou l’installateur présence de la tension AC au bornier et par des surtensions. Hunter. l’installation d’une pile neuve. L’heure clignote. Le programmateur est utilisé pour la première fois. Régler le jour et l’heure.
Seite 43
GUIDE DE DÉPANNAGE (cont.) PROBLEMES CAUSES SOLUTIONS L’arrosage automatique ne démarre pas au L’heure et le jour (AM/PM) ne sont pas entrés Corriger l’heure et le jour AM/PM. départ de cycle et le programmateur n’est correctement. pas en mode arrêt. L’heure et le jour du départ de cycle ne sont pas Corriger l’heure et le jour de départ du cycle entrés correctement.
• Sortie transformateur : 24 VCA, 0,625 A CERTIFICAT DE CONFORMITÉ AUX DIRECTIVES EUROPÉENNES Hunter Industries déclare que le programmateur d'arrosage Modèle EC est conforme aux standards des directives européennes, de “compatibilité électromagnétique” 87/336/EEC et de “basse tension” 73/23/EEC. __________________________________ Ingénieur des Travaux...
Seite 45
Regolazione dei tempi d’irrigazione INTRODUZIONE E INSTALLAZIONE (durata di irrigazione dell' ogni zona) ........8 Componenti del programmatore EC ........... 1-2 Regolazione dei giorni d’irrigazione ........8 Montaggio a muro del programmatore.......... 3 Selezione di giorni specifici della settimana ......8 Collegamento delle valvole e del trasformatore ......
COMPONENTI DEL PROGRAMMATORE EC Acceso AUTOMATIC AUTOMATIC AUTOMATIC AUTOMATIC AUTOMATICO Acceso Regolazione SYSTEM OFF SYSTEM OFF PARADO Spento CURRENT TIME/DAY CURRENT TIME/DAY DIA/HORA Regolazione Giorno/Ora SYSTEM OFF SYSTEM OFF Spento CURRENT TIME/DAY CURRENT TIME/DAY Giorno/Ora Funzionamento MARCH MANUAL -- MANUAL-ALL STATIONS MANUAL-ALL STATIONS Manuale –...
Seite 47
A – Display di visualizzazione a cristalli liquidi 16. Tasto di reset – Permette di riarmare il programmatore. 17. Rivestimento condutture – copre i cavi dell’impianto nel punto Regolazione Tempi d‘Irrigazione – Consente di impostare il tempo in cui questi confluiscono nella base del programmatore. di funzionamento di ciascuna stazione-valvola da un minuto a 4 ore.
1. Avvitare una vite (A) da 25 mm nel muro. i fermi forniti. Nota: per fissare il programmatore su muri in 5. Rimettere in posizione il pannello di accesso inferiore sull’EC. pietra o in foratini usare i tasselli. 2. Far scivolare l’intaglio (B) situato sulla parte alta del programmatore sulla vite.
è una valvola normalmente chiusa installata NOTA: il modello per esterni è resistente all’acqua e nel punto di alimentazione della linea principale, che si agli agenti atmosferici. Il collegamento dell’EC esterno apre solo quando il programmatore avvia un programma all’alimentazione primaria deve essere effettuato di irrigazione.
COLLEGAMENTO DI UN RELÈ DI POMPA COLLEGAMENTO DI UN PLUVIOMETRO Al programmatore EC si possono collegare sia un pluviometro NOTA: Il presente capitolo riguarda esclusivamente gli Mini-Clik Hunter, sia un pluviometro a contatto. Lo scopo del pluvio- ® impianti dotati di relè per la pompa. Il relè della pompa metro è...
MODULO DEL PIANO DI IRRIGAZIONE HUNTER EC PROGRAMMA A PROGRAMMA B PROGRAMMA C GIORNI DELLA SETTIMANA INTERVALLO (1 - 31 giorni) AVVIO CICLO PROG (Partenze) POSIZIONE TEMPO IRRIGAZIONE STAZIONE TEMPO IRRIGAZIONE STAZIONE TEMPO IRRIGAZIONE STAZIONE STAZIONE NOTA:...
Sarà sufficiente indicare i giorni della gramma A. Se lo si desidera, si può selezionare settimana in cui si desidera irrigare. Con il programmatore EC è tutto il programma B o C premendo il tasto molto semplice! 3.
3. Il programmatore visualizza i sette giorni della settimana con NOTA: Quando sono stati cancellati i quattro avvii di un’icona “goccia di pioggia” o “goccia di pioggia barrata” ciclo di un programma, questo sarà escluso (tutti i pra il numero del giorno della settimana. L’icona rappresenterà...
Regolazione stagionale Arresto dell’impianto Spento La regolazione stagionale viene usata per modi- Portare il selettore in posizione SPENTO. Le valvo- Regolazione ficare globalmente i tempi di irrigazione senza Stagionale le aperte vengono disalimentate entro i successivi dover ritoccare la programmazione. Questa funzione è ideale per ef- due secondi.
ripasserà poi in modo automatico senza secondo durante le fasi 2 o 3 il programmatore ritornerà automati- Funzionamento Manuale – che il programma selezionato preliminar- camente al programma A). Ciclo Completo mente venga modificato). 4. Premere il tasto per spostarsi sulla stazione dalla quale si Avvio manuale di un programma completo desidera iniziare.
Possibilità di danneggiamento del programmatore a Contattare il proprio rivenditore o nonostante ci sia tensione ai morsetti e si sia causa di picchi di tensione. l’installatore Hunter. installata una batteria nuova. L’ora lampeggia. Il programmatore viene usato per la prima volta.
• Regolazione stagionale: da 10 a 150% con incrementi del 10%. • EC-601: a 6 stazioni con trasformatore interno. Caratteristiche elettriche • EC-401-A: a 4 stazioni con trasformatore interno – cablaggio • Ingresso trasformatore: 230/240VCA, 50/60Hz, applicazione Australiano. internazionale. •...
• Tre programmi: A, B e C. CERTIFICATO DI CONFORMITÀ SECONDO LE DIRETTIVE EUROPEE Si dichiara che gli apparecchi EC per l’irrigazione automatica sono conformi alle Direttive Europee 87/336/CEE e 73/23/CEE. __________________________________ Project Engineer Per la versione completa del manuale preghiamo consultare il sito web.
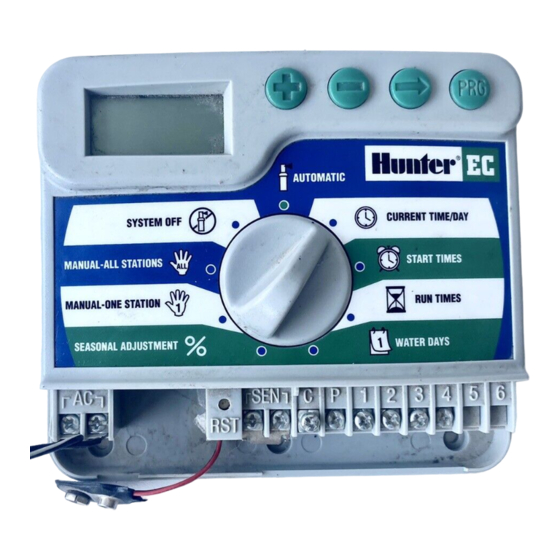
INHALTSVERZEICHNIS Programmierung des Steuergeräts (Fortführung) Einstellen der Beregnungsdauer ......... 8 INSTALLATION Einstellen der Beregnungstage ........... 8 EC Bestandteile ................ 1-2 Einzelne Tage der Woche ............8 Wandmontage des “Steuergerätes”..........3 Intervallbewässerung ............... 8 Anschluss von Ventilen und Trafo ..........3-4 Beregnung ................
EC BESTANDTEILE � � � � � � � � � � � � � � � � � �� �� AUTOMATIC AUTOMATIC Beregnung ��������� ��������� ��������� �� �� � �� SYSTEM OFF SYSTEM OFF CURRENT TIME/DAY CURRENT TIME/DAY Einstellung Tag/Stunde...
Seite 61
A – LCD Display 16. Reset Taste – Hier kann die Steuerung neu initialisiert werden. 17. Kabelschutzkappe – Sie schützt die Kabel an der Unterseite Laufzeit – Mit dieser Funktion können Sie die Laufzeit jeder des Geräts. Ventilsektion von 1 Minute bis 4 Stunden einstellen. C –...
2. Schieben Sie die Schlüssellochöffnung (B) and der Gehäuseober- kleine Kerben für die 24VAC-Kabel des externen Trafos, oder auch seite über die Schraube. der Kabel für den Sensor oder das Pumpenstartrelais/Hauptventil 3. Fixieren Sie nun das EC Steuergerat mit weiteren Schrauben in den � � (falls vorhanden).
ANSCHLUSS DER BATTERIE 4. Nullleiter an Anschluß C sowie die einzelnen farbmarkierten Leitungen an den entsprechenden Sektionsnummern fixieren. Verbinden Sie eine 9-Volt Alkalinebatterie Batterieclip 5. Innenmodell führen Sie das Trafokabel durch (nicht enthalten) mit dem Batterieclip, den Ventil 4 Batteriefach die linke Öffnung des Anschlussfaches und Sie unten links im Anschlußfach finden.
WATER DAYS STROMAUSFALL Zur Pumpe Bei Stromausfall behält die EC Steuerung nur mit eingesetzter Batterie die eingegebenen Bewässerungsprogramme, die korrekte Uhrzeit wird für ca. 1 Monat angezeigt. Während des Stromausfalls blinkt “No AC” (=“Keine Spannung”) in der Anzeige. Ist die Stromversorgung wieder hergestellt wechselt die EC Steuerung wieder in den normalen Automatikbetrieb (wenn Drehknopf auf Beregnung).
BEWÄSSERUNGSFORMULAR (BEISPIEL) HUNTER EC PROGRAMM A PROGRAMM B PROGRAMM C WOCHENT AG INTERVALL (1 bis 31 Tage) PROGRAMM STARTZEITEN BEWÄSSERUNGSDAUER BEWÄSSERUNGSDAUER BEWÄSSERUNGSDAUER SEKTION NOTIZ:...
Durchgänge pro Tag (z.B. am Morgen, zu Mittag, am Nachmittag, am Zyklusstarts. Abend) wie es bei neu gesätem Rasen ideal ist. Auch Sommer- und Kübelpflanzen benötigen u.U. mehrmals täglich Wasser. Mit dem EC 2. Drücken Sie die Taste, bis das gewün- alles kein Problem.
PROGRAMMIERUNG DES STEUERGERÄTS bewässert wird. Bei einem Symbol findet an diesem Tag im gewählten Programm keine Bewässerung statt. (Fortführung) Einzelne Tage der Woche HINWEIS: Wenn bei einem Programm alle 4 Startzeiten 1. Mit dem Cursor auf einem Tag (der Cursor ausgeschaltet sind, ist das gesamte Programm deak- startet immer bei 1), drücken Sie die tiviert.
2. Die Laufzeit der Sektion 1 blinkt im Display. Verwenden Sie die Anzeige der Unterbrechungstage um einen Tag. Wird 1 Taste um zu der gewünschten Sektion zu angezeigt wechselt der EC um Mitternacht wieder in den gelangen. Mit der Taste wählen normalen Automatikbetrieb.
Manueller Start aller Sektionen “One Touch” - Manueller Start und Weiterschaltung 1. Den Drehknopf auf MANUELLER BE- Sie können einen kompletten Bewässerungsdurchgang starten ohne TRIEB-VOLLSTÄNDIGER ZYKLUS stellen. den Drehknopf zu verwenden. 2. Programm A, B, oder C durch Drücken von auswählen.
Überprüfen ob 230V Netzversorgung vorhanden. Überprüfen ob 24V v. Trafo vorhanden. Display zeigt nichts obwohl 24V Steuerung evt. durch Überspannung defekt. Rufen Sie Ihren Bewässerungs-fachmann od. Hunter Vertrieb. vorhanden und Batterie OK Aktuelle Uhrzeit blinkt. Gerät wurde zum erstenmal eingeschaltet Einstellen von Tag und Uhrzeit.
STÖRUNGSSUCHE (FORTSETZUNG) Problem Ursache Lösung Steuerung bewässert eine Sektion Zuviele Startzeiten in einem Programm Eine Startzeit genügt für einen kompletten Bewässerungsdurchgang. öfters als einmal. eingegeben. Siehe “Startzeiten”. In der Anzeige steht “ERR” mit Fehler in der Verdrahtung oder defekte Verdrahtung auf Kurzschluss/Fehler überprüfen. Kurzschluss beseitigen einer Nummer (1-6).