Inhaltszusammenfassung für eQ-3 homematic IP basic HmIP-WTH-B-2
Seite 1
Installations- und Bedienungsanleitung Installation and operating manual Notice d‘installation et d‘emploi Manual de instalación y uso Istruzioni per l‘installazione e l‘uso Installatie- en bedieningshandleiding Wandthermostat – basic S. 2 Wall Thermostat – basic p. 35 Thermostat mural – basic p. 58 Termostato de pared –...
Hinweise zur Anleitung Hinweise zur Anleitung Lesen Sie diese Anleitung sorgfältig, bevor Sie Ihre Homematic IP Geräte in Betrieb nehmen. Bewahren Sie die Anleitung zum späteren Nachschla- gen auf! Wenn Sie das Gerät anderen Personen zur Nutzung überlassen, überge- ben Sie auch diese Anleitung. Benutzte Symbole: Achtung! Hier wird auf eine Gefahr hingewiesen.
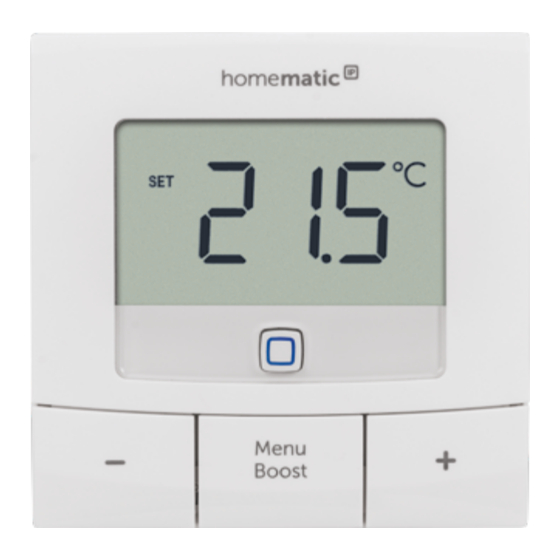
Funktion und Geräteübersicht Bei Sach- oder Personenschäden, die durch unsachgemäße Hand- habung oder Nichtbeachten der Gefahrenhinweise verursacht wer- den, übernehmen wir keine Haftung. In solchen Fällen erlischt jeder Gewährleistungsanspruch! Für Folgeschäden übernehmen wir kei- ne Haftung! Das Gerät ist nur für den Einsatz in wohnungsähnlichen Umgebun- gen geeignet.
Seite 15
Funktion und Geräteübersicht Geräteübersicht (s. Abbildung 1): (A) Elektronikeinheit (Thermostat) (B) Display (C) Systemtaste (Anlerntaste und LED) (D) Minus-Taste (E) Menü-/Boost-Taste (F) Plus-Taste (G) Batteriefach Displayübersicht (s. Abbildung 2): Soll-/Ist-Temperatur Fenster-auf-Symbol Batteriesymbol Funkübertragung Boost-Funktion Manueller Betrieb* Automatikbetrieb* Urlaubsmodus* Heizen Kühlen Bediensperre* Soll-Temperatur Übersicht der Heizphasen...
Allgemeine Systeminformationen Allgemeine Systeminformationen Dieses Gerät ist Teil des Homematic IP Smart-Home-Systems und kom- muniziert über das Homematic IP Funkprotokoll. Alle Geräte des Systems können komfortabel und individuell per Smartphone über die Home- matic IP App konfiguriert werden. Alternativ haben Sie die Möglichkeit, Homematic IP Geräte über die Homematic Zentrale CCU3 oder in Verbin- dung mit vielen Partnerlösungen zu betreiben.
Inbetriebnahme Sie können den Anlernvorgang durch erneute kurze Betätigung der Systemtaste (C) abbrechen. Dies wird durch rotes Aufleuchten der Geräte-LED (C) bestätigt. Erfolgreiches Anlernen wird durch grünes Blinken der Geräte-LED (C) signalisiert. War der Anlernvorgang nicht erfolgreich, leuchtet die Geräte-LED rot auf. Versuchen Sie es erneut. Wenn kein Anlernen erfolgt, wird der Anlernmodus automatisch nach 3 Minuten beendet.
Inbetriebnahme • Ziehen Sie den Isolierstreifen aus dem Batteriefach des Wandther- mostats heraus. • Drücken Sie die Systemtaste (C) des Wandthermostats für mind. 4 s, um den Anlernmodus zu aktivieren. Die Geräte-LED (C) blinkt orange (s. Abbildung 4). • Zur Bestätigung des erfolgreichen Anlernvorgangs leuchtet die LED grün.
Seite 19
Inbetriebnahme Richten Sie zunächst Ihren Homematic IP Access Point über die Homematic IP App ein, um weitere Homematic IP Geräte im System nutzen zu können. Ausführliche Informationen dazu finden Sie in der Bedienungsanleitung des Access Points. Durch das Anlernen des Wandthermostats am Homematic IP Access Point wird das Menü...
Inbetriebnahme Montage Bitte lesen Sie diesen Abschnitt erst vollständig, bevor Sie mit der Montage beginnen. Sie haben die Möglichkeit, den Wandthermostat • mit den mitgelieferten doppelseitigen Klebestreifen oder • mit den mitgelieferten Schrauben an der Wand zu befestigen. Alternativ können Sie den Wandthermostat auf einer Unterputzdose montieren.
Inbetriebnahme 5.2.2 Schraubmontage Um den Wandthermostat mithilfe der Schrauben zu montieren, gehen Sie wie folgt vor: • Wählen Sie einen geeigneten Montageort aus. Stellen Sie sicher, dass an der ausgewählten Position in der Wand keine Leitungen verlaufen! • Halten Sie die Wandhalterung an die gewünschte Montagepositi- on.
Seite 22
Inbetriebnahme Sollten für die Montage bzw. Installation des Geräts Änderungen oder Arbeiten an der Hausinstallation (z. B. Ausbau, Überbrücken von Schal- ter- oder Steckdoseneinsätzen) oder an der Niederspan-nungsvertei- lung erforderlich sein, ist unbedingt folgender Sicherheitshinweis zu beachten: Hinweis! Installation nur durch Personen mit einschlägigen elekt- rotechnischen Kenntnissen und Erfahrungen!* Durch eine unsachgemäße Installation gefährden Sie •...
Konfigurationsmenü Konfigurationsmenü Wenn Sie den Wandthermostat ohne Homematic IP Access Point be- treiben, können Sie nach der Inbetriebnahme direkt am Gerät über das Konfigurationsmenü folgende Modi auswählen und Einstellungen vor- nehmen, um das Gerät an Ihre persönlichen Bedürfnissen anzupassen. Gehen Sie dafür wie folgt vor: •...
Konfigurationsmenü Drücken Sie für ca. 2 s auf die Menü-Taste (E), um das Konfigura- • tionsmenü zu öffnen. Wählen Sie über die Plus- oder Minus-Tasten (D + F) den Menü- • punkt „Auto“ aus. • Bestätigen Sie mit der Menü-Taste. Zur Bestätigung blinkt das Symbol zweimal kurz auf und das Gerät wech- selt in den automatischen Betrieb.
Konfigurationsmenü • Bestätigen Sie mit der Menü-Taste. • Wählen Sie über die Plus- oder Minus-Tasten die gewünschte Offset-Temperatur aus und bestätigen Sie mit der Menü-Taste. Zur Bestätigung blinkt die Temperatur zweimal kurz auf und das Gerät wechselt zurück zur Standardanzeige. Programmierung eines Heizprofils Unter diesem Menüpunkt können Sie ein Heizprofil mit sechs Heiz- und Absenkphasen (13 Schaltzeitpunkten) nach Ihren eigenen Bedürfnissen...
Konfigurationsmenü Bediensperre Die Bedienung am Gerät kann gesperrt werden, um das ungewollte Ver- ändern von Einstellungen, z. B. durch versehentliches Berühren, zu verhin- dern. Um die Bediensperre zu aktivieren bzw. deaktivieren, gehen Sie wie folgt vor: • Drücken Sie für ca. 2 s auf die Menü-Taste (E), um das Konfigura- tionsmenü...
Konfigurationsmenü • Wählen Sie über die Plus- oder Minus-Tasten den Monat aus und bestätigen Sie mit der Menü-Taste. • Wählen Sie über die Plus- oder Minus-Tasten den Tag aus und bestätigen Sie mit der Menü-Taste. • Wählen Sie über die Plus- oder Minus-Tasten die Stunden aus und bestätigen Sie mit der Menü-Taste.
Bedienung Bedienung Nach dem Anlernen und der Montage stehen Ihnen einfache Bedien- funktionen direkt am Gerät zur Verfügung. • Temperatur: Drücken Sie die linke (D) oder rechte (F) Taste, um die Raumtemperatur manuell zu verändern. Im Automatikbetrieb bleibt die manuell eingestellte Temperatur bis zum nächsten Schaltzeitpunkt bestehen.
Fehlerbehebung • Setzen Sie die Elektronikeinheit wieder in die Wandhalterung (s. Abbildung 12). • Achten Sie nach dem Einlegen der Batterien auf die Blinkfolgen der LED (s. „9.4 Fehlercodes und Blinkfolgen“ auf Seite 31). Nach dem Einlegen der Batterien führt das Gerät zunächst einen Selbst- test für ca.
Fehlerbehebung Befehl nicht bestätigt Bestätigt mindestens ein Empfänger einen Befehl nicht, leuchtet zum Ab- schluss der fehlerhaften Übertragung die LED (C) rot auf. Grund für die fehlerhafte Übertragung kann eine Funkstörung sein (s. „12 Allgemeine Hinweise zum Funkbetrieb“ auf Seite 33). Die fehlerhafte Übertragung kann folgende Ursachen haben: •...
Fehlerbehebung Fehlercodes und Blinkfolgen Fehler- und Bedeutung Lösung Blinkcode Batteriesymbol Batteriespannung Tauschen Sie die Batterien des Geräts aus (s. „8 Bat- gering terien wechseln“ auf Seite 28). Antennensymbol Kommunikati- Prüfen Sie die Verbindung onsstörung zum zum Homematic IP Access blinkt ( ) Home-matic IP Point oder zu den angelern- Access Point oder...
Wiederherstellung der Werkseinstellungen Wiederherstellung der Werkseinstellungen Die Werkseinstellungen des Geräts können wiederhergestellt wer- den. Dabei gehen alle Einstellungen verloren. Um die Werkseinstellungen des Geräts wiederherzustellen, gehen Sie wie folgt vor: • In montiertem Zustand lässt sich die Elektronikeinheit (A) einfach von der Wandhalterung lösen.
Umwelteinflüsse wie Luftfeuchtigkeit neben baulichen Gegebenheiten vor Ort eine wichtige Rolle. Hiermit erklärt die eQ-3 AG, Maiburger Str. 29, 26789 Leer, Deutsch- land, dass der Funkanlagentyp Homematic IP HmIP-WTH-B-2 der Richtlinie 2014/53/EU entspricht. Der vollständige Text der EU-Kon- formitätserklärung ist unter der folgenden Internetadresse verfügbar:...
Seite 34
Technische Daten Wirkungsweise: Typ 1 Software-Klasse: Technische Änderungen vorbehalten. Entsorgungshinweis Gerät nicht im Hausmüll entsorgen! Elektronische Geräte sind ent- sprechend der Richtlinie über Elektro- und Elektronik-Altgeräte über die örtlichen Sammelstellen für Elektronik-Altgeräte zu entsorgen. Konformitätshinweis Das CE-Zeichen ist ein Freiverkehrszeichen, das sich ausschließlich an die Behörden wendet und keine Zusicherung von Eigenschaften beinhaltet.
Seite 36
Table of contents Information about this manual .............37 Hazard information .................37 Function and device overview ............. 38 General system information ..............39 Start-up ..................... 40 Add Device ..................40 5.1.1 Direct pairing ................40 5.1.2 Pairing to the Homematic IP Access Point (alternative) . 42 Mounting .....................
Information about this manual Information about this manual Read this manual carefully before beginning operation with your Homematic IP components. Keep the manual so you can refer to it at a later date if you need to. If you hand over the device to other persons for use, hand over this man- ual as well.
Function and device overview The device may only be operated within residential buildings. Using the device for any purpose other than that described in this operating manual does not fall within the scope of intended use and shall invalidate any warranty or liability. Function and device overview The Homematic IP Wall Thermostat offers time-controlled regulation of your conventional radiators with Homematic IP Radiator Thermostats...
General system information (E) Menu/Boost button (F) Plus button (G) Battery compartment Display overview (see figure 2): Setpoint/actual temperature Open window symbol Battery symbol Radio transmission Boost function Manual operation* Automatic mode* Holiday mode* Heating Cooling Operating lock* Setpoint temperature Overview of heating phases Time and date* Offset temperature*...
Start-up Start-up Add Device Read this entire section before starting the pairing procedure. You can either connect the wall thermostat directly with one or more Homematic IP devices or add the device to the Homematic IP Access Point (HmIP-HAP). After direct pairing, configuration has to be done directly on the device.
Start-up If you want to add a wall thermostat to an existing device group including a radiator thermostat and a window contact, you first need to pair the wall thermostat to the radiator thermostat. Afterwards, you can pair the wall thermostat with the window and door contact. If you are using several devices in one room, you should pair all devices with each other.
Start-up Press and hold down the system button (C) for at least 4 seconds • to activate the pairing mode. The device LED (C) starts to flash orange (see fig. 5). Pairing mode remains activated for 3 minutes. • Press and hold down the system button of the device you want to connect (e.g.
Start-up You can manually start the pairing mode for another 3 minutes by pressing the system button (C) shortly (see figure 6). • Your device will automatically appear in the Homematic IP app. • To confirm, enter the last four digits of the device number (SGTIN) in your app or scan the QR code.
Start-up 7). Make sure that the electronic unit properly engages into the mounting plate. • Fix the adhesive strips on the back side of the mounting plate in the provided area. You should be able to read the letters (“TOP”) on the back side (see figure 8).
Start-up 5.2.3 Installation on flush-mounted boxes You can mount the wall thermostat on flush-mounting/installation boxes using the screw holes (see figure 13). If the device is mounted to a flush-mounting box, there may be no open conductor ends. If changes or works have to be made on the house installation (e.g. extension, bypass of switch- or socket inserts) or the low-voltage distribution for mounting or installing the device, the following safety instruction must be considered:...
Configuration menu • Selection of electrical installation material for safeguarding shut- off conditions; • IP protection types; • Installation of electrical installation material; • Type of supply network (TN system, IT system, TT system) and the resulting connecting conditions (classical zero balancing, protective earthing, required additional measures etc.).
Configuration menu Automatic mode Switching from manual to automatic mode is only possible if the date and time have been set. In automatic mode, the temperature is controlled in accordance with the set heating profile. Manual changes are activated until the next point at which the profile changes.
Configuration menu Offset temperature As the temperature is measured on the room thermostat, the temperature distribution can vary throughout a room. To adjust this, a temperature offset of ±3.5 °C can be set. If a nominal temperature of e.g. 20 °C is set but the room presents with only 18 °C, an offset of -2.0 °C needs to be set.
Configuration menu • Repeat this procedure until temperatures are stored for the entire period between 0:00 and 23:59 h. To confirm, the time flashes twice and the device changes back to the standard display. Operating lock Operation of the device can be locked to avoid settings being changed unintended (e.g.
Configuration menu Time and date To set the date and time, please proceed as follows: Press and hold down the menu button (E) to open the • configuration menu. Select “Date/time” via the plus and minus buttons (D + F) in the •...
Operation • Use the plus or minus buttons to select the temperature for the holiday mode and confirm with the menu button.. To confirm, the symbol flashes twice and the device changes to holiday mode. Operation After pairing and mounting have been performed, simple operations are available directly on the device.
Replacing batteries Replacing batteries If the symbol for empty batteries ( ) appears in the display or in the app, please replace the used batteries by two new LR6/mignon/AA batteries. You must observe the correct battery polarity. To replace the batteries of the device, please proceed as follows: •...
Troubleshooting Troubleshooting Weak battery Provided that the voltage value permits it, the device will remain ready for operation also if the battery voltage is low. Depending on the particular load, it may be possible to send transmissions again repeatedly, once the batteries have been allowed a brief recovery period.
Troubleshooting During normal operation, the duty cycle is not usually reached. However, repeated and radio-intensive pairing processes mean that it may be reached in isolated instances during start-up or initial installation of a system. If the duty cycle is exceeded, this is indicated by one long flash of the device LED (C), and may manifest itself in the device temporarily working incorrectly.
Restore factory settings 1x long red Transmission failed Please try again (see sec. see lighting or duty cycle limit is „9.2 Command not confirmed“ reached on page 53 or see „9.3 Duty cycle“ on page 53). 6x long red Device defective Have a look at your app for flashing error message or contact your...
Hereby, eQ-3 AG, Maiburger Str. 29, 26789 Leer/Germany declares that the radio equipment type HmIP-WTH-B-2 is in compliance with Directive 2014/53/EU. The full text of the EU declaration...
Technical specifications Technical specifications Device short name: HmIP-WTH-B-2 Supply voltage: 2x 1.5 V LR6/mignon/AA Current consumption: 40 mA max. Battery life: 5 years (typ.) Degree of protection: IP20 Degree of pollution: Ambient temperature: 0 to 50 °C Dimensions (W x H x D): 85 x 85 x 22 mm Weight: 140 g (including batteries)
Seite 59
Table des matières Remarques sur la notice ................ 60 Mises en garde ..................60 Fonction et aperçu de l’appareil ............61 Informations générales sur le système ..........63 Mise en service ..................63 Apprentissage ..................63 5.1.1 Apprentissage direct ............... 63 5.1.2 Programmation sur le Homematic IP Access Point (alternative) ................
Remarques sur la notice Remarques sur la notice Lisez attentivement la présente notice avant de mettre les composants Homematic IP en service. Conservez la notice pour pouvoir vous y réfé- rer ultérieurement ! Si vous laissez d’autres personnes utiliser l’appareil, n’oubliez pas de leur remettre également cette notice d’utilisation.
Fonction et aperçu de l’appareil Notre responsabilité ne saurait être engagée en cas de dommages matériels ou de dommages corporels dus au maniement inappro- prié ou au non-respect des mises en garde. Dans de tels cas, tout droit à la garantie est annulé ! Nous ne pouvons être tenus respon- sables des dommages indirects occasionnés ! L’appareil convient uniquement pour l’utilisation dans des environ- nements d’habitat.
Seite 62
Fonction et aperçu de l’appareil Grâce à l’alimentation par piles et à la communication radio, le thermos- tat mural peut se monter à différents emplacements. Aperçu de l’appareil (voir figure 1) : (A) Module électronique (thermostat) (B) Écran (C) Touche système (touche d’apprentissage et LED) (D) Touche moins (E) Touche menu/boost (F) Touche plus...
Informations générales sur le système Informations générales sur le système Cet appareil fait partie du Homematic IP Système Smart-Home et com- munique par le biais du Homematic IP Protocole radio. Tous les appa- reils du système peuvent être configurés facilement et individuellement avec un smartphone à...
Seite 64
Mise en service Vous pouvez interrompre l’apprentissage en appuyant une nouvelle fois brièvement sur la touche système (C). Cela est confirmé par la LED de l’appareil (C) qui s’allume en rouge. Un apprentissage réussi est signalé par le clignotement en vert de la LED de l’appareil (C).
Mise en service Ouvrez, le cas échéant, le compartiment à piles (G) en retirant le • support mural au moyen d’un tournevis plat (voir Figure 3). • Retirez la bandelette isolante du compartiment à piles du ther- mostat mural. • Appuyez sur la touche système (C) du thermostat mural pendant au moins 4 secondes afin d’activer le mode d’apprentissage.
Seite 66
Mise en service Commencez par configurer le Homematic IP Access Point à l’aide de l’application Homematic IP afin de pouvoir utiliser d’autres appa- reils Homematic IP avec votre système. Vous trouverez des informa- tions détaillées à ce sujet dans le mode d’emploi de l’Access Point. En programmant le thermostat mural sur le Homematic IP Access Point, le menu du thermostat mural disparaît de l’écran et il n’est possible...
Mise en service • Si la LED s’allume est rouge, recommencez une nouvelle fois. • Choisissez la solution souhaitée pour votre appareil. • Dans l’appli, affectez l’appareil à une pièce et donnez un nom à l’appareil. Montage Merci de lire attentivement cette section avant de procéder au montage.
Mise en service 5.2.2 Montage par vis Afin de monter le thermostat mural avec les vis, procédez comme suit : • Choisissez un lieu de montage approprié. Assurez-vous qu’aucun câble encastré ne passe dans les cloisons à cet endroit. • Placez le support mural à...
Seite 69
Mise en service Remarque importante ! La pose doit être effectuée uniquement par des personnes possédant les connaissances et l’expérience en électrotechnique suffisantes.* En procédant à une installation incorrecte, vous • mettez votre propre vie en danger et • celle des utilisateurs de l’installation électrique. Une pose non conforme peut également entraîner des dommages maté- riels lourds (par ex. incendie).
Menu de configuration Menu de configuration Lorsque vous utilisez le thermostat mural sans Homematic IP Access Point, vous pouvez sélectionner les modes suivants via le menu de confi- guration après la mise en service et entreprendre des réglages pour adap- ter l’appareil à...
Menu de configuration Appuyez pendant environ 2 s sur la touche Menu (E)pour ouvrir • le menu de configuration. • Sélectionnez l’option de menu « Auto » via les touches plus ou moins (D + F). • Confirmez avec la touche Menu. Pour confirmer l’opération, le symbole clignote brièvement deux fois et l’appareil passe en mode automatique.
Menu de configuration • Confirmez avec la touche Menu. • Sélectionnez la température d’offset souhaitée via les touches plus ou moins et confirmez avec la touche Menu. Pour confirmer l’opération, la température clignote brièvement deux fois et l’appareil revient à l’affichage standard. Programmation d’un profil de chauffage Cette option de menu vous permet de réaliser un profil de chauffage avec six phases de chauffage et de diminution (13 horaires de commuta-...
Menu de configuration Verrouillage de commande La commande sur l’appareil peut être verrouillée pour empêcher la modifi- cation non désirée des réglages, par ex. par un contact accidentel. Afin d’ac- tiver ou de désactiver le verrouillage de commande, procédez comme suit : •...
Menu de configuration • Sélectionnez le mois via les touches plus ou moins et confirmez avec la touche Menu. • Sélectionnez le jour via les touches plus ou moins et confirmez avec la touche Menu. • Sélectionnez les heures via les touches plus ou moins et confir- mez avec la touche Menu.
Utilisation Utilisation Après la programmation et le montage, diverses fonctions de commande simples sont à votre disposition. • Température : appuyez sur la touche gauche (D) ou droite (F) pour modifier manuellement la température de la pièce. En mode automatique, la température réglée manuellement s’arrête jusqu’au prochain moment de commutation.
Correction des erreurs • Après avoir inséré les piles, observez les séquences de clignote- ment de la LED (voir v. « 9.4 Codes d’erreur et séquences de cli- gnotement « à la page 78). Après l’insertion des piles, l’appareil exécute un autotest pendant environ 2 secondes.
Correction des erreurs Commande non confirmée Si au moins un récepteur ne confirme pas une commande, la LED (C) s’allume en rouge à la fin de la transmission défectueuse. La raison de la transmission défectueuse peut être un dysfonctionnement (voir v. « 12 Remarques générales sur le fonctionnement radio ...
Correction des erreurs Codes d’erreur et séquences de clignotement Codes d’erreur et codes de Signification Solution clignotement Symbole pile Tension des piles Remplacez les piles de l’appa- reil (voir v. « 8 Remplacement faible des piles « à la page 75). Le symbole de l’an- Défaut de com- Vérifiez la connexion avec le tenne...
Restauration des réglages d’usine 1 x lumière orange Affichage de test Une fois que l’affichage de et 1 x lumière verte test (après l’insertion a disparu de l’écran, des piles) vous pouvez continuer. Restauration des réglages d’usine Les réglages d’usine de l’appareil peuvent être rétablis. Dans ce cadre, tous les réglages antérieurs sont perdus.
Par la présente, eQ-3 AG, basée à Maiburger Str. 29, 26789 Leer, en Allemagne, déclare que l’équipement radioélectrique Homematic IP HmIP-WTH-B-2 est conforme à la directive 2014/53/EU. L’intégralité...
Seite 81
Caractéristiques techniques Catégorie du récepteur : SRD catégorie 2 Portée Portée radio en champ libre typ. : 250 m Duty Cycle : < 1 % par h / < 10 % par h Mode d’action : Type 1 Classe de logiciel : Sous réserve de modifications techniques. Consignes pour l’élimination L’appareil ne doit pas être jeté...
Seite 83
Índice Advertencias sobre estas instrucciones ..........84 Advertencias de peligro ................. 84 Funciones y esquema del dispositivo ..........85 Información general del sistema ............87 Puesta en servicio ..................87 Conexión ..................... 87 5.1.1 Conexión directa ..............87 5.1.2 Conexión a Homematic IP Access Point (alternativa) ..89 Montaje ....................
Advertencias sobre estas instrucciones Advertencias sobre estas instrucciones Lea atentamente estas instrucciones antes de poner en servicio sus dis- positivos Homematic IP. ¡Conserve estas instrucciones para consultas posteriores! Si cede este dispositivo para que lo utilicen otras personas, entregue también estas Instrucciones junto con el dispositivo. Símbolos empleados ¡Atención! Esta palabra señala un peligro.
Funciones y esquema del dispositivo Se declina toda responsabilidad por lesiones o daños materiales causados por un uso indebido o por incumplimiento de las adver- tencias de peligro. ¡En esos casos se anula el derecho a garantía! ¡No se asume ninguna responsabilidad por daños indirectos! El dispositivo solo es apto para entornos domésticos.
Seite 86
Funciones y esquema del dispositivo Esquema del dispositivo (v. figura 1): (A) Unidad electrónica (termostato) (B) Pantalla (C) Botón del sistema (botón de conexión y LED) (D) Botón de menos (E) Botón de menú y boost (F) Botón de más (G) Compartimento de pilas Esquema de la pantalla (v.
Información general del sistema Información general del sistema Este dispositivo es parte del sistema smart home Homematic IP y se co- munica por el protocolo de radio Homematic IP. Se puede configurar todos los dispositivos del sistema confortablemente e indivualmente a travès la aplicación Homematic IP.
Seite 88
Puesta en servicio Puede cancelar el proceso de conexión pulsando de nuevo el botón del sistema (C). A modo de confirmación se enciende el LED rojo del dispositivo (C). La correcta conexión se señala con una luz verde intermitente del LED (C).
Puesta en servicio • Extraiga la tira aislante del compartimento de las pilas del ter- mostato de pared. • Pulse el botón del sistema (C) del termostato de pared durante al menos 4 seg. para activar el modo de conexión. El LED del dis- positivo (C) parpadea con luz naranja (v.
Seite 90
Puesta en servicio En primer lugar tiene que configurar su Homematic IP Access Point desde la app Homematic IP para poder utilizar otros dispositivos Homematic IP en su sistema. Encontrará más información al res- pecto en las instrucciones de uso del Access Point. Cuando el termostato de pared está...
Puesta en servicio • Si se enciende el LED rojo, inténtelo de nuevo. • Seleccione la solución deseada para su dispositivo. • Asigne una sala al dispositivo en la aplicación e introduzca un nombre para el dispositivo. Montaje Por favor, lea íntegramente este capítulo antes de realizar el montaje. El termostato puede fijarse •...
Puesta en servicio 5.2.2 Montaje con tornillos Modo de proceder para fijar el termostato de pared con los tornillos: • Elija un lugar de montaje apropiado. ¡Compruebe que no haya cables ni líneas de suministro donde vaya a realizar la instalación! •...
Seite 93
Puesta en servicio ¡Aviso! ¡La instalación solo puede ser realizada por personas con la correspondiente cualificación y experiencia en electrotecnia!* Una instalación incorrecta pone en peligro • su propia vida • la vida de los usuarios de la instalación eléctrica Una instalación incorrecta puede ocasionar costosos daños materiales, por ejemplo, por un incendio.
Menú de configuración Menú de configuración Si utiliza el termostato de pared sin Homematic IP Access Point, tras la instalación puede acceder al menú de configuración directamente en el dispositivo, con el fin de seleccionar el modo de funcionamiento y ajustar el dispositivo a sus necesidades personales.
Menú de configuración Seleccione la opción “Auto” con los botones de más o menos (D • + F). • Confirme con el botón de menú. Como confirmación, el símbolo parpadea dos veces cortas y el dispositi- vo cambia al modo automático. Modo manual En el modo manual la regulación de temperatura se efectúa en función de la temperatura ajustada con los botones (D + F).
Menú de configuración • Seleccione la temperatura de compensación deseada con los botones de más o menos y confirme el ajuste con el botón de menú. Como confirmación, la temperatura parpadea dos veces cortas y el dis- positivo cambia de nuevo a la indicación fija. Programación de un perfil de calefacción En este menú...
Menú de configuración Bloqueo de uso El dispositivo dispone de un bloqueo de uso para impedir modificaciones no deseadas de la configuración, por ejemplo por un contacto involunta- rio. Modo de proceder para activar o desactivar el bloqueo de uso: •...
Menú de configuración • Seleccione el mes con los botones de más o menos y confirme con el botón de menú. • Seleccione el día” con los botones de más o menos y confirme con el botón de menú. • Seleccione la hora con los botones de más o menos y confirme el ajuste con el botón de menú.
Manejo Manejo Una vez realizados el montaje y la conexión, directamente en el disposi- tivo se dispone de sencillas funciones de manejo. • Temperatura: pulse el botón izquierdo (D) o el derecho (F) para modificar manualmente la temperatura ambiente. Si el dispositi- vo se encuentra en el modo automático, la temperatura ajustada manualmente se mantiene hasta el siguiente punto de conmuta- ción y, a continuación, se activa de nuevo el perfil de calefacción...
Reparación de fallos • Coloque dos pilas LR6/Mignon/AA 1,5 V nuevas en la posición correcta, indicada por las marcas impresas en el compartimento, (ver figura 14). • Inserte la unidad electrónica de nuevo en el soporte de pared (v. figura 12). •...
Reparación de fallos Códigos de errores y secuencias intermitentes“ en página 102). En ese caso, cambie las pilas descargadas por dos pilas nuevas (v. „8 Cambio de pilas“ en página 99). Comando sin confirmar Si alguno de los receptores no confirma un comando, al final de la transmisión errónea se enciende el LED (C) rojo.
Reparación de fallos Códigos de errores y secuencias intermitentes Código de errores y secuencia Significado Solución intermitente Símbolo de la ba- Tensión de la pila Cambie las pilas del dispo- tería sitivo (v. „8 Cambio de pilas“ baja en página 99). Símbolo de la an- Error en la co- Compruebe la conexión con...
Restablecimiento de la configuración de fábrica 1 luz naranja y 1 luz Indicación de Cuando se apague verde (después de prueba la indicación de prueba, colocar las pilas) puede continuar. Restablecimiento de la configuración de fábrica Se puede restablecer la configuración de fábrica del dispositivo. Al hacerlo se pierden todos los ajustes.
AG, Maiburger Str. 29, 26789 Leer, Alemania, declara que la instalación inalámbrica, Homematic IP HmIP-WTH-B-2, cumple la Directiva 2014/53/UE. El texto de la declaración de conformidad CE está...
Seite 105
Datos técnicos Alcance típ. en campo abierto: 250 m Duty Cycle: < 1 % por h/< 10 % por h Modo de funcionamiento: tipo 1 Clase de software: Salvo modificaciones técnicas. Indicaciones sobre la eliminación ¡No desechar el dispositivo en la basura doméstica! La eliminación de los equipos electrónicos debe efectuarse siguiendo la directiva de equipos eléctricos y electrónicos usados, en los puntos de reco- gida locales para ese tipo de aparatos.
Seite 107
Indice Indicazioni su queste istruzioni ............108 Indicazioni di pericolo ................. 108 Funzioni e vista d’insieme dell’apparecchio ........109 Informazioni generali sul sistema ............111 Messa in funzione .................. 111 Accoppiamento ................111 5.1.1 Accoppiamento diretto ............111 5.1.2 Accoppiamento con l’Access Point Homematic IP (alternativa) ................114 Montaggio ..................115 5.2.1...
Indicazioni su queste istruzioni Indicazioni su queste istruzioni Leggere attentamente queste istruzioni prima di mettere in funzione i componenti Homematic IP. Conservare questo manuale per poterlo consultare anche in futuro! Se si affida l’utilizzo dell’apparecchio ad altre persone consegnare anche queste istruzioni per l’uso.
Funzioni e vista d’insieme dell’apparecchio L’azienda declina qualsiasi responsabilità per danni a cose o persone causati da un utilizzo improprio o dalla mancata osservanza delle indicazioni di pericolo. In casi simili decade il diritto alla garanzia! Si declina qualsiasi responsabilità per danni indiretti! L’apparecchio è...
Seite 110
Funzioni e vista d’insieme dell’apparecchio Vista d’insieme dell’apparecchio (v. figura 1): (A) Centralina elettronica (termostato) (B) Display (C) Tasto di sistema (tasto di inizializzazione e LED) (D) Tasto Meno (E) Tasto Menu/Boost (F) Tasto Più (G) Vano batterie Vista d’insieme del display (v. figura 2): Temperatura programmata/effettiva Icona “Finestra aperta”...
Informazioni generali sul sistema Informazioni generali sul sistema Questo apparecchio fa parte del sistema Homematic IP Smart-Home e comunica tramite il protocollo radio Homematic IP. Tutti gli apparecchi del sistema possono essere configurati comodamente e singolarmen- te dallo smartphone tramite l’app Homematic IP. In alternativa gli appa- recchi Homematic IP possono essere gestiti tramite la centralina CCU3 oppure tramite un collegamento con numerosi sistemi di fornitori terzi.
Seite 112
Messa in funzione La procedura di accoppiamento può essere interrotta premendo di nuovo il tasto di sistema (D) per alcuni secondi. Quest’operazione vie- ne confermata dall’accensione del LED rosso sull’apparecchio (C). Il LED verde lampeggiante (C) segnala che l’accoppiamento è anda- to a buon fine.
Seite 113
Messa in funzione Se necessario aprire il vano batterie (G) allentando il supporto a • parete con un cacciavite a punta piatta (v. figura 3). • Tirare la linguetta d’isolamento dal vano batterie del termostato a parete. • Premere il tasto di sistema (C) del termostato a parete per alme- no 4 secondi per attivare la modalità...
Messa in funzione 5.1.2 Accoppiamento con l’Access Point Homematic IP (alternativa) Questo dispositivo può essere accoppiato con l’Access Point Home- matic IP o con la centralina CCU3. Ulteriori informazioni a riguardo sono fornite nel Manuale dell’utente di Homematic IP (disponibile nella sezione Download all’indirizzo www.homematic-ip.com).
Messa in funzione • Attendere che la procedura di accoppiamento sia conclusa. • Per confermare che l’accoppiamento è andato a buon fine la luce del LED (C) diventa verde. L’apparecchio è pronto per l’uso. • Se si accende la luce del LED rossa, riprovare la procedura. •...
Messa in funzione • Togliere la pellicola dalle strisce adesive (v. figura 9). • Spingere il termostato a parete così assemblato con il lato poste- riore verso la posizione prescelta sulla parete (v. figura 9). 5.2.2 Montaggio con viti Per montare il termostato a parete utilizzando le viti procedere come segue: •...
Seite 117
Messa in funzione Nella presa sotto intonaco non devono esserci estremità di condut- tori libere. Se per montare o installare l’apparecchio è necessario eseguire mo- difiche o interventi sull’impianto di casa (ad es. ampliamento, bypass di inserti di prese o di interruttori) o sulla distribuzione della bassa tensione, tenere presente l’avviso di sicurezza che segue: Avviso! L’installazione deve essere eseguita soltanto da persone in possesso di conoscenze ed esperienze elettrotecniche pertinen-...
Menu di configurazione • tipo di rete di alimentazione (sistema TN, sistema IT, sistema TT) e conseguenti condizioni di allaccio (classica messa a terra del neutro, messa a terra di protezione, misure supplementari ne- cessarie etc.). Menu di configurazione Se il termostato a parete viene utilizzato senza l’Access Point Homema- tic IP, per adattare il dispositivo alle esigenze personali una volta messo in funzione, nel menu di configurazione si possono selezionare diretta- mente le seguenti modalità...
Menu di configurazione Nel funzionamento automatico la temperatura viene regolata secondo il profilo di riscaldamento impostato. Le modifiche manuali rimangono atti- ve fino al successivo orario di commutazione. Subito dopo viene riattivato il profilo di riscaldamento impostato. Per attivare il funzionamento auto- matico procedere nel modo seguente: Premere per ca.
Menu di configurazione Per regolare l’offset della temperatura secondo le esigenze personali procedere nel modo seguente: • Premere per ca. 2 secondi il tasto Menu (E) per aprire il menu di configurazione. • Selezionare la voce del menu “Offset” utilizzando i tasti Più o Meno (D + F).
Menu di configurazione L’orario lampeggia due volte brevemente per confermare l’operazione e l’apparecchio torna alla schermata standard. Blocco comandi I comandi sull’apparecchio possono essere bloccati per impedire modi- fiche involontarie delle impostazioni, ad esempio dovute a un contatto fortuito. Per attivare e disattivare il Blocco comandi procedere nel modo seguente: Premere per ca.
Menu di configurazione • Confermare con il tasto Menu. • Selezionare l’anno con i tasti Più o Meno e confermare con il tasto Menu. • Selezionare il mese con i tasti Più o Meno e confermare con il tasto Menu. •...
Completate le procedure di accoppiamento e di montaggio si possono utilizzare semplici funzioni di comando direttamente sull’apparecchio: • Temperatura: Premere il tasto sinistro (D) o destro (F) per modifi- care manualmente la temperatura ambiente. Nel funzionamento automatico la temperatura impostata manualmente rimane in- variata fino al successivo orario di commutazione.
Risoluzione dei guasti • Inserire due batterie nuove LR6/mignon/AA da 1,5 V facendo at- tenzione a posizionare i poli correttamente come contrassegna- to nel vano batterie (v. figura 14). • Rimettere la centralina elettronica nel supporto a parete (v. figura 12).
Risoluzione dei guasti compaiono l’icona di batterie scariche ( ) e il codice d’errore (v. “9.4 Codici di errore e sequenze di spie lampeggianti“ a pag. 126). In questo caso sostituire le batterie scariche con due nuove (v. “8 Sostituzione delle batterie“...
Risoluzione dei guasti Codici di errore e sequenze di spie lampeggianti Codice di errore e Significato Soluzione di lampeggio Icona della batteria Tensione della Sostituire le batterie dell’ap- batteria parecchio (v. “8 Sostituzione delle batterie“ a pag. 123). scarsa Icona dell’antenna Errore di comu- Verificare il collegamento nicazione con...
Ripristino delle impostazioni di fabbrica Luce arancione 1 Visualizzazione di Quando la visualizzazione di volta e luce ver- prova prova de 1 volta (dopo scompare dal display, l'inserimento delle si può proseguire. batterie) Ripristino delle impostazioni di fabbrica L’utente può ripristinare le impostazioni di fabbrica dell’apparecchio. In questo caso tutte le impostazioni andranno perdute.
Con la presente la eQ-3 AG, Maiburger Str. 29, 26789 Leer, Germania, dichiara che l’apparecchio radio Homematic IP modello HmIP-WTH-B-2 è conforme alla Direttiva 2014/53/UE. Il testo integrale della dichia- razione di conformità...
Seite 129
Dati tecnici Peso: 140 g (comprese batterie) Banda di frequenza radio: 868,0-868,60 MHz 869,4-869,65 MHz Max. potenza di trasmissione radio: 10 dBm Categoria ricevitore: dispositivo a corto raggio (SRD) cat. 2 Portata radio tipica in campo libero: 250 m Duty Cycle: <...
Seite 131
Inhoudsopgave Instructies bij deze handleiding ............132 Gevarenaanduidingen ................132 Werking en overzicht van het apparaat ..........133 Algemene systeeminformatie .............135 Inbedrijfstelling ..................135 Aanleren ..................... 135 5.1.1 Direct aanleren............... 135 5.1.2 Aanleren aan het Homematic IP Access Point (alternatief) ................137 Montage ..................... 138 5.2.1 Montage met plakstrips............
Instructies bij deze handleiding Instructies bij deze handleiding Lees deze handleiding zorgvuldig door voordat u uw Homematic IP ap- paraten in gebruik neemt. Bewaar de handleiding, om ze ook later nog te kunnen raadplegen! Als u het apparaat door andere personen laat gebruiken, geef dan ook deze handleiding mee.
Werking en overzicht van het apparaat Voor zaak- of personenschade die door een onjuist gebruik of niet-naleving van de gevarenaanduidingen veroorzaakt is, stellen wij ons niet aansprakelijk. In dergelijke gevallen vervalt ieder garantie- recht! Voor gevolgschade stellen wij ons niet aansprakelijk! Het apparaat is uitsluitend geschikt voor gebruik in woonruimten en soortgelijke omgevingen.
Seite 134
Werking en overzicht van het apparaat Overzicht van het apparaat (zie afbeelding 1): (A) Elektronische unit (thermostaat) (B) Display (C) Systeemtoets (aanleertoets en led) (D) Min-toets (E) Menu-/boosttoets (F) Plus-toets (G) Batterijvakje Overzicht van het display (zie afbeelding 2): Instel-/werkelijke temperatuur Raam-open-symbool Batterijsymbool Draadloze overdracht...
Algemene systeeminformatie Algemene systeeminformatie Dit apparaat is een onderdeel van het Homematic IP Smart Home systeem en communiceert via het Homematic IP Zendprotocol. Alle apparaten van het systeem kunnen comfortabel en individueel via een smartphone met de Homematic IP App worden geconfigureerd. U hebt ook de mogelijk- heid om de Homematic IP apparaten via de centrale CCU3 of in combina- tie met allerlei partneroplossingen te gebruiken.
Seite 136
Inbedrijfstelling U kunt het aanleerproces annuleren door opnieuw kort op de sys- teemtoets (C) te drukken. Dit wordt bevestigd door het rood oplich- ten van de apparaatled (C). Het succesvolle aanleren wordt gesignaleerd door het groen knip- peren van de apparaatled (C). Als het aanleerproces niet succesvol is geweest, licht de apparaatled rood op.
Inbedrijfstelling • Trek de isolatiestrip uit het batterijvakje van de wandthermostaat. Druk gedurende minimaal 4 sec. op de systeemtoets (C) van de • wandthermostaat om de aanleermodus te activeren. De appa- raatled (C) knippert oranje (zie afbeelding 4). • Ter bevestiging van een succesvol aanleerproces brandt de led groen.
Seite 138
Inbedrijfstelling Door het aanleren van de wandthermostaat aan het Homematic IP Access Point wordt het menu van de wandthermostaat uitgescha- keld en kunnen de instellingen alleen via de Homematic IP App wor- den uitgevoerd. Om te waarborgen dat de wandthermostaat in uw systeem geïntegreerd en per Homematic IP App bestuurd kan worden, moet deze op het Home- matic IP Access Point worden aangeleerd.
Inbedrijfstelling Montage Lees dit hoofdstuk volledig door, voordat u met de montage be- gint. U kunt de wandthermostaat • met behulp van de bijgeleverde dubbelzijdige plakstrips of • de bijgeleverde schroeven op de wand bevestigen. Als alternatief kunt u de wandthermostaat op een inbouwdoos monteren. 5.2.1 Montage met plakstrips Ga als volgt te werk om de wandthermostaat met de plakstrips te mon-...
Inbedrijfstelling Waarborg dat op de geselecteerde positie geen leidingen in de wand lopen! • Houd de wandhouder op de gewenste montagepositie. Let op dat de pijlen aan de binnenzijde van de wandhouder altijd naar boven wijzen (zie afbeelding 10). • Teken aan de hand van de wandhouder twee boorgaten op een onderlinge afstand van 60 mm met een pen op de wand af (zie afbeelding 10).
Configuratiemenu Door een onjuiste installatie brengt u uw eigen • leven en • het leven van de gebruikers van de elektrische installatie in ge- vaar. Met een onjuiste installatie riskeert u ernstige materiële schade, bijv. door brand. Het risico bestaat dat u persoonlijk aansprakelijk wordt gesteld voor personen- en zaakschade.
Configuratiemenu door lang op de Menu-toets (E) te drukken, roept u het configu- • ratiemenu op. Selecteer met behulp van de plus- en min-toetsen (D + F) en door • kort indrukken van de Menu-toets het gewenste symbool om de instellingen voor de verschillende menupunten uit te voeren.
Configuratiemenu Ter bevestiging knippert het symbool twee keer kort en het apparaat schakelt naar het automatische bedrijf. Handmatig bedrijf In het handmatige bedrijf wordt de temperatuur geregeld volgens de temperatuur die met behulp van de toetsen (D + F) werd ingesteld. De temperatuur blijft behouden tot de volgende handmatige wijziging.
Configuratiemenu Programmering van een verwarmingsprofiel In dit menupunt kunt u een verwarmingsprofiel instellen met zes verwar- mings- en verlaagde fasen (13 schakeltijden), geheel volgens uw behoeften. • Druk gedurende ca. 2 sec. op de Menu-toets (E) om het configu- ratiemenu te openen. •...
Configuratiemenu • Bevestig uw keuze met de Menu-toets. • Selecteer met ‘On’ (plus-toets) om de bedieningsvergrendeling te activeren of ‘OFF’ (min-toets) om de bedieningsvergrendeling te deactiveren en bevestig uw keuze met de Menu-toets. Ter bevestiging knippert de selectie twee keer kort en het apparaat scha- kelt terug naar de standaardweergave.
Bediening Ter bevestiging knippert de tijd twee keer kort en het apparaat schakelt terug naar de standaardweergave. Vakantiemodus De vakantiemodus kan worden gebruikt als gedurende een bepaalde pe- riode duurzaam een vaste temperatuur moet worden aangehouden (bijv. tijdens een vakantie of een feest). Ga als volgt te werk om de vakantie- modus in te stellen: •...
Batterijen vervangen • Boost-functie: druk kort op de Boost-toets (E) om de Boost-func- tie voor het snelle, kortstondige verwarmen van de radiator te activeren door de kraan te openen. Daardoor wordt direct een aangenaam warmtegevoel in het vertrek bereikt. De Boost-functie kan alleen worden geactiveerd als de wandther- mostaat wordt gebruikt in combinatie met een radiatorthermostaat, een vloerverwarmingsactor of een schakelactor.
Storingen oplossen Let op! Explosiegevaar bij onjuiste vervanging van de batterijen. Al- leen vervangen door batterijen van hetzelfde of een gelijkwaardig type. Normale batterijen mogen nooit worden opgeladen. Batterijen niet in het vuur werpen. Batterijen niet blootstellen aan overmatige warmte. Batterijen niet kortsluiten. Er bestaat explosiegevaar! Uitgelopen of beschadigde batterijen kunnen bij aanraking met de huid brandwonden veroorzaken;...
Storingen oplossen Duty cycle De duty cycle beschrijft een wettelijk geregelde begrenzing van de zend- tijd van apparaten in het 868MHz-bereik. Het doel van deze regeling is om de werking van alle in het 868MHz-bereik werkende apparaten te garanderen. In het door ons gebruikte frequentiebereik van 868 MHz bedraagt de maximale zendtijd van een apparaat 1% van een uur (dus 36 seconden per uur).
Herstellen van de fabrieksinstellingen Kort oranje knippe- Draadloze over- Wacht tot de overdracht dracht, zendpo- beëindigd is. ging, gegevens- overdracht 1x lang groen op- Proces U kunt met de bediening lichten doorgaan. bevestigd Kort oranje Aanleermodus Voer de laatste vier cijfers knipperen (om de actief van het apparaat-...
Hierbij verklaart eQ-3 AG, Maiburger Str. 29, 26789 Leer, Duitsland, dat het draadloze apparaattype Homematic IP HmIP-WTH-B-2 in overeenstemming is met de richtlijn 2014/53/EU. De volledige tekst van de EU-conformiteitsverklaring is beschikbaar onder het volgende internetadres: www.homematic-ip.com/nl...
Technische gegevens Technische gegevens Apparaatcode: HmIP-WTH-B-2 Voedingsspanning: 2x 1,5 V LR6/mignon/AA Stroomopname: 40 mA max. Levensduur batterijen: 5 jaar (typ.) Beschermingsgraad: IP20 Verontreinigingsgraad: Omgevingstemperatuur: 0 tot 50 °C Afmetingen (b x h x d): 85 x 85 x 22 mm Gewicht: 140 g (incl.
Seite 153
Technische gegevens Kostenloser Download der Homematic IP App! Free download of the Homematic IP app! Bevollmächtigter des Herstellers: Manufacturer’s authorised representative: eQ-3 AG Maiburger Straße 29 26789 Leer / GERMANY www.eQ-3.de...