Herunterladen Inhalt Inhalt Diese Seite drucken

Kessel EasyClean ground Multi NS 4 Einbau- Und Betriebsanleitung

Standard, direct
Vorschau ausblenden Andere Handbücher für EasyClean ground Multi NS 4:
Inhaltsverzeichnis

Werbung

Verfügbare Sprachen

Verfügbare Sprachen

Einbau- und Betriebsanleitung
DE
DE
Einbau- und Betriebsanleitung....................................................................... 2
EN
EN
Installation and operating instructions.......................................................... 27
FR
FR
Instructions de pose et d'utilisation.............................................................. 52
2022/05
EasyClean ground
EasyClean ground
Multi NS 4-10
Multi NS 4-10
Standard, Direct
Standard, Direct
016-302DE-EN-FR_01

Werbung

Inhaltsverzeichnis
loading

Inhaltszusammenfassung für Kessel EasyClean ground Multi NS 4

  • Seite 1 EasyClean ground EasyClean ground Multi NS 4-10 Multi NS 4-10 Standard, Direct Standard, Direct Einbau- und Betriebsanleitung Einbau- und Betriebsanleitung Einbau- und Betriebsanleitung............... 2 Einbau- und Betriebsanleitung............... 2 Installation and operating instructions............27 Installation and operating instructions............27 Instructions de pose et d’utilisation.............. 52 Instructions de pose et d’utilisation..............
  • Seite 2: Inhaltsverzeichnis

    Liebe Kundin, lieber Kunde, als Premiumhersteller von innovativen Produkten für die Entwässerungstechnik bietet KESSEL ganzheitliche Systemlösun- gen und kundenorientierten Service. Dabei stellen wir höchste Qualitätsstandards und setzen konsequent auf Nachhaltig- keit - nicht nur bei der Herstellung unserer Produkte, sondern auch im Hinblick auf deren langfristigen Betrieb setzen wir uns dafür ein, dass Sie und Ihr Eigentum dauerhaft geschützt sind.
  • Seite 3: Hinweise Zu Dieser Anleitung

    Hinweise zu dieser Anleitung Folgende Darstellungskonventionen erleichtern die Orientierung: Darstellung Erläuterung siehe Abbildung 1 Positionsnummer 5 von nebenstehender Abbildung Handlungsschritt in Abbildung Prüfen, ob Handbetrieb aktiviert wurde. Handlungsvoraussetzung OK betätigen. Handlungsschritt Anlage ist betriebsbereit. Handlungsergebnis Querverweis auf Kapitel 2 siehe "Sicherheit", Seite 4 Fettdruck besonders wichtige oder sicherheitsrelevante Information Variante oder Zusatzinformation (z.
  • Seite 4: Sicherheit

    VORSICHT Statik für Verkehrssicherheit beachten. Schachtverbau für Lastklasse D erfordert eine Lastverteilplatte aus armier- tem Beton. Erforderliche Lastklasse und Statik gemäß Umgebung/Nutzungsbedingungen ermitteln. Entsprechenden Bewehrungsplan bei KESSEL-Hotline anfordern. VORSICHT Heiße Oberflächen! Pumpen können während des Betriebes eine hohe Temperatur entwickeln.
  • Seite 5: Personalqualifikation

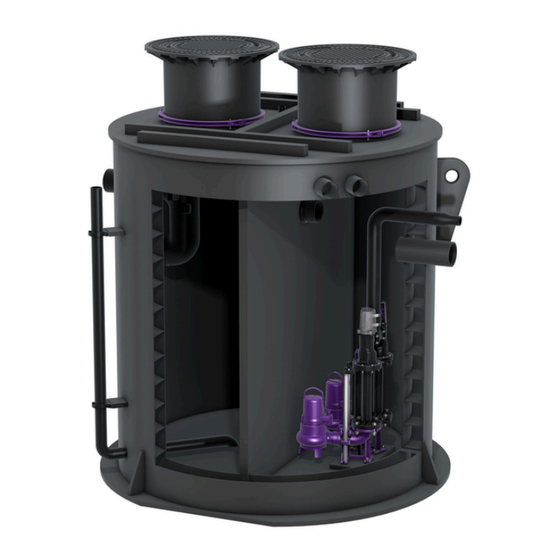
    Der Betreiber der Anlage ist dazu verpflichtet: eine Gefährdungsbeurteilung zu erstellen, entsprechende Gefährdungszonen zu ermitteln und auszuweisen, Sicherheitsunterweisungen durchzuführen, gegen die Benutzung durch Unbefugte zu sichern. Person freigegebene Tätigkeiten an KESSEL-Anlagen Betreiber Sichtprüfung Sachkundiger (kennt, ver- Entleerung, Rei- steht Betriebsanweisung)
  • Seite 6 Die Anlage ist als Variante Standard oder als Variante mit Direktentsorgungsrohr (Direct) erhältlich. Das Direktentsorgungs- rohr ermöglicht die Entsorgung über eine außerhalb des Gebäudes angebrachte Storz B Kupplung, z. B. in einem Entsor- gungsschacht (KESSEL-Zubehör). Alle Baugruppen sind komplett montiert, wobei die Pumpen separat beiliegen und noch montiert werden müssen.
  • Seite 7: Technische Daten

    50 Hz Leistung pro Pumpe 1,3/1,4 kW Leistung Stand-by (Schaltgerät) ca. 5W Erforderliche Absicherung 3 x C 16A Erforderlicher Fehlerstromschutz (RCD) 30 mA Beim Verlängern der Anschlussleitung der Pegelsonde KESSEL-Klemmdose (Art.-Nr. 28799) verwenden. 016-302DE-EN-FR_01 Einbau- und Betriebsanleitung 7 / 84...
  • Seite 8: Mögliche Verbindungen

    Mögliche Verbindungen Zulauf DN100 (NS 4) PVC-U Rohr DN150 (NS 7/10) Druckrohr DN 80 (OD90) Elektroschweißmuffe, Klemmverbinder KESSEL Zubehör (Art.- Nr. 28090) Gewebeschlauch mit 2 Schraubschellen Direktentsorgungsrohr DN 65 (Storz B Kupplung) Elektroschweißmuffe Klemmverbinder PN 10 Gewebeschlauch mit 2 Schraubschellen...
  • Seite 9: Montage

    Montage Vorgehensweise Montage Einbauvoraussetzungen prüfen Baugrube ausheben Behälter platzieren und anschließen Dichtheit prüfen Baugrube verfüllen Pumpen und Sensorik montieren Elektrische Anschlüsse herstellen Schaltgerät anschließen Einbauvoraussetzungen Voraussetzungen für Positionierung und Beschaffenheit der Baugrube Eine Klassifizierung der Bodenbeschaffenheit im Hinblick auf die bautechnische Eignung vornehmen (z. B. DIN 18196 oder USCS - Unified Soil Classification System).
  • Seite 10: Baugrube Ausheben

    Statik für Verkehrssicherheit beachten. Schachtverbau für Lastklasse D erfordert eine Lastverteilplatte aus armier- tem Beton. Erforderliche Lastklasse und Statik gemäß Umgebung/Nutzungsbedingungen ermitteln. Entsprechenden Bewehrungsplan bei KESSEL-Hotline anfordern. Aufsatzstück auf endgültige Höhe anpassen (Mindesteinstecktiefe beachten und ggf. kürzen) 10 / 84...
  • Seite 11 Unterbau (Bruchschotter) Baugrund Behälterbett (Sand) Tragschicht Abscheider gemäß statischer Berechnung Behälteroberkante Verfüllung (Bruchschotter) Lastverteilplatte (Stahlbeton) Grube mit Bruchschotter (0-16 mm Durchmesser), mind. 50 cm umlaufend auffüllen, dabei alle 30 cm das Füllmaterial fachgerecht auf 97% Dpr verdichten (z. B. Rüttelplatte). Der erforderliche Baugruben-Böschungswinkel β...
  • Seite 12: Pumpen Einbringen

    Aufsatzstück kürzen (optional) Rundherum so anzeichnen, dass das Aufsatzstück min- destens 5 cm (8 cm bei Montage von Sonic Control) in den Deckel des Behälters hineinragt. Mit Stichsäge (15°) ablängen. Kanten entgraten. Vorgehensweise ggf. für anderes Aufsatzstück wiederho- len. Pumpenkralle anbringen Pumpe mit Gewindeanschluss Klarwasser aus Behälter abpumpen.
  • Seite 13: Niveauerfassung Montieren

    4.10 Kette befestigen Abdeckplatte demontieren. Position für Haken zur Kettenfixierung anzeichnen. Der Haken darf maximal 90 mm von der Unterkante des Auf- satzstückes entfernt sein. Pumpenketten einhängen. Abdeckplatte montieren. 4.11 Niveauerfassung montieren Schutzkappe von Pegelsonde abziehen. Sicherstellen, dass der Abstand (L) zwischen Muffenstop- fen (3) und Sondenspitze (4) 630 mm beträgt.
  • Seite 14: Inbetriebnahme

    Inbetriebnahme Vorbereiten der Inbetriebnahme Zu- und Auslaufleitungen spülen. Ggf. Bauschutt und Verunreinigungen aus Behälterinneren entfernen. Ggf. Wasserversorgung herstellen. Abscheider mit Kaltwasser bis zum Ruhewasserspiegel (Höhe des Auslaufs) auffüllen. Generalinspektion durchführen lassen (bei Erstinbetrieb- nahme, danach alle 5 Jahre). Sicherheitsunterweisung durchführen. Sicherstellen, dass sich die Anlüftvorrichtung (5) des Rückflussverhinderers (5) in senkrechter Position befin- det.
  • Seite 15: Betrieb

    Anlagenbehälter soweit mit Klarwasser befüllen, bis das Schaltniveau der Anlage überschritten ist. Anlage einschalten. Pumpe läuft selbsttätig an. Pumpe pumpt bis zum Ausschaltniveau (Pumpenkopf wieder sichtbar) ab. Pumpe schaltet selbsttätig ab. Schaltgerät auf Fehler/Alarmmeldungen prüfen. Bei Fehler/Alarmmeldungen KESSEL-Kundendienst kontaktieren. 016-302DE-EN-FR_01 Einbau- und Betriebsanleitung 15 / 84...
  • Seite 16 Probenahme Die Anlage ist für eine Probenahme gemäß DIN 4040-100 ausgelegt. Folgendes ist bei der Durchführung der Probe- nahme zu beachten: Probe aus fließendem Abwasser entnehmen. 16 / 84 Einbau- und Betriebsanleitung 016-302DE-EN-FR_01...
  • Seite 17: Entsorgung

    Entsorgung Allgemeines Die Entleerungszyklen der verschiedenen Anlagentypen sind darauf abgestimmt, bei mittlerem Verschmutzungsgrad des Abwassers den Anlagenbehälter bei gleichzeitig bestmöglicher Reinigung vollständig zu entleeren. Ein Trockenlaufen der Pumpe ist bauartbedingt ausgeschlossen (Ausnahme: Erst- oder Wiederinbetriebnahme). Bitte beachten Sie: Bedienungsvorschriften sind in der näheren Umgebung des Abscheiders anzubringen. Der Entsorgungsvorgang ist genau nach Anweisung durchzuführen.
  • Seite 18: Entsorgung Durchführen (Direct)

    Mit Kaltwasser auffüllen Kaltwasserzulauf starten. Abwarten, bis Wasserniveau den Ruhewasserspiegel erreicht hat , Kaltwasserzulauf abstellen. Abdeckplatte wieder einsetzen. Entsorgung im Betriebstagebuch protokollieren. Entsorgungsvorgang ist abgeschlossen. Entsorgung durchführen (Direct) Während des Abpumpens Revisionsöffnung öffnen. Saugschlauch des Entsorgungsfahrzeugs an Storz B Kupplung anschließen. Abpumpvorgang des Entsorgungsfahrzeugs starten.
  • Seite 19 Mit Kaltwasser auffüllen Kaltwasserzulauf starten. Abwarten, bis Wasserniveau den Ruhewasserspiegel erreicht hat , Kaltwasserzulauf abstellen. Revisionsöffnung wieder verschließen. Entsorgung im Betriebstagebuch protokollieren. Entsorgungsvorgang ist abgeschlossen. 016-302DE-EN-FR_01 Einbau- und Betriebsanleitung 19 / 84...
  • Seite 20: Wartung Und Prüfung

    Wartung und Prüfung Wartungs- und Prüfungsintervalle 8.1.1 Intervall Generalinspektion An dieser Anlage muss gemäß DIN EN 1825 alle 5 Jahre eine Generalinspektion (u. a. Dichtheitsprüfung) durchgeführt werden. 8.1.2 Fettabscheider Wartungsintervall Der Fettabscheider muss jährlich durch einen Sachkundigen gewartet werden. 8.1.3 Pumpentechnik Wartungsintervall Am Schaltgerät kann ein Wartungstermin eingestellt werden.
  • Seite 21 Verkehrssicher absperren Durch angemessene Absperrmaßnahmen sicherstellen, dass die Verkehrssicherheit gewährleistet ist. VORSICHT Abdeckplatte nur auf Pallette verzurrt transportie- ren. Abdeckplatte nur montieren wenn die Baugrube bereits verfüllt wurde. Abdeckplatte nur mit geeignetem Hebewerkzeug bewegen. Persönliche Schutzausrüstung tragen (Schutz- helm, Sicherheitsschuhe). Abdeckplatte herausheben: Mit geeignetem Hebewerkzeug in Abdeckplatte einhaken.
  • Seite 22 Für die Wartungstätigkeiten ist die beiliegende Pumpenanleitung zu beachten Pegelsonde Pegelsonde reinigen Pegelsonde aus dem Schutzrohr (1) herausziehen. Pegelsonde reinigen und sicherstellen, dass das Innere des Schutzrohrs (1) frei von Verschmutzungen ist. Pegelsonde wieder in das Schutzrohr (1) einsetzen und sicherstellen, dass das Maß...
  • Seite 23 Rückschlagklappe abziehen, auf Verschleiß prüfen, ggf. blockierende Teile herausnehmen und durchspülen. Teile in umgekehrter Reihenfolge wieder montieren. Rückflussverhinderer (2) einbauen Sicherstellen, dass sich die Anlüftvorrichtung (5), wie abgebildet, in senkrechter Position befindet. Funktionskontrolle durchführen (siehe "Funktionskon- trolle"). Wartung im Betriebstagebuch protokollieren. 016-302DE-EN-FR_01 Einbau- und Betriebsanleitung 23 / 84...
  • Seite 24: Hilfe Bei Störungen

    Hilfe bei Störungen Allgemein Fehler Ursache Abhilfemaßnahmen Pumpenleistung bei der Entleerung Förderhöhe zu groß für die Leistung der Die Pumpe der Fettabscheideanlage zu gering Pumpe durch die Pumpe des Entleerungsfahr- zeugs (absaugen) unterstützen Drehfeld falsch Netzadern tauschen (Störungsmeldung am Schaltgerät beachten) Drehrichtung der Pumpen falsch Pumpenadern auf richtigen Anschluss prüfen...
  • Seite 25: Werksabnahme, Prüfungen

    Für Sie ist es wichtig, die Qualität und Funktionsfähigkeit Ihrer Anlage immer auf dem besten Stand zu halten, gerade wenn es um die Voraussetzung für eine Gewährleistung geht. Wenn Sie die Wartung über KESSEL durchführen lassen, gewähr- leisten wir Ihnen eine ständige Aktualisierung und Pflege Ihrer Anlage.
  • Seite 26 10.1 Anlagenpass 26 / 84 Einbau- und Betriebsanleitung 016-302DE-EN-FR_01...
  • Seite 27 Dear Customer, As a premium manufacturer of innovative products for draining technology, KESSEL offers integrated system solutions and customer-oriented service. In doing so, we set the highest quality standards and focus firmly on sustainability - not only with the manufacturing of our products, but also with regard to their long-term operation and we strive to ensure that you and your property are protected over the long term.
  • Seite 28: Notes On This Manual

    Notes on this manual The following conventions make it easier to navigate the manual: Symbol Explanation See Figure 1 Position number 5 from the adjacent figure Action step in figure Check whether manual operation has been Prerequisite for action activated. Press OK.
  • Seite 29: Safety

    Determine the required load class and structural calculations in accordance with the environment / use condi- tions. Request an appropriate reinforcement drawing from the KESSEL hotline. CAUTION Hot surfaces! Pumps can become very hot during operation.
  • Seite 30: Personnel Qualification

    The operator of the system must: prepare a risk assessment identify and demarcate corresponding hazard zones carry out safety training secure the system against unauthorised use. Person Approved activities on KESSEL systems Operating company Visual check Competent expert / Emptying, clean- inspector (familiar with,...
  • Seite 31 The system is available as a "Standard" variant or as a variant with direct disposal pipe ("Direct"). The direct disposal pipe enables disposal via a Storz B couplingattached outside the building, e.g. in a disposal chamber (KESSEL accessories). All assemblies are completely assembled, whereby the pumps are enclosed separately and still have to be installed.
  • Seite 32: Technical Data

    Required fuse protection 3 x C 16A Type of residual current device (RCD) required 30 mA Use KESSEL junction box (art. no. 28799) to lengthen the connection cable of the level sensor. 32 / 84 Installation and operating instructions 016-302_01...
  • Seite 33: Possible Connections

    DN100 (NS 4) PVC-U pipe DN150 (NS 7/10) pressure pipe DN 80 (OD90) Electro-welded socket, Clamp connector, KESSEL accessory (art. no. 28090) Woven hose with 2 screw clamps Direct disposal pipe DN 65 (Storz B coupling) Electro-welded socket Clamp connector PN 10...
  • Seite 34: Installation

    Installation Assembly/installation procedure Check the installation requirements Dig out the excavations Position and connect the tank Test for leak tightness Backfill the excavations Install the pumps and sensors Make the electrical connections Connect the control unit Installation requirements Requirements for positioning and quality of the excavations Classify the in-situ soil requirements (soil properties) with regard to the structural suitability (e.g.
  • Seite 35 Determine the required load class and structural calculations in accordance with the environment / use condi- tions. Request an appropriate reinforcement drawing from the KESSEL hotline. Adjust the upper section to the final height (note the minimum insertion depth and shorten if necessary)
  • Seite 36 Subbase (crushed stone) Ground Tank bed (sand) Base course Separator according to the structural calculations Top of tank Back fill material (crushed stone) Load distribution slab (reinforced concrete) Fill the excavations with crushed stone (0-16 mm diameter), at least 50 cm all around; place in layers of maximum 30 cm and compact each layer of fill material properly to 97% DPr (e.g.
  • Seite 37: Installing The Pumps

    Shortening the upper section (optional) Mark the upper section all the way round so that it projects at least 5 cm into the cover of the tank (8 cm for installation of Sonic Control). Use a jigsaw (15°) to cut to the required length. Deburr the edges.
  • Seite 38 4.10 Fix the chain Dismantle the cover plate. Mark on the position for the hook for fixing the chain. The hook must be no more than 90 mm away from the bottom edge of the upper section. Hang in the pump chains. Fit the cover plate.
  • Seite 39: Commissioning

    Commissioning Preparing for putting into service Flush the inlet and outlet pipes. Remove any building rub- ble and dirt from inside the tank(s). Connect water supply if necessary. Fill the separator with cold water up to the calm water level (level of the outlet). Have a general inspection carried out (during initial com- missioning and then every 5 years).
  • Seite 40: Operation

    The pump pumps out water until the switch-off level is reached (pump head visible again). Pump switches off automatically. Check the control unit for errors/alarm signals. In the event of errors/alarm signals, contact KESSEL Customer Services. 40 / 84 Installation and operating instructions...
  • Seite 41 Sampling The system is designed for sampling in accordance with DIN 4040-100. The following must be noted when sampling: Take a sample from flowing wastewater. 016-302_01 Installation and operating instructions 41 / 84...
  • Seite 42: Disposal

    Disposal General information The emptying cycles of the various system types are designed to achieve complete emptying of the system tank while at the same time achieving the best possible cleaning for moderate degree of soiling of the wastewater. The pump is not designed for dry running (exception: initial startup or putting back into operation). Please note: Operating instructions must be displayed near the separator.
  • Seite 43 Filling with cold water Start cold water supply. Wait until the water level has reached the calm water level , and then turn off cold water supply. Re-insert the cover plate. Record the disposal in the log book. Disposal procedure is completed. Carry out the disposal (direct) Open the service access cover during pumping off.
  • Seite 44 Filling with cold water Start cold water supply. Wait until the water level has reached the calm water level , and then turn off cold water supply. Re-close the service access. Record the disposal in the log book. Disposal procedure is completed. 44 / 84 Installation and operating instructions 016-302_01...
  • Seite 45: Maintenance And Testing

    Maintenance and testing Maintenance and test/inspection intervals 8.1.1 Interval for general inspection A general inspection (including leak test) must be carried out on this system every 5 years in accordance with DIN EN 1825. 8.1.2 Grease separator maintenance interval The grease separator must be serviced annually by a competent person. 8.1.3 Pump technology maintenance interval A maintenance date can be set at the control unit.
  • Seite 46 Cordon off to ensure traffic safety Take appropriate cordoning off measures to ensure that traffic safety is maintained. CAUTION Transport the cover plate only if it is lashed onto a pallet. Only fit the cover plate if the excavations have already been backfilled.
  • Seite 47: Level Sensor

    Follow the enclosed pump instructions when carrying out maintenance work Level sensor Cleaning the level sensor Pull the level sensor out of the protective tube (1). Clean the level sensor and make sure that the inside of the protective tube (1) is free of soiling. Insert the level sensor back into the protective tube (1) and make sure that the dimension (L) (see "Level sen- sor") is set up.
  • Seite 48 Pull the non-return flap off, check for wear, remove any blocking parts if necessary and flush through. Fit the parts again in reverse order. Install backflow preventer (2) Make sure that the ventilation device (5) is in a vertical position as shown. Carry out a functional check (see "Functional check").
  • Seite 49: Troubleshooting

    Troubleshooting General Error Cause Remedial measures Pumping capacity too low during Pumping height too large for the pump Support the pump of the grease separa- emptying capacity tor with the pump of the emptying vehicle (suction) Rotary field incorrect Swap mains wires (heed fault message at the control unit) Wrong direction of pump rotation Check pump wires for correct connection...
  • Seite 50: Factory Approval, Tests

    For you, it is important that the quality and functional ability of your system is kept at the best possible standard, particularly when this is the pre-condition for warranty conditions. If you have the maintenance carried out by KESSEL, we guarantee you continued updating and care for your system.
  • Seite 51 10.1 System passport 016-302_01 Installation and operating instructions 51 / 84...
  • Seite 52 Chère cliente, cher client, En qualité de producteur de pointe de produits novateurs dans le domaine de la technique d’assainissement, KESSEL pro- pose des réponses systématiques globales et un service orienté aux besoins de la clientèle. Nous misons simultanément sur les normes de qualité les plus élevées et une durabilité conséquente – non seulement lors de la fabrication de nos pro- duits, mais également pour leur utilisation à...
  • Seite 53: Informations Spécifiques Aux Présentes Instructions

    Informations spécifiques aux présentes instructions Les conventions de représentation suivantes facilitent l’orientation : Représentation Explication voir figure 1 Numéro de repère 5 de la figure ci-contre Action de la figure Vérifier si le mode manuel a été activé. Condition de réalisation de l’action Valider <OK>.
  • Seite 54: Sécurité

    Déterminer la classe de charge requise et la statique suivant la situation environnementale et les conditions d'uti- lisation. Demander le plan d'armature correspondant auprès de la ligne d'assistance de KESSEL. ATTENTION Surfaces chaudes ! Les pompes peuvent atteindre des températures élevées en cours de fonctionnement.
  • Seite 55: Utilisation Conforme À L'usage Prévu

    à la mise en pratique de formations se rappor- tant aux consignes de sécurité, d’empêcher toute personne non autorisée de l’utiliser. Personne Activités autorisées sur les postes KESSEL Exploitant Contrôle visuel Technicien spécialisé...
  • Seite 56 évacuation via un dispositif d’accouplement Storz B placé en dehors du bâtiment, p. ex. dans un regard d'évacuation (accessoire KESSEL). Tous les modules sont entièrement montés, les pompes étant jointes séparément et devant encore être montées.
  • Seite 57: Caractéristiques Techniques

    Protection par fusible nécessaire 3 x C 16 A Protection différentielle requise (RCD) 30 mA Utiliser la boîte à bornes KESSEL (réf. 28799) pour rallonger le câble de raccordement de la sonde de niveau. 016-302_01 Instructions de pose et d’utilisation 57 / 84...
  • Seite 58 Tuyau en U en PVC DN150 (NS 7/10) connexions DN 80 (OD90) Manchon électrosoudable, Raccord de serrage, accessoire KESSEL (réf. 28090) Tuyau textile avec 2 brides vissées Tuyau de vidange directe DN 65 (dispositif d’accouplement Manchon électrosoudable Storz B) Raccord de serrage PN 10) Tuyau textile avec 2 brides vissées...
  • Seite 59: Montage

    Montage Processus à suivre pour le montage Vérifier les conditions de pose Creuser l’excavation Positionner et raccorder la cuve Contrôler l’étanchéité Remplir l’excavation Monter les pompes et les sondes Réaliser les raccordements électriques Raccorder le gestionnaire Conditions de pose Exigences relatives au positionnement et à la nature de l’excavation Procéder à...
  • Seite 60 Déterminer la classe de charge requise et la statique suivant la situation environnementale et les conditions d'uti- lisation. Demander le plan d'armature correspondant auprès de la ligne d'assistance de KESSEL. Adapter la rehausse à la hauteur définitive (respecter la profondeur d'insertion minimale et la raccourcir si nécessaire) 60 / 84 Instructions de pose et d’utilisation...
  • Seite 61 Couche de base (pierre concassée) Sol de fondation Lit de la cuve (sable) Couche portante Séparateur suivant le calcul statique Bord supérieur de la cuve Remblayage (pierre concassée) Plaque de répartition de la charge (béton armé) Remblayer l’excavation avec de la pierre concassée (diamètre 0-16 mm), sur au moins 50 cm autour de la cuve en veillant à...
  • Seite 62 Raccourcissement de la rehausse (optionnel) Marquer le pourtour de manière à ce que la rehausse s’insère d'au moins 5 cm (8 cm en cas de montage de Sonic Control) dans le couvercle de la cuve. La raccourcir avec une scie sauteuse (15°). Ébavurer les bords.
  • Seite 63 Installer les pompes Se procurer des chaînes pour le montage de la pompe (longueur de 2 m pour NS 4 et NS 7 avec chaque fois une profondeur de montage de 80 cm) ou de 3 m (NS 10 et NS 7 avec une profondeur de montage de 120 cm ; résistance à...
  • Seite 64 4.12 Réaliser les raccordements électriques Généralités ATTENTION Les travaux électriques ne doivent être effectués que par une entreprise spécialisée en électricité. Les raccordements sont déjà montés en usine et doivent être contrôlés une nouvelle fois avant la première mise en service.
  • Seite 65: Mise En Service

    Mise en service Préparation de la mise en service Rincer les conduites d'arrivée et de sortie. Retirer si besoin les gravats et les saletés de l’intérieur de la cuve. Établir, si besoin, l’alimentation en eau. Remplir le séparateur d’eau froide jusqu’au niveau d’eau au repos (hauteur de la sortie).
  • Seite 66: Fonctionnement

    La pompe refoule l’eau jusqu’au niveau d’arrêt (la tête de pompe est à nouveau visible). La pompe se déconnecte automatiquement. Vérifier l’absence de messages d’erreur ou d'alarme du gestionnaire. Contacter le service après-vente KESSEL en cas de messages d’erreur ou d'alarme.
  • Seite 67 Dispositif d'échantillonnage Le poste est conçu comme dispositif d'échantillonnage conformément à la norme DIN 4040-100. Il convient d’obser- ver à cet effet le point suivant : Prélever l’échantillon sur les eaux usées qui s'écoulent. 016-302_01 Instructions de pose et d’utilisation 67 / 84...
  • Seite 68: Évacuation

    Évacuation Généralités Les cycles de vidage des différentes variantes sont conçus de sorte à assurer un vidage intégral de la cuve du séparateur, dès l'atteinte d'un degré de salissure moyen des eaux usées, en veillant simultanément à un nettoyage aussi approfondi que possible.
  • Seite 69 Remplissage avec de l’eau froide Ouvrir l’arrivée d’eau froide. Attendre que le niveau d’eau ait atteint le niveau d’eau de repos, puis stopper l’arrivée d’eau froide. Remettre le couvercle de protection en place. Inscrire le processus d'évacuation dans le journal d'ex- ploitation.
  • Seite 70 Remplissage avec de l’eau froide Ouvrir l’arrivée d’eau froide. Attendre que le niveau d’eau ait atteint le niveau d’eau de repos, puis stopper l’arrivée d’eau froide. Refermer l’ouverture de maintenance. Inscrire le processus d'évacuation dans le journal d'ex- ploitation. L'évacuation est terminée. 70 / 84 Instructions de pose et d’utilisation 016-302_01...
  • Seite 71: Maintenance Et Contrôle

    Maintenance et contrôle Intervalles de maintenance et de contrôle 8.1.1 Intervalle pour l’inspection générale Il est nécessaire de procéder à une inspection générale (et notamment à un essai d'étanchéité) de ce poste tous les 5 ans conformément à la norme DIN EN 1825. 8.1.2 Intervalle de maintenance du séparateur à...
  • Seite 72 Barrer de manière sûre pour la circulation S'assurer que la sécurité routière est garantie par des mesures de fermeture appropriées. ATTENTION Transporter le couvercle de protection unique- ment arrimé sur une palette. Ne monter le couvercle de protection que si l’ex- cavation a déjà...
  • Seite 73 Il convient d’observer les instructions fournies relatives à la pompe pour les travaux de maintenance Sonde de niveau Nettoyage de la sonde de niveau Extraire la sonde de niveau du tube de protection (1). Nettoyer la sonde de niveau et s’assurer de l’absence d’encrassements à...
  • Seite 74 Retirer le clapet antiretour, vérifier l’usure, retirer si besoin les parties bloquantes et les rincer. Remonter les pièces dans le sens inverse du démontage. Monter le dispositif antiretour (2) S'assurer que le dispositif de purge d'air (5) se trouve en position verticale tel qu’illustré.
  • Seite 75: Aide En Cas De Panne

    Aide en cas de panne Généralités Défaut Cause Solutions Débit de la pompe trop faible pour Hauteur de refoulement trop élevée pour Aider la pompe du séparateur à graisses le vidage. le débit de la pompe. en utilisant la pompe du véhicule de vidange (aspiration).
  • Seite 76 Messages sur le gestionnaire Voir instructions de service séparées du gestionnaire. 76 / 84 Instructions de pose et d’utilisation 016-302_01...
  • Seite 77: Réception En Usine, Contrôles

    à KESSEL. Êtes-vous à la recherche d'un contrat de maintenance ou d'une offre relative à l'inspection générale ? Veuillez copier cette page et nous la renvoyer complétée à dienstleistung@kessel.de ou veuillez remplir le formulaire de contact sous www.kes- sel.de/service/dienstleistungen.
  • Seite 78 10.1 Fiche système 78 / 84 Instructions de pose et d’utilisation 016-302_01...
  • Seite 82 82 / 84 016-302DE-EN-FR_01...
  • Seite 83 016-302DE-EN-FR_01 83 / 84...
  • Seite 84 Registrieren Sie Ihr Produkt online, um von einer schnelleren Hilfe zu profitieren! http://www.kessel.de/service/produktregistrierung.html KESSEL AG, Bahnhofstr. 31, 85101 Lenting, Deutschland...

Inhaltsverzeichnis