Herunterladen Inhalt Inhalt Diese Seite drucken
Inhaltsverzeichnis

Werbung

Verfügbare Sprachen
  • DE

Verfügbare Sprachen

  • DEUTSCH, seite 46
AIR CONDITIONING SYSTEMS
• USER'S MANUAL
• ΕΓΧΕΙΡΙΔΙΟ ΧΡΗΣΗΣ
• MANUAL UTILIZATORULUI
• BENUTZERHANDBUCH
• MANUEL DE L'UTILISATEUR
• MANUALE DELL' UTENTE
• MANUAL DEL USARIO
ENGLISH | ΕΛΛΗΝΙΚΑ | ROMANA | DEUTSCH |
FRANÇAIS | ITALIANO | ESPAÑOL
REMOTE CONTROLLER
MODELS:
M3GHP290-12
M3GHP290-12BS

Werbung

Inhaltsverzeichnis
loading

Inhaltszusammenfassung für INVENTOR M3GHP290-12

  • Seite 1 REMOTE CONTROLLER • USER’S MANUAL • ΕΓΧΕΙΡΙΔΙΟ ΧΡΗΣΗΣ • MANUAL UTILIZATORULUI • BENUTZERHANDBUCH • MANUEL DE L’UTILISATEUR • MANUALE DELL’ UTENTE • MANUAL DEL USARIO MODELS: M3GHP290-12 M3GHP290-12BS ENGLISH | ΕΛΛΗΝΙΚΑ | ROMANA | DEUTSCH | FRANÇAIS | ITALIANO | ESPAÑOL...
  • Seite 3: Προδιαγραφές Του Τηλεχειριστηρίου

    LANGUAGES ENGLISH ......................3 ΕΛΛΗΝΙΚΑ......................18 ROMANA ......................34 DEUTSCH ......................46 FRANÇAIS ......................60 ITALIANO ......................74 ESPAÑOL ......................88...
  • Seite 4: Inhaltsverzeichnis

    CONTENTS Handling the remote controller ............Remote controller Specifications........... Function buttons ................Indicators on LCD ................How to use the buttons ..............Auto operation................. Cooling/Heating/Fan operation............Dehumidifying operation ............... Swing operation................Timer operation................ECONOMY operation ..............
  • Seite 5: Handling The Remote Controller

    Handling the remote controller Location of the remote controller. Use the remote controller within a distance of 8 meters from the appliance, pointing it towards the receiver. Reception is confirmed by a beep. CAUTIONS The air conditioner will not operate if curtains, doors or other materials block the signals from the remote controller to the indoor unit.
  • Seite 6: Remote Controller Specifications

    CAUTIONS Do not mix old and new batteries or batteries of a different type. Do not leave the batteries in the remote controller if it is not going to be used for 2 or 3 months. Dispose of the old batteries in the special containers to be found in the sales outlets.
  • Seite 7: Function Buttons

    Function buttons TEMP DOWN Button Push this button to decrease the indoor temper- ature setting in 1 C(2 F) increments to 17 C(62 F). TEMP UP Button Push this button to increase the indoor temper- ature setting in 1 C(2 F) increments to 30 C(88 F). ON/OFF Button Operation starts when this button is pressed and stops when the button is pressed again.
  • Seite 8: Λειτουργία Αφύγρανσης

    Function buttons(continued) SHORT CUT Button: Push this button to set and activate your favorite pre-settings. TIMER OFF Button Press this button to activate the Auto-off time setting. Each press will increase the time setting in 30 minutes increments, up to 10 hours, then at 1 hour increments up to 24 hours.
  • Seite 9: Λειτουργία Χρονοδιακόπτη

    Remote Screen Indicators Information are displayed when the remote controller is power up. Mode display COOL AUTO HEAT AUTO (some units) Displayed when data transmitted. COOL HIGH Displayed when remote controller is ON. HEAT Displayed when TIMER ON time is set Displayed when TIMER OFF time is set Shows set temperature or room temperature, or time under TIMER setting...
  • Seite 10: How To Use The Buttons

    How to use the buttons Auto operation Ensure the unit is plugged in and power is available. The OPERATION indicator on the display panel of the indoor unit illuminates. 1. Press the MODE button to select Auto. 2. Press the TEMP button to set the desired temperature.
  • Seite 11: Dehumidifying Operation

    Dehumidifying operation Ensure the unit is plugged in and power is available. The OPERATION indicator on the display panel of the indoor unit illuminates. 1. Press the MODE button to select DRY mode. 2. Press the TEMP button to set the desired temperature.
  • Seite 12: Timer Operation

    Timer operation press the TIMER ON button can set the auto-on time of the unit. And press the TIMER OFF button can set the auto-off time of the unit. To set the Auto-on time. 1. Press the TIMER ON button. The remote controller shows TIMER ON, the last Auto-on setting time and the signal "h"...
  • Seite 13 IMPORTANT The effective operation time set by the remote controller for the timer function is limited to the following settings: 0.5, 1.0, 1.5, 2.0, 2.5, 3.0, 3.5, 4.0, 4.5, 5.0, 5.5, 6.0, 6.5, 7.0, 7.5, 8.0, 8.5, 9.0, 9.5, 10, 11, 12, 13, 14, 15,16,17, 18, 19, 20, 21, 22, 23 and 24.
  • Seite 14 TIMER OFF (Auto-off Operation) The TIMER OFF feature is useful when you want TIMER OFF the unit to turn off automatically after you go to bed. The air conditioner will stop automatically at the set time. Example: Stop To stop the air conditioner in 10 hours. 1.
  • Seite 15: Economy Operation

    TIMER ON TIMER OFF (Off Start Stop operation) This feature is useful when you want to start TIMER ON OFF the air conditioner before you wake up and stop it after you leave the house. Example: To start the air conditioner 2 hours after setting, and stop it 5 hours after setting.
  • Seite 16 I SENSE operation: The I SENSE operation enables the remote control to measure the temperature at its current location and send this signal to the air conditioner every 3 minutes interval. NOTE: Press this button for seven seconds to start/ stop memory feature of I SENSE function.
  • Seite 17 NOTE: -Buttons design is based on typical model and might be slightly different from the actual one you purchased, the actual shape shall prevail. -All the functions described are accomplished by the unit, if the unit has no this feature, there is no corresponding operation happened when press the relative button on the remote controller.
  • Seite 18 ΠΕΡΙΕΧΟΜΕΝΑ Χειρισµός του τηλεχειριστηρίου .................19 Χειρισµός του τηλεχειριστηρίου............2 Προδιαγραφές του τηλεχειριστηρίου..............20 Λειτουργίες των πλήκτρων.................21 Προδιαγραφές του τηλεχειριστηρίου............3 Ενδείξεις στην οθόνη LCD ...................23 Λειτουργίες των πλήκτρων..............4 Η χρήση των πλήκτρων ..................24 Ενδείξεις στην οθόνη LCD..............6 Αυτόµατη λειτουργία ...................24 Η χρήση των πλήκτρων.................7 Ψύξη/Θέρµανση/ Λειτουργία...
  • Seite 19: Χειρισµός Του Τηλεχειριστηρίου

    Χειρισµός του τηλεχειριστηρίου Η θέση του τηλεχειριστηρίου. Χρησιµοποιήστε το τηλεχειριστήριο σε απόσταση εντός 8 µέτρων από τη συσκευή, κατευθύνοντας το προς το δέκτη της συσκευής. Η λήψη εντολής επιβεβαιώνεται µε ηχήτική ειδοποίηση. ΠΡΟΣΟΧΗ • Το κλιµατιστικό δεν θα λειτουργήσει εάν το σήµα από το τηλεχειριστήριο...
  • Seite 20: Προδιαγραφές Του Τηλεχειριστηρίου

    ΠΡΟΣΟΧΗ • Μην χρησηµοποιείτε νέες µπαταρίες µαζί µε παλιές ή µε µπαταρίες άλλου τύπου. Μην αφήνετε τις µπαταρίες στο τηλεχειριστήριο εάν δεν πρόκειται να το χρησιµοποιήσετε για 2-3 µήνες. • Απορρίψτε τις παλίες µπαταρίες στους ειδικούς κάδους που βρίσκονται στα περισσότερα καταστήµατα ηλεκτρικών ειδών. Προδιαγραφές...
  • Seite 21: Λειτουργίες Των Πλήκτρων

    1. Πλήκτρο Temp UP Πιέστε αυτό το πλήκτρο για να αυξήσετε τη θερµοκρασία κατά 1°C έως τους 30°C. 2. Πλήκτρο Temp DOWN Πιέστε αυτό το πλήκτρο για να µειώσετε τη θερµοκρασία κατά 1°C έως τους 17°C. 3. Πλήκτρο ON/OFF Όταν πιέσετε αυτό το πλήκτρο ενεργοποιείται ή απενεργοποιείται...
  • Seite 22 9. SHORT CUT Button: Πιέστε απο το πλήκτρο για να ρυθµίσετε και να ενεργοποιήσετε τις αγαπηµένες σας λειτουργίες. 10. Πλήκτρο TIMER OFF Πιέζοντας το πλήκτρο αυτό ενεργοποιείται η λειτουργία αυτόµατης απενεργοποίησης της συσκευής µε τον χρονοδιακόπτη. Κάθε πάτηµα του πλήκτρου αυξάνει τον χρόνο...
  • Seite 23: Ενδείξεις Στην Οθόνη Lcd

    ΕΝΔΕΙΞΕΙΣ ΣΤΗΝ ΟΘΟΝΗ Οι παρακάτω πληροφορίες θα εµφανίζονται στο τηλεχειριστήριο όταν είναι ενεργοποιηµένο. ΕΝΔΕΙΞΗ ΛΕΙΤΟΥΡΓΙΑΣ COOL AUTO AUTO HEAT (σε ορισµένα µοντέλα) (some units) COOL Εµφανίζεται όταν πραγµατοποιείται HIGH µετάδοση δεδοµένων. Εµφανίζεται όταν το τηλεχειριστήριο είναι ενεργοποιηµένο. HEAT Εµφανίζεται όταν η ρύθµιση του χρονοδια- κόπτη...
  • Seite 24: Η Χρήση Των Πλήκτρων

    Η ΧΡΗΣΗ ΤΩΝ ΠΛΗΚΤΡΩΝ ΑΥΤΟΜΑΤΗ ΛΕΙΤΟΥΡΓΙΑ Βεβαιωθείτε ότι η µονάδα είναι συνδεδεµένη στη πρίζα και ότι η πρίζα είναι ενεργή. Θα ανάβει η ένδειξη λειτουργίας στην εσωτερική µονάδα. 1. Πιέστε το πλήκτρο MODE για να επιλέξετε την αυτόµατη λειτουργία. 2. Πιέστε το πλήκτρο TEMP για να επιλέξετε την επιθυµητή...
  • Seite 25: Η Χρήση Των Πλήκτρων

    Η ΧΡΗΣΗ ΤΩΝ ΠΛΗΚΤΡΩΝ ΛΕΙΤΟΥΡΓΙΑ ΑΦΥΓΡΑΝΣΗΣ Βεβαιωθείτε ότι η µονάδα είναι συνδεδεµένη στη πρίζα και ότι η πρίζα είναι ενεργή. Θα ανάβει η ένδειξη λειτουργίας στην εσωτερική µονάδα. 1. Πιέστε το πλήκτρο MODE για να επιλέξετε την λειτουργία αφύγρανσης. 2. Πιέστε το πλήκτρο TEMP για να επιλέξετε την επιθυµητή...
  • Seite 26: Λειτουργια Χρονο∆Ιακοπτη

    Η ΧΡΗΣΗ ΤΩΝ ΠΛΗΚΤΡΩΝ ΛΕΙΤΟΥΡΓΙΑ ΧΡΟΝΟ∆ΙΑΚΟΠΤΗ Πιέστε το πλήκτρο TIMER ON για να ρυθµίσετε τον χρόνο αυτόµατης ενεργοποίησης. Και πιέστε το πλήκτρο TIMER OFF για να ρυθµίσετε τον χρόνο αυτόµατης απενεργοποίησης της µονάδας. Για να ρυθµίσετε τον χρόνο αυτόµατης ενεργοποίησης. 1.
  • Seite 27 ΠΡΟΣΟΧΗ Η λειτουργία ορισµού του χρόνου του χρονοδιακόπτη περιορίζεται στις ακόλουθες: 0.5, 1.0, 1.5, 2.0, 2.5, 3.0, 3.5, 4.0, 4.5, 5.0, 5.5, 6.0, 6.5, 7.0, 7.5, 8.0, 8.5, 9.0, 9.5, 10, 11, 12, 13, 14, 15, 16, 17, 18, 19, 20, 21, 22, 23 και...
  • Seite 28 ΕΝΕΡΓΟΠΟΙΗΣΗ ΤΟΥ ΧΡΟΝΟ∆ΙΑΚΟΠΤΗ (Αυτόµατη απενεργοποίηση) Η λειτουργία αυτόµατης απενεργοποίησης είναι πολύ χρήσιµη όταν θέλετε να απενεργοποιηθεί η µονάδα αφού έχετε κοιµηθεί. Το κλιµατιστικό θα απενεργοποιηθεί αυτόµατα την προγραµµατισµένη ώρα. Παράδειγµα: Απενεργοποίηση του κλιµατιστικού σε 10 ώρες. 1. Πιέστε το πλήκτρο TIMER OFF , η τελευταία ρύθµιση...
  • Seite 29: Λειτουργία Eco

    (Ενεργοποιηµένο Απενεργοποίηση Εκκίνηση) Αυτή η λειτουργία είναι χρήσιµη όταν θέλετε εκκινήσετε το κλιµατιστικό πρίν ξυπνήσετε και να σταµατήσει αφού έχετε φύγει από το σπίτι. TIMER ON OFF Παράδειγµα: Για να ενεργοποιείσετε το κλιµατιστικό µετά από 2 ώρες και να το απενεργοποιείσετε µετά από 5 ώρες...
  • Seite 30 I SENSE λειτουργία: Η λειτουργία I SENSE επιτρέπει στο τηλεχειριστήριο να μετράει τη θερμοκρασία στην τρέχουσα θέση του και να στέλνει αυτό το σήμα στο κλιματιστικό κάθε μεσοδιάστημα 3 λεπτών. ΣΗΜΕΙΩΣΗ: Πατήστε αυτό το πλήκτρο για 7 δευτερόλεπτα για έναρξη/διακοπή της λειτουργίας μνήμης της λειτουργίας I SENSE.
  • Seite 31 ΣΗΜΕΙΩΣΗ: - Ο σχεδιασµός των πλήκτρων βασίζεται σε τυπικό µοντέλο που µπορεί να διαφέρει ελαφρώς από το πραγµατικό που αγοράσατε. Υπερισχύει το πραγµατικό µοντέλο. - Όλες οι λειτουργίες που περιγράφονται συνοδεύονται µε τη µονάδα, αν η µονάδα δεν έχει κάποια λειτουργία δεν θα υπάρχει και η αντίστοιχη λειτουργία όταν πατάτε το σχετικό πλήκτρο...
  • Seite 32 CUPRINS Manevrarea telecomenzii ...................33 Manevrarea telecomenzii ....................2  Specificații Telecomandă ....................3  Specificaţii Telecomandă ..................34 Funcționalitatea butoanelor ..................4  Indicatorii de pe ecranul LCD ..................6  Funcţionalitatea butoanelor ................35 Modul de utilizare al butoanelor ................... 7  Indicatorii de pe ecranul LCD ................37 Funcționarea automată...
  • Seite 33: Manevrarea Telecomenzii

    Manevrarea telecomenzii Loca ia telecomenzii Utiliza i telecomanda la o distan ă de 8 • metri de aparat, îndreptată către receptor. Primirea semnalului este confirmată de un sunet de bip. ATEN IE Aparatul de aer condi ionat nu va func iona dacă perdele, •...
  • Seite 34: Specificații Telecomandă

    ATEN IE • Nu amesteca i bateriile vechi cu cele noi sau bateriile de diferite feluri. • Nu l sa i bateriile în telecomand dac nu urmeaz a fi utilizate pentru 2 sau 3 luni. • Nu arunca i bateriile ca i gunoi menajer. Colectarea unor astfel de de euri se face separat deoarece este necesar aplicarea unui tratament special.
  • Seite 35: Funcționalitatea Butoanelor

    Func ionalitatea butoanelor 1) Butonul de CRE TERE TEMPERATUR Ap sa i acest buton pentru a sc dea temperatura interioar cu intervale de câte 1°C (2°F) pân la 17°C (62°F). 2) Butonul de SC DERE TEMPERATUR (TEMP DOWN) Ap sa i acest buton pentru a cre te temperatura interioar cu intervale de câte 1°C (2°F) pân la 30°C (88°F).
  • Seite 36 9) SHORT CUT Button: Apasati tasta pentru a seta si a activa functiile preferate. 10) Butonul OPRIRE TEMPORIZATOR (TIMER OFF) Ap sa i acest buton pentru a ini ia secven a automat de temporizare oprire. Fiecare ap sare va cre te setarea timpului automat cu intervale de 30 de minute pân la 10 ore, dup care la intervale de 1 or pân la 24 ore.
  • Seite 37: Indicatorii De Pe Ecranul Lcd

    Indicatorii de pe ecranul LCD Urmatoarele informatii vor fi afisate pe telecomanda cand aceasta este pornita. AFISARE MODUL COOL AUTO (la unele modele) AUTO HEAT (some units) Apare atunci cAnd datele sunt transmise. COOL HIGH Apare cand telecomanda este pornita HEAT Apare cand setarea temporizatorului TIMER ON este activata...
  • Seite 38: Modul De Utilizare Al Butoanelor

    Modul de utilizare al butoanelor Func ionarea automat Asigura i-v c aparatul este b gat în priz i alimentat cu energie. Indicatorul de FUNC IONARE de pe panoul de afi aj al unit ii interioare începe s se aprind intermitent. 1.
  • Seite 39: Operațiunea De Dezumidificare

    Opera iunea de dezumidificare Asigura i-v aparatul este în priz i are alimentare cu energie. Indicatorul de func ionare de pe panoul de afi aj al unit ii interioare începe s se aprind intermitent. Ap sa i butonul MODE pentru alege modulul DEZUMIDIFICARE.
  • Seite 40: Funcționarea Temporizatorului

    Func ionarea temporizatorului Ap sa i butonul pornire temporizator (TIMER ON) pentru a seta timpul automat de pornire a aparatului. Ap sa i butonul o prire temporizator (TIMER OFF) pentru a seta timpul automat de oprire a aparatului. Pentru a seta pornirea automat a temporizatorului 1.
  • Seite 41 IMPORTANT Timpul efectiv de func ionare setat de telecomand pentru func ia de temporizare este limitat la • urm toarele set ri:0.5, 1.0, 1.5, 2.0, 2.5, 3.0, 3.5, 4.0, 4.5, 5.0, 5.5, 6.0, 6.5, 7.0, 7.5, 8.0, 8.5, 9.0, 9.5, 10, 11, 12, 13, 14, 15,16,17, 18, 19, 20, 21, 22, 23 i 24. Exemple de setare temporizator PORNIRE TEMPORIZATOR (TIMER ON) (Func ionare automat pornit )
  • Seite 42 OPRIRE TEMPORIZATOR (TIMER OFF) (Func ionare automat oprit ) Func ia OPRIRE TEMPORIZATOR (TIMER OFF) este util atunci când dori i ca aparatul s se opreasc automat dup ce merge i la culcare. Aparatul de aer condi ionat se va opri automat la ora setat .
  • Seite 43 TEMPORIZATOR PORNIRE – TEMPORIZATOR OPRIRE (TIMER ON - TIMER OFF_ (Oprire - Pornire - Începere func ionare) TIMER ON OFF Aceast func ie este util atunci când dori i s porneasc aparatul de aer condi ionat înainte s trezi i opreasc dup ce pleca i de acas .
  • Seite 44 I SENSE operatiunea: Funcționarea I SENSE permite telecomenzii sa masoare temperatura in locatia sa actuala si sa trimita acest semnal catre aparatul de aer conditionat la inter- val de 3 minute. NOTA: Apasati acest buton timp de sapte secunde pentru a porni/opri functia de memorie a funcției I SENSE.
  • Seite 45 NOT : Proiectarea butoanelor este bazat pe modelul tipic i poate fi u or diferit de cea a butoanelor aparatului dvs. forma real va fi cea care va prevala. Toate func iile descrise sunt îndeplinite de acest aparat, dac aparatul nu are aceast func ie, nu exist nici o opera iune corespunz toare ap s rii butonului respectiv de pe telecomand .
  • Seite 46 INHALTSVERZEICHNIS Handhabung der Fernbedienung ..............47 Fernbedienung Spezifikationen ...............48 Funktionstasten ....................49 Anzeigen auf der LCD-Anzeige .................51 Verwendung der Tasten ..................52 Automatische Bedienung .................52 Kühlung/Heizung/Lüfterbetrieb ..............52 Entfeuchtungsbetrieb ..................53 Schwenkbetrieb ....................53 Zeitschaltuhr-Betrieb ..................54 ECONOMY Betrieb .....................57...
  • Seite 47: Handhabung Der Fernbedienung

    Handhabung der Fernbedienung Position der Fernbedienung. • Verwenden Sie die Fernbedienung in einer Entfernung von 8 Metern vom Gerät und richten Sie sie auf den Empfänger. Der Empfang wird durch einen Piepton bestätigt. VORSICHTSMASSNAHMEN Das Klimagerät funktioniert nicht, wenn Vorhänge, Türen oder andere Materialien die Signale von der Fernbedienung zum Innengerät blockieren.
  • Seite 48: Spezifikationen Der Fernbedienung

    VORSICHTSMASSNAHMEN Mischen Sie nicht alte und neue Batterien oder Batterien eines anderen Typs. Lassen Sie die Batterien nicht in der Fernbedienung, wenn diese 2 oder 3 Monate lang nicht benutzt wird. Entsorgen Sie die alten Batterien in den speziellen Behältern, die Sie in den Verkaufsstellen finden.
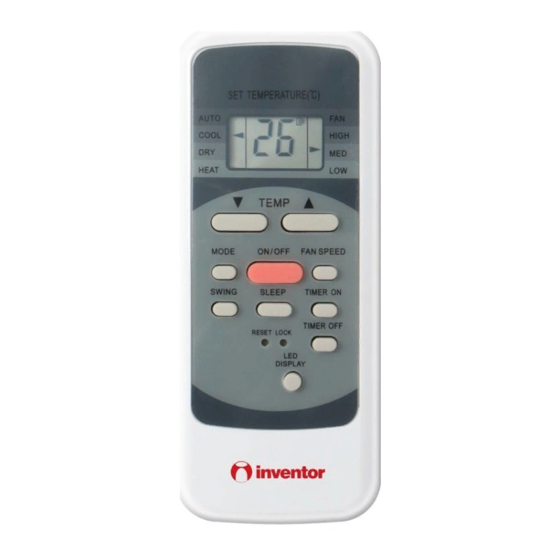
  • Seite 49: Funktionstasten

    Funktionstasten TEMP DOWN Taste Drücken Sie diese Taste, um die Innentemperatur in 1oC(2 F)-Schritten auf 17oC(62 F) zu senken. TEMP UP-Taste Drücken Sie diese Taste, um die Innentemperatur in 1oC(2 F)-Schritten auf 30oC(88 F) zu erhöhen. EIN/AUS-Taste Der Betrieb beginnt, wenn diese Taste gedrückt wird, und endet, wenn die Taste erneut gedrückt wird Bouton FAN SPEED FAN SPEED-Taste (LÜFTERGESCHWINDIGKEIT)
  • Seite 50 Funktionstasten (Fortsetzung) ECONOMY/SLEEP-Taste Wählen Sie diese Funktion während der Schlafenszeit. Sie kann die angenehmste Temperatur aufrechterhalten und Energie sparen. Diese Funktion ist nur im Modus COOL,(Kühlen), HEAT (Heizen) oder AUTO verfügbar. HINWEIS: Während das Gerät im ECONOMY/ SLEEP- Modus läuft, wird dieser durch Drücken der Tasten MODUS, GEBLÄSEGESCHWINDIGKEIT oder EIN/AUS beendet.
  • Seite 51: Fernbedienungsbildschirmanzeigen

    Fernbedienungsbildschirmanzeigen Die Informationen werden beim Einschalten der Fernbedienung angezeigt. Modus-Anzeige COOL COOL AUTO AUTO einige Einheiten AUTO AUTO HEAT HEAT (some units) (some units) Wird angezeigt, wenn Daten übertragen COOL COOL HIGH HIGH werden. Wird angezeigt, wenn die Fernbedienung eingeschaltet ist. HEAT HEAT Wird angezeigt, wenn die TIMER ON-Zeit...
  • Seite 52: Verwendung Der Tasten

    Verwendung der Tasten Automatischer Betrieb Vergewissern Sie sich, dass das Gerät eingesteckt ist und Strom zur Verfügung steht. Die Anzeige OPERATION auf dem Anzeigefeld des Innengerätes leuchtet 1. Drücken Sie die MODE-Taste, um Auto zu wählen. 2. Drücken Sie die TEMP-Taste, um die gewünschte Temperatur einzustellen.
  • Seite 53: Entfeuchtungsbetrieb

    Entfeuchtungsbetrieb Vergewissern Sie sich, dass das Gerät eingesteckt ist und Strom zur Verfügung steht. Die Anzeige OPERATION auf dem Anzeigefeld des Innengerätes leuchtet auf. 1. Drücken Sie die Taste MODE, um den Modus DRY auszuwählen. 2. Drücken Sie die TEMP-Taste, um die gewünschte Temperatur einzustellen.
  • Seite 54: Timer-Betrieb

    Timer-Betrieb Drücken Sie die Taste TIMER ON, um die automatische Einschaltzeit des Gerätes einzustellen. Durch Drücken der Taste TIMER OFF kann die automatische Ausschaltzeit des Gerätes eingestellt werden. Zum Einstellen der automatischen Einschaltzeit. 1. Drücken Sie die Taste TIMER ON. Die Fernbedienung zeigt TIMER ON, die letzte Einschaltzeit und das Signal “h”...
  • Seite 55 WICHTIG Die effektive Betriebszeit, die mit der Fernbedienung der Timer eingestellt wird, ist auf die folgenden Einstellungen beschränkt: 0. 5, 1.0, 1.5, 2.0, 2.5, 3.0, 3.5, 4.0, 4.5, 5.0, 5.5, 6.0, 6.5, 7.0, 7.5, 8.0, 8.5, 9.0, 9.5, 10, 11, 12, 13, 14, 15,16,17, 18, 19, 20, 21, 22, 23 und 24.
  • Seite 56 TIMER AUS (Auto-off Betrieb) Die Funktion TIMER OFF ist nützlich, wenn Sie möchten, dass sich das Gerät automatisch TIMER OFF ausschaltet, nachdem Sie zu Bett gegangen sind. Das Klimagerät schaltet sich zur eingestellten Zeit automatisch aus. Beispiel: Um die Klimaanlage in 10 Stunden abzuschalten. Stop 1.
  • Seite 57: Economy Betrieb

    ZEITSCHALTUHR EIN ➝ ZEITSCHALTUHR AUS (Aus ➝ Start ➝ Stopp ➝ Betrieb) Diese Funktion ist nützlich, wenn Sie die Klimaanlage vor dem Aufwachen einschalten und nach dem TIMER ON OFF Verlassen des Hauses ausschalten möchten. Beispiel: Einschalten der Klimaanlage 2 Stunden nach der Einstellung und Ausschalten 5 Stunden nach der Einstellung.
  • Seite 58 I SENSE Betrieb: Der I SENSE-Betrieb ermöglicht es der Fernbedienung, die Temperatur an ihrem aktuellen Standort zu messen und dieses Signal alle 3 Minuten an das Klimagerät zu senden. HINWEIS: Drücken Sie diese Taste sieben Sekunden lang, um die Speicherfunktion der I SENSE-Funktion zu starten/stoppen.
  • Seite 59 HINWEIS: -Das Design der Tasten basiert auf einem typischen Modell und kann sich geringfügig von dem von Ihnen gekauften Gerät unterscheiden, die tatsächliche Form ist maßgebend. -Alle beschriebenen Funktionen werden durch das Gerät ausgeführt, Wenn das Gerät nicht über diese Funktion verfügt, erfolgt kein entsprechender Vorgang, wenn Sie die entsprechende Taste auf der Fernbedienung drücken.
  • Seite 60 CONTENTS Utilisation du télécopieur .................61 Caractéristiques du télécopieur ...............62 Fonctionnement des touches ................63 Fonctionnement des touches Indicateurs de l’écran LCD ......65 Fonctionnement de l’AUTO ................66 Fonctionnement de COOL (refroidissement)/HEAT (refroidissement)/FAN (ventilation) ..............66 Fonctionnement DRY (Déshumidification) .............67 Régulation de la direction du flux d’air ............68 Fonctionnement de la fonction ECONOMIE ...........71...
  • Seite 61: Utilisation De La Télécommande

    UTILISATION DE LA TÉLÉCOMMANDE Positionnement du système de télécommande • Utilisez la télécommande à une distance maximale de 8 mètres de l’appareil, en pointant vers le récepteur. Un signal acoustique confirme la réception du signal. AVERTISSEMENTS Le climatiseur ne fonctionnera pas si des rideaux, des portes ou d’autres objets obstruent le signal de la télécommande vers l’unité...
  • Seite 62: Spécifications De La Télécommande

    AVERTISSEMENT N’utilisez pas de piles anciennes et nouvelles ou des piles de types différents dans la même télécommande. Ne laissez pas les piles dans la télécommande si celle-ci ne doit pas être utilisée pendant une période de 2 à 3 mois. Jetez les piles usagées dans les conteneurs appropriés que vous trouverez dans les magasins.
  • Seite 63: Fonction Des Boutons

    FONCTION DES BOUTONS Bouton TEMP DOWN Appuyez sur ce bouton pour diminuer le réglage de la température intérieure par incréments de 1ºC (2ºF) à 17ºC (62ºF). Bouton TEMP UP Appuyez sur ce bouton pour augmenter le réglage de la température intérieure par incréments de 1ºC (2ºF) à 30 C (88 F).
  • Seite 64 FONCTION DES BOUTONS Bouton ECONOMY/SLEEP Sélectionnez cette fonction pendant la période de sommeil. Dans ce mode, la température est automatiquement ajustée pour un confort maximal tout en économisant de l’énergie. Cette fonction est disponible dans les modes COOL, HEAT et AUTO. REMARQUE: Lorsque l’appareil fonctionne en mode ECONOMY/SLEEP, une pression sur la touche MODE, FAN SPEED ou ON/OFF annule ce mode.
  • Seite 65: Indicateurs De L'écran Lcd

    Indicateurs de l’écran LCD Les informations s’affichent lorsque la télécommande est allumée. Affichage du mode COOL AUTO (dans certains appareils) AUTO HEAT (some units) Apparaît pendant la transmission des COOL HIGH données. Apparaît lorsque la télécommande est allumée HEAT Apparaît lorsque ON est réglé à l’aide de la minuterie.
  • Seite 66: Fonctions Clés

    FONCTIONS CLÉS Auto operation Assurez-vous que l’appareil est branché à une prise électrique et qu’il y a du courant. Le voyant de fonctionnement sur l’écran de l’unité intérieure commence à clignoter. 1. Appuyez sur le bouton MODE pour sélectionner Auto. 2.
  • Seite 67: Réglage De La Direction Du Flux D'air

    Fonctionnement en mode déshumidification (DRY) Assurez-vous que l’appareil est connecté à une prise électrique et qu’il y a du courant. Le voyant de fonctionnement sur l’écran de l’unité intérieure commence à clignoter. 1. Appuyez sur le bouton MODE pour sélectionner Dry (sec).
  • Seite 68 Fonctionnement en mode TIMER Appuyez sur le bouton TIMER ON pour régler l’heure de démarrage automatique de l’appareil. Appuyez sur la touche TIMER OFF pour régler le délai d’extinction automatique de l’appareil. Réglage de l’heure de démarrage automatique 1. Appuyez sur le bouton TIMER ON. TIMER ON, la dernière heure de démarrage automatique réglée, et l’icône apparaîtra sur l’écran LCD de la télécommande.
  • Seite 69 IMPORTANT Le réglage du temps qui peut effectivement être réglé à l’aide de la fonction de minuterie de la télécommande est limité aux options suivantes : 0. 5, 1.0, 1.5, 2.0, 2.5, 3.0, 3.5, 4.0, 4.5, 5.0, 5.5, 6.0, 6.5, 7.0, 7.5, 8.0, 8.5, 9.0, 9.5, 10, 11, 12, 13, 14, 15,16,17, 18, 19, 20, 21, 22, 23 et 24.
  • Seite 70 TIMER OFF (Fonction d’arrêt automatique) La fonction TIMER OFF est utile si vous souhaitez que l’appareil s’éteigne automatiquement après vous être TIMER OFF couché. Le fonctionnement du climatiseur s’arrête à l’heure programmée. Exemple : Le fonctionnement du climatiseur s’arrête 10 heures plus tard.
  • Seite 71 MINUTERIE ACTIVÉE ➝ MINUTERIE DÉSACTIVÉE (Arrêt ➝ Démarrage ➝ Arrêt de l’opération) Cette fonction est utile si vous souhaitez faire fonctionner le climatiseur le matin avant de vous lever TIMER ON OFF et l’arrêter lorsque vous quittez la maison. Exemple: Démarrage du fonctionnement du climatiseur 2 heures après le réglage et arrêt du fonctionnement 5 heures après le réglage.
  • Seite 72 Fonction I SENSE La fonction I SENSE permet à la télécommande de mesurer la température à l’endroit où elle se trouve et d’envoyer ce signal au climatiseur toutes les 3 minutes. REMARQUE : Appuyez sur ce bouton pendant sept secondes pour démarrer/arrêter la fonction de mémorisation de la fonction I SENSE.
  • Seite 73 NOTE: - La disposition des boutons est basée sur un modèle type et peut être légèrement différente de celle du modèle que vous avez acheté ; c’est la forme réelle qui prévaut. - Si l’appareil ne dispose pas d’une fonction particulière, le fait d’appuyer sur la touche de fonction de la télécommande n’aura aucun effet.
  • Seite 74 CONTENTS Utilizzo del telecomando ..................75 Caratteristiche del telecomando ..............76 Funzione dei tasti ....................77 Funzione dei tasti Indicatori sul display LCD ..........79 Funzionamento AUTO ..................80 Funzionamento COOL (Raffreddamento)/HEAT (Riscaldamento)/FAN (Ventilazione) ......................80 Funzionamento DRY (Deumidificazione) ............81 Regolazione della direzione del flusso d’aria ..........81 Funzionamento ECONOMY ................85...
  • Seite 75: Utilizzo Del Telecomando

    UTILIZZO DEL TELECOMANDO Posizionamento del sistema di controllo a distanza • Utilizzare il telecomando ad una distanza massima di 8 metri dall’apparecchio, puntando verso il ricevitore. Un segnale acustico confermerà la ricezione del segnale. AVVERTENZE Il condizionatore non entra in funzione nel caso in cui tende, porte o altri oggetti ostacolino il segnale dal telecomando all’unità...
  • Seite 76: Caratteristiche Di Funzionamento

    AVVERTENZE Non utilizzare contemporaneamente batterie vecchie e nuove o batterie di diverso tipo nello stesso telecomando. Non lasciare le batterie nel telecomando nel caso in cui quest’ultimo non venga utilizzato per per un periodo di 2-3 mesi. Smaltire le vecchie batterie negli appositi contenitori che si trovano nei punti vendita. SPECIFICHE TECNICHE DEL TELECOMANDO MODELLO RG51F/EF...
  • Seite 77 FUNZIONE DEI TASTI Tasto TEMP DOWN Premere questo pulsante per diminuire l’impostazione della temperatura interna con incrementi da 1ºC (2ºF) fino a 17ºC (62ºF). Tasto TEMP UP Premere questo pulsante per aumentare l’impostazione della temperatura interna con incrementi da 1ºC (2ºF) fino a 30ºC (88ºF).
  • Seite 78 FONCTION DES BOUTONS Tasto ECONOMY/SLEEP Selezionare questa funzione durante il tempo di sonno. Con questa modalità la temperatura viene regolata automaticamente per il massimo comfort, risparmiando energia. Questa funzione è disponibile nelle modalità COOL, HEAT e AUTO. NOTA: Quando l’unità sta funzionando in modalità ECONOMY/SLEEP, premendo il pulsante MODE, FAN SPEED o ON/OFF si annulla questa modalità.
  • Seite 79 Indicatori del display LCD Le informazioni vengono visualizzate quando si accende il telecomando. Visualizzazione dei Modi HEAT (in certe unità) COOL AUTO (dans certains appareils) AUTO HEAT (some units) Appare durante la trasmissione dei dati. COOL HIGH Appare quando il telecomando è acceso HEAT Appare quando l’accensione è...
  • Seite 80 FUNZIONE DEI TASTI Funzionamento in modalità automatica (AUTO) Accertars80i che l’unità sia collegata ad una presa elettrica e che ci sia corrente. La spia di funzionamento sul display dell’unità interna comincia a lampeggiare. 1. Premere il tasto MODE per selezionare Auto. 2.
  • Seite 81: Regolazione Della Direzione Del Flusso D'aria

    Funzionamento in modalità Deumidificazione (DRY) Accertarsi che l’unità sia collegata ad una presa elettrica e che ci sia corrente. La spia di funzionamento sul display dell’unità interna comincia a lampeggiare. 1. Premere il tasto MODE per selezionare Dry. 2. Premere il tasto TEMP per impostare la temperatura desiderata.
  • Seite 82 Funzionamento in modalità TIMER Premere il tasto TIMER ON per impostare l’ora di avvio automatico dell’unità. Premere il tasto TIMER OFF per impostare l’ora di spegnimento automatico dell’unità. Impostazione dell’ora di avvio automatico. 1. Premere il tasto TIMER ON. Sul display LCD del telecomando appare TIMER ON, l’ultima ora di avvio automatico impostata e l’icona “H”.
  • Seite 83 IMPORTANTE L’impostazione dell’ora che è effettivamente possibile impostare con il telecomando mediante la funzione timer del telecomando si limita alle seguenti opzioni: 0.5, 1.0, 1.5, 2.0, 2.5, 3.0, 3.5, 4.0, 4.5, 5.0, 5.5, 6.0, 6.5, 7.0, 7.5, 8.0, 8.5, 9.0, 9.5, 10, 11, 12, 13, 14, 15,16,17, 18, 19, 20, 21, 22, 23 and 24.
  • Seite 84 TIMER OFF (Funzione di spegnimento automatico) La funzione TIMER OFF è utile nel caso in cui si desidera lo spegnimento automatico dell’unità dopo TIMER OFF essersi coricati. Il funzionamento del condizionatore d’aria si interrompe all’ora impostata. Esempio: Interruzione del funzionamento del condizionatore d’aria 10 ore più...
  • Seite 85 TIMER ON ➝ TIMER OFF (Off ➝ Start ➝ Interruzione funzionamento) Questa funzione è utile nel caso in cui si desidera avviare il funzionamento del condizionatore d’aria al TIMER ON OFF mattino prima alzarsi ed arrestare il funzionamento una volta usciti di casa. Esempio: Avvio del funzionamento del condizionatore d’aria 2 ore dopo l’impostazione e interruzione del...
  • Seite 86 Funzione I SENSE La funzione I SENSE permette al telecomando di misurare la temperatura nella sua posizione attuale e di inviare questo segnale al condizionatore ogni 3 minuti. NOTA: Premere questo pulsante per sette secondi per avviare/arrestare la funzione di memoria della funzione I SENSE.
  • Seite 87 NOTA: - La disposizione dei pulsanti è basata su un modello tipico e può essere leggermente diversa da quella reale che hai acquistato; la forma reale prevarrà. - Se l’unità non ha una funzione particolare, la pressione del tasto funzione sul telecomando non avrà...
  • Seite 88 ÍNDICE Manejo del mando a distancia .................89 Especificaciones del mando a distancia ............Botones de función ....................91 Indicadores de la pantalla LCD .................93 Como usar los botones..................94 Funcionamiento en Auto..................94 Funcionamiento en Frío/Calor/Ventilador............94 Funcionamiento en Seco ...................95 Oscilación......................95 Temporizador.
  • Seite 89: Manejo Del Mando A Distancia

    Manejo del mando a distancia Ubicación del mando a distancia • Utilice el mando a distancia a una distancia de 8 metros del aparato, apuntando hacia el receptor. La recepción se confirma con un pitido. PRECAUCIONES El aire acondicionado no funcionará si las cortinas, puertas u otros materiales bloquean las señales del mando a distancia a la unidad principal.
  • Seite 90: Especificaciones Del Mando A Distancia

    PRECAUCIONES No mezcle pilas viejas y nuevas o de distinto tipo. No deje las pilas en el mando a distancia si no va a utilizarlo durante 2 o 3 meses. Deseche las pilas viejas en los contenedores especiales que encontrará en los puntos de venta.
  • Seite 91: Botones De Función

    Botones de función Botón TEMP DOWN Pulse este botón para disminuir el ajuste de la temperatura interior en incrementos de 1 °C (2ºF) hasta 17 °C (62ºF) Botón TEMP UP Pulse este botón para aumentar el ajuste de la temperatura interior en incrementos de 1°C (2ºF) hasta 30°C (88ºF).
  • Seite 92 Botones de función (continuación) Botón ECONOMY/SLEEP Seleccione esta función durante el tiempo de sueño. Con este modo la temperatura se ajusta automáticamente para una comodidad máxima, ahorrando energía. Esta función está disponible en los modos FRÍO, CALOR Y AUTO. NOTA: Cuando la unidad está funcionando en el modo Sueño / Ahorro de Energía, si se pulsa los botones MODE, FAN SPEED o el botón ON/OFF, este modo se cancelará.
  • Seite 93: Indicadores De La Pantalla Lcd

    Indicadores de la pantalla LCD La información aparece cuando se enciende el mando a distancia. Visualización de modos COOL AUTO (algunos modelos) AUTO HEAT (some units) Aparece cuando se transmiten datos. COOL HIGH Se muestra cuando el mando a distancia está...
  • Seite 94: Como Usar Los Botones

    Como usar los botones Funcionamiento en Auto Asegúrese de que la unidad está enchufada y hay energía disponible. El indicador de funcionamiento en el panel de la pantalla de la unidad principal se ilumina. 1. Pulse el botón MODE para seleccionar Auto. 2.
  • Seite 95: Funcionamiento En Seco

    Funcionamiento en Seco Asegúrese de que la unidad está enchufada y hay energía disponible. El indicador de funcionamiento en el panel de la pantalla de la unidad principal se ilumina 1. Pulse el botón MODE para seleccionar Dry. 2. Pulse el botón TEMP para ajustar la temperatura deseada.
  • Seite 96: Temporizador

    Temporizador Pulse el botón TIMER ON para ajustar la hora de encendido automático de la unidad. Pulsando el botón TIMER OFF se puede ajustar el tiempo de apagado automático de la unidad. Para ajustar la hora de encendido automático. 1. Pulse el botón TIMER ON. El mando a distancia muestra TIMER ON, la última hora de encendido automático y la señal “h”...
  • Seite 97 IMPORTANTE El tiempo de funcionamiento efectivo fijado por el mando a distancia para la función de temporizador se limita a los siguientes ajustes: 0.5, 1.0, 1.5, 2.0, 2.5, 3.0, 3.5, 4.0, 4.5, 5.0, 5.5, 6.0, 6.5, 7.0, 7.5, 8.0, 8.5, 9.0, 9.5, 10, 11, 12, 13, 14, 15,16,17, 18, 19, 20, 21, 22, 23 y 24.
  • Seite 98 TIMER OFF (Operación de autoapagado) La función TIMER OFF es útil cuando quiere por ejemplo que la unidad se apague automáticamente TIMER OFF después de ir a la cama. El aire acondicionado se apagará automáticamente en la hora establecida. Ejemplo: Para apagar el aire acondicionado en 10 horas.
  • Seite 99: Modo Sueño / Ahorro De Energía

    TIMER ON ➝ TIMER OFF (Apagado ➝ Encender ➝ Detener funcionamiento) Esta función es útil cuando quiere por ejemplo poner en marcha el aire acondicionado antes de levantarse y TIMER ON OFF pararlo después de salir de casa. Ejemplo: Para poner en marcha el aire acondicionado 2 horas después del ajuste, y detenerlo 5 horas después del ajuste.
  • Seite 100 Función I SENSE: La función I SENSE permite al mando a distancia medir la temperatura en su ubicación actual y enviar esta señal al aire acondicionado de aire cada 3 minutos. NOTA: Pulse este botón durante siete segundos para iniciar/detener la función de memoria de la función I SENSE.
  • Seite 101 NOTA: - El diseño de los botones se basa en un modelo típico y puede ser ligeramente diferente del actual que usted compró; la forma real prevalecerá. - Todas las funciones descritas se pueden realizar por la unidad. Si la unidad no tiene una función en particular, presionando la tecla de la función en el mando a distancia no tendrá...
  • Seite 104: Remote Controller

    AIR CONDITIONING SYSTEMS REMOTE CONTROLLER V:1.1.032022 INVENTOR A.G. S.A. Manufacturer: 24th km National Road Athens - Lamia & 2 Thoukididou Str., Ag.Stefanos, 14565 Tel.: +30 211 300 3300, Fax: +30 211 300 3333 - www.inventor.ac...

Diese Anleitung auch für:

M3ghp290-12bs

Inhaltsverzeichnis