Ferm FRCD 16-550 Handbuch
Inhaltsverzeichnis
Quicklinks
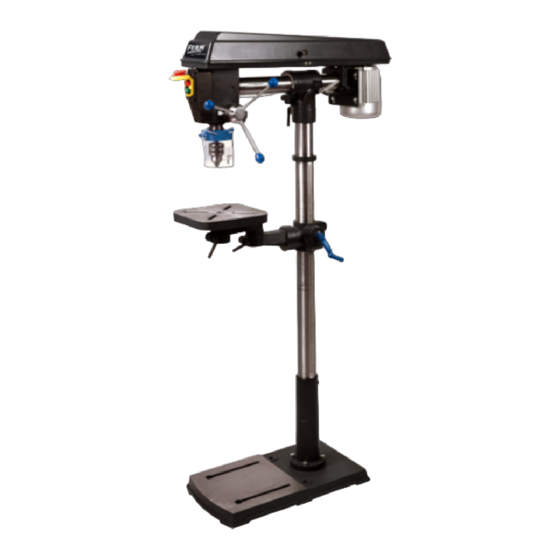
SPARE PARTS LIST FRCD-16/550
REF NR
DESCRIPTION
301270
BASE
301271
COLUMN BASE
301272
COLUMN
301273
RACK
301240
HANDLE
301274
STAND
301275
WORM + GEAR
301209
CLAMP HANDLE
301276
TABLE BRACKET
301277
COLUMN RING
301278
TABLE CONNECTOR
301279
WORK TABLE
301241
TRACK BASE
301242
ORIENTATION BASE
301243
PRESS BLOCK
301244
GUIDE TRACK
301245
TRAIL STAND
301246
BOARD FOR MOTOR
301247
MOTOR
301248
HANDLE
301249
GEAR
301250
ANGLE BRAND
301251
RACK
301252
COVER
301253
MOTOR PULLEY
800209
V-BELT 9N*1560
301255
SPINDLE PULLEY
301256
SPINDLE CONNECTOR
806203
BALL BEARING 6203 ZZ
301257
HANDLE WITH KNOB
301258
HANDLE BASE
301259
GEAR AXIS
301260
DIAL
301261
JUNCTION BOX
301262
SWITCH
806201
BALL BEARING 6201 ZZ
301263
SPINDLE COVER
806202
BALL BEARING 6202 ZZ
301264
SPINDLE
301265
DRILL CHUCK
301266
CHUCK KEY
56
23. Never use electrical machines in the presence of
inflammable fluids or gases.
24. Do not work with the machine if you are under the
FERM NR
influence of drugs,alcohol or medicines that could
limit your capability to react.
001
25. Dust from certain materials can be dangerous to
002
your health.The space in which the drill press is used
006
should therefore be well ventilated.Ensure effective
dust extraction from the work area.If at all possible,
007
make use of a dust extraction installation.
011
EXTRA SAFETY INSTRUCTIONS FOR
012
RADIAL COLUMN DRILL
013 + 014
015 / 022
Do not connect your drill to the mains power,
before you have completely assembled and
016
installed the machine according to the instructions,and not
017
before you have read and understood the operator's guide.
023
This is for your own safety.
024
1. Your drill must be firmly mounted on a workbench.
025
In the event that the drill tends to shift during certain
026
work,the workbench must be anchored to the floor.
2. This drill may only be used in dry conditions,and only
027
indoors.
028
3. Protect your eyes.Wear a face- or dust mask in
combination with safety glasses,if drilling causes
029
much dust.Wear ear protectors,especially when
035
working longer periods.
036
4. Wear no gloves,ties or loose clothing.
5. Do not drill any piece of work that is too small to be
046
held safely.
047
6. Always keep your hands out of the way of the drill.
Avoid positioning your hands in such a way or with
049
such a pressure that they could collide with the drill,
052
should they slip out of that position.
054
7. Do not use any drill bits that are longer than 175 mm,
or that extend further than 150_mm out of the
056
chuck.They could suddenly bend outwards or even
066
break.
068
8. Do not use any rotary wire brushes,routers,or
rotary cutters in the drill press.
070
9. During drilling,large workpieces should be
072
supported safely and stably at the same height as the
078 + 079
table.
10. Never work without support.Hold the workpiece
080
firmly against the table,to prevent it tilting or turning.
081
For unstable workpieces,make use of clamps or a vice.
11. Make certain that there are no nails or foreign
082
objects in the drilling zone of the workpiece.
089
12. Position or clamp the workpiece against the left-
091
hand side of the column,to avoid rotation.If the
workpiece is too short,or if the table is tilted,clamp
101
the workpiece immovably on the table,and use the
102
dog provided.
103
13. If the workpiece extends so far from the table that it
would fall or tilt when released,then it must be
104
clamped firmly to the table or supported to prevent
105
this.
14. Work safely.Make all possible use of a clamp or vice
106
to hold the workpiece fast.That is safer than using
your hands,and leaves both hands free to operate
the machine.
15. If you make use of a vice,always bolt this to the table.
16. Be absolutely certain,that every bolt and screw is
tightened,before you commence drilling.
17. Lock the chuck,lock the table support to the
column,and lock the table to the table support,
before commencing drilling.
18. Never switch on the drill unless the table is
completely clean and clear (of tools,sawdust,etc.)
19. Before commencing drilling,switch the machine on
momentarily,to check that the tool does not wobble
or vibrate.
20. Delay drilling until the spindle has reached the preset
rotational speed (RPM).Immediately stop work,
switch off the machine and remove the power plug,
whenever you hear a strange sound or there is
excessive vibration.Only switch the machine on
again,once the fault has been corrected.
21. Wait until the chuck has completely stopped
rotating,before doing anything on or about the drill
table.
22. Always observe the recommended speeds for the
accessories and relevant materials.Follow carefully
the directions for use of accessories.
23. When drilling holes with a large diameter,always
clamp the workpiece firmly to the table.Should you
fail to do this,the drill can grab the workpiece and
throw it from the table at great speed.Use no circle
cutter or multi-hole cutter,as they have been known
to fly apart or go out of balance during use.
24. Ensure that the spindle has come to a complete stop,
before you touch the workpiece.
25. Always switch the machine OFF and remove the plug
0508-03.1
Ferm
Ferm
from the power socket,before you attach or remove
Belt tension knob
an accessory,expansion appliance,or tool;or change
Turn the knob to tighten,to loosen or to adjust the belt
the setup.This avoids potential injuries through
tension.
unintended switching on.
26. All safety attributes must be activated and in a good
Chuck
state.
Holds the drill or other recommended tool firmly,to
27. Use exclusively the chuck key provided,with
perform the desired work.
automatic ejection.
Chuck key
ELECTRICAL CONNECTION
By using the chuck key,the chuck can be tightened or
loosened.
The electric motor installed in the machine is
already connected "ready for use".
Column
Connects the drill head assembly,table and base
Make use of an earthed connection,to avoid
together on a single tube,by means of which good
damaging electrical equipment and tools,and to
alignment and effortless motion is guaranteed.
prevent danger of fire. Y our drill is designed to be used with
230 V.Only use the machine on a 230 V electrical supply.Use
Column head bracket
a 15A delay fuse,or an isolating switch. T o avoid shocks and
Connects the horizontal tube of the complete drill head
fire,damaged or worn cables should be immediately
with the vertical column.
replaced.
Column support
The connection complies with the relevant VDE and
Gives support to the column,provides a bedding for the
DIN directives.
vertical rack,and is fitted with fixing holes to anchor the
Your power socket and the extension cable employed
column to the base.
must also comply with the same directives.
Depth scale
Damaged electrical connection leads
A pointer indicates the bit depth on the depth scale.
Electrical connection leads are frequently subject to
damage to the insulation.
Depth scale locking knob
Locks the depth scale at the selected depth.
This can be caused by:
•
Parts of the lead being jammed,by being passed
Bit
through windows and doorways.
The cutting tool used in the radial column drill press to
•
Kinks from unprofessional fastening or laying of the
drill holes in a workpiece.
connection lead.
•
Breaking the insulation open by pulling on the lead to
On/off switch
remove it from the wall socket.
To turn the machine on and off.
•
Splits through perishing of the insulation.
Drill speed
Electrical connection leads damaged in this way may not
The drill speed is adjusted by manually shifting the drive
be used,as the damage to the insulation makes them
belt ob the grooves of the drive pulleys.See the rotation
lethal.
speed table for the spindle on the inside surface of the
drive belt guard.
Regularly check the electrical connection leads for
damage.Always be sure while checking,that the
Drill feed
electrical lead is not connected to the power supply.
Feeds the chuck upwards and downwards.If necessary,
one or two grips can be removed,in the event that the
Electrical connection leads must comply with the
workpiece has such an irregular shape,that the drill grips
relevant VDE and DIN directives.Therefore,always use
get in the way.
connection leads of type H 07 RN.The type should be
printed on the connection lead.
Dog
Is fixed to the table if necessary to align the workpiece,
AC motor
or to perform fast repeated drilling.Can be removed.
•
The power supply must be 230 volt / 50 Hz.
Remove the dog,if this interferes with other drill tools.
•
Extension cables up to 25 m in length should have a
diameter of 1.5 mm
2
,and longer than 25 m,at least
Horizontal drill head
2.5 mm
2
.
Moves the radial column drill over the horizontal tube to
•
The mains connection is protected with a 16A inert
drill large workpieces,or to move the drill between
fuse.
holes without removing the workpiece.
The drill may not be used outdoors. T he machine
Horizontal rack
must be earthed,to protect the user against
Works in combination with the pinion mechanism to
potential electric shocks.
move the drill head smoothly forwards and backwards.
Use exclusively accessories that have been
Mill-cut groove
manufactured for this drill,to avoid injuries from
Groove on the horizontal tube for the vertical locking
parts or workpieces spinning off.
button.Holds the drill head in perpendicular position.
Do not work with any tools before you have read and
understood the directions for use.
Rack
Works in combination with the pinion mechanism to
allow the table to be smoothly raised and lowered using
3. DEFINITIONS
the table crank.
Protractor
Rotational speed
Indicates tilt angle of the drill head.
Number of revolutions per minute of a rotating object.
Filler material
Rotation-locking clamp
A piece of scrap wood that is placed between the
Locks the drill head in the desired swing angle on the top
workpiece and the table.This helps prevent the lower
of the column.
side of the workpiece from splintering when the bit
penetrates,and protects the table.
Spindle housing locking screws
Lock the spindle housing on the horizontal tube of the
Base
drill head.When working with the drill,the housing must
This supports the entire drill press.For extra stability,
always be locked.
there are holes in the bottom,through which the base
can be screwed firmly to the workbench (see section
Spindle speed
"Extra safety guidelines for radial column drill presses.")
Rotational speed (RPM) of the spindle.
Complete drive belt guard
Spring cover
Completely covers the pulleys and the drive belts,while
Sets the tension in the return spring of the drill feed.
working with the drill press.
Switch key
Belt tension
Withdrawal of the key from the on/off switch secures
In section "Setup Directions",read the paragraph "Belt
the drill press against children.
tension".
5
Inhaltsverzeichnis

Verwandte Anleitungen für Ferm FRCD 16-550


Inhaltszusammenfassung für Ferm FRCD 16-550
- Seite 1 24. Do not work with the machine if you are under the the setup.This avoids potential injuries through tension. REF NR DESCRIPTION FERM NR influence of drugs,alcohol or medicines that could unintended switching on. limit your capability to react. 26. All safety attributes must be activated and in a good...
- Seite 2 Your drill press must be anchored to a workbench • With the clamp (6) you can rotate the drilling table or frame through two holes in the base.By doing so, about it’s own central axis. Ferm Ferm...
- Seite 3 • Following this adjustment,recheck the drive belt switching the machine on. tension,and adjust,if necessary. The various configurations for fitting the belt to the pulleys for the five available spindle speeds are described Ferm Ferm...
- Seite 4 Lay a piece of wooden scrap under the workpiece distribuidor local de Ferm,donde se procederá a too short to reach the column,use the dog provided to clamp (see section “Working with the radial column drill eliminarla de un modo inocuo para el medio ambiente.
-
Seite 5: Solución De Problemas
OFF y el enchufe fuera del tomacorriente de sollten befugt sein,die Maschine zu bedienen.Das "Instrucciones para la instalación,tensión de la Las máquinas Ferm están diseñadas para funcionar sin PRODUKTINFORMATION alimentación.De este modo evitará lesiones potenciales por gesetzlich zulässige Mindestalter ist zu beachten. - Seite 6 18. Stellen Sie sich nie auf die Maschine.Dies kann zu auf den Bohrtisch auf und benutzen Sie die dafür (3) llegue a la marca realizada previamente (1). que la pieza que se trabaja pueda sostenerse,guiarse Ferm Ferm...
-
Seite 7: Instrucciones Para La Instalación
Tischklemmung Befestigungslöchern versehen,um die Säule mit dem Fuß sollten Sie Rahmen oder Werkbank gut am Boden befestigen. alineados. Fährt an der Säule hoch und runter und trägt den zu verankern. Ferm Ferm... -
Seite 8: Einstellanweisungen
Da der Bohrkopf radial verstellt werden kann,ist es auch protección de la correa de transmisión. das gewünschte Ergebnis erreicht ist.Hat die Spindel TALADRADORA wünschenswert,auch den Bohrtisch vertikal verstellen MONTAJE zu wenig Spiel,führen Sie zunächst Schritt 5,danach Fig.H zu können. Alimentación de la taladradora Ferm Ferm... -
Seite 9: Arbeiten Mit Der Radial- Säulenbohrmaschine
Klammer.Nutzen Sie dafür die importante riesgo de sufrir lesiones personales. caerse o inclinarse cuando se proceda a soltarla, • La alimentación eléctrica debe ser de 230 voltios / 50 Hz. Zu schnelles Absenken kann zu Motorstillstand, Schlitze im Bohrtisch. Ferm Ferm... -
Seite 10: Wartung
En este manual del usuario se usaron los siguientes verhindert werden. NORMAS GENERALES aus welchem Grund auch immer,nicht starten will. Ferm Maschinen sind so konzipiert,dass sie lange Zeit pictogramas: • Después de desembalar la máquina compruebe que bei minimalem Wartungsaufwand problemlos POSITIONIEREN VON BOHRTISCH UND ninguna de sus piezas ha sufrido daños durante el... - Seite 11 Teils,wenden Sie sich an einen FERM Händler in levensduur van de machine kunt verhogen. 1. TECHNISCHE GEGEVENS boret knækker.
- Seite 12 Brug kun den borepatronnøgle,der følger med konfigurationer for at tilpasse remmen til remskiverne 20. Verlaat nooit een lopende machine.Schakel eerst de 21. Tref geen voorbereidingen aan tafel,zolang de Fig.T maskinen,med automatisk udstødning,for at for de fem tilgængelige spindelhastigheder er beskrevet Ferm Ferm...
- Seite 13 • For at justere taljeblokkene,så løsn om nødvendigt ønskværdigt at kunne indstille boremaskinebordets voet.Draai de bouten met een verstelbare boltene (3) i motoropspændingen (4),og enten løft Attentie:Zelfs de geringste vervuiling van één van deze position vandret. moersleutel aan. Ferm Ferm...
- Seite 14 Draai de borgmoer (1) weer vast. Læs afsnittet “Remspænding” i kapitlet “Anvisninger om Het hout moet tegen de linkerzijde van de kolom • Haal de kantelvergrendelingshendel aan,om de arbejdsemnet. TERUGTREKVEER VAN DE SPINDEL opsætning”. worden gelegd.U kunt ook gebruik maken van de Ferm Ferm...
-
Seite 15: Tekniske Data
Undgå fejl,der kan bevirke,at du kommer til aanslag of klem het werkstuk aan de tafel vast. Radial søjleboremaskine reservedele end de originale reservedele fra Ferm. skade,og sæt ikke stikket i stikkontakten,før du Gebruik hiervoor de sleuven in de tafel. 2170... - Seite 16 BOREN de boorhouder of op het kegelvormige oppervlak dybdeskalaen justeres igjen. stykker. Maskinene fra Ferm er utformet for problemfri funksjon • Draai de boorhendels met zoveel kracht naar van de spindel. •...
-
Seite 17: Caracteristiques Techniques
1/16 3000 3000 ved å dreie låsebryteren for dybdeskalaen mot inspectez tout dispositif de sécurité et toute pièce des pièces Ferm d’origine.Ces pièces sont er reparert eller byttet ut. Ferm Ferm... -
Seite 18: Définitions
18. Ne mettez jamais la perceuse en marche tant que la For å muliggjøre boring i annet enn vinkelrett stilling,kan déplacer le foret entre des trous sans enlever la pièce. underlag.Bruk medfølgende skruer og vingemutre. • Slå av boret og still bordhøyden slik at bitsen (1) så Ferm Ferm... -
Seite 19: Instructions De Réglage
å heve bordet.Før den dreies,må låsemekanismen utføring av arbeidet. Fig.C Tournez les poignées de perçage en sens inverse horaire god stand. utløses. MONTAGE DU MANDRIN • Posez le socle (1) au sol. pour descendre la broche au maximum.Saisissez Ferm Ferm... -
Seite 20: Teknisk Informasjon
22. Vær grundig når du utfører vedlikeholdet.For at Ne portez pas de vêtements amples,de cravate ni 3000 3000 Ferm.Reservedeler er tilgjengelig fra din leverandør. Fig.Q verktøyet skal fungere sikkert og effektivt,må det de bijoux afin d’éviter tout risque d’être pris par la •... -
Seite 21: Dépistage Des Anomalies
Insérez la clavette (4) dans les trous (2 et 3). Kiristä säätömutteri moottorin käyttöpyörälohkossa. Aika-ajoin hammastangot ja hammaspyörät,pöydän évitant toutefois qu’une fois fermée elle recouvre les Retendez la courroie (voir chapitre « Consignes de • A l’aide d’un marteau en plastique,tapez avec soin spirales de la mèche. -
Seite 22: Tekniska Data
(tuumaa) Valurauta Hitsattava perceuse à colonne radial»). votre revendeur Ferm local.Elles seront mises au rebut Effekt | 230 V porakoneesta ja takerru työkaluun tai hajoa. teräs • Tension incorrecte de la courroie. -
Seite 23: Säkerhetsföreskrifter
Käyttämällä sisäänrakennettua syvyysrajoitinta,voit • Vedä moottoria taaksepäin,kunnes hihna on • Montering av eller byte mot andra än Ferm Sätt inte kontakten i vägguttaget förrän du har läst utsugningsaordning. tarkoitettu tähän.Tarkista,että ruuvit kulkevat asettaa tarkasti poraussyvyyden. - Seite 24 Bordsspärr Pöytä Chucken kan spännas eller lossas med hjälp av Koppla aldrig borrmaskinen till elnätet förrän du lattialta. Spärrar bordets vertikala läge. Työtaso työkappaletta varten. chucknyckeln. har avslutat alla steg för montering och Istukka Ferm Ferm...
- Seite 25 25. Tiettyjen materiaalien pöly voi olla terveydelle MONTERING AV BORRHUVUDET på pelarhuvudets bygel för att ställa in önskad vinkel. Ferm-varaosasta vaarallista.Poran käyttöpaikan tulee olla hyvin Fig.H Obs:Alla erfordrade justeringar för maskinens •...
-
Seite 26: Underhåll
För att undvika att arbetsstycket eller det 4. Stickor där borret kommer ut in hos en Ferm återförsäljare.Där ser man till att 14 Pohja För att undvika att arbetsstycket eller det samtidigt över den minsta skivan i blocket på spindeländan.