Inhaltsverzeichnis
Werbung
Quicklinks
HZL - 353Z, 355Z, 357Z Series
INSTRUCTION MANUAL
BEDIENUNGSANLEITUNG
Ðóêîâîäñòâî ïî ýêñïëóàòàöèè
HANDLEIDING
Please read this instruction manual before using
the machine as it contains important operational
and safety information.
Attention
Keep this manual accessible so that you may refer
to it at anytime while operating the machine.
Bitte lesen Sie diese Bedienungsanleitung vor dem
Benutzen der Nähmaschine sorgfältig durch,
sie enthält wichtige Benutzungs- und
Hinweis
Sicherheitshinweise.
Halten Sie die Anleitung beim Nähen immer in
Griffweite, um bei eventuellen Fragen die
entsprechenden Kapitel nachlesen zu können.
Ïåðåä íà÷àëîì ðàáîòû âíèìàòåëüíî
ïðî÷èòàéòå ýòó èíñòðóêöèþ ïî ýêñïëóàòàöèè,
òàê êàê îíà ñîäåðæèò âàæíóþ èíôîðìàöèþ
Âíèìàíèå
ïî ðàáîòå ñ ìàøèíîé à òàêæå ïî òåõíèêå
áåçîïàñíîñòè.
Lees deze handleiding voordat u de machine gaat
gebruiken.
Attentie
Deze bevat belangrijke gebruiks- en
veiligheidsinformatie.
All manuals and user guides at all-guides.com
Werbung
Inhaltsverzeichnis
Fehlerbehebung

Verwandte Anleitungen für JUKI HZL-353Z-Serie


Inhaltszusammenfassung für JUKI HZL-353Z-Serie
- Seite 1 All manuals and user guides at all-guides.com HZL - 353Z, 355Z, 357Z Series INSTRUCTION MANUAL BEDIENUNGSANLEITUNG Ðóêîâîäñòâî ïî ýêñïëóàòàöèè HANDLEIDING Please read this instruction manual before using the machine as it contains important operational and safety information. Attention Keep this manual accessible so that you may refer to it at anytime while operating the machine.
-
Seite 2: Important Safety Instructions
All manuals and user guides at all-guides.com “ IMPORTANT SAFETY INSTRUCTIONS ” When using an electrical appliance, basic safety precautions should always be followed, including the following: Read all instructions before using this sewing machine. “DANGER ____ To reduce the risk of electric shock:” 1. - Seite 3 All manuals and user guides at all-guides.com 10. Always unplug the machine from the electrical outlet when removing covers, when lubricating or when making any other user servicing adjustments mentioned in the instruction manual. 11. Never drop or insert any object into any opening. 12.
- Seite 4 "SAVE THESE INSTRUCTIONS" "This sewing machine is intended for household use only." Congratulations on your purchase of a JUKI sewing machine. Please be sure to read safety precautions in "To use the sewing machine safely" in the Instruction Manual before use to fully understand the functions and operating procedures of the sewing machine so as to use the sewing machine for a long time.
-
Seite 5: Other Precautions
All manuals and user guides at all-guides.com WARNING For the combination of the material and the thread and needle, in particular, refer to the explanation table in "Replacement of the needle". If the needle or thread does not match the material used such as in the case that an extra heavyweight material (e.g., denim) is sewn with a thin needle (#11 or higher), the needle can break resulting in an unexpected personal injury. - Seite 6 All manuals and user guides at all-guides.com “WICHTIGE SICHERHEITSHINWEISE” Beim Gebrauch eines elektrischen Gerätes sind folgende Sicherheitsmassnahmen zu beachten: Lesen Sie alle Anweisungen, bevor Sie die Nähmaschine benutzen. “GEFAHR ” ____ Zum Schutz vor elektrischem Schlag: 1. Die Nähmaschine nie unbeaufsichtigt stehen lassen, solange sie am Stromnetz angeschlossen ist.
- Seite 7 All manuals and user guides at all-guides.com 9. Hauptschalter immer auf "O" stellen bei Tätigkeiten im Bereich der Nadeln wie Einfädeln, Nadeln wechseln, Nähfuss wechseln, usw. 10. Bei den im Anleitungsbuch aufgeführten Unterhaltsarbeiten bei geöffneter Maschine, wie reinigen, sowie Greifer einfädeln, usw. die Maschine vorher immer vom Stromnetz trennen.
-
Seite 8: So Verwenden Sie Die Nähmaschine Sicher
"DIESE ANLEITUNG GUT AUFBEWAHREN" "Diese Nähmaschine ist ausschließlich für die private Verwendung vorgesehen." Herzlichen Glückwunsch zum Kauf dieser JUKI-Nähmaschine. Bitte lesen Sie die Vorsichtsmaßnahmen unter "So verwenden Sie die Nähmaschine sicher" in der Bedienungsanleitung, bevor Sie die Maschine verwenden, um die Funktionen und Handhabung der Nähmaschine zu verstehen und Sie sich an der Nutzung der Maschine lange freuen können. -
Seite 9: Sonstige Vorsichtsmaßnahmen
All manuals and user guides at all-guides.com ACHTUNG Spezifische Informationen zur Kombination von Stoff, Nadel und Faden finden Sie in der Erläuterungstabelle unter "Auswechseln der Nadel". Wenn Nadel und Faden nicht für den Stoff geeignet sind, wie z. B. beim Nähen von besonders schweren Stoffen (z. - Seite 10 All manuals and user guides at all-guides.com “ ÈÍÑÒÐÓÊÖÈÈ ÏÎ ÒÅÕÍÈÊÅ ÁÅÇÎÏÀÑÍÎÑÒÈ ” Ïðè èñïîëüçîâàíèè ýëåêòðè÷åñêîãî óñòðîéñòâà íåîáõîäèìî âî âñåõ ñëó÷àÿõ ñîáëþäàòü îñíîâíûå ìåðû ïðåäîñòîðîæíîñòè, âêëþ÷àÿ ñëåäóþùèå: ïåðåä ðàáîòîé ñ äàííîé øâåéíîé ìàøèíîé èçó÷èòå âñå èíñòðóêöèè. “ ÎÏÀÑÍÎ! ____ Âî èçáåæàíèå ïîðàæåíèÿ ýëåêòðè÷åñêèì òîêîì: ”...
- Seite 11 è ïîÿâèòñÿ íåîáû÷íûé çàïàõ.  ýòîì ñëó÷àå, îòêëþ÷èòå ìàøèíó, âûíüòå âèëêó èç ðîçåòêè è ìîæåòå íà÷àòü ñíà÷àëà, êîãäà ìàøèíà îñòûíåò. Åñëè ýòî ïîâòîðèòñÿ, ïîñåòèòå áëèæàéøåãî ê Âàì äèëåðà JUKI. 20. Íå èñïîëüçóéòå äàííóþ ìàøèíó, åñëè îíà ìîêðàÿ. Òàêæå íå èñïîëüçóéòå åå â...
- Seite 12 "ÑÎÕÐÀÍÈÒÅ ÝÒÈ ÈÍÑÒÐÓÊÖÈÈ" "Äàííàÿ øâåéíàÿ ìàøèíà ïðåäíàçíà÷åíà òîëüêî äëÿ áûòîâîãî ïðèìåíåíèÿ." Ïîçäðàâëÿåì âàñ ñ ïðèîáðåòåíèåì øâåéíîé ìàøèíû JUKI! Ïåðåä íà÷àëîì ðàáîòû îáÿçàòåëüíî èçó÷èòå ðàçäåë "Ïðàâèëà áåçîïàñíîé ðàáîòû ñî øâåéíîé ìàøèíîé" â Ðóêîâîäñòâå ïî ýêñïëóàòàöèè, ÷òîáû ïîíèìàòü ôóíêöèè ìàøèíû è âûïîëíÿåìûå...
- Seite 13 All manuals and user guides at all-guides.com ÏÐÅÄÓÏÐÅÆÄÅÍÈÅ Èíôîðìàöèþ î ïðàâèëüíîì ñî÷åòàíèè ìàòåðèàëà, íèòåé è èãëû ñì. â òàáëèöå â ðàçäåëå "Çàìåíà èãëû". Åñëè èãëà èëè íèòü íå ïîäõîäèò äëÿ èñïîëüçóåìîãî ìàòåðèàëà (íàïðèìåð, åñëè äëÿ ðàáîòû ñ î÷åíü ïëîòíûì ìàòåðèàëîì (äæèíñîâàÿ òêàíü è ò. ï.) èñïîëüçóåòñÿ òîíêàÿ èãëà (No. 11 èëè âûøå), èãëà...
-
Seite 14: Belangrijke Veiligheidsinstructies
All manuals and user guides at all-guides.com “ BELANGRIJKE VEILIGHEIDSINSTRUCTIES ” Bij het gebruik van elektrische apparaten dient u altijd elementaire veiligheidsmaatregelen in acht te nemen, zoals onderstaande. Lees alle instructies voordat u deze naaimachine gebruikt. “ GEVAAR ____ Beperk het risico van een elektrische schok: ”... - Seite 15 All manuals and user guides at all-guides.com 10. Haal altijd de netstekker uit het stopcontact wanneer u kleppen verwijdert, de machine smeert of onderhoud verricht zoals aangegeven in de handleiding. 11. Voorkom dat voorwerpen in een opening vallen. Steek geen voorwerpen in een opening.
- Seite 16 "BEWAAR DEZE INSTRUCTIES" "Deze naaimachine is uitsluitend bestemd voor huishoudelijk gebruik." Gefeliciteerd met de aanschaf van uw JUKI-naaimachine. Lees vóór het gebruik de veiligheidsmaatregelen in "Veilig gebruik van de naaimachine" in de handleiding. Dan begrijpt u de functies en bedieningsprocedures van de naaimachine. Zo zorgt u dat de machine lang meegaat.
-
Seite 17: Andere Voorzorgsmaatregelen
All manuals and user guides at all-guides.com WAARSCHUWING Voor de combinatie van stof, draad en naald raadpleegt u de verklarende tabel in "De naald verwisselen". Als de naald of de draad niet geschikt is voor de gebruikte stof - extra zware stof (bijv. denim) met een dunne naald (#11 of hoger) - kan de naald breken. -
Seite 18: Inhaltsverzeichnis
All manuals and user guides at all-guides.com List of contents Details of the machine..........................22 Fitting the snap-in sewing table........................24 Accessories..............................24 Connecting machine to power source......................26 Two-step presser foot lever........................28 Attaching the presser foot holder .......................28 Winding the bobbin ............................30 Inserting the bobbin............................32 Threading the upper thread ........................34 Automatic needle threader .........................36 Bringing up the lower thread ........................36... - Seite 19 All manuals and user guides at all-guides.com Inhaltsverzeichnis Beschreibung der maschine........................23 Verwendung des Anschiebetisches......................25 Zubehör..............................25 Maschine an das Netz anschließen ......................27 Lüferhebel ..............................29 Einsetzen des Nähfußes ..........................29 Unterfaden aufspulen..........................31 Unterspule einsetzen ..........................33 Oberfaden einfädeln...........................35 Automatischer Nadeleinfädler ........................37 Unterfaden heraufholen ..........................37 Rückwärts nähen ............................39 Nähgut entfernen ............................39 Faden abschneiden............................39...
- Seite 20 All manuals and user guides at all-guides.com Ñîäåðæàíèå Äåòàëè ìàøèíû ............................23 Óñòàíîâêà çàùåëêèâàþùåãîñÿ øâåéíîãî ñòîëèêà .................25 Àêñåññóàðû ...............................25 Ïîäñîåäèíåíèå ìàøèíû ê ñåòè.......................27 Äâóõóðîâíåâûé ðû÷àã ïîäúåìà ëàïêè ....................29 Ïîäñîåäèíåíèå äåðæàòåëÿ ëàïêè ......................29 Íàìîòêà øïóëüêè............................31 Óñòàíîâêà øïóëüêè ...........................33 Çàïðàâêà âåðõíåé íèòè ..........................35 Àâòîìàòè÷åñêèé...
- Seite 21 All manuals and user guides at all-guides.com Inhouds tabel Details van de machine..........................23 De aanschuiftafel installeren ........................25 Accessoires..............................25 De machine aansluiten..........................27 De persvoethevel (2 standen) ........................29 De naaivoethouder bevestigen ........................29 Spoelwinden...............................31 Een spoel inzetten............................33 De bovendraad inrijgen ..........................35 Automatische Draadinrijger........................37 De onderdraad ophalen ..........................37 Achteruit naaien ............................39 Het werk verwijderen..........................39...
-
Seite 22: Details Of The Machine
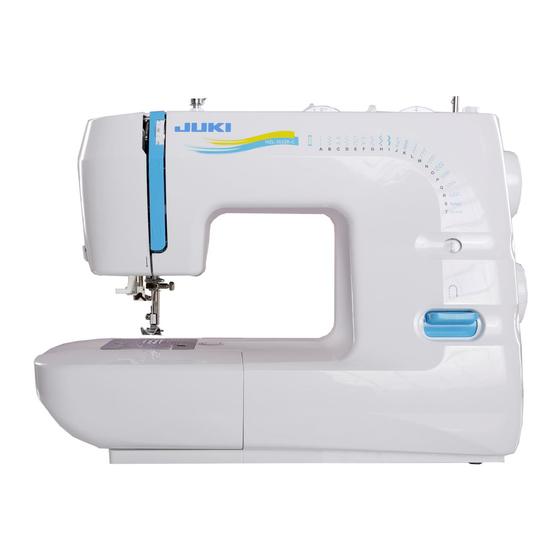
All manuals and user guides at all-guides.com Details of the machine 1. Tension dial 2. Presser foot pressure 3. Thread take up lever 4. Thread cutter 5. One step buttonhole lever 6. Automatic threader 7. Presser foot 8. Needle plate cover 9. -
Seite 23: Beschreibung Der Maschine
All manuals and user guides at all-guides.com Beschreibung der Äåòàëè ìàøèíû Details van de machine aschine 1. Fadenspannung 1. Ðåãóëÿòîð íàòÿæåíèÿ 1. Draadspanning knop 2. Fußdruckregler 2. Äàâëåíèå ëàïêè 2. Persvoetdruk regeling 3. Fadengeber 3. Ðû÷àã ïîäúåìà íèòè Draadhevel 4. Fadenabschneider 4. -
Seite 24: Fitting The Snap-In Sewing Table
All manuals and user guides at all-guides.com Fitting the snap-in sewing table Keep the snap-in sewing table horizontal, and push it in the direction of the arrow. (1) The inside of the snap-in sewing table can be utilized as an accessory box. To open, flip cover down as shown. -
Seite 25: Verwendung Des Anschiebetisches
All manuals and user guides at all-guides.com Verwendung des Óñòàíîâêà De aanschuiftafel çàùåëêèâàþùåãîñÿ Anschiebetisches installeren øâåéíîãî ñòîëèêà Halten Sie den Anschiebetisch Äåðæèòå øâåéíûé ñòîëèê Houd de aanschuiftafel waagrecht und drücken ihn in ãîðèçîíòàëüíî, ïîäòîëêíèòå horizontaal en schuif de tafel in die Pfeilrichtung. -
Seite 26: Connecting Machine To Power Source
All manuals and user guides at all-guides.com Connecting machine to power source Connect the machine to a power source as illustrated. (1) The sewing machine is equipped with a polarized plug which must be used with an appropriate polarized outlet. (2) Attention: Unplug the power cord when machine is not in use. -
Seite 27: Maschine An Das Netz Anschließen
All manuals and user guides at all-guides.com Maschine an das Ïîäñîåäèíåíèå De machine Netz anschließen ìàøèíû ê ñåòè aansluiten Schließen Sie die Maschine wie Ïîäñîåäèíèòå ìàøèíó ê Sluit de machine aan zoals èñòî÷íèêó ïèòàíèÿ, êàê abgebildet an. (1) hiernaast getoond wordt. (1) ïîêàçàíî... -
Seite 28: Two-Step Presser Foot Lever
All manuals and user guides at all-guides.com Two-step presser foot lever When sewing several layers or thick fabrics, the presser foot can be raised a second stage for easy positioning of the work. (A) Attaching the presser foot holder Raise the presser foot bar (a). (1) Attach the presser foot holder (b) as illustrated. -
Seite 29: Lüferhebel
All manuals and user guides at all-guides.com De persvoethevel Lüferhebel Äâóõóðîâíåâûé ðû÷àã ïîäúåìà ëàïêè (2 standen) Wenn Sie mehrlagig nähen, Ïðè ñøèâàíèè íåñêîëüêèõ Bij verwerking van meerdere dann kann der Fuß mit dem ñëîåâ òîëñòîé òêàíè ëàïêó lagen stof of dikke stoffen kan Lüfterhebel in eine höhere äëÿ... -
Seite 30: Winding The Bobbin
All manuals and user guides at all-guides.com Winding the bobbin - Place the thread and spool cap onto the spool pin. For small thread spools, place small side of spool cap next to spool. (1) - Snap thread into thread guide. - Wind thread clockwise around bobbin winder tension discs. -
Seite 31: Unterfaden Aufspulen
All manuals and user guides at all-guides.com Unterfaden aufspulen Íàìîòêà øïóëüêè Spoelwinden Setzen Sie die Garnrolle so Íàäåíüòå êàòóøêó ñ íèòüþ íà - Zet een klos garen op de auf den Garnrollenhalter, dass äåðæàòåëü òàê, ÷òîáû íèòü garenpen. Bij gebruik van der Faden wie dargestellt von ðàçìàòûâàëàñü... -
Seite 32: Inserting The Bobbin
All manuals and user guides at all-guides.com Inserting the bobbin When inserting or removing the bobbin, the needle must be fully raised. 1. Inserting the bobbin in the bobbin holder with the thread running counter clockwise direction (arrow). 2. Pull the thread through the slit (A). -
Seite 33: Unterspule Einsetzen
All manuals and user guides at all-guides.com Unterspule einsetzen Óñòàíîâêà øïóëüêè Een spoel inzetten Wenn Sie die Unterspule Ïðè óñòàíîâêå èëè ñíÿòèè Als men een spoel inzet moet einsetzen, dann muss die øïóëüêè èãëà äîëæíà áûòü de naald in de hoogste stand Nadel in der höchsten ïîäíÿòà... -
Seite 34: Threading The Upper Thread
All manuals and user guides at all-guides.com Threading the upper thread This is a simple operation but it is important to carry out correctly as by not doing so several sewing problems could result. - Start by raising the needle to its highest point, and also raise the presser foot to release the tension discs. -
Seite 35: Oberfaden Einfädeln
All manuals and user guides at all-guides.com Oberfaden einfädeln Çàïðàâêà âåðõíåé íèòè De bovendraad inrijgen Es ist wichtig, dass der Î÷åíü âàæíî, ÷òîáû çàïðàâêà Dit is een simpele operatie Oberfaden korrekt eingefädelt âåðõíåé íèòè áûëà maar moet nauwkeurig wird, da andernfalls Probleme âûïîëíåíà... -
Seite 36: Automatic Needle Threader
All manuals and user guides at all-guides.com Automatic needle threader - Raise the needle to its highest position - Press lever (A) right down - The threader automatically swings to the threading position (B) - Take the thread round the hook (C) - Take the thread in front of the needle so that the thread will... -
Seite 37: Automatischer Nadeleinfädler
All manuals and user guides at all-guides.com Automatischer Àâòîìàòè÷åñêèé Automatische Nadeleinfädler íèòåâäåâàòåëü Draadinrijger - Geben Sie die Nadel in die - Ïîäíèìèòå èãëó â ñàìîå - Trek hendel (A) zo ver höchste Position âåðõíåå ïîëîæåíèå. mogelijk naar beneden. - Senken Sie den Fuß - Îïóñòèòå... -
Seite 38: Reverse Sewing
All manuals and user guides at all-guides.com Reverse sewing At the end of seam, press down the reverse sewing lever. Sew a few reverse stitches. Release the lever and the machine will sew forwards again. (A) Removing the work Turn the handwheel towards to bring the thread take up lever to its highest position, raise the presser foot and remove work... -
Seite 39: Rückwärts Nähen
All manuals and user guides at all-guides.com Achteruit naaien Rückwärts nähen Øèòüå íàçàä Am Ende der Naht Taste nach Äëÿ çàêðåïëåíèÿ íà÷àëà è Afhechten aan begin en einde unten drücken. Einige Stiche êîíöà ñòðî÷êè íàæìèòå íà van een naad. Druk hendel rückwärts nähen. -
Seite 40: Inserting The Needle
All manuals and user guides at all-guides.com Inserting the needle Change the needle regularly, especially if it is showing signs of wear and causing problems. Insert the needle as illustrated as follows: A. Loosen the needle clamp screw and tighten again after inserting the new needle. -
Seite 41: Einsetzen Der Nadel
All manuals and user guides at all-guides.com Einsetzen der Nadel Âñòàâêà è çàìåíà èãëû Een naald inzetten Ersetzen Sie die Nadel Íåîáõîäèìî ðåãóëÿðíî Vervang de naald regelmatig, regelmäßig, vor allem bei ìåíÿòü èãëó, îñîáåííî åñëè zeker als deze beschadigd is. ersten Anzeichen von îíà... -
Seite 42: Adjusting Presser Foot Pressure
All manuals and user guides at all-guides.com Adjusting presser foot pressure The presser foot pressure of the machine has been pre-set and requires no particular readjustment according to the type of fabric (light-or-heavy weight). However, if you need to adjust the presser foot pressure, turn the presser adjusting screw with a coin. -
Seite 43: Nähfußdruck Einstellen
All manuals and user guides at all-guides.com Íàñòðîéêà äàâëåíèÿ Nähfußdruck Persvoetdruk ëàïêè einstellen Der Nähfußdruck ist auf normal Äàâëåíèå ëàïêè ìàøèíû De persvoetdruk van de eingestellt. Zum Nähen îáû÷íî óæå óñòàíîâëåíî è íå machine is vooraf ingesteld en extremer Materialien kann eine òðåáóåò... -
Seite 44: Matching Needle / Fabric / Thread
All manuals and user guides at all-guides.com Matching needle / fabric / thread NEEDLE, FABRIC, THREAD SELECTION GUIDE NEEDLE SIZE FABRICS THREAD 9-11(65-75) Lightweight fabrics-thin cottons, voile, Light-duty thread in cotton, nylon serge, silk , muslin, Qiana, interlocks, or polyester. cotton knits, tricots, jerseys, crepes, woven polyester, shirt &... -
Seite 45: Nadel/Faden-Tabelle
All manuals and user guides at all-guides.com Nadel/Faden-Tabelle NADEL-, STOFF- UND FADENWAHL Nadelstärke Stoffart Fadensorte 9-11(65-75) Feine Stoffe: feine Baumwolle, Voile, Serge, Feiner Baumwollfaden, Nylonfaden Seide, Musselin, Qiana, Interlock, oder Polyesterfaden. Baumwollstricksache, Tricot, Jersey, Krepp, gewebter Polyester, Rock- und Blusenstoff. 12(80) Mittlere Stoffe: Baumwolle, Satin, Segeltuch, Die meisten Fäden weisen eine... - Seite 46 All manuals and user guides at all-guides.com Ïðàâèëüíûé ïîäáîð òêàíè/èãëû/íèòè ÂÛÁÎÐ ÈÃËÛ, ÒÊÀÍÈ, ÍÈÒÈ Ðàçìåð èãëû Òêàíü Íèòü 9-11(65-75) Ëåãêàÿ òîíêèé õëîïîê, âóàëü, ñàðæà, øåëê, Òîíêàÿ õëîïêîâàÿ, íåéëîíîâàÿ ìóñëèí, Êèàíà, îðãàíäè, õëîï÷àòîáóìàæíûé èëè ïîëèýñòåðíàÿ íèòü. òðèêîòàæ, äæåðñè, êðåï, ïîëèýñòåð ñ óçîðîì, ðóáàøå÷íûå...
- Seite 47 All manuals and user guides at all-guides.com Naald / Stof / Garen Tabel NAALD, STOF, GAREN SELECTIE DAALD STOFFEN GARENSOORT 9-11(65-75) Fijne stoffen: dunne katoen, voile, serge, Licht katoen-, nylon- of zijde, mousseline, gebreide katoen, tricot, polyestergaren. jersey, crêpe-stoffen, geweven polyester, overhemd- en blousestoffen.
-
Seite 48: How To Choose Your Pattern
All manuals and user guides at all-guides.com How to choose your pattern straight stitch select pattern "A" with pattern selector dial. Adjust the stitch length with the stitch length dial. You may choose any needle position, by turning the stitch width dial. zigzag stitch , select pattern "B"... -
Seite 49: Wie Sie Die Stiche Richtig Einstellen
All manuals and user guides at all-guides.com Wie Sie die Stiche Êàê âûáðàòü òèï øâà Een Patroon Selecteren richtig einstellen Für Geradstich Åñëè âàì òðåáóåòñÿ ïðÿìàÿ Voor de rechte steek kies Stichwahlknopf auf "A" drehen. ñòðî÷êà , ñ ïîìîùüþ patroon "A" met de steek Die Stichlänge mit dem ðåãóëÿòîðà... -
Seite 50: Straight Stitching And Needle Position
All manuals and user guides at all-guides.com Straight stitching and needle position Turn the stitch selection dial so that the pointer is set to the straight stitch. Generally speaking, the thicker the fabric, thread and needle, the longer the stitch should be. Choose your needle position, from center position to left needle position by changing the... -
Seite 51: Geradstich Und Nadelposition
All manuals and user guides at all-guides.com Geradstich und Ïðÿìûå ñòðî÷êè è Rechte steek en Nadelposition ïîëîæåíèå èãëû naaldstand Drehen Sie den Stichwahlknopf Ïîâåðíèòå ïåðåêëþ÷àòåëü Draai de selectorknop zodat de so, dass Sie im Stichdisplay âûáîðà ñòðî÷åê, ÷òîáû íà rechte steek zichtbaar is in het den Geradstich stehen. -
Seite 52: Sewing On Buttons
All manuals and user guides at all-guides.com Sewing on buttons Change presser foot to button sewing foot. Move the drop feed control to " .." to lower the feed dogs. (1) Position the work under the foot. Place the button in the desired position, lower the foot. -
Seite 53: Knopf Annähen
All manuals and user guides at all-guides.com Knopf annähen Ïðèøèâàíèå ïóãîâèö Knopen aanzetten Wechseln die den Nähfuß und Çàìåíèòå ëàïêó íà ëàïêó äëÿ Wissel de voet voor de knoop setzen den Knopfannähfuß ein. ïðèøèâàíèÿ ïóãîâèö. aanzet voet. Transporteurkontroller nach Ñäâèíüòå ðåãóëÿòîð Schuif de knop om "... -
Seite 54: How To Sew Buttonholes
All manuals and user guides at all-guides.com How to sew buttonholes Buttonhole-making is a 0.4~0.6 simple process that provides reliable results. Making a Buttonhole - Using tailor's chalk, mark the position of the buttonhole on the fabric. - Attach the buttonhole foot and set the pattern selection dial to "... -
Seite 55: Knopfloch Nähen
All manuals and user guides at all-guides.com Knopfloch nähen Èçãîòîâëåíèå ïåòëè Knoopsgaten maken Knopflochnähen ist ein Èçãîòîâëåíèå ïåòåëü - ýòî Op deze machine ïðîñòîé ïðîöåññ. Íî ïðè einfacher Vorgang und ergibt knoopsgaten maken is ýòîì ñòðîãî ðåêîìåíäóåòñÿ ein gutes Ergebnis. simpel en geeft een mooi en ñíà÷àëà... -
Seite 56: Left And Right Side Balance For Buttonhole
All manuals and user guides at all-guides.com Left and right side balance for buttonhole Stitch density on right and left sides of buttonhole can be adjusted by button-hole balance control dial. This dial should usually be in a neutral position. (between "+" and "... -
Seite 57: Stichausgleich Für Des Knopfloch
All manuals and user guides at all-guides.com Stichausgleich für des Ëåâûé è ïðàâûé Balansregeling voor Knopfloch áàëàíñ äëÿ ïåòëè knoopsgaten Die Dichte der beiden Raupen Ïëîòíîñòü ñòåæêà ëåâîé è De steekdichtheid aan de des Knopfloches kann mit dem ïðàâîé ñòîðîíû ïåòëè ìîæíî rechter- en linkerzijde van het Stichausgleichsknopf íàñòðîèòü... -
Seite 58: Stitch Selection
All manuals and user guides at all-guides.com Stitch selection Turn the stitch length dial to "4". 4 , S (HZL-353Z) Turn the stitch length dial to "S". (HZL-355Z, HZL-357Z) Triple straight stitch: (1/2) For hardwearing seams. The machine sews two stitches forwards and one stitch backwards. -
Seite 59: Stichwahl
All manuals and user guides at all-guides.com Stichwahl Âûáîð øâà Kiezen van stretchsteken Stichlängenknopf auf "4" drehen. Óñòàíîâèòå ðåãóëÿòîð äëèíû Zet het steeklengtewieltje op (HZL-353Z) ñòåæêà íà "4" (HZL-353Z) "4". (HZL-353Z) Stichlängenknopf auf "S" drehen. Óñòàíîâèòå ðåãóëÿòîð äëèíû Zet het steeklengtewieltje op (HZL-355Z, HZL-357Z) ñòåæêà... -
Seite 60: Blind Hem
All manuals and user guides at all-guides.com Blind hem For hems on curtains, trousers, skirts, etc. Blind hem for stretch fabrics. (HZL-355Z, HZL-357Z) Blind hem for firm fabrics. Turn up the hem to the desired width and press. Fold back (as shown in Fig. -
Seite 61: Blindstich
All manuals and user guides at all-guides.com Blindstich Íåâèäèìàÿ ïîäãèáêà Blindzoomsteek Für Säume von Vorhängen, Äëÿ ïîòàéíîé ïîäðóáêè øòîð, Voor zomen, gordijnen, Hosen, Röcken, usw. áðþê, þáîê è ò.ä. broeken, rokken enz. Blindstich für dehnbare Íåâèäèìàÿ ïîäãèáêà äëÿ Blindzoomsteek voor Stoffe. -
Seite 62: Overlock Stitches
All manuals and user guides at all-guides.com Overlock stitches Turn the stitch length dial to "4". 4 , S (HZL-353Z) Turn the stitch length dial to "S". (HZL-355Z, HZL-357Z) Seams, neatening, visible hems. Double overlock stitch (1): For fine knits, handknits, seams. Standard overlock (2): For fine knits, jerseys, neck edges, ribbing. -
Seite 63: Overlock-Stich
All manuals and user guides at all-guides.com Overlock-Stich Îâåðëî÷íûé øîâ Overlock steek Den Stichlängenknopf auf "4" Óñòàíîâèòå ðåãóëÿòîð äëèíû Zet het steeklengtewieltje op "4". drehen (HZL-353Z) ñòåæêà íà "4" (HZL-353Z) (HZL-353Z) Den Stichlängenknopf auf "S" Zet het steeklengtewieltje op "S". Óñòàíîâèòå... -
Seite 64: Patch Work
All manuals and user guides at all-guides.com Patch work Turn the stitch length dial to "4". 4 , S (HZL-353Z) Turn the stitch length dial to "S". (HZL-355Z, HZL-357Z) These stitches are used to join two pieces of fabric while leaving a space between their edges. -
Seite 65: Patchwork
All manuals and user guides at all-guides.com Patchwork Ïýò÷âîðê Patch work Den Stichlängenknopf auf "4" Óñòàíîâèòå ðåãóëÿòîð äëèíû Zet het steeklengtewieltje op drehen (HZL-353Z) ñòåæêà íà "4" (HZL-353Z) "4". (HZL-353Z) Den Stichlängenknopf auf "S" Óñòàíîâèòå ðåãóëÿòîð äëèíû Zet het steeklengtewieltje op drehen (HZL-355Z, HZL-357Z) ñòåæêà... -
Seite 66: Practical Stitches
All manuals and user guides at all-guides.com Practical stitches Set the machine as illustrated. Turn the stitch width dial and stitch length dial to suit the fabric. Feather stitch (1) For decorative joining seam for a fagoted effect. (HZL-353Z, HZL-357Z) Bridging (2) For seams, place mats, tablecloths. -
Seite 67: Nutzstiche
All manuals and user guides at all-guides.com Nutzstiche Ïîëåçíûå øâû Nuttige steken Stellen Sie das Stichwählrad Óñòàíîâèòå ìàøèíó, êàê Stel de machine in zoals auf den gewünschten Stich. ïîêàçàíî íà ðèñóíêå. getoond. Wählen Sie die entsprechende Íàñòðîéòå äëèíó è øèðèíó Kies de steeklengte en breedte Stichlänge, die Sie für die ñòåæêà... -
Seite 68: Darning
All manuals and user guides at all-guides.com Darning - Turn stitch length dial to the desired length. - Turn stitch selector to straight stitch, center needle position. - Position the fabric to be darned under the presser foot together with the under laying fabric to be used. -
Seite 69: Stopfen
All manuals and user guides at all-guides.com Stopfen Øòîïêà Herstellen - Die Stichlänge je nach Bedarf - Óñòàíîâèòå ðåãóëÿòîð äëèíû - Zet de steeklengteknop op de wählen. ñòåæêà íà òðåáóåìóþ äëèíó. gewenste lengte. - Den Stichwahlknopf auf - Óñòàíîâèòå ðåãóëÿòîð - Zet de steekbreedteknop op Geradstich stellen und die âûáîðà... -
Seite 70: Monogramming And Embroidering With Embroidery Hoop
All manuals and user guides at all-guides.com Monogramming and embroidering with embroidery hoop* Drop the feed dogs. (1) - Remove the presser foot and the presser foot holder. - Lower presser foot lever before starting to sew. - Adjust the stitch width according to the size of lettering or design. -
Seite 71: Monogramm Und Sticken Mit Stickrahmen
All manuals and user guides at all-guides.com Monogramm und Ìîíîãðàììû è Monogrammen maken Sticken mit âûøèâêà ñ ïîìîùüþ en borduren met een Stickrahmen* ïÿëåö* borduurhoepel* Transporteur versenken. (1) Îïóñòèòå äâèãàòåëü òêàíè. (1) Laat de transporteur zakken.(1) - Den Nähfuß und den - Ñíèìèòå... -
Seite 72: Maintenance
All manuals and user guides at all-guides.com Maintenance Disconnect the machine from the mains before carrying out any maintenance. Cleaning If lint and bits of thread accumulate in the hook, this will interfere with the smooth operation of the machine. Check regularly and clean the stitching mechanism when necessary. -
Seite 73: Wartung
All manuals and user guides at all-guides.com Wartung Òåõíè÷åñêîå Onderhoud îáñëóæèâàíèå Stecken Sie den Netzschalter Ïåðåä ïðîâåäåíèåì ëþáûõ Neem de stekker uit het aus, bevor Sie ðàáîò ïî òåõîáñëóæèâàíèþ stopcontact bij onderhoud Wartungsarbeiten îòñîåäèíèòå ìàøèíó îò aan de machine. durchführen. ýëåêòðîïèòàíèÿ. -
Seite 74: Trouble Shooting Guide
All manuals and user guides at all-guides.com Trouble shooting guide Problem Cause Correction Upper thread 1. The machine is not threaded 1. Rethread the machine breaks correctly 2. Reduce the thread tension (lower 2. The thread tension is too tight number) 3. -
Seite 75: Behebung Von Störungen
All manuals and user guides at all-guides.com Behebung von Störungen Störung Ursache Fehlerbehebung Oberfaden reißt 1. Die Maschine ist falsch eingefädelt. 1. Die Maschine neu einfädeln. 2. Die Fadenspannung ist zu stark. 2. Die Fadenspannung reduzieren 3. Der Faden ist zu dick. (kleinere Nummer). -
Seite 76: Óñòðàíåíèå Íåèñïðàâíîñòåé
All manuals and user guides at all-guides.com Óñòðàíåíèå íåèñïðàâíîñòåé Ïðîáëåìà Ïðè÷èíà Óñòðàíåíèå Îáðûâ 1. Íèòü íåâåðíî çàïðàâëåíà. 1. Çàïðàâüòå íèòü ñíîâà. âåðõíåé íèòè 2. Ñëèøêîì ñèëüíîå íàòÿæåíèå 2. Îñëàáüòå íàïðÿæåíèå (óìåíüøèòå íèòè. íîìåð). 3. Íèòü ñëèøêîì òîëñòàÿ äëÿ ýòîé 3. Âîçüìèòå èãëó áîëüøåãî ðàçìåðà. èãëû... - Seite 77 All manuals and user guides at all-guides.com Probleem oplossingen Probleem Mogelijke orzaak Oplossing Bovendraad 1.De machine is niet goed ingeregen. 1.Rijg de machine opnieuw in. breekt 2.De draadspanning is te strak. 2.Verminder de draadspanning (lager 3.Het garen is te dik voor de naald. nummer).
- Seite 78 2-11-1, Tsurumaki, Tama-shi, Tokyo 206-8551, JAPAN PHONE : (81)42-357-2341 FAX : (81)42-357-2379 Copyright © 2014 JUKI CORPORATION. All rights reserved throughout the world. Reservados todos los derechos en todo el mundo. Tous les droits sont réservés à travers le monde.