Werbung
Quicklinks
COMBINE RADIO/CASSETTE/CD
CD-SPIELER-TUNER-CASSETTENDECK
CD/REGISTRATORE/SINTONIZZATORE
XC-IS22CD
STEREO POWER AMPLIFIER
AMPLIFICATEUR DE PUISSANCE STEREO
STEREO-LEISTUNGSVERSTÄRKER
AMPLIFICATORE DI POTENZA STEREO
M-IS22
ENCEINTES ACOUSTIQUES
LAUTSPRECHERSYSTEM
SISTEMA DI ALTOPARLANTI
S-IS22
S-IS22S
Operating Instructions
Bedienungsanleitung
Istruzioni per l'uso
CD TUNER DECK
SPEAKER SYSTEM
Mode d'emploi
Werbung
Kapitel

Verwandte Anleitungen für Pioneer XC-IS22CD


Inhaltszusammenfassung für Pioneer XC-IS22CD
-
Seite 1: Connecting The Radio Antennas
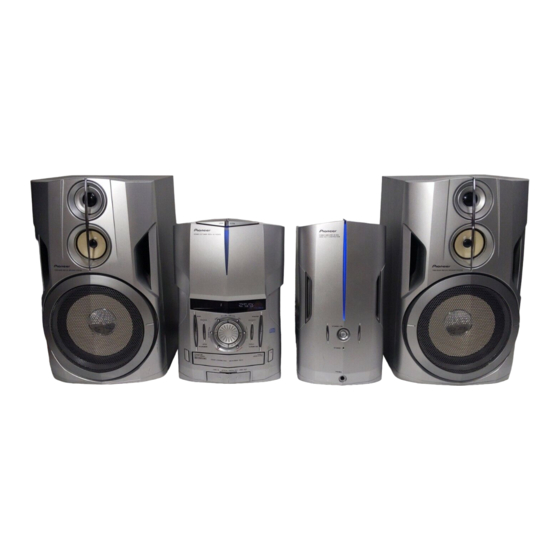
CD TUNER DECK COMBINE RADIO/CASSETTE/CD CD-SPIELER-TUNER-CASSETTENDECK CD/REGISTRATORE/SINTONIZZATORE XC-IS22CD STEREO POWER AMPLIFIER AMPLIFICATEUR DE PUISSANCE STEREO STEREO-LEISTUNGSVERSTÄRKER AMPLIFICATORE DI POTENZA STEREO M-IS22 SPEAKER SYSTEM ENCEINTES ACOUSTIQUES LAUTSPRECHERSYSTEM SISTEMA DI ALTOPARLANTI S-IS22 S-IS22S Operating Instructions Mode d’emploi Bedienungsanleitung Istruzioni per l’uso... - Seite 2 En/Fr...
-
Seite 3: Operating Environment
Operating Environment H045 En Conditions de Fonctionnement H045 Fr Operating environment temperature and humidity: Tempéraure et humidité ambiante lors du fonctionnement: ° ° ° ° C – +35 C (+41 F – +95 F); less than 85%RH (cooling ° ° °... -
Seite 4: Inhaltsverzeichnis
Thank you for buying this Pioneer product. Please read through these operating instructions so you will know how to operate your model properly. After you have finished reading the instructions, put them away in a safe place for future reference. - Seite 5 Nous vous remercions pour cet achat d’un produit Pioneer. Nous vous demandons de lire soigneusement ce mode d’emploi ; vous serez ainsi à même de faire fonctionner l’appareil correctement. Après avoir bien lu le mode d’emploi, le ranger dans un endroit sûr pour pouvoir s’y référer ultérieurement.
-
Seite 6: Before You Start Checking What's In The Box
Using this manual Utilisation de ce manuel This manual is for the XC-IS22CD Stereo CD Tuner Deck. It is Ce manuel est celui de la Platine Radio Stéréo XC-IS22CD. Il est split into three sections: setting up (chapters 1 and 2); using the divisé... -
Seite 7: Using The Remote Control
Before you start Avant de commencer Using the remote control Utilisation de la télécommande Keep in mind the following when using the remote control unit: N’oubliez pas les remarques suivantes lorsque vous utilisez la télécommande: • Make sure that there are no obstacles in between the remote and the remote •... -
Seite 8: Avoiding Condensation Problems
Before you start Avant de commencer Avoiding condensation Comment éviter les problems problèmes de condensation Condensation may form inside the unit if it is brought into a De la condensation peut se former à l’intérieur de l’appareil warm room from outside, or if the temperature of the room rises lorsqu’on le transporte de l’extérieur dans un endroit chaud, ou quickly. -
Seite 9: Connecting Up The Rear Panel
Connecting up Raccordements The rear panel Le panneau arrière The illustration on this page shows the XC-IS22CD. Sur cette page, l’illustration montre le XC-IS22CD. Main unit Unité principale Right speaker Enceinte droite Power amplifier Amplificateur de puissance CD tuner deck Combiné... -
Seite 10: Connecting The System Components
IS22CD jack on the power amplifier (see below). prise TO AMPLIFIER sur le combiné radio à la prise Use the supplied RCA pin-plug stereo cable to XC-IS22CD sur l’amplificateur de puissance (voir ci- connect the AUDIO OUT jacks on the CD Tuner dessous). -
Seite 11: Raccordement Des Antennes Radio
Connecting up Raccordements Connecting the radio Raccordement des antennes radio antennas Le raccordement des antennes fournies vous permettra d’écouter Connecting the supplied antennas will allow you to listen to à la fois les émissions de radio AM et FM. Si vous trouvez que la both AM and FM radio broadcasts. -
Seite 12: Connecting External Antennas
Connecting up Raccordements Connecting external antennas Remarque Le signal masse (H) a pour but de réduire le bruit occasionné External AM antenna lorsqu’une antenne est raccordée. Ce n’est pas une masse Use 5–6 meters of vinyl-insulated wire and set up either indoors électrique sure. -
Seite 13: Connecting The Optional Stereo Cassette Deck (Ct-Is21)
Connecting up Raccordements Connecting the optional Raccordement de la platine stereo cassette deck cassette stéréo optionnelle (CT-IS21) (CT-IS21) The optional cassette deck (model number CT-IS21) connects to La platine cassette optionnelle (modèle numéro CT-IS21) est this system using the system cable and two sets of RCA pin-plug raccordée à... -
Seite 14: Using This System With The Ct-Is21
• Bien que l’agencement du panneau avant et des of the XC-IS21MD/XC-IS21T are different from the XC- télécommandes des XC-IS21MD/XC-IS21T soit différent de IS22CD, the controls of the XC-IS22CD function in the same celui du XC-IS22CD, les commandes du XC-IS22CD way as those on the XC-IS21MD/XC-IS21T. -
Seite 15: Controls And Displays Front Panel
Controls and displays Commandes et affichages Front Panel Panneau avant OPEN/ CLOSE STEREO CD TUNER DECK XC-IS22CD T APE ENHANCE BALANCE POWER AMPLIFIER M-IS22 AERO DUCT CONSTRUCTION BASS TREBLE TUNER LINE1.2 STANDBY/ON STANDBY 1 OPEN/CLOSE touch sensor (p. 19, 20) 1 OPEN/CLOSE sensible au toucher (p. -
Seite 16: Display
Controls and displays Commandes et affichages 25 ST.MEMORY•STOP 7 (p. 25, 28–30, 34–35) 25 ST.MEMORY•STOP 7 (p. 25, 28–30, 34–35) 26 REVERSE MODE (p. 19, 24) 26 REVERSE MODE (p. 19, 24) 27 1 • 4 • TUNING – (p. 20, 22, 25, 30) 27 1 •... -
Seite 17: Remote Control
Controls and displays Commandes et affichages Remote control Télécommande 1 TUNER (p. 19, 22, 30, 33, 39) 1 TUNER (p. 19, 22, 30, 33, 39) 2 DIMMER (p. 27) 2 DIMMER (p. 27) 3 MUTE (p. 37) 3 MUTE (p. 37) STANDBY DIMMER MUTE DISP... -
Seite 18: Getting Started
Si c’est la première fois que vous avez OPEN/ CLOSE mis votre appareil sous tension, STEREO CD TUNER DECK XC-IS22CD devrait déjà être affiché. Press SET. Appuyez sur SET. Use the JOG dial to set the Utilisez le cadran JOG pour minute. -
Seite 19: Changing The Clock Format
Getting started Mise en Marche Changing the clock format Modifier le système d’heures You can choose to display the clock in either 12 or 24 hour Vous pouvez choisir d’afficher l’heure du système 12 heures ou formats. The default is 12 hour display format. du système 24 heures. -
Seite 20: Playing Cds
Press the CD button then lightly Appuyez sur la touche CD puis press the OPEN/CLOSE sensor appuyez légèrement sur le STEREO CD TUNER DECK XC-IS22CD (0 on the remote). capteur OPEN/CLOSE (0 sur la The CD cover opens. Push a CD, with télécommande). -
Seite 21: Summary Of Playback Controls For Cds
Getting started Mise en Marche Summary of playback controls for Résumé des commandes de lecture pour les CDs Below is a summary of what remote control buttons do when Voici ci-dessous un résumé de ce que font les touches de la you’re playing a CD. -
Seite 22: Tuning In Stations
CLOSE broadcasts, and lets you memorize your La radio peut recevoir à la fois des STEREO CD TUNER DECK XC-IS22CD favorite stations so you don’t have to émissions FM et AM et vous permet de manually tune in every time you want mémoriser vos stations préférées et ainsi... -
Seite 23: Improving Poor Fm Reception
Si vous trouvez que vous ne pouvez pas region. Here’s how to switch the setting: accorder des stations de manière STEREO CD TUNER DECK XC-IS22CD Switch the power into standby. satisfaisante, il s’agit peut-être de la plage de fréquence qui n’est pas Press and hold TREBLE (front adaptée à... -
Seite 24: Playing Cassette Tapes
être utilisée à la fois pour This unit has a tape deck that can be l’enregistrement et pour la lecture. Ses STEREO CD TUNER DECK XC-IS22CD used for both recording and playback. autres caractéristiques comprennent la Other features include auto-reverse and fonction autoreverse et la Réduction de... -
Seite 25: Resetting The Tape Counter
Getting started Mise en Marche To play the other side of the tape, press 23 (6). Pour lire l’autre face de la cassette, appuyez sur 23 Each time you press 23 (6) during playback, the other (6). A chaque fois que vous appuyez sur 23 (6) lors de la side of the tape starts playing. -
Seite 26: Changing Displays
Getting started Mise en Marche Changing displays Modifier les affichages It is possible to switch the display information while using tape, Il est possible de permuter les informations de l’affichage CD, or tuner functions. lorsque vous utilisez une cassette, un CD ou la fonction radio. Tuner displays Affichages radio •... -
Seite 27: Cd Displays
Getting started Mise en Marche CD displays Affichages CD • When using the CD function, press DISP(/RDS) to • Lorsque vous utilisez la fonction CD, appuyez sur cycle through display information. DISP (/RDS) pour parcourir les informations de l’affichage. During CD playback: When CD is stopped: Au cours de la lecture Lorsqu’un CD est... -
Seite 28: More Cd Features
More CD features Autres caractéristiques du lecteur Programming the CD track Programmer l’ordre des order pistes CD Programming the track order means telling the player precisely Programmer l’ordre des pistes signifie dire précisément au which tracks, and in what order, you want played. You can make lecteur quelles pistes vous souhaitez lire, et dans quel ordre. -
Seite 29: Playing Tracks At Random
More CD features Autres caractéristiques du lecteur Playing tracks at random Lecture aléatoire des pistes Selecting random play leaves the track order of the disc up to the Sélectionner le mode de lecture aléatoire laisse le choix de player. Each track on the disc is played just once, but in a l’ordre des pistes du disque à... -
Seite 30: More Tuner Features
More tuner features Autres caractéristiques de la radio Saving stations for quick Enregistrer les stations pour recall une mémoire rapide You can save up to 30 station presets so that you always have Vous pouvez enregistrer jusqu’à 30 stations préréglées afin easy access to your favorite stations without having to tune in d’avoir à... -
Seite 31: Using Rds
More tuner features Autres caractéristiques de la radio Using RDS Utilisation du RDS Radio Data System, or RDS as it’s usually known, is a system Le système de données de radio (Radio Data System), ou plus used by FM radio stations to provide listeners with various habituellement connu par RDS, est un système utilisé... -
Seite 32: Displaying Rds Information
More tuner features Autres caractéristiques de la radio LEISURE Leisure interests and hobbies LEISURE Passe-temps et loisirs JAZZ Jazz music JAZZ Musique jazz COUNTRY Country music COUNTRY Musique country NATION M Popular music in a language other than NATION M Musique populaire dans une langue autre English que l’anglais... -
Seite 33: Searching For A Program Type
More tuner features Autres caractéristiques de la radio Note Remarque • The RDS indicator will light in the RDS mode. • L’indicateur RDS s’allumera en mode RDS. • If no RDS signal can be received, the message • Si aucun signal RDS ne peut être reçu, le message NO DATA will be displayed. -
Seite 34: Making Tape Recordings
Making tape recordings Faire des enregistrements cassettes Making tape recordings Faire des enregistrements cassettes You can make tape recordings from the radio, CDs, or from an external component connected to the auxiliary inputs. If you're Vous pouvez faire des enregistrements cassette depuis la radio, recording from CD it’s more convenient to use the ASES de CDs, ou depuis un composant externe raccordé... -
Seite 35: Automatically Recording Cds (Ases)
Making tape recordings Faire des enregistrements cassettes Select the function you plan to record. Sélectionnez la fonction que vous prévoyez For example, press to record from the radio. If you’ve d’enregistrer. TUNER Appuyez par exemple sur pour enregistrer depuis la selected a CD, make sure that it’s stopped. -
Seite 36: Improving Am Tape Recordings
Making tape recordings Faire des enregistrements cassettes Improving AM tape recordings Améliorer les enregistrements Recording AM broadcasts on cassette tape can result in noisy cassette AM recordings. If you experience this, change the beat cut mode. Enregistrer des émissions AM sur des enregistrements cassette peut entraîner des enregistrements bruyants. -
Seite 37: Adjusting The Sound Adjusting The Bass, Treble And Balance
Adjusting the sound Réglage du son Adjusting the bass, treble Régler les graves, les aigus et and balance l’équilibre To help you get the sound you want you can increase or reduce Pour vous aider à obtenir le son que vous souhaitez, vous the bass and treble, or change the left/right balance. -
Seite 38: Using The Timer
Using the timer Utiliser la minuterie Setting the wake-up timer Réglage de la minuterie de sommeil Use the wake-up timer to set the system to switch on at any time and start playing your choice of source. Utilisez la minuterie de sommeil pour régler l’appareil pour qu’il se mette en Note marche à... -
Seite 39: Setting The Sleep Timer
Using the timer Utiliser la minuterie Setting the sleep timer Réglage de la minuterie de sommeil The sleep timer switches off the system after a specified time so you can fall asleep without worrying about it. La minuterie de sommeil éteint l’appareil après un temps Note spécifié, vous pouvez ainsi vous endormir sans avoir à... -
Seite 40: Turning The Record Timer On/Off
Using the timer Utiliser la minuterie Set the record end time. Tournez le cadran JOG jusqu’à ce que TIMER EDIT Use the dial to set the hour, then press . Set the minute soit affiché. in the same way, pressing when you’re done. -
Seite 41: Additional Information Taking Care Of Your System
CD ne doit pas se souiller, mais si un problème de fonctionnement se produit à cause de la saleté ou de la poussière, contactez votre centre PIONEER autorisé le plus Taking care of your discs proche. Bien que des produits nettoyants pour lentille CD soient actuellement commercialisés, nous déconseillons leur... -
Seite 42: Storing Discs
This system is designed for use with conventional, fully circular CDs only. Use of shaped discs is not recommended. Ce système est conçu pour être utilisé avec des CD PIONEER disclaims all liability arising in connection with the conventionnels, entièrement circulaires. Il est déconseillé use of shaped discs. -
Seite 43: Protecting Your Recordings
• Make sure that the head cleaning cassette you buy is Attention! compatible with auto-reverse decks. Check with a PIONEER • Assurez-vous que la cassette nettoyante pour têtes de lecture authorized service center for details. -
Seite 44: Troubleshooting
Additional information Troubleshooting Problem Remedy General No sound • Check that speakers and other system components are properly connected. • Check that the input selector is set correctly. Can’t switch between functions • If the cassette deck is currently recording, you can’t change the function. Timer doesn’t work •... -
Seite 45: Guide De Dépannage
Informations complémentaires Guide de dépannage Problème Solution Général Aucun son • Vérifiez que les enceintes et les autres composants de l’appareil sont connectés correctement. • Vérifiez que le sélecteur d’entrée est réglé correctement. Ne permute pas vers les fonctions • Si la platine cassette est en cours d’enregistrement, vous ne pouvez pas modifier la fonction. - Seite 46 Speaker cords ................2 CD Tuner Deck ..............2.7 kg Power Amplifier ..............4.1 kg Note Specifications and design subject to possible modification without notice, due to improvements. Published by Pioneer Corporation. Copyright © 2001 Pioneer Corporation. All rights reserved.
-
Seite 47: Spécifications
Combiné radio ..............2,7 kg Remarque Puissance de l’amplificateur ..........4,1 kg Les spécifications et l’aspect extérieur sont sujets à de possibles modifications sans préavis, dû aux imprévus. Publication de Pioneer Corporation. © 2001 Pioneer Corporation. Tous droits de reproduction et de traduction réservés. - Seite 48 Ge/It...
- Seite 49 Questi prodotti, XC-IS22CD, M-IS2, S-IS22 e S-IS22S sono conformi al DM 28/8/1995, Nº548, ottemperando alle prescrizioni di cui al DM 25/6/1985 (par. 3, All. A) e DM 27/8/1987 (All. Ι). H026 It Condizioni ambientali di funzionamento Betriebsbedingungen Umidità e temperatura di funzionamento: Betriebstemperatur und -feuchtigkeit: +5°C –...
- Seite 50 Wir danken lhnen für den Kauf dieses Pioneer-Produkts. Lesen Sie sich bitte diese Bedienungsanleitung durch. Dann wissen Sie, wie Sie lhr Gerät richtig bedienen. Bewahren Sie sie an einem sicheren Platz auf, um auch zukünftig nachschlagen zu können. In manchen Ländern oder Verkaufsgebieten weichen die Ausführungen von Netzstecker oder Netzsteckdose u.U. von den in den Abbildungen gezeigten ab;...
- Seite 51 Grazie per aver acquistato questo prodotto Pioneer. Leggere attentamente questo manuale di istruzioni per familiarizzarsi con l’uso dell’apparecchio. Conservare poi il manuale per ogni eventuale futuro riferimento. I modelli disponibili in alcuni paesi o regioni possono avere la forma della spina del cavo d’alimentazione e della presa ausiliaria di corrente diversa da quella mostrata nelle illustrazioni, ma il loro modo di collegamento e funzionamento è...
-
Seite 52: Vor Inbetriebnahme
Controllo del contenuto della Verpackungsinhalts scatola Vielen Dank für den Kauf dieses Pioneer-Produkts. Bevor Sie Ihr Grazie per aver acquistato un prodotto Pioneer. Prima di neues Stereosystem aufstellen, überprüfen Sie bitte, dass iniziare l’installazione del nuovo apparecchio stereo, si prega di folgendes Zubehör vorhanden ist:... -
Seite 53: Verwenden Der Fernbedienung
Vor Inbetriebnahme Informazioni preliminari Verwenden der Fernbedienung Uso del telecomando Beachten Sie bitte Folgendes, wenn Sie die Nell’usare il telecomando ricordarsi delle seguenti indicazioni: Fernbedienung verwenden: • Accertarsi che non vi siano ostacoli tra il • Vergewissern Sie sich, dass sich keine telecomando e il sensore all’interno Hindernisse zwischen der Fernbedienung dell’apparecchio. -
Seite 54: Vermeiden Von Kondensationsproblemen
Vor Inbetriebnahme Informazioni preliminari Vermeiden von Per evitare i problemi della Kondensationsproblemen condensa Im Gerät kann sich Kondensation bilden, wenn es direkt vom Se dall’esterno si porta l’apparecchio in un locale riscaldato o se Freien in einen warmen Raum gebracht wird, oder wenn ein la temperatura ambiente aumenta velocemente si potrebbe Raum schnell wärmer wird. -
Seite 55: Erstellung Der Anschlüsse
Erstellung der Anschlüsse Collegamenti Das rückseitige Bedienfeld Il pannello posteriore Die Abbildung auf dieser Seite bezieht sich auf den XC-IS22CD. L’illustrazione di questa pagina si riferisce al modello XC- IS22CD. Hauptgerät Rechter Lautsprecher Apparecchio principale Diffusore destro Leistungsverstärker Amplificatore di potenza... -
Seite 56: Anschließen Der Geräteteile
Verwenden Sie das mitgelieferte Systemkabel, um den Anschluss von der TO AMPLIFIER Buchse am CD- Usare il cavo del sistema in dotazione per collegare la Tunerdeck zur XC-IS22CD Buchse am presa dell’amplificatore (TO AMPLIFIER) sul Lettore Leistungsverstärker zu erstellen (siehe unten). -
Seite 57: Anschließen Der Radioantennen
Erstellung der Anschlüsse Collegamenti Anschließen der Radioantennen Collegamento delle antenne radio Nach Anschluss der mitgelieferten Antennen können Sie sowohl AM als auch FM Radiosendungen hören. Wenn die Il collegamento delle antenne in dotazione consentirà di Empfangsqualität nicht ausreichend ist, empfiehlt sich der ascoltare sia trasmissioni radio in AM sia in FM. -
Seite 58: Anschließen Von Aussenantennen
2 Erstellung der Anschlüsse Collegamenti Hinweis Nota Das Erdungssignal (H) dient dazu, Geräusche beim Anschluss La messa a terra del segnale (H) serve a ridurre il fruscio che si einer Antenne zu reduzieren. Es stellt keine elektrische verifica quando si collega l’antenna. Non si tratta della messa a Sicherheitserdung dar. -
Seite 59: Anschließen Des Optionalen Stereokassettendecks (Ct-Is21)
Erstellung der Anschlüsse Collegamenti Anschließen des optionalen Collegamento della piastra a Stereokassettendecks (CT- cassette stereo opzionale IS21) (CT-IS21) Dieses optionale Kassettendeck (Modell Nummer CT-IS21) wird La piastra a cassette opzionale (modello numero CT-IS21) si mit Hilfe des Systemkabels und zwei RCA Pinstecker- collega a questo sistema usando il cavo del sistema stesso e due Stereokabeln, die mit dem CT-IS21 mitgeliefert werden, serie di cavi stereo a spinotto RCA fornite assieme al CT-IS21. -
Seite 60: Verwendung Dieses Systems Mit Dem Ct-Is21
CT-IS21 stesso col sistema XC-IS21MD/XC-IS21T. L’uso col sistema Die mit dem CT-IS21 mitgelieferte Bedienungsanleitung XC-IS22CD è simile, si prega tuttavia di notare i punti che beschreibt den Einsatz des Kassettendecks mit dem XC-IS21MD/ seguono: XC-IS21T. Seine Verwendung mit dem XC-IS22CD ist ähnlich, •... -
Seite 61: Bedienelemente Und Displays Vorderes Bedienfeld
Bedienelemente und Displays Comandi e display Vorderes Bedienfeld Pannello Anteriore OPEN/ CLOSE STEREO CD TUNER DECK XC-IS22CD T APE ENHANCE BALANCE POWER AMPLIFIER M-IS22 AERO DUCT CONSTRUCTION TREBLE BASS TUNER LINE1.2 STANDBY/ON STANDBY 1 OPEN/CLOSE Sensor (S. 19, 20) 1 Sensore a sfioramento (OPEN/CLOSE) (pagg. 19, 20) 2 BALANCE (S. -
Seite 62: Display
Bedienelemente und Displays Comandi e display 25 ST.MEMORY•STOP 7 (S. 25, 28–30, 34–35) 25 ST.MEMORY•STOP 7 (pagg. 25, 28–30, 34–35) 26 REVERSE MODE (S. 19, 24) 26 REVERSE MODE (pagg. 19, 24) 27 1 • 4 • TUNING – (S. 20, 22, 25, 30) 27 1 •... -
Seite 63: Bedienelemente Und Displays Comandi E Display
Bedienelemente und Displays Comandi e display Fernbedienung Telecomando 1 TUNER (S. 19, 22, 30, 33, 39) 1 TUNER (pagg. 19, 22, 30, 33, 39) 2 DIMMER (S. 27) 2 DIMMER (pag. 27) 3 MUTE (S. 37) 3 MUTE (pag. 37) STANDBY DIMMER MUTE DISP... -
Seite 64: Grundlegende Bedienung Des Systems
OPEN/ CLOSE sollte bereits angezeigt CLK ADJ apparire nel display. werden. STEREO CD TUNER DECK XC-IS22CD Drücken Sie auf SET Premere SET. Stellen Sie mit dem JOG-Regler Usare il selettore JOG per die Stunde ein. impostare l’ora. Drücken Sie auf SET. -
Seite 65: Ändern Des Zeitanzeigenformats
Grundlegende Bedienung des Systems Preparativi Ändern des Zeitanzeigenformats Per cambiare il formato Die Zeit kann entweder im 12-Stunden- oder 24-Stunden- dell’orologio Format angezeigt werden. Als Standard ist das 12-Stunden- Si può scegliere di visualizzare l’orologio sia nel formato a 12 Format eingestellt. -
Seite 66: Wiedergabe Von Cds
Preparativi Wiedergabe von Riproduzione di compact disc OPEN/ CLOSE STEREO CD TUNER DECK XC-IS22CD Drücken Sie auf die Taste CD Premere il tasto CD e poi und dann behutsam auf den premere leggermente il sensore OPEN/CLOSE Sensor (0 an der OPEN/CLOSE (0 sul Fernbedienung). -
Seite 67: Grundlegende Bedienung Des Systems
Grundlegende Bedienung des Systems Preparativi Überblick der Bedienelemente zur Riepilogo dei comandi per la Wiedergabe von CDs riproduzione di compact disc Der Überblick unten stellt die Funktionen der Tasten der Segue un riepilogo delle funzioni dei tasti del telecomando Fernbedienung während der Wiedergabe einer CD dar. durante la riproduzione di compact disc. -
Seite 68: Einstellen Von Sendern
OPEN/ CLOSE Der Tuner empfängt sowohl Sendungen Il sintonizzatore può ricevere STEREO CD TUNER DECK XC-IS22CD in FM als auch AM und Sie können Ihre trasmissioni sia FM sia AM e consente di memorizzare le stazioni preferite in Lieblingssender abspeichern, so dass Sie... -
Seite 69: Verbessern Des Fm Empfangs In Stereo
OPEN/ CLOSE Wenn die klare Einstellung von Per cambiare il Sendern nicht möglich ist, kann es STEREO CD TUNER DECK XC-IS22CD salto di frequenza sein, dass das eingestellte Frequenzraster nicht für Ihr Land/ Se s’incontrano difficoltà nel Gebiet geeignet ist. Stellen Sie es in sintonizzarsi sulle stazioni, è... -
Seite 70: Wiedergabe Von Kassetten
OPEN/ CLOSE Andere Merkmale sind auto-reverse Quest’apparecchio è munito di una STEREO CD TUNER DECK XC-IS22CD (automat. Kassettenumkehrung) und piastra a cassette che si può usare sia Dolby B Geräuschreduzierung. per la registrazione sia per la • Mit automat. Kassettenumkehrung riproduzione. -
Seite 71: Rückstellen Des Kassettenzählwerks
Grundlegende Bedienung des Systems Preparativi Zur Wiedergabe der anderen Seite einer Kassette Per riprodurre l’altro lato della cassetta, premere drücken Sie auf 23 (6). 23 (6). Jedesmal, wenn Sie während der Wiedergabe auf 23(6) Ogni volta che si preme 23(6) durante la riproduzione, si drücken, wechselt die Kassette auf die jeweils andere Seite. -
Seite 72: Ändern Von Displays
4 Grundlegende Bedienung des Systems Preparativi Ändern von Displays Per cambiare i display Sie können auch während der Verwendung einer Kassette, CD È possibile attivare le informazioni del display mentre si usano oder des Tuners verschiedene Informationen am Display le funzioni della piastra a cassette, lettore CD o sintonizzatore. aufrufen. -
Seite 73: Display Für Cds
Grundlegende Bedienung des Systems Preparativi Display für CDs Display del lettore di compact disc • Drücken Sie, während Sie eine CD hören auf • Mentre si usa la funzione di lettore CD, premere DISP (/RDS), um die verschiedenen Informationen DISP(/RDS) per scorrere le informazioni sul display. am Display aufzurufen. -
Seite 74: Weitere Cd-Funktionen
5 Weitere CD-Funktionen Altre funzioni del lettore di CD Reihenfolge von Titeln Programmazione dell’ordine programmieren dei brani del compact disc Bei der Programmierung der Titelreihenfolge weisen Sie den Programmare l’ordine dei brani dei compact disc significa dire CD-Player an, welche Titel in welcher Abfolge zu spielen sind. precisamente al lettore quali brani, e in quale ordine, si Eine Programmierung kann bis zu 24 Titel enthalten, die nach vogliono riprodurre. -
Seite 75: Einstellen Der Zufallswiedergabe
Weitere CD-Funktionen Altre funzioni del lettore di CD Einstellen der Riproduzione dei brani in Zufallswiedergabe ordine casuale Mit Zufallswiedergabe wird die Spielfolge der Titel einer CD dem Con la selezione della riproduzione in ordine casuale l’ordine CD-Player überlassen. Jeder Titel wird einmal in zufälliger dei brani è... -
Seite 76: Weitere Tunerfunktionen Speichern Von Festsendern
Weitere Tunerfunktionen Altre funzioni del sintonizzatore Speichern von Festsendern Memorizzazione delle stazioni per la selezione Sie können bis zu 30 Festsender speichern, so dass Sie stets schnell auf Ihre Lieblingssender zugreifen können, ohne diese rapida jedesmal manuell einstellen zu müssen. Wird die Stromversorgung des Geräts vollständig unterbrochen, È... -
Seite 77: Verwendung Von Rds
Weitere Tunerfunktionen Altre funzioni del sintonizzatore Verwendung von RDS Come usare il sistema RDS Radio-Daten-System, auch als RDS bekannt, ist ein System, das Il Sistema Dati Radio, normalmente conosciuto come RDS, è FM-Radiosender verwenden, um Zuhörern verschiedene una sistema usato dalle stazioni radio in FM per fornire agli Informationen zu geben—Radio-Daten-System, auch als RDS ascoltatori vari tipi di informazioni, ad esempio il nome della bekannt, ist ein System, das FM-Radiosender verwenden, um... -
Seite 78: Anzeige Von Rds-Informationen
Weitere Tunerfunktionen Altre funzioni del sintonizzatore JAZZ Jazzmusik LEISURE Interessi e hobby per il tempo libero COUNTRY Country Musik JAZZ Musica jazz NATION M Beliebte Musik in anderen Sprachen als COUNTRY Musica country Englisch NATION M Musica popolare in una lingua diversa OLDIES Beliebte Musik aus den 50er-Jahren dall’inglese... -
Seite 79: Nach Einem Programmtyp Suchen
Weitere Tunerfunktionen Altre funzioni del sintonizzatore Hinweis Nota • Die RDS-Anzeige leuchtet im RDS-Modus. • Nel modo RDS l’indicatore RDS si illumina. • Wird kein RDS-Signal empfangen, wird • Se non si può ricevere alcun segnale RDS, appare il NO DATA Display angezeigt. -
Seite 80: Durchführung Von Kassettenaufnahmen
Durchführung von Kassettenaufnahmen Esecuzione di registrazioni su cassette Durchführung von Esecuzione di registrazioni su Kassettenaufnahmen cassette Sie können Kassettenaufnahmen vom Radio, von CDs oder È possibile eseguire registrazioni su cassette dalla radio, einem beliebigen angeschlossenen Zusatzgerät durchführen. compact disc oppure da un componente esterno collegato Wenn Sie CDs aufnehmen, empfiehlt sich die Verwendung des mediante gli ingressi ausiliari. -
Seite 81: Automatische Aufnahme Von Cds (Ases)
Durchführung von Kassettenaufnahmen Esecuzione di registrazioni su cassette Wählen Sie die aufzunehmende Tonquelle. Selezionare la funzione che si intende registrare. Drücken Sie z.B. zur Aufnahme vom Radio auf . Wenn Ad esempio, premere per registrare dalla radio. Se si TUNER TUNER Sie eine CD aufnehmen, vergewissern Sie sich, dass sie gestoppt sceglie un CD, accertarsi che sia fermo. -
Seite 82: Verbessern Von Am Aufnahmen Auf Kassette
Durchführung von Kassettenaufnahmen Esecuzione di registrazioni su cassette Verbessern von AM Aufnahmen auf Per migliorare le registrazioni su Kassette cassette di trasmissioni radio AM Die Aufnahme von Sendungen in AM ergibt manchmal sehr Registrare trasmissioni AM su nastri a cassetta potrebbe risultare geräuschstarke Aufnahmen. -
Seite 83: Durchführung Von Klangeinstellungen
Durchführung von Klangeinstellungen Regolazione del suono Bässe, Höhen und Balance Regolazione di bassi, acuti e einstellen bilanciamento Zur perfekten Klanggestaltung können Sie Bässe und Höhen Per ottenere l’audio desiderato è possibile incrementare o verstärken oder abschwächen sowie die Balance links/rechts ridurre i bassi e gli acuti, oppure cambiare il bilanciamento a betonen. -
Seite 84: Verwendung Des Timers Einstellen Des Wecktimers
Verwendung des Timers Uso del timer Einstellen des Wecktimers Impostazione del timer di accensione Mit Hilfe des Wecktimers kann das System zu jeder beliebigen Zeit eingeschaltet und Ihre bevorzugte Tonquelle gespielt Il timer di accensione si usa per impostare l’accensione del werden. -
Seite 85: Einstellen Des Schlaftimers
Verwendung des Timers Uso del timer Einstellen des Schlaftimers Impostazione del timer per lo spegnimento ritardato Mit dem Schlaftimer können Sie das System zu einer vorbestimmten Zeit ausschalten, so dass Sie auch bei Il timer per lo spegnimento ritardato spegne il sistema dopo un eingeschaltetem System unbesorgt einschlafen können. -
Seite 86: Aufnahmetimer Ein/Ausschalten
Verwendung des Timers Uso del timer Drehen Sie den JOG-Regler, bis TIMER EDIT Girare il selettore JOG finché non appare TIMER EDIT angezeigt wird. sul display. Drücken Sie auf SET. Premere SET. Stellen Sie die Zeit für den Beginn der Aufnahme ein. Impostare il tempo di inizio della registrazione. -
Seite 87: Zusätzliche Informationen Pflege Ihres Systems
Sie sich ragione dovesse funzionare male per via dello sporco o della bitte an Ihre nächste autorisierte PIONEER-Kundendienststelle. polvere, consultare il centro assistenza autorizzato PIONEER più Obwohl Linsenreiniger für CD-Players im Handel angeboten vicino. Sebbene siano disponibili sul mercato smacchiatori per werden, empfehlen wir sie nicht, da Linsen von einigen u. -
Seite 88: Aufbewahrung Von Discs
Ihr Gerät beschädigen. convenzionali, interamente circolari. Si sconsiglia l’uso di Dieses System wurde für handelsübliche, kreisrunde CDs dischi con forme particolari. PIONEER declina ogni entworfen. Die Verwendung von anders geformten Discs wird responsabilità connessa all’uso di dischi con forme nicht empfohlen. -
Seite 89: Schutz Ihrer Aufnahmen
• Accertarsi che la cassetta puliscinastro ascquistata sia Kassettendecks mit automat. Umkehrfunktion geeignet ist. compatibile con le piastre autoreverse. Controllare i Wenden Sie sich dazu bitte an ein autorisiertes PIONEER particolari con un centro assistenza autorizzato PIONEER. Kundendienstcenter. • Non usare cassette puliscitestine a secco. - Seite 90 Zusätzliche Informationen Fehlersuche Problem Mögliche Lösung Allgemein Keine Tonausgabe • Korrekte Anschlüsse aller Lautsprecher und Geräteteile prüfen. • Korrekte Einstellung des Eingabewählers prüfen. Schalten von einer Funktion auf • Während auf dem Kassettendeck aufgenommen wird, kann keine andere Funktion eine andere nicht möglich gewählt werden.
-
Seite 91: Ricerca Guasti
Altre informazioni Ricerca Guasti Problema Soluzione Intero sistema Assenza audio • Verificare che i diffusori e gli altri componenti del sistema siano correttamente collegati. • Verificare che il selettore d’ingresso sia impostato correttamente. Non si riesce a passare da una •... -
Seite 92: Technische Daten
Lautsprecherkabel ................ 2 CD-Tunerdeck ............... 2,7 kg Hinweis Leistungsverstärker ............... 4,1 kg Änderungen der technischen Daten und der äußeren Erscheinung, die dem technischen Fortschritt dienen, bleiben vorbehalten. Veröffentlicht von Pioneer Corporation. Urheberrechtlich geschützt © 2001 Pioneer Corporation. Alle Rechte vorbehalten. -
Seite 93: Caratteristiche Tecniche
Lettore CD/Sintonizzatore/Piastra a cassette ....... 2,7 kg Amplificatore di potenza ............4,1 kg Nota Le caratteristiche tecniche e il design dei prodotti sono soggetti a modifiche migliorative senza preavviso. Pubblicato da Pioneer Corporation. Copyright © 2001 Pioneer Corporation. Tutti i diritti riservati. -
Seite 96: Demo-Funktion
Haven 1087, Keetberglaan 1, B-9120 Melsele, Belgium TEL: 03/570.05.11 PIONEER ELECTRONICS AUSTRALIA PTY. LTD. 178-184 Boundary Road, Braeside, Victoria 3195, Australia, TEL: [03] 9586-6300 PIONEER ELECTRONICS DE MEXICO S.A. DE C.V. San Lorenzo 1009 3er Piso Desp. 302 Col. Del Valle Mexico D.F. C.P. 03100 TEL: 5-688-52-90 <TSWZW/01C00001>...