OHAUS Adventurer Analytical AX224N Handbuch
Vorschau ausblenden
Andere Handbücher für Adventurer Analytical AX224N:
- Bedienungsanleitung (345 Seiten) ,
- Anleitung (89 Seiten) ,
- Bedienungsanleitung (330 Seiten)
Inhaltsverzeichnis
Werbung
Verfügbare Sprachen
Verfügbare Sprachen
Quicklinks
Werbung
Kapitel
Inhaltsverzeichnis
Fehlerbehebung

Verwandte Anleitungen für OHAUS Adventurer Analytical AX224N


Inhaltszusammenfassung für OHAUS Adventurer Analytical AX224N
- Seite 1 Adventurer Balances Instruction Manual...
-
Seite 3: Inhaltsverzeichnis
ADVENTURER BALANCES EN-1 TABLE OF CONTENTS 1. INTRODUCTION ........................3 Description ..............................3 Features ............................... 3 Definition of Signal Warnings and Symbols ....................3 Safety Precautions ............................3 2. INSTALLATION ........................4 Unpacking ..............................4 Selecting the Location ..........................4 Leveling the Equipment ..........................4 Connecting Power ............................ - Seite 4 EN-2 ADVENTURER BALANCES 5.3.4 Filter Level .............................. 32 5.3.5 Auto Zero Tracking ..........................32 5.3.6 Auto Tare ..............................32 5.3.7 Graduations ............................32 5.3.8 Date & Time ............................33 5.3.9 Approved Mode ............................33 Weighing Units ............................34 5.4.1 Units Sub-menu ............................34 Data Maintenance ............................
-
Seite 5: Introduction
Description The Adventurer balance is a precision weighing instrument that will provide you with years of service if properly cared for. The Ohaus Adventurer balances are available in capacities from 120 grams to 8,200 grams. Features Touch Controls: Quick, graphical access to all control functions, over a dozen applications and many features. -
Seite 6: Installation
EN-4 ADVENTURER BALANCES INSTALLATION Unpacking Carefully remove your Adventurer balance and each of its components from the package. The included components vary depending on the balance model (see table below). Save the packaging to ensure safe storage and transport. Please read the manual completely before installing and using the Adventurer balance to avoid incorrect operation. -
Seite 7: Connecting Power
ADVENTURER BALANCES EN-5 Connecting Power Connect the DC output connector to the power receptacle on the rear of the balance. Then connect the AC power cord to a suitable electrical outlet. CAUTION: For use with CSA certified (or equivalent approved) power source, which must have a limited current output. -
Seite 8: Operation
EN-6 ADVENTURER BALANCES OPERATION Overview of Display, Home Screen This equipment utilizes a touch-sensitive display with Touch areas and Buttons to control the equipment’s functions. CONTROLS Button Action Short Press (if powered Off): Turns on the scale Long Press (if powered On): Turns off the scale Note: The balance will automatically power on when power is connected. -
Seite 9: Principal Functions And Main Menu
ADVENTURER BALANCES EN-7 Principal Functions and Main Menu Weighing: Press Zero to set the display to zero. Place an item on the pan. Display indicates gross weight. Taring: With no load on the pan, press Zero to set the display to zero. Place an empty container on the pan and press Tare. -
Seite 10: Overview Of Parts And Features - Draft Shield Models
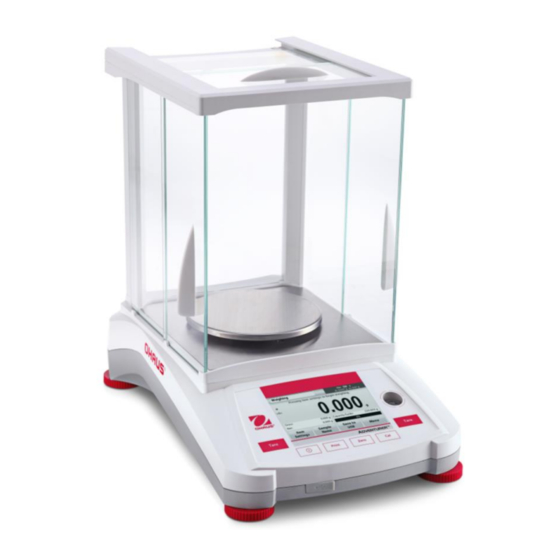
EN-8 ADVENTURER BALANCES Overview of Parts and Features – Draft Shield Models Level Indicator Adjustable Foot Adjustable Foot Power Input USB Host USB Device LFT Switch RS232 3.4 Overview of Parts and Features – Non Draft Shield Models Wing Ring Level Indicator Adjustable Foot LFT Switch RS232... -
Seite 11: Applications
ADVENTURER BALANCES EN-9 APPLICATIONS The balance can be configured to operate in various Application modes. Touch the top left Application field (weighing in the example below): The Adventurer Balance has 9 application modes, as follows: Weighing Parts Counting Percent Dynamic Density Check Weighing... -
Seite 12: Item Settings
EN-10 ADVENTURER BALANCES 4.1.1 Item Settings To view or adjust the current settings Touch the Item Settings button. The Settings screen appears. Minimum Weight: establish a minimum weight value to be used to verify a reading. If an actual weight is below the established Minimum Weight value, it is flagged by a color change: yellow. -
Seite 13: Sample Name
If this happens, unplug the USB flash drive and try another USB flash drive. Ohaus takes no responsibility if data on USB flash drive is erased or if the USB flash drive breaks while it is connected to the balance. -
Seite 14: Item Settings
EN-12 ADVENTURER BALANCES 4.2.1 Item Settings To view or adjust the current settings Touch the Item Settings button. The Settings screen appears. Samples: The sample size can be 1 to 10 000 pieces. The default sample size is 10. Once a sample size is changed, the balance will immediately open the recalculate APW screen, expecting to establish a new APW. - Seite 15 ADVENTURER BALANCES EN-13 Set a known Average Piece Weight (APW) To adjust the APW value directly, touch the APW button. A numeric input window appears. Key in the desired APW Weight, then press Save. The display returns to the application home screen with the new APW value in the reference field.
-
Seite 16: Percent Weighing
EN-14 ADVENTURER BALANCES Percent Weighing Note: Before using any application, be sure the balance has been leveled and calibrated. Use Percent Weighing to measure the weight of a sample displayed as a percentage of a pre-established reference weight. The default (or last) reference weight is displayed. Percent Weighing 1. -
Seite 17: Dynamic Weighing
ADVENTURER BALANCES EN-15 Dynamic Weighing Note: Before using any application, be sure the balance has been leveled and calibrated. Use this application to weigh an unstable load, such as a moving animal. Two different start/reset modes can be selected: Manual (start and stop via key press) and Automatic (start and stop automatically). Dynamic Weighing –... -
Seite 18: Density Determination
EN-16 ADVENTURER BALANCES Density Determination Note: Before using any application, be sure the balance has been leveled and calibrated. Use this application to determine an object’s density. Four types of density determination can be made: 1. Solids more dense than water 2. -
Seite 19: Measuring The Density Of A Buoyant Material Using Water
ADVENTURER BALANCES EN-17 Step 2 of 2 – Weigh the Sample Submerged in the Liquid. Follow the screen instructions, then press Accept to store the sample weight (submerged in liquid). Once the necessary weights have been determined, the density of the sample is displayed in g/cm (along with the weight in air, weight in water) on the Application screen. -
Seite 20: Measuring The Density Of A Liquid Using A Calibrated Sinker (Not Supplied)
EN-18 ADVENTURER BALANCES 4.5.4 Measuring the Density of a liquid using a Calibrated Sinker (not supplied) To enable this feature, enter the Density Setup menu and select the following; Density Type: Liquid. Note: when the Density Type is set to Liquid, the Liquid type and Porous material selections are disabled. The DENSITY DETERMINATION –... -
Seite 21: Measuring The Density Of Porous Material Using Oil
ADVENTURER BALANCES EN-19 Step 2 of 2 – Weigh the Sinker Submerged in the Test Liquid. Follow the screen instructions, then press Accept to store the sinker weight (submerged in liquid). Once the necessary weights have been determined, the density of the Liquid sample is displayed in g/cm (along with the weight in air, weight in water) on the Application screen. - Seite 22 EN-20 ADVENTURER BALANCES Confirm the default values displayed (Water Temp) are correct. To edit the default values, touch Item Settings. The Settings screen appears. The balance calculates water density based on the water temperature value entered (look-up table). Measure the actual water temperature using a precision thermometer.
- Seite 23 ADVENTURER BALANCES EN-21 Step 2 of 3 – Weigh the Oiled Sample in Air. Follow the screen instructions then press Accept to store the sample weight (oiled). Step 3 of 3 – Weigh the Oiled Sample Submerged in Liquid. Follow the screen instructions then press Accept to store the oiled sample weight (submerged in liquid).
-
Seite 24: Check Weighing
EN-22 ADVENTURER BALANCES Check Weighing Note: Before using any application, be sure the balance has been leveled and calibrated. Check Weighing is used to compare the weight of a sample against target limits. Check Weighing 1. In the upper left portion of the home screen, select Check Weighing 2. -
Seite 25: Display Hold
ADVENTURER BALANCES EN-23 4.7 Display Hold Note: Before using any application, be sure the balance has been leveled and calibrated. Two Modes are available: Display Hold - allows the user to capture and store a stable weight. Peak Hold - allows the user to capture and store the highest stable weight. The Display Hold Home screen Main Display Line Reference Fields... -
Seite 26: Item Settings
EN-24 ADVENTURER BALANCES 4.7.3 Item Settings To view or adjust the current settings Touch the Item Settings button. The Settings screen appears. Mode: Choose between Peak Hold and Display Hold (default). Sample Name: Assign a name to the sample. Print settings: Change printing settings. See section 7 for more information. -
Seite 27: Formulation
ADVENTURER BALANCES EN-25 4.9 Formulation Note: Before using any application, be sure the balance has been leveled and calibrated. Use this application for compounding and recipe making. The maximum number of components is 50. The Formulation Home screen Main Display Line Reference Fields Application Icon... -
Seite 28: Additional Features
EN-26 ADVENTURER BALANCES 4.10 Additional Features 4.10.1 Weigh Below The Adventurer balance is equipped with a weigh below hook for weighing below the balance. Note: Before turning the balance over, remove the pan and draft shield elements (if present) to prevent damage Attention: Do not place the balance on the pan support cone or Load cell Pins To use this feature, remove power from the balance, then remove the protective cover for the weigh below opening. -
Seite 29: Menu Settings
ADVENTURER BALANCES EN-27 MENU SETTINGS 5.1 Menu Navigation User menu structure: GLP and GMP Factory Application Modes Main Menu Calibration Balance Setup Weighing Units Data Maintenance Communication Lockout Data Reset Calibration Weighing App Calibration Internal Cal Language Milligram Export to USB RS232 Standard Headers Balance Setup... -
Seite 30: Changing Settings
EN-28 ADVENTURER BALANCES All menu navigation is performed by touching the display. To enter the Menu, touch Menu from any Application Home screen. The Main menu appears, with buttons for Back and Exit. Continue touching the appropriate list item to navigate to the Menu items. 5.1.1 Changing Settings To change a menu setting, navigate to that setting using the following steps:... -
Seite 31: Calibration Sub-Menu (Incal Models)
ADVENTURER BALANCES EN-29 5.2 Calibration Adventurer Balances (InCal models) offer a choice of six calibration methods: Internal Calibration, Automatic Calibration, AutoCal™ Adjustment, Span Calibration, Linearity Calibration and Cal Test (Calibration Test). Note: The calibration unit is always in grams. Attention: Do not disturb the balance during any calibration. 5.2.1 Calibration sub-menu (InCal models) AutoCal™... -
Seite 32: Autocal™ Adjustment
EN-30 ADVENTURER BALANCES 5.2.4 AutoCal™ Adjustment Use this calibration method to adjust the span calibration point, without affecting the span or linearity calibration. Calibration Adjust may be used to adjust the result of the Internal Calibration by +100 divisions. Note: Before making a calibration adjustment, perform an Internal Calibration. To verify whether an adjustment is needed, place a test mass equal to the span calibration value on the pan and note the difference (in divisions) between the nominal mass value and the actual Balance reading. -
Seite 33: Linearity Calibration
ADVENTURER BALANCES EN-31 5.2.6 Linearity Calibration Linearity calibration uses three calibration points, one at zero load and the others at specified loads. With no load on the scale, press Linearity Calibration to begin the process. The balance captures the zero point, and then prompts for the next weight. Continue to follow the instructions on the display until the calibration is completed. -
Seite 34: User Setting
EN-32 ADVENTURER BALANCES 5.3.3 User Setting Use this sub-menu to change the setting for: Touch Calibrate “Runtime calibration, please touch the screen at the center of the ring” (First top-left, then bottom-right.) Screen Brightness: = low screen brightness. MEDIUM = normal screen brightness. HIGH = high screen brightness. -
Seite 35: Date & Time
ADVENTURER BALANCES EN-33 5.3.8 Date & Time Set the current Date and Time. Change the format (if desired), then enter the current value. Press Save to confirm the new value. 5.3.9 Approved Mode Use this menu to set the Legal for Trade status. OFF = standard operation. -
Seite 36: Weighing Units
EN-34 ADVENTURER BALANCES 5.4 Weighing Units Enter this sub-menu to activate the desired units of measure. This menu can also be accessed by pressing the unit symbol in an application home screen. Note: Due to national laws, the balance may not include some of the units of measure listed. 5.4.1 Units Sub-menu Milligram... -
Seite 37: Communication
ADVENTURER BALANCES EN-35 5.5.2 Export to USB Export weighing data to a USB flash drive. Two types of data can be exported: - Application settings (APW, Ref. weight and etc.) - Menu settings (balance setup function and etc.) Note: The function Save to USB needs to be set to ON to enable data transfer to USB. -
Seite 38: Transmission
EN-36 ADVENTURER BALANCES 5.6.3 Transmission Set the data bits, stop bit, and parity. 7 EVEN 1 = 7 data bits, even parity, stop bit 1 7 ODD 1 = 7 data bits, odd parity, stop bit 1 7 EVEN 2 = 7 data bits, even parity, stop bit 2 7 ODD 2 = 7 data bits, odd parity, stop bit 2... -
Seite 39: Auto Print
ADVENTURER BALANCES EN-37 5.6.6 Auto Print Set the automatic printing functionality. = disabled ON STABILITY = printing occurs each time the stability criteria are met. INTERVAL = printing occurs at the defined time interval. CONTINUOUS = printing occurs continuously. When ON STABILITY is selected, set the conditions for printing. LOAD = Prints when the displayed load is stable. -
Seite 40: Glp And Gmp Data
EN-38 ADVENTURER BALANCES 5.7 GLP and GMP Data Enter this menu to set the Good Laboratory Practices (GLP) data and the Good Manufacturing Practices data. 5.7.1 GLP Data Sub-menu Header Balance Name User Name Project Name 5.7.2 Header Enables the printing of GLP headings. There are up to 5 headings available. Alphanumeric settings up to 25 characters are available for each Header setting. -
Seite 41: Legal For Trade (Lft)
ADVENTURER BALANCES EN-39 LEGAL FOR TRADE (LFT) When the balance is used in trade or a legally controlled application it must be set up, verified and sealed in accordance with local weights and measures regulations. It is the responsibility of the purchaser to ensure that all pertinent legal requirements are met. -
Seite 42: Printing
Cal Test operation, and echo print commands sent to the scale. SPDC Software The Serial Port Data Collection or SPDC software is provided by Ohaus and can be used on operating systems that do not have the HyperTerminal software mentioned above. -
Seite 43: Printout Examples
Balance ID: B234567890 Balance Type: AX224N Balance Type: AX224N Balance Type: AX224N Balance Name: Adventurer Balance Name: Adventurer Balance Name: Adventurer User Name: ohaus User Name: ohaus User Name: ohaus Project Name: ax Project Name: ax Project Name: ax Weighing... - Seite 44 Balance ID: B234567890 Balance Type: AX224N Balance Type: AX224N Balance Type: AX224N Balance Name: Adventurer Balance Name: Adventurer Balance Name: Adventurer User Name: ohaus User Name: ohaus User Name: ohaus Project Name: ax Project Name: ax Project Name: ax Density Determination...
-
Seite 45: Display Hold
Header 2 Header 3 Header 4 Header 5 1/15/2014 13:59 Balance ID: B234567890 Balance Type: AX224N Balance Name: Adventurer User Name: ohaus Project Name: ax Display Hold Sample Name: apple Hold Weight: 93.5968 g Gross: 97.5185 g G Net: 93.5967 g NET Tare: 3.9218 g T... -
Seite 46: Maintenance
Service Information If the troubleshooting section does not resolve your problem, contact an Authorized Ohaus Service Agent. Please visit our website www.ohaus.com to locate the Ohaus office nearest you. An Ohaus Product Service Specialist will be available to assist you. -
Seite 47: Technical Data
ADVENTURER BALANCES EN-45 TECHNICAL DATA Specifications Ambient conditions Indoor use only Altitude: Up to 2000 m Specified Temperature range: 10° C to 30° C Humidity: maximum relative humidity 80 % for temperatures up to 30° C decreasing linearly to 50% relative humidity at 40°... - Seite 48 EN-46 ADVENTURER BALANCES TABLE 9-1. SPECIFICATIONS Model: AX124 AX124/E AX224 AX224/E AX324 Capacity 120g 120g 220g 220g 320g Readability d 0.0001g Repeatability (std. dev.) (g) 0.0001g Linearity (g) ±0.0002g 50g, 25g, 50g 50g, 100g 25g, 50g 100g 100g Span Calibration Points (g) 75g, 150g, 75g, 100g...
- Seite 49 ADVENTURER BALANCES EN-47 TABLE 9-2. SPECIFICATIONS (continued) AX523/E Model: AX223 AX223/E AX423 AX423/E AX523 Capacity 220g 220g 420g 420g 520g 520g Readability d 0.001g Repeatability (std. 0.001g dev.) (g) Linearity (g) ±0.002g 50g, 100g, 50g, 100g Span Calibration 100g 200g 100g, 200g 200g, 300g 200g, 300g...
- Seite 50 EN-48 ADVENTURER BALANCES TABLE 9-3. SPECIFICATIONS (continued) AX422 AX422/E AX822 AX822/E Model: 420g 420g 820g 820g Capacity Readability d 0.01g Repeatability 0.01g (std. dev.) (g) Linearity (g) ±0.02g 100g, 200g 100g, 200g 200g, 400g 200g, 400g Span Calibration 300g,400g 300g,400g 600g, 800g 600g, 800g Points (g)
- Seite 51 ADVENTURER BALANCES EN-49 TABLE 9-4. SPECIFICATIONS (continued) AX4202/E AX5202 Model: AX1502 AX1502/E AX2202 AX2202/E AX4202 Capacity 1520g 1520g 2200g 2200g 4200g 4200g 5200g Readability d 0.01g Repeatability (std. 0.01g dev.) (g) Linearity (g) ±0.02g 500g, 500g, 1000g, 1000g, 2000g, 500g 500g Span Calibration 1000g...
- Seite 52 EN-50 ADVENTURER BALANCES TABLE 9-5. SPECIFICATIONS (continued) AX2201 AX2201/E Model: AX4201 AX4201/E AX8201 AX8201/E 2200g 2200g Capacity 4200g 4200g 8200g 8200g Readability d 0.1g Repeatability (std. 0.1g dev.) (g) Linearity (g) ±0.2g 1000g, 1000g, 2000g, 2000g, 500g, 1000g 500g, 1000g Span Calibration 2000g 2000g...
- Seite 53 ADVENTURER BALANCES EN-51 TABLE 9-6. SPECIFICATIONS (continued) AX124M AX224M AX324M AX223M AX423M AX523M AX1502M AX2202M AX4202M AX5202M AX8201M MODEL 8200g 120g 220g 320g 220g 420g 520g 1520g 2200g 4200g 5200g 0.01g 0.01g 0.01g 0.02g 0.02g 0.02g 0.5g 0.5g 0.5g 0.5g 0.1g 0.0001g 0.001g...
- Seite 54 EN-52 ADVENTURER BALANCES TABLE 9-7. SPECIFICATIONS (continued) Model AX224N AX223N/E AX423N AX 423N/E AX523N/E AX1502N/E AX2202N/E AX4202N/E AX8201N/E 220g 220g 420g 420g 520g 1520g 2200g 4200g 8200g 0.01g 0.02g 0.02g 0.02g 0.02g 0.5g 0.5g 0.5g 0.0001g 0.001g 0.01g 0.1g 0.001g 0.01g 0.1g Approval Class...
- Seite 55 ADVENTURER BALANCES EN-53 TABLE 9-8. SPECIFICATIONS (continued) AX124AU AX224AU AX324AU AX223AU AX423AU AX523AU AX1502AU AX2202AU AX4202AU AX5202AU AX8201AU MODEL 8200g 120g 220g 320g 220g 420g 520g 1520g 2200g 4200g 5200g 0.01g 0.01g 0.01g 0.02g 0.02g 0.02g 0.5g 0.5g 0.5g 0.5g 0.1g 0.0001g 0.001g...
-
Seite 56: Drawings And Dimensions
EN-54 ADVENTURER BALANCES Drawings and Dimensions Fully assembled dimensions Figure 9-1. Draft Shield models Figure 9-2. Non-Draft Shield models Parts and Accessories TABLE 9-5. ACCESSORIES DESCRIPTION PART NUMBER Auxiliary Display 80251396 Density Kit 80253384 Cable, USB Device (Type A-B) 83021085 Security Device (Laptop Lock) 80850043 RS232 Cable, PC 25 Pin... -
Seite 57: Communication
ADVENTURER BALANCES EN-55 Communication 9.4.1 Interface Commands Commands listed in the following table will be acknowledged by the balance. The balance will return “ES” for invalid commands. TABLE 9-6. ADVENTURER INTERFACE COMMAND LIST Command Function Characters Immediate Print of displayed weight (stable or unstable). Print displayed weight (stable or unstable). -
Seite 58: Rs232 (Db9) Pin Connections
The USB Interface The Ohaus USB Interface is a unique solution to the problem of connecting a balance to a computer using a Universal Serial Bus (USB). USB devices are categorized into classes such as disk drives, digital cameras, printers, etc. -
Seite 59: Usb Input
Once Auto-Print is activated in the menu, the balance will send data as required. If there is data in the print buffer the printer will finish printing this data. SOFTWARE UPDATES Ohaus is continuously improving its balance software. To obtain the latest release, please contact your Authorized Ohaus Dealer or Ohaus Corporation. -
Seite 60: Compliance
This product conforms to the EMC Directive 2004/108/EC, the Low Voltage Directive 2006/95/EC and the Non-automatic Weighing Instruments Directive 2009/23/EC. The complete Declaration of Conformity is available online at http://europe.ohaus.com/europe/en/home/support/compliance/ce-declaration-of-conformity.aspx. AS/NZS CISPR 11, AS/NZS 61000.4.3 CAN/CSA-C22.2 No. 61010-1-12 UL Std. No. 61010-1 (3rd edition) - Seite 61 EN-59 ISO 9001 Registration In 1994, OHAUS Corporation, USA, was awarded a certificate of registration to ISO 9001 by Bureau Veritus Quality International (BVQI), confirming that the OHAUS quality management system is compliant with the ISO 9001 standard’s requirements. On June 21, 2012, OHAUS Corporation, USA, was re-registered to the ISO 9001:2008 standard.
- Seite 62 Ohaus. In lieu of a properly returned warranty registration card, the warranty period shall begin on the date of shipment to the authorized dealer. No other express or implied warranty is given by Ohaus Corporation. Ohaus Corporation shall not be liable for any consequential damages.
- Seite 63 BALANZAS ADVENTURER ES-1 Í NDICE 1. INTRODUCCIÓN ........................3 Descripción ..............................3 Caracterí sticas ............................. 3 Definición de palabras de advertencia y sí mbolos de advertencia .............. 3 Precauciones de seguridad .......................... 3 2. INSTALACIÓN ........................4 Desempaquetado ............................4 Selección de la ubicación ..........................4 Nivelación del equipo ...........................
- Seite 64 ES-2 BALANZAS ADVENTURER 5.3.4 Nivel de filtro ............................32 5.3.5 Rastreo de cero automático ........................32 5.3.6 Tara automática ............................. 32 5.3.7 Graduaciones ............................32 5.3.8 Fecha y hora ............................32 5.3.9 Modo aprobado ............................33 Unidades de pesaje ........................... 34 5.4.1 Submenú...
-
Seite 65: Introducción
INTRODUCCIÓN Descripción La balanza Adventurer es un instrumento de pesaje de precisión que podrá utilizar durante muchos años si se emplea adecuadamente. Las balanzas Adventurer de Ohaus están disponibles en capacidades de 120 gramos a 8.200 gramos. Caracterí sticas Controles táctiles: Acceso gráfico rápido a todas las funciones de control, a más de una docena de... -
Seite 66: Instalación
ES-4 BALANZAS ADVENTURER INSTALACIÓN Desempaquetado Desembale con cuidado la balanza Adventurer y todos sus componentes. Los componentes incluidos varí an dependiendo del modelo de la balanza (consulte la tabla a continuación). Guarde el empaquetado para garantizar un almacenamiento y transporte seguros. Para evitar el funcionamiento incorrecto, lea el manual completamente antes de instalar y utilizar la balanza Adventurer. -
Seite 67: Conexión A La Red Eléctrica
BALANZAS ADVENTURER ES-5 Conexión a la red eléctrica Conecte el conector de salida de CC a la toma de corriente en la parte trasera de la balanza. Después conecte el cable de corriente de CA la toma eléctrica adecuada. PRECAUCIÓN: para uso con una fuente de alimentación certificada por la CSA (o similar aprobación), con salida de corriente limitada. -
Seite 68: Funcionamiento
ES-6 BALANZAS ADVENTURER FUNCIONAMIENTO Resumen de la pantalla, pantalla de inicio Este equipo utiliza una pantalla táctil con áreas de tacto y botones para controlar las funciones del equipo. CONTROLES Botón Acción Pulsación corta (si está apagada): enciende la báscula Pulsación larga (si está... -
Seite 69: Funciones Más Importantes Y Menú De Inicio
BALANZAS ADVENTURER ES-7 Funciones más importantes y Menú de Inicio Pesaje: Pulse Cero para ajustar la pantalla a cero. Coloque un elemento en el plato. La pantalla indica el peso bruto. Determinación de tara: Sin carga en el plato, pulse Cero para ajustar la pantalla en cero. Coloque un recipiente vací... -
Seite 70: Resumen De Piezas Y Funciones - Modelos Con Protección Contra Corrientes De Aire
ES-8 BALANZAS ADVENTURER Resumen de piezas y funciones – Modelos con protección contra corrientes de aire Plato Indicador de nivel Entrada de Servidor USB Pie ajustable USB esclavo Interruptor RS232 corriente Pie ajustable 3.4 Resumen de piezas y funciones – Modelos sin protección contra corrientes de aire Plato Anillo bobinado... -
Seite 71: Aplicaciones
BALANZAS ADVENTURER ES-9 APLICACIONES La balanza se puede configurar para funcionar en varios modos de aplicaciones. Toque el campo de aplicación superior izquierdo (pesaje en el ejemplo que aparece a continuación): La balanza Adventurer tiene los siguientes 9 modos de aplicación: Pesaje Recuento de Pesaje... -
Seite 72: Configuración De Los Elementos
ES-10 BALANZAS ADVENTURER 4.1.1 Configuración de los elementos Para ver o ajustar la configuración actual Toque el botón Configuración de elementos. Aparecerá la pantalla de configuración. Peso mí nimo: establece un valor de peso mí nimo utilizado para comprobar una lectura. Si un peso actual se encuentra por debajo del valor de peso mí... -
Seite 73: Nombre De La Muestra
Si esto ocurriera, desconecte la unidad flash USB y conecte otra unidad flash USB. Ohaus no se responsabiliza de la pérdida de datos en la unidad flash USB o si la unidad flash USB se rompiera mientras está conectada a la balanza. -
Seite 74: Configuración De Los Elementos
ES-12 BALANZAS ADVENTURER La pantalla de inicio de Recuento de piezas Lí nea de pantalla Inicio Icono de Campos de referencia aplicación Botones de aplicaciones Configuración de los elementos Para ver o ajustar la configuración actual Toque el botón Configuración de elementos. Aparecerá la pantalla de configuración. - Seite 75 BALANZAS ADVENTURER ES-13 Establecer un peso de pieza medio (APW) Cada vez que se cuenta un nuevo tipo de pieza, se debe establecer el peso nominal de una pieza (peso de pieza medio o APW) utilizando una pequeña cantidad de piezas. Este APW se almacena hasta que se sustituye por otro APW.
-
Seite 76: Pesaje Porcentual
ES-14 BALANZAS ADVENTURER 4.3 Pesaje porcentual Nota: antes de utilizar cualquier aplicación, asegúrese de haber nivelado y calibrado la balanza. Utilice el pesaje porcentual para medir el peso de una muestra como porcentaje de un peso de referencia preestablecido. Aparecerá el peso de referencia predeterminado (o último). Pesaje porcentual 1. -
Seite 77: Pesaje Dinámico
BALANZAS ADVENTURER ES-15 4.4 Pesaje dinámico Nota: antes de utilizar cualquier aplicación, asegúrese de haber nivelado y calibrado la balanza. Utilice esta aplicación para pesar una carga inestable como por ejemplo un animal que se mueve. Se pueden seleccionar dos modos diferentes de inicio o restablecimiento: Manual (se inicia y detiene pulsando la techa) y Automático (se inicia y detiene automáticamente). -
Seite 78: Determinación De La Densidad
ES-16 BALANZAS ADVENTURER 4.5 Determinación de la densidad Nota: antes de utilizar cualquier aplicación, asegúrese de haber nivelado y calibrado la balanza. Utilice esta aplicación para determinar la densidad de un objeto. Se pueden realizar cuatro tipos de determinación de densidad: 1. -
Seite 79: Medición De La Densidad De Un Material Flotante Utilizando Agua
BALANZAS ADVENTURER ES-17 Paso 2 de 2 – Pesar la muestra sumergida en lí quido. Siga las instrucciones y luego pulse Aceptar para almacenar el peso de la muestra (sumergida en lí quido). Una vez que se han determinado los pesos necesarios, la densidad de la muestra aparece en g/cm (junto con el peso en aire y peso en agua) en la pantalla de aplicaciones. -
Seite 80: Medición De La Densidad De Un Lí Quido Utilizando Un Dispositivo De Inmersión Calibrado (No Suministrado)
ES-18 BALANZAS ADVENTURER 4.5.4 Medición de la densidad de un lí quido utilizando un dispositivo de inmersión calibrado (no suministrado) Active esta función, ingrese al menú de ajuste de densidad y seleccione lo siguiente: Tipo de densidad: Lí quida Nota: si el tipo de densidad se ajusta en lí quido, se desactivan las selecciones de tipo de lí quido y material poroso. -
Seite 81: Medición De La Densidad De Un Material Poroso Utilizando Aceite
BALANZAS ADVENTURER ES-19 Paso 2 de 2 – Pesar el dispositivo de inmersión sumergido en el lí quido de prueba. Siga las instrucciones y luego pulse Aceptar para almacenar el peso del dispositivo de inmersión (sumergido en lí quido). Una vez que se han determinado los pesos necesarios, la densidad de la muestra lí... - Seite 82 ES-20 BALANZAS ADVENTURER Confirme que los valores predeterminados mostrados (temperatura del agua) sean correctos. Para editar los valores predeterminados, toque Configuración de elementos. Aparecerá la pantalla de configuración. La balanza calcula la densidad del agua basándose en el valor de la temperatura del agua introducido (tabla de búsqueda).
-
Seite 83: Control Dinámico Del Peso
BALANZAS ADVENTURER ES-21 Paso 3 de 3 – Pesar la muestra lubricada sumergida en lí quido. Siga las instrucciones y luego pulse Aceptar para almacenar el peso de la muestra lubricada (sumergida en lí quido). Una vez que se han determinado los pesos necesarios, la densidad de la muestra aparece en g/cm (junto con el peso en aire, no lubricada y lubricada y peso en agua) en la pantalla de... -
Seite 84: Configuración De Los Elementos
ES-22 BALANZAS ADVENTURER 4.6.1 Configuración de los elementos Para ver o ajustar la configuración actual Toque el botón Configuración de elementos. Aparecerá la pantalla de configuración. Nombre de la muestra: Asigna un nombre a la muestra. Configuraciones de impresión: Cambia las configuraciones de impresión. -
Seite 85: Control De La Pantalla - Automático
BALANZAS ADVENTURER ES-23 Mantenimiento del pico 4.7.2 Control de la pantalla – Automático 1. En la porción superior izquierda de la pantalla de inicio, seleccione Control de la pantalla. 2. Establezca el Modos automático en Activado en configuración de elementos (consulte la sección 4.7.3). 3. -
Seite 86: Formulación
ES-24 BALANZAS ADVENTURER La pantalla de inicio de Totalización Lí nea de pantalla Inicio Campos de referencia Icono de aplicación Botones de aplicaciones Totalización 1. En la porción superior izquierda de la pantalla de inicio, seleccione Totalización. 2. Coloque el elemento en el plato para dar inicio. El peso de la muestra aparece en la lí nea de pantalla principal. -
Seite 87: Configuración De Los Elementos
BALANZAS ADVENTURER ES-25 5. Pulse Parar para finalizar la formulación. Se muestran los resultados de Formulación: Nota: si Rellenado está Activado (consulte la sección 4.9.1 que aparece a continuación), la balanza le pedirá añadir un material de relleno para completar la formulación. Añada el material de relleno y pulse Aceptar para completar la formulación y mostrar los resultados. -
Seite 88: Funciones Adicionales
ES-26 BALANZAS ADVENTURER 4.10 Funciones adicionales 4.10.1 Peso bajo La balanza Adventurer está equipada con un gancho de peso bajo para pesaje por debajo de la balanza. Nota: para evitar daños, antes de apagar la balanza, retire el plato y los elementos de protección contra corrientes de aire (si os hubiera). -
Seite 89: Configuración Del Menú
BALANZAS ADVENTURER ES-27 CONFIGURACIÓN DEL MENÚ 5.1 Navegación por menú Estructura del menú de usuario: Valores Unidades de Mantenimiento Datos de Modos de Aplicació n Menú principal Calibració n Ajuste de la balanza Comunicació n Bloqueo pesaje de datos BPL y GMP fá... -
Seite 90: Cambio De Configuraciones
ES-28 BALANZAS ADVENTURER Toda la navegación por el menú se realiza tocando la pantalla. Para acceder al menú, toque Menú en la pantalla de inicio de la aplicación. Aparece el menú principal con los botones Volver y Salir. Continúe tocando el elemento adecuado de la lista para navegar por los elementos del menú. -
Seite 91: Submenú De Calibración (Modelos Incal)
BALANZAS ADVENTURER ES-29 5.2 Calibración Las balanzas Adventurer (modelos INCAL) ofrecen la posibilidad de elegir entre seis métodos de calibración: Calibración Interna Calibración automática, Calibración AutoCal™ Ajuste, Calibración de amplitud, Calibración de Linealidad y Prueba de calibración. Nota: La unidad de calibración es siempre en gramos. Atención: no toque la balanza durante una calibración. -
Seite 92: Ajuste De ™ Autocal
ES-30 BALANZAS ADVENTURER 5.2.4 Ajuste de ™ AutoCal Utilice este método de calibración para ajustar el punto de calibración de amplitud sin afectar la calibración de la amplitud o linealidad. Se puede utilizar el ajuste de calibración para ajustar el resultado de la Calibración interna en +100 divisiones. -
Seite 93: Ajuste De La Balanza
BALANZAS ADVENTURER ES-31 5.3 Ajuste de la balanza Ingrese a este submenú para personalizar la funcionalidad de la balanza. 5.3.1 Submenú de ajuste de la balanza Idioma Configuración Nivel de filtro Rastreo de cero del usuario automático Tara automática Graduaciones Fecha y hora Modo aprobado Las configuraciones predeterminadas de fábrica aparecen a continuación en negrita. -
Seite 94: Nivel De Filtro
ES-32 BALANZAS ADVENTURER 5.3.4 Nivel de filtro Configura la cantidad de filtrado de señales. BAJO = tiempo de estabilización má s rápido con menos estabilidad. MEDIO = tiempo de estabilización normal con estabilidad normal. ALTO = tiempo de estabilización má s lento con más estabilidad. -
Seite 95: Modo Aprobado
BALANZAS ADVENTURER ES-33 5.3.9 Modo aprobado Utilice este menú para ajustar el estado del comercio legal. APAGADO = funcionamiento estándar. ENCENDIDO = el funcionamiento cumple con las normas de Metrologí a Legal. Nota: Si se ajusta Modo aprobado en ENCENDIDO, la configuración del menú se ve afectada de la siguiente manera: Menú... -
Seite 96: Unidades De Pesaje
ES-34 BALANZAS ADVENTURER 5.4 Unidades de pesaje Acceda a este submenú para activar las unidades de medición deseadas. Además, a este menú se puede acceder pulsando el sí mbolo unidad en la pantalla principal de la aplicación. Nota: De acuerdo a las leyes nacionales, la balanza no puede incluir las unidades de medición enumeradas. -
Seite 97: Información De La Balanza
BALANZAS ADVENTURER ES-35 5.5.2 Exportar a USB Exporta los datos de pesaje a la unidad Flash USB. Se pueden exportar dos tipos de datos: - Configuración de la aplicación (APW, Peso de ref., etc.) - Configuración de menú (Función de ajuste de la balanza, etc.). Nota: La función Guardar en USB tiene que estar ajustada en ENCENDIDO para permitir la transferencia de datos a USB. -
Seite 98: Transmisión
ES-36 BALANZAS ADVENTURER 5.6.3 Transmisión Ajuste los bits de datos, bit de parada y paridad. 7 PAR 1 = 7 bits de datos, paridad par, bit de parada 1 7 IMPAR 1 = 7 bits de datos, paridad impar, bit de parada 1 7 PAR 2 = 7 bits de datos, paridad par, bit de parada 2 7 IMPAR 2... - Seite 99 BALANZAS ADVENTURER ES-37 CONTINUO = la impresión ocurre en forma continua. Si selecciona CON ESTABILIDAD, ajuste las condiciones para la impresión. CARGA = se imprime cuando la carga mostrada es estable. PUESTA A CERO, CARGA = se imprime cuando la lectura de carga o de puesta a cero mostrada es estable.
-
Seite 100: Datos De Bpl Y Gmp
ES-38 BALANZAS ADVENTURER 5.7 Datos de BPL y GMP Acceda a este menú para ajustar los datos de las buenas prácticas de laboratorio (BPL y las buenas prácticas de fabricación (GMP)). 5.7.1 Submenú de datos de BPL Nombre de la Nombre de Nombre del Encabezado... -
Seite 101: Comercio Legal
BALANZAS ADVENTURER ES-39 COMERCIO LEGAL Si la balanza se utiliza en el comercio o una aplicación controlada legalmente, se debe ajustar, verificar y sellar según las normas de medición y pesaje locales. Es responsabilidad del comprador garantizar que se cumplan todos los requisitos legales pertinentes. -
Seite 102: Imprimir
Prueba de calibración y comando de impresión de eco enviados a la báscula. Software SPDC Ohaus proporciona el software Serial Port Data Collection, o SPDC, y puede utilizarse en sistemas operativos que no tengan el software HyperTerminal mencionado anteriormente. -
Seite 103: Mantenimiento
BALANZAS ADVENTURER ES-41 5. El campo Estabilidad contiene el carácter “?” si la lectura del peso no es estable. El campo Estabilidad y el siguiente campo Espacio se omiten si la lectura del peso es estable. 6. El campo B/N contiene la indicación de neto o bruto. En el caso de pesos netos, el campo contiene “NETO”. -
Seite 104: Resolución De Problemas
Información de mantenimiento Si la sección de solución de problemas no resuelve, póngase en contacto con un servicio técnico Ohaus autorizado. Visite nuestra página web, www.ohaus.com, para localizar la oficina de Ohaus más cercana a usted. -
Seite 105: Datos Técnicos
BALANZAS ADVENTURER ES-43 DATOS TÉCNICOS Especificaciones Condiciones ambientales Solo para uso en interiores Altitud: Hasta 2.000 m Rango de temperatura especificado: 10 ℃ a 30 ℃ Humedad: humedad máxima relativa del 80 % para temperaturas de hasta 30℃ ... - Seite 106 ES-44 BALANZAS ADVENTURER TABLA 9-1. ESPECIFICACIONES Modelo: AX124 AX124/E AX224 AX224/E AX324 Capacidad 120 g 120 g 220 g 220 g 320 g Sensibilidad d 0,0001 g Repetibilidad (desv. 0,0001 g tí pica) (g) Linealidad (g) ± 0,0002 g 25 g, 50 50 g, Puntos de 25 g, 50 g...
- Seite 107 BALANZAS ADVENTURER ES-45 TABLA 9-2. ESPECIFICACIONES (continuación) AX523/E Modelo: AX223 AX223/E AX423 AX423/E AX523 Capacidad 220 g 220 g 420 g 420 g 520 g 520 g Sensibilidad d 0,001 g Repetibilidad (desv. 0,001 g tí pica) (g) Linealidad (g) ±...
- Seite 108 ES-46 BALANZAS ADVENTURER TABLA 9-3. ESPECIFICACIONES (continuación) Modelo: AX422 AX422/E AX822 AX822/E Capacidad 420g 420g 820g 820g Sensibilidad d 0,01 g Repetibilidad (desv. tí pica) 0,01 g Linealidad (g) ± 0,02 g Puntos de 100g, 200g 100g, 200g 200g, 400g 200g, 400g calibración de 300g,400g...
- Seite 109 BALANZAS ADVENTURER ES-47 TABLA 9-4. ESPECIFICACIONES (continuación) Modelo: AX1502 AX1502/E AX2202 AX2202/E AX4202 AX4202/E AX5202 Capacidad 1.520 g 1.520 g 2.200 g 2.200 g 4.200 g 4.200 g 5.200 g Sensibilidad d 0,01 g Repetibilidad (desv. tí pica) 0,01 g Linealidad (g) ±...
- Seite 110 ES-48 BALANZAS ADVENTURER TABLA 9-5. ESPECIFICACIONES (continuación) AX2201 AX2201/E Modelo: AX4201 AX4201/E AX8201 AX8201/E 2200g 2200g Capacidad 4.200 g 4.200 g 8.200 g 8.200 g Sensibilidad d 0,1 g Repetibilidad (desv. 0,1 g típica) (g) Linealidad (g) ± 0,2 g Puntos de 500g, 1000g 500g, 1000g...
- Seite 111 BALANZAS ADVENTURER ES-49 TABLA 9-6. ESPECIFICACIONES (continuación) Modelo: AX124M AX224M AX324M AX223M AX423M AX523M AX1502M AX2202M AX4202M AX5202M AX8201M Má x. 120 g 220 g 320 g 220 g 420 g 520 g 1.520 g 2.200 g 4.200 g 5.200g 8.200 g Mín.
- Seite 112 ES-50 BALANZAS ADVENTURER TABLA 9-7. ESPECIFICACIONES (continuación) Modelo: AX224N AX223N/E AX423N AX 423N/E AX523N/E AX1502N/E AX2202N/E AX4202N/E AX8201N/E Má x. 220 g 220 g 420 g 420 g 520 g 1520 g 2200 g 4200 g 8200 g Mín. 0,01 g 0,02 g 0,02 g 0,02 g...
- Seite 113 BALANZAS ADVENTURER ES-51 TABLA 9-8. ESPECIFICACIONES (continuación) Modelo: AX124AU AX224AU AX324AU AX223AU AX423AU AX523AU AX1502AU AX2202AU AX4202AU AX5202AU AX8201AU Má x. 120 g 220 g 320 g 220 g 420 g 520 g 1.520 g 2.200 g 4.200 g 5.200g 8.200 g Mín.
-
Seite 114: Dibujos Y Dimensiones
ES-52 BALANZAS ADVENTURER Dibujos y dimensiones Dimensiones completamente montada Figura 9-1. Modelos con protección contra corrientes de aire Figura 9-2. Modelos sin protección contra corrientes de aire Piezas y accesorios TABLA 9-5. ACCESORIOS DESCRIPCIÓN NÚMERO DE PIEZA Pantalla auxiliar 80251396 Kit de densidad 80253384 Cable, dispositivo USB (tipo A-B) -
Seite 115: Comunicación
BALANZAS ADVENTURER ES-53 Comunicación 9.4.1 Comandos de la interfaz La balanza debe reconocer los comandos enumerados en la siguiente tabla. La balanza mostrará “ES” para los comandos no válidos. TABLA 9-6. LISTA DE INSTRUCCIONES DE LA INTERFAZ DE ADVENTURER Caracteres Función de comandos Impresión inmediata del peso mostrado (estable o inestable). -
Seite 116: Conexiones De Patillas Rs232 (Db9)
Handshake La interfaz USB La interfaz USB de Ohaus es una solución única al problema de la conexión de la balanza a un ordenador utilizando un bus serial universal (USB). Los dispositivos USB están categorizados en clases como unidades de disco, cámaras digitales, impresoras, etc. -
Seite 117: Entrada Usb
Si hay datos en buffer de impresión, la impresora dejará de imprimir estos datos. ACTUALIZACIONES DE SOFTWARE Ohaus mejora continuamente el software de su balanza. Para obtener la última versión, póngase en contacto con el distribuidor autorizado de Ohaus o con Ohaus Corporation. -
Seite 118: Conformidad
Este producto cumple con la directiva EMC 2004/108/EC, la directiva de baja tensión 2006/95/EC y la directiva de instrumento de pesaje no automático 2009/23/EC. La Declaración de conformidad está disponible en internet a través de http://europe.ohaus.com/europe/en/home/support/compliance/ce-declaration-of-conformity.aspx. AS/NZS CISPR 11, AS/NZS 61000.4.3 CAN/CSA-C22.2 N.º 61010-1-12 UL Std. - Seite 119 International (BVQI), confirmando que el sistema de gestión de calidad de OHAUS cumple con los requisitos de la norma ISO 9001. El 21 de junio de 2012, OHAUS Corporation, EEUU, se registró nuevamente en la norma ISO 9001:2008. En cumplimiento con la Directiva Europea: Eliminación...
-
Seite 120: Garantía Limitada
Los productos de Ohaus están en garantí a por defectos en los materiales o de construcción desde la fecha de entrega hasta la duración del periodo de la garantí a. Durante el periodo de validez de la garantí a, Ohaus reparará... - Seite 121 BALANCES ADVENTURER FR-1 TABLE DES MATIÈRES 1. INTRODUCTION ........................3 Description ..............................3 Caractéristiques ............................3 Définition des symboles et des indicateurs d'avertissements ..............3 Consignes de sécurité ..........................3 2. INSTALLATION ........................4 Déballage ..............................4 Sélection de l'emplacement ......................... 4 Mise de niveau de l'équipement ........................
- Seite 122 FR-2 BALANCES ADVENTURER 5.3.4 Niveau du filtre ............................34 5.3.5 Suivi automatique du zéro ........................34 5.3.6 Tare automatique ........................... 34 5.3.7 Graduations ............................34 5.3.8 Date et heure ............................35 5.3.9 Mode approuvé ............................35 Unités de pesage ............................36 5.4.1 Sous-menu des unités..........................
-
Seite 123: Introduction
Description La balance Adventurer est un instrument de pesée de précision qui offrira de longues années de service si son entretien est correctement assuré. Les balances Ohaus Adventurer disponibles peuvent effectuer des pesées entre 120 et 8 200 grammes. Caractéristiques Contrôles tactiles : Accès graphique rapide à... -
Seite 124: Installation
FR-4 BALANCES ADVENTURER INSTALLATION Déballage Sortir avec préATTENTION la balance Adventurer et chacun de ses composants hors de l'emballage. Les composants inclus varient en fonction du modèle de la balance (voir le tableau ci-dessous). Conserver l'emballage afin d'assurer un stockage et un transport en toute sécurité. Veuillez lire le manuel intégralement avant d'utiliser la balance Adventurer afin d'éviter un fonctionnement incorrect. -
Seite 125: Connexion De L'alimentation
BALANCES ADVENTURER FR-5 Faire tourner le pied conformé ment à l'image ci-dessus en fonction de la position de la bulle de niveau jusqu'à ce qu'elle soit centrée. 2.4 Connexion de l’alimentation Brancher le connecteur de sortie CC sur la prise à l'arrière de la balance. Brancher ensuite la fiche de l'adaptateur CA dans une prise secteur. - Seite 126 FR-6 BALANCES ADVENTURER ¤ AutoCal™ Un système automatique et complet d'étalonnage interne qui facilite la maintenance de routine en étalonnant automatiquement tous les jours la balance est disponible sur la plupart des modèles. Il étalonne automatiquement le système lorsqu'il détecte une variation de température suffisante pour affecter la précision du pesage (>1,5 °...
-
Seite 127: Fonctionnement
BALANCES ADVENTURER FR-7 FONCTIONNEMENT 3.1 Aperçu général de l'affichage et de l'écran d'accueil Cet équipement utilise un affichage tactile avec des zones Tactiles ainsi que des boutons permettant de contrôler les fonctions de l'équipement. CONTRÔLES Bouton Action Appui court (si hors alimentation) : Met la balance sous tension Appui long (si sous tension) : Met la balance hors tension Imprime les données présentes vers une imprimante ou un ordinateur. -
Seite 128: Fonctions Principales Et Menu Principal
FR-8 BALANCES ADVENTURER 3.2 Fonctions principales et Menu principal Appuyer sur Zéro pour mettre l’affichage à zéro. Placer un article sur le plateau. L'affichage indique le Pesage : poids brut. Tarage : Sans charge sur le plateau, appuyer sur Zéro pour régler l'affichage sur zéro. Placer un récipient vide sur le plateau et appuyer sur Tare. -
Seite 129: Vue D'ensemble Des Pièces Et Des Caractéristiques - Modèles Avec Pare-Vent
BALANCES ADVENTURER FR-9 3.3 Vue d'ensemble des pièces et des caracté ristiques - Modè les avec pare-vent Plateau Indicateur de niveau Pied réglable USB hôte Pied réglable Puissance Commutateur RS232 d’entrée esclave 3.4 Vue d'ensemble des pièces et des caractéristiques - Modè les sans pare-vent Plateau Anneau en aile... -
Seite 130: Applications
FR-10 BALANCES ADVENTURER APPLICATIONS La balance peut être configurée pour fonctionner dans différents modes d'applications. Appuyer sur le champ Application en haut et à gauche (pesage dans l'exemple ci-dessous) : La balance Adventurer possède 9 modes d'application, comme suit : Pesage Comptage des Pesage en... -
Seite 131: Paramétrage Articles
BALANCES ADVENTURER FR-11 4.1.1 Paramétrage articles Pour visualiser ou ajuster les paramètres en cours Appuyer sur le bouton Paramé trage articles. L'é cran Paramé trage apparaî t. Poids minimum : dé termine une valeur de poids minimum devant ê tre utilisée pour vé rifier une lecture. S'il s'avè... -
Seite 132: Nom De L'échantillon
Si tel est le cas, dé brancher la clé USB et en essayer une autre. Ohaus n'est pas responsable de l'effacement de données sur une clé USB ou en cas de panne de la clé... -
Seite 133: Paramétrage Articles
BALANCES ADVENTURER FR-13 Écran d'accueil Comptage des pièces Ligne d'affichage principale Champs de référence Icône de l'application Boutons d'applications 4.2.1 Paramétrage articles Pour visualiser ou ajuster les paramètres en cours Appuyer sur le bouton Paramétrage articles. L'écran Paramétrage apparaî t. Échantillons : La dimension de l'échantillon peut se situer entre 1 et 10 000 pièces. - Seite 134 FR-14 BALANCES ADVENTURER Définition du poids moyen des pièces (APW) : À chaque fois qu'un nouveau type de pièce est compté, le poids nominal d'une pièce (poids moyen unitaire ou APW) doit être défini en utilisant une petite quantité de pièces. L'APW est stocké...
-
Seite 135: Pesage En Pourcentage
BALANCES ADVENTURER FR-15 Reportez-vous à la section 4.1.3 pour de plus amples informations. 4.3 Pesage en pourcentage Remarque : Avant d'utiliser une application, s'assurer que la balance est de niveau et étalonnée. Utiliser Pesage en pourcentage pour mesurer le poids d'un échantillon affiché en tant que pourcentage d'un poids de référence préétabli. -
Seite 136: Pesage Dynamique
FR-16 BALANCES ADVENTURER 4.4 Pesage dynamique Remarque : Avant d'utiliser une application, s'assurer que la balance est de niveau et étalonnée. Utiliser cette application pour peser une charge instable comme un animal qui bouge. Il est possible de sélectionner deux modes différents de démarrage/réinitialisation : Manuel (démarrage et arrêt en appuyant sur une touche) et Automatique (démarrage et arrêt automatiques). -
Seite 137: Détermination De La Densité
BALANCES ADVENTURER FR-17 amples informations. 4.5 Détermination de la densité Remarque : Avant d'utiliser une application, s'assurer que la balance est de niveau et étalonnée. Utiliser cette application pour déterminer la densité d'un objet. Quatre types de détermination de la densité peuvent être réalisés : 1. -
Seite 138: Mesure De La Densité D'un Matériau Flottant En Utilisant De L'eau
FR-18 BALANCES ADVENTURER Étape 1 sur 2 - Pesée de l'échantillon dans l'air. Appuyer sur Démarrage. Suivre les instructions à l’écran et appuyer sur Accepter pour stocker le poids de l'échantillon sec (dans l'air). Étape 2 sur 2 - Pesée de l'échantillon submergé... -
Seite 139: Mesure De La Densité D'un Solide En Utilisant Un Liquide Auxiliaire
BALANCES ADVENTURER FR-19 4.5.3 Mesure de la densité d'un solide en utilisant un liquide auxiliaire Pour activer cette caractéristique, entrer dans le menu Paramétrage de détermination de la densité et sélectionner ce qui suit : Type de densité : Solide ; Type de Liquide : Autre ; Matière poreuse : Arrêt. Confirmer que les valeurs par défaut affichées (densité... - Seite 140 FR-20 BALANCES ADVENTURER Une fenêtre d'entrée numérique apparaî t. Introduire la valeur désirée et appuyer sur Enregistrer. L'affichage revient à l'écran précédent avec la nouvelle valeur en surbrillance. Pour revenir à l'écran d'accueil Détermination de la densité, appuyer sur Retour. Appuyer sur Démarrage pour démarrer le processus.
-
Seite 141: Mesure De La Densité Des Matériaux Poreux En Utilisant De L'huile
BALANCES ADVENTURER FR-21 4.5.5 Mesure de la densité des matériaux poreux en utilisant de l'huile Pour activer cette fonctionnalité, entrer dans le menu Paramétrage de détermination de la densité, et définir ce qui suit : Type de densité : Solide ... - Seite 142 FR-22 BALANCES ADVENTURER Une fenêtre d'entrée numérique apparaî t. Introduire la valeur désirée, ensuite appuyer sur Enregistrer. L'affichage revient à l'écran précédent avec la nouvelle valeur en surbrillance. Pour revenir à l'écran d'accueil de Détermination de la densité, appuyer sur Quitter.
- Seite 143 BALANCES ADVENTURER FR-23 Une fois que les poids nécessaires ont été déterminés, la densité de l'échantillon est affichée en g/cm (conjointement au poids dans l'air, avec et sans huile, et au poids dans l'eau) sur l'écran Application. La valeur reste affichée jusqu'au prochain appui sur Démarrage.
-
Seite 144: Pesage De Vérification
FR-24 BALANCES ADVENTURER 4.6 Pesage de vérification Remarque : Avant d'utiliser une application, s'assurer que la balance est de niveau et étalonnée. Le pesage de vérification est utilisé pour comparer le poids d'un échantillon aux limites de la cible. Pesage de vérification 1. -
Seite 145: Maintien De L'affichage
BALANCES ADVENTURER FR-25 4.7 Maintien de l'affichage Remarque : Avant d'utiliser une application, s'assurer que la balance est de niveau et étalonnée. Deux modes sont possibles : Maintien de l'affichage – Permet à l'utilisateur de capturer et de mémoriser un poids stable. Maintien de la valeur de crête –... -
Seite 146: Paramétrage Articles
FR-26 BALANCES ADVENTURER Maintien poids maximum 4.7.3 Paramétrage articles Pour visualiser ou ajuster les paramètres en cours Appuyer sur le bouton Paramétrage articles. L'écran Paramétrage apparaî t. Mode : Choisir entre Maintien poids maximum et Maintien de l' affichage (par défaut). Nom d'échantillon : Attribution d'un nom à... -
Seite 147: Formulation
BALANCES ADVENTURER FR-27 4.9 Formulation Remarque : Avant d'utiliser une application, s'assurer que la balance est de niveau et étalonnée. Utiliser cette application pour mé langer et ré aliser des recettes. Le nombre maximum de composants s'élève à 50. Écran d'accueil Formulation Ligne d'affichage principale Champs de référence Icône de... -
Seite 148: Autres Fonctions
FR-28 BALANCES ADVENTURER réglages d'impression. Se reporter à la section 7 pour de plus amples informations. 4.10 Autres fonctions 4.10.1 Pesée sous la balance La balance Adventurer est équipée d'un crochet pour peser sous la balance. Remarque : Avant de retourner la balance, déposer le plateau et les éléments du pare-vent (le cas échéant) pour éviter tout endommagement. -
Seite 149: Paramètres Des Menus
BALANCES ADVENTURER FR-29 PARAMÈTRES DES MENUS 5.1 Navigation dans le menu Structure du menu de l'utilisateur: Maintenance des Donné es BPL Ré initialis- Modes d'applications Menu principal É talonnage Configuration de la balance Unité s de pesage Communication Verrouillage donné es et BPF ation usine É... -
Seite 150: Changement Des Paramètres
FR-30 BALANCES ADVENTURER La navigation dans les menus s'effectue en appuyant sur l'affichage. Pour entrer dans le menu, appuyer sur Menu de n'importe quel écran d'accueil d'une application. Le menu principal s’affiche avec des boutons pour Retour et Quitter. Continuer d'appuyer sur l'article approprié de la liste pour naviguer vers les éléments de menu. 5.1.1 Changement des paramètres Pour modifier un paramètre du menu, naviguer vers le paramètre conformé... -
Seite 151: Sous-Menu D'étalonnage (Modèles Incal)
BALANCES ADVENTURER FR-31 5.2 Étalonnage Les balances Adventurer (modèles INCAL) offrent le choix parmi six méthodes d'étalonnage : Étalonnage interne, Étalonnage automatique, Réglage AutoCal™, Étalonnage de l'intervalle de mesure, Étalonnage de la linéarité et Cal Test (test étalonnage). Remarque : L'unité d'étalonnage est toujours le gramme. Attention : Pendant un étalonnage, éviter de «... -
Seite 152: Réglage Autocal
FR-32 BALANCES ADVENTURER 5.2.4 Réglage AutoCal™ Utiliser cette méthode d'étalonnage pour régler l'intervalle d'étalonnage sans affecter l'intervalle de mesure ou la linéarité. Le réglage de l'étalonnage peut être utilisé pour ajuster le résultat de l'étalonnage interne par ± 100 divisions. Remarque : Avant de procéder à... -
Seite 153: Étalonnage De La Linéarité
BALANCES ADVENTURER FR-33 5.2.6 Étalonnage de la linéarité L'étalonnage de la linéarité utilise deux points d'étalonnage, l'un à charge zéro et l'autre à des charges spécifiées. Sans charge sur la balance, appuyer sur Étalonnage de la linéarité pour commencer le processus. La balance capture le point zéro et demande alors le poids suivant. -
Seite 154: Paramètre Utilisateur
FR-34 BALANCES ADVENTURER 5.3.3 Paramètre utilisateur Utiliser ce sous-menu pour modifier le paramétrage de : Toucher étalonnage « Exé cution de l'é talonnage, appuyer sur l'é cran au centre de l'anneau » (Premier en haut et à gauche, puis en bas et à droite.) Luminosité... -
Seite 155: Date Et Heure
BALANCES ADVENTURER FR-35 5.3.8 Date et heure Définition des dates et heures actuelles. Changement de format (le cas échéant), entrer alors la valeur en cours. Appuyer sur Enregistrer pour confirmer la nouvelle valeur. 5.3.9 Mode approuvé Utiliser ce menu pour définir l'état de la métrologie légale. INACTIF = Fonctionnement standard MARCHE = l'opération est conforme aux réglementations des Poids et mesures. -
Seite 156: Unités De Pesage
FR-36 BALANCES ADVENTURER 5.4 Unités de pesage Entrer dans ce sous-menu pour activer les unités de mesure désirées. Il est aussi possible d'accéder à ce menu en appuyant sur le symbole de l'unité de l'écran d'accueil de l'application. Remarque : Conformé ment aux réglementations nationales, l'indicateur peut ne pas inclure certaines des unités de mesure répertoriées. -
Seite 157: Exportation Vers Usbs
BALANCES ADVENTURER FR-37 5.5.2 Exportation vers USB Exportation des données de pesage vers une clé USB.Deux types de données peuvent être exportés : - Paramètres d'une application (APW, poids de référence, etc.) - Paramètres de menu (fonction de configuration de la balance, etc.) Remarque : La fonction Enregistrer vers USB doit être définie sur MARCHE afin d'activer le transfert des données vers USB. -
Seite 158: Débit En Bauds
FR-38 BALANCES ADVENTURER 5.6.2 Débit en bauds Définition du débit en bauds (bits par seconde). 2400 = 2400 bps 4800 = 4800 bps 9600 = 9600 bps 19200 = 19200 bps 38400 = 38400 bps 5.6.3 Transmission Définition du nombre de bits de données, du bit d'arrêt et de la parité. 7 paire 1 = 7 bits de données, parité... -
Seite 159: Impression Automatique
BALANCES ADVENTURER FR-39 Options d'impression Définition des critères d'impression. Imprimante = Impression des données vers une imprimante = Impression des données vers un PC 5.6.6 Impression automatique Définition de la fonctionnalité automatique d'impression. = Désactivé DÈS STABILITÉ = l'impression a lieu chaque fois que les critères de stabilité... -
Seite 160: Données Bpl Et Bpfglp
FR-40 BALANCES ADVENTURER Enregistrer vers USB Définition de l'état. ARRÊT = les données ne seront pas enregistrées vers USB MARCHE = les données seront enregistrées vers USB 5.7 Données BPL et BPFGLP Entrer dans ce menu pour définir les données des Bonnes pratiques de laboratoire (BPL) et des Bonnes pratiques de fabrication (BPF). -
Seite 161: Métrologie Légale
BALANCES ADVENTURER FR-41 MÉTROLOGIE LÉGALE Lorsque la balance est utilisée dans une application commerciale ou légalement contrôlée, elle doit être configurée, inspectée et scellée conformé ment à la réglementation locale des poids et mesures. Il incombe à l'acheteur de s'assurer que toutes les conditions légales pertinentes sont satisfaites. 6.1 Réglages Avant de procéder à... -
Seite 162: Imprimer
écho seront envoyées vers la balance. Logiciel SPDC Le logiciel de recueil des données du port série ou SPDC est fourni par Ohaus et peut être utilisé sur des systèmes d'exploitation qui ne sont pas équipés du logiciel HyperTerminal mentionné... -
Seite 163: Maintenance
BALANCES ADVENTURER FR-43 MAINTENANCE 8.1 Étalonnage Vérifier périodiquement l'étalonnage en plaç ant un poids précis sur la balance et en observant le résultat. Se reporter à la Section 5.2 pour des instructions si un étalonnage est nécessaire. 8.2 Nettoyage AVERTISSEMENT : Déconnecter la balance Adventurer de l'alimentation électrique avant de la nettoyer. -
Seite 164: Dépannage
8.4 Informations de maintenance Si la section de dépannage n'aide pas à résoudre le problème, contacter un technicien agréé Ohaus. Visiter le site Web à l’adresse www.ohaus.com pour trouver le plus proche bureau Ohaus. Un spécialiste des produits Ohaus... -
Seite 165: Données Techniques
BALANCES ADVENTURER FR-45 DONNÉES TECHNIQUES 9.1 Spécifications Conditions ambiantes Utilisation en intérieur seulement Altitude : Jusqu'à 2000 m Plage de température spécifiée : 10 à 30 ° C Humidité : humidité relative maximum à 80 % avec des températures jusqu'à 30 ° C avec diminution linéaire jusqu'à... - Seite 166 FR-46 BALANCES ADVENTURER TABLEAU 9-1. SPÉCIFICATIONS Modèle: AX124 AX124/E AX224 AX224/E AX324 Capacité 120 g 120 g 220 g 220 g 320 g Lisibilité d 0,0001 g Reproductibilité (écart 0,0001 g type.) (g) Linéarité (g) ±0,0002 g 25 g, 50 50 g, Points d'étalonnage 50 g, 100 g...
- Seite 167 BALANCES ADVENTURER FR-47 TABLEAU 9-2. SPÉCIFICATIONS (suite) AX523/E Modèle: AX223 AX223/E AX423 AX423/E AX523 Capacité 220 g 220 g 4200 g 4200 g 520 g 520 g Lisibilité d 0,001 g Reproductibilité (écart 0,001 g type.) (g) Linéarité (g) ±0,002 g 50 g, 100 g, 200 g,...
- Seite 168 FR-48 BALANCES ADVENTURER TABLEAU 9-3. SPÉCIFICATIONS (suite) AX422 AX422/E AX822 AX822/E Modèle: 420g 420g 820g 820g Capacité Lisibilité d 0,01 g Reproductibilité (écart 0,01 g type.) (g) Linéarité (g) ±0,02 g Points d'étalonnage de 100g, 200g 100g, 200g 200g, 400g 200g, 400g l'intervalle de mesure 300g,400g...
- Seite 169 BALANCES ADVENTURER FR-49 TABLEAU 9-4. SPÉCIFICATIONS (suite) AX4202/ E AX5202 Modèle: AX1502 AX1502/ E AX2202 AX2202/ E AX4202 Capacité 1520 g 1520 g 2200 g 2200 g 4200 g 4200 g 5200 g Lisibilité d 0,01 g Reproductibilité 0,01 g (écart type.) (g) Linéarité...
- Seite 170 FR-50 BALANCES ADVENTURER TABLEAU 9-5. SPÉCIFICATIONS (suite) AX2201 AX2201/E Modèle: AX4201 AX4201/E AX8201 AX8201/E 2200g 2200g Capacité 4200 g 4200 g 8200 g 8200 g Lisibilité d 0,1 g Reproductibilité (écart 0,1 g type.) (g) Linéarité (g) ±0,2 g 1000 g, 1000 g, 2000 g, 2000 g,...
- Seite 171 BALANCES ADVENTURER FR-51 TABLEAU 9-6. SPÉCIFICATIONS (suite) AX523M AX1502M AX2202M AX4202M AX5202M AX8201M Modè le AX124M AX224M AX324M AX223M AX423M 8200 g Maxi 120 g 220 g 320 g 220 g 420 g 520 g 1520 g 2200 g 4200 g 5200 g Mini 0,01g...
- Seite 172 FR-52 BALANCES ADVENTURER TABLEAU 9-7. SPÉCIFICATIONS (suite) Modè le AX224N AX223N/E AX423N AX 423N/E AX523N/E AX1502N/E AX2202N/E AX4202N/E AX8201N/E Maxi 220 g 220 g 420 g 420 g 520 g 1520 g 2200 g 4200 g 8200 g Mini 0,01 g 0,02 g 0,02 g 0,02 g...
- Seite 173 BALANCES ADVENTURER FR-53 TABLEAU 9-8. SPÉCIFICATIONS (suite) AX124AU AX224AU AX324AU AX223AU AX423AU AX523AU AX1502AU AX2202AU AX4202AU AX5202AU AX8201AU Modèle 8200 g Maxi 120 g 220 g 320 g 220 g 420 g 520 g 1520 g 2200 g 4200 g 5200 g Mini 0,01g...
-
Seite 174: Schémas Et Dimensions
FR-54 BALANCES ADVENTURER 9.2 Schémas et dimensions Dimensions complètement assemblée Figure 9-1 Modèles avec pare-vent Figure 9-2 Modèles sans pare-vent 9.3 Pièces et accessoires TABLEAU 9-7. ACCESSOIRES DESCRIPTION RÉFÉRENCE Affichage auxiliaire 80251396 Kit de densité 80253384 Câble, dispositif USB (Type A-B) 83021085 Dispositif de sécurité... -
Seite 175: Communications
BALANCES ADVENTURER FR-55 9.4 Communications Commandes de l’interface 9.4.1 Les commandes répertoriées sur le tableau suivant seront reconnues par la balance. La balance renverra un « ES » pour les commandes non valides. TABLEAU 9-8. LISTE DES COMMANDES DE L’INTERFACE ADVENTURER Caractère de Fonction commande... -
Seite 176: Rs232 (Db9) Connexion Des Broches
Handshake 9.5 Interface USB Le kit d'interface USB Ohaus reste la solution unique au problème de connexion d'une balance sur un ordinateur en utilisant USB (Universal Serial Bus). Les dispositifs USB sont classés selon des catégories telles que des lecteurs de disques, des caméras numériques, des imprimantes, etc. Les balances n'ont pas de classification communé... -
Seite 177: Mise À Jour De Logiciels
Si des données se trouvent dans le tampon d'impression, l'imprimante finira d'imprimer ces données. MISE À JOUR DE LOGICIELS Ohaus améliore continuellement le logiciel de ses balances. Pour obtenir la version la plus récente, contacter un représentant Ohaus agréé ou Ohaus Corporation. -
Seite 178: Conformité
Ce produit est conforme à la directive EMC 2004/108/EC, à la directive de basse tension 2006/95/EC et à la directive des instruments de pesée non automatique 2009/23/EC. La Déclaration de conformité complète est disponible en ligne sur http://europe.ohaus.com/europe/en/home/support/compliance/ce-declaration-of-conformity.aspx. AS/NZS CISPR 11, AS/NZS 61000.4.3 CAN/CSA-C22.2 61010-1-12 Standard UL N°... - Seite 179 Ohaus Corporation, États-Unis d'Amérique, confirmant que le système de gestion de la qualité d'OHAUS était conforme aux conditions normalisées de l'ISO 9001. Le 21 juin 2012, Ohaus Corporation, USA, a été ré- enregistrée à la norme ISO 9001:2008. Conforme avec l'Europe : Mise au rebut Conformé...
-
Seite 180: Garantie Limitée
GARANTIE LIMITÉE Ohaus garantit que ses produits sont exempts de défauts matériels et de fabrication à compter de la date de livraison pendant toute la durée de la garantie. Selon les termes de cette garantie, Ohaus s'engage, sans frais de votre part, à... - Seite 181 ADVENTURER-WAAGEN DE-1 INHALTSVERZEICHNIS 1. EINLEITUNG ..........................3 Beschreibung ............................... 3 Ausstattung ..............................3 Bedeutung der Signalwörter und Warnsymbole ..................3 Sicherheitsmaßnahmen ..........................4 2. INSTALLATION ........................4 Auspacken ..............................4 Auswahl des Aufstellorts ..........................4 Nivellieren des Geräts ..........................4 Anschluss der Stromversorgung ........................5 Verbindung mit der Schnittstelle ........................
- Seite 182 DE-2 ADVENTURER-WAAGEN 5.3.4 Filterebene ............................. 33 5.3.5 Automatische Nullpunktnachführung ..................... 33 5.3.6 Autom. Tarieren ............................33 5.3.7 Teilstriche ............................... 33 5.3.8 Datum & Zeit ............................34 5.3.9 Eichmodus .............................. 34 Wä geeinheiten ............................35 5.4.1 Untermenü mit den Maßeinheiten ......................35 Datenpflege ..............................
-
Seite 183: Einleitung
EINLEITUNG Beschreibung Die Adventurer-Waage ist ein Präzisionswägeinstrument, das Ihnen bei entsprechender Pflege viele Jahre lang gute Dienste leisten wird. Die Adventurer-Waage von Ohaus ist für Wägebereiche von 120 g bis 8.200 g lieferbar. Ausstattung Steuerung über Touch-Elemente: Schneller, grafischer Zugriff auf alle Steuerfunktionen, über ein Dutzend Anwendungen und viele Optionen. -
Seite 184: Installation
DE-4 ADVENTURER-WAAGEN Stellen Sie die Waage so auf, dass der Netzanschluss gut zu erreichen ist. INSTALLATION Auspacken Nehmen Sie die Adventurer-Waage und ihre Teile vorsichtig aus der Verpackung. Die mitgelieferten Komponenten sind je nach dem Waagenmodell verschieden (siehe folgende Tabelle). Bewahren Sie die Verpackung als sichere Versand- und Lagerverpackung auf. -
Seite 185: Anschluss Der Stromversorgung
ADVENTURER-WAAGEN DE-5 Drehen Sie die Füße wie dargestellt, bis die Nivellierlibelle genau in der Kreismitte liegt. Anschluss der Stromversorgung Verbinden Sie den Gleichspannungs-Ausgangsstecker mit der entsprechenden Buchse an der Rückseite der Waage. Verbinden Sie dann das Netzkabel mit einer Steckdose. ACHTUNG: Bei Verwendung eines CSA-zertifizierten Netzteils (oder eines Netzteils mit vergleichbarer Zulassung) muss der Ausgangsstrom begrenzt werden. - Seite 186 DE-6 ADVENTURER-WAAGEN Das vollautomatische System zur internen Kalibrierung, das die regelmäßige Wartung unterstützt und die Waage täglich kalibriert, ist in fast jedem Modell enthalten. Kalibriert das System automatisch, wenn ein Temperaturunterschied festgestellt wird, der die Wägegenauigkeit beeinflusst (>1,5 ° C), bzw. alle 11 Stunden. ¤...
-
Seite 187: Betrieb
ADVENTURER-WAAGEN DE-7 BETRIEB Übersichtsanzeige, Startbildschirm Dieses Gerät arbeitet mit einem Touchscreen-Display mit berührungsempfindlichen Flächen und Tasten zur Steuerung der Gerätefunktionen. STEUERELEMENTE Taste Aktion Kurzer Tastendruck (in ausgeschaltetem Zustand): Schaltet die Waage ein. Langer Tastendruck (in eingeschaltetem Zustand): Schaltet die Waage aus. Druckt die aktuellen Daten auf einem Drucker oder sendet sie an einen Computer. -
Seite 188: Hauptfunktionen Und Hauptmenü
DE-8 ADVENTURER-WAAGEN Hauptfunktionen und Hauptmenü Wä gen: Drücken Sie auf Zero (Nullstellung), um das Display auf null zu setzen. Legen Sie einen Gegenstand auf die Wägeplattform. Die Anzeige zeigt das Bruttogewicht an. Tarieren: Drücken Sie auf Zero (Nullstellung), wenn keine Last auf der Wägeplattform liegt, um das Display auf null zu setzen. -
Seite 189: Übersicht Über Teile Und Funktionen - Modelle Ohne Zugluftschutz
ADVENTURER-WAAGEN DE-9 Wä geplattform Nivellier- anzeige Netzeingang USB-Slave RS232 Eich- USB-Host Einstellbare Einstellbarer Schalter Füße Fuß Übersicht über Teile und Funktionen – Modelle ohne Zugluftschutz Wä geplattform Netzeingang Nivellieranzeige Einstellbarer USB-Host RS232 Netzeingang Einstellbare Füsse USB-slave Eich-schalter Fuß... -
Seite 190: Anwendungen
DE-10 ADVENTURER-WAAGEN ANWENDUNGEN Die Waage kann für verschiedene Anwendungsmodi konfiguriert werden. Berühren Sie das obere linke Anwendungsfeld („Wägen“ im folgenden Beispiel): Die Adventurer-Waage besitzt folgende 9 Anwendungsmodi: Wägen Stückzählung Prozentwägung Dynamisches Dichtebestimmung Prüfwägen Wägen (lebende Tiere) Anzeige mit Summierung Rezeptur Standbild Wägen Hinweis: Vor Auswahl einer Anwendung müssen Sie die Waage kalibrieren und nivellieren. -
Seite 191: Optionseinstellungen
ADVENTURER-WAAGEN DE-11 4.1.1. Optionseinstellungen Zur Einstellung bzw. Anpassung der aktuellen Einstellungen Drücken Sie die Taste Item Settings (Elementeinstellungen). Der Bildschirm Settings (Einstellungen) wird angezeigt. Minimum Weight: Zur Einstellung des Mindestgewichts bei Überprüfung eines Messwerts. Wenn das Ist-Gewicht unter dem festgelegten Mindestgewicht liegt, wird dieser Fehler gelb markiert. -
Seite 192: Sample Name (Probenname)
Display bleibt stehen. In diesem Fall müssen Sie den USB-Speicherstick trennen und den Vorgang mit einem anderen USB-Speicherstick wiederholen. Ohaus übernimmt keine Haftung, wenn Daten auf dem USB-Speicherstick gelöscht werden oder der USB-Speicherstick beim Anschluss an die Waage bricht. -
Seite 193: Optionseinstellungen
ADVENTURER-WAAGEN DE-13 Der Startbildschirm Parts Counting (Stückzählung) Hauptzeile Referenz-Felder Symbol der Anwendung Anwendungstasten 4.2.1. Optionseinstellungen Einstellung bzw. Anpassung der aktuellen Einstellungen Drücken Sie die Taste Item Settings (Elementeinstellungen). Der Bildschirm Settings (Einstellungen) wird angezeigt. Samples: Die Probengröße kann zwischen 1 und 10.000 Stück liegen. - Seite 194 DE-14 ADVENTURER-WAAGEN Es gibt zwei Methoden, das Durchschnitts- Stückgewicht zu bestimmen: 1. Das Ist-Durchschnitts-Stückgewicht ist bekannt. 2. Das Durchschnitts-Stückgewicht muss aus dem Gewicht ermittelt werden. In diesem Fall wird die aktuelle Probengröße verwendet. Einstellen eines bekannten Durchschnitts-Stückgewichts (APW) Drücken Sie zur direkten Einstellung des Durchschnitts- Stückgewichts (APW) die Taste APW: Es wird ein Zifferneingabefenster angezeigt.
-
Seite 195: Prozentwägung
ADVENTURER-WAAGEN DE-15 Prozentwägung Hinweis: Vor Auswahl einer Anwendung müssen Sie die Waage kalibrieren und nivellieren. Benutzen Sie zur Messung des Gewichts einer Probe die Option Percent Weighing (Prozentwägung): Das Gewicht wird dann als Prozentsatz des vorher definierten Referenzgewichts angezeigt. Das Standardreferenzgewicht bzw. letzte Referenzgewicht wird angezeigt. Prozentwägung 1. -
Seite 196: Dynamisches Wägen
DE-16 ADVENTURER-WAAGEN Dynamisches Wägen Hinweis: Vor Auswahl einer Anwendung müssen Sie die Waage kalibrieren und nivellieren. Mit dieser Anwendung wiegen Sie instabile Lasten, beispielsweise lebende Tiere. Sie können zwei verschiedene Modi für Start und Reset auswählen: manuell (Start und Stopp per Tastendruck) und automatisch (Start und Stopp automatisch). -
Seite 197: Dichtebestimmung
ADVENTURER-WAAGEN DE-17 Dichtebestimmung Hinweis: Vor Auswahl einer Anwendung müssen Sie die Waage kalibrieren und nivellieren. Mit dieser Anwendung bestimmen Sie die Dichte eines Objekts. Sie haben vier Möglichkeiten zur Bestimmung der Dichte: 1. Feststoffe, die schwerer sind als Wasser 2. Feststoffe, die leichter sind als Wasser 3. -
Seite 198: Messung Der Dichte Eines Schwimmfähigen Materials Mit Wasser
DE-18 ADVENTURER-WAAGEN Schritt 2 von 2 – Wiegen Sie die Probe nach dem Eintauchen. Folgen Sie den Anweisungen auf dem Bildschirm; speichern Sie mit Accept (Akzeptieren) das Probengewicht nach dem Eintauchen. Sobald die nötigen Gewichte bestimmt sind, wird die Dichte der Probe in g/cm (zusammen mit dem Gewicht an der Luft und dem Gewicht in Wasser) auf dem Anwendungsbildschirm angezeigt. -
Seite 199: Messung Der Dichte Einer Flüssigkeit Mit Einem Kalibrierten Sinkgewicht (Wird Nicht Mitgeliefert)
ADVENTURER-WAAGEN DE-19 Es wird ein Zifferneingabefenster angezeigt. Geben Sie die Dichte in g/cm ein, und drücken Sie dann auf Save (Speichern). Die Anzeige schaltet zurück zum vorhergehenden Bildschirm. Drücken Sie zur Rückkehr zum Startbildschirm für die Dichtebestimmung auf Back (Zurück). Beginnen Sie den Vorgang zur Dichtebestimmung wie oben beschrieben. -
Seite 200: Messen Der Dichte Eines Porösen Materials Mit Öl
DE-20 ADVENTURER-WAAGEN Schritt 1 von 2 – Bestimmung des Sinkgewichts an der Luft. Folgen Sie den Anweisungen auf dem Bildschirm, und drücken Sie dann Accept (Akzeptieren), um das Sinkgewicht („an der Luft“) zu speichern. Schritt 2 von 2 – Bestimmung des Sinkgewichts beim Eintauchen in die Prüfflüssigkeit Folgen Sie den Anweisungen auf dem Bildschirm, und drücken Sie dann auf Accept (Akzeptieren), um das Sinkgewicht nach... - Seite 201 ADVENTURER-WAAGEN DE-21 Der Startbildschirm DICHTEBESTIMMUNG – PORÖSES MATERIAL Hauptzeile Referenz-Felder Funktionen Symbol der Anwendung Bestätigen Sie die angezeigten Standardvorgaben (Wassertemperatur). Drücken Sie zur Bearbeitung der Standardvorgaben auf Item Settings (Elementeinstellungen). Der Bildschirm Settings (Einstellungen) wird angezeigt. Die Waage berechnet die Wasserdichte anhand der eingegebenen Wassertemperatur.
- Seite 202 DE-22 ADVENTURER-WAAGEN Schritt 2 von 3 – Wiegen der ölfgefüllten Probe an der Luft Folgen Sie den Anweisungen auf dem Bildschirm und drücken Sie dann auf Accept (Akzeptieren), um das Probengewicht mit Öl zu speichern. Schritt 3 von 3 – Wiegen der ölgefüllten Probe nach Eintauchen in Flüssigkeit Folgen Sie den Anweisungen auf dem Bildschirm und drücken Sie dann auf Accept (Akzeptieren), um das Gewicht der...
-
Seite 203: Prüfwägen
ADVENTURER-WAAGEN DE-23 Prüfwägen Hinweis: Vor Auswahl einer Anwendung müssen Sie die Waage kalibrieren und nivellieren. Beim Prüfwägen wird das Gewicht einer Probe mit Sollgrenzwerten verglichen. Prüfwägen 1. Wä hlen Sie in der oberen linken Ecke des Startbildschirms Check Weighing (Prüfwägen) aus. 2. -
Seite 204: Display Hold
DE-24 ADVENTURER-WAAGEN Es werden zwei Betriebsmodi unterstützt: Display Hold (Anzeige mit Standbild): erlaubt dem Benutzer, ein stabiles Gewicht zu erfassen und zu speichern. Peak Hold (Anzeige des Höchstgewichts): erlaubt dem Benutzer, die Bestimmung des höchsten stabilen Gewichts zu erfassen und zu speichern. Der Startbildschirm für die Anzeige mit Standbild Hauptzeile... -
Seite 205: Summierung
ADVENTURER-WAAGEN DE-25 Drücken Sie die Taste Item Settings (Elementeinstellungen). Der Bildschirm Settings (Einstellungen) wird angezeigt. Mode: Zur Umschaltung zwischen Peak Hold und Display Hold (Anzeige des Spitzengewichts und Anzeige des gemerkten Gewichts). Sample Name: Ordnet einer Probe einen Namen zu. Print Settings: Ändert die Druckeinstellungen. -
Seite 206: Optionseinstellungen
DE-26 ADVENTURER-WAAGEN Mit dieser Anwendung erstellen Sie Rezepte und Zusammensetzungen. Sie können maximal 50 Komponenten verwenden. Der Startbildschirm Formulation (Rezeptur) Hauptzeile Symbol der Referenz-Felder Anwendung Anwendungstasten Rezeptur 1. Wä hlen Sie in der oberen linken Ecke des Startbildschirms die Option Formulation (Rezeptur) aus. 2. -
Seite 207: Zusätzliche Funktionen
ADVENTURER-WAAGEN DE-27 4.10 Zusätzliche Funktionen 4.10.1 Unterflurwägehaken Die Adventurer-Waage ist mit einem Unterflurwägehaken zum Wä gen von Teilen unter der Waage ausgestattet. Hinweis: Nehmen Sie die Wä geplattform und den Zugluftschutz ab (sofern vorhanden), um Schäden beim Umdrehen der Waage zu vermeiden. Wichtiger Hinweis: Legen Sie die Waage nicht auf dem Wägeplattformträgerkonus oder den Wägezellenstiften ab. -
Seite 208: Menüeinstellungen
DE-28 ADVENTURER-WAAGEN MENÜEINSTELLUNGEN Menünavigation Struktur des Benutzermenüs: Wiederher- Kommuni- GLP- und stellung der Anwendungsmodi Hauptmenü Kalibrierung Konfiguration der Waage Wä geeinheiten Datenpflege Sperre kation GMP-Daten Werksein- stellungen Kalibrierung Wä geanwendung Kalibrierung Interne Kalibrierung Sprache Milligramm Export an USB RS-232-Standard Kopfzeilen Einstellungen des Konfiguration Automatische... -
Seite 209: Änderung Von Einstellungen
ADVENTURER-WAAGEN DE-29 Die gesamte Menünavigation erfolgt durch Berührung des Displays. Berühren Sie zum Aufruf des Menüs die Taste Menu (Menü) in einem beliebigen Start- oder Anwendungsbildschirm. Das Hauptmenü wird mit den Tasten Back (Zurück) und Exit (Beenden) angezeigt. Berühren Sie die entsprechenden Listenoptionen, um die Menüeinstellungen zu durchsuchen. -
Seite 210: Kalibrieruntermenü (Incal-Modelle)
DE-30 ADVENTURER-WAAGEN Kalibrierung Die Adventurer-Waagen (INCAL-Modelle) bieten sechs Kalibrierverfahren an: interne Kalibrierung, automatische Kalibrierung, AutoCal™-Einstellung, Messbereichskalibrierung, Linearitätskalibrierung und Kalibrierprüfung. Hinweis: Die Einheit der Kalibrierung ist immer Gramm. Wichtiger Hinweis: Berühren Sie die Waage während der Kalibrierung nicht. 5.2.1 Kalibrieruntermenü (INCAL-Modelle) AutoCal™... -
Seite 211: Autocal™-Einstellung
ADVENTURER-WAAGEN DE-31 5.2.4. AutoCal™-Einstellung Mit diesem Kalibrierverfahren passen Sie den Messspannenkalibrierpunkt an, ohne die Messspannen- oder Linearitätskalibrierung zu beeinflussen. Mit der Kalibriereinstellfunktion kann das Ergebnis der internen Kalibrierung um ±100 Teilstriche angepasst werden. Hinweis: Führen Sie zuerst die interne Kalibrierung durch, und nehmen Sie dann eine Kalibrieranpassung vor. -
Seite 212: Linearitätskalibrierung
DE-32 ADVENTURER-WAAGEN 5.2.6 Linearitätskalibrierung Bei der Linearitätskalibrierung werden drei Kalibrierpunkte verwendet, einer für Nulllast, die anderen für definierte Lasten. Drücken Sie die Taste Linearity Calibration (Linearitätskalibrierung), um den Vorgang zu beginnen, wenn keine Last auf der Waage liegt. Die Waage erfasst den Nullpunkt und fordert dann das nächste Gewicht an. Folgen Sie den Anweisungen, bis die Kalibrierung abgeschlossen ist. -
Seite 213: Benutzereinstellung
ADVENTURER-WAAGEN DE-33 5.3.3 Benutzereinstellung In diesem Untermenü ändern Sie die Einstellungen für: Kalibrieren per Tastendruck „Kalibrierung während des Betriebs, dazu den Bildschirm in der Ringmitte berühren“. (erst oben links, dann unten rechts) Bildschirmhelligkeit: = niedrige Bildschirmhelligkeit. MEDIUM = normale Bildschirmhelligkeit. HIGH = hohe Bildschirmhelligkeit. -
Seite 214: Datum & Zeit
DE-34 ADVENTURER-WAAGEN 5.3.8 Datum & Zeit Einstellung des aktuellen Datums und der Zeit Ändern Sie das Format nach Wunsch, geben Sie dann den aktuellen Wert ein. Drücken Sie Save (Speichern), um den neuen Wert zu bestätigen. 5.3.9 Eichmodus Mit diesem Menü stellen Sie die Eichpflichtigkeit ein. OFF = Standardbetrieb ON = Betrieb erfüllt die Vorschriften für eichpflichtige Anwendungen.. -
Seite 215: Wägeeinheiten
ADVENTURER-WAAGEN DE-35 Wägeeinheiten Rufen Sie dieses Untermenü auf, um die gewünschte Maßeinheit zu aktivieren. Dieses Menü kann auch durch Drücken des Einheitensymbols im Ausgangsbildschirm der Anwendung aufgerufen werden. Hinweis: Aufgrund von nationalen Vorschriften verwendet die Waage möglicherweise nicht alle der hier aufgeführten Einheiten. -
Seite 216: Export Auf Usb
DE-36 ADVENTURER-WAAGEN 5.5.2 Export auf USB Export der Wägedaten auf einen USB-Speicherstick. Es können zwei Datentypen exportiert werden: - Anwendungseinstellungen (Durchschnittsstückgewicht, Referenzgewicht usw.) - Menüeinstellungen (Waagenkonfiguration usw.) Hinweis: Die Funktion „Save to USB“ (Auf USB speichern) muss aktiviert sein, um Daten auf einen USB-Speicherstick zu übertragen. -
Seite 217: Übertragung
ADVENTURER-WAAGEN DE-37 5.6.3 Übertragung Legt die Datenbits. Stoppbit und Parität fest. 7 EVEN 1 = 7 Datenbits, gerade Parität, Stoppbit 1 7 ODD 1 = 7 Datenbits, ungerade Parität, Stoppbit 1 7 EVEN 2 = 7 Datenbits, gerade Parität, Stoppbit 2 7 ODD 2 = 7 Datenbits, ungerade Parität, Stoppbit 2 7 NONE 1... -
Seite 218: Automatischer Druck
DE-38 ADVENTURER-WAAGEN 5.6.6 Automatischer Druck Stellt die automatische Druckfunktion ein. = Deaktiviert ON.STAB = Es wird immer gedruckt, wenn die Stabilitätskriterien erfüllt sind. INTER = Es wird in einem festgelegten Intervall gedruckt. CONTINUOUS = Es wird laufend gedruckt. Bei Auswahl der Option „ON STABILITY“ (Bei Stabilität) legen Sie die Bedingungen für den Druck fest. -
Seite 219: Glp- Und Gmp-Daten
ADVENTURER-WAAGEN DE-39 Auf USB speichern Legt den Status fest. = Die Daten werden nicht auf einem USB-Laufwerk gespeichert. = Die Daten werden auf einem USB-Laufwerk gespeichert. GLP- und GMP-Daten Rufen Sie dieses Menü auf, um die Daten der Guten Laborpraxis (GLP) sowie der Guten Herstellungspraxis (GMP) zu konfigurieren. -
Seite 220: Eichung
DE-40 ADVENTURER-WAAGEN EICHUNG Wenn die Waage für eichpflichtige Anwendungen oder im Handel eingesetzt wird, muss sie entsprechend der vor Ort geltenden Eichordnung konfiguriert, überprüft und versiegelt sein. Der Käufer muss sicherstellen, dass alle geltenden rechtlichen Vorschriften eingehalten werden. Einstellungen Führen Sie vor der Überprüfung und Versiegelung folgende Schritte in dieser Reihenfolge durch: 1. -
Seite 221: Drucken
Hinweis: Nach der Konfiguration von HyperTerminal werden automatisch die Ergebnisse einer Kalibrierprüfung gedruckt und die an die Waage gesendete SPDC-Software Die SPDC-Software (Serial Port Data Collection) wird von Ohaus zur Verfügung gestellt und kann auf Betriebssystemen verwendet werden, auf denen die oben erwähnte HyperTerminal-Software nicht vorhanden ist. -
Seite 222: Ausgabeformat
DE-42 ADVENTURER-WAAGEN Ausgabeformat Die Ergebnisdaten und die G/N/T-Daten werden in folgendem Format ausgegeben. Feld: Etikett Leerzeichen Gewicht Leerzeichen Einheit Leerzeichen Stabilitä t Leerzeichen G/N Leerzeichen Term. Zeichen Lä nge: 1 1 3 8 1. Die Länge des Etikettenfelds ist nicht begrenzt. 2. -
Seite 223: Fehlerbehebung
Nullpunkteinstellung, Druck, Warten auf eine Stabilisierung des Gewichts) Serviceinformationen Wenn Sie Ihr Problem mit dem Abschnitt zur Fehlerbehebung nicht lösen konnten, wenden Sie sich an Ihren autorisierten OHAUS-Servicemitarbeiter. Die nächste Ohaus-Niederlassung finden Sie auf unserer Website unter www.ohaus.com. Ein OHAUS-Produktservicespezialist unterstützt Sie gern. -
Seite 224: Technische Daten
DE-44 ADVENTURER-WAAGEN TECHNISCHE DATEN Spezifikationen Umgebungsbedingungen Nur zur Verwendung in geschlossenen Räumen Zulässige Höhe: bis 2.000 m Definierter Temperaturbereich: 10 ° C bis 30 ° C Luftfeuchtigkeit: maximale relative Luftfeuchtigkeit 80 % bei Temperaturen bis 30 ° C, linear abnehmend bis 50 % relativer Luftfeuchtigkeit bei 40 °... - Seite 225 ADVENTURER-WAAGEN DE-45 TABELLE 9-1. SPEZIFIKATIONEN Modell: AX124 AX124/E AX224 AX224/E AX324 Höchstlast 120 g 120 g 220 g 220 g 320 g Ablesbarkeit d 0,0001 g Wiederholbarkeit 0,0001 g (Standardabweichung) (g) Linearität (g) ±0,0002 g 25 g, 25 g, 50 g, 50 g, Messspannen- 50 g...
- Seite 226 DE-46 ADVENTURER-WAAGEN TABELLE 9-2. SPEZIFIKATIONEN (Fortsetzung) Modell: AX223 AX223/E AX423 AX423/E AX523 AX523/E Höchstlast 220 g 220 g 420 g 420 g 520 g 520 g Ablesbarkeit d 0,001 g Wiederholbarkeit (Standardabweichung) 0,001 g Linearität (g) ±0,002 g 50 g, 50 g, 100 g, 100 g,...
- Seite 227 ADVENTURER-WAAGEN DE-47 TABELLE 9-3. SPEZIFIKATIONEN (Fortsetzung) AX422 AX422/E AX822 AX822/E Modell: 420g 420g 820g 820g Höchstlast Ablesbarkeit d 0,01 g Wiederholbarkeit (Standard- 0,01 g abweichung) (g) Linearität (g) ±0,02 g 100g, 200g 100g, 200g 200g, 400g 200g, 400g Messspannen- 300g,400g 300g,400g 600g, 800g 600g, 800g...
- Seite 228 DE-48 ADVENTURER-WAAGEN TABELLE 9-4. SPEZIFIKATIONEN (Fortsetzung) Modell: AX1502 AX1502/E AX2202 AX2202/E AX4202 AX4202/E AX5202 Höchstlast 1520 g 1520 g 2200 g 2200 g 4200 g 4200 g 5200 g Ablesbarkeit d 0,01 g Wiederholbarkeit (Standard- 0,01 g abweichung) (g) Linearität (g) ±0,02 g 300 g 500 g...
- Seite 229 ADVENTURER-WAAGEN DE-49 TABELLE 9-5. SPEZIFIKATIONEN (Fortsetzung) Modell: AX2201 AX2201/E AX4201 AX4201/E AX8201 AX8201/E Höchstlast 2200g 2200g 4200 g 4200 g 8200 g 8200 g Ablesbarkeit d 0,1 g Wiederholbarkeit 0,1 g (Standardabweichung) (g) Linearität (g) ±0,2 g 500g, 1000 g, 1000 g, 2000 g, 2000 g,...
- Seite 230 DE-50 ADVENTURER-WAAGEN TABELLE 9-6. SPEZIFIKATIONEN (Fortsetzung) Modell AX124M AX224M AX324M AX223M AX423M AX523M AX1502M AX2202M AX4202M AX5202M AX8201M Max. 120 g 220 g 320 g 220 g 420 g 520 g 1520 g 2200 g 4200 g 5200 g 8200 g Min.
- Seite 231 ADVENTURER-WAAGEN DE-51 TABELLE 9-7. SPEZIFIKATIONEN (Fortsetzung) Modell AX224N AX223N/E AX423N AX 423N/E AX523N/E AX1502N/E AX2202N/E AX4202N/E AX8201N/E Max. 220 g 220 g 420 g 420 g 520 g 1520 g 2200 g 4200g 8200 g Min. 0,01 g 0,02 g 0,02 g 0,02 g 0,02 g...
- Seite 232 DE-52 ADVENTURER-WAAGEN TABELLE 9-8. SPEZIFIKATIONEN (Fortsetzung) Modell AX124AU AX224AU AX324AU AX223AU AX423AU AX523AU AX1502AU AX2202AU AX4202AU AX5202AU AX8201AU Max. 120 g 220 g 320 g 220 g 420 g 520 g 1520 g 2200 g 4200 g 5200 g 8200 g Min.
-
Seite 233: Zeichnungen Und Abmessungen
ADVENTURER-WAAGEN DE-53 Zeichnungen und Abmessungen Abmessungen in vollständig montiertem Zustand Abb. 9-1. Modelle mit Zugluftschutz Abb. 9-2. Modelle ohne Zugluftschutz... -
Seite 234: Teile Und Zubehör
DE-54 ADVENTURER-WAAGEN Teile und Zubehör TABELLE 9-7. ZUBEHÖR BESCHREIBUNG TEILENUMMER Zusätzliches Display 80251396 Dichtebestimmungsset 80253384 Kabel, USB-Gerät (Typ A-B) 83021085 Sicherheitsvorrichtung (Laptopverriegelung) 80850043 RS-232-Kabel, PC 25-polig 80500524 RS-232-Kabel, PC 9-polig 80500525 Staubschutzhülle 30093334 Zusätzliches Display 80251396... -
Seite 235: Kommunikation
ADVENTURER-WAAGEN DE-55 Kommunikation 9.4.1. Schnittstellenbefehle Die in der folgenden Tabelle aufgeführten Befehle werden von der Waage erkannt. Bei ungültigen Befehlen liefert die Waage die Meldung „ES“ zurück. TABELLE 9-8. ADVENTURER-SCHNITTSTELLENBEFEHLSLISTE Befehlszeichen Funktion Sofortdruck des angezeigten Gewichts (stabil oder instabil) Druck des angezeigten Gewichts (stabil oder instabil) Fortlaufender Druck Druck bei Stabilität Automatischer Ausdruck stabiler Gewichte ohne Nullen. -
Seite 236: Usb-Schnittstelle
ADVENTURER-WAAGEN USB-Schnittstelle Die USB-Schnittstelle von Ohaus ist eine spezielle Lösung für den Anschluss einer Waage an einen Computer mit einem USB-Kabel. Es gibt verschiedene Kategorien von USB-Geräten, z. B. USB-Sticks, Digitalkameras, Drucker usw. Da Waagen nicht einer gemeinsamen Kategorie zugeordnet werden können, ist die USB-Schnittstelle von Ohaus eine allgemeine Schnittstelle auf Basis des seriellen RS232-Standards. -
Seite 237: Software-Updates
Sobald die Option Auto-Print (Automatisch Drucken) im Menü aktiviert ist, versendet die Waage die Daten wie angegeben. Wenn sich noch Daten im Druckerpuffer befinden, druckt der Drucker zunächst diese Daten. SOFTWARE-UPDATES Ohaus verbessert seine Waagensoftware laufend. Um das neueste Release zu erhalten, wenden Sie sich bitte an Ihren autorisierten Ohaus-Händler oder die Ohaus Corporation. -
Seite 238: Compliance
Norm Dieses Produkt entspricht der EMV-Richtlinie 2004/108/EG, der Niederspannungsrichtlinie 2006/95/EG und der Richtlinie über nichtselbsttätige Waagen 2009/23/EG. Die vollständige Konformitätserklärung finden Sie online unter http://europe.ohaus.com/europe/en/home/support/compliance/ce-declaration-of-conformity. AS/NZS CISPR 11, AS/NZS 61000.4.3 CAN/CSA-C22.2 No. 61010-1-12 UL Std. No. 61010-1 (3. Ausgabe) Wichtige Mitteilung für verifizierte Waagen Bei Waagen, die am Herstellungsort verifiziert werden, ist eine der oben erwähnten... -
Seite 239: Iso 9001-Registrierung
DE-59 ISO 9001-Registrierung OHAUS Corporation erhielt seine erste registrierte Zertifizierung gemäß ISO 9001 im Jahr 1994 durch die akkreditierte Registrierstelle Bureau Veritus Quality International (BVQI). Damit erfüllt das OHAUS- Qualitätsmanagementsystem die Anforderungen der Norm ISO 9001. Am 21. Juni 2012 wurde OHAUS Corporation, USA, erneut gemäß... -
Seite 240: Beschränkte Garantie
Händler. OHAUS Corporation gibt keine weiteren ausdrücklichen oder stillschweigenden Garantien. OHAUS Corporation ist für keinerlei Folgeschäden haftbar. Da die Gesetzgebung zu Garantieleistungen von Bundesstaat zu Bundesstaat und von Land zu Land anders ist, wenden Sie sich bitte an OHAUS oder Ihren OHAUS-Händler vor Ort, wenn Sie weitere Einzelheiten benötigen. - Seite 241 BILANCE ADVENTURER IT-1 INDICE 1. INTRODUZIONE ........................3 Descrizione ..............................3 Caratteristiche .............................. 3 Precauzioni di sicurezza ..........................3 Precauzioni di sicurezza ..........................4 2. INSTALLAZIONE ........................5 Disimballaggio .............................. 5 Scelta dell'ubicazione ........................... 5 Messa a livello dell'apparecchiatura ......................5 Collegamento dell'alimentazione elettrica ....................7 Collegamento dell'interfaccia ........................
- Seite 242 IT-2 BILANCE ADVENTURER 5.3.4 Livello filtro ............................. 34 5.3.5 Controllo zero automatico ........................34 5.3.6 Tara automatica ............................. 34 5.3.7 Graduazione ............................34 5.3.8 Data e ora ............................... 34 5.3.9 Omologazione per transazioni commerciali ................... 35 Unità di pesatura ............................36 5.4.1 Sottomenu unità...
-
Seite 243: Introduzione
INTRODUZIONE Descrizione La bilancia Adventurer è uno strumento di pesatura di precisione che, se conservato in condizioni ottimali, vi garantirà numerosi anni di funzionamento. Le bilance Adventurer Ohaus sono disponibili con portate da 120 grammi a 8.200 grammi. Caratteristiche Controlli touch: Accesso grafico rapido a tutte le funzioni di controllo, su oltre una dozzina di applicazioni e molte funzionalità. -
Seite 244: Installazione
IT-4 BILANCE ADVENTURER INSTALLAZIONE Disimballaggio Rimuovere con attenzione la bilancia Adventurer e i relativi componenti dalla confezione. I componenti inclusi nella confezione variano a seconda del modello della bilancia (vedere tabella sotto). Conservare i materiali di imballaggio per assicurare la conservazione o il trasporto in sicurezza del prodotto. Leggere il manuale per intero prima di installare e utilizzare la bilancia Adventurer, al fine di evitare un uso improprio. - Seite 245 BILANCE ADVENTURER IT-5 Ruotare i piedini come mostrato nell'immagine in alto, a seconda della posizione della bolla di livello, fino a centrarla.
-
Seite 246: Collegamento Dell'alimentazione Elettrica
IT-6 BILANCE ADVENTURER Collegamento dell'alimentazione elettrica Collegare il connettore di uscita CC alla presa di alimentazione sul retro della bilancia. Quindi, collegare il cavo di alimentazione a una presa elettrica idonea. ATTENZIONE: da usare con un'alimentazione certificata CSA (o approvazione equivalente) che deve avere un'uscita a circuito limitato. -
Seite 247: Funzionamento
BILANCE ADVENTURER IT-7 FUNZIONAMENTO Panoramica sul display, schermata iniziale Questa bilancia utilizza un display sensibile al tocco con aree e pulsanti touch per controllare le funzioni dell'apparecchiatura. COMANDI Pulsante Azione Pressione breve (a bilancia spenta): Accende la bilancia Pressione breve (a bilancia accesa): Spegne la bilancia Invia i dati a una stampante o a un computer. -
Seite 248: Funzioni Principali E Menu Principale
IT-8 BILANCE ADVENTURER Funzioni principali e menu principale Pesatura: Premere Zero per azzerare il display. Sistemare un articolo sul vassoio. Sul display viene visualizzato il peso lordo. Determinare la tara: Senza carico sul piatto, premere Zero per azzerare il display. Collocare un contenitore vuoto sul vassoio della bilancia e premere Tara. -
Seite 249: Panoramica Sui Componenti E Sulle Funzionalità - Modelli Con Paravento
BILANCE ADVENTURER IT-9 Panoramica sui componenti e sulle funzionalità – Modelli con paravento Piatto Spia di livello Host USBt Ingresso Piedino Dispositivo Interruttore RS-232 Piedino alimentazione regolabile regolabile 3.4 Panoramica sui componenti e sulle funzionalità – Modelli senza paravento Piatto circolare Indicatore di livello... -
Seite 250: Applicazioni
IT-10 BILANCE ADVENTURER APPLICAZIONI La bilancia può essere configurata con diverse modalità applicative. Toccare il campo in alto a sinistra nell'area Applicazioni (pesatura, nell'esempio riportato in basso): La bilancia Adventurer vanta 9 modalità applicative, come riportato di seguito: Pesatura Conteggio Pesatura Pesatura Determinazione... -
Seite 251: Modifica Impostazioni
BILANCE ADVENTURER IT-11 4.1.1 Modifica impostazioni Per visualizzare o regolare le impostazioni correnti Toccare il pulsante Modifica impostazioni. Viene visualizzata la schermata delle Impostazioni. Peso minimo: stabilire un valore di peso minimo da utilizzare per verificare una lettura. Se un peso effettivo è... -
Seite 252: Nome Campione
Ohaus non si assume alcuna responsabilità sull'eventuale cancellazione dei dati dall'unità flash USB o nel caso in cui l'unità flash USB si rompa durante il collegamento alla bilancia. Per ridurre al minimo il rischio di problemi, Ohaus consiglia l'utilizzo di unità flash USB di alta qualità. -
Seite 253: Conteggio Pezzi
BILANCE ADVENTURER IT-13 Conteggio pezzi Nota: prima di utilizzare qualsiasi applicazione, assicurarsi che la bilancia sia stata messa in bolla e regolata. Utilizzare quest’applicazione per il conteggio di campioni di peso uniforme. Conteggio pezzi 1. Nella parte in alto a sinistra della schermata iniziale, selezionare Conteggio pezzi. 2. - Seite 254 IT-14 BILANCE ADVENTURER Quindi toccare Accetta per acquisire il valore e tornare alla schermata iniziale. Determinare il peso medio dei pezzi (APW): Ogni volta che si deve contare un nuovo tipo di pezzo, è necessario determinare il peso nominale di un pezzo (peso medio dei pezzi o APW) utilizzando una piccola quantità...
-
Seite 255: Pesatura Percentuale
BILANCE ADVENTURER IT-15 La schermata iniziale mostra il numero di pezzi con il nuovo APW. Auto ottimizzazione: Quando impostata su On , l'auto ottimizzazione migliora l'accuratezza del conteggio ricalcolando automaticamente il peso man mano che vengono aggiunti pezzi. L'impostazione predefinita è Off. Nota: l'ottimizzazione APW avviene solo quando il numero di pezzi aggiunti è... -
Seite 256: Pesatura Dinamica
IT-16 BILANCE ADVENTURER Seguire le istruzioni sullo schermo per determinare un nuovo peso di riferimento. In alternativa, premere il pulsante Peso rif. dalla schermata Pesatura percentuale, Ricalcolare il peso di riferimento per impostare manualmente un nuovo peso di riferimento tramite il tastierino numerico. -
Seite 257: Modifica Impostazioni
BILANCE ADVENTURER IT-17 4.4.1 Modifica impostazioni Per visualizzare o regolare le impostazioni correnti Toccare il pulsante Modifica impostazioni. Viene visualizzata la schermata delle Impostazioni. Tempo medio: Impostare il tempo medio su un valore compreso tra 1 e 99 secondi. Il valore predefinito è... -
Seite 258: Misurazione Della Densità Di Un Solido Con L'acqua (Predefinita)
IT-18 BILANCE ADVENTURER Misurazione della Densità di un solido con l’acqua (predefinita) 4.5.1 Premere il pulsante Modifica impostazioni per aprire la schermata Configurazione dell'applicazione di determinazione della densità. Confermare la selezione delle seguenti Configurazioni: Tipo di densità: Solido Liquido ausiliario: Acqua ... -
Seite 259: Misurazione Della Densità Di Un Materiale Galleggiante Con L'acqua
BILANCE ADVENTURER IT-19 Misurazione della Densità di un materiale galleggiante con l’acqua 4.5.2 Premere il pulsante Modifica impostazioni per aprire la schermata Configurazione. Confermare la selezione delle seguenti Configurazioni: Tipo di densità: Solido Tipo di liquido: Acqua Materiale poroso: Off Premere Indietro per tornare alla schermata di determinazione della densità. - Seite 260 IT-20 BILANCE ADVENTURER Confermare la correttezza del valore predefinito visualizzato (volume affondatore). Per modificare i valori predefiniti, toccare Volume affondatore. Per regolare il valore del volume affondatore, toccare il pulsante Volume affondatore. Viene visualizzata una finestra per l'immissione di valori numerici.
-
Seite 261: Misurazione Della Densità Di Materiale Poroso Tramite Olio
BILANCE ADVENTURER IT-21 Dopo aver determinato i pesi necessari, la densità del campione viene visualizzata in g/cm (insieme al peso in aria e al peso in acqua) sulla schermata dell'applicazione. Premere Avvio per ripristinare tutti i valori di peso e riavviare il processo. - Seite 262 IT-22 BILANCE ADVENTURER Per tornare alla schermata iniziale di Determinazione densità, toccare Esci. Premere Avvia calcolo densità. Fase 1 di 3 - Pesare il campione non oleato in aria. Seguire le istruzioni sullo schermo, quindi premere Accetta per memorizzare il peso secco del campione secco (in aria). Fase 2 di 3 - Pesare il campione oleato in aria.
-
Seite 263: Controllo Del Peso
BILANCE ADVENTURER IT-23 Controllo del peso Nota: prima di utilizzare qualsiasi applicazione, assicurarsi che la bilancia sia stata messa in bolla e regolata. Il controllo peso consente di confrontare il peso di un campione rispetto a dei limiti obiettivo. Controllo del peso 1. -
Seite 264: Memoria Display
IT-24 BILANCE ADVENTURER 4.7 Memoria display Nota: prima di utilizzare qualsiasi applicazione, assicurarsi che la bilancia sia stata messa in bolla e regolata. Sono previste due modalità di funzionamento: La funzionalità Memoria display - consente all'utente di catturare e memorizzare un peso stabile. La funzionalità... -
Seite 265: Modifica Impostazioni
BILANCE ADVENTURER IT-25 4.7.3 Modifica impostazioni Per visualizzare o regolare le impostazioni correnti Toccare il pulsante Modifica impostazioni. Viene visualizzata la schermata delle Impostazioni. Modalità: Scegliere tra Memoria picco e Memoria display (predefinita). Modalità Automatica: Impostare su On o Off (predefinito). -
Seite 266: Formulazione
IT-26 BILANCE ADVENTURER 7. Premere Salva su USB per salvare i risultati su un'unità flash USB oppure Esci per ritornare alla schermata iniziale della Totalizzazione. Nota: La modifica delle unità converte i risultati di Accumulazione nell'unità selezionata. 4.9 Formulazione Nota: prima di utilizzare qualsiasi applicazione, assicurarsi che la bilancia sia stata messa in bolla e regolata. Utilizzare questa applicazione per la composizione e la realizzazione delle ricette. -
Seite 267: Modifica Impostazioni
BILANCE ADVENTURER IT-27 4.9.1 Modifica impostazioni Per visualizzare o regolare le impostazioni correnti Toccare il pulsante Modifica impostazioni. Viene visualizzata la schermata delle Impostazioni. Riempimento: Se impostato su On, al termine della formulazione viene richiesto un componente di riempimento. Tara automatica: Se impostata su On, la bilancia esegue automaticamente la Tara dopo aver accettato il peso del componente. -
Seite 268: Impostazioni Di Menu
IT-28 BILANCE ADVENTURER IMPOSTAZIONI DI MENU 5.1 Navigazione nei menu Struttura del menu utente Ripristino Menu Conservazione dei Dati GLP e Modalità applicative Regolazione Configurazione della bilancia Unità di pesatura Comunicazione Blocco Principale dati fabbrica Regolazione Taratura interna Milligrammo Esportazione su USB Standard RS232 Intestazioni Regolazione Applicazione pesatura... -
Seite 269: Modifica Delle Impostazioni
BILANCE ADVENTURER IT-29 La navigazione nei menu avviene toccando il display. Per accedere al menu, toccare Menu da qualsiasi schermata iniziale di applicazione. Viene visualizzato il Menu principale, con i pulsanti Indietro e Esci. Continuare a toccare la voce appropriata dell'elenco per navigare tra le voci di menu. 5.1.1 Modifica delle impostazioni Per modificare un'impostazione di menu, navigare tra le impostazioni attraverso la procedura seguente:... -
Seite 270: Sottomenu Regolazione (Modelli Incal)
IT-30 BILANCE ADVENTURER 5.2 Regolazione Le bilance Adventurer (modelli INCAL) prevedono sei metodi di regolazione: Regolazione interna, regolazione automatica regolazione AutoCal regolazione ad intervallo, regolazione di linearità, e test di regolazione. Note: L'unità di taratura è sempre espressa in grammi. Attenzione: non interrompere la procedura di regolazione della bilancia. -
Seite 271: Regolazione A Intervallo
BILANCE ADVENTURER IT-31 Per eseguire una regolazione, toccare Regolazione AutoCal dal menu Regolazione; immettere il valore (divisioni positive o negative) per ottenere la corrispondenza con la differenza notata in precedenza nella procedura. Nuova regolazione tramite regolazione interna. Dopo la regolazione, posizionare la massa di prova sul vassoio e verificare che il valore corrisponda a quello visualizzato. -
Seite 272: Configurazione Della Bilancia
IT-32 BILANCE ADVENTURER 5.3 Configurazione della bilancia Accedere a questo sottomenu per personalizzare le funzionalità della bilancia. 5.3.1 Sottomenu di configurazione della bilancia Lingua Impostazioni Livello filtro Controllo zero utente automatico Tara automatica Graduazione Data e ora Omologazione per transazioni commerciali Le impostazioni predefinite di fabbrica sono visualizzare in grassetto di seguito. -
Seite 273: Livello Filtro
BILANCE ADVENTURER IT-33 5.3.4 Livello filtro Impostazione del valore di filtraggio del segnale. BASSO = tempo di stabilizzazione più rapido con minore stabilità. MEDIO = tempo di stabilizzazione normale con stabilità normale. ALTO = tempo di stabilizzazione più lento con maggiore stabilità. -
Seite 274: Omologazione Per Transazioni Commerciali
IT-34 BILANCE ADVENTURER 5.3.9 Omologazione per transazioni commerciali Utilizzare questo menu per impostare lo stato Omologazione per transazioni commerciali. OFF = funzionamento standard. ON = il funzionamento è conforme alle norme della OIML (Organizzazione Internazionale di Metrologia Legale). Nota: Se la funzione Modalità approvata è impostata su ON, le impostazioni del menu si modificano come segue: Menu Regolazione: La funzione Regolazione interna AutoCal si attiva e non viene visualizzata. -
Seite 275: Unità Di Pesatura
BILANCE ADVENTURER IT-35 5.4 Unità di pesatura Entrare in questo sottomenu per attivare le unità di pesatura desiderate. È inoltre possibile accedere a questo menu premendo il simbolo dell'unità presente sulla schermata principale di qualsiasi applicazione. Nota: In virtù delle norme vigenti, la bilancia potrebbe non supportare alcune delle unità di misura elencate di seguito. -
Seite 276: Esportazione Su Usb
IT-36 BILANCE ADVENTURER 5.5.2 Esportazione su USB Esportare i dati di pesatura su un'unità flash USB. È possibile esportare due tipologie di dati: - Le impostazioni dell'applicazione (APW, Peso rif., ecc.) - Le impostazioni del menu (funzione di configurazione della bilancia, ecc.) Nota: Per abilitare il trasferimento dei dati sulla memoria USB, è... -
Seite 277: Trasmissione
BILANCE ADVENTURER IT-37 5.6.3 Trasmissione Impostare i bit di dati, i bit di arresto e la parità. 7 PARI 1 = 7 bit di dati, parità pari, bit di arresto 1 7 DISPARI 1 = 7 bit di dati, parità dispari, bit di arresto 1 7 PARI 2 = 7 bit di dati, parità... -
Seite 278: Stampa Automatica
IT-38 BILANCE ADVENTURER 5.6.6 Stampa automatica Impostazione della funzionalità di stampa automatica. = disabilitato SE STABILE = la stampa viene effettuata ogni qualvolta vengono soddisfatti i criteri di stabilità. INTERVALLO = la stampa viene effettuata in base a un intervallo temporale stabilito. CONTINUO = la stampa viene eseguita continuamente. -
Seite 279: Dati Glp E Gmp
BILANCE ADVENTURER IT-39 Salvataggio su USB Per impostare lo stato. = i dati non vengono salvati su USB = i dati vengono salvati su USB 5.7 Dati GLP e GMP Accedere a questo menu per impostare i dati corretti di GLP (Good Laboratory Practices) e GMP (Good Manufacturing Practices). -
Seite 280: Omologazione Per Transazioni Commerciali
IT-40 BILANCE ADVENTURER OMOLOGAZIONE PER TRANSAZIONI COMMERCIALI Quando la bilancia viene utilizzata per il commercio o per un'applicazione con approvazione legale, deve essere configurata, verificata e sigillata nel rispetto delle normative locali su pesi e misure. Ricade sotto la responsabilità dell'acquirente accertarsi che vengano soddisfatti tutti i requisiti normativi necessari. -
Seite 281: Stampa
Vedere i formati di output della stampa campione illustrati di seguito. Presso Ohaus sono disponibili due stampanti compatibili con le bilance Adventurer Pro. Software SPDC Il software Serial Port Data Collection (SPDC) viene fornito da Ohaus in dotazione e può essere utilizzato su sistemi operativi sprovvisti del software HyperTerminal menzionato in alto. -
Seite 282: Formato Di Uscita
IT-42 BILANCE ADVENTURER Formato di uscita I risultati e i dati G/N/T sono visualizzati nel formato seguente. Tipo di Campo: Etichetta Spazio Peso Spazio Unità Spazio Stabilità Spazio Spazio Caratteri 1 1 3 8 Lunghezza: 1. La lunghezza del campo etichetta è variabile. 2. -
Seite 283: Manutenzione
BILANCE ADVENTURER IT-43 MANUTENZIONE Regolazione Verificare periodicamente la regolazione, collocando un peso accurato sulla bilancia e visualizzando il risultato. Se è necessario eseguire la taratura, consultare le istruzioni riportate nella sezione 5.2. Pulizia AVVERTENZA: Prima di effettuare la pulizia della bilancia Adventurer, scollegare l'alimentazione elettrica. -
Seite 284: Risoluzione Dei Problemi
Se nella sezione dedicata alla risoluzione dei problemi non è possibile trovare una soluzione al problema, contattare un agente Ohaus autorizzato. Consultare il sito Web www.ohaus.com per individuare l'ufficio OHAUS più vicino. Il personale specializzato Ohaus addetto alla manutenzione dei prodotti sarà disponibile per l'assistenza. -
Seite 285: Dati Tecnici
BILANCE ADVENTURER IT-45 DATI TECNICI Specifiche Condizioni ambientali Solo per uso interno Altitudine: fino a 2000 m Intervallo di temperatura specificato: da 10° C a 30° C Umidità: umidità relativa massima 80% per temperature fino a 30℃ riduzione lineare fino al 50% di umidità... - Seite 286 IT-46 BILANCE ADVENTURER TABELLA 9-1. SPECIFICHE TECNICHE Modelli: AX124 AX124/E AX224 AX224/E AX324 Portata 120 g 120 g 220 g 220 g 320 g Risoluzione d 0,0001 g Ripetibilità (dev standard) 0,0001 g Linearità (g) ±0,0002 g 25 g, 25 g, 50 g, 50 g, Punti di regolazione ad...
- Seite 287 BILANCE ADVENTURER IT-47 TABELLA 9-2. SPECIFICHE TECNICHE (continua) AX523/E Modelli: AX223 AX223/E AX423 AX423/E AX523 Portata 220 g 220 g 420 g 420 g 520 g 520 g Risoluzione d 0,001 g Ripetibilità (dev standard) 0,001 g Linearità (g) ±0,002 g 50 g, 50 g, 100 g,...
- Seite 288 IT-48 BILANCE ADVENTURER TABELLA 9-3. SPECIFICHE (continua) Modelli: AX422 AX422/E AX822 AX822/E Portata 420g 420g 820g 820g Risoluzione d 0,01 g Ripetibilità (dev 0,01 g standard) (g) Linearità (g) ±0.02 g 100g, 200g 100g, 200g 200g, 400g 200g, 400g Punti di regolazione 300g,400g 300g,400g 600g, 800g...
- Seite 289 BILANCE ADVENTURER IT-49 TABELLA 9-4. SPECIFICHE (continua) AX4202/E AX5202 Modelli: AX1502 AX1502/E AX2202 AX2202/E AX4202 Portata 1.520 g 1.520 g 2.200 g 2.200 g 4.200 g 4.200 g 5.200 g Risoluzione d 0,01 g Ripetibilità (dev 0,01 g standard) (g) Linearità...
- Seite 290 IT-50 BILANCE ADVENTURER TABELLA 9-5. SPECIFICHE (continua) AX2201 AX2201/E Modelli: AX4201 AX4201/E AX8201 AX8201/E 2200g 2200g Portata 4.200 g 4.200 g 8.200 g 8.200 g Risoluzione d 0,1 g Ripetibilità (dev 0,1 g standard) (g) Linearità (g) ±0,2 g 1000 g, 1000 g, 2000 g, 2000 g,...
- Seite 291 BILANCE ADVENTURER IT-51 TABELLA 9-6. SPECIFICHE TECNICHE (continua) MODELLO AX124M AX224M AX324M AX223M AX423M AX523M AX1502M AX2202M AX4202M AX5202M AX8201M 120 g 220 g 320 g 220 g 420 g 520 g 1520 g 2200 g 4200 g 5200 g 8200 g 0,01 g 0,01 g...
- Seite 292 IT-52 BILANCE ADVENTURER TABELLA 9-7. SPECIFICHE TECNICHE (continua) Modello AX224N AX223N/E AX423N AX 423N/E AX523N/E AX1502N/E AX2202N/E AX4202N/E AX8201N/E 220 g 220 g 420 g 420 g 520 g 1520 g 2200 g 4200 g 8200 g 0,01 g 0,02 g 0,02 g 0,02 g 0,02 g...
- Seite 293 BILANCE ADVENTURER IT-53 TABELLA 9-8. SPECIFICHE TECNICHE (continua) MODELLO AX124AU AX224AU AX324AU AX223AU AX423AU AX523AU AX1502AU AX2202AU AX4202AU AX5202AU AX8201AU 120 g 220 g 320 g 220 g 420 g 520 g 1520 g 2200 g 4200 g 5200 g 8200 g 0,01 g 0,01 g...
-
Seite 294: Illustrazioni E Dati Dimensionali
IT-54 BILANCE ADVENTURER Illustrazioni e dati dimensionali Dimensioni bilancia completamente assemblata Figura 9-1. Modelli con paravento Figura 9-2. Modelli senza paravento Componenti e accessori TABELLA 9-7. ACCESSORI DESCRIZIONE NUMERO PARTE Display ausiliario 80251396 Kit di densità 80253384 Cavo, Dispositivo USB (tipo A-B) 83021085 Dispositivo di sicurezza (blocco laptop) 80850043... -
Seite 295: Comunicazione
BILANCE ADVENTURER IT-55 Comunicazione 9.4.1 Comandi interfaccia I Comandi elencati nella tabella seguente saranno confermati dalla bilancia. La bilancia visualizzerà "ES" per i comandi non validi. TABELLA 9-8. ELENCO COMANDI INTERFACCIA ADVENTURER Caratteri dei Funzione comandi Stampa immediata del peso visualizzato (stabile o non stabile). Stampa del peso visualizzato (stabile o non stabile). -
Seite 296: Collegamenti Dei Pin Della Rs-232 (Db9)
Handshake L'interfaccia USB L’interfaccia USB Ohaus rappresenta una soluzione unica per consentire il collegamento di una bilancia a un computer tramite USB (Universal Serial Bus). I dispositivi USB sono catalogati in classi come le unità disco, le fotocamere digitali, le stampanti, ecc. Le bilance non prevedono una classe comunemente utilizzata, quindi l'interfaccia USB Ohaus adotta un'interfaccia generica basata sullo standard seriale RS232. -
Seite 297: Ingresso Usb
Se sono presenti dati nel buffer di stampa, la stampante porterà a termine la stampa di questi dati. AGGIORNAMENTI SOFTWARE Ohaus migliora costantemente il software delle proprie bilance. Per richiedere l'ultima versione, si prega di contattare il rivenditore autorizzato Ohaus o Ohaus Corporation. -
Seite 298: Conformità
Questo prodotto è conforme alla direttiva EMC 2004/108/CE, alla Direttiva Bassa Tensione 2006/95/CE e alla Direttiva per gli strumenti di pesa non automatici 2009/23/CE. La Dichiarazione di Conformità completa è disponibile online all'indirizzo http://europe.ohaus.com/europe/en/home/support/compliance/ce-declaration-of-conformity. AS/NZS CISPR 11, AS/NZS 61000.4.3 CAN/CSA-C22.2 No. 61010-1-04 UL Std. - Seite 299 IT-59 Registrazione ISO 9001 Nel 1994, a OHAUS Corporation, USA, è stato rilasciato il certificato di registrazione ISO 9001 da BVQI (Bureau Veritus Quality International), confermando che il sistema di gestione qualità di OHAUS è conforme ai requisiti degli standard ISO 9001. Il 21 giugno 2012, OHAUS Corporation, USA, ha ottenuto una nuova registrazione conformemente allo standard ISO 9001:2008.
-
Seite 300: Garanzia Limitata
GARANZIA LIMITATA I prodotti Ohaus sono garantiti contro difetti dei materiali e difetti di fabbrica dalla data di consegna per tutta la durata del periodo di garanzia. Durante il periodo di garanzia Ohaus riparerà o, a sua scelta, sostituirà tutti i componenti che siano difettosi senza costo alcuno, purché... - Seite 304 Ohaus Corporation 7 Campus Drive Suite 310 Parsippany, NJ 07054 USA Tel: +1 973 377 9000 Fax: +1 973 944 7177 With offices worldwide. www.ohaus.com * 30206078* P/N 30206078 B © 2018 Ohaus Corporation, all rights reserved.