Herunterladen Inhalt Inhalt Diese Seite drucken
Inhaltsverzeichnis

Werbung

Verfügbare Sprachen
  • DE

Verfügbare Sprachen

  • DEUTSCH, seite 3
{
Gebrauchsanleitung
Instruction Manual
STIHL RE 361, 461, 471
Notice d'emploi
Manual de instrucciones
Instruções de serviço
Handleiding
οδηγίες χρήσης

Werbung

Inhaltsverzeichnis
loading

Inhaltszusammenfassung für Stihl RE 361

  • Seite 1 Gebrauchsanleitung Instruction Manual STIHL RE 361, 461, 471 Notice d’emploi Manual de instrucciones Instruções de serviço Handleiding οδηγίες χρήσης...
  • Seite 2 D Gebrauchsanleitung 1 - 29 G Instruction Manual 30 - 56 F Notice d’emploi 57 - 85 E Manual de instrucciones 86 - 115 P Instruções de serviço 116 - 146 n Handleiding 147 - 175 g οδηγίες χρήσης 176 - 205...
  • Seite 3: Inhaltsverzeichnis

    Wartungs- und Pflegehinweise Wartung Ölstand kontrollieren Öl wechseln Hans Peter Stihl Inbetriebnahme nach langer Lagerung Verschleiß minimieren und Schäden vermeiden Wichtige Bauteile Technische Daten Sonderzubehör Betriebsstörungen beheben Reparaturhinweise Entsorgung RE 361, RE 361 PLUS, RE 461, RE 461 PLUS, RE 471 PLUS...
  • Seite 4: Zu Dieser Gebrauchsanleitung

    Vor allen Arbeiten am Gerät, z. B. – austauschen. Reinigung, Wartung, Austausch von Teilen – Netzstecker ziehen! Gerät nur dann in Betrieb nehmen, wenn alle Bauteile unbeschädigt sind. RE 361, RE 361 PLUS, RE 461, RE 461 PLUS, RE 471 PLUS...
  • Seite 5 Beschädigung der Maschine optimal auf das Produkt und die und des zu reinigenden Objektes Anforderungen des Benutzers führen. Bei Fragen dazu an einen abgestimmt. Fachhändler wenden. RE 361, RE 361 PLUS, RE 461, RE 461 PLUS, RE 471 PLUS...
  • Seite 6 Bei Gefahr des Auftretens von beschädigt und niemand gefährdet verschmutztem Wasser (z. B. werden kann – Stolpergefahr! Fließsand) muss ein entsprechender Wasserfilter verwendet werden. RE 361, RE 361 PLUS, RE 461, RE 461 PLUS, RE 471 PLUS...
  • Seite 7 Strahlrohr zusätzlich entstehendes Gelände – Rutschgefahr! Säuren sowie Lösungsmittel Drehmoment sicher aufnehmen zu (z. B. Benzin, Heizöl, können. Hochdruckreiniger vom Farbverdünner oder Aceton) Reinigungsobjekt möglichst weit entfernt abstellen. RE 361, RE 361 PLUS, RE 461, RE 461 PLUS, RE 471 PLUS...
  • Seite 8 Kühlluftschlitze im Motorgehäuse bei Betriebsmittel“ (BGV A3) enthalten. Bedarf reinigen. Diese Unfallverhütungsvorschrift ist unbedingt zu beachten. Gerät regelmäßig warten. Nur Wartungsarbeiten und Reparaturen ausführen, die in der RE 361, RE 361 PLUS, RE 461, RE 461 PLUS, RE 471 PLUS...
  • Seite 9: Strahlrohr Anbauen, Abbauen

    Kupplung (1) loslassen Überwurfmutter (2) ansetzen, von Hand aufdrehen und festziehen Hochdruckschlauch abbauen Überwurfmutter (2) herunterdrehen Hochdruckschlauch vom Anschlussstutzen (1) ziehen Geräte mit Schlauchtrommel Der Hochdruckschlauch ist bereits angeschlossen. RE 361, RE 361 PLUS, RE 461, RE 461 PLUS, RE 471 PLUS...
  • Seite 10 Überwurfmutter (3) ansetzen, von Hand aufdrehen und festziehen Hand aufdrehen und festziehen Hochdruckschlauch in die Schlauchführung (3) einlegen und Schlauchführung schließen Bremse (1) der Schlauchtrommel lösen, Hochdruckschlauch aufwickeln RE 361, RE 361 PLUS, RE 461, RE 461 PLUS, RE 471 PLUS...
  • Seite 11: Wasserversorgung Herstellen

    Wasser aus dem Hochdruckreiniger in und Saugglocke des das Trinkwassernetz sind zu beachten. Saugschlauches in Wasserbehälter tauchen – kein verschmutztes Wasser verwenden Hochdruckschlauch mit der Hand nach unten halten Gerät einschalten RE 361, RE 361 PLUS, RE 461, RE 461 PLUS, RE 471 PLUS...
  • Seite 12: Gerät Elektrisch Anschließen

    (hohe Netzimpedanz) andere angeschlossene Verbraucher beeinträchtigen. Bei Netzimpedanzen kleiner als 0,15 Ohm sind keine Störungen zu erwarten. Die Verlängerungsleitung muss abhängig von Netzspannung und Leitungslänge den aufgeführten Mindestquerschnitt haben. RE 361, RE 361 PLUS, RE 461, RE 461 PLUS, RE 471 PLUS...
  • Seite 13: Gerät Einschalten

    5 min, bei Arbeitspausen oder wenn das Betrieb Gerät unbeaufsichtigt zurück gelassen wird, Gerät am Geräteschalter Spritzpistole auf den zu reinigenden ausschalten – siehe "Gerät Gegenstand richten – nie auf ausschalten". Personen! RE 361, RE 361 PLUS, RE 461, RE 461 PLUS, RE 471 PLUS...
  • Seite 14 Druckregulierung an der Düse An der Spritzpistole können Der Arbeitsdruck kann an der Düse Arbeitsdruck und Wassermenge für stufenlos verstellt werden. kurzzeitige Anpassungen an die Reinigungsaufgabe eingestellt werden. RE 361, RE 361 PLUS, RE 461, RE 461 PLUS, RE 471 PLUS...
  • Seite 15: Reinigungsmittel Beimischen

    Stellhülse bis zum Anschlag in einschalten. Pfeilrichtung drehen (Niederdruckbetrieb) Motornachlaufschaltung Die Pumpe arbeitet noch ca. 20 s nach Schließen der Spritzpistole drucklos im Bypass, erst dann schaltet sich der RE 361, RE 361 PLUS, RE 461, RE 461 PLUS, RE 471 PLUS...
  • Seite 16 1 Minute betätigen und passt auf die gängigen lassen, bis kein Reinigungsmittel Reinigungsmittelbehälter. mehr aus der Düse austritt Verbrauch an Reinigungsmittel "QR" an der Skala ablesen siehe "Gerät ausschalten" RE 361, RE 361 PLUS, RE 461, RE 461 PLUS, RE 471 PLUS...
  • Seite 17: Gerät Ausschalten

    Wasserzulaufschlauch vom Gerät – und Wassernetz trennen B = 2 – x 100 = Wert in % (A + B) x 100 = 33,3 % (1 + 2) RE 361, RE 361 PLUS, RE 461, RE 461 PLUS, RE 471 PLUS...
  • Seite 18: Gerät Aufbewahren

    Gerät mit geöffneter Spritzpistole einschalten Spritzpistole so lange betätigen, bis ein gleichmäßiger Strahl austritt Restfrostschutzmittel in einem geschlossenen Behälter aufbewahren Hochdruckschlauch und Wasserzulaufschlauch abschrauben Schrauben (1) herausdrehen Haube abnehmen RE 361, RE 361 PLUS, RE 461, RE 461 PLUS, RE 471 PLUS...
  • Seite 19: Wartungs- Und Pflegehinweise

    Anschlüsse am Hochdruckschlauch fetten Kupplungsstecker vom Strahlrohr und reinigen Kupplungsmuffe der Spritzpistole reinigen Wasserzulaufsieb im Hochdruckeingang ersetzen reinigen Hochdruckdüse ersetzen Belüftungsöffnungen reinigen prüfen Stützfüße ersetzen RE 361, RE 361 PLUS, RE 461, RE 461 PLUS, RE 471 PLUS...
  • Seite 20: Wartung

    Anschlüsse fetten nur noch aus dem Spritzkopf tropft – das Gerät ist jetzt drucklos Die Anschlüsse am Hochdruckschlauch Strahlrohr abbauen bei Bedarf fetten. Düse mit geeigneter Nadel reinigen RE 361, RE 361 PLUS, RE 461, RE 461 PLUS, RE 471 PLUS...
  • Seite 21: Ölstand Kontrollieren

    15 W 40 – siehe "Öl wechseln") abziehen Öl in einen geeigneten Behälter laufen lassen Schlauch wieder aufstecken und mit Schlauchschelle befestigen gebrauchtes Öl gemäß den gesetzlichen Vorschriften entsorgen RE 361, RE 361 PLUS, RE 461, RE 461 PLUS, RE 471 PLUS...
  • Seite 22: Inbetriebnahme Nach Langer Lagerung

    – defekten Bauteilen Verwendung von qualitativ minderwertigen Ersatzteilen Frostschäden – Schäden durch falsche – Spannungsversorgung Schäden durch schlechte – Wasserversorgung (z. B. Querschnitt des Zulaufschlauches zu klein) RE 361, RE 361 PLUS, RE 461, RE 461 PLUS, RE 471 PLUS...
  • Seite 23 Gebrauch einem normalen Verschleiß und müssen je nach Art und Dauer der Nutzung rechtzeitig ersetzt werden. Dazu gehören u. a.: Hochdruck-Düsen – Hochdruck-Schläuche – RE 361, RE 361 PLUS, RE 461, RE 461 PLUS, RE 471 PLUS...
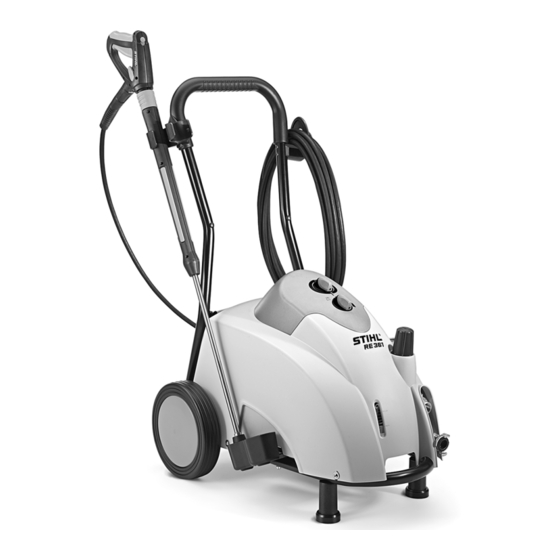
  • Seite 24: Wichtige Bauteile

    17 Dosiergriff für Reinigungsmittel 18 Geräteschalter 19 Reinigungsmitteltank 20 Halter für Spritzeinrichtung 21 Aufhängung für Anschlussleitung und Hochdruckschlauch 22 Schlauchtrommel 23 Schlauchtrommelbremse 24 Kurbel der Schlauchtrommel Typenschild nur PLUS-Version RE 361, RE 361 PLUS, RE 461, RE 461 PLUS, RE 471 PLUS...
  • Seite 25: Technische Daten

    Arbeitsdruck: 2 - 22 Mpa (20 - 220 bar) nur Japan (60 Hz Ausführung) Max. zulässiger Druck: 25 Mpa (250 bar) Max. 1 Mpa Wasserzulaufdruck: (10 bar) RE 361, RE 361 PLUS, RE 461, RE 461 PLUS, RE 471 PLUS...
  • Seite 26 RE 461, RE 461 PLUS: 73,3 dB(A) RE 361, RE 461 RE 471 PLUS: 74,7 dB(A) Länge ca.: 740 mm Breite ca.: 530 mm Höhe ca.: 1015 mm RE 361, RE 361 PLUS, RE 461, RE 461 PLUS, RE 471 PLUS...
  • Seite 27: Sonderzubehör

    3 m. Rotierende Waschbürste – Aktuelle Informationen zu diesem und Bürsteneinsatz austauschbar. weiterem Sonderzubehör sind beim Flächenwaschbürste – zur Montage auf STIHL Fachhändler erhältlich. gerade oder abgewinkelte Strahlrohre. RE 361, RE 361 PLUS, RE 461, RE 461 PLUS, RE 471 PLUS...
  • Seite 28: Betriebsstörungen Beheben

    Gerät schaltet wegen Überhitzung des Motors Übereinstimmung von Versorgungs- und Gerätespannung prüfen, den Motor min- destens 5 Minuten abkühlen lassen Schlechte, unklare, unsaubere Düse verschmutzt Düse reinigen, siehe "Wartung" Strahlform RE 361, RE 361 PLUS, RE 461, RE 461 PLUS, RE 471 PLUS...
  • Seite 29 Düse verstopft Düse reinigen Reinigungsmittel bleiben aus Reinigungsmittelbehälter ist leer Reinigungsmittelbehälter füllen Reinigungsmittelansaugung verstopft Verstopfung beseitigen Venturidüse verschlissen Gerät vom Fachhändler instandsetzen lassen STIHL empfiehlt den STIHL Fachhändler RE 361, RE 361 PLUS, RE 461, RE 461 PLUS, RE 471 PLUS...
  • Seite 30: Eg Konformitätserklärung

    Anhang V, unter Anwendung der Norm ISO 3744 verfahren. Gemessener Schallleistungspegel RE 361, RE 361 PLUS: 87,7 dB(A) RE 461, RE 461 PLUS: 86,7 dB(A) RE 471 PLUS: 88,2 dB(A) RE 361, RE 361 PLUS, RE 461, RE 461 PLUS, RE 471 PLUS...
  • Seite 31: Anschriften

    Kundendienst die strengen Anforderungen der internationalen Norm ISO 9001 für Qualitätsmanagement-Systeme erfüllen. bundesweit 0,09 Euro je angefangene Minute aus dem deutschen Festnetz. Preise aus Mobilfunknetzen können abweichen RE 361, RE 361 PLUS, RE 461, RE 461 PLUS, RE 471 PLUS...
  • Seite 32 First use after long periods of storage Minimize Wear and Avoid Damage Main Parts Specifications Special Accessories Troubleshooting Maintenance and Repairs Disposal EC Declaration of Conformity Quality Certification RE 361, RE 361 PLUS, RE 461, RE 461 PLUS, RE 471 PLUS...
  • Seite 33: Guide To Using This Manual

    The high-pressure hose must not be replacement of parts – unplug the driven over, pulled, buckled or twisted. power plug! RE 361, RE 361 PLUS, RE 461, RE 461 PLUS, RE 471 PLUS...
  • Seite 34 When transporting the machine in or on while using unauthorized attachments. a vehicle, it must be secured, e.g. with straps, so that it cannot slip or tip over. RE 361, RE 361 PLUS, RE 461, RE 461 PLUS, RE 471 PLUS...
  • Seite 35 High-pressure hose and spray – attachment in good condition (clean, moving easily) and correctly assembled RE 361, RE 361 PLUS, RE 461, RE 461 PLUS, RE 471 PLUS...
  • Seite 36 Beware of slipping on ice, water, snow the kickback force and additional torque between machine and water supply or uneven ground! produced when using spray attachments with angled spray lance. RE 361, RE 361 PLUS, RE 461, RE 461 PLUS, RE 471 PLUS...
  • Seite 37: Fitting, Removing Spray Lance

    STIHL recommends that maintenance and repair work be carried out only by authorized STIHL dealers. STIHL dealers receive regular training and are supplied with technical information. RE 361, RE 361 PLUS, RE 461, RE 461 PLUS, RE 471 PLUS...
  • Seite 38 Push the high-pressure hose into the hose guide (3) and close the hose guide. Release the brake (1) on the hose reel and wind up the high-pressure hose RE 361, RE 361 PLUS, RE 461, RE 461 PLUS, RE 471 PLUS...
  • Seite 39: Connecting The Water Supply

    Hold down the high-pressure hose by hand Switch on the machine Wait until a steady jet exits the high- pressure hose Switch off the machine RE 361, RE 361 PLUS, RE 461, RE 461 PLUS, RE 471 PLUS...
  • Seite 40: Connecting To Power Supply

    Trouble is not anticipated at power line impedances less than 0.15 ohms. The extension cord must have the following minimum cross-section depending on the mains voltage and cord length. RE 361, RE 361 PLUS, RE 461, RE 461 PLUS, RE 471 PLUS...
  • Seite 41: Switching On

    – never at persons! at the master switch – see "Switching off When the machine is switched on, the machine". voltage fluctuations that occur under unfavorable mains conditions (high RE 361, RE 361 PLUS, RE 461, RE 461 PLUS, RE 471 PLUS...
  • Seite 42 The operating pressure can be infinitely can be set on the spray gun for short- adjusted at the nozzle. term adjustment in line with the cleaning task. RE 361, RE 361 PLUS, RE 461, RE 461 PLUS, RE 471 PLUS...
  • Seite 43: Adding Detergent

    20 seconds after closing the spray gun before the motor switches off. This prevents the automatic cutoff device from unnecessarily actuating. RE 361, RE 361 PLUS, RE 461, RE 461 PLUS, RE 471 PLUS...
  • Seite 44 (1 + 2) Read the detergent consumption The cap has a standard thread and fits "QR" on the scale all standard detergent containers. Calculating the actual detergent concentration: RE 361, RE 361 PLUS, RE 461, RE 461 PLUS, RE 471 PLUS...
  • Seite 45: Switching Off

    – the spray gun is locked to prevent inadvertent operation Unplug the power plug from the socket Disconnect water intake hose from machine and water supply RE 361, RE 361 PLUS, RE 461, RE 461 PLUS, RE 471 PLUS...
  • Seite 46: Remove Shroud

    English Remove shroud Unscrew high-pressure hose and water intake hose Remove screws (1) Remove shroud RE 361, RE 361 PLUS, RE 461, RE 461 PLUS, RE 471 PLUS...
  • Seite 47: Maintenance And Care

    Water intake strainer in the high-pressure inlet replace clean High pressure nozzle replace Ventilation openings clean check Machine supports replace RE 361, RE 361 PLUS, RE 461, RE 461 PLUS, RE 471 PLUS...
  • Seite 48: Maintenance

    – Lubricate connections the machine is now depressurized Remove spray lance Lubricate the connections on the high- pressure hose as needed Clean nozzle with a suitable needle RE 361, RE 361 PLUS, RE 461, RE 461 PLUS, RE 471 PLUS...
  • Seite 49: Checking The Oil Level

    Waste oil must be disposed of in accordance with the statutory regulations. fill fresh oil into the expansion tank (650 ml, SAE 15 W 40) Refit shroud and check oil level RE 361, RE 361 PLUS, RE 461, RE 461 PLUS, RE 471 PLUS...
  • Seite 50: Minimize Wear And Avoid Damage

    – hose too small) High-pressure hoses – Maintenance work All of the tasks listed under "Maintenance and Repairs" must be carried out periodically. If the user does RE 361, RE 361 PLUS, RE 461, RE 461 PLUS, RE 471 PLUS...
  • Seite 51: Main Parts

    20 Holder for spray attachment 21 Bracket for the power cable and high-pressure hose 22 Hose reel 23 Hose reel brake 24 Hose reel crank handle Model plate PLUS models only RE 361, RE 361 PLUS, RE 461, RE 461 PLUS, RE 471 PLUS...
  • Seite 52: Specifications

    Protection class: I Protection class: I Type of depending on country Type of protection: IP X5 protection: IP X5 Norway only Japan only (50-Hz version) Japan only (60-Hz version) RE 361, RE 361 PLUS, RE 461, RE 461 PLUS, RE 471 PLUS...
  • Seite 53 RE 471 PLUS: braid supply: 60 °C see www.stihl.com/reach. Suction operation: 50 °C Max. kickback force: 63 N Oil specification: SAE 15 W 40 Oil quantity: 650 ml RE 361, RE 361 PLUS, RE 461, RE 461 PLUS, RE 471 PLUS...
  • Seite 54: Special Accessories

    Ask your STIHL dealer for current Rotary washing brush – exchangeable information on this and other special brush insert. accessories. Wash brush – for mounting on straight or angled spray lances. RE 361, RE 361 PLUS, RE 461, RE 461 PLUS, RE 471 PLUS...
  • Seite 55: Troubleshooting

    Check whether the supply voltage and overheating machine voltage match; let the motor cool down for at least 5 minutes Weak, ragged, unclean jet Nozzle fouled Clean nozzle, see "Maintenance" RE 361, RE 361 PLUS, RE 461, RE 461 PLUS, RE 471 PLUS...
  • Seite 56 Detergent tank is empty Fill detergent tank Detergent intake is clogged Eliminate clog Venturi nozzle is worn Have the machine checked by a servicing dealer STIHL recommends STIHL servicing dealers RE 361, RE 361 PLUS, RE 461, RE 461 PLUS, RE 471 PLUS...
  • Seite 57: Maintenance And Repairs

    2000/14/EC, Annex V, and standard ISO 3744. Measured sound power level RE 361, RE 361 PLUS: 87.7 dB(A) RE 461, RE 461 PLUS: 86.7 dB(A) RE 471 PLUS: 88.2 dB(A) RE 361, RE 361 PLUS, RE 461, RE 461 PLUS, RE 471 PLUS...
  • Seite 58: Quality Certification

    STIHL meet the strict requirements of the ISO 9001 standard for quality management systems in terms of product development, materials purchasing, production, assembly, documentation and customer service. RE 361, RE 361 PLUS, RE 461, RE 461 PLUS, RE 471 PLUS...
  • Seite 59 Mise en service après un arrêt prolongé Conseils à suivre pour réduire l'usure et éviter les avaries Principales pièces Caractéristiques techniques Accessoires optionnels Dépannage Instructions pour les réparations RE 361, RE 361 PLUS, RE 461, RE 461 PLUS, RE 471 PLUS...
  • Seite 60: Indications Concernant La Présente

    – Retirer la fiche secteur ! RE 361, RE 361 PLUS, RE 461, RE 461 PLUS, RE 471 PLUS...
  • Seite 61 Le nettoyeur haute pression convient équivalentes. Consulter un tout spécialement pour le nettoyage de distributeur agréé pour toute véhicules automobiles, machines, réservoirs, façades, locaux d’une RE 361, RE 361 PLUS, RE 461, RE 461 PLUS, RE 471 PLUS...
  • Seite 62 ! pouvoir être facilement amené sur Branchement électrique – uniquement à une prise installée L’interrupteur de l’appareil doit se – conformément à la réglementation trouver sur 0. RE 361, RE 361 PLUS, RE 461, RE 461 PLUS, RE 471 PLUS...
  • Seite 63 (p. ex. Ne pas risquer de les cisailler au – amiante, huile) provenant de l’objet niveau des arêtes, pointes ou nettoyé ne parviennent pas dans autres objets acérés RE 361, RE 361 PLUS, RE 461, RE 461 PLUS, RE 471 PLUS...
  • Seite 64 (par exemple choc ou originales STIHL. Les propriétés de chute), il faut impérativement vérifier avant toute nouvelle utilisation s’il présente une parfaite sécurité de RE 361, RE 361 PLUS, RE 461, RE 461 PLUS, RE 471 PLUS...
  • Seite 65: Démontage, Montage De La Lance

    Démonter le flexible haute pression Dévisser l'écrou d'accouplement (2) Tirer le flexible haute pression du raccord (1) Appareils avec enrouleur de flexible Le flexible à haute pression est déjà raccordé. RE 361, RE 361 PLUS, RE 461, RE 461 PLUS, RE 471 PLUS...
  • Seite 66 (4) Introduire le flexible haute pression dans le guide (3) et fermer ce dernier. Desserrer le frein (1) de l'enrouleur de flexible, enrouler le flexible haute pression. RE 361, RE 361 PLUS, RE 461, RE 461 PLUS, RE 471 PLUS...
  • Seite 67: Établissement D'une Alimentation En Eau Hors Pression

    Remplir le tuyau d’aspiration avec de l’eau et immerger la crépine d’aspiration dans un récipient d’eau, ne pas utiliser d’eau sale RE 361, RE 361 PLUS, RE 461, RE 461 PLUS, RE 471 PLUS...
  • Seite 68: Branchement Électrique Du Dispositif

    à 0,15 ohm. La rallonge doit avoir la section minimale indiquée en fonction de la tension du réseau et de la longueur de câble. RE 361, RE 361 PLUS, RE 461, RE 461 PLUS, RE 471 PLUS...
  • Seite 69: Mise En Marche Du Dispositif

    à nettoyer – jamais sur voir « Arrêt de l'appareil ». des personnes ! Lors de la mise sous tension de l'appareil, si les conditions du réseau sont défavorables (impédance élevée), RE 361, RE 361 PLUS, RE 461, RE 461 PLUS, RE 471 PLUS...
  • Seite 70 La pression de service et le volume graduellement sur la buse. d'eau peuvent être réglés sur le pistolet pulvérisateur pour des adaptations temporaires à l'opération de nettoyage. RE 361, RE 361 PLUS, RE 461, RE 461 PLUS, RE 471 PLUS...
  • Seite 71: Apport De Détergent

    20 s environ après la fermeture du pistolet de pulvérisation, le moteur ne s'arrête qu'après ce délai. Cela évite que RE 361, RE 361 PLUS, RE 461, RE 461 PLUS, RE 471 PLUS...
  • Seite 72 Si un apport de détergent n'est plus la concentration avec une très grande nécessaire : précision. Dans ce cas, mesurer le débit d'eau et la consommation de détergent. RE 361, RE 361 PLUS, RE 461, RE 461 PLUS, RE 471 PLUS...
  • Seite 73: Arrêt Du Dispositif

    Retirer la fiche de la prise électrique x V = Concentration Débrancher le tuyau d'arrivée d'eau x 100 = 33,3 % (1 + 2) de l'appareil et du réseau d'eau RE 361, RE 361 PLUS, RE 461, RE 461 PLUS, RE 471 PLUS...
  • Seite 74: Rangement Du Dispositif

    Dévisser le flexible haute pression Conserver le reste de produit et le tuyau d'arrivée d'eau antigel dans un récipient fermé. Desserrer les vis (1) Retirer le capot RE 361, RE 361 PLUS, RE 461, RE 461 PLUS, RE 471 PLUS...
  • Seite 75: Instructions Pour La Maintenance Et L'entretien

    Fiche de la lance et prise du pistolet nettoyer pulvérisateur nettoyer Filtre d'arrivée d'eau dans l'entrée haute pression remplacer nettoyer Buse haute pression remplacer Ouvertures de ventilation nettoyer vérifier Béquilles remplacer RE 361, RE 361 PLUS, RE 461, RE 461 PLUS, RE 471 PLUS...
  • Seite 76: Maintenance

    Actionner le pistolet jusqu'à ce que refroidissement puisse entrer et sortie l'eau s'égoutte seulement de la tête librement par les ouvertures de de pulvérisation – l'appareil est à l'appareil. présent dépressurisé RE 361, RE 361 PLUS, RE 461, RE 461 PLUS, RE 471 PLUS...
  • Seite 77: Contrôler Le Niveau D'huile

    Laisser l'huile s'écouler dans un bac l'huile ») approprié Enficher de nouveau le flexible et le fixer avec le collier de serrage Éliminer l’huile usagée conformément aux dispositions légales RE 361, RE 361 PLUS, RE 461, RE 461 PLUS, RE 471 PLUS...
  • Seite 78: Mise En Service Après Un Arrêt Prolongé

    – dommages résultant d'une tension – d'alimentation électrique incorrecte dommages résultant d'une – alimentation en eau incorrecte (par exemple section du tuyau d'arrivée trop faible) RE 361, RE 361 PLUS, RE 461, RE 461 PLUS, RE 471 PLUS...
  • Seite 79 être remplacées en temps voulu suivant la nature et la durée de l'utilisation. En font notamment partie : Buses haute pression – Flexibles haute pression – RE 361, RE 361 PLUS, RE 461, RE 461 PLUS, RE 471 PLUS...
  • Seite 80: Principales Pièces

    21 Support pour câble électrique et flexible haute pression 22 Enrouleur de flexible 23 Frein de l'enrouleur de flexible 24 Manivelle de l'enrouleur de flexible Plaque signalétique version PLUS seulement RE 361, RE 361 PLUS, RE 461, RE 461 PLUS, RE 471 PLUS...
  • Seite 81: Caractéristiques Techniques

    Japon seulement (exécution 50 Hz) « C » ou « K ») : 16 A Classe de Japon seulement (exécution 60 Hz) protection : Degré de protection : IP X5 RE 361, RE 361 PLUS, RE 461, RE 461 PLUS, RE 471 PLUS...
  • Seite 82 RE 461, RE 461 PLUS : 86,7 dB(A) RE 471 PLUS : 88,2 dB(A) Longueur approx. : 920 mm Largeur approx. : 530 mm Hauteur approx. : 1015 mm RE 361, RE 361 PLUS, RE 461, RE 461 PLUS, RE 471 PLUS...
  • Seite 83: Accessoires Optionnels

    Turbo-brosse, insert à brosse auprès de votre distributeur STIHL. remplaçable. Brosse de lavage grandes surfaces, à monter sur des lances droites ou coudées. RE 361, RE 361 PLUS, RE 461, RE 461 PLUS, RE 471 PLUS...
  • Seite 84: Dépannage

    5 minutes Jet déformé, non transparent, imprécis Buse encrassée Nettoyer la buse, voir « Entretien » RE 361, RE 361 PLUS, RE 461, RE 461 PLUS, RE 471 PLUS...
  • Seite 85 Remplir le réservoir à détergent Aspiration de détergent bouchée Supprimer l’obstruction Buse à venturi usée Faire réparer l’appareil par un distributeur STIHL recommande de contacter un distributeur STIHL. RE 361, RE 361 PLUS, RE 461, RE 461 PLUS, RE 471 PLUS...
  • Seite 86: Déclaration De Conformité Ce

    Niveau sonore mesuré RE 361, RE 361 PLUS : 87,7 dB(A) RE 461, RE 461 PLUS : 86,7 dB(A) RE 471 PLUS : 88,2 dB(A) RE 361, RE 361 PLUS, RE 461, RE 461 PLUS, RE 471 PLUS...
  • Seite 87: Certificat De Qualité

    STIHL que tous ses produits répondent aux exigences sévères de la norme internationale ISO 9001 applicable aux systèmes de management de la qualité. RE 361, RE 361 PLUS, RE 461, RE 461 PLUS, RE 471 PLUS...
  • Seite 88 Cambiar el aceite Puesta en servicio tras un almacenamiento de cierta duración 105 Minimizar el desgaste y evitar daños Componentes importantes Datos técnicos Accesorios especiales Subsanar irregularidades de funcionamiento RE 361, RE 361 PLUS, RE 461, RE 461 PLUS, RE 471 PLUS...
  • Seite 89: Notas Relativas A Este Manual De

    Tener en cuenta las normas en cuestión del país. Antes de comenzar el trabajo, comprobar siempre la máquina en cuanto al estado reglamentario. RE 361, RE 361 PLUS, RE 461, RE 461 PLUS, RE 471 PLUS...
  • Seite 90 óxido sin producir STIHL para esta máquina o piezas polvo ni chispas. técnicamente iguales. Si tiene RE 361, RE 361 PLUS, RE 461, RE 461 PLUS, RE 471 PLUS...
  • Seite 91 Enchufarla sólo a una caja de – enchufe que esté debidamente instalada El interruptor de la máquina tiene – que encontrarse en la posición 0 RE 361, RE 361 PLUS, RE 461, RE 461 PLUS, RE 471 PLUS...
  • Seite 92 ¡Tener en cuenta sin falta las directrices habituales sobre el medio No dejar que el cable roce en – ambiente! cantos ni en objetos puntiagudos o de cantos vivos RE 361, RE 361 PLUS, RE 461, RE 461 PLUS, RE 471 PLUS...
  • Seite 93 STIHL. Los distribuidores seguridad. No seguir utilizando la especializados STIHL siguen máquina en ningún caso si no reúne RE 361, RE 361 PLUS, RE 461, RE 461 PLUS, RE 471 PLUS...
  • Seite 94: Montar, Desmontar El Tubo De Proyección

    Desenroscar la tuerca de racor (2) Extraer la manguera de alta presión del racor de empalme (1) Máquinas con tambor para la manguera La manguera de alta presión ya está empalmada. RE 361, RE 361 PLUS, RE 461, RE 461 PLUS, RE 471 PLUS...
  • Seite 95 Colocar la manguera de alta presión en la correspondiente guía (3) y cerrar dicha guía Soltar el freno (1) del tamboe para la manguera, enrollar la manguera de alta presión RE 361, RE 361 PLUS, RE 461, RE 461 PLUS, RE 471 PLUS...
  • Seite 96: Establecer La Alimentación De Agua Sin Presión

    Sujetar la manguera de alta presión hacia abajo con la mano Conectar la máquina RE 361, RE 361 PLUS, RE 461, RE 461 PLUS, RE 471 PLUS...
  • Seite 97: Conectar La Máquina A La Red Eléctrica

    0,15 ohmios, no es de esperar que se produzcan perturbaciones. El cable de prolongación tiene que tener la sección mínima indicada en función de la tensión de la red y la longitud del cable. RE 361, RE 361 PLUS, RE 461, RE 461 PLUS, RE 471 PLUS...
  • Seite 98: Conectar La Máquina

    Dirigir la pistola de proyección hacia desconectar ésta accionando el el objeto a limpiar – ¡nunca hacia interruptor de la misma – véase personas! "Desconectar la máquina". RE 361, RE 361 PLUS, RE 461, RE 461 PLUS, RE 471 PLUS...
  • Seite 99 En la bomba de alta presión se pueden progresivamente en la tobera. ajustar la presión de trabajo y el caudal de agua para adaptaciones a breve plazo a la tarea de limpieza. RE 361, RE 361 PLUS, RE 461, RE 461 PLUS, RE 471 PLUS...
  • Seite 100: Mezclar Detergente

    (servicio de baja presión) La bomba trabaja todavía unos 20 s sin presión en el by-pass tras cerrar la pistola de proyección, desconectándose RE 361, RE 361 PLUS, RE 461, RE 461 PLUS, RE 471 PLUS...
  • Seite 101 Si se quiere dejar de mezclar ajustar la concentración con mucha detergente: exactitud. En este caso, medir el caudal de agua de paso y el consumo de detergente. RE 361, RE 361 PLUS, RE 461, RE 461 PLUS, RE 471 PLUS...
  • Seite 102: Desconectar La Máquina

    Desenchufarla de la red Separar la manguera de afluencia x 100 = 33,3 % (1 + 2) de agua de la máquina y de la red de agua RE 361, RE 361 PLUS, RE 461, RE 461 PLUS, RE 471 PLUS...
  • Seite 103: Guardar La Máquina

    Guardar el líquido refrigerante que Desenroscar la manguera de alta sobre en un depósito cerrado presión y la manguera de afluencia de agua Desenroscar los tornillos (1) Quitar la cubierta RE 361, RE 361 PLUS, RE 461, RE 461 PLUS, RE 471 PLUS...
  • Seite 104: Instrucciones De Mantenimiento Y Conservación

    Tamiz de afluencia de agua en la entrada de alta presión sustituir limpiar Tobera de alta presión sustituir Aberturas de ventilación limpiar comprobar Apoyos sustituir RE 361, RE 361 PLUS, RE 461, RE 461 PLUS, RE 471 PLUS...
  • Seite 105: Mantenimiento

    Comprobar los apoyos semana o más a menudo. Para garantizar la estabilidad segura de la máquina, sustituir los dos apoyos delanteros en caso de estar dañados o desgastados. RE 361, RE 361 PLUS, RE 461, RE 461 PLUS, RE 471 PLUS...
  • Seite 106: Controlar El Nivel De Aceite

    Volver a montar el tubo flexible y fijarlo con la abrazadera de tubo flexible Gestionar los residuos de aceite usado con arreglo a las disposiciones de ley RE 361, RE 361 PLUS, RE 461, RE 461 PLUS, RE 471 PLUS...
  • Seite 107: Puesta En Servicio Tras Un Almacenamiento De Cierta Duración

    Daños causados por una – alimentación de tensión errónea Daños causados por una deficiente – alimentación de agua (p. ej. sección demasiado pequeña de la manguera de alimentación) RE 361, RE 361 PLUS, RE 461, RE 461 PLUS, RE 471 PLUS...
  • Seite 108 De ellos forman parte, entre otros: Toberas de alta presión – Mangueras de alta presión – RE 361, RE 361 PLUS, RE 461, RE 461 PLUS, RE 471 PLUS...
  • Seite 109: Componentes Importantes

    18 Interruptor de la máquina 19 Depósito de detergente 20 Soporte para el equipo de proyección 21 Suspensión para cable de conexión y manguera de alta presión RE 361, RE 361 PLUS, RE 461, RE 461 PLUS, RE 471 PLUS...
  • Seite 110: Datos Técnicos

    "C" o "K"): 16 A Sólo Japón (ejecución de 50 Hz) Clase de Sólo Japón (ejecución de 60 Hz) protección: Tipo de protección: IP X5 Sólo en versión PLUS RE 361, RE 361 PLUS, RE 461, RE 461 PLUS, RE 471 PLUS...
  • Seite 111 530 mm Altura, aprox.: 1015 mm RE 361 PLUS, RE 461 PLUS, RE 471 PLUS Longitud, aprox.: 920 mm Ancho, aprox.: 530 mm Altura, aprox.: 1015 mm RE 361, RE 361 PLUS, RE 461, RE 461 PLUS, RE 471 PLUS...
  • Seite 112: Accesorios Especiales

    RE 461, RE 461 PLUS: 86,7 dB(A) RE 471 PLUS: 88,2 dB(A) Otros accesorios especiales Cepillo de lavado rotativo – elemento de cepillo cambiable. RE 361, RE 361 PLUS, RE 461, RE 461 PLUS, RE 471 PLUS...
  • Seite 113 Filtro de agua – para limpiar el agua procedente de la red y en el servicio de aspiración sin presión. RE 361, RE 361 PLUS, RE 461, RE 461 PLUS, RE 471 PLUS...
  • Seite 114: Subsanar Irregularidades De Funcionamiento

    5 minutos, como mínimo Forma del chorro, poco nítida y poco Tobera sucia Limpiar la tobera, véase "Mantenimiento" definida RE 361, RE 361 PLUS, RE 461, RE 461 PLUS, RE 471 PLUS...
  • Seite 115 Aspiración de detergente, obstruida Eliminar la obstrucción Cerrar la tobera Venturi Llevar la máquina a un distribuidor espe- cializado para repararla STIHL recomienda un distribuidor especializado STIHL RE 361, RE 361 PLUS, RE 461, RE 461 PLUS, RE 471 PLUS...
  • Seite 116: Indicaciones Para La Reparación

    Nivel de potencia sonora medido anagrama también solo). RE 361, RE 361 PLUS: 87,7 dB(A) RE 461, RE 461 PLUS: 86,7 dB(A) RE 471 PLUS: 88,2 dB(A) RE 361, RE 361 PLUS, RE 461, RE 461 PLUS, RE 471 PLUS...
  • Seite 117: Certificado De Calidad

    ISO 9001 para sistemas de gestión de calidad. RE 361, RE 361 PLUS, RE 461, RE 461 PLUS, RE 471 PLUS...
  • Seite 118 Mudar o óleo Colocação em funcionamento da lavadora depois de um longo período sem utilização Minimizar o desgaste, e evitar os danos Peças importantes Dados técnicos Acessórios especiais RE 361, RE 361 PLUS, RE 461, RE 461 PLUS, RE 471 PLUS...
  • Seite 119: Referente A Estas Instruções De Serviço

    Observar as prescrições referentes aos diferentes países. Verificar se a lavadora está no estado prescrito antes de iniciar qualquer trabalho. Observar particularmente a RE 361, RE 361 PLUS, RE 461, RE 461 PLUS, RE 471 PLUS...
  • Seite 120 STIHL para esta máquinas, recipientes, fachadas, lavadora, ou peças tecnicamente estábulos, e para desenferrujar sem pó similares. Dirija-se a um revendedor e faíscas. especializado no caso de ter RE 361, RE 361 PLUS, RE 461, RE 461 PLUS, RE 471 PLUS...
  • Seite 121 0 Verificar se a mangueira de alta – pressão, o equipamento de injecção e os equipamentos de segurança estão danificados RE 361, RE 361 PLUS, RE 461, RE 461 PLUS, RE 471 PLUS...
  • Seite 122 Observar curto-circuito! tambor do cabo imprescindivelmente as devidas normas ambientais! Não deixar esfregar nos bordos, – nem objectos bem afiados RE 361, RE 361 PLUS, RE 461, RE 461 PLUS, RE 471 PLUS...
  • Seite 123 à lavadora e às continuar a trabalhar com esta lavadora exigências do utilizador. – vide também o capítulo "Antes do RE 361, RE 361 PLUS, RE 461, RE 461 PLUS, RE 471 PLUS...
  • Seite 124: Montar, Desmontar O Tubo De Injecção

    Desatarraxar a porca com capa (2) Tirar a mangueira de alta pressão do bocal (1) Lavadoras com tambor para mangueiras A mangueira de alta pressão já está ligada. RE 361, RE 361 PLUS, RE 461, RE 461 PLUS, RE 471 PLUS...
  • Seite 125 Soltar a porca com capa (3), e para mangueiras desatarraxá-la do bocal no sentido da seta Colocar a porca com capa (4), atarraxá-la manualmente, e apertá-la bem RE 361, RE 361 PLUS, RE 461, RE 461 PLUS, RE 471 PLUS...
  • Seite 126: Estabelecer O Abastecimento De Água

    água para sem pressão". impedir o refluxo de água a partir da lavadora de alta pressão para dentro da rede de água potável. RE 361, RE 361 PLUS, RE 461, RE 461 PLUS, RE 471 PLUS...
  • Seite 127: Esteabelecer Um Abastecimento De Água Sem Pressão

    água. Encher a mangueira de aspiração de água, e imergir a campainha de aspiração da mangueira de aspiração no recipiente de água – não utilizar água suja RE 361, RE 361 PLUS, RE 461, RE 461 PLUS, RE 471 PLUS...
  • Seite 128: Ligar O Aparelho

    Dirigir a pistola de ejecção sobre o objecto a limpar – nunca sobre pessoas! As oscilações de tensão que se apresentam podem prejudicar outros consumidores ligados sob condições RE 361, RE 361 PLUS, RE 461, RE 461 PLUS, RE 471 PLUS...
  • Seite 129: Trabalho

    à caso de interrupções de trabalho tarefa de limpeza. superiores a 5 minutos ou quando a lavadora é deixada sem vigilância.– vide o capítulo "Desligar a lavadora". RE 361, RE 361 PLUS, RE 461, RE 461 PLUS, RE 471 PLUS...
  • Seite 130 A bomba trabalha ainda durante aprox. 20 segundos depois de ter fechado a pistola de ejecção sem pressão no Bypass, é só agora que o motor se RE 361, RE 361 PLUS, RE 461, RE 461 PLUS, RE 471 PLUS...
  • Seite 131: Adicionar Detergentes

    Quando já não deve ser adicionado Girar o estojo de regulação no mais detergente: sentido da seta até ao encosto (serviço de baixa pressão) RE 361, RE 361 PLUS, RE 461, RE 461 PLUS, RE 471 PLUS...
  • Seite 132 (A + B) muito exactamente em alguns detergentes. Medir neste caso o caudal x 100 = 33,3 % (1 + 2) de água e o consumo de detergentes. RE 361, RE 361 PLUS, RE 461, RE 461 PLUS, RE 471 PLUS...
  • Seite 133: Desligar O Aparelho

    é evitada assim Tirar a ficha de rede da tomada de corrente Separar a mangueira de alimentação de água da lavadora e da rede de água RE 361, RE 361 PLUS, RE 461, RE 461 PLUS, RE 471 PLUS...
  • Seite 134: Desmontar A Cobertura

    Desmontar a cobertura Desatarraxar a mangueira de alta pressão e a mangueira de alimentação de água Desaparafusar os parafusos (1) Retirar a cobertura RE 361, RE 361 PLUS, RE 461, RE 461 PLUS, RE 471 PLUS...
  • Seite 135: Indicações De Manutenção E De Conservação

    Peneira de alimentação de água na entrada de alta pressão substituir limpar Tubeira de alta pressão substituir Aberturas de ventilação limpar controlar Pés de apoio substituir RE 361, RE 361 PLUS, RE 461, RE 461 PLUS, RE 471 PLUS...
  • Seite 136: Manutenção

    – a Manter a lavadora limpa para que o ar lavadora é agora sem pressão de refrigeração nas aberturas da lavadora possa entrar e sair livremente. RE 361, RE 361 PLUS, RE 461, RE 461 PLUS, RE 471 PLUS...
  • Seite 137: Controlar O Nível De Óleo

    Tirar a mangueira do niple da mangueira Deixar correr o óleo num recipiente adequado Enfiar novamente a mangueira, e fixá-la pela braçadeira para mangueiras Eliminar o óleo usado conforme as prescrições legais RE 361, RE 361 PLUS, RE 461, RE 461 PLUS, RE 471 PLUS...
  • Seite 138: Colocação Em Funcionamento Da Lavadora Depois De Um Longo Período Sem Utilização

    Danos causados por um mau – abastecimento de água (por exemplo a secção transversal da mangueira de alimentação é demasiadamente pequena) RE 361, RE 361 PLUS, RE 461, RE 461 PLUS, RE 471 PLUS...
  • Seite 139 A isto pertencem entre outros: Tubeiras de alta pressão – Mangueiras de alta pressão – RE 361, RE 361 PLUS, RE 461, RE 461 PLUS, RE 471 PLUS...
  • Seite 140: Peças Importantes

    22 Tambor da mangueira 23 Travão do tambor da mangueira 24 Manivela do tambor da mangueira Placa do tipo Só a versão PLUS RE 361, RE 361 PLUS, RE 461, RE 461 PLUS, RE 471 PLUS...
  • Seite 141: Dados Técnicos

    16 A Só a Noruega Classe de Só o Japão (execução de 50 Hz) protecção: Tipo de Só o Japão (execução de 60 Hz) protecção: IP X5 RE 361, RE 361 PLUS, RE 461, RE 461 PLUS, RE 471 PLUS...
  • Seite 142 Com equipamento de injecção e RE 361, RE 361 PLUS: < 2,5 m/s mangueira de alta pressão: RE 461, RE 461 PLUS: < 2,5 m/s RE 471 PLUS: < 2,5 m/s RE 361, RE 361 PLUS, RE 461, RE 461 PLUS, RE 471 PLUS...
  • Seite 143: Acessórios Especiais

    à rede de água potável. montagem de tubos de injecção direitos Conjunto de aspiração – execução ou com desvio angular. profissional, 3/4", comprimento de 3 m. RE 361, RE 361 PLUS, RE 461, RE 461 PLUS, RE 471 PLUS...
  • Seite 144 As informações actuais referentes a estes acessórios especiais e a outros acessórios especiais podem ser adquiridas no revendedor especializado da STIHL. RE 361, RE 361 PLUS, RE 461, RE 461 PLUS, RE 471 PLUS...
  • Seite 145: Eliminar As Perturbações De Serviço

    5 minutos Forma do jacto má, não clara, não Tubeira suja Limpar a tubeira, vide o capítulo limpa "Manutenção" RE 361, RE 361 PLUS, RE 461, RE 461 PLUS, RE 471 PLUS...
  • Seite 146 A aspiração dos detergentes está entupida Eliminar o entupimento A tubeira Venturi está gasta Mandar reparar a lavadora pelo revende- dor especializado A STIHL recomenda o revendedor especializado da STIHL RE 361, RE 361 PLUS, RE 461, RE 461 PLUS, RE 471 PLUS...
  • Seite 147: Indicações De Reparação Eliminação

    RE 361, RE 361 PLUS: 87,7 dB(A) pequenas peças). RE 461, RE 461 PLUS: 86,7 dB(A) RE 471 PLUS: 88,2 dB(A) RE 361, RE 361 PLUS, RE 461, RE 461 PLUS, RE 471 PLUS...
  • Seite 148: Certificado De Qualidade

    à fabricação, à montagem, à documentação e ao serviço de assistência técnica, satisfazem as exigências severas da norma internacional ISO 9001 para os sistemas de administração de qualidade. RE 361, RE 361 PLUS, RE 461, RE 461 PLUS, RE 471 PLUS...
  • Seite 149 Onderhoud Oliepeil controleren Olie verversen Ingebruikneming na langere periode van opslag Slijtage minimaliseren en schade voorkomen Belangrijke componenten Technische gegevens Speciaal toebehoren Opheffen van storingen Reparatierichtlijnen RE 361, RE 361 PLUS, RE 461, RE 461 PLUS, RE 471 PLUS...
  • Seite 150: Met Betrekking Tot Deze Handleiding

    Voor alle werkzaamheden aan het – Nooit met een beschadigde apparaat, bijv. schoonmaken, hogedrukslang werken – deze direct onderhoud, vervanging van vervangen. onderdelen – de netsteker uit de contactdoos trekken! RE 361, RE 361 PLUS, RE 461, RE 461 PLUS, RE 471 PLUS...
  • Seite 151 Bij vragen hierover Toepassingen contact opnemen met een De hogedrukreiniger is geschikt voor het reinigen van voertuigen, machines, ketels, gevels, stallen en voor het stof- en vonkvrij ontroesten. RE 361, RE 361 PLUS, RE 461, RE 461 PLUS, RE 471 PLUS...
  • Seite 152 Hogedrukslang, spuitinrichting en – Netstekers, netkabels en – veiligheidsinrichtingen op verlengkabels alsmede elektrische beschadiging controleren stekerverbindingen nooit met natte handen vastpakken RE 361, RE 361 PLUS, RE 461, RE 461 PLUS, RE 471 PLUS...
  • Seite 153 De kabelhaspel altijd geheel – Altijd voor een stabiele en veilige reinigen oppervlak te voorkomen. afwikkelen, om brandgevaar door houding zorgen. oververhitting te voorkomen RE 361, RE 361 PLUS, RE 461, RE 461 PLUS, RE 471 PLUS...
  • Seite 154 De elektriciens. veiligheidsinrichting is af fabriek ingesteld en mag niet worden versteld. RE 361, RE 361 PLUS, RE 461, RE 461 PLUS, RE 471 PLUS...
  • Seite 155: Spuitlans Aansluiten, Loskoppelen

    Wartelmoer (4) aanbrengen, met de hand erop draaien en vastdraaien De hogedrukslang in de slanggeleider (3) plaatsen en de slanggeleider dichtdrukken Rem (1) van de slanghaspel loszetten, de hogedrukslang oprollen RE 361, RE 361 PLUS, RE 461, RE 461 PLUS, RE 471 PLUS...
  • Seite 156: Apparaat Op Het Waterleidingnet Aansluiten

    – zie "Hogedrukreiniger buiten het waterleidingnet om aansluiten". Hogedrukslang (1) op de aansluitnippel (2) schuiven Wartelmoer (3) aanbrengen, met de hand erop draaien en vastdraaien RE 361, RE 361 PLUS, RE 461, RE 461 PLUS, RE 471 PLUS...
  • Seite 157: Hogedrukreiniger Buiten Het Waterleidingnet Om Aansluiten

    – geen drinkwaterleidingnet in acht nemen. vervuild water aanzuigen De hogedrukslang met de hand naar beneden houden Apparaat inschakelen RE 361, RE 361 PLUS, RE 461, RE 461 PLUS, RE 471 PLUS...
  • Seite 158: Apparaat Op Het Lichtnet Aansluiten

    Het spuitpistool op het te reinigen object richten – nooit op personen! Bij het inschakelen van het apparaat kunnen de bij een instabiel spanningsnet optredende RE 361, RE 361 PLUS, RE 461, RE 461 PLUS, RE 471 PLUS...
  • Seite 159: Werken

    5 min, bij reinigingstaak, worden ingesteld. rustpauzes of als het apparaat onbeheerd wordt achtergelaten, het apparaat met behulp van de schakelaar uitschakelen – zie "Apparaat uitschakelen". RE 361, RE 361 PLUS, RE 461, RE 461 PLUS, RE 471 PLUS...
  • Seite 160 Motornaloopschakeling De pomp draait nog ca. 20 sec. na het sluiten van het spuitpistool drukloos in de bypass-stand, pas dan schakelt de RE 361, RE 361 PLUS, RE 461, RE 461 PLUS, RE 471 PLUS...
  • Seite 161: Reinigingsmiddel Toevoegen

    Reinigingsmiddelen mogen niet op het te reinigen object opdrogen. Als er geen reinigingsmiddel meer mag De stelhuls tot aan de aanslag in de worden bijgemengd: richting van de pijl draaien (lagedrukstand) RE 361, RE 361 PLUS, RE 461, RE 461 PLUS, RE 471 PLUS...
  • Seite 162 Berekening van de werkelijke Bij enkele reinigingsmiddelen moet de reinigingsmiddelconcentratie: concentratie zeer nauwkeurig worden ingesteld. In dit geval de waterdoorzet x V = concentratie en het reinigingsmiddelverbruik meten. RE 361, RE 361 PLUS, RE 461, RE 461 PLUS, RE 471 PLUS...
  • Seite 163: Apparaat Uitschakelen

    100 = waarde in % (A + B) De netsteker uit de contactdoos trekken x 100 = 33,3 % (1 + 2) De waterslang loskoppelen van het apparaat en het waterleidingnet RE 361, RE 361 PLUS, RE 461, RE 461 PLUS, RE 471 PLUS...
  • Seite 164: Apparaat Opslaan

    De overgebleven antivries in een afgesloten jerrycan bewaren De hogedrukslang en de waterslang losschroeven Bouten (1) losdraaien Kap wegnemen RE 361, RE 361 PLUS, RE 461, RE 461 PLUS, RE 471 PLUS...
  • Seite 165: Onderhouds- En Reinigingsvoorschriften

    Steekkoppeling van de spuitlans en de reinigen koppelingsmof van het spuitpistool reinigen Zeef in watertoevoer in de hogedrukingang vervangen reinigen Hogedruksproeier vervangen Ventilatieopeningen reinigen controleren Steunpoten vervangen RE 361, RE 361 PLUS, RE 461, RE 461 PLUS, RE 471 PLUS...
  • Seite 166: Onderhoud

    – de druk in het apparaat is naar buiten kan stromen. nu afgebouwd RE 361, RE 361 PLUS, RE 461, RE 461 PLUS, RE 471 PLUS...
  • Seite 167: Oliepeil Controleren

    De olie in een hiertoe geschikte bak opvangen De slang weer aanbrengen en met behulp van een slangklem vastzetten De afgetapte olie volgens de wettelijke voorschriften opslaan en afvoeren RE 361, RE 361 PLUS, RE 461, RE 461 PLUS, RE 471 PLUS...
  • Seite 168: Ingebruikneming Na Langere Periode Van Opslag

    Schade door bevriezing – minderwaardige onderdelen Schade door verkeerde – netspanning Schade door slechte watertoevoer – (bijv. diameter van de toevoerslang te klein) RE 361, RE 361 PLUS, RE 461, RE 461 PLUS, RE 471 PLUS...
  • Seite 169 Hiertoe behoren o.a.: Hogedruksproeiers – Hogedrukslangen – RE 361, RE 361 PLUS, RE 461, RE 461 PLUS, RE 471 PLUS...
  • Seite 170: Belangrijke Componenten

    17 Doseerknop voor reinigingsmiddel 18 Hoofdschakelaar 19 Reinigingsmiddeltank 20 Houder voor spuitlans 21 Ophangbeugel voor netkabel en hogedrukslang 22 Slanghaspel 23 Slanghaspelrem 24 Slinger van de slanghaspel Typeplaatje Alleen PLUS-modellen RE 361, RE 361 PLUS, RE 461, RE 461 PLUS, RE 471 PLUS...
  • Seite 171: Technische Gegevens

    "C" of Afhankelijk van het exportland "K"): 16 A Beveiligingstype: IP X5 Beveiligings- Alleen Noorwegen klasse: Alleen Japan (50 Hz-uitvoering) Beveiligingstype: IP X5 Alleen Japan (60 Hz-uitvoering) RE 361, RE 361 PLUS, RE 461, RE 461 PLUS, RE 471 PLUS...
  • Seite 172 60 °C (EG) nr. 1907/2006 zie RE 471 PLUS: gevlochten stalen www.stihl.com/reach Zuigstand: 50 °C mantel Max. terugstootkracht: 63 N Oliesoort: SAE 15 W 40 Oliehoeveelheid: 650 ml RE 361, RE 361 PLUS, RE 461, RE 461 PLUS, RE 471 PLUS...
  • Seite 173: Speciaal Toebehoren

    3 m. worden vervangen. Actuele informatie over bovengenoemd Platte wasborstel – voor montage op en ander speciaal toebehoren is rechte of geknikte spuitlansen. verkrijgbaar bij de STIHL dealer. RE 361, RE 361 PLUS, RE 461, RE 461 PLUS, RE 471 PLUS...
  • Seite 174: Opheffen Van Storingen

    Controleren of de voedingsspanning en motor uitgeschakeld de voorgeschreven spanning met elkaar corresponderen, de motor minimaal 5 minuten laten afkoelen Slechte, ondefinieerbare, onzuivere Sproeier vervuild Sproeier reinigen, zie "Onderhoud" straal RE 361, RE 361 PLUS, RE 461, RE 461 PLUS, RE 471 PLUS...
  • Seite 175 Reinigingsmiddel wordt niet Reinigingsmiddelreservoir is leeg Reinigingsmiddelreservoir vullen aangezogen Zuigmond voor reinigingsmiddel verstopt Verstopping opheffen Venturisproeier versleten Apparaat door STIHL dealer laten repareren STIHL adviseert de STIHL dealer RE 361, RE 361 PLUS, RE 461, RE 461 PLUS, RE 471 PLUS...
  • Seite 176: Reparatierichtlijnen

    ISO 3744 gehandeld. Gemeten geluidvermogensniveau RE 361, RE 361 PLUS: 87,7 dB(A) RE 461, RE 461 PLUS: 86,7 dB(A) RE 471 PLUS: 88,2 dB(A) RE 361, RE 361 PLUS, RE 461, RE 461 PLUS, RE 471 PLUS...
  • Seite 177: Kwaliteitscertificaat

    STIHL wat betreft productontwikkeling, materiaalvoorziening, productie, montage, documentatie en service voldoen aan de strenge eisen van de internationale norm ISO 9001 voor kwaliteitsmanagementsystemen. RE 361, RE 361 PLUS, RE 461, RE 461 PLUS, RE 471 PLUS...
  • Seite 178: Πίνακας Περιεχομένων

    Hans Peter Stihl Θέση σε λειτουργία μετά από μεγάλο διάστημα αχρησίας Περιορισμός φθοράς και αποφυγή ζημιών Κύρια μέρη του μηχανήματος Τεχνικά χαρακτηριστικά Πρόσθετος εξοπλισμός Αντιμετώπιση βλαβών Οδηγίες επισκευής RE 361, RE 361 PLUS, RE 461, RE 461 PLUS, RE 471 PLUS...
  • Seite 179: Σχετικά Με Τις Οδηγίες Χρήσης

    στις οδηγίες χρήσης δεν δεσμεύουν τον εξηγήσει τον ασφαλή χειρισμό του κατασκευαστή. μηχανήματος. Σε ορισμένες χώρες, η χρήση μηχανημάτων που εκπέμπουν θόρυβο μπορεί να περιορίζεται με δημοτικούς κανονισμούς. Τηρείτε τους ισχύοντες κανονισμούς. RE 361, RE 361 PLUS, RE 461, RE 461 PLUS, RE 471 PLUS...
  • Seite 180 καθορίζουν σε μεγάλο βαθμό την φαρμάκων που μειώνουν την ικανότητα μέσου – Βλέπε «Φύλαξη μηχανήματος». ασφάλεια του μηχανήματος. Το αντίδρασης. μηχάνημα πρέπει να χρησιμοποιείται μόνο με τους RE 361, RE 361 PLUS, RE 461, RE 461 PLUS, RE 471 PLUS...
  • Seite 181 θέση 0. Ο διακόπτης του μηχανήματος – πρέπει να είναι στη θέση 0. Ελέγξτε τον σωλήνα υψηλής πίεσης, – το σύστημα εκτόξευσης και τις διατάξεις ασφαλείας για ζημιές. RE 361, RE 361 PLUS, RE 461, RE 461 PLUS, RE 471 PLUS...
  • Seite 182 πάνω από το έδαφος, π.χ. με τη με το λάστιχο – Κίνδυνος χρήση μιας ανέμης καλωδίου. βραχυκυκλώματος! Τυχόν επικίνδυνες ουσίες που απελευθερώνονται κατά το καθάρισμα (π.χ. αμίαντος, λάδια) δεν επιτρέπεται να RE 361, RE 361 PLUS, RE 461, RE 461 PLUS, RE 471 PLUS...
  • Seite 183 Πιάνετε πάντα το φις! άριστα προσαρμοσμένες στο μηχάνημα Αν το μηχάνημα εκτεθεί σε αντικανονικές και στις απαιτήσεις του χρήστη. καταπονήσεις (π.χ. χτύπημα ή πτώση), ελέγξτε οπωσδήποτε την κατάστασή του RE 361, RE 361 PLUS, RE 461, RE 461 PLUS, RE 471 PLUS...
  • Seite 184 Αποσυνδέστε τον σωλήνα υψηλής πίεσης. Ξεβιδώστε το παξιμάδι (2). Αποσυνδέστε τον σωλήνα υψηλής πίεσης από το στόμιο (1). Μηχανήματα με ανέμη Ο σωλήνας υψηλής πίεσης είναι ήδη συνδεμένος. RE 361, RE 361 PLUS, RE 461, RE 461 PLUS, RE 471 PLUS...
  • Seite 185 το με το χέρι. Τοποθετήστε τον σωλήνα υψηλής πίεσης μέσα στον οδηγό (3) και κλείστε τον οδηγό. Λύστε το φρένο (1) της ανέμης και τυλίξτε τον σωλήνα υψηλής πίεσης. RE 361, RE 361 PLUS, RE 461, RE 461 PLUS, RE 471 PLUS...
  • Seite 186: Σύνδεση Στην Παροχή Νερού

    πλυστικό υψηλής πίεσης προς το δίκτυο νερού. πόσιμου νερού. Γεμίστε τον σωλήνα αναρρόφησης με νερό και βυθίστε το φίλτρο αναρρόφησης του σωλήνα αναρρόφησης μέσα στο δοχείο νερού. Μη χρησιμοποιείτε βρόμικο νερό. RE 361, RE 361 PLUS, RE 461, RE 461 PLUS, RE 471 PLUS...
  • Seite 187: Ηλεκτρική Σύνδεση Μηχανήματος

    αναμένεται να προκληθούν προβλήματα. Το καλώδιο επέκτασης (μπαλαντέζα) πρέπει να έχει τουλάχιστον την ελάχιστη διατομή που ισχύει για την τάση του δικτύου και το μήκος του καλωδίου. RE 361, RE 361 PLUS, RE 461, RE 461 PLUS, RE 471 PLUS...
  • Seite 188: Θέση Σε Λειτουργία

    μηχάνημα με τον διακόπτη, αν πρόκειται στο αντικείμενο που θέλετε να να διακόψετε την εργασία σας για καθαρίσετε – Ποτέ σε άλλα άτομα! περισσότερα από 5 λεπτά (π.χ. RE 361, RE 361 PLUS, RE 461, RE 461 PLUS, RE 471 PLUS...
  • Seite 189 Ρύθμιση πίεσης/παροχής στο πιστόλι εκτόξευσης Η πίεση λειτουργίας και η παροχή νερού μπορούν να ρυθμιστούν στο πιστόλι εκτόξευσης, ώστε να προσαρμόζονται κάθε φορά στη συγκεκριμένη εργασία καθαρισμού. RE 361, RE 361 PLUS, RE 461, RE 461 PLUS, RE 471 PLUS...
  • Seite 190: Πρόσμειξη Απορρυπαντικού

    μέχρι τέρμα στην κατεύθυνση του Μετά το κλείσιμο του πιστολιού βέλους (λειτουργία με χαμηλή εκτόξευσης, η αντλία εξακολουθεί να πίεση). λειτουργεί για περίπου 20 δευτερόλεπτα στην παράκαμψη, και στη συνέχεια ο RE 361, RE 361 PLUS, RE 461, RE 461 PLUS, RE 471 PLUS...
  • Seite 191 Για ορισμένα απορρυπαντικά, η συγκέντρωση πρέπει να ρυθμιστεί με Για να διακόψετε την πρόσμειξη μεγάλη ακρίβεια. Στην περίπτωση αυτή, απορρυπαντικού: μετρήστε την παροχή νερού και την κατανάλωση απορρυπαντικού. RE 361, RE 361 PLUS, RE 461, RE 461 PLUS, RE 471 PLUS...
  • Seite 192: Σβήσιμο Του Μηχανήματος

    100 = 33,3 % Αποσυνδέστε το φις από την πρίζα. x V = Συγκέντρωση (1 + 2) Αποσυνδέστε τον σωλήνα παροχής νερού από το μηχάνημα και το δίκτυο νερού. RE 361, RE 361 PLUS, RE 461, RE 461 PLUS, RE 471 PLUS...
  • Seite 193: Φύλαξη Του Μηχανήματος

    δημιουργηθεί μια ομοιόμορφη δέσμη. Ξεβιδώστε τον σωλήνα υψηλής Φυλάξτε το υπόλοιπο αντιψυκτικό πίεσης και το λάστιχο. σε ένα κλειστό δοχείο. Ξεβιδώστε τις βίδες (1). Αφαιρέστε το κέλυφος. RE 361, RE 361 PLUS, RE 461, RE 461 PLUS, RE 471 PLUS...
  • Seite 194: Οδηγίες Συντήρησης Και Καθαρισμού

    και θηλυκός σύνδεσμος πιστολιού Καθάρισμα εκτόξευσης Καθάρισμα Σήτα παροχής νερού στην είσοδο υψηλής πίεσης Αλλαγή Καθάρισμα Μπεκ υψηλής πίεσης Αλλαγή Ανοίγματα αερισμού Καθάρισμα Έλεγχος Πόδια στήριξης Αλλαγή RE 361, RE 361 PLUS, RE 461, RE 461 PLUS, RE 471 PLUS...
  • Seite 195: Συντήρηση

    την εβδομάδα ή και πιο συχνά, αν χρειάζεται. Έλεγχος ποδιών Για να εξασφαλίζεται η σταθερότητα του μηχανήματος, αλλάξτε τα μπροστινά πόδια στήριξης αν έχουν ζημιά ή αν έχουν φθαρεί. RE 361, RE 361 PLUS, RE 461, RE 461 PLUS, RE 471 PLUS...
  • Seite 196: Έλεγχος Στάθμης Λαδιού

    Συλλέξτε το λάδι σε ένα κατάλληλο (SAE 15 W 40 – βλέπε "Αλλαγή δοχείο. λαδιού"). Συνδέστε πάλι τον σωλήνα και σφίξτε το κολάρο. Απορρίψτε το μεταχειρισμένο λάδι σύμφωνα με τους τοπικούς κανονισμούς. RE 361, RE 361 PLUS, RE 461, RE 461 PLUS, RE 471 PLUS...
  • Seite 197 Ζημιές λόγω εσφαλμένης τάσης – Ζημιές στο μηχάνημα λόγω χρήσης – τροφοδοσίας ποιοτικά υποδεέστερων ανταλλακτικών Ζημιές από κακή τροφοδοσία νερού – (π.χ. πολύ μικρή διατομή του σωλήνα παροχής) RE 361, RE 361 PLUS, RE 461, RE 461 PLUS, RE 471 PLUS...
  • Seite 198 παρουσιάζεται κατά την κανονική χρήση και πρέπει να αντικαθίστανται κατά διαστήματα, ανάλογα με το είδος και τη διάρκεια χρήσης. Εδώ συγκαταλέγονται μεταξύ άλλων: Μπεκ υψηλής πίεσης – Σωλήνες υψηλής πίεσης – RE 361, RE 361 PLUS, RE 461, RE 461 PLUS, RE 471 PLUS...
  • Seite 199: Κύρια Μέρη Του Μηχανήματος

    20 Στήριγμα συστήματος εκτόξευσης 21 Στήριγμα καλωδίου τροφοδοσίας και σωλήνα υψηλής πίεσης 22 Ανέμη σωλήνα 23 Φρένο ανέμης σωλήνα 24 Μανιβέλα ανέμης Πινακίδα τύπου Μόνο στην έκδοση PLUS RE 361, RE 361 PLUS, RE 461, RE 461 PLUS, RE 471 PLUS...
  • Seite 200: Τεχνικά Χαρακτηριστικά

    (κωδικός «C» ή Ανάλογα με τη χώρα «K»): 16 A Μόνο για Ιαπωνία (μοντέλο 50 Hz) Κατηγορία Μόνο για Ιαπωνία (μοντέλο 60 Hz) προστασίας: Είδος μόνωσης: IP X5 RE 361, RE 361 PLUS, RE 461, RE 461 PLUS, RE 471 PLUS...
  • Seite 201 στη λαβή κατά ISO 5349 Ύψος περίπου: 1015 mm RE 361, RE 361 PLUS: < 2,5 m/s RE 461, RE 461 PLUS: < 2,5 m/s RE 471 PLUS: < 2,5 m/s RE 361, RE 361 PLUS, RE 461, RE 461 PLUS, RE 471 PLUS...
  • Seite 202: Πρόσθετος Εξοπλισμός

    καθάρισμα πέτρας και μετάλλου. το μηχάνημα είναι σε λειτουργία. Φιλτρο νερού για το καθάρισμα του νερού από το δίκτυο ύδρευσης και κατά την αναρρόφηση από παροχές νερού χωρίς πίεση. RE 361, RE 361 PLUS, RE 461, RE 461 PLUS, RE 471 PLUS...
  • Seite 203 Σετ αναρρόφησης, επαγγελματική έκδοση, 3/4", μήκος 3 m. Για τις τελευταίες πληροφορίες σχετικά με τα παραπάνω εξαρτήματα και άλλο πρόσθετο εξοπλισμό, απευθυνθείτε στον επίσημο αντιπρόσωπο της STIHL. RE 361, RE 361 PLUS, RE 461, RE 461 PLUS, RE 471 PLUS...
  • Seite 204: Αντιμετώπιση Βλαβών

    συμφωνεί με την τάση του μηχανήματος, αφήστε τον κινητήρα να κρυώσει για τουλάχιστον 5 λεπτά. Κακό, ακαθόριστο, ακανόνιστο σχήμα Βρόμικο μπεκ Καθαρίστε το μπεκ – Βλέπε «Συντήρηση». δέσμης. RE 361, RE 361 PLUS, RE 461, RE 461 PLUS, RE 471 PLUS...
  • Seite 205 Καθαρίστε την κεφαλή αναρρόφησης. απορρυπαντικού. Φθαρμένα μπεκ βεντούρι Ζητήστε από ένα ειδικευμένο κατάστημα να επισκευάσει το μηχάνημα. Η STIHL συνιστά να απευθυνθείτε σε επίσημο αντιπρόσωπο της STIHL. RE 361, RE 361 PLUS, RE 461, RE 461 PLUS, RE 471 PLUS...
  • Seite 206: Οδηγίες Επισκευής

    Μετρημένη στάθμη ηχητικής ισχύος εξαρτήματα ενδέχεται να υπάρχει μόνο το σήμα). RE 361, RE 361 PLUS: 87,7 dB(A) RE 461, RE 461 PLUS: 86,7 dB(A) RE 471 PLUS: 88,2 dB(A) RE 361, RE 361 PLUS, RE 461, RE 461 PLUS, RE 471 PLUS...
  • Seite 207: Πιστοποιητικό Ποιότητας

    των υλικών, την κατασκευή, τη συναρμολόγηση, την τεκμηρίωση και την εξυπηρέτηση πελατών, ικανοποιούν τις αυστηρές απαιτήσεις του διεθνούς προτύπου ISO 9001 σχετικά με τα συστήματα διασφάλισης ποιότητας. RE 361, RE 361 PLUS, RE 461, RE 461 PLUS, RE 471 PLUS...
  • Seite 208 0458-671-9021-A D G F E P n g www.stihl.com *04586719021A* 0458-671-9021-A...

Diese Anleitung auch für:

Re 461Re 471

Inhaltsverzeichnis