EuroLite LED TSL-1000 Scan Bedienungsanleitung
Scanner mit 100-w-led, rotierenden gobos und 3-facetten-prisma, farbrad und motorfokus
Inhaltsverzeichnis
Verfügbare Sprachen
Verfügbare Sprachen
LED
TSL-
Scan
Bedienungsanleitung
User Manual
LED TSL-1000 Scan
Scanner mit 100-W-LED, rotierenden Gobos und 3-Facetten-Prisma, Farbrad und Motorfokus
Scanner with 100 W LED, rotating gobos and 3-facet prism, color wheel and motorized focus
STAND
MASTER
DMX
SLAVE
ALONE
No. 51786122
www.eurolite.de
1000
MOTOR-DRIVEN
FOCUS
COB
COLD WHITE
STROBE
LED
20°
Inhaltsverzeichnis

Verwandte Anleitungen für EuroLite LED TSL-1000 Scan


Inhaltszusammenfassung für EuroLite LED TSL-1000 Scan
- Seite 1 TSL- 1000 Scan Bedienungsanleitung User Manual LED TSL-1000 Scan Scanner mit 100-W-LED, rotierenden Gobos und 3-Facetten-Prisma, Farbrad und Motorfokus Scanner with 100 W LED, rotating gobos and 3-facet prism, color wheel and motorized focus MOTOR-DRIVEN STAND MASTER COLD WHITE 20°...
- Seite 2 2/32...
-
Seite 3: Inhaltsverzeichnis
Diese Bedienungsanleitung gilt für die Artikelnummer: /This user manual is valid for the article number: 51786122 Das neueste Update dieser Bedienungsanleitung finden Sie im Internet unter: You can find the latest update of this user manual in the Internet under: www.eurolite.de 3/32... -
Seite 4: Einführung
BEDIENUNGSANLEITUNG LED TSL-1000 Scan GEFAHR! Elektrischer Schlag durch Kurzschluss Seien Sie besonders vorsichtig beim Umgang mit gefährlicher Netzspannung. Bei dieser Spannung können Sie einen lebensgefährlichen elektrischen Schlag erhalten. Öffnen Sie das Gerät niemals und schützen Sie es vor Feuchtigkeit und Nässe. -
Seite 5: Sicherheitshinweise
SICHERHEITSHINWEISE WARNUNG! Lesen Sie aufmerksam die Sicherheitshinweise und benutzen Sie das Produkt nur wie in dieser Anleitung beschrieben, damit es nicht versehentlich zu Verletzungen oder Schäden kommt. Verwendungszweck • Bei diesem Gerät handelt es sich um ein LED Lichteffekt-Gerät, mit dem sich dekorative Lichteffekte erzeugen lassen. - Seite 6 Warnung vor Verbrennung und Brand • Der zulässige Umgebungstemperaturbereich (Ta) beträgt -5 bis +45 °C. Verwenden Sie das Gerät niemals außerhalb dieses Temperaturbereichs. • Die Gehäusetemperatur (Tc) kann im Betrieb bis zu 55°C betragen. Vermeiden Sie den Kontakt mit Personen oder Gegenständen. •...
-
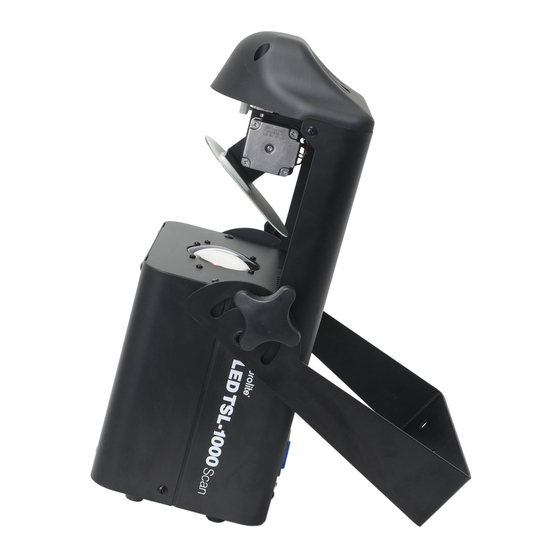
Seite 7: Gerätebeschreibung
GERÄTEBESCHREIBUNG (1) Ablenkspiegel (2) Objektivlinse (3) Feststellschraube (4) DMX-Modus-Kontrollanzeige (5) Power-Kontrollanzeige (6) Mikrofon (7) Lüftungsschlitze (8) Gummifuß (9) Menu-Taste (10) Up-Taste (11) Down-Taste (12) Enter-Taste (13) OLED-Display 9 10 (14) Loch für Montageklammer (15) Montagebügel (16) Fangsicherung (17) DMX-Eingang (18) Spannungsversorgungseingang (19) Sicherungshalter (20) DMX-Ausgang (21) Spannungsversorgungsausgang... -
Seite 8: Installation
INSTALLATION WARNUNG! Verletzungsgefahr durch Herabfallen Über Kopf installierte Geräte können beim Herabstürzen erhebliche Verletzungen verursachen! Stellen Sie sicher, dass das Gerät sicher installiert ist und nicht herunterfallen kann. Die Montage darf nur durch eine Fachkraft erfolgen, die mit den Gefahren und den einschlägigen Vorschriften hierfür vertraut ist. -
Seite 9: Anschlüsse
ANSCHLÜSSE Anschluss an den DMX512-Controller / Verbindung Gerät – Gerät Gerät 1 Gerät 2 Gerät 3 Startadresse 1 Startadresse 16 Startadresse 31 DMX Controller Program Chase32 Step100 Achten Sie darauf, dass die Adern der Datenleitung an keiner Stelle miteinander in Kontakt treten. Die Geräte werden ansonsten nicht bzw. -
Seite 10: Anschluss Ans Netz
Anschluss ans Netz Das Gerät verfügt über ein Schaltnetzteil, das eine Netzspannung zwischen 100 und 240 Volt erlaubt. Schließen Sie das beiliegende Netzkabel an und stecken den Netzstecker in eine geerdete Schutzkontaktsteckdose ein. Damit ist das Gerät eingeschaltet. Zum Ausschalten ziehen Sie den Netzstecker aus der Steckdose. Schließen Sie das Gerät nicht über einen Dimmer an die Netzspannung an. -
Seite 11: Bedienung
Das Gerät kann entweder im Standalone-Modus über das Bedienfeld oder im DMX-gesteuerten Modus über einen handelsüblichen DMX-Controller betrieben werden. Wenn Sie das Gerät an die Spannungsversorgung angeschlossen haben, nimmt der LED TSL-1000 Scan den Betrieb auf. Während des Reset justieren sich die Motoren aus und das Gerät ist danach betriebsbereit. - Seite 12 DMX Address Mit dieser Funktion können Sie die gewünschte DMX-Startadresse über das Control Board einstellen. DMX Channel Mit dieser Funktion lässt sich der gewünschte DMX-Kanal-Modus einstellen. Running Mode Mit dieser Funktion können Sie den gewünschten Betriebsmodus einstellen: Auto Sound Slave Programs Mit dieser Funktion lassen sich 8 unterschiedliche interne Programme aufrufen (1 ~ 8).
-
Seite 13: Dmx-Betrieb
DMX-Betrieb DMX-Startadresse einstellen Für den Betrieb über einen Controller mit DMX512-Protokoll verfügt das Gerät über 15 Steuerkanäle. Es kann aber auch in einen Modus mit 10 Kanälen umgeschaltet werden, wenn andere Funktionen benötigt werden. Damit das Gerät vom Controller angesteuert werden kann, muss außerdem die DMX-Startadresse eingestellt werden. - Seite 14 Farbrad Weiß (offen) Weiß /Farbe 1 Farbe 1 Farbe 1 / Farbe 2 Farbe 2 Farbe 2 / Farbe 3 Farbe 3 Farbe 3 / Farbe 4 Farbe 4 Farbe 4 / Farbe 5 Farbe 5 Farbe 5 / Farbe 6 Farbe 6 Farbe 6 / Farbe 7 Farbe 7...
- Seite 15 Goborotation rückwärts mit zunehmender Geschwindigkeit Fokus Allmähliche Einstellung von weit bis nah 3-Facetten-Prisma Offen 3-Facetten-Prisma LED Makros Leer Auto 1 Auto 2 Auto 3 Auto 4 Auto 5 Auto 6 Auto 7 Auto 8 Auto 9 Auto 10 Auto 11 Auto 12 Musikgesteuert XY Makros...
-
Seite 16: Reinigung Und Wartung
REINIGUNG UND WARTUNG Das Gerät sollte äußerlich in regelmäßigen Abständen von Verunreinigungen wie Staub usw. gereinigt werden. Insbesondere die Linse sollte sauber sein, damit das Licht mit maximaler Helligkeit abgestrahlt werden kann. Trennen Sie das Gerät vom Netz und lassen Sie es abkühlen, bevor Sie mit der Reinigung beginnen. Reinigen Sie die Oberflächen mit einem fusselfreien, angefeuchteten Tuch. -
Seite 17: Technische Daten
5,5 kg Zubehör 141 mm 251 mm EUROLITE TPC-10 Klammer, silber Best.-Nr. 59006856 EUROLITE Sicherungsseil A 3x600mm bis 5kg, silber Best.-Nr. 58010310 EUROLITE DMX Kabel XLR 3pol 3m schwarz Best.-Nr. 3022785H PSSO DMX Kabel XLR 3pol 3m schwarz Neutrik Best.-Nr. 30227810 PSSO PowerCon Verbindungskabel 3x1,5 3m Best.-Nr.