Herunterladen Diese Seite drucken
Pulox PO-400 Bedienungsanleitung
Vorschau ausblenden Andere Handbücher für PO-400:

Werbung

Verfügbare Sprachen
  • DE

Verfügbare Sprachen

  • DEUTSCH, seite 1
DE
PULSOXIMETER PULOX PO-400
www.pulox.de
BEDIENUNGSANLEITUNG
Pulse Oximeter PO-400 – Instruction manual
Pulsioxímetro PO-400 – Manual de instrucciones
Oxymètre de Pouls PO-400 – Mode d'emploi
Pulsossimetro PO-400 – Instruzioni per l'uso

Werbung

loading

Inhaltszusammenfassung für Pulox PO-400

  • Seite 1 PULSOXIMETER PULOX PO-400 www.pulox.de BEDIENUNGSANLEITUNG Pulse Oximeter PO-400 – Instruction manual Pulsioxímetro PO-400 – Manual de instrucciones Oxymètre de Pouls PO-400 – Mode d'emploi Pulsossimetro PO-400 – Instruzioni per l’uso...
  • Seite 2 Fuggerstr. 30 • 51149 Köln Tel.: +49 (0) 2203 / 9885 200 Fax: +49 (0) 2203 / 9885 206 www.pulox.de • Mail: info@novidion.de Bedienungsanleitung Sehr geehrte Kundin, sehr geehrter Kunde, wir freuen uns, dass Sie sich für ein Produkt unseres Sortimentes entschieden haben.
  • Seite 3 1.2 Warnung  Explosionsgefahr –verwenden Sie das Gerät nicht in der Nähe entzündlicher Stoffe wie Anästhetika.  Verwenden Sie das Gerät NICHT während einer MRT-oder CT-Untersuchung.  Biegen oder knicken Sie das Armband nicht, es könnte kaputt gehen oder zu locker am Handgelenk sitzen, so dass das Gerät herunterfällt.
  • Seite 4 Konzentration im Blut. Sie ist ein wichtiger Bioparameter für die Atmung. Gewisse Erkrankungen, die im Zusammenhang mit dem Atmungssystem stehen, können die SpO im Blut senken. Einige andere Ursachen, wie eine nicht richtig funktionierende Selbstregulation des menschlichen Körpers und eine Verletzung während einer Operation oder während einer medizinischen Untersuchung können ebenfalls zu Schwierigkeiten bei der Sauerstoffversorgung des menschlichen Körpers führen.
  • Seite 5 eines niedrigen Batteriestands zu Messfehlern kommen kann und die Batteriespannung für eine ordnungsgemäße Funktion zu niedrig ist. E. Einstellbare Bildschirmhelligkeit F. Alarmton bei Über- oder Unterschreitung der Grenzwerte, Finger nicht im Sensor und niedrigem Batteriestand. G. Pulston H. Speicherfunktion Daten können über USB Kabel auf den PC geladen werden. J.
  • Seite 6 Öffnen Sie den USB-Stecker des Geräts, stecken Sie das Mikroende des USB-Kabels in den USB Anschluss des Geräts und das andere Ende in den Computer oder das Netzteil. 5.5 Lieferumfang und Zubehör Pulsoximeter PULOX PO-400, externer Fingersensor (steckbar), USB-Datenkabel, USB-Ladegerät, PC- Software als Download (Windows 2000/XP/7/8/10), Gebrauchsanweisung 6. Anwendung 6.1 Messung...
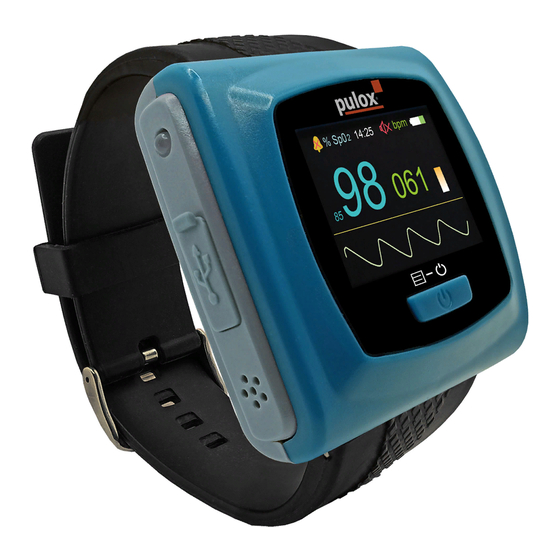
  • Seite 7 Abb. 5 Hauptmenü Abb. 6 Alarmmenü Abb. 7 Aufnahmemenü 6.3.1 Alarmmenü Drücken Sie im Hauptmenü die Funktionstaste kurz und der Auswahlbalken bewegt sich auf „Sound“. Drücken Sie nun die Funktionstaste lange, um ins Alarmmenü zu gelangen, siehe Abb. 6. Drücken Sie im Alarmmenü die Funktionstaste mehrmals kurz um den Auswahlbalken an die gewünschte Stelle zu setzen.
  • Seite 8 Sie die Daten hochladen. Hinweis: Weitere Informationen finden Sie in der ausführlichen Bedienungsanleitung der Software auf https://www.pulox.de/Anleitungen-Datenblaetter-Retouren. Hinweis: Die PC Software kann von unserer Webseite www.pulox.de heruntergeladen werden. 6.5 Akku laden Schließen Sie das Gerät mittels mitgeliefertem Steckdosenadapter an eine Steckdose an.
  • Seite 9: Problemlösung

    6.6 Reset/Zurücksetzen Verwenden Sie ein spitzes, stabiles Objekt (z. B. eine Büroklammer), um die Reset-Taste in der RESET- Öffnung zu drücken und das Gerät zurückzusetzen.7. Wartung, Transport und Aufbewahrung 7. Wartung,Transport und Aufbewahrung 7.1 Reinigung und Desinfektion Das Gerät muss vor der Reinigung ausgeschaltet werden und darf nicht in Flüssigkeiten getaucht werden.
  • Seite 10 Siehe Pulsfrequenz PRbpm Bedienungsanleitung (Pulsschläge pro Minute) Arterielle Sauerstoffsättigung des Anwendungsteil Typ BF %SpO2 Hämoglobins (in Prozent) Zurücksetzen auf Kein Alarm Werkseinstellungen Hersteller Haltbarkeitsdatum Seriennummer Batterieanode Batteriekathode International Protection IP22 Akku voll geladen Schutzart Luftfeuchtigkeitsgrenzen Temperaturgrenzen für für Lagerung und Lagerung und Transport Transport Luftdruckgrenzen für...
  • Seite 11 Die durchschnittliche Pulsfrequenz wird alle 4 Pulsschlagzyklen berechnet. Durchschnittliche Pulsfrequenz Die Abweichung zwischen Durchschnittswert und wahrem Wert überschreitet 1% nicht Sicherheitstyp Interner Akku, BF Type Pulsstärke Kontinuierliche Balkenanzeige, je höher der Bereich Balken geht, desto stärker ist der Puls Akkuanforderung 3,7 Volt wiederaufladbarer Lithium-Akku x 1 Akkulebensdauer Laden und entladen mindestens 500 Mal...
  • Seite 12 Fuggerstr. 30 • 51149 Köln Tel.: +49 (0) 2203 / 9885 200 Fax: +49 (0) 2203 / 9885 206 www.pulox.de • Mail: info@novidion.de Instructions to User Dear users, thank you very much for purchasing the Pulse Oximeter. This Manual is written and compiled in accordance with the council directive MDD93/42/EEC for medical devices and harmonized standards.
  • Seite 13 foams and paper boxes) should follow the local laws and regulations.  Please check the packing before use to make sure the device and accessories are totally in accordance with the packing list, or else the device may have the possibility of working abnormally. ...
  • Seite 14 The Pulse Oximeter features in small volume, low power consumption, convenient operation and being portable. It is only necessary for patients to put one of his fingers into a probe for diagnosis, and a display screen will directly show the measured value of pulse oxygen saturation with the high veracity and repetition.
  • Seite 15: Installation

    Measuring range: 0%~100% Accuracy: When the SpO2 measuring range is 70%~100%,the permission of absolute error is ±2%, Below 70% unspecified. B. Measurement of pulse rate Measuring range:30bpm~250bpm Accuracy: ±2 bpm or ±2% (select larger) C. Resolution SpO2 : 1%, Pulse rate: 1bpm D.
  • Seite 16 5.2 Interface introduction Figure 3 Measurement interface 5.3 SpO2 probe installation Open the USB plug of the device, then insert the SpO2 probe interface into the USB port of the device. 5.4 Connection of USB cable Open the USB plug of the device, insert the micro end of USB cable into the SpO2 probe interface , the other end into computer or power adapter.
  • Seite 17 Fig. 5 Main menu Fig. 6 Alarm menu Fig. 7 Record menu 6.3.1 Sound prompt setting Under main menu, short press the button to select “Sound”, then long press the button to enter its setting interface shown in Figure 6. Short press the button to select the option to be adjusted, then long press the button to change the value.
  • Seite 18 Fig. 8 Time setting interface Fig. 9 System menu interface Short press the button to select the option to be adjusted, then long press the button to change the value. The device adopts 24-hour clock. “set time”: set the time, “yes”: to set the time, “no”: not set the time “set year”: set the year “set month”: set the month “set day”: set the day...
  • Seite 19: Troubleshooting

    B. Please recharge the battery when the screen shows . C. Recharge the battery soon after the over-discharge. The device should be recharged every six months when it is no regular used. It can extend the battery life following this guidance. 7.3 Transportation and Storage A.
  • Seite 20 Pause the sound Open the sound prompt prompt Menu/ Power button Close the PR sound Recyclable Open the PR sound R● Recording Sensor Fault Probe failure The probe is The finger is not Sensor Off Finger Out disconnected. inserted. This item is compliant with Medical Device Directive 93/42/EEC of June 14, 1993, a directive of the European Economic Community.
  • Seite 21 - for wearing parts - for defects that were already known to the customer at the time of purchase - in case of the customer's own fault The statutory warranties of the customer remain unaffected by the guarantee. For the assertion of a warranty claim within the warranty period, the customer must provide proof of purchase.
  • Seite 22 Fuggerstr. 30 • 51149 Köln Tel.: +49 (0) 2203 / 9885 200 Fax: +49 (0) 2203 / 9885 206 www.pulox.de • Mail: info@novidion.de Instrucciones para el usuario Querido usuario, muchas gracias por haber comprado este pulsioxímetro de dedo. Este manual se ha escrito y diseñado en cumplimiento de la Directiva del Consejo sobre Dispositivos Médicos 93/42/EEC y sus correspondientes normativas.
  • Seite 23  Por favor deseche el equipo, accesorios y embalaje (incluido la bolsa de plástico, foam y cartón) de acuerdo a la ley vigente.  Compruebe el paquete antes de usarlo para asegurarse de que el dispositivo y los accesorios son totalmente compatibles con la lista de contenido;...
  • Seite 24 la monitorización del SpO es indispensable en los cuidados clínicos. El método tradicional para medir el es analizar una muestra de sangre del paciente para obtener la presión parcial de oxígeno y calcular el SpO con un analizador de gases en sangre. Este método es complicado y anticuado. Con la finalidad de medir el SpO más fácilmente y de manera más precisa, se ha desarrollado el pulsioxímetro.
  • Seite 25 cargar en un ordenador Se puede conectar una sonda oxímetro externa Los datos pueden ser transferidos a un ordenador K. Con función de reloj 4.2 Parámetros principales A. Medición de SpO Rango de medida: 0%~100% Precisión: SpO2 70% a 100% ±2 dígitos, por debajo de 70% sin especificar B.
  • Seite 26 5.2 Pantalla Figura 3 Pantalla de medición 5.3 Conexión del sensor Introduzca el enchufe USB del sensor en el puerto USB correspondiente del equipo. 5.4 Conexión de cable USB Abra el enchufe USB del dispositivo, inserte el cable USB en el puerto USB y en la computadora o adaptador de corriente.
  • Seite 27 Fig. 5 Menú principal Fig. 6 Menú de alarma Fig. 7 Menú de grabación 6.3.1 Menú de alarma En el menú principal, haga clic en el botón de encendido para seleccionar "Sound", pulse el botón de encendido (1seg) para acceder a la interfaz de ajuste de la alarma como se muestra en la Figura 6. Haga clic en el botón de encendido para seleccionar el parámetro que desea ajustar.
  • Seite 28 Conecte el dispositivo al ordenador con la línea de datos y abra el software del PC. Consulte el manual de usuario del software para obtener información detallada sobre el método de carga de datos. Nota: El software para PC se puede descargar desde nuestro sitio web oficial www.pulox.de 6.5 Carga Se puede seleccionar un adaptador de corriente para cargar el dispositivo.Cuando el dispositivo está...
  • Seite 29 el dispositivo directamente y evite que el líquido penetre en el dispositivo. 7.2 Mantenimiento A. Limpie y desinfecte el dispositivo antes de utilizarlo de acuerdo con el Manual del usuario (7.1). B. Recargue la batería si aparece en la pantalla . C.
  • Seite 30 Limitación de Limitación de humedad temperatura Limitación de la presión Por este camino atmosférica Frágil, manipular con Mantener alejado de la cuidado lluvia Sonido de alarma Batería baja desactivado Suspender las Sonido de alarma instrucciones de alarma activado audible Botón de menú/botón Sonido de pulso de encendido/función desactivado...
  • Seite 31 Voltaje de salida 5 VDC Corriente de salida 1000mA Dimensiones y peso Dimensiones 61(Largo)×56(Ancho)×24 (Alto) mm Peso Aprox. 60g (con batería de litio) 11. Garantía y servicio Ofrecemos 1 año de garantía por defectos de material y fabricación del producto. La garantía no se aplica: - en caso de daño causado por un funcionamiento incorrecto - para piezas de desgaste...
  • Seite 32: Avis Aux Utilisateurs

    Fuggerstr. 30 • 51149 Köln Tel.: +49 (0) 2203 / 9885 200 Fax: +49 (0) 2203 / 9885 206 www.pulox.de • Mail: info@novidion.de Avis aux utilisateurs Cher client, je vous remercie beaucoup de l'achat et l'utilisation de l'oxymétre de pouls.
  • Seite 33 de pouls.  Ne cassez pas le bracelet, il peut devenir inutilisable, ou l'appareil tombera de manière inattendue, en raison du relâchement du bracelet au cours du processus de port. Non recommandé pour les utilisateurs allergiques au bracelet.  Pour de personne allergique au caoutchouc, n’utilise pas cet appareil. ...
  • Seite 34 satisfaisante, renonce à l'utilisation de cet appareil. 2. Aperçu général La saturation de l’oxygène est le pourcentage d'oxygène contenu dans le l'oxyhémoglobine (HbO2) combiné avec le nombre total de l'hémoglobine (Hb), la concentration d'oxygène dans le sang est un paramètre physiologiques très importants du système respiratoire et circulatoire. Plusieurs maladie de système respiratoire peut causer la réduction de la saturation d’oxygène dans le sang humain, de plus l'ajustement automatiquement de dysfonctionnement de l'organisme causée par l'anesthésie, la chirurgie majeure, traumatisme, et les dommages causés par certains examens médicaux, etc., sont...
  • Seite 35 4. Caractéristiques techniques 4.1 Performance principal A. Affichage des valeurs de saturation en oxygène. B. La valeur de taux d'impulsions, l'affichage graphique à barres. C. Affichage de la forme d'onde d’impulsion. D. Indicateur de niveau de la batterie. E. Il est possible de modifier la luminosité de l'écran F.
  • Seite 36 Fig.2 Apparence Port USB: Connecter une ligne de données ou un capteur SpO2 Bouton: Allumer, mettre le son en pause, afficher l'horloge, entrer dans le menu, fonctionnement du menu RESET: Remettre tous les paramètres à leurs paramètres par défaut 5.2 Écran Fig.3 Écran 5.3 Raccordement du capteur Insérez la fiche USB du capteur dans le port USB correspondant de l'équipement.
  • Seite 37 en 60 secondes environ. L’alarme, y compris l’alarme de limite de valeur mesurée, alarme de batterie faible et l’alarme de mettre les doigts. B. Si vous voulez définitivement désactiver l'alarme, vous devez entrer dans le menu de fonction. Lorsque la fonction alarme est desactivée , appuyez brièvement sur le bouton pour entrer directement dans l'interface de l'horloge, appuyez à...
  • Seite 38 Il affichera “Recording” lorsqu'il n'y a pas d'opération en état d'enregistrement pendant 30 s. Après quelques secondes, il entrera en mode d'économie d'énergie. Appuyez longuement sur le bouton pour quitter ce mode. Appuyez brièvement sur le bouton pour afficher “Recording”. Remarque: Dans l'état d'enregistrement des données, une fois que l'écran d'affichage s'éteint automatiquement, l'indication du son d'impulsion s'éteint automatiquement afin d'économiser de l'énergie.
  • Seite 39 Connectez l'appareil à l'ordinateur avec la ligne de données et ouvrez le logiciel PC. Reportez-vous au mode d'emploi du logiciel pour des informations détaillées sur la méthode de téléchargement des données www.pulox.de 6.5 Chargement L'adaptateur secteur peut être sélectionné pour charger l'appareil.
  • Seite 40 endommagée clientèle La mise en charge 2. S'il vous plaît contacter le 1. Peut-être la batterie est pendant plus de 10 centre local de services à la heures est encore endommagée clientèle insuffisant 9. Signification des symboles Symbole Signification Symbole Signification Se référer au Taux d'impulsions (en...
  • Seite 41 Taux d'impulsions (PR) 3 nombre d’affichage Intensité d'impulsion (graphiques à barres) graphiques à barres affichage Paramètres SpO plage de mesure 0%~100% (Résolution de 1%) précision 70% ~ 100%: ± 2%, inférieure à 70% n’est pas défini. La valeur moyenne est calculée pour chaque valeur de 4 mesures.
  • Seite 42 Fuggerstr. 30 • 51149 Köln Tel.: +49 (0) 2203 / 9885 200 Fax: +49 (0) 2203 / 9885 206 www.pulox.de • Mail: info@novidion.de Istruzioni per l’Uso Egregio Utente, grazie per aver acquistato il nostro Pulsossimetro. Questo Manuale è stato scritto e realizzato nel rispetto delle direttive comunitarie MDD93/42/EEC per dispositivi medici e relative normative.
  • Seite 43 se si è allergici alla gomma.  Lo smaltimento di dispositivi danneggiati e dei relativi accessori e confezioni (compresi batterie, buste in plastica, contenitori in schiuma e in cartone) deve essere eseguito nel rispetto della normativa e della legislazione locale. ...
  • Seite 44 umano, danni durante un intervento chirurgico e le lesioni causate da alcuni esami medici possono a loro volta condurre a difficoltà di rifornimento di ossigeno al corpo umano con la conseguente apparizione di sintomi a ciò collegati come vertigini, impotenza, vomito, ecc. Una grave sintomatologia potrebbe mettere a rischio la vita umana.
  • Seite 45: Installazione

    D. Indicazione di batteria scarica: l’indicazione appare prima che si verifichi un funzionamento anomalo a causa di insufficiente alimentazione E. Il modo di visualizzazione può essere modificato F. Indicazione sonora del battito G. Con funzione di allarme H. Con memoria di valore di SpO2 e battito cardiaco, I dati immagazzinati possono essere caricati su computer Può...
  • Seite 46 5.2 Schermo Figura 3: Schermo 5.3 Collegamento del sensore Inserire la spina USB del sensore nella porta USB corrispondente dell'apparecchiatura. 5.4 Collegamento del cavo USB Aprire la presa USB del dispositivo, inserire il cavo USB nel dispositivo, l'altro connettore nel computer o nell'adattatore di alimentazione.
  • Seite 47 Menù Impostazioni (vd. Figura 5). L’utente può impostare i seguenti parametric nel menù Impostazioni – attiva allarme, ora, memorizzazione dati (registrazione) e spegnimento: Fig. 5 Menù Fig. 6 Menù di allarme Fig. 7 Menù di registrazione 6.3.1 Menù di allarme In interfaccia di Menù...
  • Seite 48 6.4 Caricamento dei dati salvati Collegare l'apparecchio al computer con la linea dati e aprire il software del PC. Consultare il manuale utente del software per informazioni dettagliate sul metodo di caricamento dei dati www.pulox.de 6.5 Carica È possibile selezionare l'adattatore di alimentazione per caricare il dispositivo.
  • Seite 49: Risoluzione Dei Problemi

    7. Manutenzione, Trasporto e Conservazione 7.1 Pulizia e Disinfezione Il dispositivo deve essere spento prima della pulizia e non deve essere immerso in liquidi. Utilizzare alcol al 75% per pulire l'involucro del dispositivo e utilizzare sapone liquido o isopropanolo per pulire il cinturino per la disinfezione, asciugarlo in natura o pulirlo con un panno pulito e morbido.
  • Seite 50 Limitazione Limitazione della temperatura dell'umidità Limitazione della pressione Su questa via atmosferica Tenere lontano dalla Fragile, maneggiare con cura pioggia Chiuso suono Batteria scarica dell'allarme Sospendere istruzioni di Attivazione Allarme allarme sonori sonoro Tasto Chiuso suono del menù/alimentazione/funzione battito Attivazione del suono Riciclabile del battito R●...
  • Seite 51 Dimensioni 61(Lu)×56(La)×24 (A) mm Peso Circa 60g (con batterie lithium) 11. Garanzia e assistenza Forniamo una garanzia di 1 anno per i difetti di materiale e di fabbricazione del prodotto. La garanzia non si applica: • in caso di danni causati da un uso improprio •...
  • Seite 52 Novidion GmbH, Fuggerstr. 30, 51149 Köln Tel.: +49 2203 - 9885 200, Fax: +49 2203 - 9885 206 info@novidion.de www.pulox.de WEEE: DE24355330 Sollten Sie beim Lesen dieser Anleitung Probleme haben, so können Sie diese auch auf unserer Website downloaden:/In case you have any problems reading this manual, you can download it from our website:/En caso de que tenga algún...
  • Seite 53 Appendix Appendix 1 State Alarm condition delay Alarm signal generation delay Low voltage alarm 0.6s 20ms SpO2 alarm 400ms 20ms Pulse rate alarm 400ms 20ms Probe error alarm 400ms 20ms Appendix 2 Guidance and manufacture's declaration Guidance and manufacture’s declaration – electromagnetic emissions- for all EQUIPMENT and SYSTEMS Guidance and manufacture’s declaration –...
  • Seite 54 Portable and mobile RF communications equipment should be used no closer to any part of the Pulse Oximeter, including cables, than the recommended separation distance calculated from the equation applicable to the frequency of the transmitter. Recommended separation distance  ...
  • Seite 55 3.689 3.689 7.379 11.67 11.67 23.33 For transmitters rated at a maximum output power not listed above, the recommended separation distance d in meters (m) can be estimated using the equation applicable to the frequency of the transmitter, where P is the maximum output power rating of the transmitter in watts (W) according to the transmitter manufacturer.