SATO CT4-LX Kurzanleitung
Vorschau ausblenden
Andere Handbücher für CT4-LX:
- Bedienerhandbuch (504 Seiten) ,
- Kurzanleitung (3 Seiten)
Werbung
Quicklinks
Barcode Printer
Quick Guide
Kurzanleitung
Guía rápida
Guide rapide
Guida rapida
Snelgids
Skrócona instrukcja
Guia rápido
Краткое руководство
Snabbguide
퀵 가이드
Open Source Software
This printer product includes open source software applied to the open
source software license. Please see our web site for more information.
http://www.satoworldwide.com/licenses/OSS.aspx
First edition: Oct. 2019
Q05296700
©2019 SATO Corporation
English
This is the quick start guide for your first operation.
For detail, refer to the operator manual available on your region's website (www.satoworldwide.com).
Illustrations used in this quick guide is thermal transfer model unless otherwise specified.
Accessories (
)
CT4-LX
AC adapter
Power cord*
Quick guide
Global Warranty Program leaflet
Documents
Core adapters (2)
Ribbon core (3 types)
* The shape of power plug varies depending on the region.
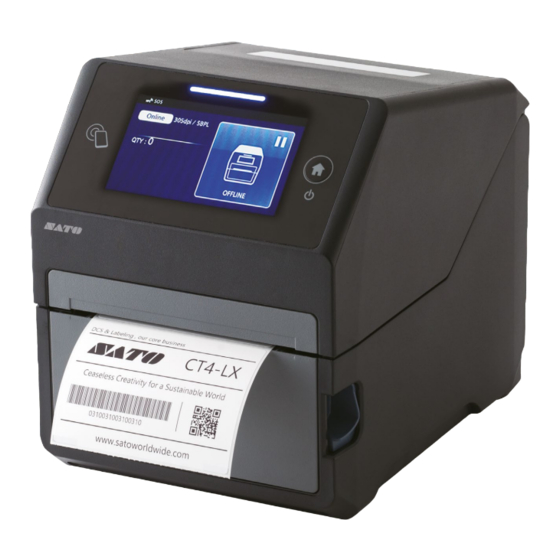
A
Parts Identification (
)
NFC built-in antenna
LCD/Touch panel
LED indicator
/ (Power/Home) button
Media discharge outlet
Cover open latch
DC input connector
USB connector (Type
B)
USB connector (Type A)
LAN connector
Media loading port
USB connector (Type A) *
(ribbon cover open) mark
Top cover
Media guide
Platen roller
* This USB connector is inside the top cover.
B
Options (
)
Cutter unit
Dispenser unit
Interface Options
• RS-232C for connection with RS-232C cable
• WLAN/Bluetooth for wireless connection
C
Connecting the AC Adapter (
)
1 Connect the power cord
to the AC adapter
.
2 Connect the plug of the AC adapter to the DC input connector
of the CT4-LX
3 Plug the power cord into an AC outlet.
D
Setting the Carbon Ribbon (Thermal transfer model only) (
a
Setting the Core adapter
with the carbon ribbon
b
Loading the Carbon Ribbon
1 "# Open the top cover and $ pull the
mark of the ribbon unit (C). The ribbon cover (A)
is drawn forward. %& Set the carbon ribbon (B) on the ribbon cover.
2 " Attach the carbon ribbon to the ribbon core
with adhesive tape (D) or the like, and #
wind them in the direction of the arrow a few rounds.
3 "# Set the ribbon core.
4 " Close the ribbon cover (A), and # turn the dial (E) to wind the carbon ribbon a few
rounds. $ Close the top cover.
E
Loading Media (
)
• When the media roll is installed properly, the flap (F) will be vertical.
• Pass the media under the tab (G) at the edge of the media guide
.
• Use only the supply products specified by SATO.
• Adjust the media guide
to the media size.
Turning on the Power
Press the
/ (Power/Home) button
.
Turning off the Power
Press the
/ (Power/Home) button
, then tap ✔ on the LCD/Touch panel
.
Basic Specifications
Print method: Direct thermal, Thermal transfer
Head density (Resolution): 203 dpi/305 dpi
Model name: CT4-LX
Dimensions: 178 (W) x 238 (D) x 214 (H) mm (7 x 9.4 x 8.4 in.) (not including protruding parts)
Weight: Direct thermal model: Approx. 3.3 kg (7.3 lb), Thermal transfer model: Approx. 3.4 kg
(7.5 lb) (not including media and options)
Power consumption:
Input power voltage condition: AC 100 - 240 V, 50 - 60 Hz
At peak: 155 VA/95 W (AC100V, 30 % printing ratio)
187 VA/88 W (AC240V, 30 % printing ratio)
Standby: 18 VA/8 W (AC100V), 24 VA/8 W (AC240V)
Power requirements: AC adapter
Input voltage: AC 100 - 240 V, 50 - 60 Hz
Output voltage: DC 24 V ±5 %
2.7 A (DC Symbol
)
Maker: Lead Year Enterprise Co., Ltd.
Model: TG16-0064-01
Environmental conditions (Temperature/Humidity):
Operating: 0 - 40 ºC (32 - 104 ºF), 30 - 80 % RH (non-condensing)
Storage: −10 - 60 ºC (14 - 140 ºF), 15 - 90 % RH (non-condensing)
Technical Specification ([B] Bluetooth [W] Wireless LAN [N] NFC)
Frequency band: [B] 2402 - 2480 MHz, [W] 2412 - 2472 MHz, 5180 - 5825 MHz, [N] 13.56 MHz,
Modulation: [B] GFSK, Π/4 DQPSK, 8DQPSK, [W] DSSS, OFDM, [N] NFC Type 2 Tag (Passive),
Channel Spacing: [B] 1 MHz, [W] 5, 20, 40, 80 MHz, Max. output power*: [B] 4 dBm,
[W] 20.5 dBm, Antenna gain (2.4 GHz)*: [B] +5 dBi, [W] +5 dBi, Antenna gain (5 GHz)*:
[W] +5 dBi
* [N] Operating distance of up to 100 mm (depending on various parameters, such as field strength
and antenna geometry)
To display the regulatory information on the LCD/Touch panel, tap "Offline" - "
"Information" - "Regulatory."
Deutsch
Dies ist die Kurzanleitung für Ihren ersten Betrieb.
Weitere Details finden Sie in der Betriebsanleitung, die auf der Webseite für Ihre Region
erhältlich ist (www.satoworldwide.com).
Die in dieser Kurzanleitung verwendeten Illustrationen zeigen das Thermotransfer-Modell,
sofern nicht anders angegeben.
Zubehör (
)
CT4-LX
Netzteil
Netzkabel*
Kurzanleitung
Weltweite Garantie
Kernadapter (2)
Farbbandkern (3 Typen)
* Die Form des Netzsteckers ist je nach Region unterschiedlich.
A
Identifizierung der Bauteile (
)
Integrierte NFC-Antenne
LCD/Touchpanel
LED-Anzeige
/
(An/Aus/Home)-Taste
Etikettenauswurf
Hebel zum Öffnen der Abdeckung
DC-Eingangsbuchse
USB-Buchse (Typ B)
USB-Buchse (Typ A)
LAN-Buchse
Medien-Ladeöffnung
Druckkopf
USB-Buchse (Typ A)*
(Farbbandabdeckung offen)-Markierung
Obere Abdeckung
Etikettenführung
Andruckrolle
* Dieser USB-Anschluss befindet sich in der oberen Abdeckung.
B
Optional (
)
Schneideeinheit
Spendeeinheit
Schnittstellenoptionen
• RS-232C für Verbindung mit RS-232C-Kabel
• WLAN/Bluetooth für Drahtlosverbindung
C
Anschluss des Netzteils (
)
1 Schließen Sie das Netzkabel
an das Netzteil
an.
2 Schließen Sie den Netzstecker des AC-Adapters an den DC-Eingangsbuchse
CT4-LX
an.
3 Schließen Sie das Netzkabel an eine AC-Steckdose an.
D
Einstellen des Farbbands (Nur Thermotransfer-Modell) (
)
a
Einstellen des Kernadapters
mit dem Farbband
b
Laden des Farbbands
1 "# Öffnen Sie die obere Abdeckung und $ ziehen Sie an der -Markierung des
Farbbandgerätes (C). Die Farbbandabdeckung (A) wird nach vorne gezogen. %& Legen
Sie das Farbband (B) auf die Farbbandabdeckung.
2 " Bringen Sie das Farbband mit Klebeband (D) oder dergleichem an dem Farbbandkern
an und # wickeln Sie es ein paar Umdrehungen in Pfeilrichtung.
3 "# Legen Sie den Farbbandkern ein.
4 " Schließen Sie die Farbbandabdeckung (A) und # drehen Sie die Drehscheibe (E), um
das Farbband ein paar Umdrehungen aufzuwickeln. $ Schließen Sie die Obere Abdeckung.
E
Laden von Medien (
)
• Wenn die Etikettenrolle richtig eingesetzt ist, steht die Lasche (F) vertikal.
• Führen Sie die Medien unter den Streifen (G) am Rand der Etikettenführung .
• Verwenden Sie nur die durch SATO spezifizierten Produkte.
• Passen Sie die Etikettenführung an die Mediengröße an.
Einschalten des Stroms
Drücken Sie die
/ (An/Aus/Home)-Taste
.
Ausschalten des Stroms
Drücken Sie die
/ (An/Aus/Home)-Taste
und tippen Sie dann auf ✔ auf dem LCD/
Touchpanel
.
Grundlegende Spezifikationen
Druckverfahren: Thermodirektmethode,Thermotransfer
Thermokopf-Druckdichte (Auflösung) 203 dpi/305 dpi
Modellname: CT4-LX
Abmessungen: 178 (B) x 238 (T) x 214 (H) mm (ohne hervorstehende Teile)
Gewicht: Thermodirektmodell: Ca. 3,3 kg, Thermotransfer-Modell: Ca. 3,4 kg (ohne Medien
und Optional)
Leistungsaufnahme:
Eingangsspannungsbedingungen: AC 100 - 240 V, 50 - 60 Hz
Bei Spitzenwert:
155 VA/95 W (AC100V, 30 % Schwärzungsgrad)
187 VA/88 W (AC240V, 30 % Schwärzungsgrad)
Bereitschaftszustand: 18 VA/8 W (AC100V), 24 VA/8 W (AC240V)
Spannungsversorgung: Netzteil
Eingangsspannung: AC100 - 240 V, 50 - 60 Hz
Ausgangsspannung: DC24 V ±5 %
2,7 A (DC-Symbol
)
Hersteller: Lead Year Enterprise Co.,Ltd.
Modell: TG16-0064-01
A
D
b
4
Print head
Umgebungsbedingungen (Temperatur/Luftfeuchtigkeit):
Bei Betrieb: 0 - 40 ºC, 30 - 80 % Luftfeuchtigkeit (nicht kondensierend)
Bei Lagerung: −10 - 60 ºC, 15 - 90 % Luftfeuchtigkeit (nicht kondensierend)
Technische Spezifikationen ([B] Bluetooth [W] Wireless LAN [N] NFC)
.
Frequenzband: [B] 2402 - 2480 MHz, [W] 2412 - 2472 MHz, 5180 - 5825 MHz, [N] 13,56 MHz,
Modulation: [B] GFSK, Π/4 DQPSK, 8DQPSK, [W] DSSS, OFDM, [N] NFC Type 2 Tag
)
(Passive), Kanalabstand: [B] 1 MHz, [W] 5, 20, 40, 80 MHz, Max. Ausgangsleistung*:
[B] 4 dBm, [W] 20,5 dBm, Antennengewinn (2,4 GHz)*: [B] +5 dBi, [W] +5 dBi,
Antennengewinn (5 GHz)*: [W] +5 dBi
* [N] Betriebsabstand von bis zu 100 mm (abhängig von verschiedenen Parametern wie Feldstärke
und Antennengeometrie)
Um die Regulierungsinformationen auf dem LCD/Touchpanel anzuzeigen, tippen Sie auf
„Offline" - „
(Einstellung)" - „Information" - „Regulatory".
Das Gerät ist nicht für die Benutzung im unmittelbaren Gesichtsfeld am Bildschirmarbeitsplatz
vorgesehen.
Um störende Reflexionen am Bildschirmarbeitsplatz zu vermeiden, darf dieses Produkt nicht im
unmittelbaren Gesichtsfeld platziert werden.
Español
El presente documento es la guía de inicio rápido para el primer uso.
Para obtener más información, consulte el manual de usuario disponible en el sitio web de su
región (www.satoworldwide.com).
Las ilustraciones usadas en esta guía rápida muestran el modelo de transferencia térmica, en
caso contrario se especificará.
Accesorios (
)
CT4-LX
Adaptador de CA
Cable de corriente*
garantía
Documentos
Adaptadores de bobina (2)
(3 tipos)
* La forma de la clavija varía en función de la región.
A
Identificación de las piezas (
)
Antena NFC incorporada
LCD/Panel táctil
Indicador LED
Salida de papel
Palanca de apertura de la cubierta
Conector
USB (tipo B)
Conector
USB (tipo A)
Puerto de carga de papel externo
Cabezal de impresión
Marca
(apertura de la cubierta de la cinta)
Tapa superior
de goma
* Este conector USB se encuentra dentro de la cubierta superior.
B
Opciones (
)
Unidad del cortador
Unidad del dispensador
Opciones de interfaz
• RS-232C para conexión con cable RS-232C
• WLAN/Bluetooth para conexión inalámbrica
C
Conexión del adaptador de CA (
)
1 Conecte el cable de corriente
al adaptador de CA
2 Conecte el enchufe del adaptador de CA al conector de entrada de CC
3 Enchufe el cable de corriente a una toma de CA.
Configuración de la cinta de transferencia (solo modelo de transferencia
D
térmica) (
)
a
Configuración del adaptador de bobina
con la cinta de transferencia
(Setting)" -
b
Carga de la cinta de transferencia
1 "# Abra la tapa superior y $ tire de la marca
de la unidad de la cinta (C). La cubierta de
la cinta (A) se abre hacia delante. %& Coloque la cinta de transferencia (B) en la cubierta
de la cinta.
2 " Conecte la cinta de transferencia al núcleo de la cinta de transferencia
adhesiva (D) o similar y # enróllela unas cuantas veces en la dirección de la flecha.
3 "# Coloque el núcleo de la cinta.
4 " Cierre la cubierta de la cinta (A) y # gire el disco (E) para enrollar la cinta de
transferencia unas cuantas veces. $ Cierre la tapa superior.
E
Carga de papel (
)
• Cuando el rollo de etiquetas está bien instalado, la pestaña (F) quedará en posición vertical.
• Pase las etiquetas por debajo de la lengüeta (G) que está en el borde de la guía de
etiquetas
.
Unterlagen
• Utilice únicamente los productos suministrados y especificados por SATO.
• Ajuste la guía de etiquetas
al tamaño del papel.
Encendido de la impresora
Pulse el Botón
/ (Encendido/Inicio)
.
Apagado de la impresora
Pulse el Botón
/ (Encendido/Inicio)
y, a continuación, toque ✔ en el LCD/Panel táctil
Especificaciones básicas
Método de impresión: Método térmico directo,Transferencia Térmica
Densidad de cabezales (resolución): 203 dpi/305 dpi
Nombre del modelo: CT4-LX
Dimensiones: 178 (An) x 238 (P) x 214 (Al) mm (7 x 9.4 x 8.4 in.) (sin incluir las partes que
sobresalen)
Peso: Modelo térmico directo: Aprox. 3,3 kg (7.3 lb), Modelo de transferencia térmica: Aprox.
3,4 kg (7.5 lb) (sin incluir el papel ni los accesorios)
Consumo de energía:
Condiciones de voltaje de entrada de corriente: CA 100 - 240 V, 50 - 60 Hz
Máximo:
155 VA/95 W (CA 100 V, relación de impresión del 30 %)
187 VA/88 W (CA 240 V, relación de impresión del 30 %)
En standby: 18 VA/8 W (CA 100 V), 24 VA/8 W (CA 240 V)
Requisitos de alimentación de corriente: Adaptador de CA
des
Voltaje de entrada: CA de 100 - 240 V, 50 - 60 Hz
Voltaje de salida: CC de 24 V ±5 %
2,7 A (Símbolo de CC
Fabricante: Lead Year Enterprise Co.,Ltd.
Modelo: TG16-0064-01
Condiciones ambientales (temperatura/humedad):
En funcionamiento: 0 - 40 ºC (32 - 104 ºF), 30 - 80 % RH (sin condensación)
En almacenaje: −10 - 60 ºC (14 - 140 ºF), 15 - 90 % RH (sin condensación)
Especificaciones técnicas ([B] Bluetooth [W] LAN inalámbrica [N] NFC)
Bandas de frecuencias: [B] 2402 - 2480 MHz, [W] 2412 - 2472 MHz, 5180 - 5825 MHz,
[N] 13,56 MHz, Modulación: [B] GFSK, Π/4 DQPSK, 8DQPSK, [W] DSSS, OFDM, [N] NFC
Type 2 Tag (Passive), Separación entre canales: [B] 1 MHz, [W] 5, 20, 40, 80 MHz, Potencia
máx. de salida*: [B] 4 dBm, [W] 20,5 dBm, Ganancia de antena (2,4 GHz)*: [B] +5 dBi,
[W] +5 dBi, Ganancia de antena (5 GHz)*:[W] +5 dBi
* [N] Distancia de alcance de hasta 100 mm (en función de distintos parámetros, como intensidad
de campo o geometría de antena)
Para visualizar la información normativa en el LCD/Panel táctil, toque "Offline" -
"
(Configuración)" - "Information" - "Regulatory".
Français
Ceci est le guide de démarrage rapide pour la première utilisation.
Pour plus de détails, reportez-vous au manuel de l'opérateur sur le site Web de votre région
(www.satoworldwide.com).
Les illustrations utilisées dans ce guide rapide proviennent du modèle de transfert thermique, sauf
indication contraire.
Accessoires (
)
CT4-LX
Adaptateur secteur
Cordon d'alimentation*
programme de garantie mondiale
Documents
Adaptateurs de noyau (2)
ruban (3 types)
* La forme de la fiche d'alimentation varie en fonction de la région.
A
Nomenclature (
)
Antenne NFC intégrée
Écran LCD/tactile
Indicateur LED
tension/Accueil)
Sortie Étiquette
Loquet d'ouverture du capot
Connecteur
USB (Type B)
Connecteur
USB (Type A)
Overture pour chargement des étiquettes
Tête d'impression
Marque
(ouverture du capot du ruban)
Capot supérieur
d'entrainement
* Ce connecteur USB se trouve à l'intérieur du capot supérieur.
B
Options (
)
Unité de massicot
Unité de distributeur
1
(B)
(E)
Click
(A)
Options d'interface
• RS-232C pour une connexion avec le câble RS-232C
• WLAN/Bluetooth pour une connexion sans fil
Connexion de l'adaptateur secteur (
1 Branchez le cordon d'alimentation
2 Branchez la fiche de l'adaptateur secteur au connecteur d'entrée CC
3 Branchez le cordon d'alimentation à une prise secteur.
Réglage du ruban carbone (modèle de transfert thermique uniquement) (
a
Réglage de l'adaptateur de noyau
b
Chargement du ruban carbone
1 "# Ouvrez le capot supérieur et $ tirez la marque
ruban (A) est tiré vers l'avant. %& Installez le ruban carbone (B) sur le capot du ruban.
2 " Fixez le ruban carbone au mandrin de ruban
et # faites-les tourner dans le sens de la flèche.
3 "# Installez le mandrin de ruban.
4 " Fermez le capot du ruban (A), et # tournez la molette (E) pour faire tourner le ruban
carbone.$ Fermez le capot supérieur.
Chargement des étiquettes (
• Lorsque le rouleau d'étiquettes est installé correctement, l'onglet (F) est à la verticale.
• Passez les étiquettes sous la languette (G) au bord du guide d'étiquette
• N'utilisez que les produits fournis et spécifiés par SATO.
• Ajustez le guide d'étiquette
à la taille de l'étiquette.
Mise sous tension
Appuyez sur Interrupteur
/
(Mise sous tension/Accueil)
Mise hors tension
Appuyez sur Interrupteur
/
(Mise sous tension/Accueil)
Guía rápida
Especificaciones de
LCD/tactile
.
Núcleo de la cinta de transferencia
Spécifications de base
Méthode d'impression : Méthode thermique directe, Transfert thermique
Densité de tête (Résolution) : 203 dpi/305 dpi
Nom de modèle : CT4-LX
Botón
/ (Encendido/Inicio)
Dimensions : 178 (L) x 238 (P) x 214 (H) mm (7 x 9.4 x 8.4 po.) (parties saillantes non
Conector de entrada de CC
incluses)
Conector
LAN
Poids : Modèle thermique direct : environ 3,3 kg (7.3 lb), modèle de transfert thermique :
Conector
USB (tipo A) *
environ 3,4 kg (7.5 lb) (étiquettes et options non incluses)
Guía de etiquetas
Rodillo
Puissance consommée :
En crête : 155 VA/95 W (100 V CA, rapport d'impression 30 %)
187 VA/88 W (240 V CA, rapport d'impression 30 %)
Veille :
18 VA/8 W (100 V CA), 24 VA/8 W (240 V CA)
Puissance requise : Adaptateur secteur
Tension d'entrée : CA 100 - 240 V, 50 - 60 Hz
Tension de sortie : CC 24 V ±5 %
Fabricant : Lead Year Enterprise Co.,Ltd.
Modèle : TG16-0064-01
Conditions d'utilisation (Température/Humidité) :
En service : 0 - 40 ºC (32 - 104 ºF), 30 - 80 % HR (sans condensation)
.
En stockage : −10 - 60 ºC (14 - 140 ºF), 15 - 90 % HR (sans condensation)
del CT4-LX
.
Spécifications techniques ([B] Bluetooth [W] LAN Sans fil [N] NFC)
Bandes de fréquences: [B] 2402 - 2480 MHz, [W] 2412 - 2472 MHz, 5180 - 5825 MHz,
[N] 13,56 MHz, Modulation: [B] GFSK, Π/4 DQPSK, 8DQPSK, [W] DSSS, OFDM, [N] NFC
Type 2 Tag (Passive), Espacement des canaux: [B] 1 MHz, [W] 5, 20, 40, 80 MHz, Puissance
de sortie max.*: [B] 4 dBm, [W] 20,5 dBm, Gain d'antenne (2,4 GHz)*: [B] +5 dBi, [W] +5 dBi,
Gain d'antenne (5 GHz)*: [W] +5 dBi
* [N] Distance opérable jusqu'à 100 mm (en fonction de plusieurs paramètres, tels que l'intensité
de champ et la géométrie de l'antenne)
Pour afficher les informations réglementaires sur l'écran LCD/tactile, appuyez sur « Offline » -
con cinta
«
(Réglage) » - « Information » - « Regulatory ».
Italiano
È una guida introduttiva per la prima operazione.
Per i dettagli, consultare il manuale dell'operatore disponibile sul sito web della propria regione
(www.satoworldwide.com).
Le illustrazioni utilizzate in questa guida rapida fanno riferimento al modello di trasferimento termico,
se non specificato altrimenti.
Accessori (
)
CT4-LX
Adattatore CA
Cavo di alimentazione*
Programma di garanzia globale
* La forma della spina di alimentazione varia in base alla regione.
.
Identificazione delle parti (
Antenna NFC incorporata
LCD/pannello Touch
(Alimentazione/Home)
Uscita prelievo etichetta
di ingresso CC
Connettore
USB (tipo B)
LAN
Ingesso caricamento Carta
Simbolo
(coperchio nastro aperto)
Stampa
* Questo connettore USB si trova all'interno del coperchio superiore.
B
Opzioni (
)
Unità taglierina
Unità dispensatore
Opzioni interfaccia
• RS-232C per connessione con un cavo RS-232C
• WLAN/Bluetooth per connessione wireless
Collegamento dell'adattatore CA (
)
1 Collegare il cavo di alimentazione
2 Collegare la spina dell'adattatore CA al connettore di ingresso CC
3 Inserire il cavo di alimentazione in una presa CA.
Impostazione del nastro carbografico (solo per il modello di trasferimento
D
termico) (
)
a
Impostazione dell'adattatore nucleo
b
Caricamento del nastro carbografico
1 "# Aprire il coperchio superiore e $ tirare il simbolo
del nastro (A) viene tirato in avanti. %& Posizionare il nastro carbografico (B) sul coperchio
del nastro.
2 " Collegare il nastro carbografico al nucleo del nastro
# avvolgerlo per qualche giro seguendo la direzione della freccia.
3 "# Posizionare il nucleo del nastro.
4 " Chiudere il coperchio del nastro (A) e # ruotare la manopola (E) per avvolgere per
qualche giro il nastro carbografico. $ Chiudere il coperchio superiore.
Caricamento del supporto (
• Quando il rullo del supporto è installato correttamente, la linguetta (F) è verticale.
• Passare il supporto sotto l'aletta (G) sul bordo della guida del supporto
• Utilizzare solo i prodotti di alimentazione specificati da SATO.
• Regolare la guida del supporto
Accensione della stampante
Premere il tasto
/
(Alimentazione/Home)
Per spegnere la stampante
Premere il tasto
/ (Alimentazione/Home)
Guide rapide
Notice du
Specifiche di base
Mandrin de
Metodo di stampa: Metodo termico diretto,Trasferimento termico
Densità testina (risoluzione): 203 dpi/305 dpi
Nome modello: CT4-LX
Dimensioni: 178 (L) x 238 (P) x 214 (A) mm (escluse le parti sporgenti)
Interrupteur
/
(Mise sous
Peso: Modello termico diretto: Circa 3,3 kg, Modello trasferimento termico: Circa 3,4 kg (non
Connecteur d'entrée CC
compresi supporto e opzioni)
Connecteur
LAN
Potenza assorbita:
Condizione di tensione di alimentazione d'ingresso: CA 100 - 240 V, 50 - 60 Hz
Connecteur
USB (Type A)*
Guide d'étiquette
Rouleau
In fase di picco: 155 VA/95 W (CA 100 V, rapporto di stampa del 30%)
187 VA/88 W (CA 240 V, rapporto di stampa del 30%)
Stand-by:
18 VA/8 W (CA 100 V), 24 VA/8 W (CA 240 V)
Requisiti di alimentazione: Adattatore CA
Tensione di ingresso: CA 100 - 240 V, 50 - 60 Hz
Tensione in uscita: CC 24 V ±5 %
Produttore: Lead Year Enterprise Co.,Ltd.
Modello: TG16-0064-01
B
D
C
a
2
(D)
(C)
(A)
E
(F)
Condizioni ambientali (temperatura/umidità):
Operativa: 0 - 40 ºC, 30 - 80 % di umidità relativa (senza condensa)
Conservazione: −10 - 60 ºC, 15 - 90 % di umidità relativa (senza condensa)
Specifica tecnica ([B] Bluetooth [W] LAN wireless [N] NFC)
C
)
Banda di frequenza: [B] 2402 - 2480 MHz, [W] 2412 - 2472 MHz, 5180 - 5825 MHz,
[N] 13,56 MHz, Modulazione: [B] GFSK, Π/4 DQPSK, 8DQPSK, [W] DSSS, OFDM, [N] NFC
à l'adaptateur secteur
.
Type 2 Tag (Passive), Spaziatura tra i canali: [B] 1 MHz, [W] 5, 20, 40, 80 MHz, Max. potenza
du CT4-LX
.
in uscita*: [B] 4 dBm, [W] 20,5 dBm, Guadagno antenna (2,4 GHz)*: [B] +5 dBi, [W] +5 dBi,
Guadagno antenna (5 GHz)*: [W] +5 dBi
D
)
* [N] Distanza operativa di fino a 100 mm (può variare in funzione di vari parametri, come
pour le ruban carbone
l'intensità di campo e la geometria dell'antenna)
de l'unité de ruban (C). Le capot du
Per visualizzare le informazioni sulla regolamentazione sull'LCD/pannello Touch a sfioramento,
toccare "Offline" - "
à l'aide de ruban adhésif (D), ou similaire,
Nederlands
Dit is de snelstarthandleiding voor uw eerste handeling.
E
)
Meer informatie vindt u in de gebruikershandleiding op de website van uw regio (www.
satoworldwide.com).
.
De gebruikte afbeeldingen in deze beknopte handleiding zijn van het model met thermische
overdracht, tenzij anders aangegeven.
Accessoires (
CT4-LX
.
Wereldwijde Garantie
* De vorm van de stekker verschilt afhankelijk van de regio.
, puis appuyez sur ✔ sur l'écran
Identificatie van onderdelen (zie afbeelding
Ingebouwde NFC-antenne
Home)-knop
USB-aansluiting (type B)
Medialaadpoort
open)-markering
* Deze USB-aansluiting bevindt zich in de bovenste beschermkap.
B
Opties (
Snijeenheid
Interfaceopties
• RS-232C voor verbinding met RS-232C-snoer
• WLAN/Bluetooth voor draadloze verbinding
Aansluiting van de lichtnetadapter (
1 Sluit het netsnoer aan
2,7 A (Symbole CC
)
2 Sluit de stekker van de lichtnetadapter aan op de DC-ingangaansluiting
3 Steek het netsnoer in een stopcontact.
Het koolstoflint plaatsen (enkel voor model met thermische overdracht) (
a
De kernadapters
b
Het koolstoflint laden
1 "# Open de bovendeksel en $ trek aan de -markering van de linteenheid (C). De
beschermkap van het lint (A) wordt naar voren getrokken. %& Plaats het carbonlint (B) op
de beschermkap van het lint.
2 " Maak het carbonlint aan de lintkern
het een paar keer in de richting van de pijl.
3 "# Plaats de lintkern.
4 " Sluit de beschermkap van het lint (A) en # draai de draaiknop (E) om het carbonlint een
paar rondjes op te draaien. $ Sluit de bovendeksel.
Papier plaatsen (
• Wanneer de papierrol goed is geplaatst, staat de klep (F) in verticale positie.
• Voer het papier onder het lipje (G) aan de rand van de mediageleider
• Gebruik alleen verbruiksartikelen die door SATO zijn vermeld.
• Pas de papiergeleider
Het toestel inschakelen
Druk op de
Het toestel uitschakelen
Druk op de
Basisspecificaties
Afdrukmethode: Directe thermische methode,Thermische overdracht
Guida rapida
Brochure
Kopdichtheid (resolutie): 203 dpi/305 dpi
Documenti
Adattatori nucleo (2)
Nucleo del nastro (3 tipi)
Modelnaam: CT4-LX
Afmetingen: 178 (B) x 238 (D) x 214 (H) mm (niet inclusief vooruitstekende onderdelen)
Gewicht: Direct thermisch model: Ca. 3,3 kg, model met thermische overdracht: Ca. 3,4 kg
A
)
(exclusief papier en opties)
Indicatore LED
Tasto
/
Stroomverbruik:
Leva di apertura del coperchio
Connettore
Spanning ingangsvermogen: AC 100 - 240 V, 50 - 60 Hz
Connettore
USB (tipo A)
Connettore
Bij piek: 155 VA/95 W (AC100V, bij afdrukverhouding van 30 %)
Testina di stampa
Connettore
USB (tipo A)*
Coperchio superiore
Guida supporto
Rullo
Stand-by: 18 VA/8 W (AC100V), 24 VA/8 W (AC240V)
Voeding: Lichtnetadapter
Ingangsspanning: AC 100 - 240 V, 50 - 60 Hz
Uitgangsspanning: DC 24 V ±5 %
Fabrikant: Lead Year Enterprise Co.,Ltd.
Model: TG16-0064-01
Omgevingsomstandigheden (temperatuur/vochtigheid):
In bedrijf: 0 - 40 ºC, 30 - 80 % RV (niet-condenserend)
Opslag: −10 - 60 ºC, 15 - 90 % RV (niet-condenserend)
Technische specificatie ([B] Bluetooth [W] Draadloos LAN [N] NFC)
C
Frequentieband: [B] 2402 - 2480 MHz, [W] 2412 - 2472 MHz, 5180 - 5825 MHz, [N]
)
13,56 MHz, Modulatie: [B] GFSK, Π/4 DQPSK, 8DQPSK, [W] DSSS, OFDM, [N] NFC Type 2
all'adattatore CA
.
Tag (Passive), Kanaalafstand: [B] 1 MHz, [W] 5, 20, 40, 80 MHz, Max. uitgangsvermogen*:
dell'CT4-LX
.
[B] 4 dBm, [W] 20,5 dBm, Antennewinst (2,4 GHz)*: [B] +5 dBi, [W] +5 dBi, Antennewinst
(5 GHz)*: [W] +5 dBi
* [N] Ontvangstbereik tot 100 mm (afhankelijk van verschillende parameters, zoals veldsterkte en
antennegeometrie)
con il nastro carbografico
Om de wettelijk verplichte informatie op het lcd/bedieningspaneel weer te geven, tik op
"Offline" - "
dell'unità del nastro (C). Il coperchio
con nastro adesivo (D) o simili e
E
)
.
in base alle dimensioni del supporto.
.
, quindi toccare ✔ sull'LCD/sul pannello Touch
.
2,7 A (simbolo CC
)
W
L
L: Ribbon core
92mm/110mm/111mm 111mm
length
59mm/76mm
76mm
45mm
45mm
W: Carbon
ribbon width
3
(G)
(G)
(Impostazione)" - "Information" - "Regulatory".
)
Lichtnetadapter
Netsnoer*
Snelgids
Brochure met Programma voor
Documenten
Kernadapters (2)
Lintkern (3 types)
A
)
Lcd/bedieningspaneel
Led-indicatielampje
/
(Aan-Uit/
Media-uitvoer
Pal voor beschermkap open
DC-ingangaansluiting
USB-aansluiting (type A)
LAN-aansluiting
Printkop
USB-aansluiting (type A)*
(beschermkap lint
Bovendeksel
Mediageleider
Drukrol
)
Dispenser
C
)
op de lichtnetadapter
.
van de CT4-LX
D
met het carbonlint plaatsen
vast met plakband (D) of iets dergelijks en # draai
E
)
.
aan de grootte van het papier aan.
/
(Aan-Uit/Home)-knop
.
/
(Aan-Uit/Home)-knop
, tik vervolgens op ✔ op het lcd/bedieningspaneel
187 VA/88 W (AC240V, bij afdrukverhouding van 30 %)
2,7 A (DC-symbool
)
(Instelling)" - "Information" - "Regulatory".
.
)
.
Werbung

Verwandte Anleitungen für SATO CT4-LX


Inhaltszusammenfassung für SATO CT4-LX
- Seite 1 De gebruikte afbeeldingen in deze beknopte handleiding zijn van het model met thermische El presente documento es la guía de inicio rápido para el primer uso. • N’utilisez que les produits fournis et spécifiés par SATO. overdracht, tenzij anders aangegeven.
- Seite 2 Wart. szczytowa: 155 VA/95 W (100 V AC, przy 30 % współczynniku zadrukowania) 2 เชื ่ อ มต่ อ ปลั ๊ ก ของอะแดปเตอร์ AC เข้ า กั บ ช่ อ งเชื ่ อ มต่ อ DC ขาเข้ า ของ CT4-LX Generella specifikationer Дополнительные...
- Seite 3 ALTAREX jest wiodącym dostawcą całej gamy urządzeń do systemów informatycznych wykorzystujących automatyczną identyfikację produktów, w oparciu o technikę kodów kreskowych, jak również z zastosowaniem nowych technologii, na przykład RFID. OFERUJEMY : Weryfikatory jakości kodów kreskowych Czytniki kodów kreskowych ...